|
Siebel Business Analytics Applications Installation and Administration Guide > Installing and Configuring Analytics Applications on Windows >
Setting Up the Informatica Server
After the Informatica Server is installed, you must configure it before you can start it. Make note of the settings you enter in the Server tab and Repository tab of the Configure Informatica Service window; you will need to enter the same settings in other configuration steps. To set up the Informatica Server
- Navigate to Programs > Informatica PowerCenter 7.1.2 > Informatica PowerCenter 7.1.2 OEM for Siebel - Server > Informatica Server Setup.
- In the Informatica Server Setup Application - Options window, select Configure Informatica Service, and then click Continue.
- In the Server tab, enter the following:
|
|
Server Name |
A logical name for the Informatica Server. It is recommended that you enter SIEBEL_DW_SERVER. |
TCP/IP Host Address |
The IP address or name of the machine on which you plan to run the Informatica Server. |
Max no. of concurrent sessions |
From 1 to 15 sessions but not greater than 15. |
Shared Memory |
A number not greater than 3000000. |
- In the Repository tab, enter the following:
|
|
Repository Name |
A logical name for the Informatica repository. It is recommended that you enter Siebel_DW_Rep. For Teradata databases, it is recommended that you enter Siebel_DW_Rep_Teradata. |
Repository User |
The account used to access the repository. It is recommended that you use Administrator as the username. |
Repository Password |
The password you use to connect to the Repository Server from the Repository Manager. It is recommended that you use Administrator as the password. |
Repository Server Host Name |
The host machine name where the Informatica Repository Server is installed. |
Repository Port Number |
The port number the Repository Server uses to connect to repository client applications. By default, this value is 5001. It is recommended that you use the default value. |
- In the Licenses tab:
- Leave the default License File Name as
pm.lic.
- If you have an option or connectivity license key, enter it in the "with Key" field, and click Update. Do this for each option and connectivity license key.
- In the Compatibility and Database tab:
- Make sure the "Treat CHAR as CHAR on read" option is selected.
- Make sure the maximum number of database connections is 100.
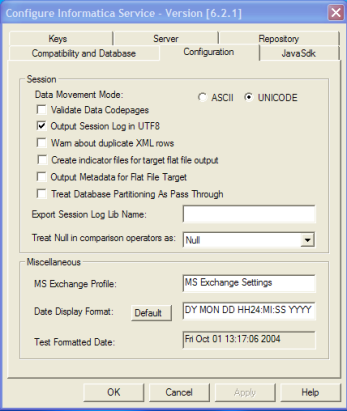
- In the Configuration tab, set the Data Movement Mode.
NOTE: You must run the Informatica Server in Unicode mode if your source data contains multibyte or ISO 8859-1 (8-bit ASCII) data.
- Select the ASCII or UNICODE option.
- If you select the UNICODE option, remove the check from the Validate Data Codepages check box, and check the Output Session Log in UTF8 check box.
- Leave the default values in the remaining fields.
- In the JavaSdk tab, leave the default values in all fields.
- Click OK in the Configure Informatica Service dialog box to complete the configuration of the Informatica Server service.
NOTE: You cannot start the Informatica Server until you have completed the procedures in the section Creating, Restoring, and Configuring the Informatica Repository.
|