| Oracle® Retail Price Management User Guide Release 13.2.9 E71079-01 |
|

 Previous |
 Next |
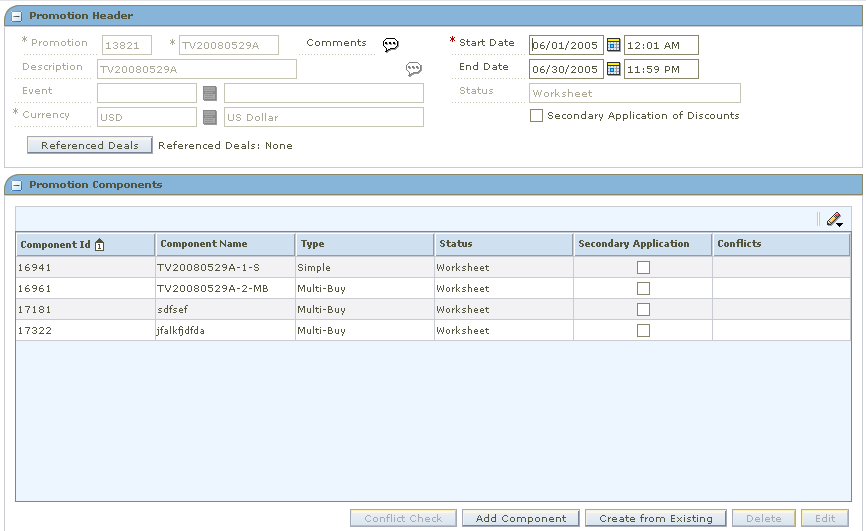
A promotion is a temporary reduction in price. In addition, you can track sales at one or more locations for a given time period as well as track the sales of merchandise with no price reductions, at given locations for a set time period.
Updates can be made to the details of an existing promotion and promotion components can be added to an existing promotion.
The following are the promotion components that RPM mainly focuses on.
Simple Component - A simple promotion component consists of an item, item group, or merchandise level that receives a discount at a specific location or group of locations when the customer purchases an item.
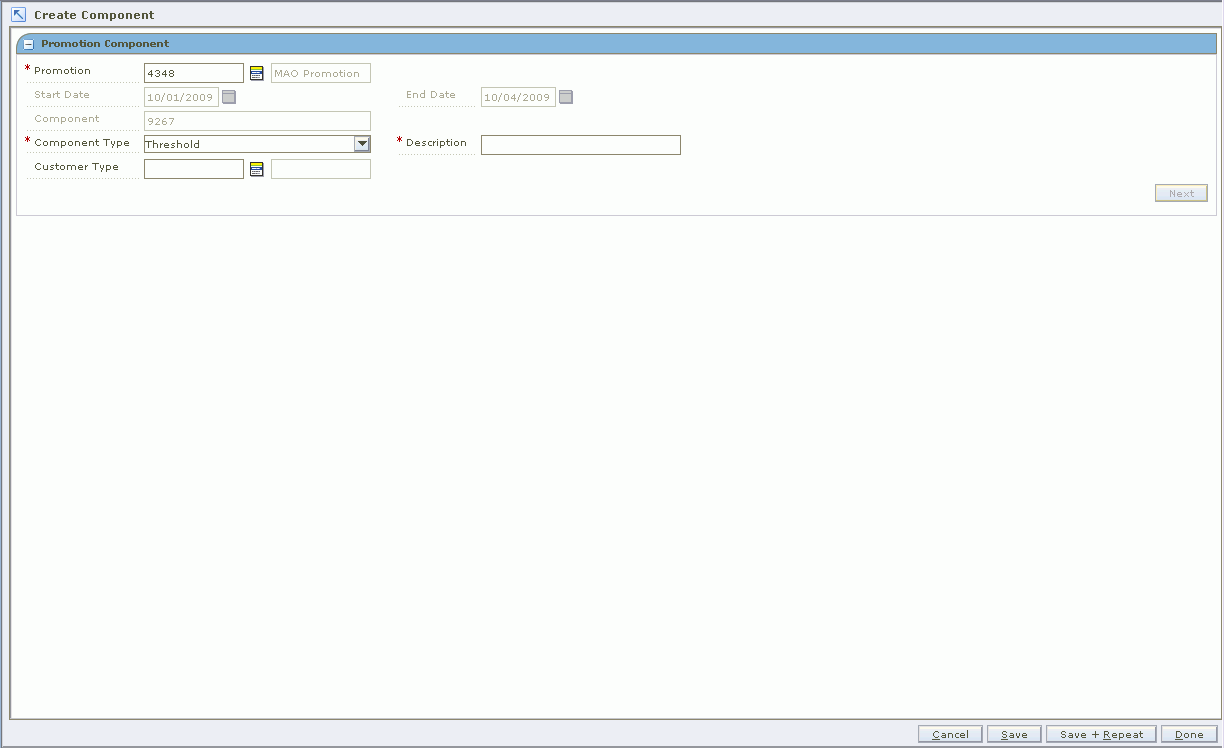
Threshold Component - A threshold promotion component consists of an item, item group, or merchandise level that receives a discount at a location or group of locations when the customer purchases a quantity or a amount of an item. You must define the threshold levels before you can create the threshold component.
Multi-Buy Component - A multi-buy promotion component consists of an item, item group, or merchandise level. You can define the quantity of items or amount of purchase required for the customer to receive a discount or reward. For example, a promotion might include a reward of a third pair of shoes free with the purchase of any two pair of shoes from selected items or item groups. Another promotion might allow purchase of any five items from selected item groups at a fixed price or discount. See "Examples of Multi-Buy Components" for more detailed examples.
Changes can be made to the details of a promotion component, and new details can be added to promotion components.
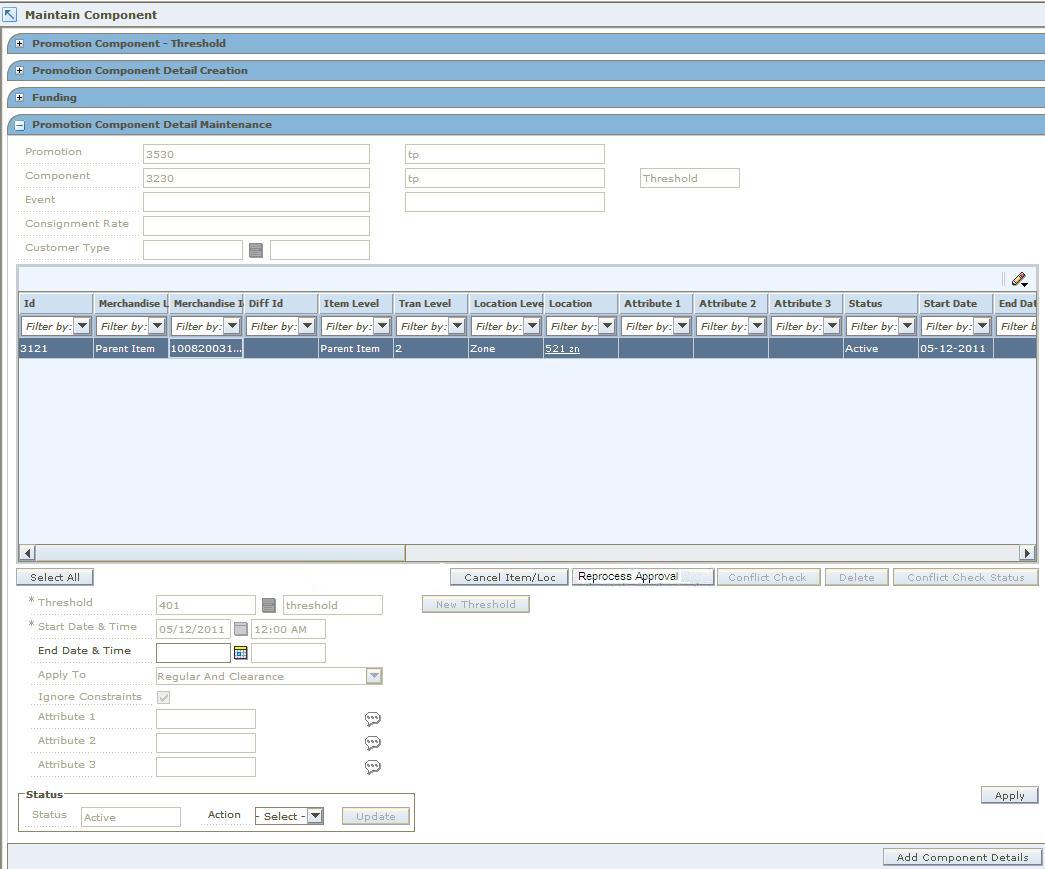
In the Promotion Component Detail Maintenance pane, records that contain item/location exceptions or exclusions are indicated by a down arrow. Records that are item/location exceptions or exclusions are indicated by an up arrow.
Existing promotion components can be copied into a new promotion.
Finance Component - The finance component consists of the type of the credit card, index number of the card issuing bank, threshold details, items that will be included or excluded for promotion, and so on.
Funding is added to a promotion at the component level so that you can indicate the vendor that is contributing to the promotion. If you choose to create deals, based on the funded component, you must indicate the billing information for the deal. If the promotion is associated with an existing deal, the billing information defaults from the existing deal.
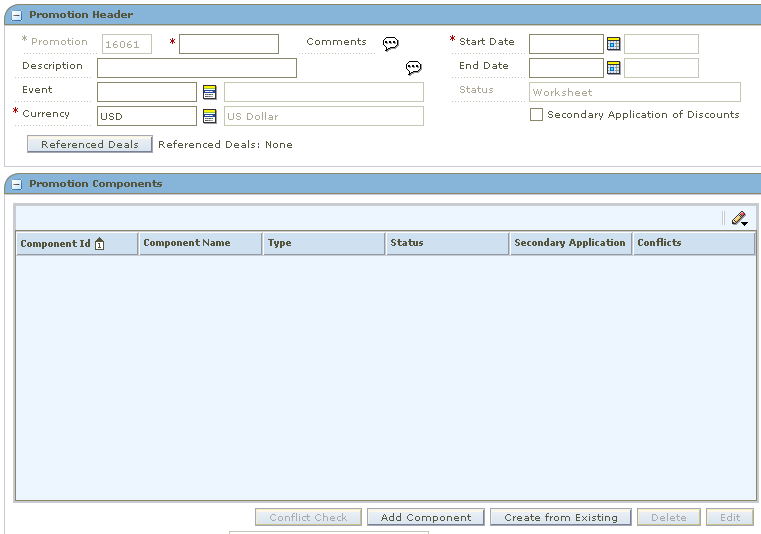
Navigate: From the Task Pad, select Promotion > Create Promotion.
OR
From the Maintain Promotion Events workspace, click New Promotion.
The Create Promotion workspace opens.
In the Promotion field, enter the name of the promotion.
In the Description field, enter additional information as necessary.
In the Start Date field, enter the day the promotion begins.
In the End Date field, enter the day the promotion stops.
In the Event field, enter the ID of the event you want to associate with the promotion, or click the LOV button and select an event.
Update the Currency field as necessary.
Select Secondary Application of Discounts as necessary.
Click one of the following:
Click Cancel to go back to the Create Component workspace without saving the promotion details.
Click Save + Repeat to save the promotion and add a new promotion.
Click Done to save the promotion details and go back to the Create Component workspace.
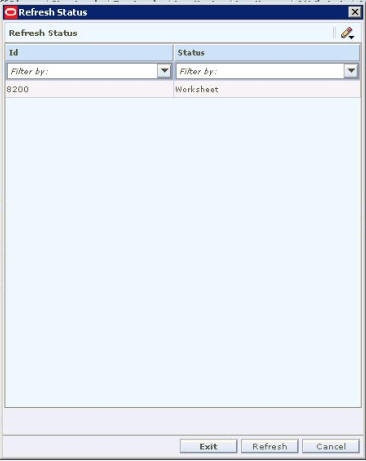
Whenever the status of a price event changes, conflict checking is performed and the conflicts are displayed.
Conflict check is done for the following status only.
Worksheet to Approved
Worksheet to Submitted
Submitted to Approved
Approved to Worksheet
The existence of any conflict is identified by a binocular icon in the conflicts column of the multi-record block. To review a conflict, click on the binocular icon, the Conflict Review List window opens.
If the event type is Promotion, the promotion ID and promotion component ID are displayed. In case of Price Change and Clearance, the promotion ID and promotion component ID are not displayed.
In the Maintenance workspace, click Conflict Check Status. The Refresh Status window opens.
Click Refresh to update the conflict checking state in the window.
Click Exit to go back to the price event window.
The status in the multi-record block is refreshed.
Click Cancel to close the status window without making any changes or refreshing the price event.
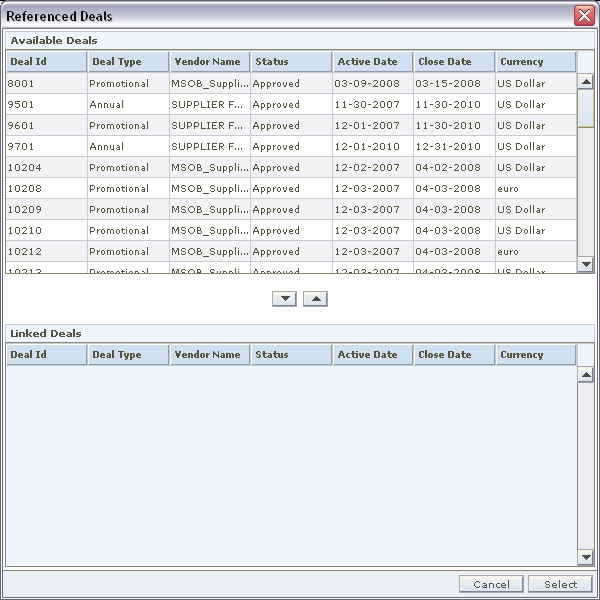
Click Referenced Deals. The Referenced Deals window opens.
Select the deals you want to add to the promotion.
Click Select. The window closes.
Click Done to save any changes and close the workspace.
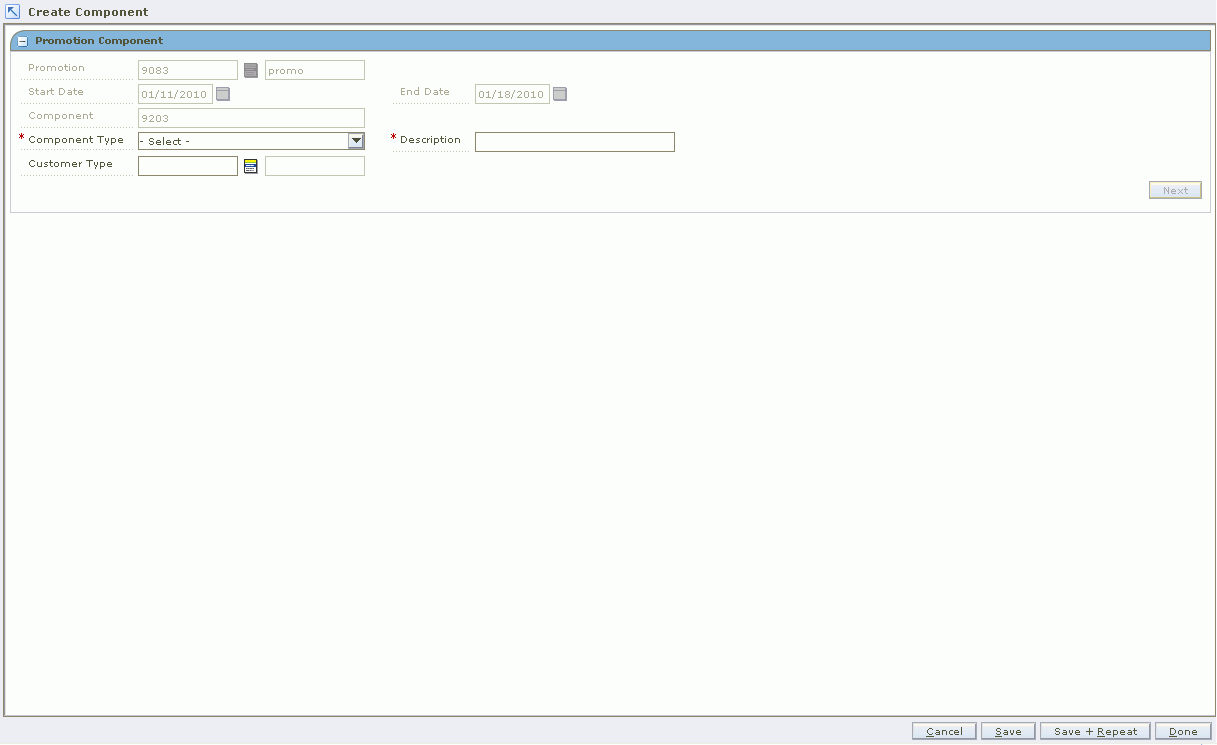
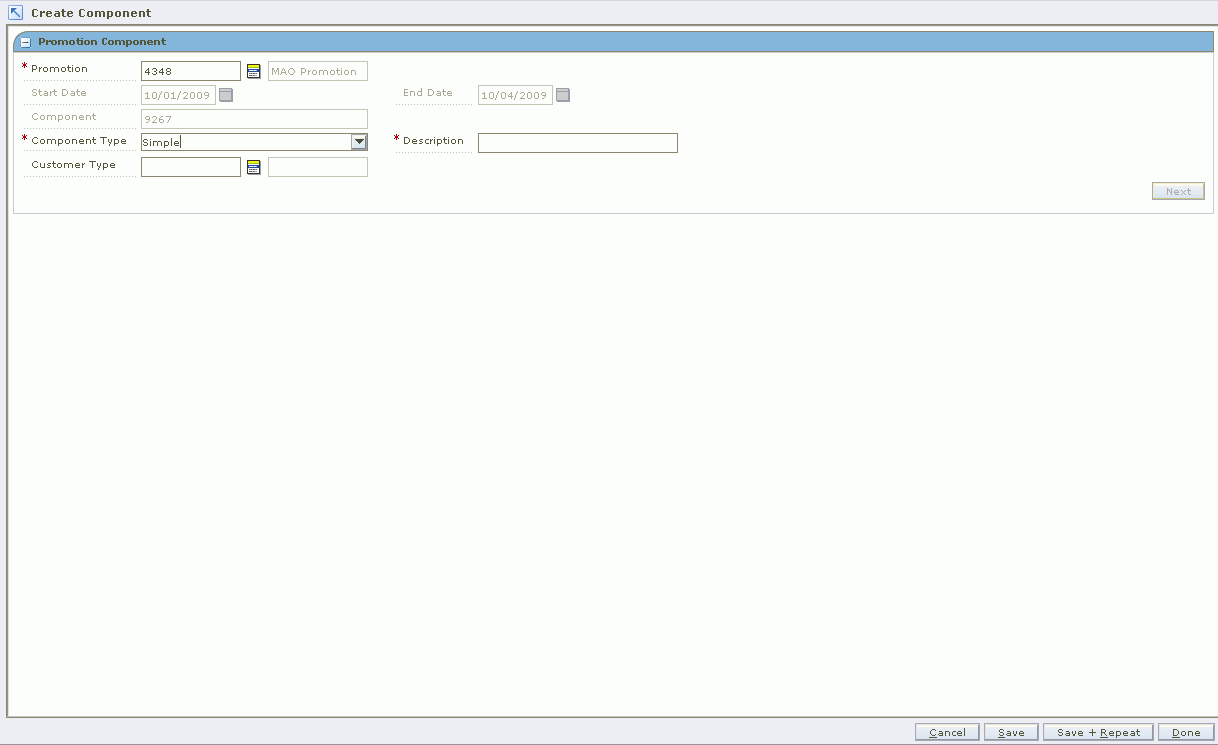
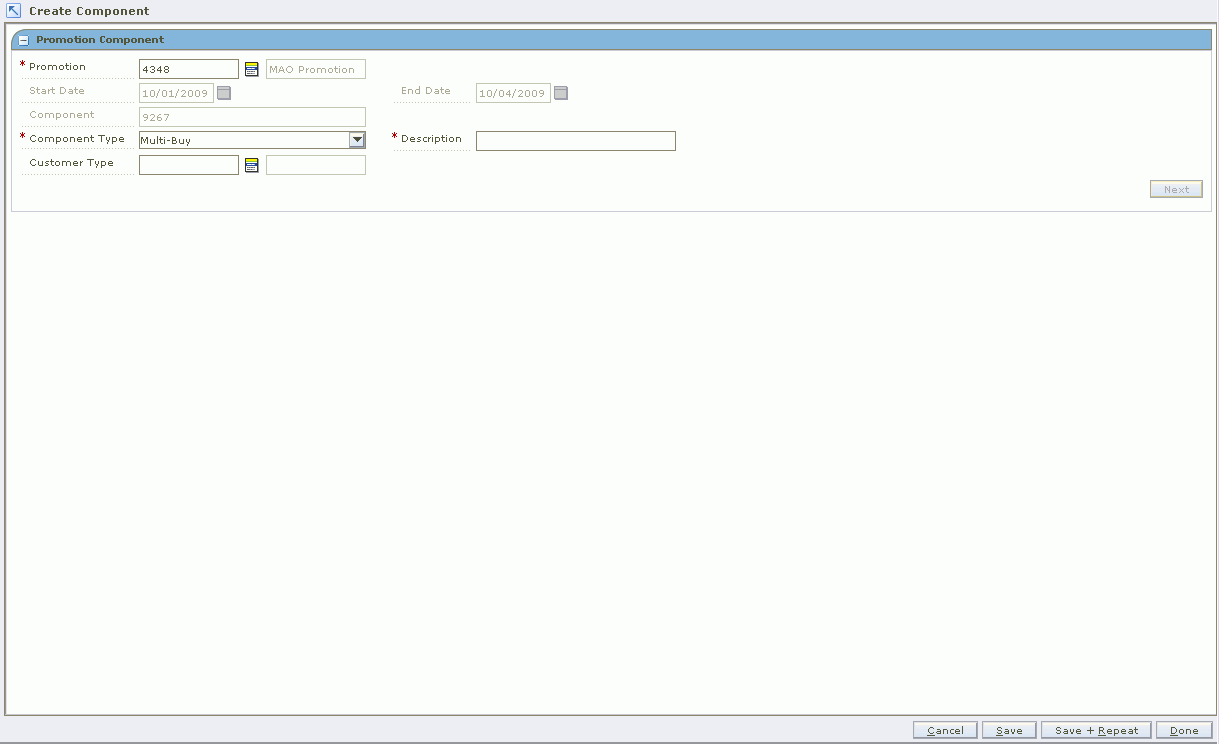
In the Promotion Components pane, click Add Component. The Create Component workspace opens.
In the Component Type field, select one of the following components:
Simple
Threshold
Multi-Buy
Finance
In the Description field, enter the description of the promotion component.
In the Customer Type field, enter the ID of the customer type, or click the LOV button and select the customer type. This field is optional.
Click one of the following:
Click Cancel to go back to the Promotion Header screen.
Click Save to save the changes.
Click Save + Repeat to save the changes and create another component type.
Click Done to save the changes and go back to the Promotion Header screen.
Click Next. The Promotion Component Detail Creation screen opens.
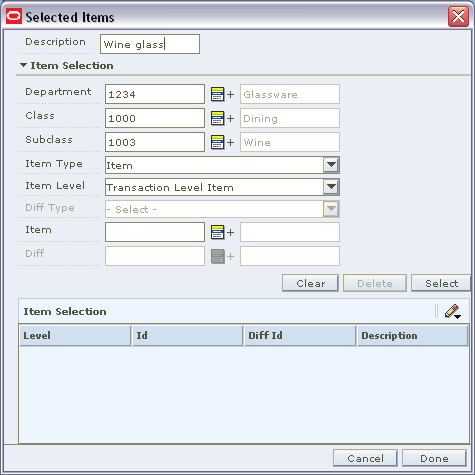
In the Item Selection area, select items on the price change using the available fields.
|
Note: All fields with LOV buttons allow multiple selections. |
To select items from all available items, enter an ID in the Item field, or click the LOV button and select item.
Or
Enter information in the enabled fields to limit the items available in the Item field.
In the Department field, enter a department number, or click the LOV button and select a department.
In the Class field, enter a class number, or click the LOV button and select a class.
In the Subclass field, enter a subclass number, or click the LOV button and select a subclass.
In the Item Type drop-down list, select Item or Item List.
|
Note: If you select Item List from the Item Type drop down, only item lists will be selectable from the Item field. If you select Item, only single items that conform to the other criteria specified will be selectable. |
In the Item Level drop-down list, select Parent Item, Parent Item/Diff, or Transaction Level Item.
|
Note: The Diff Type and Diff fields are only enabled if Parent Item/Diff is selected. |
In the Diff Type drop-down list, select a diff type.
In the Diff drop-down list, select a diff.
In the Item field, click the LOV button and select items.
|
Note: If the Item Type is selected as Item List, the Item Level is defaulted to Item List and the Item Editor defaults to Item List. |
In the Item List field, enter the item list ID or select the item list from the LOV.
Click View Items. A pop-up window opens where the items in the item list are displayed.
Click Select. Items that meet your criteria are added to the Item Selection table.
If the Item Type is Item List, then the item list ID is populated in the ID column of the Item Selection MRB as a hyperlink. Click the hyperlink to view the items in the item list.
In the Location Selection area, filter and select the locations to be included.
Click Select. The locations are added to the Location Selection table.
In the Change Type field, select the price change that occurs during the promotion:
Amount Off: The items are reduced in price by the amount entered in the Change Amount field.
Exclude: The selected items are not be affected by price changes that occur as a result of the promotion.
Fixed Price: The items are priced at the amount entered in the Change Amount field.
No Change: The item prices are not changed. For reporting purposes, the selected items are recognized as being on promotion.
Percent Off: The items are reduced in price by the percentage entered in the Change Amount field.
In the Change Amount field, enter the amount off, percent off, or fixed price.
|
Note: Do not enter a negative sign before the number entered in the Change Amount field. The amount entered is assumed to be a decrease in price. |
Enter or select a value in the Selling UOM field (Optional for a Fixed Price change.) If you leave this field blank, the selling unit of measure will default to the current selling unit of measure for the items/location combination. (The Selling UOM field is only active for a Fixed Price change.)
|
Note: If you do not specify a Selling UOM value, and the selected items do not all have the same selling unit of measure, UOM validation is moved to conflict checking engine. |
Update the Start Date & Time and End Date & Time fields if you want this promotion component to use start and end times different from those of the promotion.
Select the checkbox if this is a Time Based Promotion.
In the Apply To field, select the types of item pricing to which you want to apply the promotion component:
Clearance Only
Regular Only
Regular and Clearance
If you want to apply a price guide to this promotion component, enter the price guide in the Price Guide field or click the LOV button and select the price guide.
Select the Ignore Constraints check box to override any constraints that apply to this promotion.
Click Apply. The promotion is displayed in the Promotion Component Detail Maintenance pane.
|
Note: If a promotion component that you apply results in a negative margin for an item, fields in the Promotion Component Detail Maintenance list are highlighted to call the negative margin to your attention. (If the Add Column Detail button is displayed, click the button to view full details, including negative margins.) See "View Margins (Margin Visibility)" for more information. |
Click one of the following buttons:
Click Cancel to go back to the Create Promotion screen.
Click Save to save the promotion component.
Click Save + Repeat to save the promotion component and add another component.
Click Done to save the promotion component and close the workspace.
In the Promotion Components pane, select the components you want to copy to a new promotion.
Click Copy to New. A dialog opens for you to enter details about the new promotion you want to create.
In the Description field, enter a description of the new promotion.
In the Start Date field, enter or select the start date of the new promotion.
In the End Date field, enter or select the end date of the new promotion (Optional).
To associate the new promotion with an event, enter or select the event in the Event field (Optional).
Click Create. The Create Promotion workspace opens. The header information is copied into the Promotion Header pane, and the selected components are copied into the Promotion Components pane.
|
Note: If funding exists for the copied components, you will be asked if you want to copy the funding information. |
Create the new promotion.
Click Create from Existing. The Copy dialog opens.
In the Promotion field, enter the valid promotion ID associated with the component that you want to copy. If the Promotion ID entered is not numeric, an error will be displayed. If user enters invalid or unprivileged promotion ID, then the Component field will remain disabled.
In the Component field, enter or select the ID of the component you want to copy.
Update the Start and End Date fields as necessary.
Click Copy. The component is added to the Promotion Components table.
Navigate: From the Task Pad, select Promotions > Maintain Promotion. The Promotions Search workspace opens.
Enter or select the criteria to limit your search.
Click Search. Promotions that match these criteria appear in the Promotion Search Results pane.
Navigate: From the Task Pad, select Promotions > Maintain Promotion. The Promotions Search workspace opens.
Search for a promotion.
In the Promotion Search Results pane, select the promotion you want to edit.
Click Edit. The Maintain Promotion workspace opens.
In the Promotion Header pane, edit the enabled fields as necessary.
Click Done to save any changes and close the workspace.
Navigate: From the Task Pad, select Promotions > Create Component.
OR
From the Create Promotion workspace, click Add Component in the Promotion Components pane.
The Create Component workspace opens.
In the Promotion field, enter a promotion ID or click the LOV button and select a promotion.
In the Component Type field, select Simple from the drop-down list.
In the Customer Type field, enter the customer type ID, or click on the LOV button and select a customer type. This field is optional.
Click Next. The Promotion Component Detail Creation pane opens.
In the Item Selection area, filter and select the items to be included in the promotion component.
Click Select. The items are added to the Item Selection table.
In the Location Selection area, filter and select the locations to be included..
Click Select. The locations are added to the Location Selection table.
In the Change Type field, select the price change that occurs during the promotion:
Amount Off: The items are reduced in price by the amount entered in the Change Amount field.
Exclude: The selected items are not be affected by price changes that occur as a result of the promotion.
Fixed Price: The items are priced at the amount entered in the Change Amount field.
No Change: The item prices are not changed. For reporting purposes, the selected items are recognized as being on promotion.
Percent Off: The items are reduced in price by the percentage entered in the Change Amount field.
In the Change Amount field, enter the amount off, percent off, or fixed price.
|
Note: Do not enter a negative sign before the number entered in the Change Amount field. The amount entered is assumed to be a decrease in price. |
Enter or select a value in the Selling UOM field (Optional for a Fixed Price change.) If you leave this field blank, the selling unit of measure will default to the current selling unit of measure for the items/location combination. (The Selling UOM field is only active for a Fixed Price change.)
|
Note: If you do not specify a Selling UOM value, and the selected items do not all have the same selling unit of measure, UOM validation is moved to conflict checking engine. |
Select the checkbox if this is a Time Based Promotion.
Update the Start Date & Time and End Date & Time fields if you want this promotion component to use start and end times different from those of the promotion.
In the Apply To field, select the types of item pricing to which you want to apply the promotion component:
Clearance Only
Regular Only
Regular and Clearance
If you want to apply a price guide to this promotion component, enter the price guide in the Price Guide field or click the LOV button and select the price guide.
Select the Ignore Constraints check box to override any constraints that apply to this promotion.
Click Apply. The promotion is displayed in the Promotion Component Detail Maintenance pane.
|
Note: If a promotion component that you apply results in a negative margin for an item, fields in the Promotion Component Detail Maintenance list are highlighted to call the negative margin to your attention. (If the Add Column Detail button is displayed, click the button to view full details, including negative margins.) See "View Margins (Margin Visibility)" for more information. |
Click one of the following buttons:
Click Cancel to go back to the Create Promotion screen.
Click Save to save the promotion component.
Click Save + Repeat to save the promotion component and add another component.
Click Done to save the promotion component and close the workspace.
Create a simple component.
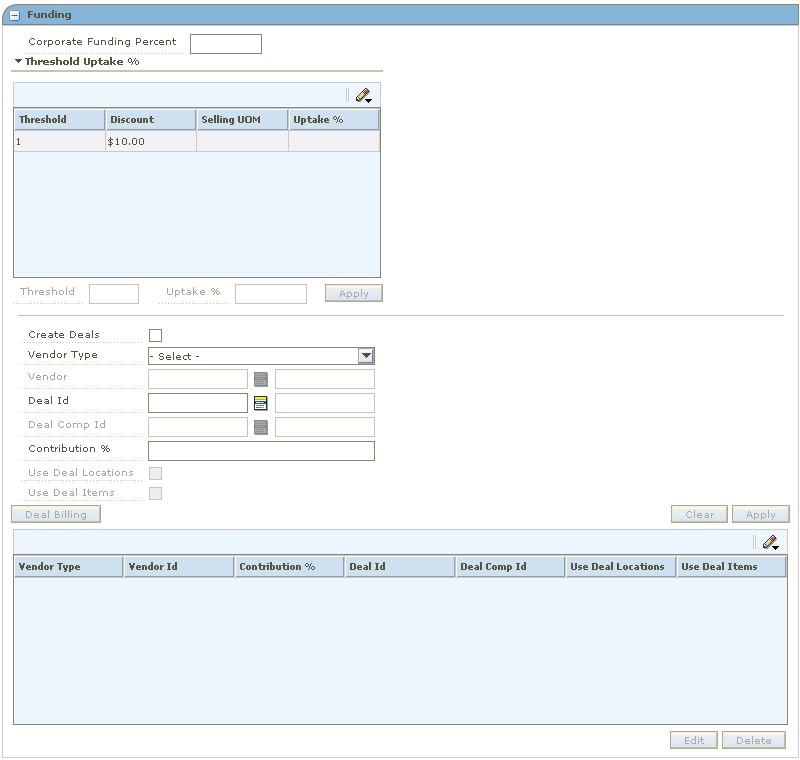
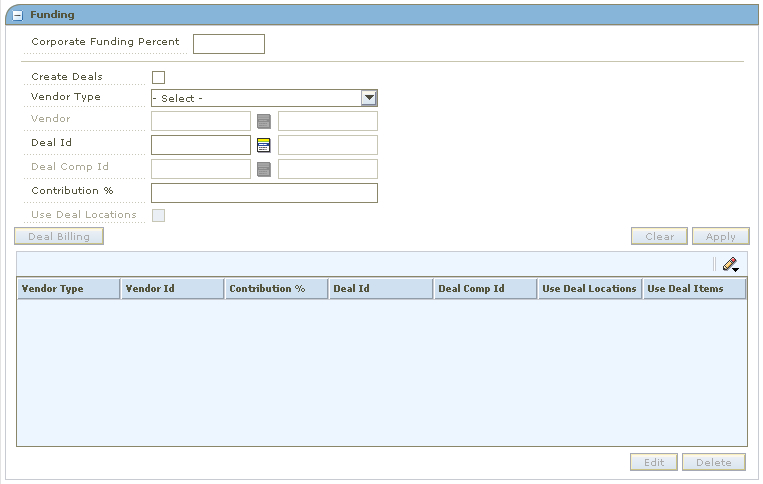
Expand the Funding pane.
In the Corporate Funding Percent field, enter the percent that the retailer contributes to the promotion.
Select the Create Deals check box to create a deal based on this promotion component and funding.
In the Vendor Type field, select the type of vendor that is funding the component.
In the Vendor field, enter the ID of the vendor, or click the LOV button and select a vendor.
In the Deal ID field, enter the deal the promotion is associated with, or click the LOV button and select a deal.
In the Deal Comp ID, enter the ID of the deal component field, or click the LOV button and select a deal component.
|
Note: The Deal and Deal ID field are disabled if you selected the Create Deals check box. |
In the Contribution % field, enter the percentage that this vendor contributes to the promotion component.
Select the Use Deal Locations check box to indicate that the locations on the deal should be used for the promotion.
Select the Use Deal Items check box to indicate that the items on the deal should be used for the promotion.
|
Note: The Use Deal Locations and Use Deal Items check boxes are disabled if the promotion component already has items or locations. |
If you selected the Create Deals check box, add billing information for a deal to a funded component.
Click Apply to add your changes to the table.
Click Done to save any changes and close the workspace.
Navigate: From the Task Pad, select Promotions > Create Component.
OR
From the Create Promotion workspace, click Add Component in the Promotion Components pane.
The Create Component workspace opens.
In the Description field, enter a description of the component.
In the Component Type field, select Threshold.
In the Customer Type field, enter the ID of the customer type, or click the LOV button and select the customer type. This field is optional.
Click Next. The Promotion Component Detail Creation pane opens.
In the Item Selection area, filter and select the items to be included in the promotion component.
Click Select. The items are added to the Item Selection table.
In the Location Selection area, filter and select the locations to be included..
Click Select. The locations are added to the Location Selection table.
In the Threshold field, select the threshold you want to associate with the promotion, or click New Threshold to create a threshold definition.
Select the checkbox if this is a Time Based Promotion.
Update the Start Date & Time and End Date & Time fields if you want this promotion component to use start and end times different from those of the promotion.
In the Apply To field, select the types of item pricing to which you want to apply the promotion component:
Clearance Only
Regular Only
Regular and Clearance
If you want to apply a price guide to this promotion component, enter the price guide in the Price Guide field or click the LOV button and select the price guide.
Select the Ignore Constraints check box to override any constraints that apply to this promotion.
Click Apply. The promotion is displayed in the Promotion Component Detail Maintenance pane.
Click one of the following buttons:
Click Save to save the promotion component.
Click Done to save the promotion component and close the workspace.
Create a threshold component.
Expand the Funding pane.
In the Corporate Funding Percent field, enter the percent that the retailer contributes to the promotion.
Select a threshold.
In the Uptake % field, enter the percentage of customers that you expect to take advantage of the promotion at this threshold.
Click Apply to add your changes to the table.
Select the Create Deals check box to create a deal based on this promotion component and funding.
In the Vendor Type field, select the type of vendor that is funding the component.
In the Vendor field, enter the ID of the vendor, or click the LOV button and select a vendor.
In the Deal ID field, enter the deal the promotion is associated with, or click the LOV button and select a deal.
In the Deal Comp ID, enter the ID of the deal component field, or click the LOV button and select a deal component.
|
Note: The Deal and Deal ID field are disabled if you selected the Create Deals check box. |
In the Contribution % field, enter the percentage that this vendor contributes to the promotion component.
Select the Use Deal Locations check box to indicate that the locations on the deal should be used for the promotion.
Select the Use Deal Items check box to indicate that the items on the deal should be used for the promotion.
|
Note: Note: The Use Deal Locations and Use Deal Items check boxes are disabled if the promotion component already has items or locations. |
If you selected the Create Deals check box, add billing information for a deal to a funded component.
Click Apply to add your changes to the table.
Click Done to save any changes and close the workspace.
Navigate: From the Task Pad, select Promotions > Create Component.
OR
From the Create Promotion workspace, click Add Component in the Promotion Components pane. The Create Component workspace opens.
In the Description field, enter a description of the component.
In the Component Type field, select Multi-Buy.
In the Customer Type field, enter the ID of the customer type, or click the LOV button and select the customer type. This field is optional.
Click Next. The Promotion Component Detail Maintenance pane opens.
|
Note: See "Examples of Multi-Buy Components" for examples of different types of multi-buy promotion components and how to create them. |
In the Buy List area, you create one or more buy lists for a multi-buy promotion. Follow these steps to create a buy list:
Select how the items in the buy list must be purchased:
All: All the items in the buy list must be purchased to receive the discount, fixed price, or other reward.
Amount: A specified money amount must be spent on items from the buy list to receive the reward.
Quantity: A specified number of items in the buy list must be purchased to receive the reward.
In the next field, enter the quantity or amount of the required purchase:
If All is selected, enter the number of each item in the buy list that the customer must purchase. For example, if you enter 2, the customer must buy 2 of each item in the buy list.
If Amount is selected, enter the money amount that the customer must spend on items in the buy list. For example, if you enter 5 and your currency is dollars, the customer must spend 5 dollars on buy list items.
If Quantity is selected, enter the number of items that the customer must purchase from any items in the buy list. For example, if you enter 3, the customer must purchase any 3 buy list items.
Click Items to select the items for the buy list. The Selected Items window opens.
Add items to the buy list. See "Add Items to a Multi-Buy Component".
Enter a description for the buy list (optional).
To add another buy list, click Add Buy List and repeat steps 1 through 5.
|
Note: If your system option settings allow, you can use either AND or OR conditions to connect multiple buy lists. If all buy lists are connected by AND, the customer must purchase items from all buy lists to qualify for the reward. If OR settings are allowed on your system, you can specify options for the buy lists from which customers can purchase qualifying items. See "Examples of Multi-Buy Components" for information about multiple buy lists with OR conditions. |
When you have created all the buy lists for this component, select how to apply the reward:
All Buy Lists: The reward applies to the items that the customer purchased from all buy lists.
Each Buy List: For each buy list, a separate reward applies.
Reward List: The reward applies to one or more separate reward lists. Because the customer purchased the required items, the customer can obtain a reward on one or more other items.
Click Create Reward.
Proceed to create the rewards for this promotion component.
The procedures to create rewards are different, depending on how the reward applies:
If the reward applies to All Buy Lists or to the Reward List, you create the reward in the Reward List area.
If the reward applies to Each Buy List, you create the applicable reward under each buy list.
If rewards apply to all buy lists together, or to one or more reward lists, you create the reward in the Reward List area.
Select the number or amount of items included in the reward:
All: The reward includes all items in the reward list.
Amount: The reward applies to a purchase amount of the items in the reward list.
Quantity: The reward applies to a number of items in the reward list.
In the next field, enter the applicable quantity or currency amount for the reward.
Click Items to select the items for the reward list. The Selected Items window opens.
Add items to the reward list. See "Add Items to a Multi-Buy Component".
Enter a description for the reward list (optional).
Select the type of reward from the drop-down list:
Amount Off: The price for the item or items is reduced by a specified amount.
Cheapest Free: The cheapest item purchased is free.
Fixed Price: The price for the item or items is a fixed amount.
Percent Off: The price for the item or items is a specified percentage off.
In the next field, enter a value appropriate for the type of reward:
Amount Off: Enter the currency amount of the price reduction.
Cheapest Free: This field does not apply and is disabled.
Fixed Price: Enter the currency amount the customer must pay for the reward item (or all reward items together).
Percent Off: Enter the percentage amount to be taken off the price.
If the reward is Fixed Price, enter the unit of measure of the reward item in the Selling UOM field, or click the LOV button and select the selling UOM. (The Selling UOM field is active and required only for Fixed Price rewards.)
To add another reward list, click Add Reward List and repeat steps 1 through 8.
|
Note: If your system option settings allow, you can use either AND or OR conditions to connect multiple reward lists. If all buy lists are connected by AND, the customer is eligible for reward from all reward lists. If OR settings are allowed on your system, you can specify options for the reward lists from which customers can select rewards. See "Examples of Multi-Buy Components" for information about multiple reward lists with OR conditions. |
When you have created all the reward lists for this component, proceed to add locations. See "Add Locations and Save the Multi-Buy Component".
If rewards apply to each buy list, you create each reward separately under each buy list.
Select the type of reward from the drop-down list:
Amount Off: The price for the item or items is reduced by a specified amount.
Cheapest Free: The cheapest item purchased is free.
Fixed Price: The price for the item or items is a fixed amount.
Percent Off: The price for the item or items is a specified percentage off.
In the next field, enter a value appropriate for the type of reward:
Amount Off: Enter the currency amount of the price reduction.
Cheapest Free: This field does not apply and is disabled.
Fixed Price: Enter the currency amount the customer must pay for the reward item (or all reward items together).
Percent Off: Enter the percentage amount to be taken off the price.
If the reward is Fixed Price, enter the unit of measure of the reward item in the Selling UOM field, or click the LOV button and select the selling UOM. (The Selling UOM field is active and required only for Fixed Price rewards.)
If there are multiple buy lists, repeat steps 1 through 3 for each of the buy lists. Then proceed to add locations. See "Add Locations and Save the Multi-Buy Component".
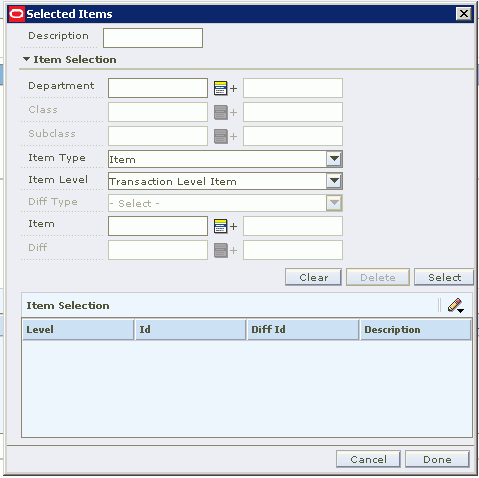
For a buy list or reward list, select the transaction-level items for the list in the Selected Items window. You can select and filer items by any of the following:
Department
Class
Subclass
Item Type
Item Level
Diff Type
Item
Diff
Perform the following steps:
Enter values or use LOV buttons to filter and select items.
Click Select to select items and move them to the Item Selection table.
Click Done when you are finished selecting items.
In the Location Selection area, add locations for this promotion component. You can add locations by any combination of zone group, zone, and store.
Enter Zone Group, Zone, or Store values, or use the LOV buttons to select locations.
Click Select. The locations are added to the Location Selection table.
Correct the Start Date & Time and End Date & Time fields if needed.
Select the checkbox if this is a Time Based Promotion.
In the Apply To field, select the types of item pricing to which you want to apply the promotion component:
Clearance Only
Regular Only
Regular and Clearance
Select the Ignore Constraints check box if you want this component to ignore all constraints for the associated promotion.
Use the fields Attribute 1, Attribute 2, and Attribute 3 if you want to enter any additional descriptive text about this promotion component. For example, you can enter "end-of-aisle promotion" or "advertised in weekly flyer" as information for future reference. You can click the comment icon to open the Description window to enter text.
The status of this promotion component is displayed in the Status field. To change the status:
In the Action field, select one of the following values from the drop-down list:
Submit: Save and submit this promotion component for approval.
Approve: Approve this promotion component.
Click Update.
Click one of the following buttons:
Click Save to save the promotion component.
Click Done to save the promotion component and close the workspace.
Create a multi-buy component.
Expand the Funding pane.
In the Corporate Funding Percent field, enter the percent that the retailer contributes to the promotion.
Select the Create Deals check box to create a deal based on this promotion component and funding.
In the Vendor Type field, select the type of vendor that is funding the component.
In the Vendor field, enter the ID of the vendor, or click the LOV button and select a vendor.
In the Deal ID field, enter the deal the promotion is associated with, or click the LOV button and select a deal.
In the Deal Comp ID, enter the ID of the deal component field, or click the LOV button and select a deal component.
|
Note: The Deal and Deal ID field are disabled if you selected the Create Deals check box. |
In the Contribution % field, enter the percentage that this vendor contributes to the promotion component.
Select the Use Deal Locations check box to indicate that the locations on the deal should be used for the promotion.
|
Note: The Use Deal Locations check boxes are disabled if the promotion component already has locations. |
If you selected the Create Deals check box, add billing information for a deal to a funded component.
Click Apply to add your changes to the table.
Click Done to save any changes and close the workspace.
Click Deal Billing. The Deal Billing window opens.
Select the information about the deal that you require:
Deal Reporting Level: The frequency that the deal is reported.
Bill Back Method: The type of invoice that is created for the supplier. Select the appropriate option.
Bill Back Period: The frequency that the vendor is charged for the bill back. Select when to charge the vendor.
Invoice Processing Logic: The method used to create invoices. Invoices are created automatically, manually, or not at all depending on the option selected.
Include VAT in Deal Billing: Select the check box to indicate that VAT should be included in the invoice information.
Include Deal Income in Stock Ledger: Select the check box to indicate that deal income accrual should be written to the stock ledger.
Click Done to save any changes and close the window.
|
Note: If the System Options "Do not run Conflict Check for Multi-Buy Promotion Approval" is checked, then the Funding panel is disabled for multi-buy promotion. |
Multi-buy components provide many flexible options to design a promotion component that gives the customer a discount, fixed price, or other reward for purchasing selected items. The component can specify either a quantity or purchase amount as the requirement to receive the reward.
A multi-buy component can be simple or complex. You can use AND and OR conditions to create components with numerous purchase and reward options.
All multi-buy promotion components share common characteristics, and you create them using the same interface. Any multi-buy component can be considered as one of the following general types:
Multi-buy "meal deal"
Multi-buy link saver
Multi-buy "cheapest free"
Multi-buy with multiple reward (get) lists
Multi-buy with AND or OR conditions for buy and reward lists
The following are examples of each of these types of multi-buy promotion components.
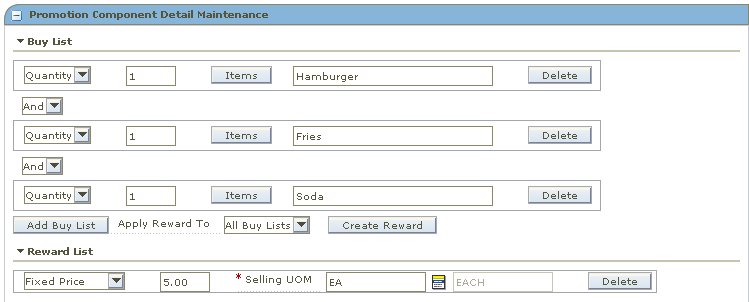
In this example, the customer can buy one hamburger sandwich, an order of French fries, and a soda for a fixed price of five dollars. In the Buy List area, it is specified that the customer must purchase a quantity of 1 from each buy list. The AND connectors specify that the customer must buy the required quantity from all buy lists to qualify for the reward. The reward applies to all buy lists; that is, the reward is applied to the items purchased from the buy lists. The Reward List area specifies the reward as a fixed price of 5.00.
The items can be specific items or items from selected item lists. For example, any kind of soda might qualify, or the customer might be required to purchase a particular brand or flavor of soda.
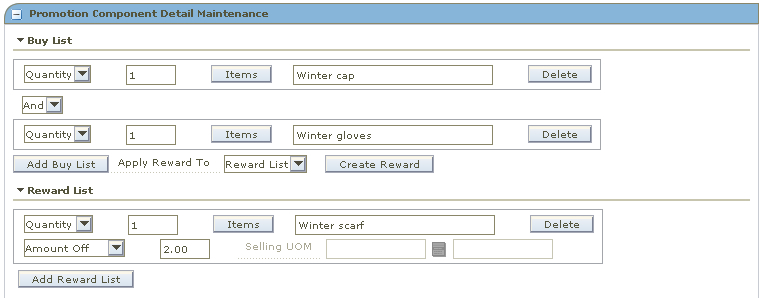
In this example, the customer receives two dollars off the price of a winter scarf if it is purchased along with both a cap and gloves. In this case, the reward is not a fixed price or discount on the purchased items, but a special deal on an additional item.
In the Buy List area, it is specified that the customer must buy a quantity of 1 from each buy list. The AND connectors specify that the customer must buy the specified quantity from both buy lists to qualify for the reward. The reward applies to the separate reward list. The Reward List area specifies a selected item or item list and a price reduction (amount off) of 2.00 for the item from the reward list.
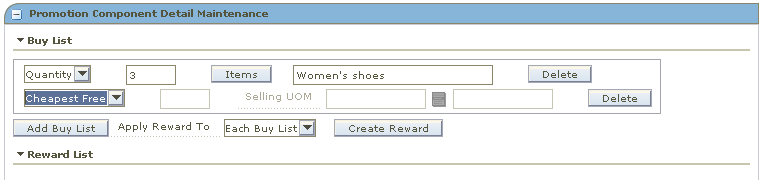
In the following example, the customer receives the cheapest pair of shoes free with the purchase of three pair. In the Buy List area, it is specified that the customer must buy a quantity of 3 from the buy list. The reward applies to "Each Buy List" (although in this example there is only one buy list).
|
Note: When a reward applies to "Each Buy List," the reward for each buy list appears under the buy list, instead of in the Reward List area. The rewards for the buy lists are created when you click Create Reward. |
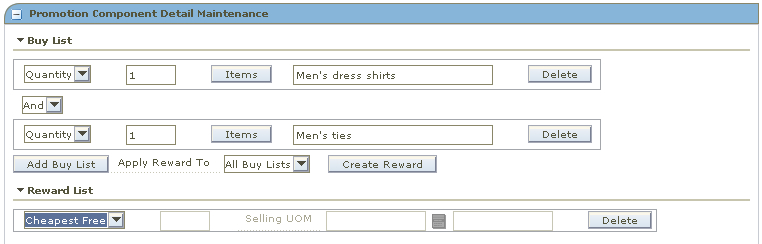
The following example has two buy lists. If the customer buys one dress shirt and one tie, the cheaper item is free. In this example, the reward applies to all buy lists, and there is a separate Reward List area.
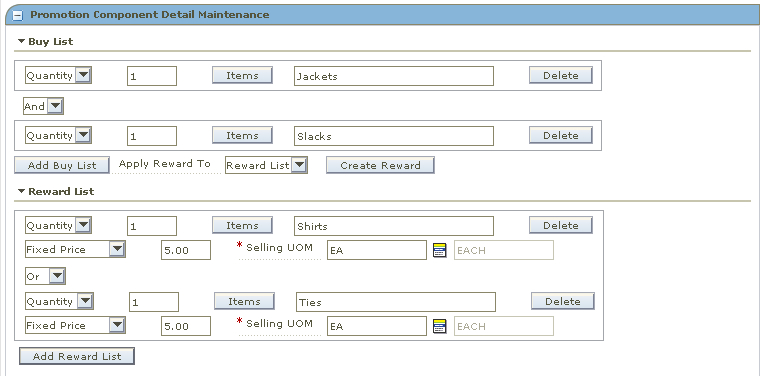
In this more complex example, when the customer buys one jacket and one pair of slacks, the customer can buy one shirt or two ties for a fixed price of five dollars more.
The Buy List area in this example is similar to other examples that have multiple buy lists. The customer must buy a quantity of 1 from all buy lists, and the reward applies to the reward list.
In this case, there are multiple reward lists. The OR connector specifies that the customer has the choice of a reward from either (but not both) of the reward lists. Each reward list specifies a fixed price and a quantity. In this example, the quantity is different for each reward list. (The fixed price could also be different for each reward list.)
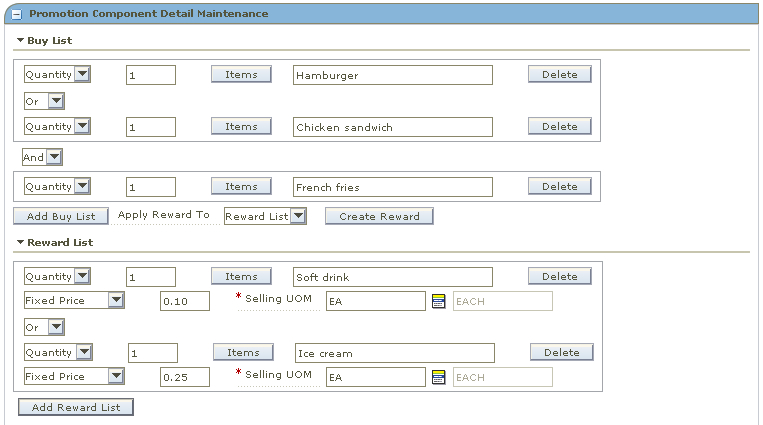
The following example uses both multiple buy lists and multiple reward lists. The buy and reward lists use a combination of AND and OR conditions.
In this example, the customer buys either a hamburger or a chicken sandwich and an order of French fries. The reward is either a soft drink for 10 cents or ice cream for 25 cents.
Navigate: From the Task Pad, select Promotions > Create Component.
OR
From the Create Promotion workspace, click Add Component in the Promotion Components pane.
The Create Component workspace opens.
In the Promotion field, enter a promotion ID or click the LOV button and select a promotion.
In the Component Type field, select Finance from the drop-down list.
In the Description field, enter the description of the promotion component.
In the Customer Type field, enter the customer type ID, or click on the LOV button and select a customer type. This field is optional.
Click Next. The details promotion component detail screen opens.
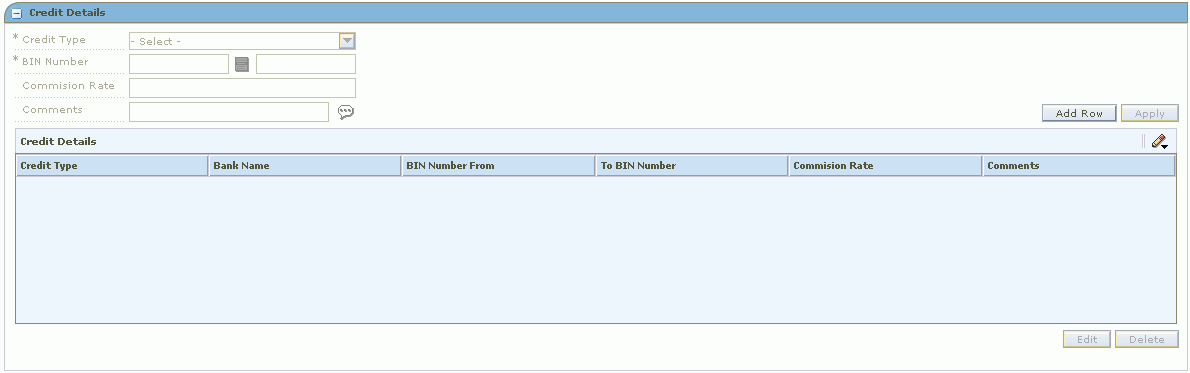
The type of credit card is required in order to qualify for the promotion.
In the credit details workspace, click Add Row.
In the Credit Type field, select the type of the credit card from the drop-down list.
In the BIN field, enter the Bank Index Number or click on the LOV button and select the bank name and index number.
In the Commission Rate field, enter the commission percentage that the Retailer has to pay to the Credit Card Company when a customer purchases using the Finance Promotion.
In the Comments field, enter the comments.
Click Apply.
The credit card details are displayed in the credit details table.
To edit the credit details, select a credit type and click Edit.
Make the necessary changes and click Apply to save the changes.
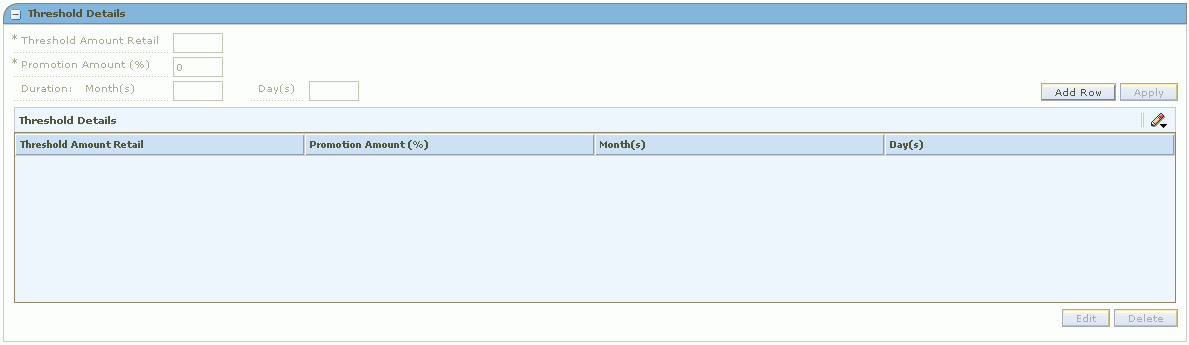
Threshold amount is the total amount that the customer has to spend in order to qualify for the Finance Promotion. For example, promotion is set up for Visa Credit Card with a threshold of $1,000 and promotion percentage of 0, with a duration of 18 months. If the customer spends $1,000 or more for the items in the promotion and pays using Visa Credit Card, the customer has an option to pay back the credit card company without any interest (0 %) in 18 months.
In the Threshold Details workspace, click Add Row.
In the Threshold Amount Retail field, enter the threshold amount to be applied for the credit promotion.
In the Duration field, enter the month and day in the respective fields.
Click Apply.
The threshold details are displayed in the threshold details table.
To edit the threshold details, select a threshold and click Edit.
Make the necessary changes and click Apply to save the changes.
You can make your selection based on Department, Class, Subclass, Item Type, Item Level, Diff Type, Item, or Diff in order to specify the items that should be included in the promotion component.
In the Description field, enter the description based on the item selection.
You can select and filer items for inclusion by any of the following:
Department
Class
Subclass
Item Type
Item Level
Diff Type
Item
Diff
Enter values or use LOV buttons to filter and select items.
Click Select to select items and move them to the Item Selection table.
Click Done when you are finished selecting items.
In the Description field, enter the description.
You can select and filer items for exclusion by any of the following:
Department
Class
Subclass
Item Type
Item Level
Diff Type
Item
Diff
Enter values or use LOV buttons to filter and select items.
Click Select to select items and move them to the Item Selection table.
Click Done when you are finished selecting items.
You can add locations by any combination of zone and store. You can also create item exclusion records for existing Item/Location records that have been created at a level above the transaction item level.
In the Location Selection area, Enter Zone Group, Zone, or Store values, or use the LOV buttons to select locations.
Click Select. The locations are added to the Location Selection table.
In the Location Exclusion area, enter the location ID to exclude, or click on the LOV button to select the location to be excluded from the selected list.
Click Select. The selected locations for exclusion are listed in the Location Selection table.
Correct the Start Date & Time and End Date & Time fields if needed.
Select the Ignore Constraints check box if you want this component to ignore all constraints for the associated promotion.
Use the fields Attribute 1, Attribute 2, and Attribute 3 if you want to enter any additional descriptive text about this promotion component. You can click the comment icon to open the Description window to enter text.
The status of this promotion component is displayed in the Status field. To change the status:
In the Action field, select one of the following values from the drop-down list:
Submit: Save and submit this promotion component for approval.
Approve: Approve this promotion component.
Click Update.
Click one of the following buttons:
Click Save to save the promotion component.
Click Done to save the promotion component and close the workspace.
Navigate: From the Task Pad, select Promotions > Create Component.
OR
From the Create Promotion workspace, click Add Component in the Promotion Components pane.
The Create Component workspace opens.
In the Promotion field, enter a promotion ID or click the LOV button and select a promotion.
In the Component Type field, select Finance from the drop-down list.
In the Description field, enter the description of the promotion component.
In the Customer Type field, enter the customer type ID, or click on the LOV button and select a customer type. This field is optional.
Click Next. The details promotion component detail screen opens.
The type of credit card is required in order to qualify for the promotion.
In the credit details workspace, click Add Row.
In the Credit Type field, select the type of the credit card from the drop-down list.
In the BIN field, enter the Bank Index Number or click on the LOV button and select the bank name and index number.
In the Commission Rate field, enter the commission percentage that the Retailer has to pay to the Credit Card Company when a customer purchases using the Finance Promotion.
In the Comments field, enter the comments.
Click Apply.
The credit card details are displayed in the credit details table.
To edit the credit details, select a credit type and click Edit.
Make the necessary changes and click Apply to save the changes.
Threshold amount is the total amount that the customer has to spend in order to qualify for the Finance Promotion. For example, promotion is set up for Visa Credit Card with a threshold of $1,000 and promotion percentage of 0, with a duration of 18 months. If the customer spends $1,000 or more for the items in the promotion and pays using Visa Credit Card, the customer has an option to pay back the credit card company without any interest (0 %) in 18 months.
In the Threshold Details workspace, click Add Row.
In the Threshold Amount Retail field, enter the threshold amount to be applied for the credit promotion.
In the Duration field, enter the month and day in the respective fields.
Click Apply.
The threshold details are displayed in the threshold details table.
To edit the threshold details, select a threshold and click Edit.
Make the necessary changes and click Apply to save the changes.
You can make your selection based on Department, Class, Subclass, Item Type, Item Level, Diff Type, Item, or Diff in order to specify the items that should be included in the promotion component.
To select an item:
In the Description field, enter the description based on the item selection.
You can select and filer items for inclusion by any of the following:
Department
Class
Subclass
Item Type
Item Level
Diff Type
Item
Diff
Enter values or use LOV buttons to filter and select items.
Click Select to select items and move them to the Item Selection table.
Click Done when you are finished selecting items.
In the Description field, enter the description.
You can select and filer items for exclusion by any of the following:
Department
Class
Subclass
Item Type
Item Level
Diff Type
Item
Diff
Enter values or use LOV buttons to filter and select items.
Click Select to select items and move them to the Item Selection table.
Click Done when you are finished selecting items.
You can add locations by any combination of zone and store. You can also create item exclusion records for existing Item/Location records that have been created at a level above the transaction item level.
In the Location Selection area, Enter Zone Group, Zone, or Store values, or use the LOV buttons to select locations.
Click Select. The locations are added to the Location Selection table.
In the Location Exclusion area, enter the location ID to exclude, or click on the LOV button to select the location to be excluded from the selected list.
Click Select. The selected locations for exclusion are listed in the Location Selection table.
Correct the Start Date & Time and End Date & Time fields if needed.
Select the Ignore Constraints check box if you want this component to ignore all constraints for the associated promotion.
Use the fields Attribute 1, Attribute 2, and Attribute 3 if you want to enter any additional descriptive text about this promotion component. You can click the comment icon to open the Description window to enter text.
The status of this promotion component is displayed in the Status field. To change the status:
In the Action field, select one of the following values from the drop-down list:
Submit: Save and submit this promotion component for approval.
Approve: Approve this promotion component.
Click Update.
Click one of the following buttons:
Click Save to save the promotion component.
Click Done to save the promotion component and close the workspace.
The user can cancel an item or location from an active price event that has been created at a level higher than the transaction item location level. This is applicable only to active promotion price events created as simple or threshold, including vendor funded and customer segment, and it is not allowed for multi-buy promotions, finance promotions, price changes, or clearance programs.
To cancel an item and/or location:
Select the promotion component detail row.
Click Cancel Item/Loc. The Cancel Item/Locations window opens.
Select the item to be cancelled off the promotion. Note that the item selected may be parent, parent-diff, or transaction level.
Click Apply.
Select the item or location to cancel.
Click the appropriate button:
Cancel: Closes out of the cancel request window without processing any data.
Cancel Item/Loc: Triggers the promotion cancellation or the merchandise/location(s) and will initiate an asynchronous conflict check, close the window, and returns the user to the Promotion Component Details window. The status of the new row is Conflict Checking, and will later change to Cancel Pending after successful conflict check is complete.
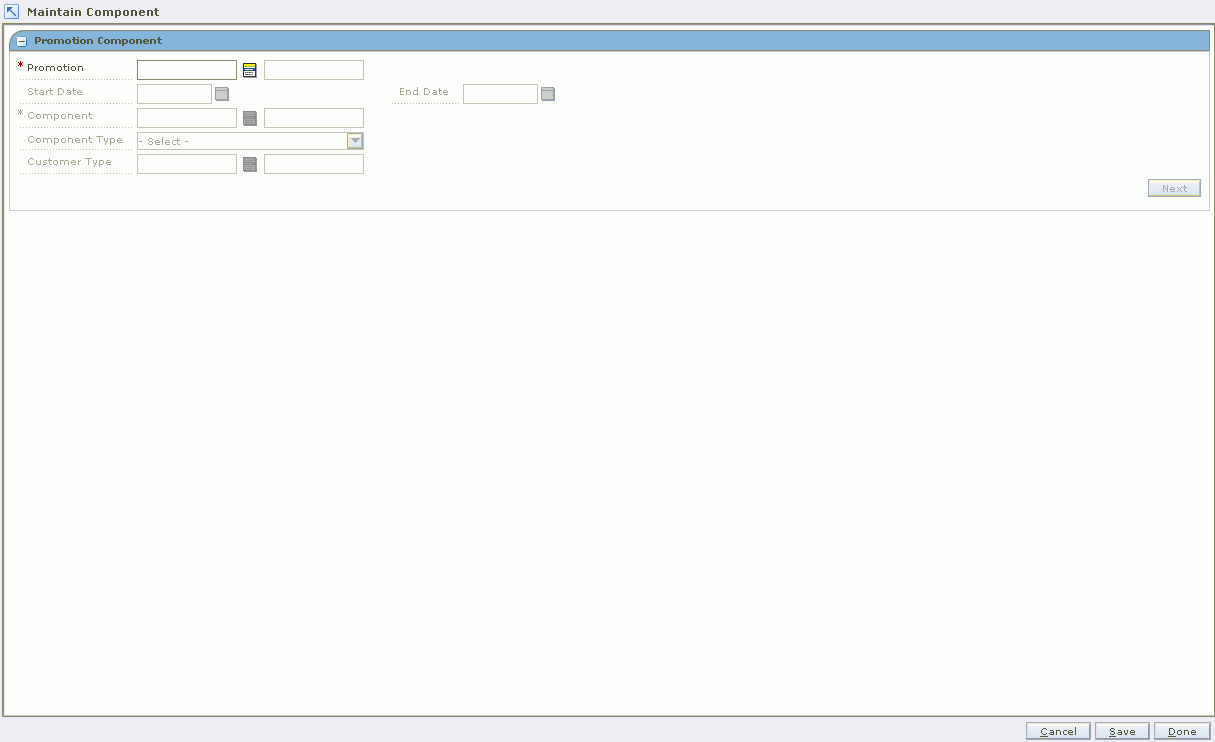
Navigate: From the Task Pad, select Promotion > Maintain Component. The Maintain Component workspace opens.
In the Promotion field, enter the ID of the promotion that the component is associated with, or click the LOV button and select a promotion.
In the Component field, enter the ID of the component you want to maintain, or click the LOV button and select a component.
In the Customer Type field, enter the ID of the customer type, or click the LOV button and select the customer type. This field is optional.
Click Next. Additional component maintenance panes are displayed.
|
Note: Collapse and expand areas and panes to view the information needed to complete the task. |
In the Promotion Component Detail Maintenance pane, edit the name of the component as necessary.
Enter the consignment rate used for the item while it is on promotion, if necessary.
To edit a specific record, select a record, or click Select All to make changes to all records on the table.
Click Edit.
Edit the enabled fields as necessary.
Click Apply.
Click Done to save any changes and close the workspace.
In the Promotion Component Detail Maintenance pane, select the record you want to delete:
To edit a specific record, select a record.
Click Select All to make changes to all records in the table.
Click Delete.
You are prompted to confirm your decision.
Click Yes. The item location is removed from the table.
Click Done to save any changes and close the workspace.
In the Promotion Component Detail Maintenance pane, select the record for which you want to create an item exception or exclusion. The Item Exceptions and Exclusion pane opens.
In the Location field, enter a location ID, or click the LOV button and select a location.
|
Note: You can only create item exceptions or exclusions for items above the transaction level. |
Create the exception or exclusion:
Click Create Exceptions to create an exception to the selected record.
Click Create Exclusion to create an exclusion.
|
Note: Exceptions and exclusions can only be created and approved for details that are in worksheet status only. |
The pane closes. In the Promotion Component Detail Maintenance pane exceptions and exclusions are indicated in the Exclusion/Exception Indicator column:
A down arrow indicates that the item/location records contains an exception or exclusion.
An up arrow indicates that the item/location records is an exception or exclusion.
Click Done to save any changes and close the pane.
In the Promotion Component Detail Maintenance pane, select the record for which you want to create a location exception or exclusion. The Location Exceptions and Exclusion pane opens.
In the Location field, enter a location ID, or click the LOV button and select a location.
|
Note: You can only create location exceptions or exclusions for locations at the zone level. |
Create the exception or exclusion:
Click Create Exceptions to create an exception to the selected record.
Click Create Exclusions to create an exclusion.
|
Note: Exceptions and exclusions can only be created and approved for details that are in worksheet status only. |
The pane closes. In the Promotion Component Detail Maintenance pane exceptions and exclusions are indicated in the Exclusion/Exception Indicator column:
A down arrow indicates that the item/location records that contain an exception or exclusion.
An up arrow indicates that the item/location records that is an exception or exclusion.
Click Done to save any changes and close the pane.
A promotion event is a method of grouping promotions that occur during a period of time. Each event can be associated with many promotions, but a promotion can only be associated with one event.
Updates can be made to the details of existing promotion events.
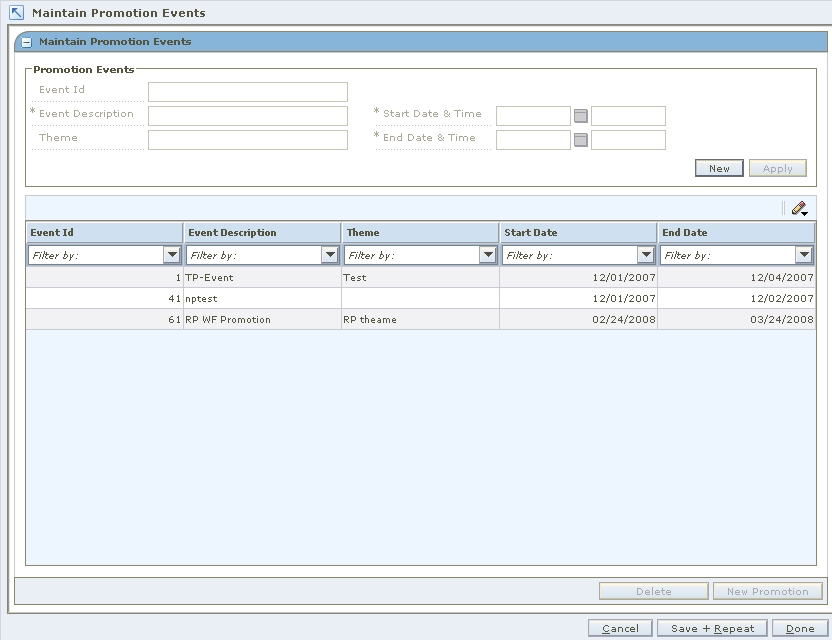
Navigate: From the Task Pad, select Promotion Events > Create/Maintain Events. The Maintain Promotion Events workspace opens.
In the Promotion Events section, click New.
In the Event Description field, enter a name for the event you are creating.
In the Theme field, enter any additional informative information about the event.
In the Start Date and Time fields:
In the first field, enter the date the event starts, or click the LOV button and select a date.
In the second field, enter the time the event starts.
In the End Date and Time fields:
In the first field, enter the date the event ends, or click the LOV button and select a date.
In the second field, enter the time the event ends.
Click Apply. The promotion event is added to the table.
Click Done to save any changes and close the window.
In the Maintain Promotion Events pane, click New Promotion. The Create Promotion workspace opens.
Add details to create a promotion.
Navigate: From the Task Pad, select Promotion Events > Create/Maintain Events. The Maintain Promotion Events workspace opens.
Select the event you want to maintain from the table.
In the Promotion Events area, edit the enabled fields as necessary.
Click Apply. Your changes are added to the promotion event and appear on the table
Click Done to save any changes and close the window.
A threshold is a discount that a customer receives for purchasing a pre-determined amount of an item. You must define the levels that exist in the threshold, then associate the threshold definition to the threshold component.
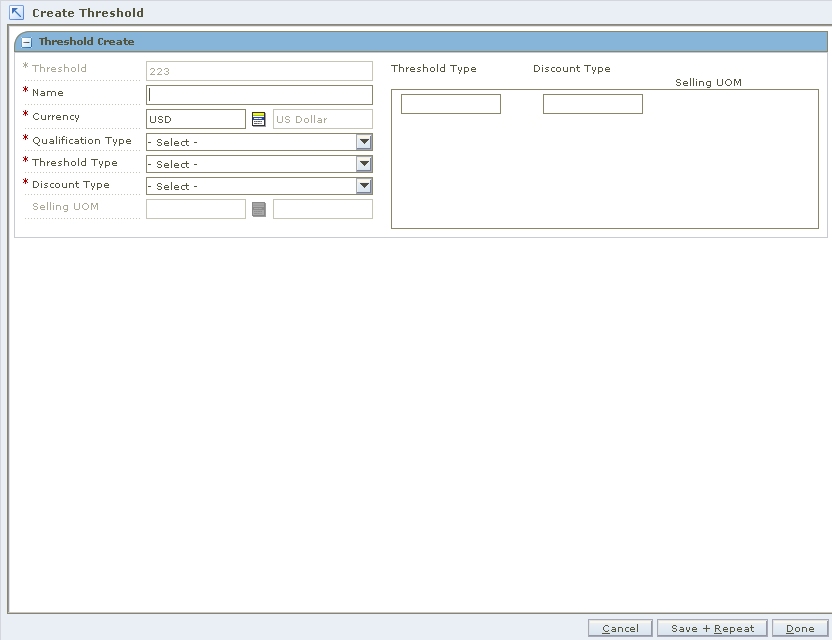
Navigate: From the Task Pad, select Promotion Threshold > Create Threshold. The Create Threshold workspace opens.
In the Name field, enter a description of the threshold you are creating.
In the Currency field, enter the ID of the appropriate currency, or click the LOV button and select a currency.
In the Qualification Type field, select how the threshold is met:
Threshold Level: All items on the promotion can be counted together to meet the terms of the threshold and have the promotion applied.
Item Level: Each item on the promotion must meet the threshold to have the discount applied.
In the Threshold Type field, select the measure that indicates how the threshold is met:
Quantity: A number of units of an item must be purchased by the customer from the retailer.
Amount: A value of the item must by purchased by the customer from the retailer.
In the Discount Type field, select the method used to determine the new price of the item.
Percent Off: A price for an item is changed by a percentage removed from the original price. The percent of change is determined by the percent entered in the Change Amount field.
Amount Off: A price for an item is changed by an amount removed from the original price. The amount of change is determined by the amount entered in the Change Amount field.
Fixed Price: The price for the item will be at a specified retail that will be defined in the change amount field.
If you choose Fixed Price in the Discount type field, you must enter the Selling UOM for the item.
In the threshold area on the right, enter the amount or quantity that needs to be purchased in the Threshold Type field.
In the Discount Type field, enter the percent off, amount off, or fixed price received.
Press Tab to add additional threshold levels.
Click Done to save any changes and close the window.
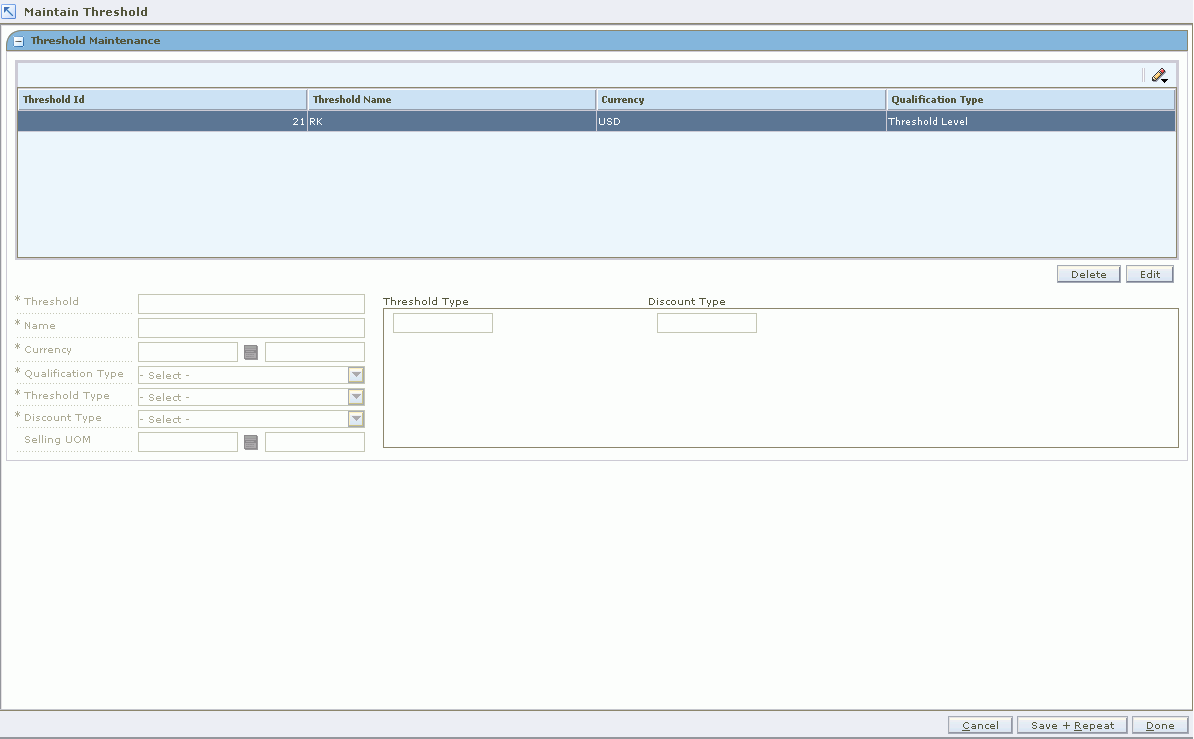
Navigate: From the Task Pad, select Promotion Threshold > Maintain Threshold. The Maintain Threshold workspace opens.
Thresholds are listed in the Threshold Maintenance pane.
Select a threshold to edit.
Click Edit.
The threshold details are enabled for editing.
Edit the required fields.
Click Done to save any changes and close the window.
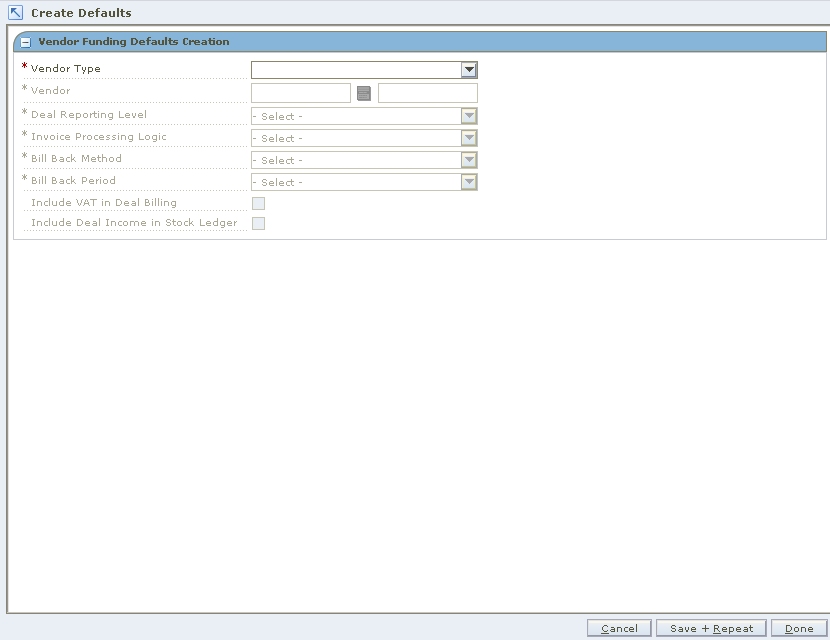
When an item is on promotion at a retailer, part of the discount a customer receives may be contributed by the vendor. When you set up a promotion, you can define the vendor's contribution.
You can create billing information defaults at the vendor level, which allows you to apply the information to any deal that is created through the promotions dialog that is associated with the vendor.
Navigate: From the Task Pad, select Vendor Funding Defaults > Create Defaults. The Create Defaults workspace opens.
In the Vendor Type field, select the type of vendor that is contributing to the promotion.
In the Vendor field, enter the ID of the vendor, or click the LOV button and select a vendor.
In the Deal Reporting Level field, select the frequency of deal reporting.
In the Bill Back Method field, select the type of invoice that is created for the supplier.
In the Bill Back Period field, select the frequency that the vendor is charged for the bill back.
In the Invoice Processing Logic field, select the method used to create invoices. Invoices are created automatically, manually, or not at all depending on the option selected.
Select the Include VAT in Deal Billing check box to indicate that VAT should be included in the invoice information.
Select the Include Deal Income in Stock Ledger check box to indicate that deal income accrual should be written to the stock ledger.
Click Done to save any changes and close the window.
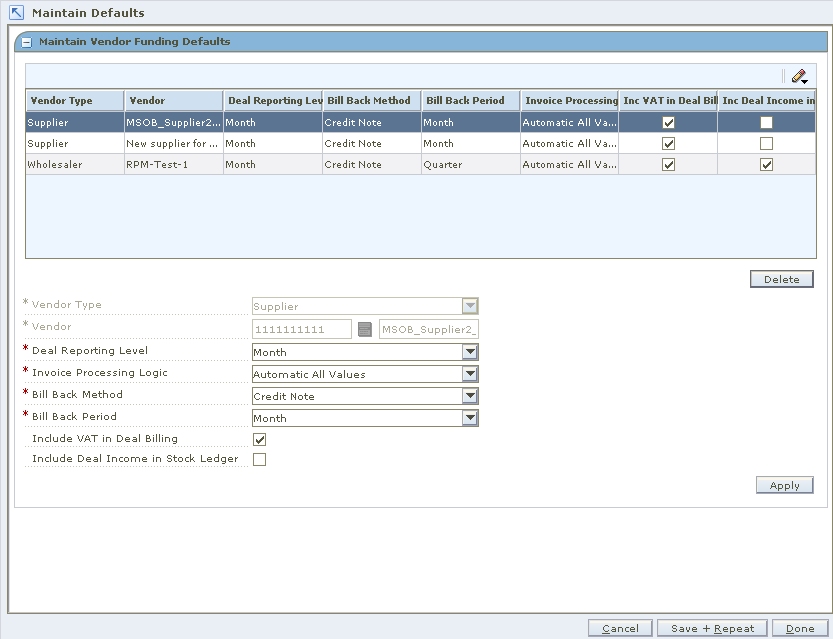
Navigate: From the Task Pad, select Vendor Funding Defaults > Maintain Defaults. The Maintain Defaults workspace opens.
On the table, select a vendor. The details area is enabled.
Update the enabled fields as necessary.
Click Apply to add your changes to the table.
Click Done to save any change and close the window.
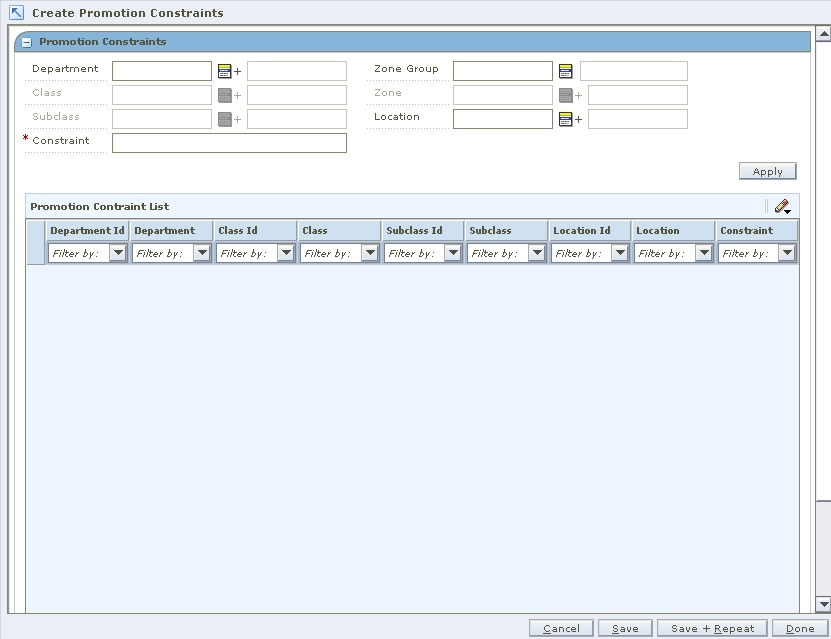
The number of days before the promotion is called the promotion constraint. You can set up promotion constraints at the department, class, or subclass level for a particular zone or location. A warning will appear if a price change or promotion is created that would fall a certain number of days before or during another approved promotion or price change.
Navigate: From the Task Pad, select Promotion Constraints > Maintain Promotion Constraints. The Create Promotion Constraints workspace opens.
Enter the ID of the merchandise level the promotion constraint should apply to, or click the LOV button and select the appropriate merchandise level
In the Location Selection area, select the locations the promotion constraint should apply to.
Zone Group: Enter the ID of the zone group the constraint should apply to, or click the LOV button and select a zone group.
Zone: Enter the ID of the zone the constraint should apply to, or click the LOV button and select a zone.
Location: Enter the ID of the location the constraint should apply to, or click the LOV button and select a location.
In the Constraint field, enter the number of days for the promotion constraint.
Click Apply. A row is added to the table.
Click Save.
Click Done to close the workspace.
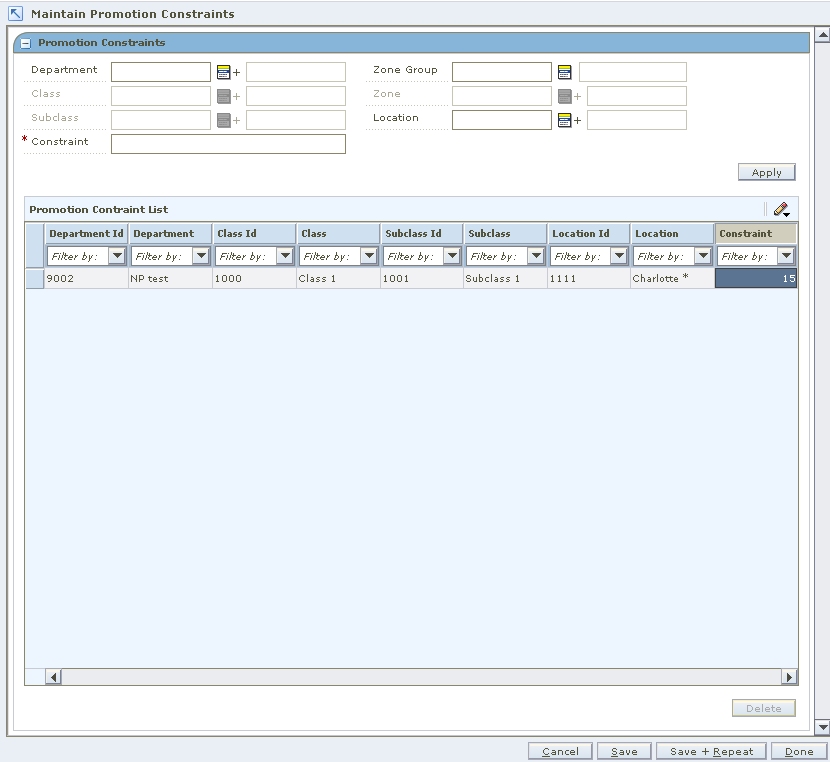
The Maintain Promotion Constraint workspace allows you to maintain promotion constraints.
Navigate: From the Task Pad, select Promotion Constraints > Maintain Promotion Constraints. The Maintain Promotion Constraints workspace opens.
Enter or select the criteria to limit your search.
Click Search. Your results appear in the Promotion Constraints list.
Select the promotion constraint you want to edit.
Edit the Constraint value as needed.
Click Save.
Click Done to close the workspace.
In the Promotion Constraints table, select the row you want to delete by clicking the box to the left of the row. Press and hold the Ctrl key while selecting to select multiple rows. Click Select All to select all the rows.
Click Delete. You are prompted to confirm your decision.
Click Yes.
Click Done to close the workspace.