| Oracle® Retail Price Management Oracle® Retail Price Management User Guide Release 14.1 E54702-01 |
|

 Previous |
 Next |
| Oracle® Retail Price Management Oracle® Retail Price Management User Guide Release 14.1 E54702-01 |
|
Previous |
Next |
Pricing strategies allow you to define how prices are proposed when pricing worksheets are generated. You can define pricing strategies at the department, class, or subclass level to identify the items that are affected by the strategy. The lowest merchandise level you can define for a pricing strategy is determined by the aggregation levels defined for the department. An item/location can be on multiple regular pricing strategies as long as the review periods within the calendar assigned do not overlap (clearance, competitive, or margin) and one maintain margin pricing strategy which can overlap with a (clearance, competitive, or margin) strategy.
After you have created a pricing strategy, you can maintain different aspects of the pricing strategy.
|
Note: Updates to pricing strategies affect only future worksheets. Current worksheets will not be updated. |
Area differential pricing allows you to set prices for items at a particular zone or zone group differently than another zone or zone group. The price differential is based on the rules you define. Area differentials can be used when you create a price change to ensure consistent pricing. These price changes are generated by selecting Price Changes for Area Differentials within the Price Change task pad dialog. These price changes are generated by selecting Price Changes for Area Differentials within the Price Change task pad dialog. Differential pricing cannot be applied to other pricing events, such as clearances or promotions.
When creating an area differential:
You first establish a primary area, by defining the merchandise hierarchy and zone hierarchy for the primary area.
Next, select the zones that fall within the secondary area.
Then define how prices for the items in the hierarchy will differ in the secondary areas from the prices in the primary area. You can choose to price the item higher or lower by percent, or set the price to the same as the primary area.
You can choose to exclude certain items in the merchandise hierarchy from the secondary area differential prices.
You can choose to create and associate a competitive pricing strategy with the secondary area differential.
Area differentials are applied when price changes are created manually in the Price Change Dialog or from the Create Price Changes for Area Differentials dialog. They are also created in the worksheet if there are item/zone combinations brought into the worksheet that are part of the primary area on an area differential strategy. When competitive information is associated with an area differential, the worksheet chooses the lower of the retails proposed by the strategies.
If you set up the secondary area to be auto-approved, secondary area price changes are conflict checked, and if no conflict exists, created in approved status. If conflicts exist, the secondary area price change is created in worksheet status. If you set up the secondary are to not be auto-approved, secondary area price changes are created in worksheet status. See "Change the Status of a Price Change" for additional information about status changes and conflict checking.
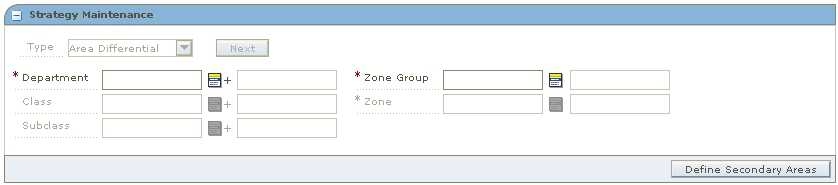
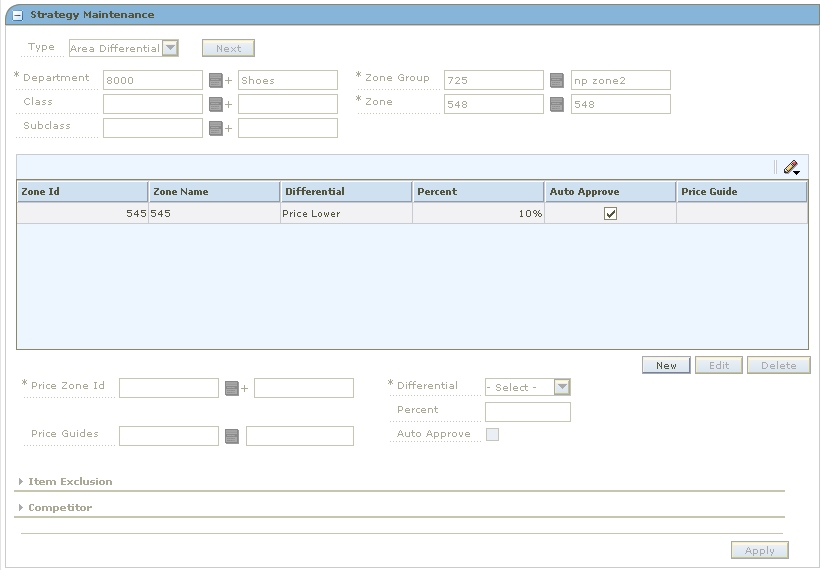
Navigate: From the Task Pad, select Pricing Strategy > Create Pricing Strategy. The Create Pricing Strategy workspace opens with the Strategy Maintenance pane.
In the Type field, select Area Differential.
Click Next. Additional fields appear.
Enter the ID of the merchandise level you want to apply the area differential to, or click the LOV button and select the appropriate merchandise level.
|
Note: You must enter a department. Subsequent merchandise levels are enabled as you add the level above, if the definition of the department in the aggregation level dialog allows it. |
Select the zones that define the primary area:
Zone Group - Enter the ID of the zone group that contains the locations to add to the area differential price strategy, or click the LOV button and select a zone group.
Zone - Enter the ID of the zone to add to the area differential price strategy, or click the LOV button and select a zone.
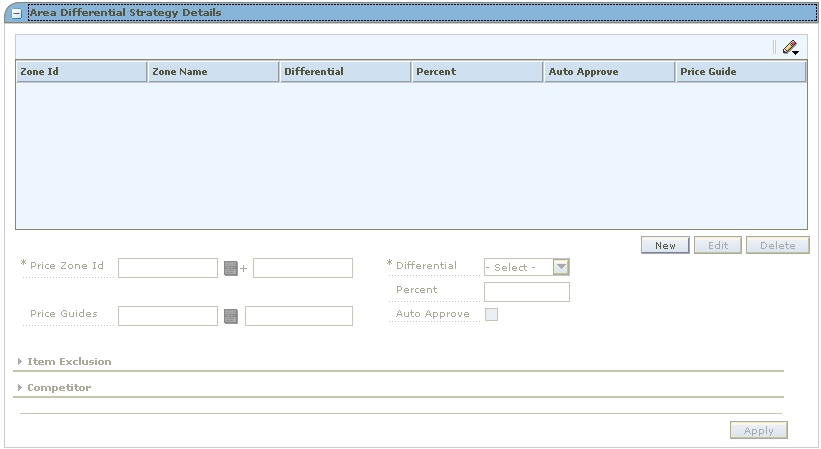
Click Define Secondary Areas. The Area Differential Strategy Details pane opens.
Click New to enable the fields.
In the Price Zone field, enter the ID of the zone that you want to add to the secondary area of the area differential price strategy, or click the LOV button and select a zone.
In the Price Guides field, enter the ID of the price guide you want to apply to the differential pricing, or click the LOV button and select a price guide.
|
Note: Only price guides associated with the selected departments can be selected. |
In the Differential field, select how the price differs from the primary area:
Price Higher - The items at the specified secondary area are priced higher by the percentage entered in the Percent field.
Price Lower - The items at the specified secondary area are priced lower by the percentage entered in the Percent field.
Price Equal - The items at the specified secondary area are priced the same as the items in the primary area.
In the Percent field, enter the percent by which the secondary area price is different from the primary area price.
Select the Auto Approve checkbox to indicate price changes for the area differential should be created in Approved status.
|
Note: Expand the Item Exclusion section of the Area Differentials pane to complete the procedure. |
Enter or select criteria ID of the items you want to exclude.
Click Add. The information is added to the item exclusion table.
To remove an item from the item exclusion table:
Select an item.
Click Remove. The item is removed from the item exclusion table.
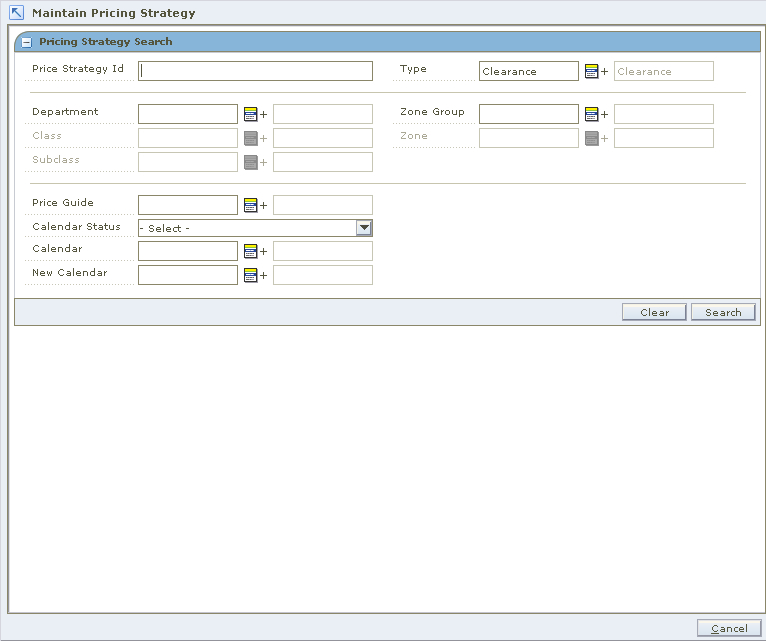
Navigate: From the Task Pad, select Pricing Strategy > Maintain Pricing Strategy. The Pricing Strategy Search workspace opens.
Enter criteria as needed to limit your search.
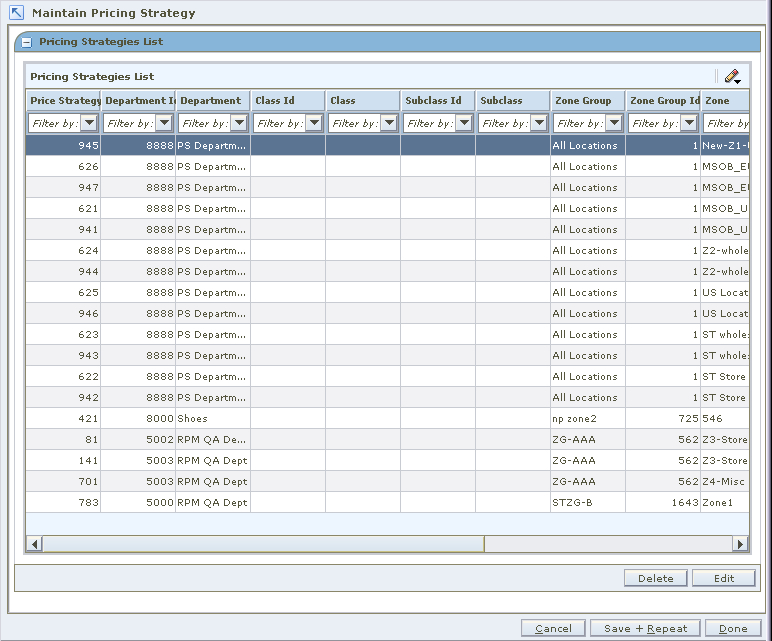
Click Search. The results of your search are listed in the Pricing Strategies List.
From the Pricing Strategies List, select the area differential strategy you want to maintain.
Click Edit, or double-click the strategy selected. A Strategy Maintenance editing pane opens, and the fields that can be changed are enabled.
If you selected an area differential strategy, select the location you want to update.
Select the zone you want to delete.
Click Delete. The zone is removed from the table.
|
Note: Expand the Item Exclusion section of the Area Differentials pane to complete the procedure. |
Enter or select criteria ID of the items you want to exclude.
Click Add. The information is added to the item exclusion table.
To remove an item from the item exclusion table:
Select an item.
Click Remove. The item is removed from the item exclusion table.
A clearance pricing strategy allows you to define the method used to mark down items.
Navigate: From the Task Pad, select Price Strategy > Create Price Strategy. The Create Pricing Strategy workspace opens with the Strategy Maintenance pane.
In the Type field, select Clearance.
Click Next. Additional fields appear.
Enter the ID of the merchandise level you want to apply the strategy to, or click the LOV button and select the appropriate merchandise level.
|
Note: You must enter a department. Subsequent merchandise levels are enabled as you add the level above, if the definition of the department in the aggregation level dialog allows it. |
Select the zones for the strategy:
Zone Group - Enter the ID of the zone group that contains the locations to add to the price strategy, or click the LOV button and select a zone group.
Zone - Enter the ID of the zone to add to the price strategy, or click the LOV button and select a zone.
In the Price Guides field, enter the ID of the Price Guide field, or click the LOV button and select a price guide.
|
Note: Only price guides associated with the selected departments can be selected. |
In the Calendar field, enter the ID of the calendar you want to associate with the strategy, or click the LOV button and select a calendar.
In the Suspend field, select the checkbox to indicate that reviews of the existing strategy are stopped.
|
Note: Clear the checkbox to indicate the review periods should begin with the next review period. |
In the New Calendar field, enter the ID of the calendar you want to associate with the strategy, or click the LOV button and select a calendar.
|
Note: You must select the Suspend checkbox before you can add a new calendar |
Click Define Strategy Details. The Clearance Strategy Details pane opens.
In the Markdown Percent field, select the price from which the clearance price is calculated.
Click Add Row.
In the Discount Percent field, enter the percent of the markdown.
Click Apply.
|
Note: If the price from which the clearance price is calculated is Regular Retail, the Discount Percent fields must increase with each markdown added. |
Navigate: From the Task Pad, select Price Strategy > Maintain Price Strategy. The Pricing Strategy Search workspace opens.
Enter criteria as needed to limit your search.
Click Search. The results of your search are listed in the Pricing Strategy Search List window.
From the Pricing Strategies List, select the clearance strategy you want to maintain.
Click Edit, or double-click the strategy selected. A second Strategy Maintenance pane opens and the fields that can be changed are enabled.
Make necessary changes.
Click Apply.
Change or enter a price guide name, or click the LOV button and select the appropriate price guide if necessary.
|
Note: Before you can specify a new calendar, the existing calendar must be suspended. |
Select the Suspend checkbox.
Enter a calendar name, or click the LOV button and select a calendar.
A clearance defaults pricing strategy allows you to set up a strategy for generating subsequent markdowns after an initial clearance event.
Navigate: From the Task Pad, select Price Strategy > Create Price Strategy. The Create Pricing Strategy workspace opens with the Strategy Maintenance pane.
In the Type field, select Clearance Defaults.
Click Next. Additional Strategy fields appear.
Enter the ID of the merchandise level you want to apply the strategy to, or click the LOV button and select the appropriate merchandise level.
|
Note: You must enter a department. Subsequent merchandise levels are enabled as you add the level above, if the definition of the department in the aggregation level dialog allows it. |
Click Define Strategy Details. The Clearance Defaults Strategy Details pane opens.
Enter the percent of the first markdown after the initial markdown in the Discount Percent field.
Enter how many days after the first markdown that this markdown should be taken in the Days after First field.
Enter when to reset the price to regular price in the Reset Price this many days after out of stock date field.
Click Apply. A row is added to the table.
Navigate: From the Task Pad, select Price Strategy > Maintain Price Strategy. The Pricing Strategy Search workspace opens.
Enter criteria as needed to limit your search.
Click Search. The results of your search are listed in the Pricing Strategies List.
From the Pricing Strategies List, select the clearance defaults strategy you want to maintain.
Click Edit, or double-click the strategy selected. A Strategy Maintenance pane opens and the fields that can be changed are enabled.
Make necessary changes.
Select the row before which you want to add the markdown.
Click Add Row.
Enter a percent in the Discount Percent field.
|
Note: Subsequent markdown percents must be greater than the previous. |
Enter a number of days in the Days after First field.
Click Apply. The markdown is added to the table.
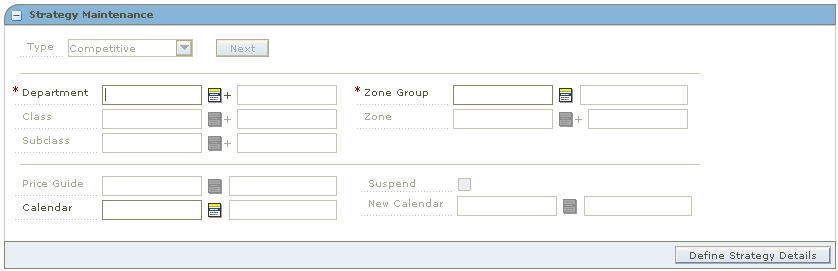
A competitive pricing strategy allows you to define your pricing strategy for items based on your primary competitor's prices.
Note that all locations in a competitive pricing strategy must use the same currency.
You can also assign reference competitors to a competitive pricing strategy. This information allows you to compare the proposed prices to the prices available from other retailers. If the proposed prices vary from the target percentages defined for the reference competitors, you are prompted by the system, so that you can adjust the price in the pricing worksheet.
Navigate: From the Task Pad, select Price Strategy > Create Price Strategy. The Create Pricing Strategy workspace opens with the Strategy Maintenance pane.
In the Type field, select Competitive.
Click Next. Additional strategy fields appear.
Enter the ID of the merchandise level you want to apply the strategy to, or click the LOV button and select the appropriate merchandise level.
|
Note: You must enter a department. Subsequent merchandise levels are enabled as you add the level above, if the definition of the department in the aggregation level dialog allows it. |
Select the zones for the strategy:
Zone Group - Enter the ID of the zone group that contains the locations to add to the price strategy, or click the LOV button and select a zone group.
Zone - Enter the ID of the zone to add to the price strategy, or click the LOV button and select a zone.
In the Price Guides field, enter the ID of the Price Guide field, or click the LOV button and select a price guide.
|
Note: Only price guides associated with the selected departments can be selected. |
In the Calendar field, enter the ID of the calendar you want to associate with the strategy, or click the LOV button and select a calendar.
In the Suspend field, select the checkbox to indicate that reviews of the existing strategy are stopped.
|
Note: Clear the checkbox to indicate the review periods should begin with the next review period. |
In the New Calendar field, enter the ID of the new calendar you want to associate with the strategy, or click the LOV button and select a calendar.
|
Note: You must select the Suspend checkbox before you can add a new calendar. |
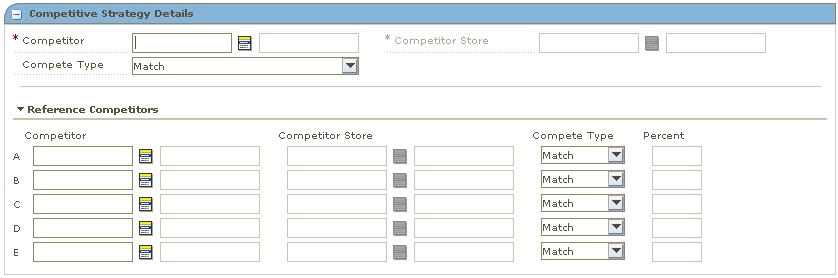
Click Define Strategy Details. The Competitive Strategy Details pane opens.
In the Competitor field, enter the ID of the primary competitor or click the LOV button and select a competitor.
In the Competitor Store field, enter the ID of the store that proposed retails are being compared against.
|
Note: The currency at the competitor store must be the same as the zones previously selected. |
In the Compete Type, select how the price strategy determines the prices:
Match - Prices are proposed to be the same as the primary competitor's prices.
Price Above - Prices are proposed to be a percentage above the primary competitor's prices.
Price Below - Prices are proposed to be a percentage below the primary competitor's prices.
Price by Code - Prices are proposed by the market basket code for the merchandise hierarchy/zone.
Define reference competitors as necessary.
Click Done to save any changes and close the workspace.
In the Compete Percent field, enter the percent above or below the primary competitor's price that the new price is set at.
Set up the acceptable range:
|
Note: Acceptable range is the amount by percentage that a retail price can vary from a primary competitor before a price change is proposed. |
In the Acceptable Range From field, enter the bottom of the range.
In the Acceptable Range To field, enter the top of the range.
Define reference competitors as necessary.
Click Done to save any changes and close the workspace.
In the Code field, select the competitive market basket code you want to use to set the price.
In the Compete Type, select how the price strategy determines the prices:
Match - Prices are proposed to be the same as the primary competitor's prices.
Price Above - Prices are proposed to be a percentage above the primary competitor's prices.
Price Below - Prices are proposed to be a percentage below the primary competitor's prices.
In the Compete Percent field, enter the percent above or below the primary competitor's price that the new price is set at.
Set up the acceptable range:
|
Note: Acceptable range is the amount by percentage that a retail price can vary from a primary competitor before a price change is proposed. |
In the Acceptable Range From field, enter the bottom of the range.
In the Acceptable Range To field, enter the top of the range.
Define reference competitors as necessary.
Click Done to save any changes and close the workspace.
In the Reference Competitors section, enter the ID of the competitor in the Competitor field, or click the LOV button and select a competitor.
In the Competitor Store field, enter the ID of the store, or click the LOV button and select a store.
In the Compete Type, select how to compare prices to the reference competitors:
Match - A pass or fail indicator appears on the worksheet depending on if the proposed price matches the referenced competitors price.
Price Above - A pass or fail indicator appears on the worksheet depending on if the proposed price is at least the specified percent above the referenced competitor's price.
Price Below - A pass or fail indicator appears on the worksheet depending on if the proposed price is at least the specified percent below the referenced competitor's price.
If you selected Price Above or Price Below, enter the percent above or below the competitor's price that the new price is compared.
Click Done to save any changes and close the workspace.
|
Note: Expand the Competitor section of the Area Differentials pane to complete the procedure. |
In the Competitor field, enter the ID of the competitor or click the LOV button and select a competitor.
In the Competitor Store field, enter the ID of the store that proposed retails are being compared against or click the LOV button and select a store.
|
Note: The currency at the competitor store must be the same as the zones previously selected. |
In the Compete Type, select how the price strategy determines the prices:
Match - Prices are proposed to be the same as the competitor's prices.
Price Above - Prices are proposed to be a percentage above the competitor's prices.
Price Below - Prices are proposed to be a percentage below the competitor's prices.
Price by Code - Prices are proposed by the market basket code for the merchandise hierarchy/zone.
Define reference competitors as necessary.
Click Done to save any changes and close the workspace.
In the Compete Percent field, enter the percent above or below the competitor's price that the new price is set at.
Set up the acceptable range:
|
Note: Acceptable range is the amount by percentage that a retail price can vary from a competitor before a price change is proposed. |
In the Acceptable Range From field, enter the bottom of the range.
In the Acceptable Range To field, enter the top of the range.
Define reference competitors as necessary.
Click Done to save any changes and close the workspace.
In the Code field, select the competitive market basket code you want to use to set the price.
In the Compete Type, select how the price strategy determines the prices:
Match - Prices are proposed to be the same as the competitor's prices.
Price Above - Prices are proposed to be a percentage above the competitor's prices.
Price Below - Prices are proposed to be a percentage below the competitor's prices.
In the Compete Percent field, enter the percent above or below the competitor's price that the new price is set at.
Set up the acceptable range:
|
Note: Acceptable range is the amount by percentage that a retail price can vary from a competitor before a price change is proposed. |
In the Acceptable Range From field, enter the bottom of the range.
In the Acceptable Range To field, enter the top of the range.
Define reference competitors as necessary.
Click Done to save any changes and close the workspace.
|
Note: Expand the Reference Competitor section of the Area Differentials pane to complete the procedure. |
In the Reference Competitors section, enter the ID of the competitor in the Competitor field, or click the LOV button and select a competitor.
In the Competitor Store field, enter the ID of the store, or click the LOV button and select a store.
In the Compete Type, select how to compare prices to the reference competitors:
Match - A pass or fail indicator appears on the worksheet depending on if the proposed price matches the referenced competitors price.
Price Above - A pass or fail indicator appears on the worksheet depending on if the proposed price is at least the specified percent above the referenced competitor's price.
Price Below - A pass or fail indicator appears on the worksheet depending on if the proposed price is at least the specified percent below the referenced competitor's price.
If you selected Price Above or Price Below, enter the percent above or below the competitor's price that the new price is compared.
Click Done to save any changes and close the workspace.
Navigate: From the Task Pad, select Price Strategy > Maintain Price Strategy. The Pricing Strategy Search workspace opens.
Enter criteria as needed to limit your search.
Click Search. The results of your search are listed in the Pricing Strategies List.
From the Pricing Strategies List, select the competitive strategy you want to maintain.
Click Edit, or double-click the strategy selected. A second Strategy Maintenance pane opens and the fields that can be changed are enabled.
Make necessary changes.
To edit a price guide:
Enter the price guide name, or click the LOV button and select the appropriate price guide.
|
Note: In order to specify a new calendar, the existing calendar must be suspended. |
Select the Suspend checkbox.
Enter a calendar name, or click the LOV button and select a calendar.
In the Competitor field, enter or change the competitor ID, or click the LOV button and select the appropriate competitor.
In the Competitor Store field, enter a competitor store ID, or click the LOV button and select the appropriate store.
In the Compete Type drop-down field, select the compete type.
For Price Above and Price Below compete types, set up the acceptable range:
|
Note: Acceptable range is the amount by percentage that a retail price can vary from a competitor before a price change is proposed. |
In the Acceptable Range From field, enter the bottom of the range.
In the Acceptable Range To field, enter the top of the range.
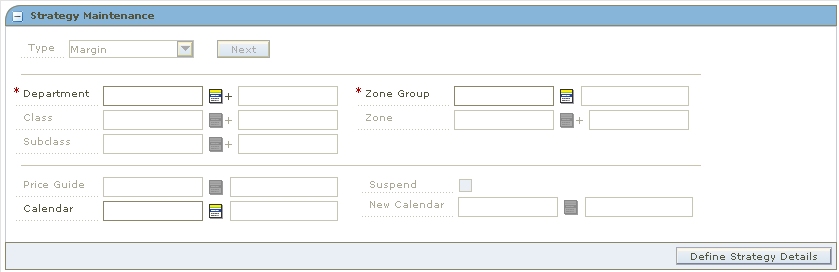
A margin pricing strategy allows you to define the pricing strategy for items based on margin targets.
Navigate: From the Task Pad, select Price Strategy > Create Price Strategy. The Create Pricing Strategy workspace opens with the Strategy Maintenance pane.
In the Type field, select Margin.
Click Next. Additional strategy fields appear.
Enter the ID of the merchandise level you want to apply the strategy to, or click the LOV button and select the appropriate merchandise level.
|
Note: You must enter a department. Subsequent merchandise levels are enabled as you add the level above, if the definition of the department in the aggregation level dialog allows it. |
Select the zones for the strategy:
Zone Group - Enter the ID of the zone group that contains the locations to add to the price strategy, or click the LOV button and select a zone group.
Zone - Enter the ID of the zone to add to the price strategy, or click the LOV button and select a zone.
In the Price Guides field, enter the ID of the Price Guide field, or click the LOV button and select a price guide.
|
Note: Only price guides associated with the selected departments can be selected. |
In the Calendar field, enter the ID of the calendar you want to associate with the strategy, or click the LOV button and select a calendar.
In the Suspend field, select the checkbox to indicate that reviews of the existing strategy are stopped.
|
Note: Clear the checkbox to indicate the review periods should begin in the next period. |
In the New Calendar field, enter the ID of the calendar you want to associate with the strategy, or click the LOV button and select a calendar.
|
Note: You must select the Suspend checkbox before you can add a new calendar. |
Click Define Strategy Details. The Margin Strategy Details pane opens.
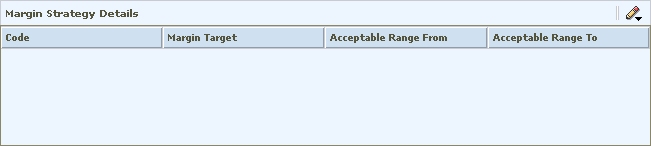
In the Code field, select the margin market basket code you want to use to set the price.
In the Margin Target field, enter the percent of margin you want to earn on the item/zone.
Set up the acceptable range:
|
Note: Acceptable range is the amount by percentage that a margin can vary from the target before a price change is proposed. |
In the Acceptable Range From field, enter the bottom of the range.
In the Acceptable Range To field, enter the top of the range.
Click Apply. An entry is added to the Margin Strategy Details table.
Define reference competitors as necessary.
Click Done to save any changes and close the workspace.
Navigate: From the Task Pad, select Price Strategy > Maintain Price Strategy. The Pricing Strategy Search workspace opens.
Enter criteria as needed to limit your search.
Click Search. The results of your search are listed in the Pricing Strategies List.
From the Pricing Strategies List, select the margin strategy you want to maintain.
Click Edit, or double-click the strategy selected. A Strategy Maintenance pane opens and the fields that can be changed are enabled.
Make necessary changes.
To edit a price guide:
Enter the price guide name, or click the LOV button and select the appropriate price guide.
|
Note: Before you can specify a new calendar, the existing calendar must be suspended. |
Select the Suspend checkbox.
Enter a calendar name, or click the LOV button and select a calendar.
Select a row in the Margin Strategy Details table.
In the Margin Target field, enter the percent of margin you want to earn on the item/zone.
|
Note: Acceptable range is the amount by percentage that a margin can vary from the target before a price change is proposed. |
In the Acceptable Range From field, enter the bottom of the range.
In the Acceptable Range To field, enter the bottom of the range.
Click Apply.
The maintain margin pricing strategy allows you to define the pricing strategy for items based on future cost changes. The proposed retails can be based on current or market basket margin percentages. Reference competitors may be assigned for comparison purposes.
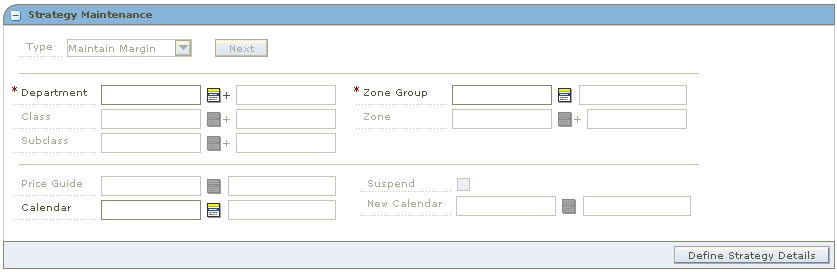
Navigate: From the Task Pad, select Price Strategy > Create Price Strategy. The Create Pricing Strategy workspace opens with the Strategy Maintenance pane.
In the Type field, select Maintain Margin.
Click Next. Additional strategy fields appear.
Enter the ID of the merchandise level you want to apply the strategy to, or click the LOV button and select the appropriate merchandise level.
|
Note: You must enter a department. Subsequent merchandise levels are enabled as you add the level above, if the definition of the department in the aggregation level dialog allows it. |
Select the zones for the strategy:
Zone Group - Enter the ID of the zone group that contains the locations to add to the price strategy, or click the LOV button and select a zone group.
Zone - Enter the ID of the zone to add to the price strategy, or click the LOV button and select a zone.
In the Price Guides field, enter the ID of the Price Guide field, or click the LOV button and select a price guide.
|
Note: Only price guides associated with the selected departments can be selected. |
In the Calendar field, enter the ID of the calendar you want to associate with the strategy, or click the LOV button and select a calendar.
In the Suspend field, select the checkbox to indicate that reviews of the existing strategy are stopped.
|
Note: Clear the checkbox to indicate the review periods should begin in the next period. |
In the New Calendar field, enter the ID of the calendar you want to associate with the strategy, or click the LOV button and select a calendar.
|
Note: You must select the Suspend checkbox before you can add a new calendar. |
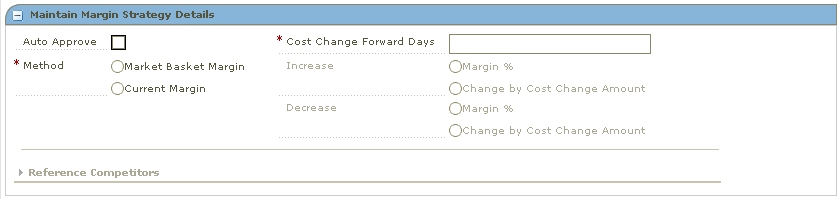
Click Define Strategy Details. The Maintain Margin Strategy Details pane opens.
Select the Auto Approve checkbox to indicate price changes should be created in Approved status.
In the Cost Change Forward Days, enter the number of days into the next review period that the strategy will consider cost changes when proposing price changes.
|
Note: Cost Change Forward Days should not exceed the length of a review period. |
Select the method for the strategy:
Market Basket Margin - Select to have the margin for the item's market basket applied to the item's new cost. A new Margin Strategy Details area appears.
Current Margin - Select to have the current margin applied to the item's new cost. The current margin fields are enabled.
In the Code drop-down field, select the margin market basket code you want to use to set the price.
In the Margin Target field, enter the percent of margin you want to earn on the item/zone.
Set up the acceptable range:
|
Note: Acceptable range is the amount by percentage that a margin can vary from the target before a price change is proposed. |
In the Acceptable Range From field, enter the bottom of the range.
In the Acceptable Range To field, enter the top of the range.
Click Apply. An entry is added to the Maintain Strategy Details table.
Define reference competitors as necessary.
Click Done to save any changes and close the workspace.
Select how the strategy will apply an increase in margin to a proposed retail:
Margin % - Select to have the percent of the cost change added to the basis retail to determine the proposed retail.
Change by Cost Change Amount - Select to have the amount of the cost change added to the basis retail.
Select how the strategy will apply a decrease in margin to a proposed retail:
Margin % - Select to have the percent of the cost change subtracted from the basis retail to determine the proposed retail.
Change by Cost Change Amount - Select to have the amount of the cost change subtracted from the basis retail.
Click Done to save any changes and close the workspace.
In the Reference Competitors section, enter the ID of the competitor in the Competitor field, or click the LOV button and select a competitor.
In the Competitor Store field, enter the ID of the store, or click the LOV button and select a store.
In the Compete Type, select how to compare prices to the reference competitors:
Match - A pass or fail indicator appears on the worksheet depending on if the proposed price matches the referenced competitors price.
Price Above - A pass or fail indicator appears on the worksheet depending on if the proposed price is at least the specified percent above the referenced competitor's price.
Price Below - A pass or fail indicator appears on the worksheet depending on if the proposed price is at least the specified percent below the referenced competitor's price.
If you selected Price Above or Price Below, enter the percent above or below the competitor's price that the new price is compared.
Click Done to save any changes and close the workspace.
Navigate: From the Task Pad, select Price Strategy > Maintain Price Strategy. The Pricing Strategy Search workspace opens.
Enter criteria as needed to limit your search.
Click Search. The results of your search are listed in the Pricing Strategies List.
From the Pricing Strategies List, select the maintain margin strategy you want to maintain.
Click Edit, or double-click the strategy selected. Another Strategy Maintenance pane opens and the fields that can be changed are enabled.
Make necessary changes.
To edit a price guide:
Enter the price guide name, or click the LOV button and select the appropriate price guide.
|
Note: Before you can specify a new calendar, the existing calendar must be suspended. |
Select the Suspend checkbox.
Enter a calendar name, or click the LOV button and select a calendar.
Select the Auto Approve checkbox to indicate price changes should be created in Approved status.
In the Cost Change Forward Days, enter the number of days into the next review period that the strategy will consider cost changes when proposing price changes.
|
Note: Cost Change Forward Days should not exceed the length of a review period. |
Select the method for the strategy:
Market Basket Margin - Select to have the margin for the item's market basket applied to the item's new cost. A new Margin Strategy Details area appears.
Current Margin - Select to have the current margin applied to the item's new cost.
In the Code drop-down field, select the margin market basket code you want to use to set the price.
In the Margin Target field, enter the percent of margin you want to earn on the item/zone.
Set up the acceptable range:
|
Note: Acceptable range is the amount by percentage that a margin can vary from the target before a price change is proposed. |
In the Acceptable Range From field, enter the bottom of the range.
In the Acceptable Range To field, enter the top of the range.
Click Apply. An entry is added to the Maintain Strategy Details table.
Define reference competitors as necessary.
Click Done to save any changes and close the workspace.
Select how the strategy will apply an increase in margin to a proposed retail:
Margin % - Select to have the percent of the cost change added to the basis retail to determine the proposed retail.
Change by Cost Change Amount - Select to have the amount of the cost change added to the basis retail.
Select how the strategy will apply a decrease in margin to a proposed retail:
Margin % - Select to have the percent of the cost change subtracted from the basis retail to determine the proposed retail.
Change by Cost Change Amount - Select to have the amount of the cost change subtracted from the basis retail.
Click Done to save any changes and close the workspace.
Navigate: From the Task Pad, select Pricing Strategy > Maintain Pricing Strategy. The Pricing Strategy Search workspace opens.
Enter criteria as needed to limit your search.
Click Search. The search results are listed in the Pricing Strategies List.
From the list, select the price strategy you want to delete.
Click Delete. You are prompted to confirm your decision.
Click Yes.
Click Done to close the window.