| Oracle® Retail Price Management Oracle® Retail Price Management Operations Guide Release 15.0 E64975-01 |
|

 Previous |
 Next |
| Oracle® Retail Price Management Oracle® Retail Price Management Operations Guide Release 15.0 E64975-01 |
|
Previous |
Next |
This chapter provides information concerning the various aspects of RPM's functional areas. Topics include:
Functional assumptions
Functional overviews
Concurrency considerations
Initial price setting does not respect link codes.
RPM uses RMS VDATE to represent today's date rather than the server's system date.
RPM only recognizes Sellable items that are in an Approved status in RMS (for example, A in ITEM_MASTER table). So, if the item is not sellable, or not Approved, then the item is not selectable in RPM.
If the item is Deleted from the location--whether deleted physically from ITEM_LOC table or change the status to Deleted in the ITEM_LOC table in RMS (this is not done immediately), Item Deletion Batch needs to be run in RPM, the item/location association will be deleted from the system. The user will not be able to create price events for that item at that location.
If the retailer includes VAT as part of the retail, VAT regions, VAT items, and VAT codes must be set up in the merchandising system (such as RMS). If using GTAX in RMS, GTAX Item Rollup data must be in place in the merchandising system.
Link codes are only used for regular price changes and are considered a point-in-time price change creation. If the link code relationship is updated, future price changes are not dynamically updated to reflect the change.
The following are overviews of RPM functionality.
Zone structures in RPM allow you to define groupings of locations for pricing purposes and eliminate the need to manage pricing at a location level. At the highest level, these groupings are divided into categories called zone groups. While these zone groups may be flexibly defined, they are primarily defined by their pricing scheme. The three types of zone groups in RPM are regular zone groups, clearance zone groups, and promotion zone groups.
In addition to being defined by pricing, zone groups are defined by the items being priced. The following are examples of zone groups:
Regular price beverage zone group
Regular price footwear zone group
Promotion price beverage zone group
Within zone groups in RPM are groupings of locations (stores and/or warehouses) called zones. The function of these zones is to group locations together in a manner that best facilitates company pricing strategies. These zones may be flexibly defined. For example, you may choose to create zones based on geographic regions such as the following:
US East region
US West region
Mexico stores
Similarly, you may create zones with locations that share similar characteristics such as the following:
US urban stores
US rural stores
Contained within zones are locations. These locations can be stores or warehouses. There are no restrictions on the number of locations a zone can contain. However, there are two rules that apply to the relationship between locations and zones.
A location cannot exist in more than one zone within a zone group. A location can, however, exist in multiple zone groups. For example, a New York City store might exist in the US urban stores zone group as well as the US East region zone group.
All locations within the same zone must use the same currency.
|
Note: When locations are deleted from an existing zone, RPM handles this processing in the same way that it handles location moves processing and deletes all future retail data for that zone/location. |
Once zone groups have been created in RPM, users are able to assign them to primary zone group definitions. The primary zone group definition allows the user to specify the zone structure to use when pricing merchandise hierarchies, and how to initially price items in these hierarchies (markup %, markup type). These definitions can be created at the department, class, or subclass level.
Users can add, modify, or delete the primary zone group definition for a given merchandise hierarchy within RPM. There are limitations for deleting a primary zone group definition. See the Oracle Retail Merchandising Implementation Guide for details.
If a user modifies an existing primary zone group definition or adds a new primary zone group definition at the merchandise hierarchy level that is lower than an already existing merchandise hierarchy (for example, a definition already exists for Dept 100 and a user creates a new definition for Dept 100 and Class 200), the primaryZoneModificationsBatch process must be executed for the changes to be reflected in the future retail tables. This batch requires that no other processes access the future retail tables as it runs. Also, the data in the merchandise hierarchy affected by the new or updated primary zone group definition should not be used until this batch has processed completely. Therefore, updating existing primary zone group definitions and adding new primary zone group definitions at the end of the day just prior to the batch window is highly recommended.
The following details the codes:
A market basket code is a mechanism for grouping items within a hierarchy level in order to apply similar pricing rules (margin target or competitiveness). Market basket codes cannot vary across locations in a zone. RPM thus assigns and stores market basket codes against an item/zone. An RPM user can set up the following two market basket codes per item/zone:
One used in conjunction with the competitive pricing strategy (competitive market basket code).
One used in conjunction with the margin and maintain margin pricing strategy (margin market basket code).
When the merchandise extract batch process runs, the program identifies the pricing strategy being executed and uses the items extracted, the zone information on the strategy, and the type of strategy to determine what market basket codes to use when proposing retails.
Link codes are used to associate items to each other at a location and price them exactly the same. RPM users set up and maintain item/location link code assignments.
Link codes are only used for regular price changes and are considered a point-in-time price change creation. If the link code relationship is updated, future price changes are not dynamically updated to reflect the change.
The pricing strategies front end allows you to define how item retails are proposed when pricing worksheets are generated. The strategies can be defined at department, class or subclass in order to represent which items are affected. The strategies are grouped into two categories, regular and clearance. An item/location can be on one maintain margin strategy and one other strategy.
When setting up pricing strategies, the first task is to specify what type of pricing strategy is to be applied, and at what merchandise hierarchy/location hierarchy combination it is applied to. The pricing strategy types are described in this functional overview and include the following:
Area differentials
Clearance
Competitive
Clearance Default
Margin
Maintain margin
When determining what merchandise level a pricing strategy is applied to, the lowest definable level (from aggregation) is taken into consideration.
Other contributing factors when establishing pricing strategies include attaching price guides to the strategy, specifying a calendar to run against the pricing strategy, and attaching warehouses (if they are not recognized as pricing locations), to a strategy for the purpose of inventory visibility.
Area differential pricing allows a buyer to perform the following:
Set prices for items against a primary zone.
Price other zones off of the primary zone using a defined differential.
This functionality allows the user to focus on establishing a primary retail, which drives system generated prices for other secondary areas.
Secondary area retails can change based on primary area changes, regardless of the status of the primary areas. Secondary area retails are generated when the primary area retail is changed due to a competitive retail change or a margin strategy retail change. Secondary area proposed price changes can be created in worksheet status to allow for user approval or can be dynamically updated to allow the user to work through multiple zone worksheets at the same time (primary zone included). If dynamic update is chosen, the system provides a dynamic update of the worksheet changes from the primary area to the secondary area. Following the same logic as that which resides in a 'what if' scenario, price changes are not actually created in the worksheet dialog until the user approves a worksheet. A system option signifies whether this process is used.
In the worksheet, competitive pricing comparisons are layers on top of the area differential pricing rules for secondary areas. Note that layering is not carried out throughout the RPM application. The area differentials front end allows the user to set up and maintain competitive pricing strategies that are specifically associated to the differential.
The area differential price acts as a guide. The retail proposed based on the defined area differential is compared to the proposed retail based on the competitor rules defined. The lower of the two retails is the retail that RPM proposes. After the resulting retails are compared and the lower chosen, the pricing guidelines are applied.
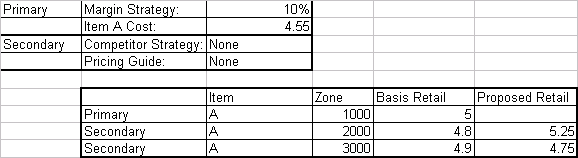
This section illustrates the retails that are derived under various scenarios.
Setup Data
The following setup data applies to all the scenarios.
Table 6-1 Setup Data
| Zone Group ID | Zone | Rule | % |
|
|---|---|---|---|---|
|
Primary |
1000 |
1000 |
||
|
Secondary |
1000 |
2000 |
Percent Higher |
5 |
|
Secondary |
1000 |
3000 |
Percent Lower |
5 |
Scenario 1
Note that the proposed retails are displayed based on the percent higher or lower for the secondary zones.

Scenario 2
Note that because the basis retail for Item A in zone 1000 was already $5.00, no proposed retail is displayed. The secondary area proposed retail was calculated using the current retail of the primary area.
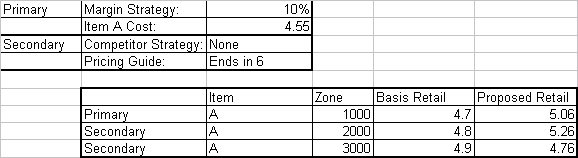
Scenario 3
Note that the proposed retails all end in 6 due to the pricing rule in place.
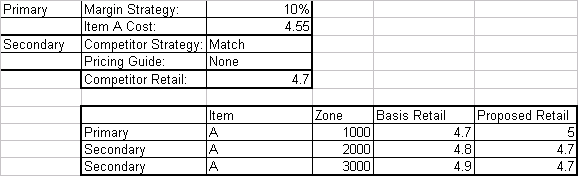
Scenario 4
Note the proposed retails for the secondary areas are equal to the competitor price due to the competitor strategy in place.
Scenario 5
Note the proposed retail for zone 3000 did not change to $4.85 even though the competitive strategy is match and the competitor retail is $4.85. The competitor strategy should never cause a price to increase.

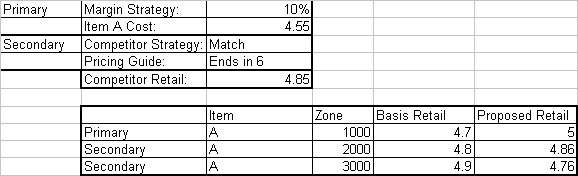
Scenario 6
Note the pricing rule was applied after the competitive strategy causing the competitor price to be matched to the $4.85 and then adjusted to $4.86 to account for the pricing guide.
The clearance strategy allows you to define the markdowns that should be proposed for items in the specified merchandise hierarchy/location hierarchy level. Each markdown specified in the strategy has an associated markdown percent, and the strategy also details to what retail the markdown percent should be applied (regular retail or clearance retail). This section illustrates the retails that are derived under various scenarios.
Scenario 1
Item/Zone is currently not on clearance.
Regular Retail: $35.00
Clearance Retail: n/a
Proposed Markdown/Retail for Item/Zone: Markdown 1/$28.00Item/Zone is currently on its first markdown.
Regular Retail: $35.00
Clearance Retail: $28.00
Proposed Markdown/Retail for Item/Zone: Markdown 2/$24.50Item/Zone is currently on its second markdown.
Regular Retail: $35.00
Clearance Retail: $24.50
Proposed Markdown/Retail for Item/Zone: Markdown 3/$17.50Item/Zone is currently on its third markdown.
Regular Retail: $35.00
Clearance Retail: $17.50
Proposed Markdown/Retail for Item/Zone: Markdown 4/$8.75
Scenario 2
Apply To Type: Clearance Retail
Item/Zone is currently not on clearance.
Regular Retail: $35.00
Clearance Retail: n/a
Proposed Markdown/Retail for Item/Zone: Markdown 1/$26.25Item/Zone is currently on its first markdown.
Regular Retail: $35.00
Clearance Retail: $26.25
Proposed Markdown/Retail for Item/Zone: Markdown 2/$23.63
Item/Zone is currently on its second markdown.
Regular Retail: $35.00
Clearance Retail: $23.63
Proposed Markdown/Retail for Item/Zone: Markdown 3/$21.27Item/Zone is currently on its third markdown.
Regular Retail: $35.00
Clearance Retail: $21.27
Proposed Markdown/Retail for Item/Zone: Markdown 4/$19.14
This strategy allows the user to specify clearance defaults as low as the subclass level. Pricing Worksheets are not generated for this pricing strategy. The markdown defaults (or subsequent markdown cadence) is set up in the pricing strategy dialog and then applied in the manual clearance dialog. When the user creates a manual clearance, they need to click Apply subclass defaults in order for the subsequent markdowns to be automatically generated. Once they click Apply the user sees the clearance they manually created as well as clearance IDs for subsequent markdowns generated from the clearance default strategy. The subsequent markdowns that are created can be updated to have reset dates and out of stock dates. Because worksheets are not generated for this new strategy, a calendar is not attached.
This strategy allows you to define which competitor's retails to reference and how to make comparisons to those retails when proposing new retails.
In other words, the competitive strategy allows you to define the following:
A primary competitor retail that should be referenced when proposing retails for items in the specified merchandise hierarchy/location hierarchy level.
How to propose new retails based on that primary competitor's retail (for example, price above a certain percent, price below a certain percent, or match the competitor's retail).
This section illustrates the retails that are derived under various scenarios.
Scenario 1
Regular Retail for Item/Zone: $26.00
Primary Competitor Retail for Item: $25.00
Strategy: Price Above - 10%
Acceptable Range: 8% - 12% Above
Proposed Retail: 27.50
Scenario 2
Regular Retail for Item/Zone: $27.50
Primary Competitor Retail for Item: $25.00
Strategy: Price Above - 10%
Acceptable Range: 8% - 12% Above
Proposed Retail: No proposal
Scenario 3
Regular Retail for Item/Zone: $22.50
Primary Competitor Retail for Item: $25
Strategy: Price Below - 10%
Acceptable Range: 8% - 12% Below
Proposed Retail: No proposal
Scenario 4
Regular Retail for Item/Zone: $21.00
Primary Competitor Retail for Item: $25
Strategy: Price Below - 10%
Acceptable Range: 8% - 12% Above
Proposed Retail: 22.50
Scenario 5
Regular Retail for Item/Zone: $28.00
Primary Competitor Retail for Item: $25
Strategy: Match
Acceptable Range: n/a
Proposed Retail: $25.00
This strategy allows you to define the target amount of markup you want to have above the cost (margin target). The system uses this value to propose new retails for the items in the specified merchandise hierarchy/location hierarchy level. This section illustrates the retails that are derived under various scenarios.
Scenario 1
Regular Retail for Item/Zone: $25.00
Cost of the Item: $18.00
Margin Target: 25%
Acceptable Range: 23% - 27%
Markup Type: Retail
Proposed Retail: $24.00
Scenario 2
Regular Retail for Item/Zone: $23.50
Cost of the Item: $18.00
Margin Target: 25%
Acceptable Range: 23% - 27%
Markup Type: Retail
Proposed Retail: No proposal
The maintain margin strategy allows a retailer to receive proposed retail changes based upon impending cost changes. Proposed retail changes are dependent on either the retail margin or cost margin. The formulas and calculations for both methods are illustrated later in this overview.
The maintain margin strategy retrieves all cost changes related to a specified zone/merchandise hierarchy on a look forward basis and generates proposed retail changes. In the unlikely event that there is multiple cost changes in the forward looking review period, the system bases the proposed retail on the last cost change to occur during that forward looking review period. The retail changes proposed can be based on the current margin percent between the item's retail and the cost, or the market basket code margin associated with the item.
The user also has the ability to specify how to apply the increase/decrease in retail in one of two ways:
As a margin percent (current or market basket) applied to the new cost.
As the monetary amount change to the cost applied to the retail (for example, a 5 cent increase in cost results in a 5 cent increase in retail).
Reference competitors can be attached to the maintain margin strategy. Note, however, that these competitors do not drive price proposals. They are visible via the worksheet once a price change proposal has been created.
|
Note: For all calculations below, if price guides are assigned to the strategy, they are applied after the above stated calculations have been completed. |
Market Basket Margin
This section includes calculations for GTAX and SVAT.
GTAX Calculation
The following is a calculation of proposed retail in margin strategy and maintain margin-margin basket code.
Calculate the retail by applying margin target.
Proposed retail exclusive of tax = basis cost/(1-margin target%) --retail markup.
or
Proposed retail exclusive of tax = base cost*(1+margin target%) --cost markup.
Apply the taxes to calculate the proposed retail.
Proposed retail (tax inclusive) = (proposed retail exclusive of tax/(1-consolidated tax rate))+consolidated tax value.
SVAT Calculation
Cost method: Proposed retail = ((New Cost * Margin Target%) + New Cost) + VAT rate if applicable.Retail method: Proposed retail = (New Cost / (1- Margin Target%)) + VAT rate if applicable.
Current Margin
This section includes calculations for GTAX and SVAT.
GTAX Calculation.
The following is a calculation of proposed retail in maintain margin strategy - current margin.
Calculate the current margin.
Step 1: Calculate the retail minus taxes: Retail exclusive of tax on review period start date=retail inclusive of tax on review period start date-((Retail inclusive of tax on review period start date-consolidated tax value)*consolidated tax rate) -consolidated tax value.
Step 2: Calculate the current margin:
Current margin % using retail method = (retail exclusive of tax on review period start date - cost on review period start date) / retail exclusive of tax on review period start date.
or
Current margin % using Cost method = (retail exclusive of tax on review period start date - cost review period start date) / cost on review period start date.
Calculate the proposed retail based on the current margin calculated above.
Step 1: Apply the margin calculated above with the basis cost.
Proposed retail exclusive of tax(retail markup) = (basis cost/(1-current margin%).
or
Proposed retail exclusive of tax(cost markup) = basis cost * (1+current margin%).
Step 2: Apply the taxes to calculate the proposed retail.
Proposed retail (tax inclusive) = (proposed retail exclusive of tax value.
SVAT Calculation
Current margin % =
Cost method: (Retail on Review period start date - Cost on review period start date) / Cost on review period start date.
Retail method: (Retail on Review period start date - Cost on review period start date) / Retail on review period start date.
Using the current margin % calculated above, the retail can be proposed.
Cost Method
Proposed retail = ((New Cost * Current Margin %) + New Cost) + VAT rate if applicable.Retail Method:Proposed retail = (New Cost / (1- Current Margin%)) + VAT rate if applicable.
Change by Cost Change Amount
Proposed retail = (New cost - Cost on the day before the New Cost date) + Retail on day before the New Cost Date. This retail value includes VAT if applicable.
Examples:
Table 6-4 Examples
|
Market Basket % |
40 |
|
Current Margin % (cost) |
50 |
|
Current Margin % (retail) |
33 |
|
Current Retail |
0.75 |
|
Current Cost |
0.5 |
Price inquiry is designed to allow retailers to retrieve the price of an item at an exact point in time. This price may be the current price of a particular item or the future price. You can search for prices based on the following search criteria:
Merchandise hierarchy
Item
Zone group
Zone
Location
Location (warehouse or store)
Date/Time
After the search criteria has been specified, item/location combinations are displayed with their corresponding dates, and the prices on those dates. Included in the display are the item/location regular, clearance, and promotional retails--as well as cost and margin information. Items can be retrieved at the parent, parent/differential, or transaction level, and valid locations are price zone or location. After you have retrieved the desired pricing information, you have the option of exporting the information outside of the system. For maximum performance, Price inquiry search limitations should be set in the system option dialog. For more information regarding the Price inquiry dialog, see the Oracle Retail Price Management User Guide.
The RPM worksheet functionality allows for the maintenance of automatically generated price change and clearance proposals resulting from the RPM merchandise extract batch program. These proposed price changes and clearances are the product of existing strategies, calendars and item/location information. The merchandise extract program outputs them to Worksheet at the transaction item level for zone. Worksheet groups these values together. While not all items have a proposed price change, each item in the pricing strategy is represented (with the exception of worksheet generation for the maintain margin strategy). Only item/zones with a proposed retail are populated in a worksheet generated from a maintain margin strategy.
The Worksheet dialog includes two main screens, Worksheet Status and Worksheet Detail. In the Worksheet Status screen, a table is displayed, where each row represents an individual worksheet. Access to the records in the worksheet is dependent on worksheet status and your user role. Functions available include the following.
Submit
Approve
Reject
Reset
Delete
|
Note: Actions are applied only to detail records in worksheets that allow that action. For example, a Submit action is not applied to a record in Approved status. |
Among the information displayed is the proposed price change generated by the merchandise extract program and other information that can assist in determining whether to accept, reject, or modify proposed pricing in the worksheet. After these determinations have been made, you can submit the worksheet for approval, rejection, and so on.
A worksheet does not exist until the merchandise extract program has run. These worksheets then have a new status. However, the exception to this process is for those items/zones involved in an area differential pricing strategy. The locations that are part of a secondary area have a worksheet and corresponding rows in either pending or new status based on the Dynamic Area Differential system option. If the system option is unchecked, the secondary areas contain no detailed information for individual rows until price changes for the primary area are approved. If the system option is checked, the secondary areas contain detailed retail information derived from the retails proposed for the primary area.
The merchandise extract batch process is responsible for creating worksheets based on calendars and pricing strategies.
This is a three-step process:
Identify the work to be processed.
Extract RMS data into RPM.
Use extracted data to propose retails (based on strategies) and build the worksheets.
The merchandise extract batch program initially finds calendars with review periods that start tomorrow and the pricing strategies that use those calendars. This processing determines which item/locations are pulled into the worksheet. There are attributes associated with calendar review periods, and these help to determine whether candidate rules or exceptions are run for that particular review period.
This set of rules is run against the items/locations being extracted from the merchandise system to determine if they should be flagged for review. They are defined at the corporate level and can contain variables at the department level. Candidate rules can be inclusive or exclusive. If they are inclusive, and the candidate rule is met, the item/location is flagged in the worksheet. When exclusive candidate rules are met, the item/location is excluded from the review when the merchandise extract program builds the worksheet. Candidate rules can also be active or inactive, allowing the user to suspend rules that are only needed at certain times of the year. Candidate rules are only run against the worksheet the first time the worksheet is created.
Each review period has an indicator stating whether or not to run exceptions. If the indicator is set to Yes, the merchandise extract should tag those Item/Location records that are pulled into the worksheet with an exception flag if any of the following occur during a review period where exceptions are processed: competitor regular retail price changes, cost changes, and new item/location relationships.For every item/location pulled into the worksheet, RPM attempts to propose a new retail based on the strategy attached to that item/location. When the worksheet is first created, the details of the strategy are saved. Updates to the strategy do not affect any worksheets that are currently being reviewed. The updates are only reflected in worksheets generated after the updates to the strategy are made. Until the worksheet has been locked, new retails should continue to be proposed using the strategy details every night the batch program is run.
The following is a list of reasons why item/locations are not included in the worksheet.
Any item that does not have a record on the future cost table for the location on a margin strategy.
If there are varying link codes across the item/locations.
If the strategy is set up at a zone level, and the unit of measure for the item varies across the locations in the zone.
If the merchandise extract program is running a margin strategy or competitive strategy against a zone, and all of the locations within the zone do not share the same market basket code.
If the merchandise extract program in running against a strategy setup at the zone level (where the zone is not the primary zone for the item) and all of the locations within that zone do not share the same BASIS selling unit of measure.
If there is an exclusion candidate rule that is met.
If the item is not ranged in the location or if the strategy is at the zone level and the item is not ranged to any location in that zone.
Items are on the exclude list of an area differential strategy.
See Chapter 7, ”"Java Batch Processes",” for information about this batch process.
Calendars are set up in RPM for the primary purpose of attaching them to pricing strategies. When you create a calendar in RPM, initially select a start date. This date can be no earlier than tomorrow's date. In addition, for the calendar to be valid, you must specify an end date that is later than the start date.
Once the time frame of the calendar has been established, you can specify review periods for the calendar, which is comprised of numbers of days. You can also specify the number of days between those review periods. Collectively, these completely span the date range of the new calendar. When establishing the review period duration, the review periods and the time between them must exactly reach the specified end date. If these actions are not performed properly, RPM suggests an end date that makes this calendar valid. The following is an example of a valid calendar:
Start Date: 01/01/09
End Date: 01/20/09
Review Period Duration: 3 Days
Days Between Review Periods: 3 Days
Aggregation level functionality is used in RPM to define parameters that vary at the department level. Within this functional area, you select a department and specify the 'lowest definable level' at which the pricing strategies can be defined. The merchandise hierarchy levels at which a pricing strategy can be defined are department, class, and subclass.
When the merchandise extract runs to generate worksheets the Worksheet Level setting is used to determine the level at which the worksheets should be generated. Merchandise hierarchy levels with varying strategies can be aggregated into the same worksheet based on this aggregation level setting. For example, the strategies for a worksheet may be defined at the class level but if the worksheet level for the department that class is in is set to department then a single worksheet status row exists per zone with all the classes rolled up to the department.
The sales settings on the aggregation level screen determine the sales types that are pulled during the extract process and represented in the worksheet as historical sales. The inventory settings determine how warehouse inventory is utilized and which inventory the sell through calculations use.
Location moves in RPM allow you to select a location that exists in a zone and move to a different zone within a zone group on a scheduled date. The user chooses to approve the location move. A batch, Location Move Schedule Batch, processes all approved location move records, runs them through conflict checking and updates them to scheduled status. The batch runs during the next batch window after the user approves the location move. The night before the location move takes effect, the Location Move Execution batch is executed. This batch will also execute conflict checking logic and create exclusions from price events as necessary to avoid conflicts for the location that is being moved.
After conflict checking is complete, the process also allows the location to persist most valid pricing events through the move and to smoothly transition out of their old zone pricing strategies into the new zones' pricing strategies. System options provide the user the flexibility to configure location moves in the following ways:
System option that specifies location move rules in regards to existing pending and active zone level promotions that a location is moving from or into. The overlap options are as follows.
Extend old zone's promotion and do not inherit new zones overlapping promotions: The location keeps running the old zones promotion. The location does not inherit any zone level promotion for the new zone if it overlaps the move date.
End old zone's promotion and inherit new zones overlapping promotions: The promotion ends at the location the evening before the location move date. The location inherits the new zones promotion that overlaps the move date, but the promotion only starts on the location move date.
Do not start old zone's overlapping promotions and inherit new zones overlapping promotions: The location does not start the promotion if the zone promotion overlaps the move date. The location inherits the new zones promotion that overlaps the move date and starts the same day the zone level promotion starts or starts the day the move is scheduled if the zone level promotion is already active.
System options which determine whether the location should inherit the zone retail for the new zone it is moving into.
System option to distinguish how location move validation handles pricing strategies with review periods that overlap a move date.
When a location move is successfully scheduled in RPM, all future retail data for the old zone/location are removed. Location level pricing events remain intact but exclusions are created if the new zone's pricing events create conflicts such as a negative retail.
This section describes Oracle application security, including permissions, roles, and users.
Oracle Retail Security Manager (RSM) is an application that provides a centralized method of authenticating and authorizing Oracle Retail system users. RSM leverages a Lightweight Directory Access Protocol (LDAP)-compliant directory service to authenticate valid users.
One of the primary purposes of RSM is to establish who has access to what business functionality. To facilitate this processing, any application (Oracle Retail or non- Oracle Retail) that is utilizing RSM populates RSM tables with named permissions. These are pieces of business functionality around which the application has security. For example, if RPM has promotions functionality surrounded by security, RPM creates a promotions named permission. Named permissions data is sent to the RSM database during installation.
An RSM user could never change a named permission because the applicable outside application must respond to it. That is, once a user logs into an application (Oracle Retail or non- Oracle Retail), the application accesses RSM to request all the named permissions for this user. Within RSM, a user has a collection of roles, and roles have a collection of named permissions. For example, when the RPM user logs in, RSM provides the named permissions. RPM asks, Does this user have promotion capability? If the user does not have the capability, RPM does not display that functionality for the user.
When each RSM-integrated application populates the RSM database with named permissions (during installation), the application specifies potential actions that are possible against a named permission. Named permissions contain flags that determine specific actions (shown in the following) that can be taken in the system. For example, RPM might have a named permission script for Promotions that specifies the following for the actions:
Edit: true
View: true
Approve: false
Submit: false
Emergency: false
The result of RPM's script would be that users in the RPM system could only be assigned view, edit or no action with respect to Promotions functionality.
Table 6-8 Type of Action
| Type of Action | Description |
|---|---|
|
None |
Users associated with the role have access to the permission but no actions. |
|
Edit |
Users associated with the role are allowed to create, update, and save any changes to a workflow. |
|
View |
Users associated with the role are allowed to see to all secured information in a workflow, but not make any changes to the data in the workflow. |
|
Approve |
Users associated with the role are allowed to change the status of a workflow to Approved. |
|
Submit |
Users associated with the role are allowed to change the status of a workflow from Worksheet to Submitted. |
|
Emergency |
Users associated with the role are granted special access that goes beyond normal day-to-day access to functionality. They can thus bypass normal delays in processing. |
A content model defines in an xml document the task groups and tasks that are displayed in the task pad of an Oracle Retail GUI application window. By defining a content model and assigning named permissions to the content model attributes, applications can login to RSM and retrieve secure content in return. For example, an administrator can configure an application's content model to restrict certain tasks that are visible and/or editable by specific users. This is done by configuring named permissions in conjunction with content model tasks.
For RSM to manage another Oracle Retail application's content, the application's content model must be deployed with the RSM server. See the Oracle Retail application's documentation before modifying an application's named permission settings.
RSM administers hierarchy (data level) permissions. To facilitate this functionality, any Oracle Retail application utilizing RSM for data level permissions populates RSM tables with its hierarchy types (that is, merchandise and location). Applications either provide the details of these types up front with SQL scripts or dynamically by implementing an RSM interface and exposing it to the RSM service. RSM does not understand application specific data (for example, RSM does not know the difference between departments and locations). To RSM, the data is a tag (for example, department) and a specific value (for example, 1000). This information is passed back to calling applications, and it is the applications responsibility to apply the data level permissions appropriately.
For example, when an RPM user logs in, RSM provides the hierarchy permissions for the user. RPM asks, Does this user have access to Department 1000? If the user does not have access, RPM does not display data from this department to the user. Like named permissions, within RSM a user has a collection of roles, and roles have a collection of hierarchy permissions.
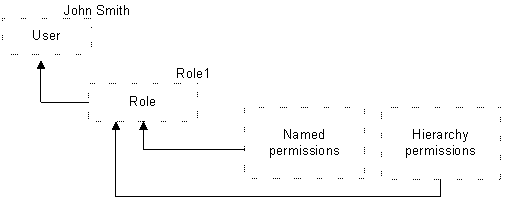
RSM allows for the creation of security roles. Roles consist of a unique identifier, an arbitrary name, and any number of permissions. Roles are created by the retailer and are used as a mechanism for administering its security requirements.As the following diagram illustrates, roles are used as a mechanism for grouping any number of permissions. The role then is assigned to various users.
The security administrator assigns permissions to roles. To continue the earlier example, the security administrator could only assign a role with view or edit promotions functionality. Suppose that the security administrator decided to assign a role with view (a true flag behind the scenes) but not edit (a false flag behind the scenes), the security administrator could then assign a user, John Smith, to that role. John Smith could only view Promotions functionality.
This section contains currency considerations and solutions within the RPM system. If multiple users are using the same data, RPM has concurrency solutions to prevent the persistence of invalid or inaccurate data in the RPM database.
Pessimistic locking prevents data integrity issues that are missed by business rules/validation due to overlapping transactions. For example, suppose two users working on the same set of data kick off the approval process for a price event. If the second user's process is started after the first user's process has completed, the application business rules handle the concurrency issues.
Although this scenario only arises in a very specific case within a specific time window, ramifications of the resulting overwrites can be quite severe due to the loss of data integrity (especially with respect to retails going below zero, events at locations that have been moved or are scheduled to be moved, incorrect basis value retails, and so on).
With pessimistic locking, the first user in locks the data until he or she is finished with that transaction's processing. If a second user tries to lock the same data, he or she receives a message notifying them that the data is currently locked by another user. Because a user can only update data that he or she has locked, data integrity is guaranteed.
With pessimistic workflow locking, you are not allowed to edit within a workflow that is currently in use by another user.
Scenario:
Two pricing managers have security access to the same department for price change decisions. User one selects a worksheet in the worksheet status screen for Dept 100 in Zone 100 and enters into the detail screen. User two enters the worksheet status screen and decides to review the same worksheet. When user two selects and attempts to enter that worksheet, the system stops them. They are informed that user one is currently in the worksheet and they are not able to access it at this time.
Data submitted by the second user overwrites data submitted by the first user. With Last User Wins, there is no warning or message to notify the second user that they overwrote data modified by the first user.If the second user's changes are incompatible with the first user's changes, business validation/rules will protect data integrity. In this case, the second user receives the appropriate business exception message.
Scenario:
Two users have been told to update a pricing strategy. User one enters the strategy and changes the value. User two enters the strategy. Since user one has not saved their change yet, user two still sees the original value and makes the change. User one then saves the change and leaves the dialog. User two then saves their change. Since there is no validation that has been broken, the second user's change is also saved resulting in no difference from the first user. If the second user changed the value and validation failed, they are prompted with an error to fix the problem, just as though they created the validation error themselves.
The second user receives an error message if they attempt to overwrite data modified by the first user. The message notifies the user that they have been working with stale data, so they should re-load and re-process their changes. With, Optimistic Data Locking, the first user wins; therefore, it is the opposite of the Last User Wins approach.
Table 6-9 Concurrency Solution/Functional Area Matrix
| Functional Area | Pessimistic Data Locking | Pessimistic Workflow Locking | Last User Wins | Optimistic Data Locking |
|---|---|---|---|---|
|
Clearance Price Changes |
X |
X |
||
|
Price Changes |
X |
X |
||
|
Promotions |
X |
X |
||
|
Future Retail/Conflict Checking |
X |
X |
||
|
Location Moves |
X |
X |
||
|
Worksheet |
X |
|||
|
Aggregation Level |
X |
|||
|
Area Differentials |
X |
|||
|
Calendar |
X |
|||
|
Candidate Rules |
X |
|||
|
Foundation |
X |
|||
|
Initial Price Settings |
X |
|||
|
Pricing Attributes |
X |
|||
|
Pricing Guides |
X |
|||
|
Pricing Strategies |
X |
|||
|
Promotional Funding |
X |
|||
|
Security |
X |
|||
|
System Options |
X |
|||
|
Zone Structure |
X |
|||
|
Link Codes |
X |
|||
|
Merch Extract |
X |
|||
|
Zone Future Retail |
X |
