| Oracle® Retail Price Management User Guide Release 16.0 E80052-01 |
|

 Previous |
Oracle Retail Security Manager (RSM) gives the system administrator a single point of security management for RPM. Users with like functions are grouped together into roles. The roles are then assigned the types of permissions needed for each workflow and for the data within an application.
Access to RSM is restricted to those with appropriate security privileges.
This section describes how to create roles, edit roles, add users to a role, remove users from a role, add workflow permissions to a role, delete a workflow and associated action from a role, add data permissions to a role, and delete data permissions from a role.
A role is a way to group workflows and actions of applications. When you create a role, you assign it a name. Each role can be used to give different levels of permissions to users who have that role. After you create the role, you can:
|
Note: Permissions are assigned to roles, then users are assigned roles. Permissions are not assigned directly to users. |
A workflow is a secured task or group of tasks in an application. An action is the type of ability to which users associated with a role have access in an application work flow. When the role, workflow, and action are associated, users assigned to the role can complete their work.
Each application that uses RSM provides a list of workflows and actions that a user assigned to the appropriate role can access through RSM.
There are six types of actions that can be assigned to a role and workflow:
Access - Users associated with the role have access to the application, but are not allowed see any secured information within a workflow. Users must have access to an application in order to have any of the other permission types.
|
Note: This action is the lowest level of permission a user associated with a role can have. You must assign Access to a role before any of the other permissions are available. |
Edit - Users associated with the role are allowed to create, update, and save any changes to a workflow.
View - Users associated with the role are allowed to see to all secured information in a workflow, but not make any changes to the data in the workflow.
Approve - Users associated with the role are allowed to change the status of a workflow to Approved.
Submit - Users associated with the role are allowed to change the status of a workflow from Worksheet to Submitted.
Emergency - Users associated with the role are granted special access that goes beyond normal day-to-day access to functionality. This allows users to bypass normal delays in processing.
|
Note: Permissions are assigned to roles, then users are assigned to roles. Permissions are not assigned directly to users. |
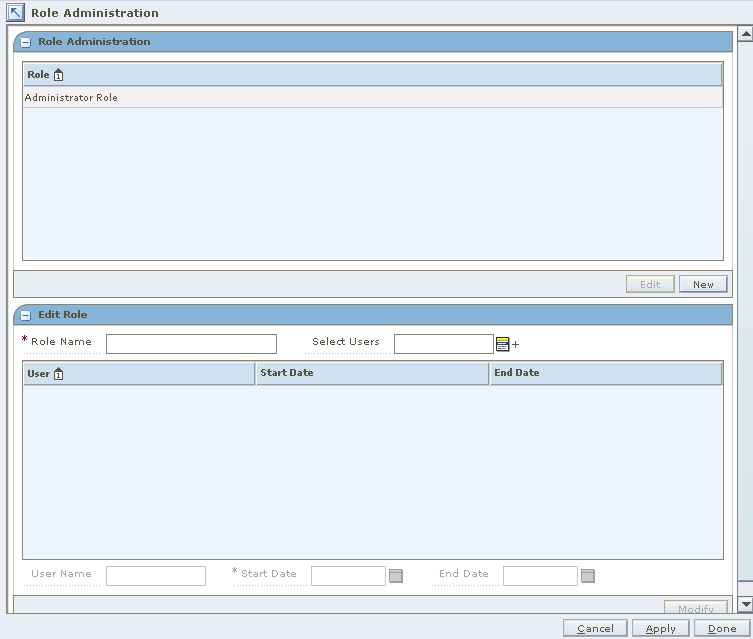
Navigate: From Tasks, select Role Administration > Role Administration. The Role Administration workspace opens.
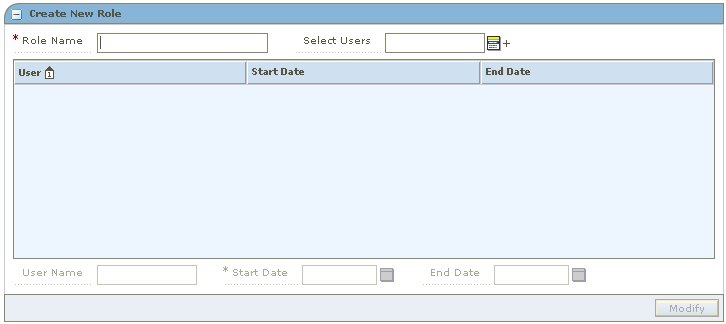
In the Role Administration workspace, click New. The Create New Role pane opens.
In the Role Name field, enter the name of the new role you are creating.
Click the LOV next to the Select Users field.
Select a user from the left column.
Click the right arrow button. The user is listed in the right (selected users) column.
Repeat steps a and b until all users assigned to the role are selected.
Click Select. The user names appear in the table.
Modify the end date of a user.
Select a user name from the table.
Enter a different start date in the Start Date field, or click the calendar button and select a date.
Enter an end date in the End Date field, or click the calendar button and select a date. The End Date field can be left blank.
Click Modify. The role is added to the list of roles.
Apply your changes by doing one of the following:
Click Apply. The new role is saved.
Click Done. The new role is saved and the workspace is closed.
Navigate: From Tasks, select Role Administration > Role Administration. The Role Administration workspace is displayed.
In the Role Administration pane, select a role.
Click Edit. The role name is displayed in the Edit Role pane. (You can also double-click on the role you want to edit.)
Edit the role as needed:
Add users to a role
Remove users from a role
Change the name of the role by editing the Role Name field.
Apply your changes by doing one of the following:
Click Apply. The changes to the role are saved.
Click Done. The changes to the role are saved and the workspace is closed.
Navigate: From Tasks, select Role Administration > Role Administration. The Role Administration workspace is displayed.
Click the LOV next to the Select Users field.
Select a user to add from the left (available users) column.
Click the right arrow button. The user is displayed in the right (selected users) column.
Click Select. The users are added to the role.
Apply your changes by doing one of the following:
Click Apply. The changes are saved.
Click Done. The changes are saved and the workspace is closed.
Navigate: From Tasks, select Role Administration > Role Administration. The Role Administration workspace is displayed.
Click the LOV next to the Select Users field.
Select a user to add from the right (selected users) column.
Click the left arrow button. The user is displayed in the right (available users) column.
Click Select. The users are removed from the role.
Apply your changes by doing one of the following:
Click Apply. The changes are saved.
Click Done. The changes are saved and the workspace is closed.
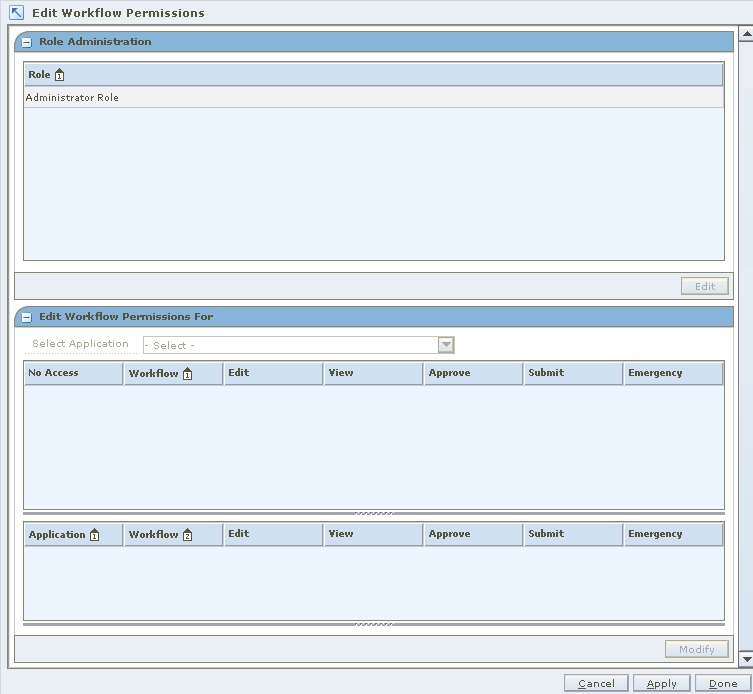
Navigate: From Tasks, select Role Administration > Edit Workflow Permissions. The Edit Workflow Permissions workspace is displayed.
In the Role area, select a role.
Click Edit. Information is displayed on the Edit Workflow Permissions pane. (You can also double-click the role you want to edit.)
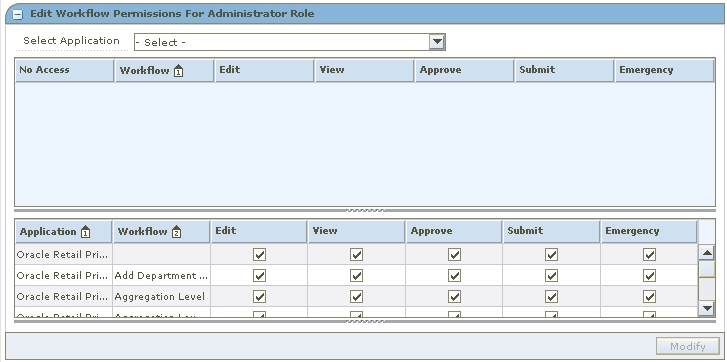
Select the application with the workflows you want to add to the role from the Select Workflows drop-down list. The following workflows are for the application.
Select the check box for each action you want to assign to the role.
|
Note: You must assign the Access action for the other assigned actions to be available to users in the role. |
Apply your changes by doing one of the following:
Click Apply. The changes to the role are saved.
Click Done. The changes to the role are saved and the workspace is closed.
Navigate: From Tasks, select Role Administration > Edit Workflow Permissions. The Edit Workflow Permissions workspace is displayed.
In the Role area, select a role.
Click Edit. (You can also double-click on the role you want to edit.)
In the lower pane, select the application with the workflows you want to add to the role from the Select Workflows drop-down list. Workflows for the application are displayed in the Edit Workflow Permissions pane.
Deselect the check boxes for each type of action you want to remove from the role.
Apply your changes by doing one of the following:
Click Apply. The changes to the role are saved.
Click Done. The changes to the role are saved and the workspace is closed.
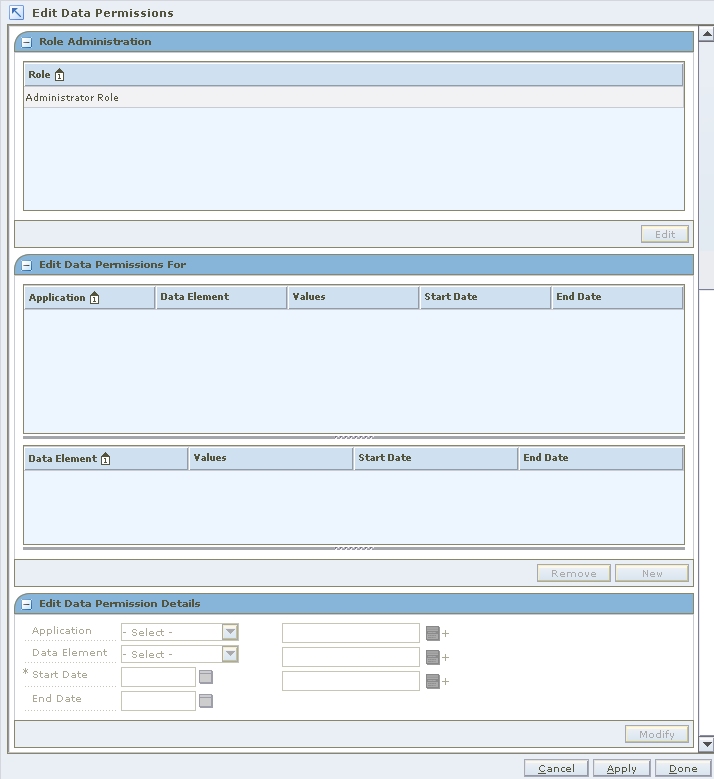
Navigate: From Tasks, select Role Administration > Edit Data Permissions. The Edit Data Permissions workspace is displayed.
In the Role area, select a role.
Click Edit. Information is displayed in the Edit Data Permissions pane. (You can also double-click on the role you want to edit.)
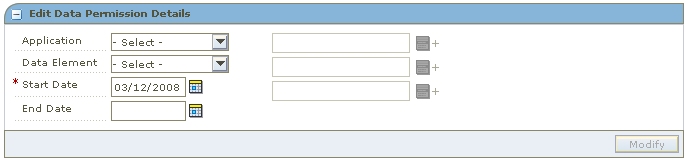
Click New. The Edit Data Permission Details pane is enabled.
Select an application from the Application drop-down list.
Select a data element from the Data Element drop-down list.
Enter a date in the Start Date field, or click the calendar button and select a date.
Enter a date in the End Date field, or click the calendar button and select a date. (You can leave the End Date field blank.)
Enter information in the rest of the enabled fields as required.
Apply your changes by doing one of the following:
Click Apply. The changes to the role are saved.
Click Done. The changes to the role are saved and the workspace is closed.
Navigate: From the Task Pad, select Role Administration > Edit Data Permissions. The Edit Data Permissions workspace is displayed.
In the Role area, select a role.
Click Edit. Information is displayed on the Edit Data Permissions pane. (You can also double-click on the role you want to edit.)
Select the application from the Application drop-down list.
Select the data permission you want to remove from the Data Element drop-down list.
Click Remove. The data permission is removed from the list.
Apply your changes by doing one of the following:
Click Apply. The changes to the role are saved.
Click Done. The changes to the role are saved and the workspace is closed.
This section describes how to assign roles to users, add roles to a user, and remove roles from a user.
Users are not created in RSM. Rather, RSM looks up users in a directory service that complies with Lightweight Directory Access Protocol (LDAP). RSM retrieves the user information from the LDAP directory. You can then assign roles to the user.
|
Note: For additional information on RSM and LDAP-compliant directories, see the Oracle Retail Security Manager Operations Guide. |
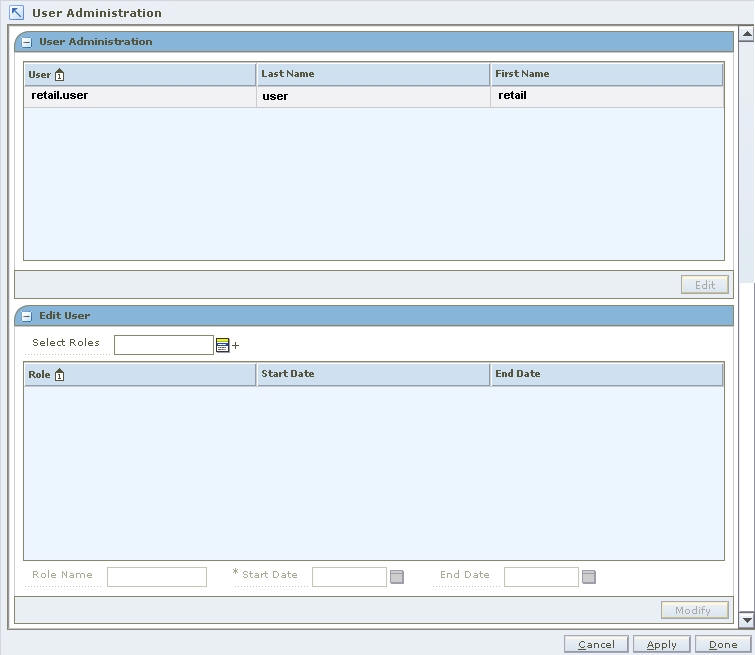
Navigate: From Tasks, select User Administration > User Administration. The User Administration workspace is displayed.
|
Note: Permissions are assigned to roles, then users are assigned to roles. Permissions are not assigned directly to users. |
Navigate: From Tasks, select User Administration > User Administration. The User Administration workspace opens.
In the User Administration pane, select a user.
Click Edit. The Edit User pane is enabled. (You can also double-click on the user you want to edit.)
Click the LOV next to the Select Roles field.
Select a role from the left column.
Click the right arrow button. The role is listed in the right (selected roles) column.
Repeat steps a and b until all roles for the user are selected.
Click Select. The roles are assigned to the user.
Apply your changes by doing one of the following:
Click Apply. The changes to the user are saved.
Click Done. The changes to the user are saved and the workspace is closed.
Navigate: From Tasks, select User Administration > User Administration. The User Administration workspace opens.
|
Note: Permissions are assigned to roles, then users are assigned roles. Permissions are not assigned directly to users. |
In the User Administration window, select a user.
Click Edit. The Edit User pane is enabled. (You can also double-click on the user you want to edit.)
Click the LOV next to the Select Roles field.
Select a role to remove from the right (selected roles) column.
Click the left arrow button. The role is listed in the left (available roles) column.
Click Select. The user is removed from the role.
Apply your changes by doing one of the following:
Click Apply. The changes to the user are saved.
Click Done. The changes to the user are saved and the workspace is closed.