| Oracle® Retail Active Retail Intelligence User Guide Release 14.0 E49474-01 |
|

 Previous |
 Next |
For an end user, using Active Retail Intelligence is largely system-initiated, and consists of using two main viewers or dialogs:
Alert Viewer
Event Viewer
The Alert Viewer displays all alerts routed to you. In the Oracle Retail Merchandising System, or other Active Retail Intelligence-integrated application, clicking Alert button on the toolbar displays the Alert Viewer.
If you have new alerts, the button is displayed as Alert; otherwise, the button is displayed as an Alert button. This button is updated every time you open a new window in RMS.
The Alert Viewer shows end users the priority and a count of the number of instances of each event type assigned to them. New alerts can be deferred out of New status, but just opening the alert viewer does not take an alert out of New status. An alert is new until it is deferred or the event it represents is closed.
Clicking the Details button in the Alert Viewer displays events associated with an alert in the Event Viewer. The Event Viewer displays additional details about events, including actions to drill into the system to further examine the cause of the event, and other actions that you can take to resolve events.
Committing and Canceling Changes
At the bottom of the Metadata Maintenance form is a set of buttons for committing edits to the various views on the form, and for exiting the form.
OK
Commits all changes and closes the Metadata Maintenance form.
Cancel
Closes the Metadata Maintenance form without saving any changes.
Apply
Commits all changes. The Metadata Maintenance form remains open.
Setting up Active Retail Intelligence in your business involves defining users and user groups to which events will be routing. In its role as a business rule monitoring tool and messaging/workflow system, Active Retail Intelligence routes event to particular users of the system to be dealt with. To add flexibility to this routing (and to provide a framework for other aspects of the application such as security), users are consolidated into groups. These groups can be set up to mirror aspects of a company's business model, with groups reflecting job functions, for example, Buyers and Invoice Matching Teams. Groups can also be made members of other groups, allowing for the creation of multi-layered group hierarchies to reflect more complex organizations (for example, employee supervision).
Users correspond to actual individuals working in the Active Retail Intelligence system. Oracle user functionality tracks system users. User definitions extend this Oracle user functionality by tracking additional user attributes and preferences, such as the user to whom events should be forwarded in the event that a user is unable to receive alerts, for example, out of the office on vacation.
A user definition is maintained in a table, and includes such attributes as:
The name of the user.
The name of the user to receive this user's alerts when this user is inactive.
Notification Information: Miscellaneous information on external notification options, including numbers and addresses for notifying the user via e-mail, fax, and pager.
List of Group Memberships: All of the groups to which the user belongs.
Status (Active/Inactive):Whether the user is active or inactive, that is, available or unavailable for event routing in Active Retail Intelligence. A user can be deactivated at any time. If the user has any active events assigned at the time of deactivation, the user is given the option to forward those events on to other users.
A target user for any automatically forwarded events.
A group is used to combine users based on some common characteristics. The most typical use for groups is to represent aspects of the company's business model that need to be mapped back to individual users. For example, you can define groups to reflect employee work areas, such as store or department, or to reflect job roles such as buyer roles, or invoice matching teams.
Within Active Retail Intelligence, user groups are used to route events. A user group or groups can be linked with event conditions, so that when the event conditions are met, the routing process uses that group or groups to build a list of users eligible to receive the event.
This routing group can be setup as either the intersection or the union of all groups associated with the event condition. The intersection or union is taken over all users who are members of those groups either directly or through nested group membership.
From this routing group a user or set of users will be selected for the event assignment, in accordance with the routing rules associated with the event, such as workload-based distribution, random or even-based distribution, or distribution to all group members.
A user group can have a parameter associated with it, and the resolution of state rules may resolve to several groups.
An example of how this routing could work is a group is set up using the store parameter and another just of buyers. By assigning to both the store parameter is evaluated and only users associated with that parameter in the store group and also in the buyer group will fill the resultant routing set, so store buyers are effectively found specific to the instance.
Each group definition has several attributes:
Name: The name of the group.
List of Members: A list of the users and groups that belong to this particular group.
Group Type: Whether the group is a simple group or parameter-driven group, described below.
For parameter-driven groups only, there is an additional group attribute, Parameter Type, which is the parameter type associated with the group.
There are two types of groups: parameter-driven groups and simple groups.
Parameter-driven groups are groups where membership is driven by a specific parameter value. These group types are used to simplify the assignment of users into what would otherwise be extremely large numbers of group specifications. For example, an assignment may be made to a Store group, driven by a Store Number parameter. Subsequently, when users were made members of the group, they would be assigned a value (or values) for the parameter.
To illustrate, Joe Smith could be made a member of the Store group with a Store Number of 1001. This group assignment means that Joe Smith is eligible to receive events that were routed to the Store group with parameter value 1001. This grouping not only saves the effort of defining a separate group for each store, but it also allows Active Retail Intelligence to route events to a specific users within a group based on the value of an event parameter. For example, a quality control event could be assigned to the Store group, and when a shipment requiring quality control was received it would be routed only to those members of the store group whose Store Number matched that of the store receiving the merchandise.
The parameters used to drive these groups must be of either a character, or a discrete numeric data type. Parameters such as date, or currency values, cannot be used to drive a group since inexact comparisons (>, <, between, and so on) are not possible within the group resolution, although they can be part of Active Retail Intelligence event rules.
Parameter based groups can also be set to use exclusion values, that is, all values except some specified. These exclusion values do not contradict other values a user may have assigned through other group membership: they are just a convenient way to choose most, but not all, values. All values are also an option. Composite groups can also be created, though they can contain at most one group that requires a parameter.
Simple groups are groups that are not driven by any parameters. Simple groups can be based on values that align with aspects of a company's business model. Such groups may be location based, for example, Northeast, Midwest, Southeast, or function-based, for example, Buyer or Sr Buyer. Simple groups are purely structural, with no internal routing mechanisms.
Users and groups can be connected by making a user or group a member of another group. However, a user or a group cannot be made a member of another user. When a user or a group is made a member of a parameter-driven group, values must be specified for the driving parameter. This will allow for parameter-driven routing within the group. Parameter driven groups cannot be made a member of another group. This ability to nest groups within groups allows for the definition of group hierarchies that can parallel a specific business model, or provide a more general grouping.
When a user or group is added to another group, it must be specified whether the user or group belongs to the parent group in a membership capacity, a supervisory capacity, or both. A user that belongs to a group in a membership capacity has all roles and responsibilities associated with that group. Within Active Retail Intelligence a member of a group is able to receive any events routed to that group. A user that belongs to a group in a supervisory capacity is not necessarily given the responsibilities associated with that group, but is able to monitor activity within the group. For example, within Active Retail Intelligence supervisors of groups will not be eligible to receive events associated with that group, but will be able to oversee any events routed to that group. A group can be designated as supervising another group by making it a member of the other group in a supervisory capacity. However, it is important to note that if the supervisory capabilities are to propagate to the users assigned to that group, the users must also be mapped to the supervisory group in a supervisory capacity. This will allow system administrators to use the same group hierarchies for both event routing and supervisory situations, or to set up completely separate group structures for the two purposes.
The following are examples of group structures.
In this strictly location-based hierarchy, there are four groups, and five users. The Store group is a parameter driven group, driven by store number. The other groups (District 1 Stores, District 2 Stores, and Central Region Stores) are all simple groups. The District 1 Stores and District 2 Stores groups are members of the Store group, with associated parameter values, while the Central Region Stores group is a member of both the District 1 Stores group and the District 2 Stores group. User A is a member of the Store group directly, with a parameter value of 1001. Users B and C are members of the District 1 Stores group, making them indirectly members of the STORE group with parameter values 1001, 1002, and 1003. Similarly, User D is a member of the District 2 Stores group, and User E is a member of the Central Region Stores group.
This group model allows us to access the data in a number of ways. In the case of event routing, we can start with the routing group and trace through the tree to find all the users eligible to receive that event. For example, if an Out of Stock event occurred at Store 1001, the event could be routed to User A directly, Users B and C through the District 1 Stores group, or to User E through the Central Region Stores group. In the case of event supervision (considering all relationships to be supervisory for this example), we can start with a particular user and trace through the tree in the opposite direction to find which events the user is eligible to supervise. For example, User A would be able to supervise events routed to Store 1001, where User D would be able to supervise events routed to Stores 1004 and 1005. User E would have the ability to supervise the stores in either the District 1 Stores or the District 2 Stores groups through supervision of the Central Region Stores Group.
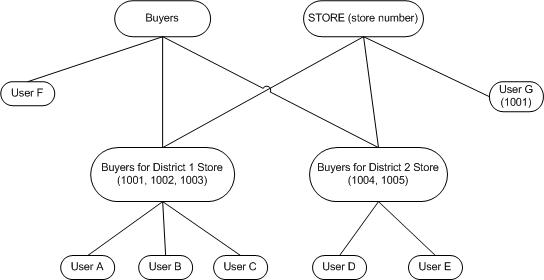
In the group configuration, we have set up groups to encompass both location and business role functionality.
Again we have our store group, driven by a store number, and we also have a simple group called Buyer. We can then create two other simple groups, Buyers for District 1 Stores and Buyers for District 2 Stores, that are members of both the Store and Buyer groups, thereby combining the aspects and privileges of those groups. In this situation one might route an event to both the Buyer and the Store groups. In this case the set of users eligible to receive the event instances would be the intersection of the Users assigned to the Buyer group and the Store group. This would mean Users A, B, and C would be eligible for any events whose Store parameter value was 1001,1002, or 1003, and Users D and E would be eligible for events whose Store parameter value was 1004 or 1005. Users F and G would not be eligible for any events of this type, since the event is routed to both the Store and the Buyer groups, and they are not members of both groups.
It is possible that one group can supervise another; however, because routing groups are determined dynamically, supervision can be elusive, so it may be helpful to assign an entirely distinct set of groups to form a supervision hierarchy. Supervision works such that a supervisor can view all of the events owned by a supervised user. Alternatively, without assigning supervision rights, an Active Retail Intelligence supervisor user attribute allows supervisors to view all events whose signature is contained in the union of all possible event signatures that could have been routed to the supervisor.
The previous release of Active Retail Intelligence attempted to implement application level security that allowed supervisors to add and remove users from a user group, but this left a security gap allowing a user-level supervisor to elevate his rights by adding more powerful users to the supervised role. Application security is not implemented elsewhere in the enterprise application at lower than menu level, so it is being removed here for consistency. Any user with access to the user group and user forms can add and remove users from user groups as appropriate.
There are several ways to create new events:
By using the event wizard, which walks you through the steps for creating events. The wizard for creating events shares many of the screens within the Event Manager dialog. To use the wizard, click the Wizard button.
By creating the new event manually; that is, by working through the screens of the Event Manager and filling in information about the event. To create an event manually, click the Add button. See Figure 10-5.
By versioning, or creating a new event from a version level of an existing event, and establishing a date and time at which this new event version will take effect. To create an event through versioning, click the button. See Figure 10-6.
By cloning, or copying, an existing event. Click the Cloning button. See Figure 10-7.
The Event Manager has several screens for entering data about events. The Event Summary List, the first screen that is displayed when you open the Event Manager, presents summary information about exceptions. From this screen, you can access the rest of the dialog's functionality.
|
 Copyright © 2013, Oracle and/or its affiliates. All rights reserved. Legal Notices |
|