| Oracle® Retail Active Retail Intelligence User Guide Release 15.0 E65706-01 |
|


 Previous |
 Next |
| Oracle® Retail Active Retail Intelligence User Guide Release 15.0 E65706-01 |
|
Previous |
Next |
The Exception Manager dialog is used to define, view, and maintain exceptions.
There are several ways to create new exceptions:
By using the exception wizard, which walks you through the steps for creating exceptions. The wizard for creating exceptions shares many of the screens within the Exception Manager dialog. To use the wizard, click the Wizard button.
By creating the new exception manually or from scratch; that is, by working through the screens of the Exception Manager and filling in information about the exception. To create an exception manually, click the button.
By versioning, or creating a new exception from a version level of an existing exception, and establishing a date and time at which this new exception version will take effect. To create an exception through versioning, click the button.
By cloning, or copying, an existing exception. Click the button.
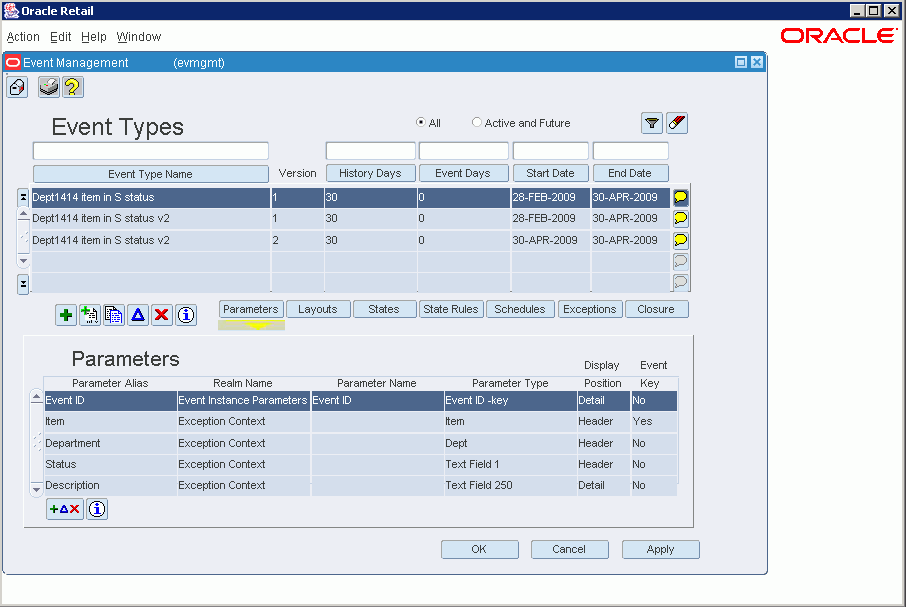
The Exception Manager has several screens for entering data about the exception. The Exception Summary List, the first screen that is displayed when you open the Exception Manager, presents summary information about exceptions. From this screen, you can access the rest of the dialog's functionality.
The Exception Type - Event Type Link Parameter Mapping screen is used to add/edit links between exception types and event types. This screen is available from both the Exception Manager and Event Manager dialogs.
Event/Exception Type Header
The header section displays the name and version of the event type and exception type for which a link is being established or edited. None of these fields are editable.
Event Parameters/Required/Exception Parameters
This section lists all of the event parameters for which parameters of corresponding type exist on the linked exception.
Parameters labeled Required must be mapped to complete a valid link between an exception and an event. These are also referred to in Active Retail Intelligence as "event key parameters." The exception parameter being mapped to the event parameter must be of the same type or a more specific type than the event parameter. Non-required parameters may be mapped, in which case the value of the event parameter will be passed from the exception, even though it could also be fetched from an online system (as the event is currently defined).
Use the LOVs and Clear buttons to select exception parameters or clear them from the list.
The Exception Type - Event Type Link screen is used to add, edit, and delete links between event types and an exception type. The screen has the following sections.
If you are using the exception wizard to define an exception, this is the last screen of the wizard.
Exception Header
The header section displays information about the current exception type. All of these fields are read-only.
Available Event Types
Available event types show event types that are valid, have some overlap in their start and end dates with those of the exception type, and for which the exception type has appropriate parameter types to map to the events key parameters. The comments button in this section displays the event type description in a pop-up comments window.
Unavailable Event Types
Unavailable event types are like available events with respect to validity and an existing overlap period, but the exception is missing one or more of the event's key parameter types. Double-clicking or pressing the key-list-value key displays a list of needed parameter types.
Active Link Period
The active link period is a pair of dates that are used when the exception type and event type are linked to set the active period of the mapping. These dates are used with the Add button. An exception type can be mapped to an event type more than once and the validation for these dates is somewhat complicated. In every case it is necessary to account for the fact that a null end date acts like an infinity end date. The start and end date must be between the minimum of the exception type and event types end dates and the maximum of its start dates. The start date is further restricted in that it must be later than the current date. Finally, if the event type is already mapped to the exception type, the start and end dates must define a period that does not overlap with an existing mapping. If valid date have been entered, the link mapping screen is invoked to complete the process of specifying how the key event type parameters will be populated from the exception type.
Linked Event Types
The linked event types section shows already mapped event types. A radio group toggles between link period dates and event type activity dates. None of the fields are editable except the link start date and end dates. These are both editable, subject to the aforementioned date rules, provided that the start date is always later than the current date. Once the start date had passed only the end date is editable; in which case the end date cannot be set earlier than the current date. Note also with respect to date validation that when editing already linked events, there is no visibility to the event start and end date so a special error message should be given if the user attempts to choose a date outside of this range. Only events that have not entered the active link period (mapping start date has not yet passed) can be removed. Finally, if the end date has passed, neither date is editable.
Parameter Mapping
The parameter mapping section of the screen shows which event type parameters are mapped from which exception type parameters. The mapping is editable only before the start date of the linkage has passed. The button displays the Exception Type - Event Type Link Parameter Mapping screen.
When viewing exception and event type links, only the OK button is enabled, and all fields are read-only.
When using this dialog to add, edit, and delete exception and event type links, you use the following sections of the screen: a header, a list of available events, a list of unavailable events, an add/remove section, a linked events section, and a link mapping section.
The Exception Type Conditions screen is used to add, edit, and delete conditions of an exception. On this screen, you define the conditions that drive the exception and that, when all of them are true, cause an exception instance to occur.
At the top of the screen is header information about the exception type for which conditions are being defined or edited. This information is read-only.
The rest of the screen details information about exception conditions. It consists of an editor for creating or editing conditions, and a list of all the conditions defined for the exception.
The condition editor is used to add, edit, and delete conditions showing that a parameter changes or that a relationship exists between two parameters or a parameter and a value. For more information on setting up conditions for an exception, see Condition Editor.
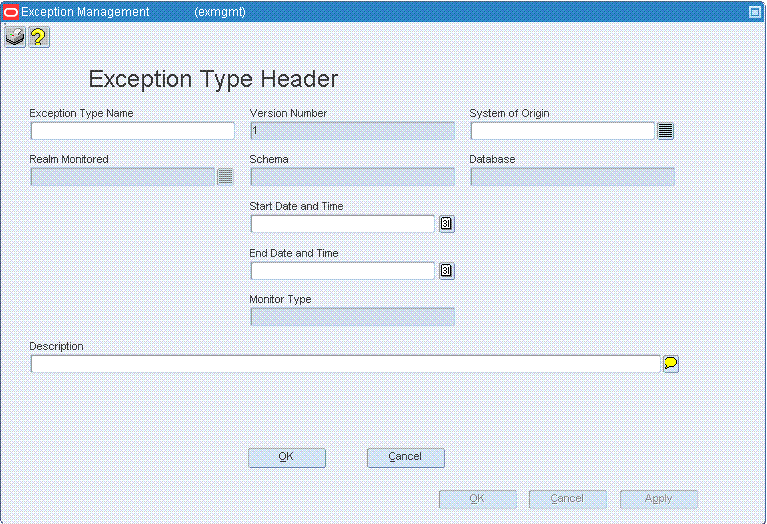
The Exception Type Header screen is used to set up exception type header information. This screen has the following fields:
Exception Name
A unique name by which the exception is known in your system.
Version Number
The version number of the exception.
Realm Type
The kind of realm to be monitored as the exception driver. Different realms allow different kinds of monitoring. For more information on realm types, see the description of the Realm Maintenance screen, which is part of metadata maintenance.
Realm Monitored
The monitored data realm that will drive the exception.
Schema
The database schema that owns the monitored realm. This field is for informational purposes only.
Database
The database instance identifier of the database to which the database schema belongs. This field is for informational purposes only.
Start Date/Time
The date and time at which the exception takes effect.
End Date/Time
The date and time at which the exception expires.
Monitor Type
The type of monitoring used for the exception, which may be batch, real-time, or trickle. All new exceptions have either batch or trickle monitoring until conditions are added that monitor change, in which case the monitoring for the exceptions transitions to real-time monitoring. Whether exceptions are of batch or trickle monitoring type depends on whether they are monitoring "external" data realms, such as External through the API.
Description
An explanation of exception purpose, or any other notes that are appropriate to include with the exception's definition.
When creating the first version of a new exception, the following fields are enabled and editable: Exception name, realm type, realm monitored, description and start and end date. Except for end date, all of these fields are required, as is version number, which is populated to 1.
For future exception types, the following fields are editable: name, start and end date and description.
For active exception types (that is, exception types for which the start date has passed), the start date is not editable.
To change a realm or realm type on a future exception can be accomplished by deleting the future version. This is very high impact, so it is left to be done via deleting, meaning these fields are not editable in Edit mode.
In View mode nothing is editable. The screen returns to the calling screen when called in View mode.
Cloning acts like Edit mode, except that you are working on a new record that has been created and manually populated with a version number of one and the name is left blank.
During versioning based on an exception with an active realm (cloned version), versioning acts just like cloning, except that the version number is the next highest version number based on the exception type.
During versioning that is to be the next version of an exception type, but is not directly based on a known exception (either because the driving realm needs to change either functionally or because it was deactivated) then versioning acts like New mode (new version). This second kind of versioning can be in either standard or wizard format and is in all ways like New mode except that the exception type ID and version number are known.
In every instance of working with exception types, start dates cannot be set to be before now (current date and time) or before the end date of the previous exception version, whichever is greater. End dates cannot be set later than the start date of the next version, if one exists, and also become required fields if a later version exists. When creating a new version, if not already set, the previous version's end date is updated to equal the new start date of the new version and the user is notified of the update.
|
Note: Changing start and end dates may impact mappings to schedules and events. You are notified of this potential impact before leaving the screen. |
When you choose a parameter from a realm outside of the exception realm, or one that can be mapped in more than one way, the Exception Type Parameter Mapping screen is displayed to illustrate how the parameter will be queried.
On the left side are the key parameters of the realm of the parameter you want to fetch.
On the right side are the parameters on the exception that are of the appropriate types to make the mapping. The exception type parameters are displayed using the exception parameter name (alias).
Using the LOV button on the right of the screen, you select the parameters of the type needed for the key parameters of the realm being mapped. However, the combination must ultimately be unique to allow the completion of the parameter mapping. For key parameters that have only one mapping option from the set of exception type parameters, that value is automatically filled in.
In several cases, this screen is shown even when there is only one mapping combination. This is so that you can be clear about how the data-model navigation is occurring, even when there is only the one mapping option.
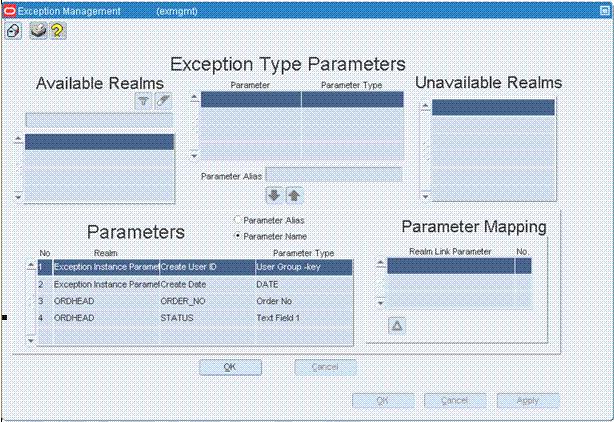
On the Exception Type Parameters screen, parameters are added to the exception. The top half of the screen shows available realms, the parameters of the currently selected realm, and unavailable realms. The bottom half shows the actual parameters on the exception and the links that map those parameters based on other parameters that had been added to the exception previously.
Available Realms and Unavailable Realms Lists
The available and unavailable realm lists show the realms from which you can choose parameters. Realms whose set of key parameters' parameter types is a subset of the parameter type set of the parameters already on the exception are available. Other realms are unavailable. Every time a parameter is added to or removed from an exception, the list of available and unavailable realms is updated.
Available Realms
The Available Realms section displays realms from which parameters can be selected and added to the exception type.
The filter button allows you to filter the view of exception type parameters by the available realms defined in your system.
Using the radio buttons, you restrict the list of available realms. Monitored shows only the monitored realm so that you can quickly find the monitored realm, which is probably where most of your parameters will come from. All shows all available realms.
Based on your selection, all realms that could be mapped based on parameters already on the exception are displayed.
To filter the view, select a realm from the list and click the Filter button. To clear an active filter, click the Clear button.
Unavailable Realms
The unavailable realms list shows realms from which parameters could be selected if the appropriate driving parameters already had been added to the exception type. The list of unavailable realms does not include external system realms (which cannot be queried), because no choice of parameters will ever make them available. Such a realm is available only if it is the monitored realm of the exception.
Double clicking one of the unavailable realms in the list or pressing F9 displays the Needed Types screen, which shows a list of parameter types that are needed in order to access an unavailable realm.
Parameters in Available Realm (Parameter/Parameter Type List)
The parameter list between the Available Realms and Unavailable Realms displays the parameters associated with the currently selected available realm, and the parameter type for each parameter. Parameter names are displayed using the format [realm name:parm name].
Parameter Alias
An alias for the parameter. Although it is rare on an exception, it is possible to add the same parameter twice using a different mapping each time. To distinguish these parameters from one another later, when building conditions or mapping an event, the option of creating an alias for each parameter is provided. However, it is typically not necessary and so is not required. Consider the following example:
You are monitoring the transfer table for transfers between two stores that are not in the same promotion zone. In this case, you would have to add the store promotion zone parameter once for each store. These parameters would be indistinguishable on other screens, which show only the realm/parameter name, unless they were aliased (for example, as to store promo zone and from store promo zone).
Down Arrow and Up Arrow Buttons
Parameters are added to and deleted from the exception by clicking the button and button.
The (Move Down) button adds the select parameter to the exception. The added parameter is displayed in the Parameters section in the lower half of the screen. If the parameter is not from the monitored realm, or if more than one option to map to the realm is available, then the Exception Parameter-Mapping screen is displayed.
The Up button removes the selected parameter and any of its dependent parameters, link dependencies, and any conditions or event mappings dependent on it from the exception.
Parameters Associated with Exception
The parameters list on the bottom of the screen shows the parameters on the exception, in the order in which they were added.
Parameter Mapping Link
The Parameter Mapping Link section shows, for the currently selected exception parameter, how that parameter is mapped based on the parameters already on the exception.
In this list, the Realm Link parameter column shows the key parameter, of the selected parameter's realm, that was needed to map to that realm. The Link Number column displays the number of the parameter on the exception that was used to make that mapping. For example:
You base an exception off of order status changing by monitoring the ordering realm. In the parameters screen creation date, creation user ID, and the key parameter of the order realm, order number, are already added to the exception. When the order status is added, the realm link parameter is shown as order number, since that is the key parameter needed to get the status column from the order header table, and the link number is the sequence number of order number parameter already added to the exception.
Alias Name/Parameter Name Selections
The Alias Name/Parameter Name radio group selections determine whether the list of parameters will be displayed by parameter alias or parameter name.
Exception Type Parameters List
The exception type parameters are displayed by parameter type name, realm/logical realm name, and parameter name.
Parameter Mapping Link
This part of the screen shows the dependencies by which a selected parameter is mapped to the exception. Included here are the realm:parm name of the needed input parameter for the realm of the selected parameter, and the parameter number that was used as the input to this realm. Clicking the button displays the Exception Type Parameter Mapping screen, where you can specify details about the mapping between the parameters and the exception.
In this mode only the parameters and link blocks are populated with data. Other blocks are entirely disabled. Everything is read-only.
In this mode, you are adding, editing, and deleting exception type parameters.
Any available parameter can be added to the list of parameters on the exception type by using the down (add) arrow. Exception type parameters must have unique names. If no alias is specified the parameter name is used, though uniqueness must be checked. When adding a parameter, the mapping for the parameter must be specified. If it can only be specified one way (based on existing parameter types and those required by the realm) then the mapping is performed automatically. Otherwise the parameter-mapping screen is invoked.
There are several special conditions that must be noted when adding a parameter. Parameters that are added from this exception realm must be added as invariant and require no special mapping. This is also true of any parameters mapped from the monitored exception realm if and only if that realm does not have any key parameters.
Removing parameters has several implications:
Realm key parameters of the monitored realm (which are pre-added when the exception is created) cannot be removed.
Any parameters that are linked via a removed parameter must also be removed, and in fact removed first, as must their dependents, and so on.
All dependent event type mappings to the exception must be removed, as must any conditions depending on the removed parameters. In the case of key parameters that cannot be removed, you are informed of the reason.
If an attempt to remove a parameter affects dependent parameters, conditions, or event types, a warning is displayed asking whether you want to continue with the removal.
This Exception Type Schedules screen is used to add, edit, and delete exception type schedules. The screen is divided into several sections, a header, a list of available schedules, an add/remove section and a schedules section.
Exception Header Information
The header section displays information about the current exception type. This information is read-only.
Available Schedules
The Available Schedules section shows a list of all active schedules. This list includes the schedule type and a brief description of the frequency of the schedule or the signal associated with the schedule, as specified in the schedule's definition.
Active Link Period
This is the period when the schedule is used to drive this exception's monitors. Scheduling exception monitoring is achieved by applying fixed schedules over a period of time. It may be that during certain periods, you would like to use a more or less frequent monitoring schedule. Setting an appropriate link period enables this kind of variation in monitoring.
The active link period must fall within the exception type's active period and the start date cannot be set to be before the current date. Also, the link period cannot overlap any periods already established for the same schedule. When removing a schedule its active link period is copied into this active link period section and that schedule is selected in the available schedules block (unless it has become inactive before it was removed).
Down Arrow Button
The button adds, or attaches, a schedule to the exception. The schedule is then displayed in the Schedules list in the lower part of the screen.
Up Arrow Button
The button deletes the schedule from the exception's definition. The schedule is then displayed in the Available Schedules list.
Schedules
The Schedules section contains a list of all the schedules mapped to the exception. The start and end dates are editable, provided they have not already passed and in no case can they be set before the current date. These are in fact date/times, not just dates. Once a start date has occurred, the date cannot be removed or changed.
The button and button are for adding and removing schedules to and from the exception. The button is essentially a delete button, but instead of just deleting it moves the schedule up into the Available Schedules list, highlights it and keeps the link period intact so you can "undo" the action by re-adding the schedule to the exception.
Schedules determine when batch scans are run for batch monitored exceptions, and thus are only meaningful for batch-monitored exceptions. Schedules for trickle and real-time monitored exceptions are not used in this Active Retail Intelligence release, though they may be defined. The active link period of a schedule determines the period during which the schedule will be used to drive exception monitoring. Multiple schedules with overlapping periods will all drive the exception. In this way schedules of different periods may be reused across multiple exceptions, and sophisticated monitoring patterns may be built up from a combination of simple schedules.
The Exception summary displays a list all exceptions defined in your Active Retail Intelligence system.
Filtering the View of Exceptions
Using the button and the listbox above the list of exceptions, you can choose to display all exceptions, including expired exceptions, or only active and future-active exception types. The button clears any active filter.
Exception Types List
The top part of the screen lists all the exception types in summary form. All the information in this screen is read-only. From this summary list, you can create new exceptions and edit existing exception definitions.
Realm Catalog: Displayed in the format schema.realm@dblink, this value shows the name of the realm, its logical schema, and its link to another database (if applicable).
Monitor Type: Identifies the type of monitoring for the exception: batch, trickle, or real-time.
Start Date/Time: The date and time the exception starts being monitored.
End Date/Time: The date and time exception monitoring ends.
Exception Name: The name by which the exception is referred to in the Active Retail Intelligence system.
Version: The version number of the exception.
Buttons
Several action buttons are available to go from this screen that allow creation, editing and deletion of exception types.
The Wizard button starts the wizard for creating a new event type. This button is active at all times.
The Add button creates a new exception type manually. This means you work through the screens of the Exception Manager yourself to define the new exception type, rather than using the wizard. This button is active at all times.
The Version button creates a new version of an existing exception type, and establishes a date and time for the new version to take effect. The Version button is available at all times that an exception is displayed in the summary list.
The Cloning button clones, or copies, an existing exception type.
The Edit button edits an exception type that is not yet active.
The Delete button deletes an expired or not-yet-active exception type.
The Information button displays additional header information about an existing event type.
Exception Details
The lower half of the screen shows details about the currently selected exception in the top half of the screen, depending on which button is selected in the center of the screen, parameters, conditions, schedules or events.
Parameters
Clicking the Parameters button displays the parameters for the selected exception type, as defined on the Exception Type Parameters screen. See the Exception Type Parameters screen description for field descriptions.
Conditions
Clicking the Conditions button displays the conditions associated with the exception, as defined on the Exception Type Conditions screen. For more information on setting up conditions for an exception, click the following link.
Schedules
Clicking the Schedules button displays the schedules that are attached to the exception type, and indicates which schedules are active now, in the future, or in the past, as defined on the Exception Type Schedules screen. From this list of schedules, you can add, edit, and delete schedules for active and future-active exceptions types. The comments box on the right side of each schedule item displays a description of the schedule.
Event Types
Clicking the Event Types button displays the events that are linked to the exception and the window when the link will be valid, as defined on the Exception Type-Event Type Link screen. From this list of event types, you can add, edit, and delete links to event types.
The window of time when the link is valid depends on the link period, and the exception type and event type's active dates and is computed dynamically for display here. Like schedules, event mappings may be edited in for all exceptions that are active and future active. The comments box on the right side of each event type displays a description of the event type.
The Needed Parameter Types window is displayed in several situations when defining exception types:
In the Exception Type Parameters screen, when you double-click on or press F9 on an unavailable realm.
In the Exception Type - Event Type Link Parameter Mapping screen, when you are attempting to map to an unavailable realm by double-clicking or pressing F9 on the realm.
Several exception and event management screens involve defining conditions associated with the exception or event, including
Exception Type Conditions
Event Type State - Event Attribute Rules
Event Type - State Rules
Event Type - Closure Rules
Following is a description of how to create and edit conditions on these screens.
In all the screens that involve conditions, you use the Condition Editor to add, edit, and delete conditions showing that a parameter changes or that a relationship exists between two parameters or a parameter and a value. The basic layout of a condition is a comparison between a parameter and a value or another parameter, using an operator such as = or >. Exception definitions have an additional setting for the condition, Monitor Change, which specifies whether you want to be notified when the parameter change occurs. It is also possible for a parameter to change and have a relationship condition simultaneously.
All conditions must be between a parameter and a value or two parameters, but never between two constant values. At least one parameter must be chosen, so when the condition editor is empty only the first parameter field and its LOV are enabled. Once a parameter is selected (only varchar2, date, number, and Boolean data types are available in the LOV), the other fields are enabled. When the first parameter field is cleared, the condition editor reverts to the original state.
Once the condition is defined, you add it to the list of exception or event-rule conditions below the editor by clicking the Down button. When you need to change a condition, you click the Up button to move the condition into the editor, and when done changing the condition, you click the Down button to move it back into the condition list for the exception or rule.
The conditions defined for an exception or event are treated as logical AND conditions. That is, when a monitor detects candidate exception instances, or when an event is evaluated against the rules defined for it, the exception or event is tested against all of these conditions. If they are not all true, the candidate is discarded and ignored without further processing. For example, if all the conditions for candidate instance are true, then the candidate instance becomes an actual exception instance, at which time linked events are created.
The condition editor is displayed above the list of existing conditions, and consists of the following fields and controls.
Parameter
The parameter on which the condition is based. This parameter is compared to a value or another parameter. Click the LOV button to display allowable parameters for the exception or event.
The parameter chosen to drive the condition determines:
Which operators are available
For exceptions, whether the exception can be monitored online
Whether other parameters or special values can be used for the comparison created.
All parameters allow comparison to NULL values. Only parameters from the monitored realm, if the realm can be monitored in real time, allow change detection. Some parameters have a constrained set of valid values that can be used for comparison, such as the store number parameter only allowing valid store numbers. Also, the data type of the parameter, character, Boolean, date, or number, determines which comparisons can be made to other parameters (that is, those of the same data type). Actually, many times such comparisons are not meaningful, unless the two parameter types are the same, such as comparing two store numbers, as opposed to comparing a dollar amount and a store number.
Monitor Change (for Exception Type Conditions Screen Only)
The monitor change radio button indicates whether or not the condition will be real-time monitored. In other words, whether you want to monitor the field changing to the entered value (for example, order status changing to 'S') or all fields that contain that value (for example, order status = S).
Monitoring a change is only possible on parameters that come from the monitored realm, and even then only on a realm with active, query-able data. So, monitoring change is impossible for external systems. For internal systems, however, whether an exception monitors transactions online or through a nightly batch sweep depends on whether at least one of the conditions is set to monitor a change.
Operator
The operator used to compare the parameter with a value or another parameter.
For Exceptions only, an operator is required for all conditions except for those in which a change is being monitored.
Available operators depend on the data type of the specified parameter. Specifically, text parameters do not support inequality operators. In addition, any exception parameters with a Long or Long Raw Data type are not available for defining conditions, since they cannot be used to perform comparisons anyway. The only reason to add such parameters to an exception is to pass them from a non-queried data source through to an event as additional information to present to users in the event interface.
For all data types, if you use the operators IS and IS NOT, the value must be specified as NULL.
For varchar2 and Boolean data types, the only other options are = and !=.
For date and number data types, the operators <, <=, >, >=, =, and != are also available.
Character and Boolean parameters allow = and != operators.
Numbers and dates allow inequality operators as well.
Specifies whether the selected parameter is being compared to a parameter or a parameter value. The default setting is Value, with the Value field set up for the appropriate data type.
A parameter can only be compared to another parameter when a parameter of the same type exists on the exception or event (that is, if there are available parameters to compare the parameter against). Otherwise, the parameter must be compared to a value.
Parameter or Value
This field specifies the parameter or value to which the selected parameter is being compared.
Depending on the data type of the parameter, the controls on this field change. In some cases, when making a value comparison, a list item, a date button, or an LOV button is available to help you choose an appropriate value. For example, for dates, a date button is displayed to enable entering a date. For parameters with a code type, clicking the LOV button displays a list of appropriate code values from which you can choose.
Down Arrow Button
The button adds the condition in the condition editor into the condition list for the exception or rule. The fields of the condition editor remain filled with the values for the condition. You can either continue to define more conditions on the same parameter, or click the button to clear the fields.
Up Arrow Button
The button removes the condition from the condition list, and puts it in the condition editor. Click this button to edit or delete existing conditions.
Clear Button
The button clears the condition editor fields.
Below the condition editor is a list of the conditions currently defined for the exception or rule. The conditions defined for an exception or event are treated as logical AND conditions, as described earlier in this topic.
Adding a Condition
Choose a parameter from the list.
(For exceptions only) Specify whether you want to be notified of the change to the parameter.
Choose an operator from the list.
Choose whether you want to compare the parameter to a value or another parameter.
Specify the value or parameter to which the parameter will be compared.
Click the . (dot) button. The condition is added to the condition list below the editor.
Editing a Condition
Select the condition from the condition list.
Click the . (dot) button to move it into the condition editor.
Modify the definition as needed, for example, changing the operator or the value to which the parameter is compared.
When done, click the button to add the condition back to the condition list for the exception or rule.
Deleting a Condition
Select the condition from the condition list.
Click the . (dot) button to move it into the condition editor. The exception condition is left in the edit section, since the only way to edit a condition is remove it, change it, then add it back to the exception conditions.
If you want to remove an exception condition and then add another, remove the condition, and then change the first parameter. Or, click the button to clear the fields and start with a new exception condition.