| Oracle® Retail Merchandising System User Guide 14.1.1 E60812-02 |
|

 Previous |
 Next |
Cost Management refers to the procedure of maintaining the cost of the different items that are used in the retailer's setup and allow the user to manage any cost changes that occur during the lifecycle of these items. There are a lot of different processes which impact the cost of an item either directly or indirectly. For goods being imported, the user would need to define any duties, expenses, and assessments that directly affect the final landed cost of the item along with their respective computational basis. Goods being moved between the retailer's locations can have costs associated with this movement. Events being processed by the future cost engine which have an effect on the cost of an item at a later point of time may also be viewed by the application user.
The navigational procedure as well as the set of activities that are required to be done by the user for each of the above scenarios are described in more detail in this chapter.
The Cost Management chapter includes the following areas:
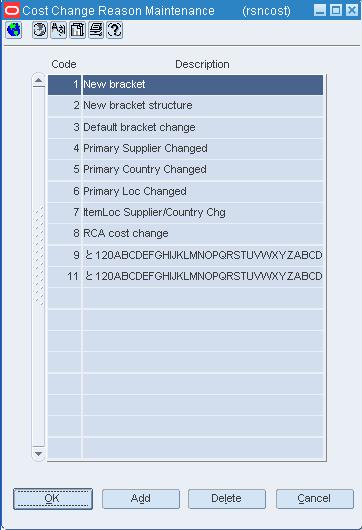
A cost change is an adjustment to the cost of an item, either up or down. Before you can create a cost change, a list of user defined cost change reasons are created and then applied to each cost change.
If you are tracking Estimated Landed Costs (ELC), you set up cost zones to facilitate a cost change at the location or zone level. All items are associated with zones upon item set up.
RMS uses cost zone groups to implement the most effective pricing strategy for each item. There are two types of costing strategies.
Zone level: The cost for the item is the same across all locations in a price zone. The landed cost for an item and supplier relationship is the same across a zone.
Location level: Each location can have a unique retail price for an item. The landed cost for an item and supplier relationship can also be different at each location.
To view more information on these topics, see also:
See "Edit Cost Zone Groups" in the System Administration chapter
See "View Cost change Reasons" in the Foundation Data chapter
Navigate: From the main menu, select Control > Setup > Cost Change Reason > Edit. The Cost Change Reason Maintenance window opens.
Click Add. The next available line is enabled.
In the Code field, enter an ID for the reason.
In the Description field, enter a description for the reason.
Click OK to save your changes and close the window.
Navigate: From the main menu, select Control > Setup > Cost Zone Group > View.
The Cost Zone Groups window opens.
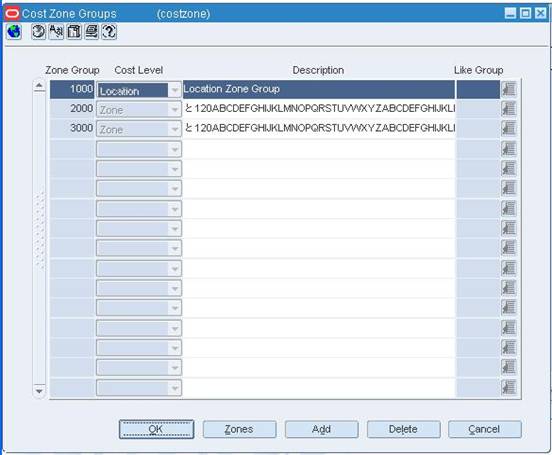
Navigate: From the main menu, select Control > Setup > Cost Zone Group > Edit. The Cost Zone Groups window opens.
Click Add. The next line on the table is enabled.
In the Zone Group field, enter a unique ID.
In the Cost Level field, select Zone.
|
Note: If a location cost level is not set up, you may select Location in the Cost Level field. You can create only one cost zone group at the location cost level |
In the Description field, enter the description of the cost zone group.
To copy the zones and locations from an existing cost zone group, in the Like Group field enter the ID of the cost zone group or click the LOV button and select a cost zone group.
Competitive Pricing allows you to track pricing at competitors' stores. These windows allow you to define competitors and competitor stores, and to store competitor pricing information at the item/competitor/competitor store/day level.
The Competitive Pricing windows also allow you to create competitive shopping lists and historic records of competitors' prices. Each competitor's store must be associated with a specific competitor organization and can also be associated as a competitor of one or more of your company's merchandising stores. You can create competitive shopping lists, guides for obtaining competitor pricing information, from a standard RMS item list. Information about the individuals who perform your competitive shopping can also be stored.
See "Create a Competitor" in the System Administration chapter
See "Create a Competitor's Store" in the System Administration chapter
See "Create an Association Between Your Store and a Competitor's Store" in the Foundation Data chapter
See "Create a Competitive Shopper" in the System Administration chapter
See "Create a Shopping List" in the Item Maintenance chapter
See "Record Competitor Prices" in the System Administration chapter
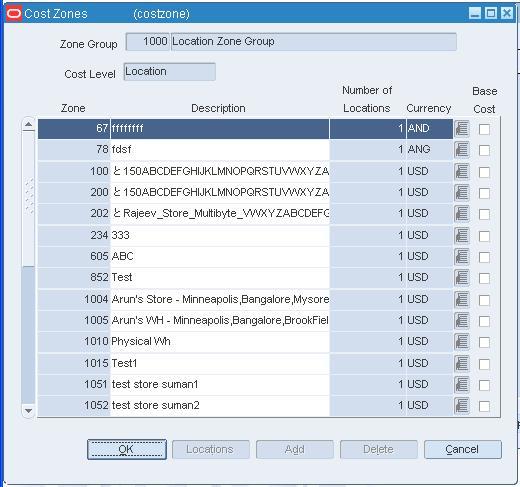
On the Cost Zone Groups window, click Zones to add zones to the new cost zone group. The Cost Zones window opens.
Click Add. The next line on the table is enabled.
In the Zone field, enter a unique zone ID.
In the Description field, enter a cost zone description.
In the Currency field, enter the code for the currency to be used in the cost zone or click the LOV button and select the currency.
On the Cost Zone Groups window, click Zones. The Cost Zones window opens.
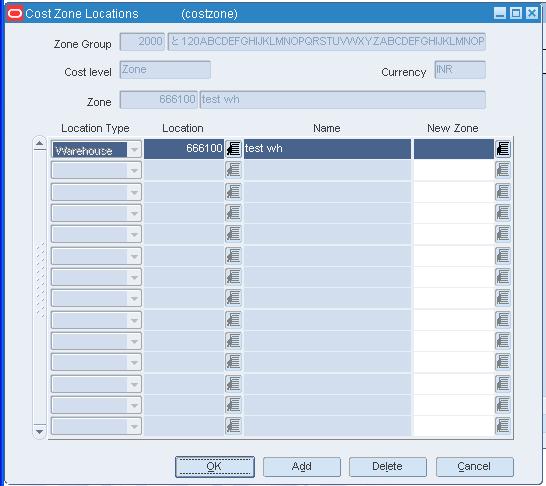
On the Cost Zones window, click Locations. The Cost Zone Locations window opens.
To add a location that has not been assigned to a cost zone group, click Add.
In the Location Type field, select store or warehouse.
In the Location field, enter the location ID, or click the LOV button and select the location.
To add a location to a cost zone that is currently in a different cost zone:
On the Cost Zones window, select the Zone that contains the location you want to put in the new zone.
Click Locations. The Cost Zone Locations window opens.
In the New Zone field, enter the zone ID of the cost zone that you would like the location to appear in, or click the LOV button and select the new cost zone.
Navigate: From the main menu, select Control > Competitive Shopper > View. The Competitive Shopper Maintenance window opens.
In the Shopper field, enter the ID of the competitive shopper, or click the LOV button and select the shopper.
Click OK to close the window.
Navigate: From the main menu, select Control > Competitor > View. The Competitor window opens.
In the Competitor field, enter a competitor number, or click the LOV button and select a competitor.
Click OK to close the window.
Navigate: From the main menu, select Control > Competitor > Edit. The Competitor window opens.
In the Competitor field, enter the ID of the competitor, or click the LOV button and select the competitor.
From the Options menu, select Competitor Stores > View. The Competitor Store Maintenance window is displayed.
In the Competitor Store field, enter the ID of the competitor's store, or click the LOV button and select the store.
Click OK to close the window.
Navigate: From the main menu, select Action > Organizational Hierarchy > Store. The Organizational Hierarchy Main Form window opens.
Select a store. Click View. The Store Maintenance window opens.
From the Options menu, select Assign Competitors. The Competitor Store Association window opens.
Select a store.
Click OK to close the window.
Navigate: From the main menu, select Control > Competitive Pricing > Competitive Price History > View.
In the From Date and To Date fields, select dates to create a range for your search.
In the other Search Criteria fields, enter any other information to restrict your search.
Click Search. RMS displays all pricing records that match your search criteria.
To search for another pricing record, click Refresh.
Enter different search criteria.
Click Cancel to close the window.
The landed costs functions allow you to define expenses, assessments upcharges, and combinations of both in order to track the costs involved in purchasing and moving goods from the manufacturer to the distribution center or store.
Within RMS, landed cost is defined using computation value bases (CVB), expenses, and assessments. Expenses and assessments are more generically referred to as cost components. Computation value bases describe how expenses and assessments are combined in order to provide a base for the calculation of other expenses and assessments. Assessments differ from expenses in that they are defined by a government agency.
An expense is cost component associated with moving a product from a supplier to the retailer, primarily dealing with importing. Examples include freight costs, shipping insurance, and so on. Expenses can be set up to apply to different legs of the shipment. For example, there may be an ocean freight charged for transporting goods across the ocean (between the discharge and lading ports) and then other charges associated with moving the goods from the lading port to the warehouse that is inland (for example, land freight).
See "Add an Expense Profile for a Country" in the System Administration chapter
See "Add an Expense Profile for a Supplier" in the Foundation Data chapter
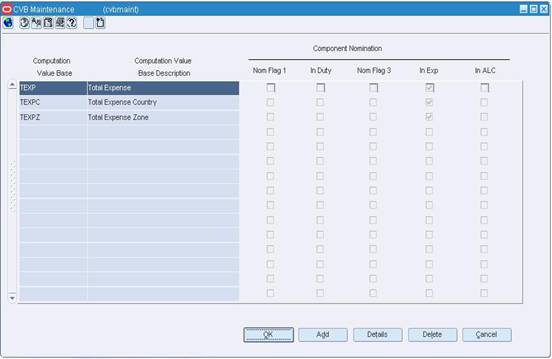
Navigate: From the main menu, select Control > Landed Cost > CVB Maintenance > View. The computation value bases appear in the CVB Maintenance window.
Select the computation value base (CVB).
Click Details to view the cost components of a CVB. The cost components appear in the CVB Details window.
Click OK to close the windows.
Navigate: From the main menu, select Control > Landed Cost > CVB Maintenance > New.
The CVB Maintenance window opens.
Click Add. The next available line is enabled.
Enter an ID and description for the Computation Value Base (CVB).
Select the types of calculations that will use the CVB.
Click OK to exit, or continue to select CVB components.
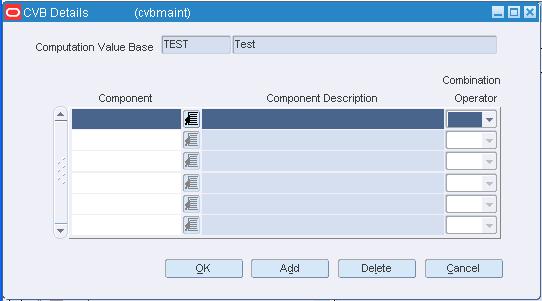
Click Details. The CVB Details window opens.
Click Add.
In the Component field, enter the ID of the component, or click the LOV button and select the component.
In the Combination Operator field, select:
+ (plus sign) to add the component.
- (minus sign) to subtract the component in the CVB.
Click OK to save your changes and close the window.
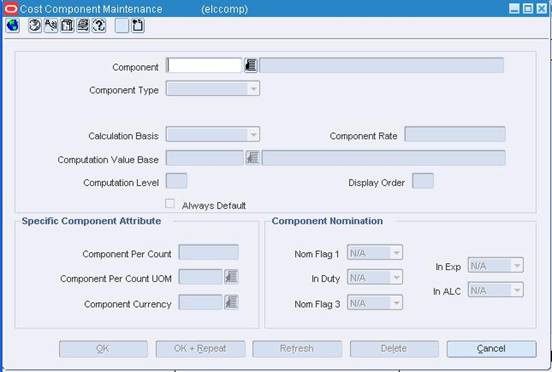
Navigate: From the main menu, select Control > Landed Cost > Cost Component Maintenance > New. The Cost Component Maintenance window opens.
In the Component fields, enter an ID and description of the component.
In the Component Type field, select Assessment.
In the Assessment Type field, enter the ID of the tax or fee, or click the LOV button and select the tax or fee as necessary.
In the Import Country field, enter the code for the country importing the goods, or click the LOV button and select the import country.
|
Note: When creating an import order, make sure that the import country and the import location are the same. |
In the Calculation Basis field, select Specific.
In the Component Rate field, enter the monetary amount per unit.
In the Component Per Count field, enter the number of units to which the rate applies.
In the Component Per Count UOM, enter the abbreviation for the unit of measure to which the rate applies, or click the LOV button and select the unit of measure.
Click OK to save your changes and close the window.
In the Calculation Basis field, select Value.
In the Component Rate field, enter the percentage per unit.
In the Computation Value Base, enter the ID of the CVB to which you want to attach the assessment, or click the LOV button and select the CVB. This field is optional.
In the Computation Level field, enter a number to indicate the sequence in which this component should be computed in regards to other components. For example, if it should be computed first, enter 1.
In the Component Currency field, enter the code for the currency in which the assessment is denominated, or click the LOV button and select the currency.
In the Component Nomination fields, select the status of the assessment in relation to the other components in a CVB.
Select N/A if the assessment is not included in the calculation.
Select + (plus sign) to add the assessment.
Select - (minus sign) to subtract the assessment.
Click OK to save your changes and close the window.
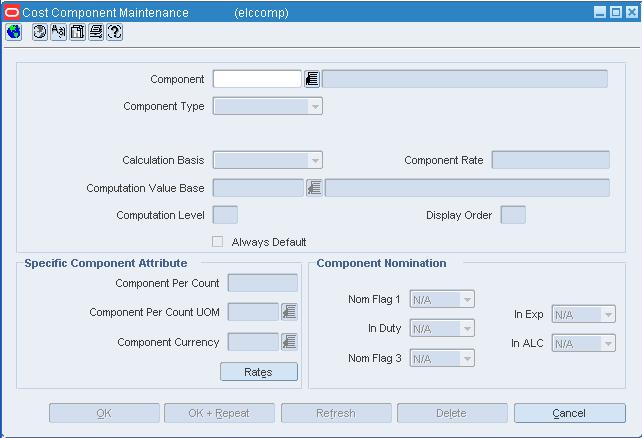
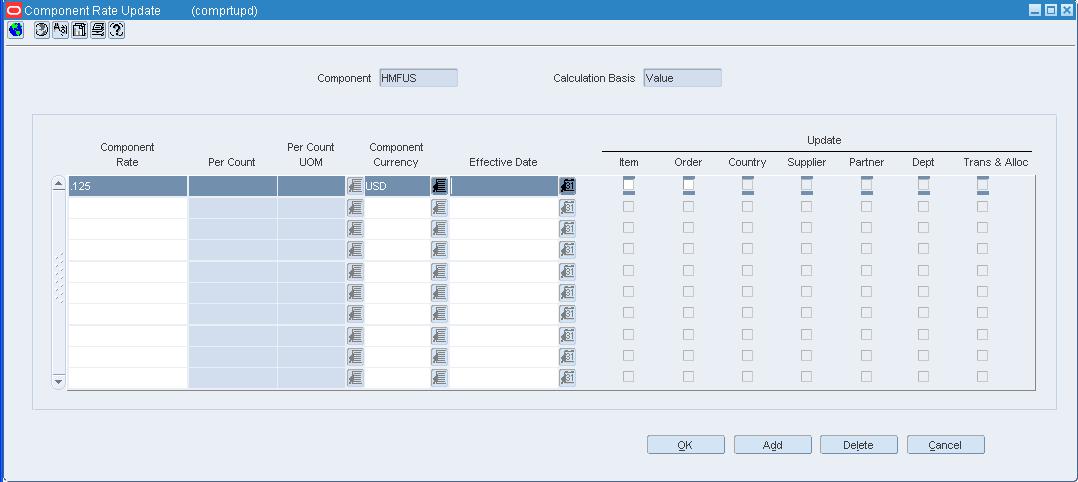
The Component Rate Update window allows the user to change the component rate information, as well as add or delete a component.
Navigate: From the main menu, select Control > Landed Cost > Cost Component Maintenance > Edit. The Cost Component Maintenance window opens.
In the Component field select a component, or select the LOV button and select a component.
Click Rates. The Component Rate Update window opens.
Update any pertinent information.
In the Effective Date field, enter the date or select the calendar button and select a date.
Click OK to save your changes and close the window.
Navigate: From the main menu, select Control > Landed Cost > Cost Component Maintenance > Edit. The Cost Component Maintenance window opens.
In the Component field select a component, or select the LOV button and select a component.
Click Rates. The Component Rate Update window opens.
Click Add.
In the Component Rate field enter the rate.
In the Per Count field, enter the count.
In the Per Count UOM field, enter the per count, or select the LOV button and select the per count.
In the Component Currency field enter the currency, or select the LOV button and select the currency.
In the Effective Date field, enter the date or select the calendar button and select a date.
Select any of the appropriate check boxes.
Click OK to save your changes and close the window.
Navigate: From the main menu, select Control > Landed Cost > Cost Component Maintenance > New. The Cost Component Maintenance window opens.
In the Component fields, enter an ID and description of the component.
In the Component Type field, select Expense.
In the Expense Type field, select either Zone or Country.
For expenses based on the quantity or dimensions of the goods:
In the Calculation Basis field, select Specific.
In the Component Rate field, enter the monetary amount per unit.
In the Component Per Count field, enter the number of units to which the rate applies.
In the Component Per Count UOM, enter the code for the unit of measure to which the rate applies, or click the LOV button and select the unit of measure.
For expenses based on a percentage of the value of the goods:
In the Calculation Basis field, select Value.
In the Order Cost Basis field, select the base for calculating the Expense.
In the Component Rate field, enter the percentage per unit.
In the Computation Value Base, enter the ID of the CVB to which you want to attach the expense, or click the LOV button and select the CVB.
In the Component Currency field, enter the ID of the currency in which the expense is denominated, or click the LOV button and select the currency.
In the Component Nomination fields, select the status of the expense in relation to the other components in a CVB:
Select N/A if the expense is not included in a calculation.
Select + (plus sign) to add the expense.
Select - (minus sign) to subtract the expense.
Click OK to save your changes and close the window.
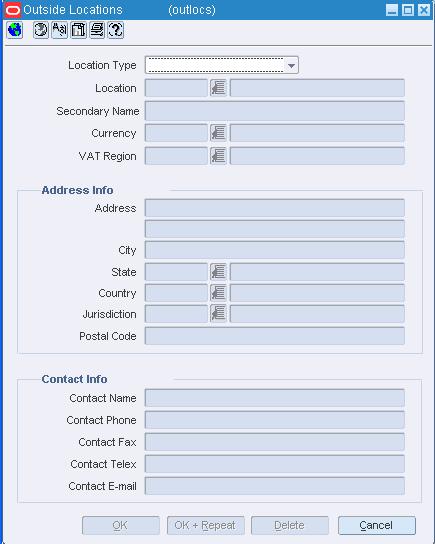
Outside locations are those locations that are not part of the organizational hierarchy. Some examples of outside locations are entry ports, discharge ports, lading ports, return centers, bill-to locations, and destination locations.
Navigate: From the main menu, select Control > Setup > Outside Locations > Edit. The Outside Locations window opens.
In the Location Type field, select the type of outside location that you want to edit.
In the Location field, enter the ID of the outside location, or click the LOV button and select the outside location.
Edit the currency, VAT region, address, and contact information as necessary.
Click OK to save your changes and close the window.
In the Location Type field, select the type of outside location that you want to edit.
In the Location field, enter the ID of the outside location, or click the LOV button and select the outside location.
Click Delete.
When prompted to delete the record, click Yes.
Click OK to save your changes and close the window.
Navigate: From the main menu, select Control > Setup > Outside Locations > View. The Outside Locations window opens.
In the Location Type field, select the type of outside location that you want to view.
In the Location field, enter the ID of the outside location, or click the LOV button and select the outside location.
Enter the jurisdiction information. This further breaks down the tax rate if different than the transaction location.
Click OK to close the window.
Navigate: From the main menu, select Control > Setup > Outside Locations > New. The Outside Locations window opens.
In the Location Type field, select the type of location that you want to create.
In the Location field, enter a unique ID and description for the outside location.
In the Currency field, enter the currency code for the location, or click the LOV button and select the currency.
In the Country field, enter the ID of the country in which the outside location is located.
Enter the jurisdiction information. This further breaks down the tax rate if different than the transaction location.
Enter optional information in the remaining fields as necessary.
Click OK to save your changes and close the window.
An up charge is a cost associated with moving items between locations in the merchandising system. Up charges are included since there is work associated with the transfer of goods (for example, cost that the origin location incurs to prepare the items for shipping) and since locations can exist in different legal entities there is accounting between the different locations.
Each up charge has a calculation basis of value or specific, a cost basis of either weighted average cost (when using average cost method) or unit cost (when using standard cost method), component currency, and up charge group, which is used to group up charge components together to show a total sum on the Transfer Up Charge window.
The following up charge types can be applied:
Department up charges: Incurred when transferring items within the department or within the from and the to locations.
Location up charges: Tracked when both average costing (as opposed to standard costing) and estimated landed cost (ELC) is used.
Transfer up charges: Associated with a specific Transfer/Item/From Location/To Location combination.
Up charge groups: A combination of up charge components.
Up charge components: Charges that are incurred when transferring from a RMS store or warehouse to another RMS store or warehouse.
To view more information on these topics, see also:
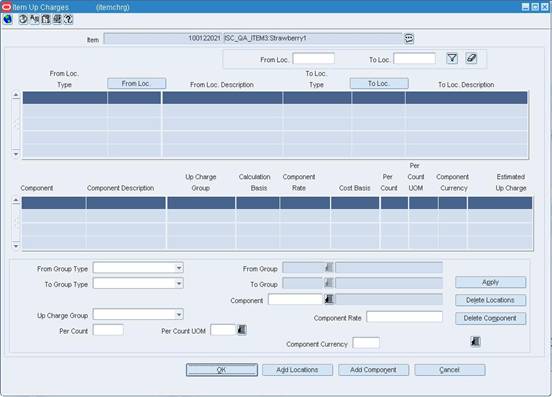
Navigate: From the Main menu, select Items> Items. The Item Search window opens. Search for and retrieve an item in edit mode. The Item Maintenance window opens. From the Options list, select Item Up Charges. The Item Up Charges window opens.
In the From Group Type field of the Apply block, select the locations from which the items originate.
If available, enter a From Group value, or click the LOV button and select a value.
Select a value in the To Group Type field.
If available, enter a To Group value, or click the LOV button and select a value.
In the Component field, enter an up charge component ID or click the LOV button and select an up charge component.
Update the following fields as necessary:
Up Charge Group: Used to group up charges together on the Transfer Up Charge window. All up charge components with the same up charge group are summed together.
Component Rate: The rate to be charged against the weighted average cost of the Item/To Location combinations within the department. The value in this field is a percentage if the calculation basis is Value, and a monetary amount if the calculation basis is Specific.
Per Count: The amount of the Per Count Unit of Measure to which the rate applies. For example, when creating an up charge that is defined as $.20 for every 10 kilograms of an item, the Per Count would be 10. This field is enabled if the calculation basis is Specific.
Per Count UOM: Displays the unit of measure in which the Per Count is specified. This field is enabled if the calculation basis is Specific
Click Apply. The Component table is updated.
Click OK to save your changes and close the window.
Navigate: From the Main menu, select Items> Item List. The Item List Search window opens. Search for and retrieve an item list in use mode. The Item List Header window opens. From the Options list, select Create Mass Item Charge > Up Charges. The Item Up Charges window opens.
In the From Group Type field of the Apply block, select the locations from which the items originate.
If available, enter a From Group value, or click the LOV button and select a value.
Select a value in the To Group Type field.
If available, enter a To Group value, or click the LOV button and select a value.
In the Component field, enter an up charge component ID or click the LOV button and select an up charge component.
Update the following fields as necessary:
Up Charge Group: Used to group up charges together on the Transfer Up Charge window. All up charge components with the same up charge group are summed together.
Component Rate: The rate to be charged against the weighted average cost of the Item/To Location combinations within the department. The value in this field is a percentage if the calculation basis is Value, and a monetary amount if the calculation basis is Specific.
Per Count: The amount of the Per Count Unit of Measure to which the rate applies. For example, when creating an up charge that is defined as $.20 for every 10 kilograms of an item, the Per Count would be 10. This field is enabled if the calculation basis is Specific.
Per Count UOM: Displays the unit of measure in which the Per Count is specified. This field is enabled if the calculation basis is Specific
Click Apply. The Component table is updated.
Click OK to save your changes and close the window.
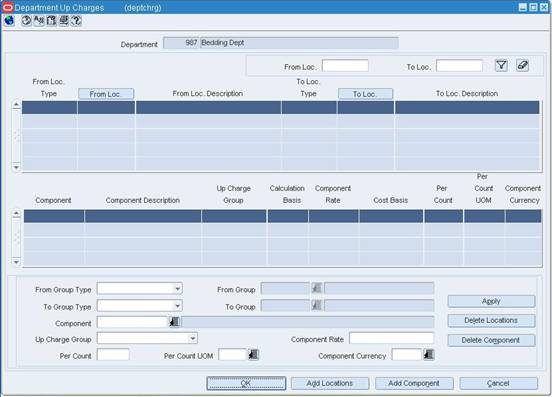
Navigate: From the Main menu, select Action > Merchandise Hierarchy. The Merchandise Hierarchy Main Form window opens. Search for and retrieve a department in edit mode. The Department Maintenance window opens. From the Options menu, select Up Charges. The Department Up Charges window opens.
In the From Group Type field of the Apply block, select the locations from which the items originate.
If available, enter a From Group value, or click the LOV button and select a value.
Select a value in the To Group Type field.
If available, enter a To Group value, or click the LOV button and select a value.
In the Component field, enter an up charge component ID or click the LOV button and select an up charge component.
Update the following fields as necessary:
Up Charge Group: Used to group up charges together on the Transfer Up Charge window. All up charge components with the same up charge group are summed together.
Component Rate: The rate to be charged against the weighted average cost of the Item/To Location combinations within the department. The value in this field is a percentage if the calculation basis is Value, and a monetary amount if the calculation basis is Specific.
Per Count: The amount of the Per Count Unit of Measure to which the rate applies. For example, when creating an up charge that is defined as $.20 for every 10 kilograms of an item, the Per Count would be 10. This field is enabled if the calculation basis is Specific.
Per Count UOM: Displays the unit of measure in which the Per Count is specified. This field is enabled if the calculation basis is Specific
Click Apply. The Component table is updated.
Click OK to save your changes and close the window.
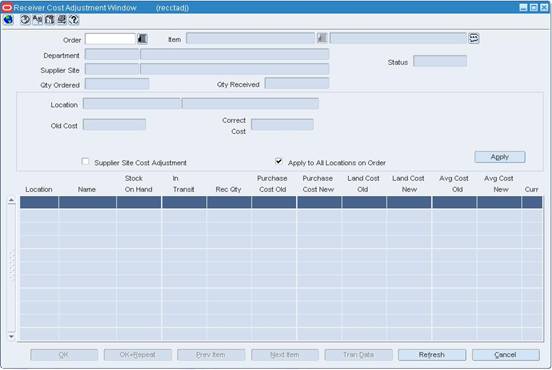
Navigate: From the main menu, select Finance > Receiver Cost Adjustment. The Receiver Cost Adjustment window opens.
In the Order field, enter the number of the purchase order, or click the LOV button and select the purchase order.
In the Item field, enter the item number, or click the LOV button and select the item. The cost details for the purchase order/item appear by location.
Select a location. The details appear in the Apply area.
In the Correct Cost field, enter the new cost per unit.
Select the Supplier Cost Adjustment check box to apply the cost change for the item at the location/supplier level.
Select the Apply To All Locations On Order check box to apply the cost change to the items at the order level.
Click Apply.
You may be prompted to enter a new average cost. Enter the average cost in the Avg Cost New field.
Click Apply. The unit costs are updated for the selected location.
Click Next Item or Prev Item to edit unit costs for another item on the current purchase order.
Click OK to save your changes and close the window.
The initial cost of an item is established at item set-up. The cost of the item can be adjusted in the item record until the status of the item is Approved or Unapproved. Any cost changes will need to be handled through the cost change windows.
When submitted through EDI, you review the cost change, then submit the cost change for approval.
When entered manually, you enter the cost change, an event description, an effective date, and a reason code. Then submit the cost change for approval.
|
Note: You cannot create a cost changes for a transformed sellable item. |
After you approve the cost change, the Item/Supplier cost record is updated and any outstanding purchase orders that have not been received are recalculated.
See "View a Cost Change" in the Foundation Data chapter
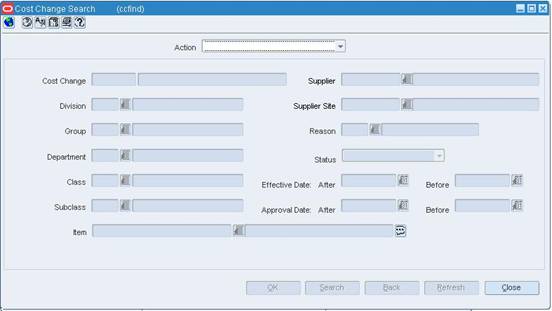
Navigate: From the main menu, select Costing > Cost Change. The Cost Change Search window opens.
|
Note: There are two additional ways in which to access the Cost Change by Supplier window: - From the main menu, select Items > Items. In the Item Search window, select New Cost Change in the Action field and search for the item to be edited; - From the main menu, select Items > Item List. In the Item List Search window, select Use in the Action field and search for an item list to be edited. Select Create Cost Change from the Options menu. |
In the Action field, select New.
Click OK. The Cost Change by Supplier window opens.
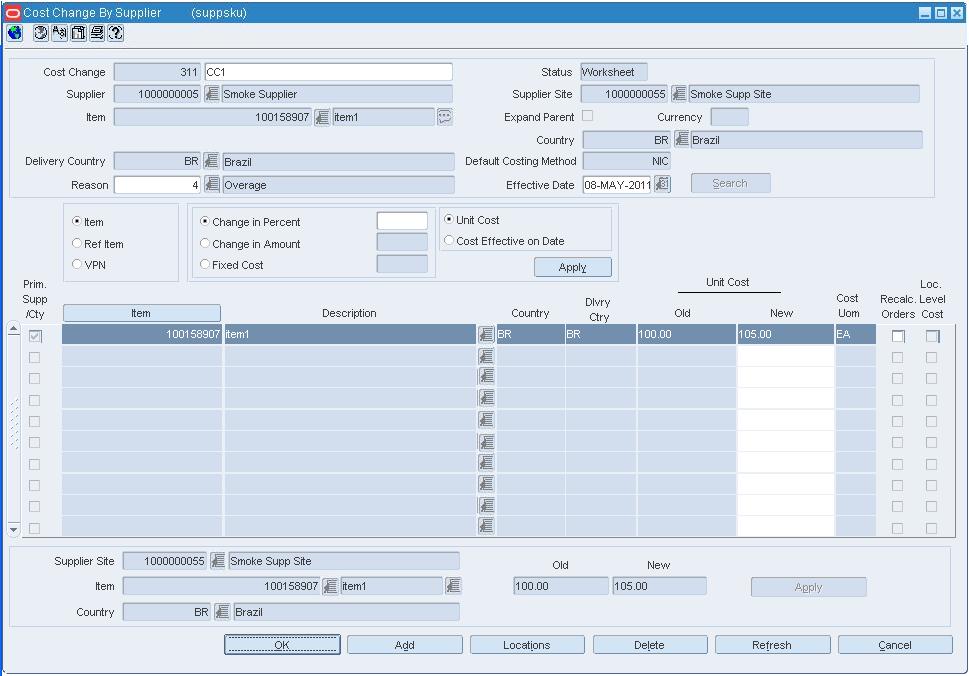
In the Cost Change field, enter a description for the cost change.
In the Item, Supplier, and Country field, enter the item number or ID of each as necessary, or click the LOV button and select the item, supplier, or country.
In the Reason field, enter the ID of the reason for the cost change, or click the LOV button and select the reason.
In the Effective Date field, enter the date on which the cost changes become effective.
Click Search. The records that match the search criteria appear.
In the box on the left, select the type of item number you want to view.
Item: Displays the item ID.
Ref Item: Displays the ID of the child item.
VPN: Displays the vendor product number for the item.
Select the type of adjustment in the Apply block.
Enter the change in the box next to the selected option.
Change in Percent: Enter the percent by which the cost changes. Use a negative symbol (-) before the percent to indicate a decrease in cost by percent.
Change in Amount: Enter the amount by which the cost changes. Use a negative symbol (-) before the percent to indicate a decrease in cost by amount.
Fixed Cost: Enter the new cost of the item. The amount entered becomes the cost of all items selected for cost change.
Click Apply. The new costs per unit are calculated.
Edit the monetary amounts in the New Unit Cost field next to each item as necessary.
Select the Recalc Orders check box next to each item or supplier if you want to update the costs on approved or unapproved purchase orders.
Select a supplier or item record and click Locations. The locations associated with the item/supplier/country of sourcing appear in the Cost Change by Location window.
Select the type of adjustment in the Apply block.
Enter the change in the box next to the selected option.
Change in Percent: Enter the percent by which the cost changes. Use a negative symbol (-) before the percent to indicate a decrease in cost by percent.
Change in Amount: Enter the amount by which the cost changes. Use a negative symbol (-) before the percent to indicate a decrease in cost by amount.
Fixed Cost: Enter the new cost of the item. The amount entered becomes the cost of all items selected for cost change.
In the Loc Type field, select a grouping mechanism.
In the Location field, enter the ID of the specific location or group, or click the LOV button and select the location or group.
In the Bracket field, enter the bracket, or click the LOV button and select the bracket.
|
Note: The Bracket field is enabled when you select warehouse group type in the Loc. Type field. |
Click Apply. The new costs per unit are calculated.
Edit the monetary amounts in the New Unit Cost field next to each item as necessary.
Select the Recalc Orders check box if you want to update the costs on approved or unapproved purchase orders.
Click OK to save your changes and close the window.
This form will display the status of all events being processed or already processed by the future cost engine. The form will allow users to view any issues that occurred during the process.
Navigate: From the main menu, select Costing > Future Cost Event Log. The Future Cost Event Log window opens.
In the Event field, enter an event or click the LOV button to select an event.
In the Event Type field, enter an event type or click the LOV button to select an event type.
In the Status field, select a status from the drop down option.
In the Event Date From field, enter a date or click the calendar button and select a date.
In the To field, enter a date or click the calendar button and select a date.
In the User ID field, enter an ID or click the LOV button and select an ID.
Click Search. The results are listed in the table.
Select the event type in the table.
From the View menu, select Detail. The Cost Change Detail window opens.
Click OK to close the window.
From the View menu, select Audit. The Audit window opens.
Click OK to close the window.
From the View menu, select Threads for cost event. The Future Cost Event Thread window opens.
In the Status field, select a status from the drop down option.
In the Thread field, select a thread or click the LOV button to select a thread.
Click Search. The results are listed in the table.
Select the Process checkbox of the item you want to process.
Click Process. The item is processed.
Click OK to close the window and save your changes.
Navigate: From the main menu, select Costing > Cost Change. The Cost Change Search window opens. Search for and retrieve a cost change in Edit mode. Restrict the search to cost changes in worksheet or submitted status. The Cost Change by Supplier window opens.
In the Cost Change field, edit the description of the cost change as necessary.
To add a supplier or item:
Click Add.
Select a supplier or item from the list of values that opens.
To edit a supplier or item:
Select a record.
Select a Delivery Country associated with the supplier.
Select a record.
When prompted to delete the record, click Yes.
To delete a supplier or item:
Select a record and click Delete.
When prompted to delete the record, click Yes.
Select the type of adjustment in the Apply block. Then enter the monetary amount or percentage in the box next to the selected option.
Click Apply. The new retail values and costs per unit are calculated.
Edit the monetary amounts in the New Unit Cost field next to each item as necessary.
Select the Recalc Orders check box next to each item or supplier if you want to update the costs on approved or unapproved purchase orders.
Select a supplier or item record and click Locations. The locations associated with the item/supplier/country of sourcing appear in the Cost Change by Location window.
To add a location:
Click Add.
Select a location from the list of values that opens.
To delete a location:
Select a location and click Delete.
When prompted to delete the record, click Yes.
Select the type of adjustment in the Apply block. Then enter the monetary amount or percentage in the box next to the selected option.
In the Loc Type field, select a grouping mechanism.
In the Location field, enter the ID of the specific location or group, or click the LOV button and select the location or group.
In the Bracket field, enter the bracket, or click the LOV button and select the bracket.
|
Note: The Bracket field is enabled when you select a warehouse in the Location field. |
Click Apply. The new retail values and costs per unit are calculated.
Edit the monetary amounts in the New Unit Cost field next to each item as necessary.
Select the Recalc Orders check box if you want to update the costs on approved or unapproved purchase orders.
Click OK to save your changes and close the window.
The Cost Change Search window allows you to enter criteria in order to search for cost change events and view the results of the search.
The default view for the Cost Change Search window opens when you open the window for the first time. You can also create a custom view.
Navigate: From the main menu, select Costing > Cost Change. The Cost Change Search window opens.
In the Action field, select either Edit or View.
In the Origin field, select Cost.
Enter additional criteria as desired to make the search more restrictive.
Click Search. The Price Change Search window displays the cost changes that match the search criteria.
Select a task:
To perform another search, click Refresh.
To display the details of a cost change, select a record and click OK. The details appear in the Cost Change by Supplier window.
Click Close to close the window.
Navigate: From the main menu, select Costing > Cost Change. The Cost Change Search window opens. Search for and retrieve a cost change in Edit mode. Restrict the search to cost changes in Worksheet, Submitted, or Rejected status. The Cost Change by Supplier window opens.
From the Options menu, select Delete. You are prompted to delete the cost change.
Click Yes. The cost change is deleted. The Cost Change Search window opens.
Click Close to save your changes and close the window.
Navigate: From the main menu, select Control > Setup > Cost Change Reason > Edit. The Cost Change Reason Maintenance window opens.
Edit the description as necessary.
To delete a cost change reason:
Select a reason.
Click Delete. You are prompted to delete the record.
Click Yes.
Click OK to save your changes and close the window.
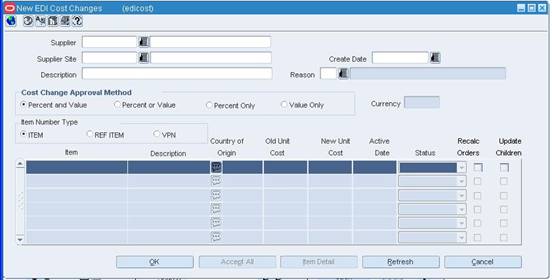
Navigate: From the main menu, select Items > EDI Cost Changes. The New EDI Cost Changes window opens.
In the Supplier field, enter the ID of the supplier, or click the LOV button and select the supplier.
In the Create Date field, enter the date on which the cost changes were received, or click the LOV button and select the date. The items that match the criteria appear.
In the Description field, enter a description for the cost change event.
In the Reason field, enter the ID of the reason for the cost change, or click the LOV button and select the reason.
In the Cost Change Approval Method area, select an approval method.
In the Status field, select either Accepted or Rejected for each cost change.
|
Note: To accept all the cost changes, click Accept All. |
Select the Recalc Orders check box next to each cost change if you want to update the cost on unapproved purchase orders.
Select the Update Children check box next to each cost change if you want to apply the change to subordinate items.
Click OK to save your changes and close the window.
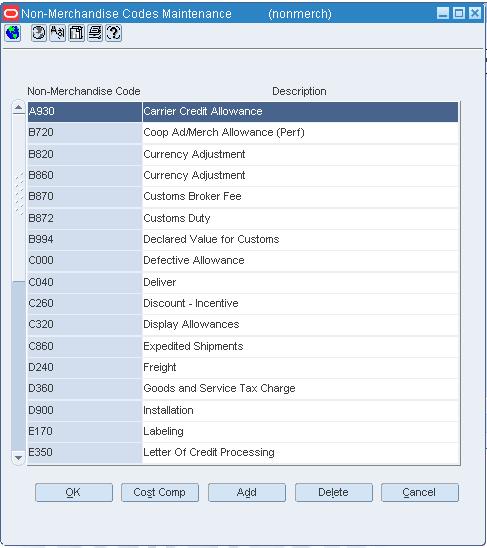
Navigate: From the main menu, select Control > Setup > Non-Merchandise Codes > Edit. The Non-Merchandise Codes Maintenance window opens.
|
Note: This window is only available when you are using Oracle Retail Trade Management (RTM) with RMS. If simplified RTM is used, the functionality may differ. |
Select a non-merchandise code in the table.
Click Cost Comp. The Non-Merchandise Cost Components window opens.
Select a cost component in the table.
Click Delete. You are prompted to delete the component.
Click Yes.
Click OK to close the window and save your changes.
|
Note: This window is only available when you are using Oracle Retail Trade Management (RTM) with RMS. If simplified RTM is used, the functionality may differ. |
Navigate: From the main menu, select Control > Setup > Non-Merchandise Codes > Edit. The Non-Merchandise Codes Maintenance window opens.
Select a non-merchandise code in the table.
Click Cost Comp. The Non-Merchandise Cost Components window opens.
Click Add.
On the next available line, enter the ID of the cost component in the Component ID field, or click the LOV button and select a cost component.
Click OK to save your changes and close the window.
For a cost change to take affect, it needs to be in approved status. Depending on your user role, you may be able to move the cost change to the next status. A cost change may be in any of the following statuses:
Table 8-1 Cost Change Statuses
| Status | Status definition |
|---|---|
|
Worksheet |
The cost change event is incomplete. You can edit, submit, or delete the cost change event. |
|
Submitted |
The cost change event is complete and submitted for approval. You can approve, reject, or delete the cost change event. |
|
Approved |
The cost change event is complete and has been approved. You can return the cost change event to Worksheet status for editing or cancel the cost change event. |
|
Rejected |
The cost change event is complete and has been approved. You can return the cost change event to Worksheet status for editing or cancel the cost change event. |
|
Extracted |
The details of the cost change event were extracted to the locations affected by the cost change event. Only cost change events in Approved status are extracted. |
|
Canceled |
The details of the cost change event were extracted to the locations affected by the cost change event. Only cost change events in Approved status are extracted. |
Navigate: From the main menu, select Costing > Cost Change. The Cost Change Search window opens. Search for and retrieve a cost change in Edit mode. Restrict the search to cost changes in Worksheet status. The Cost Change by Supplier window opens.
From the Options menu, select Submit.
When prompted to submit the cost change, click Yes. The status of the cost change changes to Submitted.
Click OK to save your changes and close the window.
Navigate: From the main menu, select Costing > Cost Change. The Cost Change Search window opens. Search for and retrieve a cost change in Edit mode. Restrict the search to cost changes in Submitted status. The Cost Change by Supplier window opens.
From the Options menu, select Approve.
When prompted to approve the cost change, click Yes. The status of the cost change changes to Approved.
Click OK to save your changes and close the window.
Navigate From the main menu, select Costing > Cost Change. The Cost Change Search window opens. Search for and retrieve a cost change event in Edit mode. Restrict the search to cost changes in Submitted status. The Cost Change by Supplier window opens.
From the Options menu, select Reject. You are prompted to reject the cost change.
Click Yes. The status of the cost change changes to Rejected.
Click OK to save your changes and close the window.
Navigate: From the main menu, select Costing > Cost Change. The Cost Change Search window opens. Search for and retrieve a cost change in Edit mode. Restrict the search to cost changes in Approved status. The Cost Change by Supplier window opens.
From the Options menu, select Cancel. You are prompted to cancel the cost change.
Click Yes. The status of the cost change changes to Cancelled.
Click OK to save your changes and close the window.