| Oracle® Retail Merchandising System Custom Flex Attribute Solution Implementation Guide Release 15.0 E65438-01 |
|


 Previous |
 Next |
| Oracle® Retail Merchandising System Custom Flex Attribute Solution Implementation Guide Release 15.0 E65438-01 |
|
Previous |
Next |
Once the attribute structure and other relevant details have been planned out, you can set the attributes up in the system using the CFAS Maintenance screens. The CFAS Maintenance screens are set of screens that appear under the Custom Flex Attribute Setup group in the RMS Start Menu. This chapter describes how you can use the CFAS Maintenance screens to set up the CFAS attributes. It includes the following sections:
The following considerations apply to all the screens mentioned in this chapter:
CFAS Administration Role
To access the Custom Flex Attribute Setup group and CFAS Maintenance screens, ensure that you have the CFAS Administrator (CFAS_ADMIN) role associated with your user account. For more information, see CFAS Administration Role.
Character Limit for Labels
The CFAS Maintenance screens enable you to set up labels for the attribute, attribute groups, attribute group sets, record groups, codes, and entities. When activated, the labels set for the attribute group sets are the screen text that appear on the Options menu and labels set for other objects are the field prompts in the CFAS UI. To avoid any overlap issues in the user interface and data consistency, it is recommended that you maintain a 60 character limit for all the labels and 40 character limit for the entity key labels.
The Entity Maintenance screen enables you to review and set up entities and entity labels for your CFAS-based implementation. For more information on entities, see Entities.
To set up entity labels:
From the main menu, expand Custom Flex Attributes Setup, and then click Entity Setup.
From the Contents of Entity Setup area, double click Edit. The Entity Maintenance screen appears.
On the Entity Maintenance screen, select the base RMS table corresponding to the entity you want. For more information, see Adding an Entity.
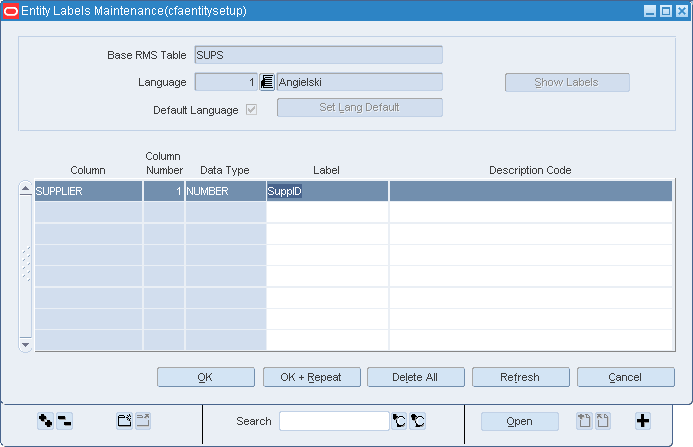
Click Label.The Entity Labels Maintenance screen appears.
On the Entity Labels Maintenance screen, select the relevant language from the Language list of values, and then click Show Labels.
Under the Labels column, enter the labels for the relevant columns, enter a relevant function name under Description Code. Description Code column must contain the function that will display the description of the relevant key. For example, SUPPS_SQL.GET_SUPP_NAME will retrieve the supplier name.
In case you want to set the selected language as the default, click Set Lang Default. The Default Language check box appears selected.
Click OK+Repeat to set labels for another language.
Once the labels are set up, click OK to close the Entity Labels Maintenance screen.
Click OK to close the Entity Maintenance screen.
Adding an Entity
To add an entity that is not currently extended, click Add. A new line entry appears on screen.
Under Base RMS Table, enter the relevant base RMS table name using the LOV button. The List of Base RMS tables window appears.
Find and select the table that is not currently extended, and click OK. Notice that the base RMS table name gets added under the Base RMS Table column and a new corresponding extension table name (with the _CFA_EXT suffix) gets added under the Custom Extension Table column.
Optional. Under the Validation Function column, you can choose to specify any validation function you have planned at the entity level.
Click Label and follow steps 4 through 10 to set up labels.
|
Note: On the Entity Maintenance screen, the Active check box indicates that the CFAS attribute is active for the relevant entity. It also means that the relevant database tables and views are created and ready for use. The Base check box indicates that the relevant entity is pre-enabled by default in RMS. |
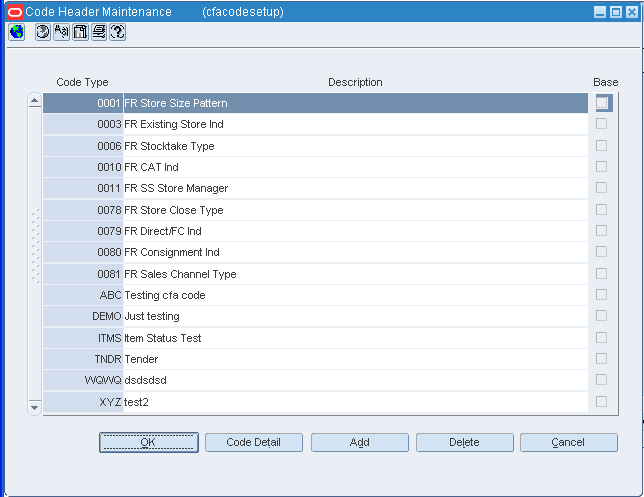
The Code Header Maintenance screen enables you to set up codes that will be used as values in the attributes with the List Item widget type. For more information on codes, see Codes.
To set up codes:
From the main menu, expand Custom Flex Attributes Setup, and then click Code Setup.
From the Contents of Code Setup area, double click Edit. The Code Header Maintenance screen appears.
On the Code Header Maintenance screen, click Add. A new line entry appears on screen.
Enter a valid code type under Code Type, and add a relevant description.
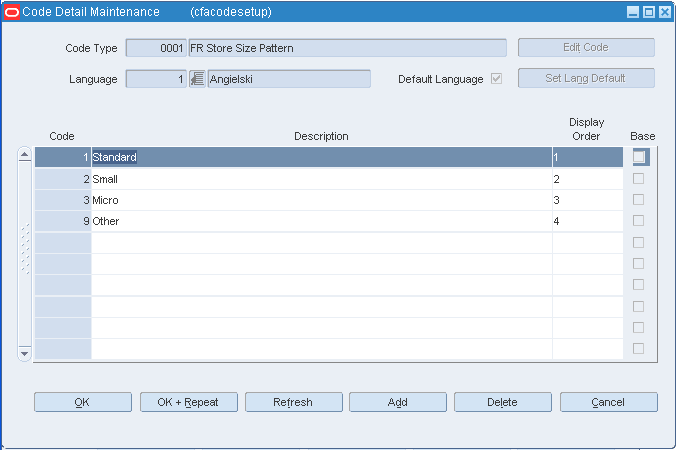
Keeping the new code type selected, click Code Detail. The Code Detail Maintenance screen appears.
In the Code Detail Maintenance screen, select the relevant language using the Language LOV button, and then click Edit Code.
Enter relevant code, associated descriptions, and set a display order.
In case you want to set the current language as the default, click Set Lang Default.
Click OK+Repeat to set codes in other languages.
Click OK to apply and close the Code Detail Maintenance screen.
Click OK to close the Code Header Maintenance screen.
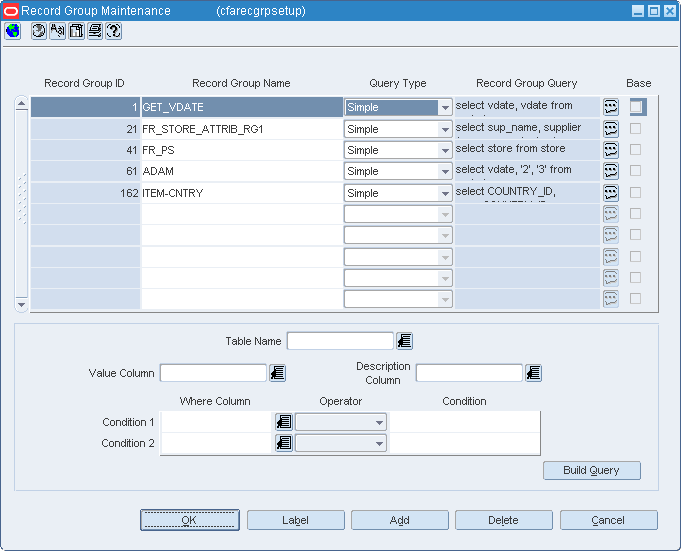
The Record Group Maintenance screen enables you to set up record groups for the attributes with List of Values (LOV) widget type. For more information on record groups, see Record Groups.
To set up record groups:
From the main menu, expand Custom Flex Attributes Setup, and then click Record Group Setup.
From the Contents of Record Group Setup area, double click Edit. The Record Group Maintenance screen appears.
On the Record Group Maintenance screen, click Add. A new line entry appears on screen.
Under Record Group Name, enter a valid name for the record group.
Under Query Type, select one of the following query types:
For simple queries:
Under Query Type, select Simple. The Table Name field gets enabled.
Use the Table LOV button and select the relevant database table for the query. Once you select the table, the other fields get enabled.
Select the relevant column and description column for the query in the Value Column and Description Column fields.
Set a condition for the query by specifying values under Where Column, Operator, and Condition columns.
Click Build Query. Notice that the record group query gets added under the Record Group Query column.
For complex queries:
Under Query Type, select Complex. Unlike simple queries, the user interface does not provide you the ability to set a query. You must work with your database administrator to build and record the query for your record group.
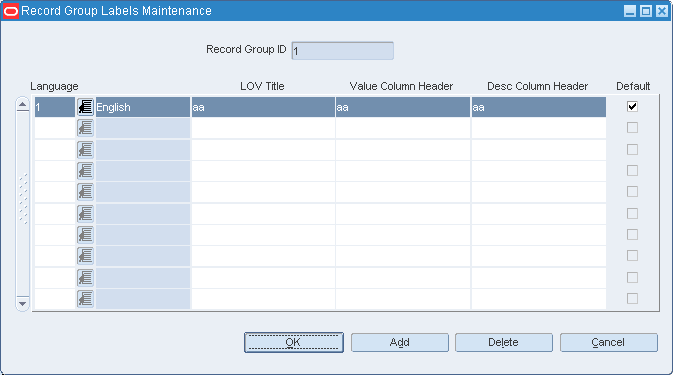
Once the query is set up, click Label. The Record Group Labels Maintenance screen appears.
On the Record Group Labels Maintenance screen, select the language using the Language LOV button.
Under LOV Title, set a relevant list of values title.
Under Value Column Header and Desc Column Header, set a header name for the value column and description column.
Add more lines to enter similar information for other languages.
Under Default, select the check box next to the language you want to set as the default language.
Click OK to apply and close the Record Group Labels Maintenance screen.
Click OK to close the Record Group Maintenance screen.
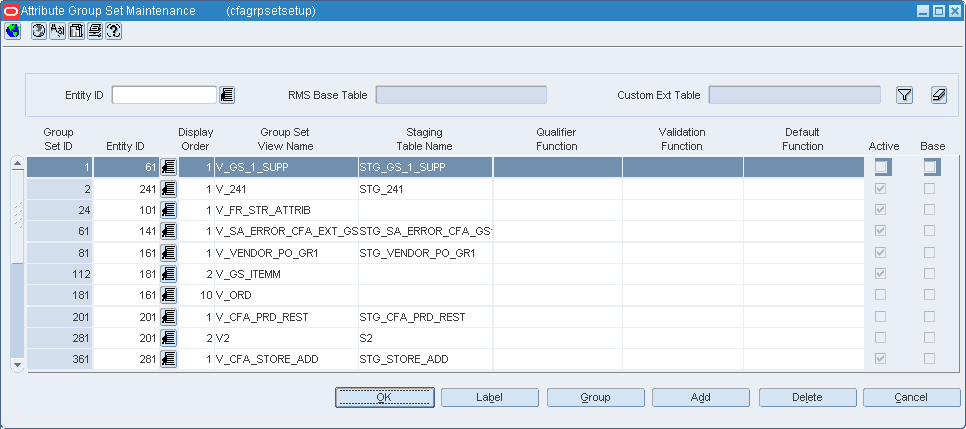
The Attribute Group Set Maintenance screen enables you to set up attribute group sets. For more information on attribute group sets, see Attribute Group Sets.
To set up attribute group sets:
From the main menu, expand Custom Flex Attributes Setup, and then click Group Set Setup.
From the Contents of Group Set Setup area, double click Edit. The Attribute Group Set Maintenance screen appears.
On the Attribute Group Set Maintenance screen, click Add to add a new attribute group set. A new line entry appears on screen.
Enter relevant information in the following columns:
Under Entity ID, enter the relevant Entity ID using the list of values button. This will be the identification code of the entity you set up in the Entity Maintenance screen.
Under Display Order, enter a valid number that indicates the order in which the attribute group set label will appear in the Options menu of the relevant RMS base form.
Under Group Set View Name, enter a valid group set view name for the attribute group set. It is recommended that you start the name with V_.
Under Staging Table Name, enter a staging table name that you want to create and associate with this attribute group set. It is recommended that you start the name with STG_.
Under Qualifier Function, Validation Function, and Default Function, enter the planned functions for the attribute group set. For more information, see Attribute Group Sets.
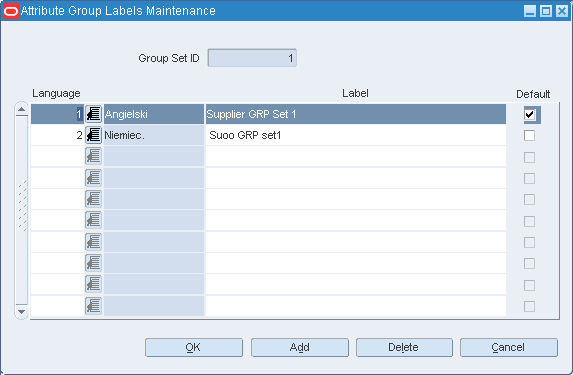
Click Label. The Attribute Group Labels Maintenance screen appears.
On the Attribute Group Labels Maintenance screen, under Language, select the relevant language code using the list of values button.
Under Label, enter the name that will appear for the attribute group set in the Options menu of the base RMS form.
You can define a hot key by putting a & character before any character in the label you want. This makes the attribute group set label in the Options menu to appear with a hot key. It can be used as a keyboard shortcut to quickly access the CFAS user interface.
For example, consider that you want to set up a attribute group set label as Create Special Order. To set up the letter S as the hot key, enter the & character before the letter S in the Attribute Group Labels Maintenance screen. The label will then read as Create &Special Order. Once activated, the label name in the Options menu will read as Create Special Order. Notice the underline under the letter S which indicates that it is the designated hot key for the menu option. Ensure that you maintain a list of assigned hot keys to ensure that they remain unique for each base RMS form.
You can choose to set up the labels for more languages. In case you set up more languages, ensure that you select the relevant check box under Default for the default language.
Once done, click OK to close the Attribute Group Labels Maintenance screen.
Once all attribute group sets are set up, click OK to close the Attribute Group Set Maintenance screen.
You must now set up attribute groups. To open the Attribute Group Maintenance screen, you can access the screen from the main menu or click the Group button on the Attribute Group Set Maintenance screen.
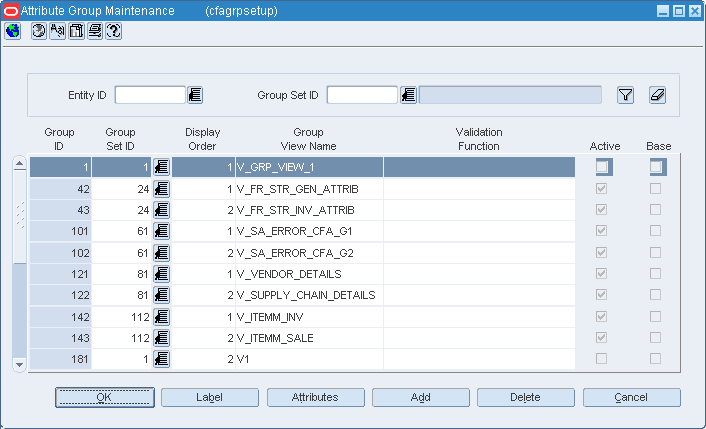
The Attribute Group Maintenance screen enables you to set up attribute groups. For more information on attribute groups, see Attribute Groups.
To set up attribute groups:
From the main menu, expand Custom Flex Attributes Setup, and then click Group Setup.
From the Contents of Group Setup area, double click Edit. The Attribute Group Maintenance screen appears.
On the Attribute Group Maintenance screen, click Add to add a new attribute group. A new line entry appears on screen.
Enter the following information in the columns:
Under Group Set ID, enter the relevant group set ID using the list of values button. This will be the identification code of the attribute group set you set up in the Attribute Group Set Maintenance screen.
Under Display Order, enter a valid number that indicates the order in which the attribute group label will appear.
Under Group View Name, enter a valid group view name for the attribute group. It is recommended that you start the name with V_.
Under Validation Function, enter the planned function for the attribute group set. For more information, see Attribute Groups.
Click Label. The Attribute Group Labels Maintenance screen appears.
On the Attribute Group Labels Maintenance screen, under Language, select the relevant language code using the list of values button.
Under Label, enter the name that will appear for the attribute group set in the Options menu of the base RMS form.
You can choose to set up the labels for more languages. In case you set up more languages, ensure that you select the relevant check box under Default for the default language.
Once done, click OK to close the Attribute Group Labels Maintenance screen.
Once all attribute group sets are set up, click OK to close the Attribute Group Maintenance screen.
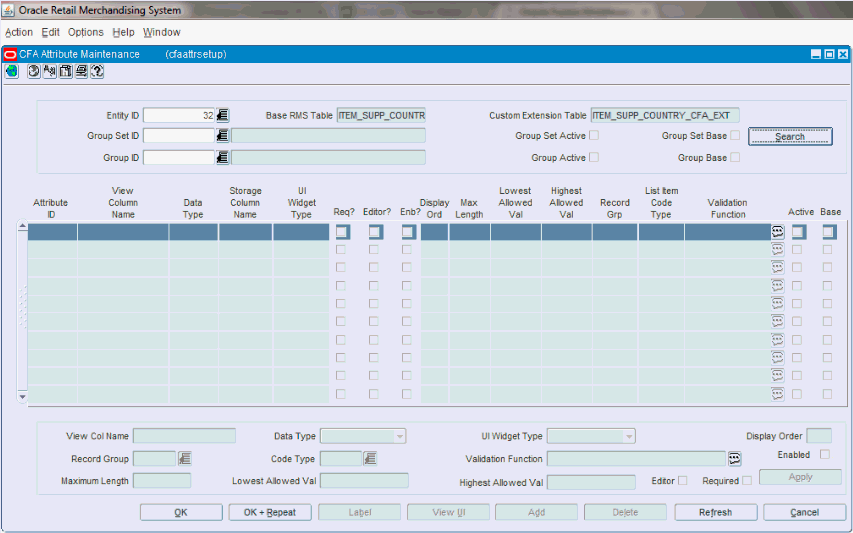
You must now set up attributes. To open the Attribute Maintenance screen, you can access the screen from the main menu or click the Attributes button on the Attribute Group Maintenance screen.
The Attribute Maintenance screen enables you to set up attributes. For more information on attributes, see Attributes.
To set up attributes:
From the main menu, expand Custom Flex Attributes Setup, and then click Attribute Setup.
From the Contents of Attribute Setup area, double click Edit. The Attribute Maintenance screen appears.
On the Attribute Maintenance screen, select the relevant entity ID, attribute group set ID, and group ID set up in the Entity Maintenance, Attribute Group Set Maintenance, and Attribute Group Maintenance screens.
Click Add to add a new attribute.
Enter information in the following fields:
In the View Col Name field, enter a valid column name.
In the Data Type drop-down list, select a relevant data type. You can choose from VARCHAR2, NUMBER, and DATE.
In case you selected VARCHAR2 or NUMBER in the Data Type field, the UI Widget Type drop-down list gets enabled.
In the UI Widget Type drop-down list, select a relevant widget type. Based on the data type you selected, the following options appear in the UI Widget Type drop-down list:
– For VARCHAR2 data type, the Text Item, List of Values, List Item, and Check Box widget types appear.
– For NUMBER data type, the Text Item and List of Values widget types appear.
Set a display order in the Display Order field.
In case you selected List of Values widget type, the Record Group field gets enabled. Use the LOV button to select one of the available record groups. Record groups are set up in the Record Groups Maintenance screen. For more information, see Setting Up Record Groups.
In case you selected List Item widget type, the Code Type field gets enabled. Use the LOV button to select one of the available code types. Code types are set up in the Code Type Maintenance screen. For more information, see Setting Up Codes.
|
Note: A current limitation in Oracle Forms causes the check box label to offset when selected. This may occur when you set up a single attribute with the Check box widget type.To avoid this issue, it is recommended that you add another attribute to the screen. |
In the Validation Function field, enter a valid validation function planned for the attribute.
In case you want to keep this attribute enabled in the CFAS user interface, keep the Enabled check box selected.
In case you selected the Text Item widget type, the Max Length field gets enabled. Set the maximum number of characters allowed in the field.
In case you selected the Number data type, the Lowest Allowed Val and Highest Allowed Val fields get enabled. Set the lowest and highest allowed values in the field.
In case you want to set this field as mandatory, select the Required check box. You must also ensure that the Enabled check box is selected.
Click Apply. Notice that a new attribute is added.
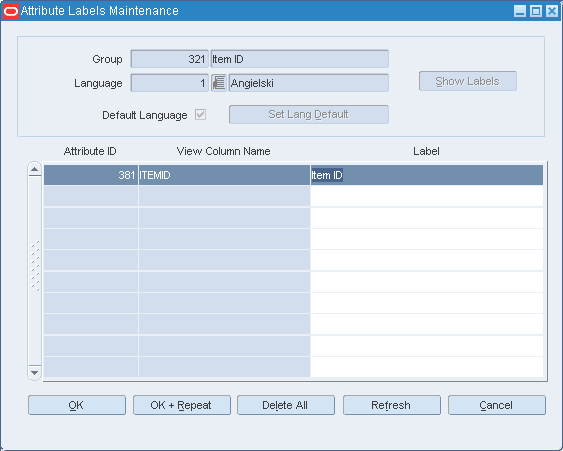
Once the attributes are added, click Label. The Attribute Labels Maintenance screen appears.
In the Attribute Labels Maintenance screen, select the relevant language using the Language LOV button, and then click Show Labels.
Under Label, enter relevant labels for the attributes. Click OK+Repeat to set up labels for other languages.
Click OK to close the Attribute Labels Maintenance screen.
Once you have set up all the information into the system, it is recommended that you test and review all the attribute group sets for each entity using the View UI button and View CFAS UI Parameters menu option in the Attribute Maintenance screen.
After verifying that all the screen layouts look correct and work as expected, you can proceed with running the cfagen.ksh batch script and make the CFAS attributes available for use in RMS. For more information on the database scripts, see CFAS Database Scripts.