Oracle® Retail Merchandising
System
Operations Guide, Volume 3 - Back End Configuration and Operations
Release
15.0.1
E75566-01
June 2016
Oracle®
Retail Merchandising System Operations Guide, Volume 3 - Back End Configuration
and Operations, Release 15.0.1
E75566-01
Copyright © 2016, Oracle. All rights reserved.
Primary Author: Maria Andrew
This software and related documentation are provided
under a license agreement containing restrictions on use and disclosure and are
protected by intellectual property laws. Except as expressly permitted in your
license agreement or allowed by law, you may not use, copy, reproduce,
translate, broadcast, modify, license, transmit, distribute, exhibit, perform,
publish, or display any part, in any form, or by any means. Reverse
engineering, disassembly, or decompilation of this software, unless required by
law for interoperability, is prohibited.
The information contained herein is subject to change
without notice and is not warranted to be error-free. If you find any errors,
please report them to us in writing.
If this is software or related documentation that is
delivered to the U.S. Government or anyone licensing it on behalf of the U.S.
Government, then the following notice is applicable:
U.S. GOVERNMENT END USERS: Oracle programs, including
any operating system, integrated software, any programs installed on the
hardware, and/or documentation, delivered to U.S. Government end users are
"commercial computer software" pursuant to the applicable Federal
Acquisition Regulation and agency-specific supplemental regulations. As such,
use, duplication, disclosure, modification, and adaptation of the programs,
including any operating system, integrated software, any programs installed on
the hardware, and/or documentation, shall be subject to license terms and
license restrictions applicable to the programs. No other rights are granted to
the U.S. Government.
This software or hardware is developed for general use
in a variety of information management applications. It is not developed or
intended for use in any inherently dangerous applications, including
applications that may create a risk of personal injury. If you use this
software or hardware in dangerous applications, then you shall be responsible
to take all appropriate fail-safe, backup, redundancy, and other measures to
ensure its safe use. Oracle Corporation and its affiliates disclaim any
liability for any damages caused by use of this software or hardware in
dangerous applications.
Oracle and Java are registered trademarks of Oracle
and/or its affiliates. Other names may be trademarks of their respective owners.
Intel and Intel Xeon are trademarks or registered
trademarks of Intel Corporation. All SPARC trademarks are used under license
and are trademarks or registered trademarks of SPARC International, Inc. AMD,
Opteron, the AMD logo, and the AMD Opteron logo are trademarks or registered
trademarks of Advanced Micro Devices. UNIX is a registered trademark of The
Open Group.
This software or hardware and documentation may provide
access to or information about content, products, and services from third
parties. Oracle Corporation and its affiliates are not responsible for and
expressly disclaim all warranties of any kind with respect to third-party
content, products, and services unless otherwise set forth in an applicable
agreement between you and Oracle. Oracle Corporation and its affiliates will
not be responsible for any loss, costs, or damages incurred due to your access
to or use of third-party content, products, or services, except as set forth in
an applicable agreement between you and Oracle.
Value-Added Reseller (VAR) Language
Oracle
Retail VAR Applications
The following restrictions and provisions only apply to
the programs referred to in this section and licensed to you. You acknowledge
that the programs may contain third party software (VAR applications) licensed
to Oracle. Depending upon your product and its version number, the VAR
applications may include:
(i) the MicroStrategy Components developed and
licensed by MicroStrategy Services Corporation (MicroStrategy) of McLean, Virginia to Oracle and imbedded in the MicroStrategy for Oracle Retail Data
Warehouse and MicroStrategy for Oracle Retail Planning & Optimization
applications.
(ii) the Wavelink component developed and
licensed by Wavelink Corporation (Wavelink) of Kirkland, Washington, to Oracle
and imbedded in Oracle Retail Mobile Store Inventory Management.
(iii) the software component known as Access Via™
licensed by Access Via of Seattle, Washington, and imbedded in Oracle Retail
Signs and Oracle Retail Labels and Tags.
(iv) the software component known as Adobe Flex™ licensed
by Adobe Systems Incorporated of San Jose, California, and imbedded in Oracle
Retail Promotion Planning & Optimization application.
You acknowledge and confirm that Oracle grants you use
of only the object code of the VAR Applications. Oracle will not deliver source
code to the VAR Applications to you. Notwithstanding any other term or
condition of the agreement and this ordering document, you shall not cause or
permit alteration of any VAR Applications. For purposes of this section,
"alteration" refers to all alterations, translations, upgrades,
enhancements, customizations or modifications of all or any portion of the VAR
Applications including all reconfigurations, reassembly or reverse assembly,
re-engineering or reverse engineering and recompilations or reverse
compilations of the VAR Applications or any derivatives of the VAR
Applications. You acknowledge that it shall be a breach of the agreement to
utilize the relationship, and/or confidential information of the VAR
Applications for purposes of competitive discovery.
The VAR Applications contain trade secrets of Oracle and
Oracle's licensors and Customer shall not attempt, cause, or permit the
alteration, decompilation, reverse engineering, disassembly or other reduction
of the VAR Applications to a human perceivable form. Oracle reserves the right
to replace, with functional equivalent software, any of the VAR Applications in
future releases of the applicable program.
Oracle Retail Merchandising System Operations Guide, Volume 3 -
Back End Configuration and Operations, Release 15.0.1
Oracle welcomes customers' comments and suggestions on the
quality and usefulness of this document.
Your feedback is important, and helps us to best meet your needs
as a user of our products. For example:
§
Are the implementation steps correct and complete?
§
Did you understand the context of the procedures?
§
Did you find any errors in the information?
§
Does the structure of the information help you with your tasks?
§
Do you need different information or graphics? If so, where, and
in what format?
§
Are the examples correct? Do you need more examples?
If you find any errors or have any other suggestions for
improvement, then please tell us your name, the name of the company who has
licensed our products, the title and part number of the documentation and the
chapter, section, and page number (if available).
Note:
Before sending us your comments, you might like to check that you have the
latest version of the document and if any concerns are already addressed. To do
this, access the new Applications Release Online Documentation CD available on
My Oracle Support and www.oracle.com. It
contains the most current Documentation Library plus all documents revised or
released recently.
Send your comments to us using the electronic mail address: retail-doc_us@oracle.com
Please give your name, address, electronic mail address, and
telephone number (optional).
If you need assistance with Oracle software, then please contact
your support representative or Oracle Support Services.
If you require training or instruction in using Oracle software,
then please contact your Oracle local office and inquire about our Oracle University offerings. A list of Oracle offices is available on our Web site at www.oracle.com.
This Retail Merchandising System Operations Guide,
Volume 3 - Back End Configuration and Operations provides critical
information about the processing and operating details of Oracle Retail
Merchandising System (RMS), including the following:
§
System configuration settings
§
Technical architecture
§
Functional integration dataflow across the enterprise
§
Batch processing
This guide is for:
§
Systems administration and operations personnel
§
Systems analysts
§
Integrators and implementers
§
Business analysts who need information about Merchandising System
processes and interfaces
For information about Oracle's commitment to accessibility, visit
the Oracle Accessibility Program website at
http://www.oracle.com/pls/topic/lookup?ctx=acc&id=docacc.
Access to Oracle Support
Oracle customers that have purchased support have access to
electronic support through My Oracle Support. For information, visit http://www.oracle.com/pls/topic/lookup?ctx=acc&id=info
or visit http://www.oracle.com/pls/topic/lookup?ctx=acc&id=trs
if you are hearing impaired.
For more information, see the following documents:
§
Oracle Retail Merchandising System Installation Guide
§
Oracle Retail Merchandising System Release Notes
§
Oracle Retail Merchandising System Data Model
§
Oracle Retail Merchandising System Data Access Schema Data
Model
§
Oracle Retail Merchandising Security Guide
§
Oracle Retail Merchandising Implementation Guide
§
Oracle Retail Merchandising Batch Schedule
§
Oracle Retail Sales Audit documentation
§
Oracle Retail Trade Management documentation
§
Oracle Retail Fiscal Management documentation
To contact Oracle
Customer Support, access My Oracle Support at the following URL:
https://support.oracle.com
When contacting
Customer Support, please provide the following:
§
Product version and program/module name
§
Functional and technical description of the problem (include
business impact)
§
Detailed step-by-step instructions to re-create
§
Exact error message received
§
Screen shots of each step you take
When you install the application for the first time, you install
either a base release (for example, 15.0) or a later patch release (for
example, 15.0.1). If you are installing the base release or additional patch
releases, read the documentation for all releases that have occurred since the
base release before you begin installation. Documentation for patch releases
can contain critical information related to the base release, as well as
information about code changes since the base release.
To more quickly address critical corrections to Oracle Retail
documentation content, Oracle Retail documentation may be republished whenever
a critical correction is needed. For critical corrections, the republication of
an Oracle Retail document may at times not be attached to a numbered
software release; instead, the Oracle Retail document will simply be replaced
on the Oracle Technology Network Web site, or, in the case of Data Models, to
the applicable My Oracle Support Documentation container where they reside.
This process will prevent delays in making critical corrections
available to customers. For the customer, it means that before you begin
installation, you must verify that you have the most recent version of the
Oracle Retail documentation set. Oracle Retail documentation is available on
the Oracle Technology Network at the following URL:
http://www.oracle.com/technetwork/documentation/oracle-retail-100266.html
An updated version of the applicable Oracle Retail document is
indicated by Oracle part number, as well as print date (month and year). An
updated version uses the same part number, with a higher-numbered suffix. For
example, part number E123456-02
is an updated version of a document with part number E123456-01.
If a more recent version of a document is available, that version
supersedes all previous versions.
Oracle Retail product documentation is available on the following
web site:
http://www.oracle.com/technetwork/documentation/oracle-retail-100266.html
(Data Model documents are not available through Oracle Technology
Network. You can obtain them through My Oracle Support.)
Navigate:
This is a navigate statement. It tells you how to get to the start of the
procedure and ends with a screen shot of the starting point and the statement
“the Window Name window opens”.
This is a code sample
It is used to display examples of code
2
Pro*C Restart and Recovery
RMS has implemented a restart recovery process in most of its
batch architecture. The general purpose of restart/recovery is to:
§
Recover a halted process from the point of failure.
§
Prevent system halts due to large numbers of transactions.
§
Allow multiple instances of a given process to be active at the
same time.
Further, the RMS restart/recovery tracks batch execution
statistics and does not require DBA authority to execute.
The restart capabilities revolve around a program’s logical unit
of work (LUW). A batch program processes transactions, and commit points are
enabled based on the LUW. LUWs consist of a relatively unique transaction key
(such as sku/store) and a maximum commit counter. Commit events take place
after the number of processed transaction keys meet or exceed the maximum
commit counter. For example, after every 10,000 sku/store combinations, a
commit occurs. At the time of commit, key data information that is necessary
for restart is stored in the restart tables. In the event of a handled or
un-handled exception, transactions is rolled back to the last commit point, and
upon restart the key information is retrieved from the tables so that
processing can continue from the last commit point.
The RMS restart/recovery process is driven by a set of four
tables. These tables are shown in Entity Relationship diagram. For detailed table
description, see RESTART_CONTROL, RESTART_PROGRAM_STATUS, RESTART_BOOKMARK and RESTART_PROGRAM_HISTORY.

RMS Restart Recovery Entity
Relationships Diagram
RESTART_CONTROL
The restart_control
table is the master table in the restart/recovery table set. One record exists
on this table for each batch program that is run with restart/recovery logic in
place. The restart/recovery process uses this table to determine:
§
Whether the restart/recovery is table-based or file-based.
§
The total number of threads used for each batch program.
§
The maximum records processed before a commit event takes place.
§
The driver for the threading (multi-processing) logic.
§
Time to wait for a lock and the number of lock retry.
|
restart_control
|
|
(PK) program_name
|
varchar2
|
25
|
Batch program name.
|
|
program_desc
|
varchar2
|
120
|
A brief description of the program function.
|
|
driver_name
|
varchar2
|
25
|
Driver on query, for example, department (non-updatable).
|
|
num_threads
|
num
|
10
|
Number of threads used for current process.
|
|
update_allowed
|
varchar2
|
2
|
Indicates whether user can update thread numbers or if
done programmatically.
|
|
process_flag
|
varchar2
|
1
|
Indicates whether the process is table-based (T) or file-based
(F).
|
|
commit_max_ctr
|
num
|
6
|
Numeric maximum value for counter before commit occurs.
|
|
LOCK_WAIT_TIME
|
num
|
6
|
Contains the number of seconds between the last and the
next lock retry.
|
|
RETRY_MAX_CTR
|
num
|
10
|
Contains the maximum number of lock retry.
|
RESTART_PROGRAM_STATUS
The restart_program_status
table is the table that holds record keeping information about current program
processes. The number of rows for a program on the status table is equal to its
num_threads value on the restart_control table. The status table
is modified during restart/recovery initialization and close logic. For
table-based processing, the restart/recovery initialization logic assigns the
next available thread to a program based on the program status and restart
flag. For file-based processing, the thread value is passed in from the input
file name. When a thread is assigned, the program_status
is updated to prevent the assignment of that thread to another process.
Information is logged on the current status of a given thread, as well as
record keeping information such as operator and process timing information.
|
restart_program_status
|
|
(PK)restart_name
|
varchar2
|
50
|
Program name
|
|
(PK)thread_val
|
num
|
10
|
Thread counter
|
|
start_time
|
date
|
|
dd-mon-yy hh:mi:ss
|
|
program_name
|
varchar2
|
25
|
Program name
|
|
program_status
|
varchar2
|
25
|
Started, aborted, aborted in init, aborted in process,
aborted in final, completed, ready for start.
|
|
restart_flag
|
varchar2
|
1
|
Automatically set to ‘N’ after abnormal end, must be
manually set to ‘Y’ for program to restart.
|
|
restart_time
|
date
|
|
dd-mon-yy hh:mi:ss.
|
|
finish_time
|
date
|
|
dd-mon-yy hh:mi:ss.
|
|
current_pid
|
num
|
15
|
Starting program ID.
|
|
current_operator_id
|
varchar2
|
20
|
Operator that started the program.
|
|
err_message
|
varchar2
|
255
|
Record that caused program abort and associated error
message.
|
|
current_oracle_sid
|
num
|
15
|
Oracle SID for the session associated with the current
process.
|
|
current_shadow_pid
|
num
|
15
|
O/S process ID for the shadow process associated with the
current process. It is used to locate the session trace file when a process
is not finished successfully.
|
RESTART_PROGRAM_HISTORY
The restart_program_history
table will contain one record for every successfully completed program thread
with restart/recovery logic. Upon the successful completion of a program
thread, its record on the restart_program_status
table will be inserted into the history table. Table purging will be at
user discretion.
|
restart_program_history
|
|
restart_name
|
varchar2
|
50
|
Program name.
|
|
thread_val
|
Num
|
10
|
Thread counter.
|
|
start_time
|
Date
|
|
dd-mon-yy hh:mi:ss.
|
|
program_name
|
varchar2
|
25
|
Program name.
|
|
num_threads
|
Num
|
10
|
Number of threads.
|
|
commit_max_ctr
|
num
|
6
|
Numeric maximum value for counter before commit occurs.
|
|
restart_time
|
date
|
|
dd-mon-yy hh:mi:ss.
|
|
finish_time
|
date
|
|
dd-mon-yy hh:mi:ss.
|
|
shadow_pid
|
num
|
15
|
O/S process ID for the shadow process associated with the
process. It is used to locate the session trace file.
|
|
success_flag
|
varchar2
|
1
|
Indicates whether the process finished successfully
(reserved for future use).
|
|
non_fatal_err_flag
|
varchar2
|
1
|
Indicates whether non-fatal errors have occurred for the
process.
|
|
num_commits
|
num
|
12
|
Total number of commits for the process. The possible last
commit when restart/recovery is closed is not counted.
|
|
avg_time_btwn_commits
|
num
|
12
|
Accumulated average time between commits for the process.
The possible last commit when restart/recovery is closed is not counted.
|
|
LREAD
|
num
|
|
Session logical reads. The sum of "db block
gets" plus "consistent gets". This includes logical reads of
database blocks from either the buffer cache or process private memory.
|
|
LWRITE
|
num
|
|
Session logical writes. The sum of "db block
changes" plus "consistent changes".
|
|
PREAD
|
num
|
|
Physical reads. Total number of data blocks read from
disk.
|
|
UGA_MAX
|
num
|
|
Peak UGA (user global area) size for a session.
|
|
PGA_MAX
|
num
|
|
Peak PGA (program global area) size for the session.
|
|
SQLNET_BYTES_FROM_CLIENT
|
num
|
|
Total number of bytes received from the client over Oracle
Net Services.
|
|
SQLNET_BYTES_TO_CLIENT
|
num
|
|
Total number of bytes sent to the client from the
foreground processes.
|
|
SQLNET_ROUNDTRIPS
|
num
|
|
Total number of Oracle Net Services messages sent to and
received from the client.
|
|
COMMITS
|
num
|
|
Number of user commits. When a user commits a transaction,
the redo generated that reflects the changes made to database blocks must be
written to disk. Commits often represent the closest thing to a user
transaction rate.
|
RESTART_BOOKMARK
When a restart/recovery program thread is active, its state is
started or aborted, and a record for it exists on the restart_bookmark table. Restart/recovery initialization logic
inserts the record into the table for a program thread. The restart/recovery
commit process updates the record with the following restart information:
§
A concatenated string of key values for table processing
§
A file pointer value for file processing
§
Application context information such as counters and accumulators
The restart/recovery closing process deletes the program thread
record if the program finishes successfully. In the event of a restart, the
program thread information on this table will allow the process to begin from
the last commit point.
|
restart_bookmark
|
|
(PK)
restart_name
|
varchar2
|
50
|
Program name.
|
|
(PK)
thread_val
|
num
|
10
|
Thread counter.
|
|
bookmark_string
|
varchar2
|
255
|
Character string of key of last committed record.
|
|
application_image
|
varchar2
|
1000
|
Application parameters from the last save point.
|
|
out_file_string
|
varchar2
|
255
|
Concatenated file pointers (UNIX sometimes refers to these
as stream positions) of all the output files from the last commit point of
the current process. It is used to return to the right restart point for all
the output files during restart process.
|
|
non_fatal_err_flag
|
varchar2
|
1
|
Indicates whether non-fatal errors have occurred for the
current process.
|
|
num_commits
|
num
|
12
|
Number of commits for the current process. The possible
last commit when restart/recovery is closed is not counted.
|
|
avg_time_btwn_commits
|
num
|
12
|
Average time between commits for the current process. The
possible last commit when restart/recovery is closed is not counted.
|
Restart views are used for query-based programs that require
multi-threading. Separate views (ex v_restart_dept, and v_restart_store) are created
for each threading driver, for example, department or store. A join is made to
a view based on threading driver to force the separation of discrete data into
particular threads. See the threading discussion for more details.
|
v_restart_<x>
|
|
driver_name
|
varchar2
|
Example dept, store, region, and others.
|
|
num_threads
|
number
|
Total number of threads in set (defined on restart
control).
|
|
driver_value
|
number
|
Numeric value of the driver_name.
|
|
thread_val
|
number
|
Thread value defined for driver_value and num_threads
combination.
|
The restart_program_status
and restart_bookmark are separate
tables. This is because the initialization process needs to fetch all of
the rows associated with restart_name/schema,
but will only update one row. The commit process will continually lock a row
with a specific restart_name and Thread_val. The data involved with these
two processes is separated into two tables to reduce the number of hangs that
could occur due to locked rows. Even if you allow ‘dirty reads’ on locked rows,
a process will still hang if it attempts to do an update on a locked row. The
commit process is only interested in a unique row, so if we move the commit
process data to a separate table with row level (not page level) locking, there
will not be contention issues during the commit. With the separate tables, the
initialization process will now see fewer problems with contention because rows
will only be locked twice, at the beginning and end of the process.
The restart/recovery process needs to be as robust as possible in
the event of database related failure. The costs outweigh the benefits of
placing the restart/recovery tables in a separate database. The tables should,
however, be setup in a separate, mirrored table space with a separate rollback
segment.
The restart/recovery process works by storing all the data
necessary to resume processing from the last commit point. Therefore, the
necessary information is updated on the restart_bookmark
table before the processed data is committed. Query-based and file-based module
stores different information on the restart tables, and therefore calls different
functions within the restart/recovery API to perform their tasks.
When a program’s process is query-based on a module is driven by
a driving query that processes the retrieved rows, the information that is
stored on the restart_bookmark table
is related to the data retrieved in the driving query. If the program fails
while processing, the information that is stored on the restart-tables can be
used in the conditional where-clause of the driving query to only retrieve data
that has yet to be processed since the last commit event.
File-based processing, needs to store the file location at the
time of the last commit point. This file’s byte location is stored on the restart_bookmark table and will be
retrieved at the time of a restart. This location information will be used
further be used in reopening the file when the data was last committed. Because
there is different information being saved to and retrieved from the restart_bookmark table for each of the
different types of processing, different functions need to be called to perform
the restart/recovery logic. The query-based processing calls the restart_init or retek_init and restart_commit
or retek_commit functions
while the file-based processing calls the restart_file_init
and restart_file_commit functions.
In addition to the differences in API function calls, the batch
processing flow of the restart/recovery differs between the files. Table-based
restart/recovery needs to use a priming fetch logical flow, while the
file-based processing usually reads lines in a batch. Table-based processing
requires its structure to ensure that the LUW key has changed before a commit
event is allowed to occur, while the file-based processing does not need to
evaluate the LUW, which can typically be thought of as the type of transaction
being processed by the input file.
The following diagram depicts table-based Restart/Recovery
program flow:

Table-Based Restart/Recovery Program Flow
The following diagram depicts file-based Restart/Recovery
program flow

File-based Restart/Recovery Program Flow
Initialization logic:
§
Variable declarations
§
File initialization
§
Call restart_init() or restart_file_init() function - determines
start or restart logic
§
First fetch on driving query
Start logic: initialize counters/accumulators to start values
Restart logic:
§
Parse application_image field on bookmark table into
counters/accumulators
§
Initialize counters/accumulators to values of parsed fields
Process/commit loop:
§
Process updates and manipulations
§
Fetch new record
§
Create varchar from counters/accumulators to pass into
application_image field on restart_bookmark table
§
Call restart_commit() or restart_file_commit()
Close logic:
§
Reset pointers
§
Close files/cursors
§
Call Restart_close()
An initialization functions for table-based batch processing.
The batch process gathers the following information from the
restart control tables:
§
Total number of threads for a program and thread value assigned
to current process.
§
Number of records to loop through in driving cursor before commit
(LUW).
§
Start string - bookmark of last commit to be used for restart or
a null string if current process is an initial start and initializes the
restart record-keeping (restart_program_status).
§
Program status is changed to ‘started’ for the first available
thread.
§
Operational information is updated: operator, process,
start_time, and bookmarking (restart_bookmark) tables.
§
On an initial start, a record is inserted.
§
On restart, the start string and application context information
from the last commit is retrieved.
§
Lock wait time and maximum retry for locking.
An initialization functions for file-based batch processing. It
is called from program modules.
The batch process gathers the following information from the
restart control tables:
§
Number of records to read from file for array processing and for
commit cycle.
§
File start point- bookmark of last commit to be used for restart
or 0 for initial start.
The process initializes the restart record-keeping
(restart_program_status):
§
Program status is changed to ‘started’ for the current thread.
§
Operational information is updated: operator, process, start_time.
The process initializes the restart bookmarking (restart_bookmark)
tables:
§
On an initial start, a record is inserted.
§
On restart, the file starting point information and application
context information from the last commit is retrieved.
A function that commits the processed transaction for a given
number of driving query fetches. It is called from program modules.
The process updates the restart_bookmark
start string and application image information if a commit event has taken
place:
§
The current number of driving query fetches is greater than or
equal to the maximum set in the restart_program_status table (and fetched in
the restart_init function).
§
The bookmark string of the last processed record is greater than
or equal to the maximum set in the restart_program_status table (and fetched in
the restart_init function).
§
The bookmark string increments the counter.
§
The bookmark string sets the current string to be the most
recently fetched key string.
A function that commits processed transactions after reading a
number of lines from a flat file. It is called from program modules.
The process updates the RESTART_BOOKMARK table:
§
Start_string is set to the file pointer location in the current
read of the flat file.
§
Application image is updated with context information.
A function that updates the restart tables after program
completion.
The process determines whether the program was successful. If the
program finished successfully:
§
The restart_program_status table is updated with finish
information and the status is reset.
§
The corresponding record in the RESTART_BOOKMARK table is deleted.
§
The restart_program_history table has a copy of the
restart_program_status table record inserted into it.
§
The restart_program_status is re-initialized.
If the program ends with errors:
§
The transactions are rolled back.
§
The program_status column on the restart_program_status table is
set to ‘aborted in *’ where * is one of the three main functions in batch:
init, process or final.
§
The changes are committed.
This function parses a string into components and places results
into multidimensional array. It is only called within API functions and will
never be called in program modules.
The process is passes a string to parse, and a pointer to an
array of characters.
The first character of the passed string is the delimiter.
This function will append output in temporary files to final
output files when a commit point is reached. It is called from program modules.
This function contains the logic that appends one file to
another. It is only called within the restart/recovery API functions and never
called directly in program modules.
The restart.h and
the std_err.h header files are
included in retek.h to utilize
the restart/recovery functionality.
This library header file contains constant, macro substitutions,
and external global variable definitions as well as restart/recovery functions prototypes.
The global variables that are defined include:
§
The thread number assigned to the current process.
§
The value of the current process’s thread maximum counter:
– For
table-based processing, it is equal to the number of iterations of the driving
query before a commit can take place.
– For
file-based processing, it is equal to the number of lines that is read from a
flat file and processed using a structured array before a commit can take place.
§
The current count of driving query iterations used for
table-based processing or the current array index used in file-based processing.
§
The name assigned to the program/logical unit of work by the
programmer. It is the same as the restart_name column on the
restart_program_status, restart_program_history, and RESTART_BOOKMARK tables.
This library header file contains standard restart variable
declarations that are used in the program modules.
The variable definitions that are included are:
§
The concatenated string value of the fetched driving query key
that is currently being processed.
§
The concatenated string value of the fetched driving query key that
will be processed next.
§
The error message passed to the restart_close function and
updated to restart_program_status.
§
Concatenated string of application context information, for
example, counters and accumulators.
§
The name of the threading driver, for example, department, store,
warehouse and others.
§
The total number of threads used by this program.
§
The pointer to pass to initialization function to retail number
of threads value.
Restart/recovery
performs the following, among other capabilities:
§
Organizes global variables associated with restart recovery.
§
Allows the batch developer full control of restart recovery
variables parameter passing during initialization.
§
Removes temporary write files to speed up the commit process.
§
Moves more information and processing from the batch code into
the library code.
§
Adds more information into the restart recovery tables for tuning
purposes.
retek_2.h
This library header file is included by all C code within Retail
and serves to centralize system includes, macro defines, globals, function
prototypes, and, especially, structs for use in the new restart/recovery
library.
The globals used by the old restart/recovery library are all
discarded. Instead, each batch program declares variables needed and calls
retek_init() to get them populated from restart/recovery tables. Therefore, only
the following variables are declared:
§
gi_no_commit: flag for NO_COMMIT command line option (used for
tuning purposes).
§
gi_error_flag: fatal error flag.
§
gi_non_fatal_err_flag: non-fatal error flag.
In addition, a rtk_file struct is defined to handle all file
interfaces associated with restart/recovery. Operation functions on the file
struct are also defined.
#define NOT_PAD 1000 /* Flag not to pad thread_val */
#define PAD 1001 /* Flag to pad thread_val at the
end */
#define TEMPLATE 1002 /* Flag to pad thread_val using
filename template */
#define MAX_FILENAME_LEN 50
typedef struct
{
FILE* fp; /* File pointer */
char filename[MAX_FILENAME_LEN + 1]; /* Filename */
int pad_flag; /* Flag whether to pad thread_val to
filename */
} rtk_file;
int set_filename(rtk_file* file_struct, char* file_name, int
pad_flag);
FILE* get_FILE(rtk_file* file_struct);
int rtk_print(rtk_file* file_struct, char* format, ...);
int rtk_seek(rtk_file* file_struct, long offset, int whence);
The parameters that retek_init() needs to populate passed using a
format known to retek_init(). A struct is defined here for this purpose. An
array of parameters of this struct type is needed in each batch program. Other requirements
have to be initialized at each batch program.
§
The lengths of name, type and sub_type should not exceed the
definitions here.
§
Type can only be: "int", “uint”, "long",
"string", or "rtk_file".
§
For type "int", “uint” or "long", use
"" as sub_type.
§
For type "string", sub_type can only be "S"
(start string) unless the string is the thread value or number of threads, in
which case use “” as sub_type or "I" (image string).
§
For type "rtk_file", sub_type can only be "I"
(input) or "O" (output).
#define NULL_PARA_NAME 51
#define NULL_PARA_TYPE 21
#define NULL_PARA_SUB_TYPE 2
typedef struct
{
char name[NULL_PARA_NAME];
char type[NULL_PARA_TYPE];
char sub_type[NULL_PARA_SUB_TYPE];
} init_parameter;
INT RETEK_INIT(INT NUM_ARGS, INIT_PARAMETER *parameter, ...)
retek_init
initializes restart/recovery (for both table and file-based):
Pass in num_args
as the number of elements in the init_parameter
array, and then the init_parameter
array, then variables a batch program needs to initialize in the order and
types defined in the init_parameter
array. Note that all int, uint and long variables need to be passed by
reference.
Get all global and module level values from databases.
Initialize records for RESTART_PROGRAM_STATUS and
RESTART_BOOKMARK.
Parse out user-specified initialization variables (variable
arg list).
Return NO_THREAD_AVAILABLE if no qualified record in
RESTART_CONTROL or RESTART_PROGRAM_STATUS.
Commit work.
INT RETEK_COMMIT(INT NUM_ARGS, ...)
retek_commit checks
and commits if needed (for both table and file-based):
Pass in num_args, then variables for start_STRING first, and
those for image string (if needed) second. The num_args is the total number of
these two groups. All are string variables and are passed in the same order as
in retek_init().
Concatenate start_string either from passed in variables
(table-based) or from ftell of input file pointers (file-based).
Check if commit point is reached (counter check and, if
table-based, start string comparison).
If reached, concatenated image_string from passed in
variables (if needed) and call internal_commit() to get out_file_string and
update RESTART_BOOKMARK.
If table-based, increment pl_current_count and update
ps_cur_string.
INT COMMIT_POINT_REACHED(INT
NUM_ARGS, ...)
commit_point_reached
checks if the commit point is reached (for both table- and file-based). The
difference between this function and the check in retek_commit() is that here the pl_current_count and ps_cur_string
are not updated. This checking function is designed to be used with retek_force_commit(), and the logic to
ensure integrity of LUW exists in user batch program. It can also be used
together with retek_commit() for
extra processing at the time of commit.
Pass in num_args, then all string variables for start_string
in the same order as in retek_init(). The num_args is the number of variables
for start_string. If no start_string (as in file-based), pass in NULL.
For table-based, if pl_curren_count reaches pl_max_counter
and if newly concatenated bookmark string is different from ps_cur_string,
return 1; otherwise return 0.
For file-based, if pl_curren_count reaches pl_max_counter
return 1; otherwise return 0.
INT RETEK_FORCE_COMMIT(INT NUM_ARGS,
...)
retek_force_commit always
commits (for both table and file-based):
Pass in num_args, then variables for start_string first, and
those for image string (if needed) second. The num_args is the total number of
these two groups. All are string variables and are passed in the same order as
in retek_init().
Concatenate start_string either from passed in variables
(table-based) or from ftell of input file pointers (file-based).
Concatenated image_string from passed in variables (if
needed) and call internal_commit() to get out_file_string and update
RESTART_BOOKMARK.
If table-based, increment pl_current_count and update
ps_cur_string.
INT RETEK_CLOSE(void)
retek_close closes
restart/recovery (for both table and file-based):
If gi_error_flag or NO_COMMIT command line option is TRUE,
rollback all database changes.
Update RESTART_PROGRAM_STATUS according to gi_error_flag.
If no gi_error_flag, insert record into
RESTART_PROGRAM_HISTORY with information fetched from RESTART_CONTROL,
RESTART_PROGRAM_BOOKMARK and RESTART_PROGRAM_STATUS tables.
If no gi_error_flag, delete RESTART_BOOKMARK record.
Commit work.
Close all opened file streams.
INT RETEK_REFRESH_THREAD(void)
You must refresh a program’s thread, so that it can be run again.
Updates the RESTART_PROGRAM_STATUS record for the current
program’s PROGRAM_STATUS to be ‘ready for start’.
Deletes any RESTART_BOOKMARK records for the current program.
Commits work.
VOID INCREMENT_CURRENT_COUNT(void)
increment_current_count
increases pl_current_count by 1.
Note:
This is called from get_record()
of intrface.pc for file-based input/output.
INT PARSE_NAME_FOR_THREAD_VAL(char*
name)
parse_name_for_thread_val
parses thread value from the extension of the specified file name.
INT IS_NEW_START(void)
is_new_start checks
if current run is a new start; if yes, return 1; otherwise 0.
The restart capabilities revolve around a program’s logical unit
of work (LUW). A batch program processes transactions and enables commit points
based on the LUW. An LUW is comprised of a transaction key (such as item-store)
and a maximum commit counter. Commit events occur after a given number of
transaction keys are processed. At the time of the commit, key data information
that is necessary for restart is stored in the restart table. In the event of a
handled or un-handled exception, transactions will be rolled back to the last
commit point. Upon restart the restart key information will be retrieved from
the tables so that processing can resume with the unprocessed data.
3
Processing multiple instances of a given program can be
accomplished through “threading”. This requires driving cursors to be separated
into discrete segments of data to be processed by different threads. This is
accomplished through a stored procedure that separates threading mechanisms
(for example, departments or stores) into particular thread given value (for
example, department 1001) and the total number of threads for a given process.
File-based processing will not “thread” its processing. The same
data file will never be acted upon by multiple processes. Multi-threading is
accomplished by dividing the data into separate files using a separate process
for each file. The thread value is related to the input file. This is necessary
to ensure that the appropriate information can be tied back to the relevant
file in the event of a restart.
The store length in RMS is ten digits. Therefore, thread value
which is based on the store number must allow ten digits. As the thread value
is declared as a ‘C’ variable of type integer (long), the system restricts
thread values to nine digits.
This does not mean that you cannot use ten digit store numbers.
It means that if you do use ten digit store numbers you cannot use them as
thread values.
The use of multiple threads or processes in Oracle Retail batch
processing increases efficiency and decrease processing time. The design of the
threading process allows maximum flexibility to the end user in defining the
number of processes over which a program is divided.
Originally, the threading function was used directly in the
driving queries. This was a slow process. Instead of using the function call
directly in the driving queries, the designs call for joining driving query
tables to a view (for example, v_restart_store) that includes the function.
A stored procedure has been created to determine thread values.
Restart_thread_return returns a thread value derived from a numeric driver
value, such as department number, and the total number of threads in a given
process. Retailers should be able to determine the best algorithm for their
design, and if a different means of segmenting data is required, then either
the restart_thread_return function can be altered, or a different function can
be used in any of the views in which the function is contained.
Currently the restart_thread_return function is a very simple
modulus routine:
CREATE OR REPLACE FUNCTION RESTART_THREAD_RETURN(in_unit_value
NUMBER,
in_total_threads NUMBER)
RETURN NUMBER IS
ret_val NUMBER;
BEGIN
ret_val := MOD(ABS(in_unit_value),in_total_threads) + 1;
RETURN ret_val;
END;
Each restart view will have four elements:
§
The name of the threading mechanism, driver_name.
§
The total number of threads in a grouping, num_threads.
§
The value of the driving mechanism, driver_value.
§
The thread value for that given combination of driver_name,
num_threads, and driver value, thread_val.
The view will be based on the restart_control table and an
information table such as DEPS or STORES. A row will exist in the view for
every driver value and every total number of threads value. Therefore, if a
retailer were to always use the same number of threads for a given driver
(dept, store, and others), then the view would be relatively small. As an
example, if all of a retailer’s programs threaded by department have a total of
5 threads, then the view will contain only one value for each department. For
example, if there are 10 total departments, 10 rows will exist in
v_restart_dept. However, if the retailer wants to have one of the programs to
have ten threads, then there will be 2 rows for every department: one for five
total threads and one for ten total threads (for example, if 10 total
departments, 20 rows will exist in v_restart_dept). Obviously, retailers should
be advised to keep the number of total thread values for a thread driver to a
minimum to reduce the scope of the table joins of the driving cursor with the
view.
Below is an example of how the same driver value can result in
differing thread values. This example uses the restart_thread_return function
as it currently is written to derive thread values.
|
Driver_name
|
num_threads
|
driver_val
|
thread_val
|
|
DEPT
|
1
|
101
|
1
|
|
DEPT
|
2
|
101
|
2
|
|
DEPT
|
3
|
101
|
3
|
|
DEPT
|
4
|
101
|
2
|
|
DEPT
|
5
|
101
|
2
|
|
DEPT
|
6
|
101
|
6
|
|
DEPT
|
7
|
101
|
4
|
Below is an example of what a distribution of stores might look
like given 10 stores and 5 total threads:
|
Driver_name
|
num_threads
|
driver_val
|
thread_val
|
|
STORE
|
5
|
1
|
2
|
|
STORE
|
5
|
2
|
3
|
|
STORE
|
5
|
3
|
4
|
|
STORE
|
5
|
4
|
5
|
|
STORE
|
5
|
5
|
1
|
|
STORE
|
5
|
6
|
2
|
|
STORE
|
5
|
7
|
3
|
|
STORE
|
5
|
8
|
4
|
|
STORE
|
5
|
9
|
5
|
|
STORE
|
5
|
10
|
1
|
View syntax:
The following is an example of the syntax needed to create the
view for the multi-threading join, created with script (see threading
discussion for details on restart_thread_return
function):
create or replace view v_restart_store
as
select rc.driver_name driver_name,
rc.num_threads num_threads,
s.store driver_value,
restart_thread_return(s.store,
rc.num_threads) thread_val
from restart_control rc, store s
where rc.driver_name = 'STORE'
There is a different threading scheme used within Oracle Retail
Sales Audit (ReSA). Because ReSA needs to run 24 hours a day and seven days a
week, there is no batch window. This means that there may be batch programs
running at the same time that there are online users. ReSA solved this
concurrency problem by creating a locking mechanism for data that is organized
by store days. These locks provide a natural threading scheme. Programs that
cycle through all of the store day data attempt to lock the store day first. If
the lock fails, the program simply goes on to the next store day. This has the
affect of automatically balancing the workload between all of the programs
executing.
All program names will be stored on the restart_control table
along with a functional description, the query driver (department, store,
class, and others) and the user-defined number of threads associated with them.
Users should be able to scroll through all programs to view the name,
description, and query driver, and if the update_allowed flag is set to true,
to modify the number of threads (update is set to true).
File-based processing does not truly “multi-thread” and therefore
the number of threads defined on restart_control will always be one. However, a
restart_program_status record needs to be created for each input file that is
to be processed for the program module. Further, the thread value that is
assigned must be part of the input file name. The restart_parse_name function
included in the program module will parse the thread value from the program
name and use that to determine the availability and restart requirements on the
restart_program_status table.
Refer to the beginning of this multi-threading section for a
discussion of limits on using large (greater than nine digits) thread values.
When the number of threads is modified in the restart_control
table, the form must first validate that no records for that program are
currently being processed in the restart_program_status_table (that is, all
records = ‘Completed’). The program must insert or delete rows depending on
whether the new thread number is greater than or less than the old thread
number. In the event that the new number is less than the previous number, all
records for that program_name with a thread number greater than the new thread
number will be deleted. If the new number is greater than the old number, new
rows will be inserted. A new record is inserted for each restart_name/thread_val combination.
For example if the batch program SALDLY has its number of
processes changed from 2 to 3, then an additional row (3) will be added to the
restart_program_status table. In the same way, if the number of threads was
reduced to 1 in this example, rows 2 and 3 would be deleted.
|
Row
|
RESTART_NAME
|
THREAD_VA
|
program_name
|
|
1
|
SALDLY
|
1
|
SALDLY
|
|
2
|
SALDLY
|
2
|
SALDLY
|
restart_program_status
table after insert:
|
Row
|
RESTART_NAME
|
THREAD_VA
|
program_name
|
|
1
|
SALDLY
|
1
|
SALDLY
|
|
2
|
SALDLY
|
2
|
SALDLY
|
|
3
|
SALDLY
|
3
|
SALDLY
|
restart_program_status
table after delete:
|
Row
|
RESTART_NAME
|
THREAD_VA
|
program_name
|
|
1
|
SALDLY
|
1
|
SALDLY
|
Users should also be able to modify the commit_max_ctr column in
restart_program_status table. This controls the number of iterations in driving
query or the number of lines read from a flat file that determine the logical
unit of work (LUW).
Users must be able to view the status of all records in
restart_program_status table. This is where the user gets to view error
messages from aborted programs, and statistics and histories of batch runs. The
only fields that are modified will be program_status and restart_flag. The user
should be able to reset the restart_flag to ‘Y’ from ‘N’ on records with a
status of aborted, started records to aborted in the event of an abend
(abnormal termination), and all records in the event of a restore from
tape/re-run of all batch.
Before any batch with restart/recovery logic is run, an
initialization program must be run to update the status in the
restart_program_status table. This program must update the program_status to
‘ready for start’ wherever a record’s program_status is ‘completed.’ This leaves
unchanged all programs that ended unsuccessfully in the last batch run.
Due to the nature of threading algorithm, individual programs
needs a pre or a post program run to initialize variables or files before any
of the threads have run or to update final data when all the threads are run.
The decision was made to create pre-programs and post-programs in these cases
rather than let the restart/recovery logic decide whether the currently
processed thread is the first thread to start or the last thread to end for a
given program.
For ksh driven batch programs that call PL/SQL for its main
processing logic, multi-threading is also supported. An example of this type of
batch job is ksh script stockcountupload.ksh calling PL/SQL package
CORESVC_STOCK_UPLOAD_SQL. The threading configuration for each program is
defined in table RMS_PLSQL_BATCH_CONFIG (instead of RESTART_CONTROL for the
ProC programs). Column MAX_CONSURRENT_THREAD holds the maximum number of
concurrent threads. MAX_CHUNK_SIZE defines the commit size within each thread,
similar to the RESTART_CONTROL.COMMIT_MAX_CTR column.
4
Oracle Retail batch architecture uses array processing to improve
performance. Instead of processing SQL statements using scalar data, data is
grouped into arrays and used as bind variables in SQL statements. This improves
performance by reducing the server/client and network traffic.
Array processing is used in selecting, inserting, deleting, and
updating statements. Oracle Retail typically does not statically define the
array sizes, but uses the restart maximum commit variable as a sizing multiple.
The user must remember this when defining the system's maximum commit counters.
Remember, when using array processing in Oracle, it does not
allow a single array operation to be performed for more than 32000 records in
one step. The Oracle Retail restart/recovery libraries have been updated to
define macros for this value: MAX_ORACLE_ARRAY_SIZE.
All batch programs that use array processing need to limit the
size of their array operations to MAX_ORACLE_ARRAY_SIZE.
If the commit max counter is used for array processing size,
check it after the call to restart_init() and, if necessary, reset it to the
maximum value if greater. If retek_init() is used to initialize, check the
returned commit max counter and reset it to the maximum size if it is greater.
In case of retek_init(), reset the library’s internal commit max counter by
calling extern int limit_commit_max_ctr(unsigned int new_max_ctr).
If some other variable is used for sizing the array processing,
the actual array-processing step must be encapsulated in a calling loop that
performs the array operation in sub segments of the total array size where each
sub-segment is at most MAX_ORACLE_ARRAY_SIZE large. Currently all Oracle Retail
batch programs are implemented in the similar way.
5
Pro*C Input and Output
Formats
Oracle Retail batch processing utilizes input from both tables
and flat files. Further, the outcome of processing can both modify data
structures and write output data. Interfacing Oracle Retail with external
systems is the main use of file based I/O.
To simplify the interface requirements, Oracle Retail requires
that all in-bound and out-bound file-based transactions adhere to standard file
layouts. There are two types of file layouts, detail-only and master-detail,
which are described in the sections below.
An interfacing API exists within Oracle Retail to simplify the
coding and the maintenance of input files. The API provides functionality to
read input from files, ensure file layout integrity, and write and maintain
files for rejected transactions.
The RMS interface library supports two standard file layouts; one
for master/detail processing, and one for processing detail records only. True
sub-details are not supported within the RMS base package interface library
functions.
A 5-character identification code or record type identifies all
records within an I/O file, regardless of file type. The following includes the
valid record type values:
§
FHEAD—File Header
§
FDETL—File Detail
§
FTAIL—File Tail
§
THEAD—Transaction Header
§
TDETL—Transaction Detail
§
TTAIL—Transaction Tail
Each line of the file must begin with the record type code
followed by a 10-character record ID.
File layouts have a standard file header record, a detail record
for each transaction to be processed, and a file trailer record. Valid record
types are FHEAD, FDETL, and FTAIL.
Example:
FHEAD0000000001STKU1996010100000019960929
FDETL0000000002SKU100000040000011011
FDETL0000000003SKU100000050003002001
FDETL0000000004SKU100000050003002001
FTAIL00000000050000000003
File layouts consists of:
§
Standard file header record
§
Set of records for each transaction to be processed
§
File trailer record.
The transaction set consists of:
§
Transaction set header record
§
Transaction set detail for detail within the transaction
§
Transaction trailer record
Valid record types are FHEAD, THEAD, TDETL, TTAIL, and FTAIL.
Example:
FHEAD0000000001RTV 19960908172000
THEAD000000000200000000000001199609091202000000000003R
TDETL000000000300000000000001000001SKU10000012
TTAIL0000000004000001
THEAD000000000500000000000002199609091202001215720131R
TDETL000000000600000000000002000001UPC400100002667
TDETL0000000007000000000000020000021UPC400100002643 0
TTAIL0000000008000002
FTAIL00000000090000000007
|
Record Name
|
Field Name
|
Field Type
|
Default Value
|
Description
|
|
File Header
|
File Type Record Descriptor
|
Char(5)
|
FHEAD
|
Identifies file record type.
|
|
|
File Line Identifier
|
Number(10)
|
Specified by external system
|
Line number of the current file.
|
|
|
File Type Definition
|
Char(4)
|
n/a
|
Identifies transaction type.
|
|
|
File Create Date
|
Date
|
Create date
|
Date file was written by external system.
|
|
Transaction Header
|
File Type Record Descriptor
|
Char(5)
|
THEAD
|
Identifies file record type.
|
|
|
File Line Identifier
|
Number(10)
|
Specified by external system
|
Line number of the current file.
|
|
|
Transaction Set Control Number
|
Char(14)
|
Specified by external system
|
Used to force unique transaction check.
|
|
|
Transaction Date
|
Char(14)
|
Specified by external system
|
Date the transaction was created in external system.
|
|
Transaction Detail
|
File Type Record Descriptor
|
Char(5)
|
TDETL
|
Identifies file record type.
|
|
|
File Line Identifier
|
Number(10)
|
Specified by external system
|
Line number of the current file.
|
|
|
Transaction Set Control Number
|
Char(14)
|
Specified by external system
|
Used to force unique transaction check.
|
|
|
Detail Sequence Number
|
Char(6)
|
Specified by external system
|
Sequential number assigned to detail records within a
transaction.
|
|
Transaction Trailer
|
File Type Record Descriptor
|
Char(5)
|
TTAIL
|
Identifies file record type.
|
|
|
File Line Identifier
|
Number(10)
|
Specified by external system
|
Line number of the current file.
|
|
|
Transaction Detail Line Count
|
Number(6)
|
Sum of detail lines
|
Sum of the detail lines within a transaction.
|
|
File Trailer
|
File Type Record Descriptor
|
Char(5)
|
FTAIL
|
Identifies file record type.
|
|
|
File Line Identifier
|
Number(10)
|
Specified by external system
|
Line number of the current file.
|
|
|
Total Transaction Line Count
|
Number(10)
|
Sum of all transaction lines
|
All lines in file less the file header and trailer records.
|
6
RETL Program Overview for the RMS-RPAS
Interface
This chapter covers information about the Oracle Retail Extract
Transform and Load (RETL) program overview for the RMS and the RPAS interface. The
RETL architecture is mentioned along with the RETL program overview.
RMS works with the Oracle Retail Extract Transform and Load
(RETL) framework. This architecture utilizes a high performance data processing
tool that allows database batch processes to take advantage of parallel
processing capabilities.
The RETL framework runs and parses through the valid operators
composed in XML scripts. For more information on RETL tool, see RETL
Programmer’s Guide.
The figure The two stages of RETL
processing illustrates the extraction processing architecture. Instead of managing the change captures as they
occur in the source system during the day, the process involves
extracting the current data from the source system. The extracted data is output to flat files. These flat files are then
available for consumption by products such as RPAS.
The target system has its own way of completing the
transformations and loading the necessary data into the system, where it can be used for further processing.. For more
information on transformation and loading, see RPAS documentation.
The architecture relies upon two distinct stages, shown in the figure
The two stages of RETL processing.
§
Stage 1- Extraction from the RMS database using
well-defined flows specific to the RMS database. The resulting output is
comprised of data files written in a well-defined schema file format. This
stage includes no destination specific code.
§
Stage 2- Introduces a flow specific to the destination. In
this case, flows for RPAS are
designed to transform the data so that RPAS can import the data properly.
The two stages of RETL processing
This section summarizes the RETL program features utilized in the
RMS extractions and loads. Installation information about the RETL tool is
available in the latest RETL Programmer’s Guide.
Before trying to configure and run RMS RETL, install RETL version
13.0 or later, which is requires RMS RETL to run. For thorough installation
procedure, see RETL Programmer’s Guide.
The permissions are set up as per the RETL Programmer’s Guide.
RMS RETL reads and writes data files, you can also create, delete, update and
insert into tables. The extraction fails, if it is not set up properly.
See the RETL Programmer’s Guide for RETL environment variables
that must be set up for your version of RETL. You will need to set RDF_HOME to
your base directory for RMS RETL. This is the top level directory that you
select during the installation process. Add export RDF_HOME=<base
directory for RMS RETL> in. profile.
There are several constants that must be set in
rmse_rpas_config.env depending upon a retailer’s preferences and the local
environment. This is summarized in the table below.
|
Constant Name
|
Default Value
|
Alternate Value
|
Description
|
|
DATE_TYPE
|
vdate
|
current_date
|
Determines whether the date used in naming the error, log,
and status files is the current date or the VDATE value found in the PERIOD
table.
|
|
DBNAME
|
rtkdev01
|
Depends on installation
|
The database schema name.
|
|
RMS_OWNER
|
RPASINT
|
Depends on installation
|
The username of the RMS database schema owner.
|
|
BA_OWNER
|
|
Depends on installation
|
The username of the RMS batch user (not currently used by
RMS-RPAS).
|
|
CONN_TYPE
|
thin
|
oci
|
The way in which RMS connects to the database.
|
|
DBHOST
|
mspdev17
|
Depends on installation
|
The computer hardware node name.
|
|
DBPORT
|
1524
|
Depends on installation
|
The port on which the database listener resides.
|
|
LOC_ATTRIBUTES_
ACTIVE
|
False
|
True
|
Determines whether rmse_rpas_attributes.ksh is run or not.
|
|
PROD_
ATTRIBUTES_ACTIVE
|
False
|
True
|
Determines whether rmse_rpas_attributes.ksh is run or not.
|
|
DIFFS_ACTIVE
|
True
|
False
|
Determines whether rmse_rpas_merchhier.ksh generates data
files that contain diff allocation information.
|
|
ISSUES_ACTIVE
|
True
|
False
|
If set to ‘True’, rmse_rpas_stock_on_hand also extracts
stock at the warehouse level. If set to ‘False’, rmse_rpas_stock_on_hand
extracts stock at the store level only.
|
|
LOAD_TYPE
|
CONVENTIONAL
|
DIRECT
|
Data loading method to be used by SQL*Loader
(Direct may be faster than conventional).
|
|
DB_ENV
|
ORA
|
DB2, TERA
|
Database type (Additional changes to the software may be
needed if a database other than Oracle is selected).
|
|
NO_OF_CPUS
|
4
|
Depends on installation
|
Used in parallel database query hints to improve
performance.
|
|
LANGUAGE
|
en
|
Various
|
En = English
|
|
RFX_OPTIONS
|
-c $RDF_HOME/
rfx/etc/rfx.conf
-s SCHEMAFILE
|
-c $RDF_
HOME/
rfx/etc/rfx
.conf
|
Processing speed may be increased for some extractions if
the
-s SCHEMAFILE
option is omitted.
|
You must set up the wallet alias in the rmse_aip_config.env. The
wallet and wallet alias creation is required to use programs in a secured mode.
The following variables must be setup RETL_WALLET_ALIAS, ORACLE_WALLET_ALIAS,
SQLPLUS_LOGON.
Be sure to review the environmental parameters in the
rmse_rpas_config.env file before executing batch modules.
Steps to Configure RETL
Log in to the UNIX server with a UNIX account that will run
the RETL scripts.
Change directories to <base_directory>/rfx/etc.
Modify the constants from the table above in the
rmse_rpas_config.env script as needed.
RETL programs use a return code to indicate successful
completion. If the program successfully runs, a zero (0) is returned. If the
program fails, no number is returned.
To prevent a program from running while the same program is
already running against the same set of data, the code utilizes a program
status control file. At the beginning of each module, rmse_rpas_config.env is run.
This script checks for the existence of the program status control file. If the
file exists, then a message stating, ‘${PROGRAM_NAME}
has already started’, is logged and the module exits. If the file does
not exist, a program status control file is created and the module executes.
If the module fails at any point, the program status control file
is not removed, and the user is responsible for removing the control file
before running the module again.
File Naming Conventions
The name and directory of the program status control file is set
in the configuration script (rmse_rpas_config.env). The directory defaults to
$RDF_HOME/error.
The naming convention for the program status control file itself
defaults to the following dot separated file name:
§
The program name.
§
The program status is mentioned under the ‘status’ parameter.
§
The business virtual date for which the module was run.
For example, a program status control file for the
rmse_rpas_daily_sales.ksh program is named as follows for a batch run on the
business virtual date of January 5, 2001:
$RDF_HOME/error/rmse_rpas_daily_sales.status.20010105
Because RETL processes all records as a set, as opposed to one
record at a time, the method for restart and recovery must be different from
the method that is used for Pro*C. The restart and recovery process serves the
following two purposes:
It prevents the loss of data due to program or database
failure.
It increases performance when restarting after a program or
database failure by limiting the amount of reprocessing that needs to occur.
The RMS extract (RMSE) modules extract from a source transaction
database or text file and write to a text file. The RMS loads module import
data from flat files, performs necessary transformations, and then loads the
data into the applicable RMS table.
Most modules use a single RETL flow and do not require the use of
restart and recovery. If the extraction process fails for any reason, the
problem can be fixed, and the entire process is started again without the loss
of data. No RMS to RPAS extraction programs has any restart/recovery
capability. The single RMS load program, rmsl_rpas_forecast.ksh, takes
a text file as its input, and the following choices are available, that enables
the program to complete the load in the event of an error:
§
Re-run the program with the entire input file.
§
Re-run the program with only the input records that were not
processed successfully the first time.
Message logs are written daily in a format as described in this
section.
Every RETL program writes a message to the daily log file when it
starts and when it finishes. In some cases, progress messages are also written.
The name and directory of the daily log file is set in the configuration script
(rmse_rpas_config.env). The directory defaults to $RDF_HOME/log. All log files
are encoded UTF-8.
The naming convention of the daily log file defaults to the
following “dot” separated file name:
§
The business virtual date for which the modules are run.
§
The log file format should be ‘.log’.
For example, the location and the name of the log file for the
business virtual date of January 5, 2001 would be the following:
$RDF_HOME/log/20010105.log
As the following examples illustrate, every message written to a
log file has the name of the program, a timestamp, and either an informational
or error message. For example:
rmse_rpas_item_retail 17:09:07: Program started ...
rmse_rpas_item_retail 17:09:12: Program completed successfully
Some error messages are also written to the log file, such as ‘No output file specified’.
In addition to the daily log file, each program also writes its
own detailed flow and error messages. Rather than clutter the daily log file
with these messages, each program writes out its errors to a separate error
file unique to each execution.
If a program finishes unsuccessfully, a message is usually
written in the error file that indicates where the problem occurred in the process.
The name and directory of the program error file is set in the
applicable configuration file (rmse_rpas_config.env). The directory defaults to
$RDF_HOME/error. All errors and all routine processing messages for a
given program on a given day go into this error file (for example, it contains
both the stderr and stdout produced during execution of the program).
The naming convention for the program’s error file defaults to
the following “dot” separated file name:
§
The program name
§
The business virtual date for which the module was run
For example, all errors and detailed log information for the rms_item_master.ksh program would be placed in the
following file for the batch run on the business virtual date of January 5,
2001:
$MMHOME/error/rms_item_master.20010105
RMSE extract modules may produce a reject file if they encounter
data related problems, such as the inability to find data on required lookup
tables. The module tries to process all data and then indicates that records
were rejected so that all data problems can be identified in one pass and
corrected; then, the module can be re-run to successful completion. If a module
does reject records, the reject file is not removed, and the user is
responsible for removing the reject file before re-running the module. The
records in the reject file consist of the rejected records.
The name and directory of the reject file are defined in the
applicable configuration script (rmse_rpas_config.env). The directory defaults
to $RDF_HOME/data.
Note:
A directory specific to reject files can be created. The rmse_rpas_config.env
script would need to be changed to define the reject directory constant such
that it would point to that directory.
The naming convention for the reject file defaults to the following
“dot” separated file name:
§
The program name.
§
The first filename, if one is specified on the command line.
§
The file format should be as ‘.rej’.
§
The business virtual date for which the module was run.
RETL uses schema files to specify the format of incoming or
outgoing datasets. The schema file defines each column’s data type and format,
which is then used within RETL to format/handle the data. For more information
about schema files, see the latest RETL Programmer’s Guide. Schema file names
are hard-coded within each module because they do not change on a day-to-day
basis. All schema files end with “.schema” and are placed in the
“$RDF_HOME/rfx/schema” directory.
The only programs or scripts that allows the command line
parameters (or arguments) are:
§
rmse_rpas_config.env script
§
pre_rmse_rpas.ksh
§
rmse_rpas.ksh programs.
All of the command line parameters for these modules are optional
and are described in section rmse_rpas_config.env, the
square brackets indicate that the parameter is optional.
Usage: $RDF_HOME/rfx/etc/rmse_rpas_config.env [-t
$*] [-r $*] [-s $*] [-v $* | -c $*]
Description of Command Line Options
Note:
See the end of this description for an explanation of the need for the ‘$*’
that appears after each command line option.
§
-t:
This option causes rmse_rpas_config.env to skip the initializing of the
environment variables that obtains the values from the ‘.txt’ files, except for
VDATE which is initialized with the date found in the vdate.txt file. This
option is utilized by pre_rmse_rpas.ksh, rmse_rpas.ksh, rdft.ksh and outage.ksh
when they call rmse_rpas_config.env.
§
-r: This option prevents the
redirection of all output (stdout and stderr) to the error file. This can be
useful during debugging and maintenance. This option can also be utilized by
rmse_rpas.ksh, rdft.ksh and outage.ksh when they call rmse_rpas_config.env.
o The ‘-t’ and ‘-r’ options
must be followed by ‘$*’ on the line which invokes this script.
This step is necessary in order to preserve the command line arguments or
options that may have been present on the command line for the RETL script that
invokes this script. However, the ‘$*’ must
only appear once if both options are used.
§
-s: This option causes
rmse_rpas_config.env to skip the STATUS_FILE test. This is also useful during
maintenance and debugging.
§
-v: If DATE_TYPE (in
rmse_rpas_config.env) is set to ‘vdate’, this option prevents the normal exit
with an error message when the vdate.txt file is empty or non-existent;
instead, it uses the current date to derive FILE_DATE. However, if DATE_TYPE is
set to ‘vdate’, and vdate.txt actually does exist and
is non-empty, the date in vdate.txt continues to be used even if this option is
set. If DATE_TYPE is set to ‘current_date’, this option
has no effect.
§
-c: This option overrides the
DATE_TYPE switch setting and causes the current date to be used to derive
FILE_DATE regardless of what DATE_TYPE is set to. This option is utilized by
pre_rmse_rpas.ksh when it calls rmse_rpas_config.env, if it is run with the -c option on
its command line. The ‘-c’ option is normally only used when rmse_rpas_config.env
is called from pre_rmse_rpas.ksh.
o If only one
command line option is used, it must be followed by ‘$*’. But if more than one option is
specified, then ‘$*’
must be entered on the command line only once after all options have been
entered. The ‘$*’
is necessary in order to preserve the command line arguments or options (if
there are any) that are present on the command line that is used to execute the
RETL script which invokes this script.
o If more than
one option is specified, options must appear on the command line in the same
order as shown on the “Usage” line, above.
pre_rmse_rpas.ksh
§
Usage: pre_rmse_rpas.ksh [-c]
§
The ‘-c’
option is used to specify what option is to be placed on the
rmse_rpas_config.env command line when it is called by this program. It is
usually used the first time that pre_rmse_rpas.ksh is run at a new installation
or if the state of the vdate.txt file is unknown. This option is passed
directly to rmse_rpas_config.env when it is called by pre_rmse_rpas.ksh. No
other use is made of this parameter by pre_rmse_rpas.ksh.
§
This option causes rmse_rpas_config.env to use the current date
to initialize FILE_DATE instead of possibly setting it to VDATE, which is
obtained from the vdate.txt file. (FILE_DATE is the date that is used to name
the error, log, and status files).
§
The current date is used regardless of how DATE_TYPE is set in
rmse_rpas_config.env. By using the ‘-c’ option, there is no need to
manually set up the vdate.txt file before running this script.
§
The normal mode for pre_rmse_rpas.ksh (without the -c option)
is that when it calls rmse_rpas_config.env, FILE_DATE is set to VDATE or the
current date, depending on how DATE_TYPE is set in rmse_rpas_config.env. If
DATE_TYPE is set to ‘vdate’, and if the vdate.txt file does not exist or is
empty, rmse_rpas_config.env (and this program) exits with an error message.
§
The use of this option does not affect what date is used by any
of the other RETL scripts that run after this script is done. After
pre_rmse_rpas.ksh has run, when the other RETL scripts are run, they call
rmse_rpas_config.env with no options on the command line, and their files are
named using VDATE or the current date, depending on how DATE_TYPE is set in
rmse_rpas_config.env.
rmse_rpas.ksh
§
Usage: rmse_rpas.ksh [-c]
§
The presence of the ‘-c’ option causes FILE_DATE in rmse_rpas_config.env
to be set to the current date instead of possibly using VDATE (which gets its
value from the vdate.txt file), but only when it is called by rmse_rpas.ksh and
pre_rmse_rpas.ksh (pre_rmse_rpas.ksh is invoked by rmse_rpas.ksh). It has no effect
when other extract programs call rmse_rpas_config.env, at the time that they
are invoked by rmse_rpas.ksh. This option is passed directly to
rmse_rpas_config.env and pre_rmse_rpas.ksh when they are called by
rmse_rpas.ksh. No other use is made of this parameter by rmse_rpas.ksh.
Note: During the rmse_rpas_config.env configuration to
connect to the JDBC, enter the connection details as follows:
jdbc:oracle:thin:@<DB host server>:<PORT ID>:<connection
string>. For example, oracle:thin:@msp52417.us.oracle.com:1521:dolsp01app.
RMSE
I/O File Names
Most of the output path/filenames have the format,
$DATA_DIR/(RMSE_RPAS_program name).dat. Similarly, the schema format for the
records in these files are specified in the file -
$SCHEMA_DIR/(RMSE_RPAS_program name).schema.
The following examples illustrate typical run and debugging
situations for programs. The log, error, etc. file names referenced below assumes
that the module is run on the business virtual date of March 9, 2001. For more
information on naming convention, see File Naming
Conventions section.
For example:
To run rmse_rpas_stores.ksh:
Change directories to $RDF_HOME/rfx/src.
At a UNIX prompt ($) enter:
$rmse_rpas_stores.ksh
If the module runs successfully, the following results:
Log file: Today’s log file, 20010309.log, contains the
messages “Program started …” and “Program completed successfully” for
rmse_rpas_stores.
Data: The rmse_rpas_stores.dat file exists in the data
directory and contains the extracted records.
Schema: The rmse_rpas_stores.schema file exists in the
schema directory and contains the definition of the data file in #2 above.
Error file: The program’s error file,
rmse_rpas_stores.20010309, contains the standard RETL flow (ending with “All
threads complete” and “Flow ran successfully”) and no error messages.
Program status control: The program status control
file, rmse_rpas_stores.status.20010309, will not exist.
Reject file: The reject file,
rmse_rpas_stores.rej.20010309, will not exist.
If the module does not run
successfully, the following results:
Log file: Today’s log file, 20010309.log, does not
contain the “Program completed successfully” message for rmse_rpas_stores.
Data: The rmse_rpas_stores.dat file may exist in the
data directory but may not contain all the extracted records.
Schema: The rmse_rpas_stores.schema file exists in the
schema directory and contains the definition of the data file in #2 above.
Error file: The program’s error file,
rmse_rpas_stores.20010309, may contain one or more error messages.
Program status control: The program status control
file, rmse_rpas_stores.status.20010309, exists.
Reject file: The reject file,
rmse_rpas_stores.status.20010309, does not exist because this module does not
reject records.
To re-run the module, perform the following actions:
Determine and fix the problem causing the error.
Remove the program’s status control file.
Change directories to $RDF_HOME/rfx/src. At a UNIX prompt,
enter: $rmse_rpas_stores.ksh
This section covers information about the configuration of
RPAS/AIP. It gives an overview of handling installation and configuration in
RMS ETL.
This section summarizes the RETL program features utilized in the
RMS Extractions (RMSE) for the RMS–time-phased inventory planning tool
integration. Starting with RMS version 11, the RMS extract for a time-phased
inventory planning tool is separate from the RMS extracts for RPAS. In prior
RMS version, time-phased inventory planning tool and RPAS had common RETL
extracts.
More installation information about the RETL tool is available in
the latest RETL Programmer’s Guide.
Note:
In this section, some examples refer to RETL programs that are not related to
RMS or are related to other versions of RMS than this document addresses. Such
examples are included for illustration purposes only.
Select a directory where you would like to install RMS ETL. This
directory (also called MMHOME) is the location from which the RMS ETL files are
extracted.
The following code tree is utilized for the RETL framework during
the extractions, transformations, and loads and is referred to in this
documentation.
<base directory (MMHOME)>
/data
/error
/log
/rfx
/bookmark
/etc
/lib
/schema
/src
Before trying to configure and run RMS RETL, install RETL version
13.0 or later, which is required to run RMS ETL. For thorough installation
process, see the latest RETL Programmer’s Guide.
RMS ETL is installed and run as the RETL user. Additionally, the
permissions are set up as per the RETL Programmer’s Guide. RMS ETL reads data,
creates, deletes and updates tables. If these permissions are not set up
properly, extractions fail.
To set up RETL environment variable for the RETL version you have
installed, see RETL Programmers Guide. You will need to set MMHOME to your base
directory for RMS RETL. This is the top level directory that you selected
during the installation process (see the section, ‘Installation’, above). In
your .kshrc, you should add a line such as the following:
export MMHOME=<base directory for RMS ETL>
There variables you must be change depending upon your local
settings:
For example:
export DBNAME=int9i
export RMS_OWNER=steffej_rms1011
export BA_OWNER=rmsint1011
You must set up the wallet alias in the rmse_aip_config.env. The
wallet and wallet alias creation is required to use programs in a secured mode.
The following variables must be setup RETL_WALLET_ALIAS, ORACLE_WALLET_ALIAS,
SQLPLUS_LOGON.
Make sure to review the environmental parameters in the
rmse_aip_config.env file file before executing batch modules.
Steps to Configure RETL
Log in to the UNIX server with a UNIX account that will run
the RETL scripts.
Change directories to <base_directory>/rfx/etc.
Modify the rmse_aip_config.env script.
For example:
b. Change
the DBNAME variable to the name of the RMS database.
c. Change
the RMS_OWNER variable to the username of the RMS schema owner.
d. Change
the BA_OWNER variable to the username of the RMSE batch user.
Note: During the rmse_aip_config.env configuration to
connect to the JDBC, enter the connection details as follows: jdbc:oracle:thin:@<DB
host server>:<PORT ID>:<connection string>. For example, oracle:thin:@msp52417.us.oracle.com:1521:dolsp01app.
RETL program uses one return code to indicate successful
completion. If the program successfully runs, a zero (0) is returned. If the
program fails then, zero is not returned.
To prevent a program from running while the same program is
already running against the same set of data, the code utilizes a program
status control file. At the beginning of each module, rmse_aip_config.env is
run. These files check for the existence of the program status control file. If
the file exists, then a message stating, ‘${PROGRAM_NAME} has already started’,
is logged and the module exits. If the file does not exist, a program status
control file is created and the module executes.
If the module fails at any point, the program status control file
is not removed, and the user is responsible for removing the control file
before re-running the module.
The naming convention of the program status control file allows a
program whose input is a text file to be run multiple times at the same time
against different files.
The name and directory of the program status control file is set
in the applicable configuration file (rmse_aip_config.env). The directory
defaults to $MMHOME/error. The naming convention for the program status control
file itself defaults to the following dot separated file name:
§
The program name.
§
The status of the program name should be specified in ‘status’.
§
The business virtual date for which the module was run.
For example, a program status control file for one program is
named as follows for the batch run of January 5, 2001:
$MMHOME/error/rmse_aip_banded_item.status.20010105
Because RETL processes all records as a set, as opposed to one
record at a time, the method for restart and recovery must be different from
the method that is used for Pro*C. The restart and recovery process serves the
following two purposes:
It prevents the loss of data due to program or database
failure.
It increases performance when restarting after a program or
database failure by limiting the amount of reprocessing that needs to occur.
The RMS Extract (RMSE) module extracts a source transaction
database or text file and writes to a text file. The RMS Load (RMSL) modules
import data from flat files, performs transformation if necessary and then loads
the data into the applicable RMS tables.
Most modules use a single RETL flow and do not require the use of
restart and recovery. If the extraction process fails for any reason, the
problem is fixed, and the entire process runs from the beginning without the
loss of data. For a module that takes a text file as its input, the following
two choices are available that enables the module to be re-run from the
beginning:
Re-run the module with the entire input file.
Re-run the module with only the records that were not
processed successfully the first time and concatenate the resulting file with
the output file from the first time.
To limit the amount of data that needs to be re-processed, more
complicated modules that require the use of multiple RETL flows utilize a
bookmark method for restart and recovery. This method allows the module to be
restarted at the point of last success and run to completion. The bookmark
restart/recovery method incorporates the use of a bookmark flag to indicate
which step of the process should be run next. For each step in the process, the
bookmark flag is written to and read from a bookmark file.
Note:
If the fix for the problem causing the failure requires changing data in the
source table or file, then the bookmark file must be removed and the process
must be re-run from the beginning in order to extract the changed data.
Message logs are written daily in a format described in this
section.
Every RETL program writes a message to the daily log file when it
starts and when it finishes. The name and directory of the daily log file is
set in the configuration file (rmse_aip_config.env). The directory defaults to
$MMHOME/log. All log files are encoded UTF-8.
The naming convention of the daily log file defaults to the
following “dot” separated file name:
§
The business virtual date for which the modules are run
§
‘.log’
For example, the location and the name of the log file for the
business virtual date of January 5, 2001 would be the following:
$MMHOME/log/20010105.log
As the following examples illustrate, every message written to a
log file has the name of the program, a timestamp, and either an informational
or error message:
aipt_item 17:07:43: Program started ...
aipt_item 17:07:50: Program completed successfully
rmse_aip_item_master 17:08:53: Program started ...
rmse_aip_item_master 17:08:59: Program completed successfully
rmse_item_retail 17:09:07: Program started ...
rmse_item_retail 17:09:12: Program completed successfully
If a program finishes unsuccessfully, an error file is usually
written that indicates where the problem occurred in the process. There are
some error messages written to the log file, such as ‘No output file
specified’, that require no further explanation written to the error file.
Program Error File
In addition to the daily log file, each program also writes its
own detail flow and error messages. Rather than clutter the daily log file with
these messages, each program writes out its errors to a separate error file
unique to each execution.
The name and directory of the program error file is set in the
applicable configuration file (rmse_aip_config.env). The directory defaults to
$MMHOME/error. All errors and all routine processing messages for a
given program on a given day go into this error file (for example, it will
contain both the stderr and stdout from the call to RETL). All error files are
encoded UTF-8.
The naming convention for the program’s error file defaults to
the following “dot” separated file name:
§
The program name
§
The business virtual date for which the module was run
For example, all errors and detail log information for the rms_aip_item_master program would be placed in the
following file for the batch run of January 5, 2001:
$MMHOME/error/rms_aip_item_master.20010105
RMSE extract and transformation modules may produce a reject file
if they encounter data related problems, such as the inability to find data on
required lookup tables. The module tries to process all data and then indicates
that records were rejected so that all data problems can be identified in one
pass and corrected; then, the module can be re-run to successful completion. If
a module does reject records, the reject file is not removed, and the user is
responsible for removing the reject file before re-running the module.
The record in the reject file contains an error message and key
information from the rejected record. The following example illustrates a
record that is rejected due to problems within the currency conversion library:
Currency Conversion Failed|101721472|20010309
The following example illustrates a record that is rejected due
to problems looking up information on a source table:
Unable to find item_master record for Item|101721472
The name and directory of the reject file is set in the
applicable configuration file (rmse_config.env or config.env). The directory
defaults to $MMHOME/data.
Note:
A directory specific to reject files can be created. The rmse_config.env and/or
config.env file would need to be changed to point to that directory.
The naming convention for the reject file defaults to the
following “dot” separated file name:
§
The program name
§
The first filename, if one is specified on the command line
§
‘rej’
§
The business virtual date for which the module was run
For example, all rejected records for the slsildmex program would be placed in the following
file for the batch run of January 5, 2001:
$MMHOME/data/slsildmex.slsildmdm.txt.rej.20010105
RETL uses schema files to specify the format of incoming or
outgoing datasets. The schema file defines each column’s data type and format,
which is then used within RETL to format/handle the data. For more information
about schema files, see the latest RETL Programmer’s Guide. Schema file names
are hard-coded within each module since they do not change on a day-to-day
basis. All schema files end with “.schema” and are placed in the “rfx/schema”
directory.
In order for each RETL module to run, the input/output data file
paths and names may need to be passed in at the UNIX command line.
Most RMSE and transformation modules do not require the passing
in of any parameters. The output path/filename defaults to $DATA_DIR/(RMSE and
transfer program name).dat. Similarly, the schema format for the records in
these files are specified in the file - $SCHEMA_DIR/(RMSE program name).schema.
The scripts below are run on a full snapshot basis. The parameter
is F (for full snapshot).
§
rmse_aip_store_cur_inventory.ksh
§
rmse_aip_wh_cur_inventory.ksh
The following examples illustrate typical run and debugging
situations for types of programs. The log, error, and other file names
referenced below assume that the module is run on the business virtual date of
March 9, 2001. See the previously described naming conventions for the location
of each file.
For example:
To run rmse_aip_store.ksh:
Change directories to $MMHOME/rfx/src.
At a UNIX prompt enter:
%rmse_aip_store.ksh
If the module runs successfully, the following results:
§
Log file: Today’s log file, 20010309.log, contains the
messages “Program started …” and “Program completed successfully” for rmse_aip_store.
§
Data: The rmse_aip_store.dat file exists in the data
directory and contains the extracted records.
§
Schema: The rmse_aip_store.schema file exists in the
schema directory and contains the definition of the data file in #2 above.
§
Error file: The program’s error file,
rmse_aip_store.20010309, contains the standard RETL flow (ending with “All
threads complete” and “Flow ran successfully”) and no additional error
messages.
§
Program status control: The program status control file,
rmse_aip_store.status.20010309, does not exist.
§
Reject file: The reject file, rmse_aip_store.rej.20010309,
does not exist because this module does not reject records.
§
If the module does not run successfully, the following
results:
§
Log file: Today’s log file, 20010309.log, does not contain
the “Program completed successfully” message for rmse_stores.
§
Data: The rmse_aip_store.dat file may exist in the data
directory but may not contain all the extracted records.
§
Schema: The rmse_aip_store.schema file exists in the
schema directory and contains the definition of the data file in #2 above.
§
Error file: The program’s error file,
rmse_aip_store.20010309, may contain an error message.
§
Program status control: The program status control file,
rmse_aip_store.status.20010309, exists.
§
Reject file: The reject file,
rmse_aip_store.status.20010309, does not exist because this module does not
reject records.
To re-run the module, perform the following actions:
Determine and fix the problem causing the error.
Remove the program’s status control file.
Change directories to $MMHOME/rfx/src. At a UNIX prompt,
enter: %rmse_aip_store.ksh.
7
Internationalization is the process of creating software that can
be translated more easily. Changes to the code are not specific to any
particular market. RMS is internationalized to support multiple languages.
This section describes configuration settings and features of the
software that ensure that the base application can handle multiple languages.
Translation is the process of interpreting and adapting text from
one language into another. Although the code itself is not translated,
components of the application that are translated may include the following:
§
Graphical user interface (GUI)
§
Error messages
§
Reports
The following components are not translated:
§
Documentation (online help, release notes, installation guide,
user guide, operations guide)
§
Batch programs and messages
§
Log files
§
Configuration tools
§
Demonstration data
§
Training materials
The user interface for RMS is translated into:
§
Chinese (simplified)
§
Chinese (traditional)
§
Croatian
§
Dutch
§
French
§
German
§
Greek
§
Hungarian
§
Italian
§
Japanese
§
Korean
§
Polish
§
Portuguese (Brazilian)
§
Russian
§
Spanish
§
Swedish
§
Turkish
You can select a preferred language through the RMS UI or the
database on the USER_ATTRIB table. The selected language is connected to your
ID in RMS and the translated strings are displayed in the selected language.
RMS has a fail/safe mechanism built into the code. If the preferred language is
not found, then RMS rolls back to English language display of the UI label.
Note: A retailer has the three options
regarding internationalization when installing the application. See the RMS
Installation Guide for the procedures related to each.
§
English and multiple secondary languages.
§
Translated language (fully translated non-English installation).
No secondary languages are installed when your primary language is one other
than English.
§
Install a translated language as the primary language. Obtain the
whitepapers, which allows you to install English as a secondary language.
RMS allows for multiple application servers to point to a single
instance of forms and database. This is specific to users who want to have a
multi-lingual install of RMS and have two URLs, each with a separate NLS_LANG
session setting. This helps to facilitate secondary user language sessions as
some UI elements are displayed in the language of the NLS_LANG session of the
application server.
To set up multiple URLs:
Copy URL information in formsweb.cfg.
e. Change
the URL (the part in square brackets) to something new.
f. Change
the .env file reference to a new file (to be created in step 2).
Copy the current .env file to the new name created in step 1.
Modify the new .env file by setting NLS_LANG to the new
value.
Several tables handle displayable text that can also be
translated.
If the retailer creates a new form, a new menu, or a new object
on a form, then the retailer has to populate these tables with the
corresponding information. If the retailer customizes the information in any of
the tables FORM_ELEMENTS, FORM_ELEMENTS_LANGS, MENU_ELEMENTS, or
MENU_ELEMENTS_LANGS, the base_ind field in customized records must contain ‘N’.
This table is used for screen display and holds the master list
of items for all forms whose labels/prompts are translated. This information
will always be in English. The BASE_IND=Y means that the item is part of the
base Oracle Retail code set. BASE_IND =N indicates that the item was added as
part of retailer customization.
This table is used for screen display. This table holds
translated values for labels/prompts on forms. This information will be in a
language that is defined on the lang column of the user_attrib table. All users
see data from this table, as the retailer may customize the text of a given
field. The access key for a button is defined by filling in the
LANG_ACCESS_KEY/LANG_LABEL_PROMPT field. At run time, that character will be
marked in the string, and function as the access key. Any time the retailer
changes the LANG_ACCESS_KEY/LANG_LABEL_PROMPT or LANG_ACCESS_KEY/LANG_LABEL_PROMPT,
the BASE_IND should be updated to N because it is not part of the base language
translations provided by Oracle Retail.
This table is used for screen display. This table holds the
master list for all menus whose items are translated. This information will
always be in English. The access key for a menu option is defined by using the
ampersand (&) before the character that is the access key in the default
description. The BASE_IND=Y means that the item is part of the base Oracle
Retail code set. BASE_IND=N indicates that the item was added as part of
retailer customization.
This table is used for screen display. This table holds the
values for all menus whose items are translated. This information will be in a
language that is defined on the lang table. Even English language users see
data from this table, as the retailer may customize the text of a given menu
option. Any time the retailer changes the LANG_LABEL, the BASE_IND should be
updated to N because it is not part of the base language translations provided
by Oracle Retail.
This table is used for screen display. This table holds the
intersection of form and menu files, mapping each form to the menu that it
displays.
This table holds non-primary language descriptions of code types
defined on the CODE_DETAIL table. The retailer has a multi-language option. The
column CODE_DESC on the tables CODE_DETAIL and CODE_DETAIL_TRANS have been
increased to 250 bytes. (They were 40 in previous versions of RMS).
This table contains translations for the UOM_CLASS table. The
column UOM_TRANS holds translations of the abbreviations of the units of
measure. UOM_DESC_TRANS holds translated descriptions.
In RMS, several tables have been redesigned to handle
multilingual information. For these tables, the translated text has been moved
to a related table that has the same name but with “_TL” added to it.
The original table contains all information that does not need
translation. All of the strings that could be translated are on the related
*_TL table. The following is a list of new tables:
§
ADD_TYPE_TL
§
COST_CHG_REASON_TL
§
DEAL_COMP_TYPE_TL
§
FREIGHT_SIZE_TL
§
FREIGHT_TERMS_TL
§
FREIGHT_TYPE_TL
§
INV_ADJ_REASON_TL
§
INV_STATUS_CODES_TL
§
INV_STATUS_TYPES_TL
§
NON_MERCH_CODE_HEAD_TL
§
ORDER_TYPES_TL
§
TERMS_HEAD_TL
8
Integrating RMS with Store Inventory
Management
Oracle Retail Store Inventory Management (ORSIM or SIM) is a Java
based application with multitier architecture. SIM assists store operation,
tracking item and item inventory with all the integrated systems.
SIM helps store personnel in performing the following in-store
operations:
§
Receiving merchandise from the warehouse or directly from the
vendor.
§
Replenishing and order stock.
§
Requesting and implementing price changes.
§
Managing physical inventories and performing stock count.
§
Lookup for the detailed information about merchandise items,
suppliers, containers, and customer orders.
§
Transferring or returning stock.
SIM function includes administration, shipping, receiving,
inventory management, lookups and reporting.
The administration function is performed either by the SIM
administrator or the Manager. The function includes:
§
Setup and technical maintenance of SIM.
§
Security setup to define SIM users and their roles.
§
Setup and maintenance of serial numbers that are Unique
Identification Numbers (UIN) based.
The usage of serial numbers for item is an optional feature.
The inventory management function helps to maintain an accurate
perpetual store Inventory for the Stock Counts, Sequencing, Pick Lists, Item Requests,
Store Orders, Price Changes, and Ticketing.
The inventory management system provides detailed information
about inventory items, suppliers, containers and customer orders which are
created in RMS. You can check for the related information in parallel. For
example, when you are checking for an item, the supplier information of the
item can also be viewed.
Using inventory management, you can perform lookup along with the
other SIM tasks. For example, lookup for an item while preparing an item
request or lookup for a supplier information when preparing the store order.
SIM includes many standard reports, which can be customized as
per your requirement. SIM uses Oracle BI Publisher as an interface for the SIM
reports. The SIM reports are custom designed as per the organizational
requirement. The BI Publisher interface is also customized to organize and
present the reports available to the SIM users.
All the location, item and supplier information are created in
RMS whether it is ranged or not ranged to a store, flows to SIM using the RIB
Adapter.
Supplier is created in RMS. The details of the supplier are sent
to SIM through RIB.
RIB Validation: After successful execution of the batches, check
for the stores in the RIB.
§
Vendor_Publisher in
RIB-RMS
§
Vendor_Subscriber
in RIB-SIM
When
RIB message shows as succeeded, the vendor will be available in the SIM.
Merchandise hierarchy includes Department, Class, and Sub-Class
which are created in RMS. After they are created successfully in RMS, the
details are sent to SIM through RIB.
RIB Validation: After successful execution of the batches, check
for the stores in the RIB.
§
MerchHier_Publisher
in RIB-RMS
§
MerchHier_Subscriber
in RIB-SIM
When
RIB message shows as succeeded, the Department, Class and Subclass is available
in SIM.
When a warehouse is created in the RMS, the details of warehouse
are sent to SIM through RIB.
RIB Validation: After successful execution of the batches, check
for the stores in the RIB.
§
WH_Publisher in RIB-RMS
§
WH_Subscriber in
RIB-SIM
When
RIB message shows as succeeded, warehouse will be available in SIM.
The SIM Store function allows you to set operating parameters for
stores managed with SIM. The Store is created in RMS and flows to SIM application.
RIB Validation: After successful creation of the stores,
check for the stores message in the RIB.
§
Stores_Publisher in
RIB-RMS
§
Store_Subscriber in
RIB-SIM
When
RIB message shows as succeeded, the store is available in SIM.
You can add, change, and delete reason codes used for inventory
adjustments. In addition to showing the reasons for inventory adjustments, the reason
code specifies how inventory adjustments affect stock on hand, unavailable
inventory, or customer order reserve inventory.
Note: The Reason Codes created in SIM
must be mapped to the RMS Inventory Adjustment Reason Codes.
To add an Inventory Adjustment Reason in SIM:
Navigate and select Admin > Setup >
Inv. Adj. Reason. >The Inventory Adjustment Reason Maintenance window
opens.
Click Add.
Enter ID: 123.
Description: Test Inventory Reason Code.
The UI must be check.
Select Stock on Hand from the Disposition dropdown
list.
Click Done.
Validate the database in the INV_ADJUSTMENT_REASON table.
When the Inventory reason code is set up in SIM, it must be
mapped to RMS.
To map Inventory Adjustment Reasons in RMS:
Navigate and select Control > Setup > Inventory Adjustment
Reason >Edit.
Click Add. The next available line is enabled.
Enter the details as entered in SIM, enter ID: 123.
Description: Test Inventory Reason Code.
Click OK to save your changes and close the window.
Database Validation
|
Functionality
|
SIM Table
|
RMS Table
|
|
Inventory Adjustment Reason
|
INV_ADJUSTMENT_REASON
|
INV_ADJ_REASON
|
To
create a Diff ID in RMS, navigate and select Items > Diffs > Diff
Group/Diff IDs.
RIB Validation: Validate the details in RIB.
§
Diffs Publisher in RIB-RMS
§
Diffs Subscriber in RIB-SIM
When the Diff ID is available in both publisher and subscriber,
it will be available in SIM.
You can create the item with diff or without diff in RMS. To
create you must navigate and select Item> Items. Select the items to
be created in RMS. If you have associated the stores to the item, then you can
validate the item availability in SIM.
RIB Validation: Validate the details in RIB.
§
Items Publisher (for item) and ItemLoc Publisher (For location)
in RIB-RMS.
§
Items Subscriber and ItemLoc Subscriber in RIB-SIM.
§
When the item and location are available in publisher and
subscriber, it will be available in SIM.
Database Validation
|
Functionality
|
SIM Table
|
RMS Table
|
|
Item
|
ITEM
|
ITEM_MASTER
|
|
Country of Manufacture
|
SUPPLIER_ITEM_MANUFACTURE
|
ITEM_SUPP_MANU_COUNTRY
|
|
Item Supplier Relationship
|
SUPPLIER_ITEM
|
ITEM_SUPPLIER
|
|
Item Supplier Relationship
|
SUPPLIER_ITEM_COUNTRY
|
ITEM_SUPP_COUNTRY
|
|
Item Location Relationship
|
STORE_SEQUENCE_ITEM
|
ITEM_LOC
|
To view SIM GUI item lookup:
Log in to SIM and select the associated store.
Navigate and select Lookups > Item Lookup.
Enter the item created in RMS and search.
You get the details with the diff (optional) available in the
Merchandise Hierarchy block.
There are different types of transactions created and maintained
in SIM.
Purchase Order
Transfer
Return to Warehouse
Return to Vendor
Store Order
Inventory Adjustment
Stock Count
Price Change
To create a purchase order in RMS for a store you must navigate
and select Ordering>Orders. When the order is created and submitted,
approve the Purchase Order (PO). The order details is be sent to SIM
successfully.
RIB Validation: When the purchase order is create, make sure to
verify the order number for the following:
§
Order_Publisher in
RIB-RMS
§
Order_Subscriber in
RIB-SIM
Receiving the Order in SIM
The Purchase Order is received with different combinations as
given below:
Receive
with Exact Quantity.
Under Receive Quantity.
Over Receive Quantity.
Receive with Damage Quantity.
PO On The FLY – In this scenario, the Purchase Order is
created in SIM and not RMS. This can be done based on the item and supplier’s
detail, when we have the details in SIM a PO is displayed.
Transfer implies to movement of goods from one location to
another. Accordingly to SIM, transfer is either store to store transfer or
warehouse to store transfer. Transfers can be generated in SIM also.
Store To Store Transfer
The Store to Store transfer is created for the movement of goods
from Store A to Store B.
RIB Validation:
§
Verify the Stock-Order/Transfer in Transfer_Publisher in RIB-RMS.
§
Verify the Stock-Order/Transfer in StockOrder_Subscriber in RIB-SIM.
To receive a transfer, select the receiving store in the SIM
login form. For dispatching transfer from store to store:
Log in to the correct FROM store.
Navigate and select > Shipping/Receiving
> Transfers.
Double-click the record and update the quantity column with
the unit which needs to be transferred. The transfer functionality supports
both overage and underage.
Click Dispatch and accept the warnings.
RIB Validation: When the dispatch is completed, a message
is sent to RMS.
§
ASNOut_Publisher in
RIB SIM
§
ASNOut_Subscriber in
RIB RMS
To receive the transfer from store to store:
Log in to the correct TO store.
Navigate and select Shipping/Receiving > Transfers.
Double-click the record and updates the quantity column with
the unit which needs to be transferred. The transfer functionality supports
overage and underage.
Click Receive All and accept the warning.
RIB Validation: When the receiving is done, a message is
sent to RMS. Verify the order number in:
§
Receiving_Publisher in RIB-SIM
§
Receiving _Subscriber in RIB-RMS
RMS Database Validation
§
Stock on Hand gets updated in ITEM_LOC_SOH table in RMS.
Received quantity is deducted from FROM store and added in TO store.
§
Tran code 37 and 38 is posted in TRAN_DATA table.
In this case of transfer, the goods are moved from warehouse to
another store. The user must login to the receiving store to receive the
transfer. Before receiving in SIM, the transfer must to be shipped from the
corresponding warehouse.
To receive the transfer from Warehouse to Store:
Log in to the correct TO store.
Navigate and select Shipping/Receiving > Warehouse Delivery.
Double-click the container ID which has received from
Warehouse.
Edit quantities or record damages.
Click Receive. The status changes to Received.
Click Confirm and accept the warning message.
RIB Validation: When the transfer is received, a message
is sent to RMS. Verify the order number in:
§
Receiving_Publisher in RIB-SIM
§
Receiving _Subscriber in RIB-RMS
RMS Database Validation:
§
Stock on Hand gets updated in ITEM_LOC_SOH table in RMS. Received
quantity is deducted from FROM Warehouse and added in TO store.
§
Tran code 30 and 32 is posted in TRAN_DATA table.
SIM
Database Validation:
§
STORE_ITEM_STOCK is increased in SOH for the store.
You can create the transfers from one store to another. No other
transfers are possible.
Navigate and select Shipping/Receiving > Transfer
> Create Transfer.
Select Transfer To store from the dropdown.
Enter the item and shipped quantity.
Click BOL and select the pickup date.
Click Dispatch and accept the warning message.
To
receive the transfer on the FLY:
The user must log in to the correct TO store.
Navigate and select Shipping/Receiving > Transfers.
Double-click on the record and updates the quantity column
with the units which needs to be transferred. The transfer functionality
supports overage and underage.
Click Receive All and accept the warning in the pop
up.
Click Done to save changes and confirm the transfer.
RIB Validation: When receiving is done, message is sent to
RMS. Verify the order number in:
§
Receiving_Publisher in RIB-SIM
§
Receiving _Subscriber in RIB-RMS
RMS Database Validation
§
Stock on Hand is updated in ITEM_LOC_SOH table in RMS. The
received quantity is deducted from FROM store and added in TO store.
§
Tran code 30, 32 and 22 is posted in TRAN_DATA table.
Note:
§
The Reason Codes created in SIM must be mapped to the RMS Inventory
Adjustment Reason Codes.
§
If the external ID is a number and the user is external it
implies that the transfer is generated in RMS.
§
If a transfer request is initiated in SIM this message is not
published in RMS or any other integrated application.
§
A transfer handles damaged quantities which in turn are put in
the non-sellable bucket in RMS.
§
Negative receiving though cannot be done nor can be transferred.
§
We can also receive multiple times against the same transfer for
the expected quantity. This action will be allowed as long as the transfer is
open and not restricted by expected quantity.
§
While transferring we can also add items which were not part of
the original transfer but we cannot remove the original item while we transfer
as long as we have stock on hand.
§
Non ranged items can also be part of the transfer. These are
items which are not ranged to that particular location but it is ranged by
raising the transfer.
You can create, edit, and dispatch returns from the store to a company-owned
warehouse, or directly to a vendor. If there is unavailable stock for a
returned item, you have an option to use items from unavailable stock for the
return. A completed (dispatched) return decreases available Stock on Hand.
The store to warehouse transfer is created in RMS, which is
displayed as a return to warehouse in SIM. A similar transfer is created in
SIM.
Note: Unless the return is dispatched
from SIM, WMS cannot see the transaction.
Creating Return to Warehouse in SIM
To create a return to Warehouse in SIM:
Select the correct store from the dropdown in the Login page.
Navigate and select Shipping/Receiving > Returns.
Click Create.
In the Return Type field, select Warehouse from the
dropdown.
Enter warehouse, inventory status, authorization number, item
details, reason to return and quantity.
Click Dispatch.
Click Done to save the changes.
RIB Validation: After dispatch is cleared, a message is
sent to RMS.
Verify the order number in:
§
RTV_Publisher in RIB-SIM
§
RTV _Subscriber in RIB-RMS
A transfer (RTW) is created in RMS with APPROVED status.
RMS/SIM Database Validation
§
Stock on Hand gets updated in ITEM_LOC_SOH table in RMS.
Inventory must be reduced from SIM and RMS by correct quantity.
§
Tran code 30 and 32 is posted in TRAN_DATA table.
When initiated by RMS, a warehouse to store transfer is created
in RMS, and is returned back to warehouse then it is called Return to
Warehouse.
RMS functionality includes, create a transfer, return to warehouse
in RMS and APPROVE it.
RIB Validation: When the dispatch is completed, a message
is sent to RMS.
§
RTV_Publisher in RIB-RMS
§
RTV _Subscriber in RIB-SIM
§
Transfer_Publisher in RIB-RMS
Dispatching in SIM
To dispatch to SIM:
Select the correct store from the login form.
Navigate and select Shipping/Receiving > Returns.
Select the transfer you need to return. The user ID will be
external along with the external ID number which indicates that the transfer
originated in ORMS.
Double-click on the Record.
Update the quantity column with the unit which needs to be
returned.
Click Dispatch and accept the warning message.
RIB Validation: When the dispatch is completed, a message is
sent to RMS.
§
RTV_Publisher in RIB-SIM
§
RTV _Subscriber in RIB-RMS
RMS/SIM Database Validation:
§
Stock on Hand is updated in ITEM_LOC_SOH table in RMS. Inventory
should be reduced from SIM and RMS by correct quantity.
§
Tran code 30 and 32 is posted in TRAN_DATA table.
Return to vendor can be created both in SIM and ORMS.
Initiating SIM in RTV
Following the the steps to initiate SIM in RTV:
Select the correct store from the dropdown in the login page.
Navigate and select Main menu > Shipping/Receiving > Returns.
Click Create.
In the Return Type field, select Supplier from the
dropdown.
Enter supplier, authorization number, item details, reason to
return and quantity.
Click Dispatch.
RIB Validation: When the dispatch is done, message is
sent to RMS
§
RTV_Publisher in RIB-SIM
§
RTV _Subscriber in RIB-RMS
A transfer (RTV) is created in ORMS.
RMS/SIM Database
Validation
§
Stock on hand gets updated in ITEM_LOC_SOH table in RMS
(Inventory should be reduced from SIM and RMS by correct quantity).
§
Tran code 24 is posted in TRAN_DATA table.
Initiating RMS in RTV
When a Return to vendor along with a mass return transfer is
created in ORMS, and is returned back to vendor then it is called Return to
Vendor.
Steps for creating Returns in SIM:
Select the correct store from the login form.
Navigate and select Main menu > Shipping/Receiving > Returns.
Select the transfer you need to return. (The user ID will be
external along with the external ID number which indicates that the transfer
originated in RMS).
Double-click on the record which needs to be returned.
Update the quantity column with the units which need to be
returned.
Click Dispatch and accept the warning message.
RIB Validation: When dispatch is completed, message is
sent to RMS
§
RTV_Publisher in
RIB-SIM
§
RTV _Subscriber in
RIB-RMS
RMS/SIM Database Validation:
Stock on hand gets updated in ITEM_LOC_SOH table in RMS
(Inventory should be reduced from SIM and RMS by correct quantity). Tran code
24 is posted in TRAN_DATA table.
Store ordering allows to View, Create, Modify, and Approve orders
to a supplier or Transfer requests from a warehouse. Use store-level ordering
to order items that are not set up for automatic replenishment, when items run
short, or demand increases.
Create a store orders to replenish items for which you have the
authority to place orders from the store.
Log in to SIM with the correct store.
Navigate and select Inv Mgmt > Store Orders.
Click Create Order.
Specify a delivery date range.
Enter Item number, quantity, and UOM.
Click Done. Order is created in Pending Status.
Log in to the SIM with the correct store.
Navigate and select Inv Mgmt > Store Orders.
Double-click on the store order to be approved.
Specify a delivery date range.
Click Approve. Order status is changed to Approved
Status.
Database Validation
|
Functionality
|
SIM Table
|
RMS Table
|
|
Store Order
|
PRINT_STORE_ORDER_ITEM
|
STORE_ORDER
|
|
|
PRINT_STORE_ORDER
|
N/A
|
Inventory adjustments that you enter in SIM are supplied to the
merchandising system to adjust stock levels and maintain perpetual inventory.
Inventory adjustments increment or decrement inventory levels such as Stock on
Hand and unavailable inventory.
Each inventory adjustment contains a reason code that determines
the disposition of the inventory being adjusted. For example, inventory removed
for repair is added to the unavailable inventory and the Stock on Hand is
decreased. When the items are returned to inventory, unavailable inventory is
decreased and the Stock on Hand is increased.
Log in to SIM with the store where you need to do the
inventory adjustment.
Navigate and select Inv Mgmt > Inventory Adjustment.
Click Create.
Enter the item number in the Item field.
Update the UOM, Quantity, and Reason.
Click Done.
Enter UINs for an Inventory Adjustment
If an item requires a serial number type UIN, the Quantity field
is disabled on the Inventory Adjustment Detail window.
Double-click the UIN Qty field.
Click Add.
Enter valid number in the in the Unique Identification Number
(UIN) field.
Click Save to return to the Inventory Adjustment Detail
window.
RIB Validation: When the Inventory adjustment is completed
in SIM, a message is sent to ORMS to update the inventory stock. Message flows
through RIB:
§
InvAdjust_Publisher in RIB-SIM
§
InvAdjust_Subscriber in RIB-RMS
SIM TABLES Validation:
§
INV_ADJUSTMENT: STORE_ID, ITEM_ID, QUANTITY
RMS DATABASE Validation
§
INV_ADJ: ITEM, ADJ_QTY, LOCATION
§
INV_STATUS_QTY : ITEM, QTY
Stock counts are the principal tools to ensure that the perpetual
inventory for a store remains accurate. For maximum flexibility in performing
stock counts, SIM allows the following types of stock counts:
§
Unit - Unit stock counts are scheduled counts that update
the RMS and SIM inventory positions, but only for the physical count values.
These counts are performed on regular schedules.
§
Unit and Amount - A Unit and Amount count is an annual
count that can be used to adjust the financial systems in a corporate
merchandising system, in addition to updating inventory positions in SIM.
§
Problem Line - Problem Line stock counts are similar to
Unit counts. Problem Line product groups use.
Pre-defined criteria to the identify
problem items. For example, you might use a Problem Line count for all of the
items that have negative Stock on Hand values.
§
Ad hoc - An ad hoc stock count is an unscheduled stock
count that is initiated on a handheld device. An ad hoc count is similar to a
Unit count, but the items are not pre-assigned and there is no schedule.
Each stock count must be generated, except for ad hoc stock count
type. To generate a stock count, you must first create a product group and
schedule. Product groups can include a particular inventory item or entire
segments of the inventory hierarchy, including all items in a store.
Stock Counting Process
The general process to conduct a stock count in SIM is as
follows:
Create the stock count product group.
Schedule the stock count.
Perform a stock count using both or any of the hand held
devices or a personal computer.
Recount discrepant items, depending on whether the product
group requires a recount.
Review the count information and authorize the count
quantities.
For Unit and Amount counts, export the stock count results to
the merchandising system to update Stock on Hand.
The following diagram illustrates the general process flow.

General Process Flow
Executing a Stock Count
The steps to execute a stock count from start to finish are as
follows:
Take a Snapshot.
Enter Stock Count Results.
Enter Recount Results.
Complete a Child Stock Count.
Authorize a Stock Count.
RIB Validations: When the Stock Count is schedule, a message
flows to ORMS using RIB as interface:
§
StkCountSch_Publisher
in RIB-SIM
§
StkCountSch_Subscriber
in RIB-RMS
Using the Price Change function, you can request price changes
for items at your store. Price changes are set in the pricing system. The
pricing system might be in Oracle Retail Price Management (RPM) or another
application.
You can request price changes only for items for which you can
control prices. This is controlled by an indicator at the store (location)
level. Your price change requests are submitted to the pricing system, where
they may be approved or rejected. After a price change is approved in the
pricing system, a price change event is sent from the pricing system to SIM.
A price change request that is approved in the pricing system
creates a pricing event that is sent back to SIM. For an approved price change,
you can print labels and tickets for the re-priced items.
You can request price changes for those items for which you are
allowed to make pricing changes at the store (location) level. For these items,
you can request changes to retail, promotion, or clearance pricing.
The request is sent to the pricing system, where it may be
approved or rejected. Your price change requests are checked for possible
conflicts. You cannot request price changes for items involved in complex
promotions (such as buy one, get one free). You cannot request multiple price
changes on the same day. Your request may be rejected if it conflicts with any
other pricing events.
To create price change and promotions in SIM:
Navigate and select Inv Mgmt > Price Change.
Enter search criteria to limit the price change requests that
you want displayed, and click Search.
Click Create.
Enter Item, start date, price change description and new
price.
For clearance or promotion, select end date.
Click Done and accept the warning message.
RIB Validations: When the price is completed, a message is sent
to ORPM using RIB as interface.
§
PrcChgReq_Publisher
in RIB-SIM
SIM DATABASE VALIDATION
§
ITEM_PRICE : ID_ITM, EFFECTIVE_DATE, UNIT_RETAIL, STATUS.
9
Integrating
RMS with Oracle E-Business Suite Financials Using Oracle Retail Financial
Integration
This chapter describes the integration between Oracle Retail
systems and Oracle E-Business Suite Financials (including Oracle General Ledger
and Oracle Payables), as developed and supported by Oracle Retail Financial
Integration (ORFI).
When the option to integrate is chosen, the selected information
is shared between the systems. Integration and validation services are in place
to ensure the shared data matches.
Note: This chapter addresses the points
within Oracle Retail systems that are essential to integration. For more
information about the entire integration process, including mapping to Oracle
E-Business Suite data and settings, see the ORFI documents, Oracle Retail
Financial Integration for Oracle Retail Merchandising Suite and Oracle
E-Business Suite Financials - Implementation Guide. For more information
about Web services, see the following chapters in the Oracle
Retail Merchandising System Operations Guide, Volume 2: "Service
Provider Implementations API Designs" and "Web Services”.
The following Oracle Retail applications are included in the
integration covered by this chapter:
§
Oracle Retail Merchandising System (RMS)
§
Oracle Retail Sales Audit (ReSA)
§
Oracle Retail Invoice Matching (ReIM)
§
Oracle Retail Integration Bus (RIB)
§
The option to integrate must be selected during initial set up of
the RMS system.
§
ReIM accesses RMS to determine if integration is active. The RMS
set up must be done before integrating with REIM.
§
The URLs for the RFI Web services that are necessary for this
integration are maintained in the RETAIL_SERVICE_REPORT_URL table and in the
ReIM IM_SYSTEM_OPTIONS table.
§
Real time account validation is done only when the financial
integration with Oracle E-Business Suite is ON.
§
Partners must be set up as suppliers in Oracle E-Business Suite
and manually set up in RMS using the RMS Supplier ID. The RMS supplier ID
generated when the Oracle E-Business Suite supplier is interfaced with Oracle
Retail. The RMS supplier generated as part of this process is not used.
§
Payment terms and freight terms are manually maintained.
Integration of Oracle Retail applications and Oracle E-Business
Suite Financials relies on synchronization of essential data, such as currency
exchange rates and suppliers. Through careful discussions, the users of both
systems determine the common codes and descriptions that will best serve their
business needs.
When an agreement is reached, this information is set up and
maintained. Depending on the volume, some shared information is set up in
Oracle Retail applications or in Oracle E-Business Suite and electronically
transferred to other systems. Otherwise, shared information is set up manually
within each system, and the users of both systems must ensure that the code and
the description match.
This section describes setup considerations for RMS data.
RMS System Options
As part of the RMS system options setup, set the following
options as indicated:
The system_option
indicates that the Oracle Retail system is integrated with a financial system:
§
FINANCIAL_AP=A
A value of A indicates that the financial system to which RMS
is interfaced is Oracle E-Business Suite through Oracle Retail Financial
Integration (ORFI).
§
GL_ROLL_UP can be D/S/C
§
SUPPLIER_SITES_IND = Y
§
ORG_UNIT_IND = Y
Organization Units
Use the Organizational Unit window (RMS Start Menu >
Control > Setup > Org Unit >Edit) to define
organizational units in RMS that match those being setup in Oracle E-Business
Suite. When an organizational unit is entered in RMS, the valid organizational
units are those associated with the Set Of Books (SOB) used for the general
ledger interface.
Currency Exchange Rates
Currency exchange rate is used to translate the monetary value of
one currency in terms of another. Depending on business needs, a Currency
Exchange Rate Type of Operational or Consolidation is selected for use in all
transactions.
This value is set up manually in RMS and mapped to Oracle
E-Business Suite through the Currency Exchange Type mapping window. Currency
Exchange Rate data is owned by Oracle General Ledger and updates are sent to
Oracle Retail applications.
Determine the Exchange Type being sent by Oracle General
Ledger (for example, Consolidation or Operational) that you want RMS to use.
Update the FIF_CURRENCY_XREF for mapping the external
exchange type being sent by Oracle General Ledger with RMS Exchange Type. For
example, for Consolidation and Operational exchange types, the
FIF_CURRENCY_XREF table holds the following entries:
|
FIF_EXCHANGE_TYPE
|
RMS_EXCHANGE_TYPE
|
|
C
|
C
|
|
O
|
O
|
Supplier Address Types
Within RMS, supplier information (such as Order From and Remit To
addresses) is used for generating the purchase orders. Oracle Payables uses
supplier information for payment generation. It is important that this
information is synchronized.
Partner Org Unit
Suppliers are created in Oracle Payables and exported to RMS.
When FINANCIAL_AP is set to A, suppliers cannot be created using the RMS forms.
However, if a supplier exists in RMS, all data values for the supplier (except
supplier name and status) are updated using the RMS forms. The association of
supplier sites to organization units is accessed only in view mode through RMS
forms. One supplier site per supplier and organization unit combination can be
marked as primary payment site.
Where SYSTEM_OPTIONS.FINANCIAL_AP is A, disable auto generate
supplier/partner numbers and associated check boxes.
Note: Supplier information is created, updated and
inactivated only in Oracle Payables. This information is transferred from
Oracle Payables to the participating Oracle Retail applications, where
additional retail-specific attributes are maintained.
Country Codes
When country codes are defined and seeded in RMS, ensure that
country codes are mapped to Oracle E-Business Suite country codes through RFI
DVM mapping. The following is an example of RFI DVM Mapping (Table
RFI_XREF_DVM, available in RFI schema in Retail.
|
EXT_SYSTEM_ID
|
COMMON_ID
|
RETL_ID
|
|
USA
|
700
|
US
|
|
CAN
|
701
|
CA
|
Financial Calendar
The financial calendar within Oracle Retail systems is manually
set up and maintained separately from the Oracle General Ledger financial
calendar.
Freight Terms
A freight term is an agreement between the retailer and a
supplier regarding transportation charges for goods delivered by the supplier.
Freight terms are used by RMS as purchase orders are generated.
Within the RMS system, freight terms are set up and maintained
manually. They are also maintained in Oracle Payables.
Payment Terms and Currency Exchange Rates
Currency, exchange rates are created and updated in Oracle General
Ledger and exported to RMS. Changes to Retail currency exchange rates are not
propagated to Oracle General Ledger. Payment terms, however, are manually set
up and maintained in each system.
Oracle E-Business Suite Financials Units and Site IDs
The data concepts of Org Units and Site IDs in RMS mirror the
data maintained in Oracle E-Business Suite. RMS forms are used to manage and
view Oracle Org Units and Site IDs. The RMS windows for Store and Warehouse
maintenance allow for the association of each store and warehouse with an Org
Unit. The following is an example of the Organizational Unit form:
Organizational Unit
Store and Warehouse Maintenance
The organizational unit is found in the Store Maintenance and
Warehouse forms, which allow the Oracle E-Business Suite operating unit to be
associated with the Store or Warehouse.
§
When RMS is set up for multi-channel operation, the
organizational unit is set up at the virtual warehouse level.
Financial sales audit and inventory information is identified
through interface routines and posted to the appropriate general ledger
accounts. An organizational unit must be designated for each Store and
Warehouse location in the RMS.
The following are examples of the Store Maintenance and Warehouse
Maintenance forms:
Store Maintenance Window
Virtual Warehouse Maintenance
RMS General Ledger Setup
For RMS and ReSA, manual setup is required for validating the
chart of accounts. Valid chart of accounts are created and stored in general
ledger cross reference tables. Once the validation is completed, transaction
data is assigned to specific account codes.
Ongoing maintenance of the chart of accounts information (such as
adding, changing, or deleting chart of accounts) requires re-validation. In
this regard, Oracle General Ledger is the system of record, as it is used to
verify the chart of accounts used by Oracle Retail applications. When these
applications send a chart of accounts for validation, Oracle General Ledgers
issues a message with:
§
Valid or invalid status
§
Response date
§
Chart of accounts
The RMS table FIF_GL_SETUP, stores the Oracle E-Business Suite
Set of Books IDs to post financial information. This table must be setup
manually after Set of Books IDs are determined. Where a system indicator
Multiple Set of Books ID is set to N, FIF_GL_SETUP must hold a single Set of
Books (SOB) record.
The Set of Books IDs is associated with the chart of accounts
when setting up general ledger cross-reference.
RMS General Ledger Cross Reference
Select RMS
Start Menu > Finance> GL Cross Reference. The General Ledger Search
window opens. Map Chart of Accounts to department, Class, Subclass, Set Of
Books, location, and transaction codes using the GL cross reference form in
RMS.
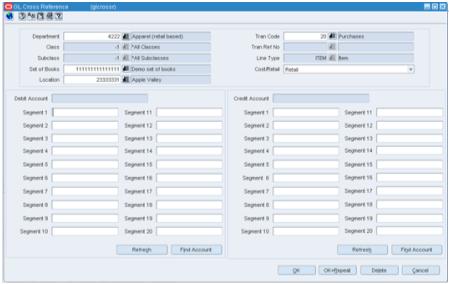
GL Cross Reference
ReSA General Ledger Cross Reference
Select ReSA task list>Foundation
Data>Data
Loading>Manage
Data. The manage data
screen opens. Through this screen, the user can choose the General Ledger
template to maintain the data using spreadsheet download and upload.
When
SYSTEM_OPTIONS.FINANCIAL_AP is A, the upload validates entries of valid segment
combinations.
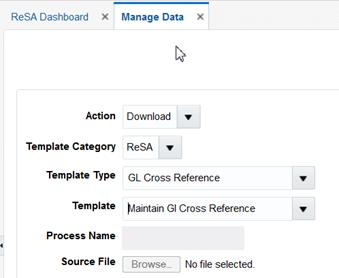
Manage Data
This section describes setup considerations for ReIM data.
System Options
As part of the RMS system options setup script, set the following
options as indicated:
§
FINANCIAL_AP =A
Chart of Accounts Setup
The chart of accounts is set up manually in Oracle Retail
applications and in Oracle General Ledger. All account combinations are set up
in each Set Of Books. Account validation is done while executing Financial
Posting batch
Segment Mapping
The retailer determines how many segments are populated. Up to 20
account segments can be specified. The following is an example of how segments
are mapped between the ReIM transaction table and Oracle General Ledger:
|
ReIM Segments
|
Oracle General Ledger Chart of Accounts
|
|
Segment 1
|
PRODUCT
|
|
Segment 2
|
ACCOUNT
|
|
Segment 3
|
ALTACCT
|
|
Segment 4
|
OPERATING_UNIT
|
|
Segment 5
|
FUND_CODE
|
|
Segment 6
|
DEPTID
|
|
Segment 7
|
PROGRAM_CODE
|
|
Segment 8
|
CLASS_FLD
|
|
Segment 9
|
BUDGET_REF
|
|
Segment 10
|
BUSINESS_UNIT_PC
|
|
Segment 11
|
PROJECT_ID
|
|
Segment 12
|
ACTIVITY_ID
|
|
Segment 13
|
RESOURCE_TYPE
|
|
Segment 14
|
RESOURCE_CATEGORY
|
|
Segment 15
|
RESOURCE_SUB_CAT
|
|
Segment 16
|
CHARTFIELD1
|
|
Segment 17
|
CHARTFIELD2
|
|
Segment 18
|
CHARTFIELD3
|
|
Segment 19
|
AFFILIATE
|
|
Segment 20
|
AFFILIATE_INTRA1
|
If any one of the values in the 20 segments does not match the
Oracle General Ledger, the account combination is considered as invalid. The
following error message is added to IM_POSTING_DOC_ERRORS table “One or more
accounts subjected to posting is invalid”.
Segments 1 and 2 may be set up as dynamic at the Location level,
or Segments 4 and 5 can be dynamic at the Department and Class level
respectively. Segments defined as dynamic are allowed to be null for certain
types of Basic Transaction or Reason Code cross-reference types. When a segment
is null, the segment is assigned dynamically when transactions are posted.
(Non-dynamic segments cannot be blank). Validation applies to the segment
combination, not to individual segments.
Note: For Tran code TAP, each segment must have a
value regardless of whether the segment is dynamic.
Running the Initial Load from Oracle E-Business Suite Financials
The initial load for ReIM is run by Oracle E-Business Suite and
includes the following information:
§
Suppliers
§
Currency Rates
Note: The
view, mv_currency_conversion_rates should be refreshed once the initial loads
of currencies from Oracle General Ledger are loaded to ReIM.
To accommodate integration, the IM_SYSTEM_OPTOINS table should be
configured with the following properties.
WS_FIN_ACC_VALID_URL
- This attribute holds the URL for the financial account validation web
service.
WS_FIN_ACC_VALID_CRED
- This attribute indicates if the account validation web service call is
authenticated or not. Y means Authentication enabled. N means Authentication is
not enabled (See configuring web service credentials in weblogic server).
WS_FIN_DRILL_FWD_URL
- This attribute holds the URL for the financial drill
forward web service.
WS_FIN_DRILL_FWD_CRED
- This attribute indicates if the drill forward web service call is
authenticated or not. Y means Authentication enabled. N means Authentication is
not enabled (See configuring web service credentials in weblogic server).
The above attributes are configured in the System Options screen.
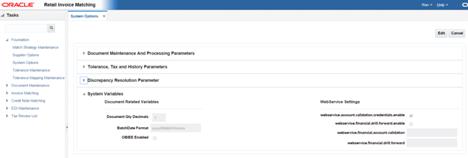
Configuring WebService Credentials in Weblogic Server
Enterprise Manager:
The credentials for the web service call are configured in the
default domain credential store of the weblogic server through the admin console.
Create A Map:
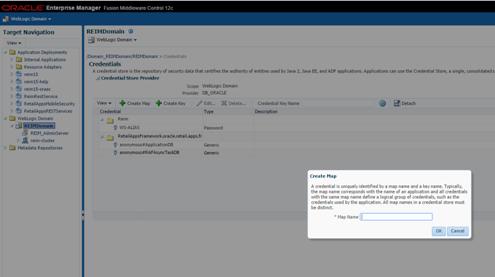
Creating Credentials:
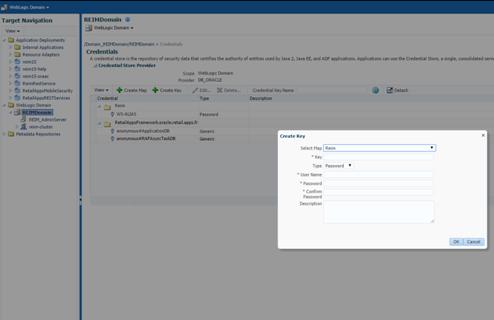
Note: Select
the map as ReIM. The Key name should always be WS-ALIAS. Any user name /
password can be assigned to the key
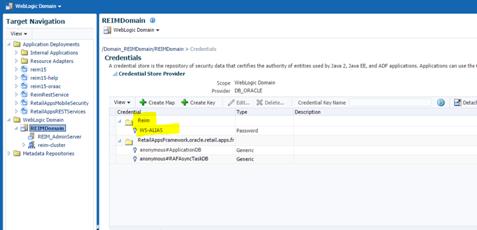
Reports are created by Business Intelligence Publisher for the
following:
The URL for each report must be updated in the table, retail_service_report_url. The
following table provides sample URLs.
Integration to Oracle General Ledger includes a number of
transactions, as described below.
The TRANS_AMOUNT field in the im_financial_stage
table stores the value of the journal entry to be posted to Oracle General
Ledger. (The currency for the calculated amount is the currency assigned to the
transaction). The TRANS_AMOUNT value is calculated as follows:
|
Row Description
|
DEBIT_CREDIT_IND
|
TRANS_AMOUNT Value
|
|
Normal
|
Debit
|
Transaction Amount
|
|
Normal
|
Credit
|
(-1) * Transaction Amount
|
|
VAT
|
Debit
|
Transaction Amount * VAT Rate
|
|
VAT
|
Credit
|
(-1) * Transaction Amount * VAT Rate
|
Note: Transaction
Amount is taken from the database column, IM_FINANCIALS_STAGE.AMOUNT.
A staging table accommodates the outgoing transfer of data. The
reference key assigned to each document or receipt is used to find data on this
table.
|
From
|
To
|
Transactions
|
|
ReIM
|
Oracle Payables
|
Invoices
Debit Memos
Credit Memos
Credit Notes
|
|
ReIM
|
Oracle General Ledger
|
General Ledger accounting entries resulting from the
Invoice Matching process, including:
Pre-paid invoices
Receipt Write-offs
|
|
RMS
|
Oracle General Ledger
|
Accounting entry data (potentially very high volume)
|
|
ReSA
|
Oracle General Ledger
|
Accounting entry data (potentially very high volume)
|
Valid chart of accounts are stored in the ReIM table,
IM_VALID_ACCOUNTS, which includes the Set of Books ID (sob_id) and 20 segments.
An ORFI Web service validates accounts against the Oracle General Ledger. Valid
accounts are posted to IM_VALID_ACCOUNTS; invalid accounts are posted to
IM_POSTING_DOC_ERROR. The following steps describe the validation process:
1. The ReIM
system invokes the validation Web service to validate the chart of accounts. (A
URL for the ORFI Web service is configured in the SYSTEM_OPTIONS table.
The posting batch job checks the accounts
to be posted against the IM_VALID_ACCOUNTS table.
If the chart of accounts is in the
table, the transaction is posted to staging tables.
If the chart of account does not
exist in the table, a collection of accounts is built. These collected accounts
are validated against the Oracle General Ledger, and a status is returned.
§ If the status of the
collected accounts is valid, the accounts are inserted in the IM_VALID_ACCOUNTS
table, and the transactions are posted to the staging tables.
§ If the status of the
accounts is NOT valid, the entire collection is flagged as errors, and
transactions are posted to IM_POSTING_DOC_ERROR.
Note:
ReIM completes the first level of account validation and posts the transaction
to staging tables. It is assumed the second level of account validation is done
at the end of the extraction process (where transactions are moved from ReIM
staging tables to Oracle General Ledger). If account validation fails at this
point, Oracle General Ledger must change the account information before
transactions are loaded to Oracle General Ledger, and the chart of accounts
must be re-validated in ReIM.
A Merchandise document with a ready for match status can be pre
paid before matching. The Document Search screen provides this option.
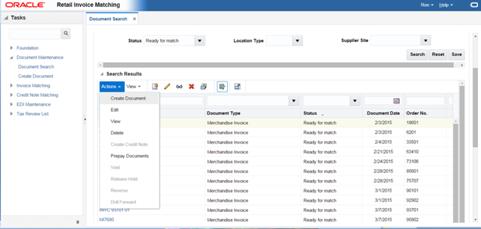
Valid chart of accounts are stored in the ReIM table,
IM_VALID_ACCOUNTS, which includes the Set of Books ID (sob_id) and 20 segments.
An ORFI Web service validates accounts against the Oracle General Ledger. Valid
accounts are posted to IM_VALID_ACCOUNTS; invalid accounts are posted to
IM_POSTING_DOC_ERROR. The following steps describe the validation process:
1. The
ReIM system invokes the validation Web service to validate the chart of
accounts. (A URL for the ORFI Web service is configured in the SYSTEM_OPTIONS
table.
2. The
Prepay operation checks the accounts to be posted against the IM_VALID_ACCOUNTS
table.
If the chart of accounts is in the
table, the transaction is posted to staging tables.
If the chart of account does not exist in the table, a collection
of accounts is built. These collected accounts are validated against the Oracle
General Ledger, and a status is returned.
§ If the status of the
collected accounts is valid, the accounts are inserted in the IM_VALID_ACCOUNTS
table, and the transactions are posted to the staging tables.
§ If the status of the
accounts is NOT valid, the entire collection is flagged as errors, and
transactions are posted to IM_POSTING_DOC_ERROR and the user will be shown an
error message “One or more accounts subjected to posting is invalid”.
As account information is changed in the Oracle General Ledger,
Retail must re-validate the locally stored chart of accounts. Oracle General
Ledger will not propagate chart of account changes to Retail. The AccountWorkspacePurge
Batch can clear all valid accounts in the IM_VALID_ACCOUNTS table or only those
that are considered updates in Oracle E-Business Suite.
Usage
AccountWorkspacePurge userid/password PURGE [ALL |
<Accounts>]
Where:
§
The argument is a combination of user ID and password.
§
The argument is the word PURGE.
§
The argument is either ALL or specific accounts to be deleted
from the local table.
10
Integrating RMS with PeopleSoft Financials
Using Oracle Retail Financial Integration
This chapter describes the integration between Oracle Retail
systems and PeopleSoft Financials (including PeopleSoft General Ledger and
PeopleSoft Payables), as developed and supported by Oracle Retail Financial
Integration (ORFI).
When the option to integrate is chosen, the selected information
is shared between the systems. Integration and validation services are in place
to ensure the shared data matches.
Note: This
chapter addresses the points within Oracle Retail systems that are essential to
integration. For more information about the entire integration process,
including mapping to data and settings, see the ORFI document, Oracle Retail Financial Integration for Oracle Retail Merchandise
Operations Management and Oracle Financials Implementation Guide. For
more information about Web services, see the following chapters in the Oracle Retail Merchandising System Operations Guide, Volume 2:
"Service Provider Implementations API Designs" and "Web Services”.
The following Oracle Retail applications are included in the
integration covered by this chapter:
§
Oracle Retail Merchandising System (RMS)
§
Oracle Retail Sales Audit (ReSA)
§
Oracle Retail Invoice Matching (ReIM)
§
Oracle Retail Integration Bus (RIB)
§
The option to integrate must be selected during initial set up of
the RMS system.
§
ReIM accesses RMS to determine if integration is active. The RMS
set up must be done before integrating with REIM.
§
The URLs for the RFI Web services that are necessary for this
integration are maintained in the RETAIL_SERVICE_REPORT_URL table and in the
ReIM SYSTEM_OPTIONS table.
§
Real time account validation is done only when the financial
integration with Oracle E-Business Suite is ON.
§
Partners must be set up as suppliers in Oracle E-Business Suite
and manually set up in RMS using the RMS Supplier ID. The RMS supplier ID
generated when the Oracle E-Business Suite supplier is interfaced with Oracle
Retail. The RMS supplier generated as part of this process is not used.
§
Payment terms and freight terms are manually maintained.
The Location ID field is restricted to eight characters, to
accommodate PeopleSoft Operating Unit, which has a maximum of eight characters.
The Ext_Doc_ID field is restricted to 30 characters, because the
corresponding PeopleSoft field has only 30 characters. Characters beyond 30 are
truncated.
RMS allows for four decimals, and PeopleSoft allows only three.
Truncation may occur when data is passed to PeopleSoft Enterprise Financials.
ReIM values in the IM_CURRENCY_LOCALE are restricted to three
decimals, because the corresponding PeopleSoft Enterprise Financials field can
accept no more than three decimal positions.
Integration of Oracle Retail applications and PeopleSoft Financials
relies on synchronization of essential data, such as currency exchange rates,
suppliers, and payment terns. Through careful discussions, the users of both
systems determine the common codes and descriptions that will best serve their
business needs.
Once agreement is reached, this information is set up and
maintained. Depending on the volume, some shared information is set up in
Oracle Retail applications or in PeopleSoft and electronically transferred to
the other systems. Otherwise, shared information is set up manually within each
system, and the user of both systems must ensure that the code and the
description match.
This section describes setup considerations for the RMS data.
This system_option
indicates that the Oracle Retail system is integrated with a financial system:
§
FINANCIAL_AP=A
A value of A indicates that the financial system to which RMS is
interfaced is PeopleSoft through Oracle Retail Financial Integration (ORFI).
§
GL_ROLL_UP can be D/S/C
§
SUPPLIER_SITE_IND = Y
§
ORG_UNIT_IND = Y
Organization Units
Use the Organizational Unit window (RMS Start Menu >
Control > Setup > Org Unit >Edit) to define organizational units
in RMS that match those being setup in PeopleSoft. When an organizational unit
is entered in RMS, the valid organizational units are those associated with the
Set Of Books (SOB) that is being used for the general ledger interface.
Currency Exchange Rates
Currency exchange rate is used to translate the monetary value of
one currency in terms of another. Depending on business needs, a Currency
Exchange Rate Type of Operational or Consolidation is selected for use in all
transactions.
This value is set up manually in RMS and mapped to PeopleSoft
through the Currency Exchange Type mapping window. Currency Exchange Rate data
is owned by PeopleSoft General Ledger and updates are sent to Oracle Retail
applications.
Determine the Exchange Type being sent by PeopleSoft General
Ledger (for example, Consolidation or Operational) that you want RMS to use.
Update the
FIF_CURRENCY_XREF for mapping the external exchange type being sent by
PeopleSoft General Ledger with RMS Exchange Type.
For example, for Consolidation and Operational exchange types,
the
FIF_CURRENCY_XREF table holds the following entries:
|
FIF_EXCHANGE_TYPE
|
RMS_EXCHANGE_TYPE
|
|
C
|
C
|
|
O
|
O
|
Supplier Address Types
Within RMS, supplier information (such as Order From and Remit To
addresses) is used for generating the purchase orders. PeopleSoft Payables uses
supplier information for payment generation. It is important that this
information is synchronized.
Partner Org Unit window
Suppliers are created in PeopleSoft Payables and exported to RMS.
When FINANCIAL_AP is set to A, suppliers cannot be created using the RMS forms.
However, after the supplier exists in RMS, all data values for the supplier
(except supplier name and status) continue to be updated using the RMS forms.
The association of supplier sites to organization units is accessed only in
view mode through RMS forms. One supplier site per supplier organization unit
combination can be marked as primary payment site.
Where SYSTEM_OPTIONS.FINANCIAL_AP is A, disable auto generate
supplier/partner numbers and associated check boxes.
Note: Supplier information is
created, updated and inactivated only in PeopleSoft Payables. This information
is transferred from PeopleSoft Payables to the participating Oracle Retail
applications, where additional retail-specific attributes may be maintained.
Country Codes
When country codes are defined and seeded in RMS, ensure that
country codes are mapped to PeopleSoft country codes through RFI DVM mapping.
The following is an example of RFI DVM Mapping (Table RFI_XREF_DVM, available
in RFI schema in Retail.
|
EXT_SYSTEM_ID
|
COMMON_ID
|
RETL_ID
|
|
USA
|
700
|
US
|
|
CAN
|
701
|
CA
|
Financial Calendar
The financial calendar within Oracle Retail systems is manually
set up and maintained separately from the PeopleSoft General Ledger financial
calendar.
Freight Terms
A freight term is an agreement between the retailer and a
supplier regarding transportation charges for goods delivered by the supplier.
Freight terms are used by RMS as purchase orders are generated.
Within the RMS system, freight terms are set up and maintained
manually. They also are maintained in PeopleSoft Payables.
Payment Terms and Currency Exchange Rates
Currency exchange rates are created and updated in PeopleSoft
General Ledger and exported to RMS. Changes to Retail currency exchange rates
are not propagated to PeopleSoft General Ledger. Payment terms set up in
PeopleSoft are propagated to RMS but changes to payment terms in RMS are not
propagated back to PeopleSoft.
PeopleSoft Financials Units and Site IDs
The data concepts of Org Units and Site IDs in RMS mirror the
data maintained in PeopleSoft. RMS forms are used to manage and view Oracle Org
Units and Site IDs. The RMS windows for Store and Warehouse maintenance allows
for the association of each store and warehouse with an Org Unit. The following
is an example of the Organizational Unit form:
Organizational Unit
Store and Warehouse Maintenance
The organizational unit is found in the Store Maintenance and
Warehouse forms, which allow the PeopleSoft operating unit to be associated
with the Store or Warehouse. When RMS is set up for single-channel operation,
the organizational unit is set at the physical warehouse level. When RMS is set
up for multi-channel operation, the organizational unit is set up at the
virtual warehouse level. Financial sales audit and inventory information can
then be identified through interface routines and posted to the appropriate
general ledger accounts. An organizational unit must be designated for each
Store and Warehouse location in the RMS.
The following are examples of the Store Maintenance and Warehouse
Maintenance forms:
Store Maintenance Window
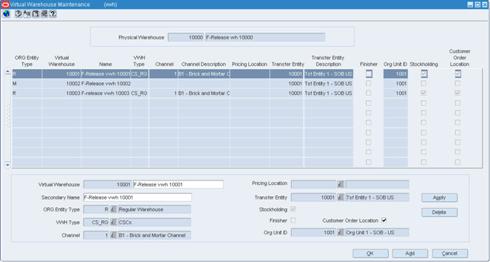
Virtual Warehouse Window
RMS General Ledger Setup
For RMS and ReSA, manual setup is required for validating the
chart of accounts. Valid chart of accounts are created and stored in general
ledger cross reference tables. Once the validation is completed, transaction
data can be assigned to specific account codes.
Ongoing maintenance of the chart of accounts information (such as
adding, changing, or deleting chart of accounts) requires re-validation. In
this regard, PeopleSoft General Ledger is the system of record, as it is used
to verify the chart of accounts used by Oracle Retail applications. When these
applications send a chart of accounts for validation, PeopleSoft General
Ledgers issues a message with:
§
Valid or invalid status
§
Response date
§
Chart of accounts
The RMS table, FIF_GL_SETUP, stores the PeopleSoft Set of Books
IDs to post financial information. This table must be setup manually after Set
of Books IDs are determined. Where system indicator Multiple Set of Books ID is
set to N, FIF_GL_SETUP must hold a single Set of Books (SOB) record.
The Set of Books IDs is associated with the chart of accounts
when setting up general ledger cross reference.
RMS General Ledger Cross Reference
Navigate: RMS Start Menu > Finance> GL
Cross Reference. The General Ledger Search window opens. Map Chart of
Accounts to department, Class, Subclass, Set Of Books, location, and
transaction codes using the GL cross reference form in RMS.
GL Cross Reference
ReSA General Ledger Cross Reference
Select ReSA task list>Foundation
Data>Data
Loading>Manage
Data. The manage data
screen opens. Through this screen, the user can choose the General Ledger
template to maintain the data using spreadsheet download and upload.
When
SYSTEM_OPTIONS.FINANCIAL_AP is A, the upload validates entries of valid segment
combinations.
Manage Data
Retail web services table, RETAIL_SERVICE_REPORT_URL, must be
updated with appropriate URLs to integrate with PeopleSoft Enterprise
Financials.
The records in the table for Services (indicated by RS_TYPE=S)
for Account Validation (RAV) and Drill Forward (RDF), must be updated with the
URL information from AIA where the services are hosted.
Note: If
Web services are secure, then the SYS_ACCOUNT column must be populated with
authentication information in the form of user name/password.
The records in the table for Reports (indicated by RS_TYPE=R) for
both RMS and ReIM reports, must be updated with the URL information from the
BIP Server where the reports are hosted.
This section describes setup considerations for ReIM data.
System Options
As part of the RMS system options setup script, set the following
options as indicated:
§
FINANCIAL_AP =A
Because PeopleSoft Enterprise Financials uses only three
decimals, the transactions generated by the Oracle Retail ReIM application must
not include more than three decimals.
Make sure that the RMS table CURRENCIES has maximum of 3 decimal
places for the currency_cost_dec attribute for difference currency codes. The
currency_rates table in RMS should be loaded initially by PeopleSoft Enterprise
Financials.
System Options window
The chart of accounts is set up manually in Oracle Retail
applications and in PeopleSoft General Ledger. All account combinations are set
up in each Set Of Books. Account validation is done while executing Financial
Posting batch.
Segment Mapping
The retailer determines how many segments are populated. Up to 20
account segments can be specified. The following is an example of how segments
are mapped between the ReIM transaction table and PeopleSoft General Ledger:
|
ReIM Segments
|
PeopleSoft General Ledger Chart of Accounts
|
|
Segment 1
|
ACCOUNT
|
|
Segment 2
|
ALTACCT
|
|
Segment 3
|
DEPTID
|
|
Segment 4
|
OPERATING_UNIT
|
|
Segment 5
|
PRODUCT
|
|
Segment 6
|
FUND_CODE
|
|
Segment 7
|
CLASS_FLD
|
|
Segment 8
|
PROGRAM_CODE
|
|
Segment 9
|
BUDGET_REF
|
|
Segment 10
|
AFFILIATE
|
|
Segment 11
|
AFFILIATE_INTRA1
|
|
Segment 12
|
AFFILIATE_INTRA2
|
|
Segment 13
|
CHARTFIELD1
|
|
Segment 14
|
CHARTFIELD2
|
|
Segment 15
|
CHARTFIELD3
|
|
Segment 16
|
RESOURCE_TYPE
|
|
Segment 17
|
RESOURCE_CATEGORY
|
|
Segment 18
|
RESOURCE_SUB_CAT
|
|
Segment 19
|
BUSINESS_UNIT_PC
|
|
Segment 20
|
PROJECT_ID
|
If any one of the values in the 20 segments does not match the
PeopleSoft General Ledger, the account combination is considered as invalid.
The following error message is added to IM_POSTING_DOC_ERRORS table: “One or
more accounts subjected to posting is invalid“
Segments 1 and 2 may be set up as dynamic at the Location level,
or Segments 4 and 5 can be dynamic at the Department and Class level
respectively. Segments defined as dynamic are allowed to be null for certain
types of Basic Transaction or Reason Code cross-reference types. When a segment
is null, the segment is assigned dynamically when transactions are posted.
(Non-dynamic segments cannot be blank). Validation applies to the segment
combination, not to individual segments.
Note: For Tran code TAP, each
segment must have a value regardless of whether the segment is dynamic.
Running the Initial Load from PeopleSoft Financials
The initial load for ReIM is run by PeopleSoft and includes the
following information:
§
Suppliers
§
Currency Rates
§
Payment Terms
Note: The
view, mv_currency_conversion_rates should be refreshed once the initial loads
of currencies from PeopleSoft General Ledger are loaded to ReIM
IM_SYSTEM_OPTIONS table Setup
To accommodate integration, IM_SYSTEM_OPTOINS table should be
configured to with the following properties.
Note:
Drill forward functionality is applicable for PeopleSoft – RMS and ReIM
integration. Drill backward functionality is only applicable for PeopleSoft –
RMS integration.
Drill forward and drill backward functionality is applicable
for Peoplesoft - RMS integration only.
WS_FIN_ACC_VALID_URL
- This attribute holds the URL for the financial account validation web
service.
WS_FIN_ACC_VALID_CRED
- This attribute indicates if the account validation web service call is authenticated
or not. Y means Authentication enabled. N means Authentication is not enabled
(See configuring web service credentials in weblogic server).
WS_FIN_DRILL_FWD_URL
- This attribute holds the URL for the financial drill forward web service.
WS_FIN_DRILL_FWD_CRED
- This attribute indicates if the drill forward web service call is
authenticated or not. Y means Authentication enabled. N means Authentication is
not enabled (See configuring web service credentials in weblogic server).
The above attributes are configured in the System Options screen.
Reports are created by Business Intelligence Publisher for the
following:
The URL for each report must be updated in the table,
retail_service_report_url. The following table provides sample URLs.
Reporting
Reports are created by Business Intelligence Publisher for the
following:
§
Merchandise Invoice
§
Non-Merchandise Invoice
§
Credit Note
§
Credit Memo
§
Debit Memo
§
Receipt Write-Off
The URL for each report must be updated in the table,
retail_service_report_url. The following table provides sample URLs:
|
Document Type
|
Report Name
|
Sample Report URL
|
|
MRCHI
|
Merchandise invoice document Report
|
http://hostname:portno/xmlpserver_nonsso/
Guest/REIM13/Finance/invreport/invreport.xdo
|
|
NMRCHI
|
Non-Merchandise invoice document Report
|
http://hostname:portno
/xmlpserver_nonsso/
Guest/REIM13/Finance/invreport/invreport.xdo
|
|
CRDNT
|
Credit Note document Report
|
http://hostname:portno/xmlpserver_nonsso/
Guest/REIM13/Finance/invreport/crnreport.xdo
|
|
CRDMEC
|
Credit Memo cost document Report
|
http://hostname:portno/xmlpserver_nonsso/
Guest/REIM13/Finance/invreport/memoreport.xdo
|
|
CRDMEQ
|
Credit Memo quantity document Report
|
http://hostname:portno/xmlpserver_nonsso/
Guest/REIM13/Finance/invreport/memoreport.xdo
|
|
DEBMEC
|
Debit Memo cost document Report
|
http://hostname:portno/xmlpserver_nonsso/
Guest/REIM13/Finance/invreport/imemoreport.xdo
|
|
DEBMEQ
|
Debit Memo quantity document Report
|
http://hostname:portno/xmlpserver_nonsso/
Guest/REIM13/Finance/invreport/memoreport.xdo
|
|
DEBMEV
|
Debit Memo Tax document Report
|
http://hostname:portno/xmlpserver_nonsso/
Guest/REIM13/Finance/invreport/memoreport.xdo
|
|
RWO
|
Receipt Write Off document Report
|
http://hostname:portno/xmlpserver_nonsso/
Guest/REIM13/Finance/invreport/rworeport.xdo
|
Integration to PeopleSoft General Ledger includes a number of
transactions, as described below.
The TRANS_AMOUNT field in the im_financial_stage table stores the
value of the journal entry to be posted to PeopleSoft General Ledger. (The
currency for the calculated amount is the currency assigned to the transaction).
The TRANS_AMOUNT value is calculated as follows:
|
Row Description
|
DEBIT_CREDIT_IND
|
TRANS_AMOUNT Value
|
|
Normal
|
Debit
|
Transaction Amount
|
|
Normal
|
Credit
|
(-1) * Transaction Amount
|
|
VAT
|
Debit
|
Transaction Amount * Tax Rate
|
|
VAT
|
Credit
|
(-1) * Transaction Amount * Tax Rate
|
Note:Transaction
Amount is taken from the database column, IM_FINANCIALS_STAGE.AMOUNT.
A staging table accommodates the outgoing transfer of data. The
reference key assigned to each document or receipt is used to find data on this
table.
Outgoing Data
|
From
|
To
|
Transactions
|
|
ReIM
|
PeopleSoft Accounts Payable
|
Invoices
Debit Memos
Credit Memos
Credit Notes
|
|
ReIM
|
PeopleSoft General Ledger
|
General Ledger accounting entries resulting from the
Invoice Matching process, including:
Pre-paid invoices
Receipt Write-offs
|
|
RMS
|
PeopleSoft General Ledger
|
Accounting entry data (potentially very high volume)
|
|
ReSA
|
PeopleSoft General Ledger
|
Accounting entry data (potentially very high volume)
|
Valid accounts are stored in the ReIM table, IM_VALID_ACCOUNTS,
which includes the Set of Books ID (sob_id) and 20 segments. An ORFI Web
service validates accounts against the PeopleSoft Enterprise Financials system.
Valid accounts are posted to IM_VALID_ACCOUNTS; invalid accounts are posted to
IM_POSTING_DOC_ERROR. The following steps describe the validation process:
1. The
ReIM system invokes the account validation Web service to validate the account.
(A URL for the ORFI Web service is configured in the ReIM SYSTEM_OPTIONS table.
2. The
posting batch job checks the accounts to be posted against the
IM_VALID_ACCOUNTS table.
3. If
the account entries are in the table, the transaction is posted to the G/L or
AP tables.
4. If
the account does not exist in the table, a collection of accounts is built.
These collected accounts are validated against the PeopleSoft Enterprise
Financials system, and a status is returned.
§
If the status of the collected accounts is valid, the accounts
are inserted in the IM_VALID_ACCOUNTS table, and the transactions are posted to
the staging tables.
§
If the status of the accounts is NOT valid, the entire collection
is flagged as errors, and transactions are posted to IM_POSTING_DOC_ERROR.
Note: ReIM
completes the first level of account validation and posts the transaction to
staging tables. It is assumed the second level of account validation is done at
the end of the extraction process (where transactions are moved from ReIM
staging tables to PeopleSoft). If account validation fails at this point,
Oracle Data Integrator (ODI) or PeopleSoft must change the account information
before transactions are loaded to PeopleSoft, and the account change must be
communicated to ReIM.
As account information is changed in the PeopleSoft system, the
same changes are communicated to, and manually completed in, the ReIM system.
After ReIM is updated accordingly, the AccountWorkspacePurge Batch is run to
clear the valid accounts maintained locally in ReIM.
The AccountWorkspacePurge Batch can clear all valid accounts in
the IM_VALID_ACCOUNTS table or only those that are considered updates in
PeopleSoft.
Usage:
AccountPurge batch-alias-name PURGE [ALL | <Accounts>]
Where:
The first argument is batch alias name.
The second argument is the word PURGE.
The third argument is either ALL or specific accounts to be
deleted from the local table.
Drill back and drill forward functionality uses Reference ID to
locate documents and receipts. A Reference ID is a combination of document type
and document (or receipt) ID, as illustrated in the table below:
|
Type
|
Doc ID
|
Receipt ID
|
Reference ID
|
|
Merchandise Invoice
|
101
|
Null
|
MRCHI#101
|
|
Non-Merchandise Invoice
|
102
|
Null
|
NMRCHI#102
|
|
Receipt
|
Null
|
103
|
RECEIPT#103
|
For documents, the Resolution Posting Batch program builds the
Reference ID using the standard, Document Type + DeLimiter + Doc_id. For
receipts, the program builds the Reference ID using the standard, Document Type
+ DeLimiter + Receipt_id.
To enable drill down functionality, Reference IDs are loaded to
staging tables. FinancialsAPStageDao and FinancialsGLStageDao are populated, as
are IM_RWO_SHIPMENT_HIST and IM_RWO_SHIPSKU_HIST.
Drilling back allows users to view the source of posted
PeopleSoft transactions that originated in Oracle Retail systems (from a
voucher to an invoice, for example).
When drilling back from PeopleSoft Enterprise Financials, users
are not directed to an actual screen within RMS, ReIM or ReSA. Rather, a retail
Web service generates and launches a URL to a BI Publisher report. The report
contains the information that typically appears on the appropriate retail
screen.
Depending on the information requested by the user, PeopleSoft
invokes web service in the ORFI layer which in turn calls the report locator
service available in RMS. This service returns back BIP report reference URL
which is passed back to PeopleSoft and report gets launched in browser window.
Information from the reference key determines what kind of report
URL to issue. For example, if the retail key has a prefix of ReIM, the
ReIM_REPORT_URL function is called, else the RMS_REPORT_URL function is called
to retrieve the appropriate report URL. If the key does not match any key in
the retail systems, an error message is launched.
The following function determines which RMS report to return to
the user:
RMS_REPORT_URL() -
O_error_message IN OUT RTK_ERRORS.RTK_TEXT%TYPE
O_rpt_url IN OUT
RETAIL_SERVICE_REPORT_URL.URL%TYPE
I_ref_key IN KEY_MAP_GL.REFERENCE_TRACE_ID%TYPE
The appropriate report URL is found and issued as follows:
1. The
ref_trace_type is found on KEY_MAP_GL by matching I_ref_key with the
KEY_MAP_GL.REFERENCE_TRACE_ID column.
2. When
ref type is determined, the re_trace_type is used to find the appropriate
report URL on the RETAIL_SERVICE_REPORT_URL table.
3. The
value of I_ref_key is appended to the end of the URL retrieved from the table.
4. The
URL is sent back to the calling function.
5. If
I_ref_key does not exist on KEY_MAP_GL, an error message is sent back to the
calling function.
The following drill back options are available for viewing
information within the ReIM system:
Using Document ID, users can drill back to ReIM to view information
related to a voucher or payment. The report includes information from
im_doc_head and im_invoice_detail, the same data shown on the Document
Maintenance Header screen within ReIM.
Using the Receipt ID, users can drill back to view information
from the Receipt Write-off History screen. Receipt write-offs occur either
when an open receipt is closed in ReIM or if a receipt is purged in RMS before
it is fully matched. Details come from the IM_RWO_SHIPMENT_HIST and
IM_RWO_SHIPSKU_HIST tables.
The function below determines which of the two ReIM reports to
return to the user:
REIM_REPORT_URL() -
O_error_message IN OUT RTK_ERRORS.RTK_TEXT%TYPE
O_rpt_url IN OUT
RETAIL_SERVICE_REPORT_URL.URL%TYPE
I_ref_key IN KEY_MAP_GL.REFERENCE_TRACE_ID%TYPE
The I_ref_key contains the reference ID, which ultimately
determines the type of report required. The appropriate BI Publisher report URL
is found on the RETAIL_SERVICE_REPORT_URL table.
In general, if the reference ID has a prefix of RECEIPT, the
report type (RS_CODE) is RCPT. Otherwise, the report type is DOC. For example:
|
Reference ID
|
Report Type (RS_CODE)
|
|
MRCHI#101
|
DOC
|
|
NMRCHI#102
|
DOC
|
|
RECEIPT#103
|
RCPT
|
The following is an example of a BI Publisher URL that is
generated upon drilling back to PeopleSoft Enterprise Financials for
information on an invoice in ReIM, using Document ID as the search parameter:
http://mspdev6970vip:7777/BIPublisher/Guest/ReIM/13.0.3/doc/tsf_det.xdo
?doc_id=101
Where
http://mspdev6970vip:7777/BIPublisher = the BI Publisher
application server address and port
Guest/ReIM/13.0.3 = the directory/folder location
doc/tsf_det.xdo ? = report name (Document Report)
doc_id=101 = the parameter name and value (Document ID 101)
The following is an example of an Oracle Business Intelligence
Publisher URL that is generated upon drilling back to PeopleSoft Enterprise
Financials for information on an invoice in ReIM, using Receipt ID as the
search parameter:
http://mspdev6970vip:7777/BIPublisher/Guest/ReIM/13.0.3/doc/tsf_det.xdo
?receipt_id=101
Where
http://mspdev6970vip:7777/BIPublisher = the BI Publisher
application server address and port
Guest/ReIM/13.0.3 = the directory/folder location
doc/tsf_det.xdo ? = report name (Receipt Report)
receipt_id=101 = the parameter name and value (Receipt ID 101)
Drilling forward allows users to see detailed information about
retail transactions that have been posted to PeopleSoft Enterprise Financials.
When drilling forward, users are directed to selected "view-only"
screens.
The following forms may be used to drill forward from RMS/ReSA:
§
RMS StartMenu->Finance->Transaction Data View
(trandata.fmb)
§
RMS StartMenu->Ordering->Fixed Deals->Fixed Deal
Transaction Data View (fdltrandata.fmb)
§
Resa Task List-> Operations->General Level Transaction View
For drilling forward, the ORFI Web service uses the Invoice ID
and Accounting Entry parameters. The ReIM system uses these parameters together
as the Reference ID.
From the Document search screen, users can drill forward to
PeopleSoft Enterprise Financials accounts payable to view voucher and payment
status. The information is displayed on a read-only Payment Doc Status Inquiry
screen. Drill forward access to the accounts payable system is available only
for pre-paid invoices (but not for manually pre-paid invoices).
To drill down to the payables/ledger screens, the user invokes
the Web service as follows:
Invoice ID/Accounting Entry parameter = Reference ID
Drill forward access to the G/L system is available only for
pre-paid and manually pre-paid invoices.
Note: For
more information on drilling forward, see the Oracle Retail Financial Integration for Oracle Retail Merchandise Operations
Management and Oracle Financials Suite (E-Business Suite Financials
or PeopleSoft Financials).
11
Understanding Data Access Schema
The Data Access Schema (DAS) is a
new schema that allows third party applications to access RMS owned data. A
subset of the data mastered by RMS is replicated to a new database schema. This
replicated data is in a READ ONLY format. The DAS is an optional function;
where the base RMS does not require DAS. However, you may want to install DAS
for the following reasons:
§
Accelerate integration with some of the third party systems.
§
Insulate core RMS processes from the resource demands for the
third party systems.
§
Provide downstream applications with data 24x7, instead of a
predetermined time for the batch cycle that extracts RMS data.
§
Perform custom operational reporting without impacting the core
RMS operations.
§
Use out of box integration with Merchandise Financial Planning’s (MFP)
PoViewer micro application.
Views are layered on top of the replicated data to shape it in a
less RMS specific terms.
Oracle recommends that DAS be deployed in a separate database
instance on a separate hardware. This insulates the operations and performance
of RMS from all demands made of DAS by other systems.
For more information on DAS, see the Oracle Retail Merchandising
System Data Access Schema Developer’s Guide and the Oracle Retail Merchandising
System Data Access Schema Data Model.
The process flow diagram of a DAS system:
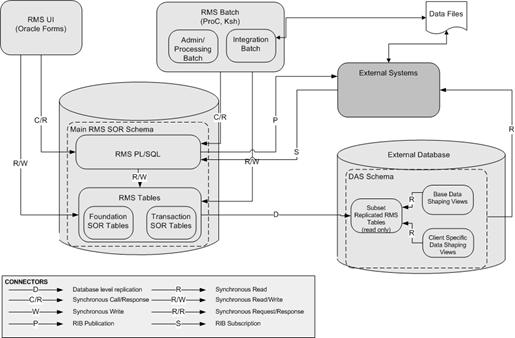
DAS Process Flow
DAS contains replicated tables and parallel layers of views. The
two parallel layers of views are:
§
Generic Data Shaping View
§
Client Specific Data Shaping View
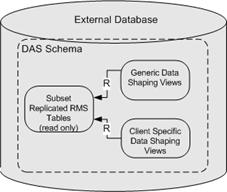
DAS Views
The Generic Data Shaping View makes RMS owned data more
understandable to external systems by both flattening and exploding some of the
concepts in RMS.
The client specific data shaping views presents data for specific
downstream client applications. You can add additional client specific data
shaping views to execute queries that are important to manage the DAS
integrations with the third party systems.
You are encouraged to use the DAS for downstream, custom
integration batch, and query service integrations. The following are the
advantages of using DAS instead of the core RMS system of record tables:
§
DAS insulates core RMS processing from the resource demands of
third party systems.
§
DAS allows constant access to data that of a RMS batch cycle
which is processed once in a day, restricting the access of data or a real time
query that is slower when processing demands of high point of RMS batch cycles.
§
Custom client specific data shaping views can accelerate the
development of custom integrations.
12
RMS Batch programs runs using wallet alias as the first parameter
to the batch command line arguments. This is enabled to prevent the security
concerns around exposing database user ID and password while running the batch
programs.
The wallet creation steps are described in the RMS Installation
Guide. The wallet and wallet alias creation are a required in order to use
batch programs in secured mode.
If we assume wallet alias is “dvols29_rms01batch”;
Usage:
./dtesys $UP
(where UP will be set during installation to the wallet alias,
that is: $UP=/@dvols29_rms01batch)
or
./dtesys /@dvols29_rms01batch (wallet alias)
RMS/RPAS and RMS/AIP RETL scripts uses Oracle Wallet. Defined
Oracle Wallet is referenced in rmse_config.env, rmse_aip_config.env and
rmse_rpas_config.env files.