| Oracle® Retail Merchandising Implementation Guide Release 16.0 E80776-04 |
|

 Previous |
 Next |
This chapter is an overview of RPM.
RPM is a highly configurable, strategy-based pricing solution that suggests and assists with pricing decisions. RPM empowers retailers to automate and streamline pricing strategies across the organization, yielding a more predictable and profitable outcome. It provides decision support through pricing-focused business information to validate and approve new retails and markdown suggestions. This approach results in improved margins and strengthened productivity, all while remaining competitive.
RPM supports the creation and execution of manual price changes and clearances. It also provides semi-automated pricing functionality through the execution of a pricing strategy. Pricing strategies allow the retailer to define parameters that will propose retail prices based on competitive information, margin targets, or clearance objectives.
RPM is part of the Oracle Retail Enterprise footprint. It uses several methods of integration: RIB, Batch, and RSB. RPM is the system of record for all retail pricing. SIM can request the creation/update or deletion of price events, but there is no import option from SIM.
RPM includes a system options and defaults menu that allows the client to configure system settings as well as default values for certain dialogs. These are described in detail later in this chapter. Additionally, there are columns in the worksheet, worksheet status, price change and clearance dialog that can be displayed or hidden at the global level. This hide/show definition does not need to be supported with a GUI. It is important that during installation and implementation of the application, these system options are reviewed and set based on client business needs and/or preferences.
There are system options and system defaults that exist both in the table and the user interface. In addition, listed in each section is a default value for each system option/default field. This default value is populated upon entering the RPM application; however, values are not automatically stored in the database. The user must save the values in the system options user interface to commit the values to the database. This gives the user the option to change the values per business processes before committing any values to the RPM system options table.
The following flowchart illustrates the position of RPM in relation to other Oracle Retail modules:
During installation and implementation, RPM requires some initial data setup to create and implement price changes, clearances, promotions and pricing strategies. This foundation data includes aggregation level, link codes, market basket codes, zone structures, price guides, calendar, and candidate rules. The following is a general overview of each functional area, including examples of lessons learned in the field. This information is to be used as reference when encountering issues or to avoid issues when implementing RPM.
The merchandise hierarchy allows the client to create the relationships required to support the product management structure of a company. Key information about how inventory is tracked, priced and reported is stored at the department level. It is very important that departments are set up in appropriate order for subsequent systems such as RPM to utilize. Departments are associated to zone groups, which assist in calculating the initial price for an item when created, approved and ranged to a location. The following is important information about using hierarchy information in RPM.
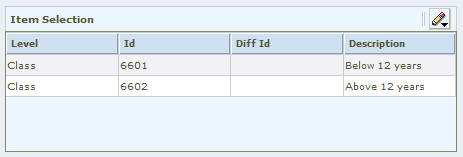
When creating a merchandise hierarchy in RMS, it is important that the department, class and subclass are set up correctly. Inappropriate setup will cause performance concerns in supporting applications such as RPM. The following are the correct and incorrect ways of creating Merchandise Hierarchical data.
The following is a suggested approach for creating Merchandise Hierarchy in RMS:
Department-Next level below group in the merchandise hierarchy of a company. A group can have multiple departments. Key information about how inventory is tracked and reported is stored at the department level.
Class-Next level below department in the merchandise hierarchy of a company. A department can have multiple classes. A class provides the means to group products within a department.
Subclass-Next level below class in the merchandise hierarchy of a company. A class can have multiple subclasses. A subclass provides the means to classify products within a department/class combination.
Example:
Department: Active Wear
Class: Women's Active Wear
Subclass: Women's Running Active Wear
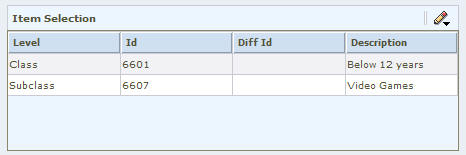
The following is a less-effective, alternative approach to creating Merchandise Hierarchy in RMS:
In this example, the department is set up by designer; the department spans all locations and when it is used in RPM will cause performance issues. RPM was intended to support department data in order to create/implement price events under the Oracle Retail definition of what a department is in a retail store.
Example:
Department: Prada (The department is set up by designer but spans many locations)
Class: Prada Women's Apparel
Subclass Prada: Women's Apparel-Active Wear
Deleting an Existing Department from RMS
If a department is deleted from the DEPS table in RMS, it should also be removed from the aggregation table in RPM. If the two tables are not in sync, the RPM application errors out with a fatal exception when entering the Aggregation Level user interface.
Markup Definition
For each Department (or Class or Subclass, if the Primary Zone Group has been defined at either of those levels), the client will need to specify the Initial Markup Percentage. This is used to determine the initial retail price for new items. It also necessary to specify whether this percentage should be applied as a Cost or Retail Markup.
The markup definition is defined in two places. The first is RMS in the DEPT form. The second is under the Maintain Primary Zone Group Definition in RPM. Even though there are two places where the setup can be defined, RPM reads and uses this information in the Maintain Primary Zone Group Definition, and all settings should be controlled there. Therefore, all modifications made to markup percentage should be done in RPM.
When the Markup Type and Markup percent is NULL for a department, or primary zone group does not exist, an embedded system default (DEF_MARKUP_TYPE) will default the markup type to RETAIL(R).
Link codes should be used for identical items that will always share the same retail price (for example, a retailer wants all frozen vegetables to carry the same price). They are used for ease of data entry and considered a point-in-time price change. When the link code price change is created and effective, it is considered complete and will not inherit new items/locations.
Link codes can be created at the Zone Group, Zone, or individual location levels and are held at an item/location level in RPM; only one can be assigned per item/location. For link code price changes, the Apply button validates the item/locations for which a price change is being created/edited, has link codes attached, and prohibits the user from applying the new/edited price change. When a price change is approved, this validation need not occur, as the state of the link when that price change was approved is respected. The state of the link means which items/locations were affected when the price change was approved at that point in time. If any of the item/locations in the link code fail conflict checking, the entire link code price change will fail conflict checking. The user will not be allowed to create a regular price change through the price change dialog that affects an item/location that has a link code assigned.
Link code functionality is not available in clearances. For worksheets, there are certain rules that need to be followed to determine how items with link codes should be handled in the worksheet. For each item/zone pulled by the extract program (assuming strategy is set up at a zone level), validation is performed to verify if there are any link codes that exist across all of the locations in the zone for the item. If there are varying link codes across the item/locations, the item will not be pulled into the worksheet. A NULL link code counts and is considered different than an item/location that has a link code assigned. Every item in the link code at the locations must also be represented in the worksheet, or the item will not be pulled into the worksheet.
For price changes created in SIM that affect a link code, the price change will need to be converted into a link code/location price change so the price change can be created in RPM (that is, the price change fails if it stays in a SKU/location form and affects a link code).
Link Codes and Inheritance
Link codes should be used as a grouping mechanism for items that should be priced the same for a particular price change and assumes all items that exist for the link code at the time the price is effective will be represented. Link codes do not inherit price events, nor is the link code dynamic and able to add details. As stated, it represents a point-in-time price change and should not be assumed or used to group items for future events, such as new item location, and location move.
Proper use of a link code
Create a link with a grouping of cola that should be priced the same for an event. All items exist when price change is created. New retail price is reflected.
Improper user of a link code
Create a link with a grouping of cola that should be priced the same for an event. Create a new item and add to the link code. The link code price change already in effect will not reflect the new item unless a new price change is created.
Link codes can be used within the worksheet/pricing strategy functionality. The link code must be the same for an item across all locations in the zone, and all items in the link code must be present.
Example:
| Primary Area | Secondary Area |
|---|---|
| Link Code A | Link Code A |
| Item 1 | Item 1 |
| Item 2 | Item 2 |
| Item 3 | Link Code B |
| Link Code B | Item 4 |
| Item 4 | Item 6 |
| Item 5 | Link Code C |
| Item 7 | |
| Item 6 | |
| Item 7 | Item 3 |
| Item 8 | Item 8 |
From primary to secondary areas:
A price change to link code A should propose a retail for link code A in the secondary area. This applies to items 1 and 2.
A price change to link code B should propose a retail for link code B in the secondary area. This applies to items 4 and 6.
Link code C does not exist in the primary area and therefore no retail will be proposed, it should be thrown out of the secondary area worksheet.
Item 3 is in the link code in the primary area but is not in the link code in the secondary area. Because Item 3 was not an individual item in the primary area, it should not be an individual item in the secondary area and should be thrown out.
Item 6 was a single item in the primary area, but is not in the link code in the secondary area. Item 6 should be represented within the link code in the secondary area and should have its retails proposed from the link code, not the item 6 change of the primary area.
Item 8 is a single item in the primary area and single item in the secondary. No unique processing is needed.
If an item does not exist in the primary area but exists in the secondary area, but is not a part of any link code in the secondary area, throw it out. There are multiple errors that can be triggered by merchandise extract batch when a link code is not set up properly.
INVALID_SECONDARY_ITEM
This error occurs when the items in the secondary are mismatched with primary and, therefore, the secondary is not able to receive the primary's proposed retail for that secondary item. To rectify this error, ensure the item meets or does not meet any of the following conditions:
Item does not belong to any link code, whereas the same item belongs to a link code in the primary area.
Item does not exist in the primary area and does not belong to any link code in the secondary area.
Item belongs to a link code that does not exist in the primary area.
MISSING_LINK_ITEM
This error occurs when one or more items from an item-link code/zone group are missing, or the entire group is excluded. To rectify this error, ensure the item meets or does not meet any of the following conditions:
If any one item from a link code is present in the worksheet, all items in the same link code must also be present in the worksheet.
Items sharing the same link code should have the same Basis UOM.
Items sharing the same link code should all have the same Class VAT Indicator settings.
For Margin and Maintain Margin Strategies, items sharing the same link code should have the same Margin Market Basket code.
For Competitive Margin Strategies, items sharing the same link code should have the same Competitive Market Basket code.
VARIABLE_LINK_CODE
This error occurs when the item does not have the same link code at all locations in the zone. In order to rectify this, modify your link code to reflect the locations and ensure the link is setup with all locations used in the pricing strategy.
VARIABLE_LINK_MBC
This error occurs when the items sharing a market basket code do not have the same link code at all locations in the zone. In order to rectify this, compare the items in the market basket code to the item/locations in the link code.
VARIABLE_LINK_SELLING_UOM
This error occurs when the items sharing a link code do not have the same Basis UOM at all locations in the zone. In order to rectify this, verify the basis UOM for all the items in the link code at the locations in the zone.
VARIABLE_LINK_VAT_IND
This error occurs when the items sharing a link code do not have the same VAT indicator at all locations in the zone. In order to rectify this, check for the existence of the item on the VAT tables in RMS in comparison to the locations.
Link Codes and New Item Location Batch
The user must run the NewItemLocation batch to populate RPM_FUTURE_RETAIL with an item location record. When a user creates a link code, the user interface utilizes the item location table in RMS to verify the item/location exists. Potential issues can occur when a link code is created after the item is ranged in RMS and populated on ITEM_LOC but before the NewItemLocation batch has been run. If a price change is created against the link code before the batch is run, price changes will not be reflected since seed data does not exist on the RPM_FUTURE_RETAIL table. The correct approach is to range an item, run the NewItemLocation batch job and then create the link code.
The maintain market basket codes area allows the client to assign market baskets codes to an item/zone. The items can be associated to the code through the merchandise hierarchy, at the item level, or through item attributes such as diff or diff type. They are used in Competitive Strategies to match, price above or price below the competitor price. Margin and Maintain Margin Strategies can set different targets by market basket code. The market basket codes are used to group items together with similar pricing characteristics. Only one market basket code per item/location can exist.
For example, price all items in the A market basket code at 30% margin while all items in the B market basket code items have a target of 20% margin. A market basket code could group highly competitive or margin-sensitive merchandise together. The user will have the ability to set up two market basket codes per item/zone: one to be used with the Competitive Pricing Strategy, and the other to be used with the Maintain Margin Pricing Strategy. When the merchandise extract batch program is run, the program will identify the pricing strategy being executed and associate the proper market basket code.
Market Basket Codes need to be created and maintained by the Database Administrator (DBA). There is no UI to create the list of values (LOV). The table is RPM_MBC_LOV_VALUES. The table includes MKT_BASKET_CODE (the market basket code), NAME (description of the code), and TYPE, which indicates if Market Basket Code (MBC) is for Margin strategies (1) or competitive strategy (0). The high level process is as follows:
User assigns market basket codes to item/zones in the Market Basket Code dialog.
User creates a Maintain Margin Pricing Strategy and assigns margin values to the market basket codes.
User creates a cost change and approves it in RMS.
Merchandise Extract is run and it identifies the cost change in RMS and generates a worksheet using the maintain margin pricing strategy and its corresponding market basket code.
Market Basket Codes and Link Codes
Items set up in a market basket code also can be in a Link code. The items in the market basket are considered a grouping of items with similar pricing attributes, such as competitive, and within that grouping the items are then instructed to be priced the same within a link code. In this scenario of using a link code/market basket code together, items must have the same Link Code at all locations in the zone in order to avoid merchandise extract batch errors.
Zone structures in RPM allow you to define groupings of locations for pricing purposes and eliminate the need to manage pricing at a location level. At the highest level, these groupings are divided into categories called zone groups. While these zone groups might be flexibly defined, they are primarily defined by their pricing scheme. The three types of zone groups in RPM are regular zone groups, clearance zone groups, and promotion zone groups. In addition to being defined by pricing, zone groups are defined by the items being priced. The following are examples of zone groups:
Regular price beverage zone group
Regular price footwear zone group
Promotion price beverage zone group
Within zone groups in RPM are groupings of locations (stores or warehouses) called zones. The function of these zones is to group locations together in a manner that best facilitates company pricing strategies. These zones might be flexibly defined. For example, the client might choose to create zones based on geographic regions, such as the following:
U.S. East region
U.S. West region
Mexico stores
Similarly, the client can create zones with locations with similar characteristics, such as the following:
U.S. urban stores
U.S. rural stores
Contained within zones are locations. These locations can be stores or warehouses.
Regular Only- Stores and warehouses allowed.
Clearance Only- Stores and warehouses allowed.
Promotion Only- Stores only, warehouse not allowed.
There are no restrictions on the number of locations a zone can contain. However, two rules apply to the relationship between locations and zones:
A location cannot exist in more than one zone within a zone group. A location can, however, exist in multiple zone groups. For example, a New York City store might exist in the U.S. urban stores zone group as well as the U.S. East region zone group.
All locations within the same zone must use the same currency.
When zone groups are created in RPM, users are able to assign them to primary zone group definitions. The primary zone group definition allows the user to specify the zone structure to use when pricing merchandise hierarchies, and how to initially price items in these hierarchies (markup percentage, markup type). These definitions can be created at the department, class, or subclass level.
When RMS publishes a new location or warehouse (if warehouses are recognized as locations per a system option) the message will include a pricing location. RPM will take the pricing location of the new location or warehouse and attempt to add the new location to every zone group/zone in which the pricing location exists. This will include Regular, Clearance and Promotion Zone Groups. If the Pricing location and the new location are not of the same currency, then the new location will be added to every Zone Group where the pricing location exists but the system will create a new zone for the location with the same currency as the new location.
This process works the same for the following location types: Company stores, virtual warehouses, franchise locations, stocking holding and non-stock holding.
Users can add, modify, or delete the primary zone group definition for a given merchandise hierarchy within RPM. There are limitations for deleting a primary zone group definition. For more information, see Primary Zone Group - Delete Functionality in the section below.
Primary Price Zone Benefits
When the primary price zone is used when creating a price event, location level data is stored at zone level versus location level. It is recommended to enter the item data at the highest level possible; Merchandise Hierarchy (department, class, or subclass), Parent Item, Parent Item DIFF-1, or using an Item List. This is also true for the selection of locations at primary zone level versus store level.
RPM supports storing future retails at higher than transaction item/location level i.e. style (parent), style/color (parent item/DIFF-1) and zone, only where the zone is part of the Primary Zone Group for a department. This rule is in place for all price event types, price change, clearance and promotions.
For example, if you create a promotion for a single parent item that has 50 color/size items associated and the primary zone used includes 500 store locations. The RPM future retail tables can be updated with as few as one record at the style (parent) and zone (primary zone) that represents all items and locations.
If you create the same promotion, but do not use primary zone, RPM can update the future retail tables with one record for each of the 500 store locations. The location rollup functions only when a department's primary zone group is used to create the price event. If non-primary zone groups are used, data will be stored at parent/location vs. parent/zone.
Examples:
If you are setting up a clearance for an entire style, create the data at parent item, or item list level. Do not explode down to transaction item detail.
When creating item lists, include parent items when you can instead of transaction level items.
If you need to create price events at transaction item level, keep in mind the number of items you are selecting, because more items means slower response times.
Primary Zone Group — Delete Functionality
Primary zone groups are set up at one of the three levels of the merchandise hierarchy. The highest level of the merchandise hierarchy for a primary zone group cannot be deleted from the system.
Deletion rules include:
| Delete Rules | |||
|---|---|---|---|
| Primary Zone Group Create Level | Department | Class | Subclass |
| Department Only | Not Allowed | n/a | n/a |
| Department/Class | Not Allowed | Delete Allowed | n/a |
| Department/Class/ Subclass | Not Allowed | Delete Allowed if Subclass is Deleted | Delete Allowed |
There is an ad hoc batch process that will process any merchandise hierarchy changes requested to the primary zone group - refer to the Operations Guide for more details.
Empty Zones and Price Events
A user can create an empty zone and add locations to the zone at a later date. They can create price events against the zone with no locations; however, conflict checking will not run and records are not generated on the future retail tables or RPM_ZONE_FUTURE_RETAIL. Those price events will be inherited after locations are added to the empty zone and the new item location batch is executed for items/locations in that zone.
Open Zone Use and Flexibility
The Open Zone Use System Option defines whether or not different Zone Group types can be used in all the pricing dialogs or if the type of the Zone Group will limit where it can be used. For example, if set to No (unchecked), then Promotion Zone Groups cannot be used in the clearance and price change dialogs or in the pricing strategies definition. It is recommended during implementation to set this as checked or Yes initially, so that when creating price events you can take advantage of rollup functionality. Setting this value to Yes allows flexibility in how/which zones can be used for certain price events. However, when checked or set to Yes, it cannot be unchecked.
Deleting and Adding a Location after Zone Exists
When a user adds a location to or deletes a location from an existing zone, the location move functionality is leveraged to move that location in or out of the zone. A location move is created in approved status and will move to scheduled when the scheduling batch is run. It is important to note that the location will not be added to the zone until it is properly moved in or out through a location move which is scheduled automatically when the user presses the Delete or Add button.
RPM price guides help users create a uniform pricing strategy. They are used to smooth proposed retails in order to maintain a consistent set of price points by rounding or applying ends in logic to retail values. Price guides can be set up at the corporate or department level. Department price guides can also link into corporate price guides. After price guides are defined, they can then be used when defining primary zone groups, creating price changes, clearances or promotions, and are very useful when performing what-if analysis for worksheets. The user can edit a price guide at any time, regardless of whether it is attached to a strategy, price change, promotion, or clearance. Edited price guide details will only affect retails derived by the price guide from that point on. It will not affect/overwrite any retails that have already been derived based on the old price guide details.
Price guides are optional. For customers that do not use price guides the following rules are enforced for "percent off" price events:
Regular Price Changes: normal rounding rules are enforced
For example, last digit is between 0 and 4, round down; last digit between 5 and 9, round up
Clearance or Promotion Events: retail will always round down
Calendars are set up in RPM for the primary purpose of attaching them to pricing strategies. Calendars span a user-defined period of time and contain a review period that occurs once or many times over the duration of the calendar.
This set of rules is run against the items/locations being extracted from the merchandise system to determine if they should be flagged for review. They are defined at the corporate level and can contain variables at the department level. Candidate rules can be inclusive or exclusive. If they are inclusive, and the candidate rule is met, the item/location is flagged in the worksheet. When exclusive candidate rules are met, the item/location is excluded from the review when the merchandise extract program builds the worksheet. Candidate rules can also be active or inactive, allowing the user to suspend rules that are only needed at certain times of the year. Candidate rules are only run against the worksheet the first time the worksheet is created.
Exceptions:
Each review period has an indicator stating whether or not to run exceptions. If the indicator is set to Yes, the merchandise extract should tag those item/location records that are pulled into the worksheet with an exception flag if any of the following occur during a review period where exceptions are processed: competitor regular retail price changes, cost changes, and new item/location relationships.
For every item/location pulled into the worksheet, RPM attempts to propose a new retail based on the strategy attached to that item/location. When the worksheet is first created, the details of the strategy are saved. Updates to the strategy do not affect any worksheets that are currently being reviewed. The updates are only reflected in worksheets generated after the updates to the strategy are made. Until the worksheet has been locked, new retails will continue to be proposed using the strategy details every night the batch program is run.
Candidate Rules and Worksheets
Each review period has an indicator stating what kind of candidate rules to run, if any. The options on the calendar are to run only inclusion rules, only exclusion rules, both inclusion rules and exclusion rules, or none of the rules. Each item/location from the strategy to which the calendar is attached should be run against the rules. If the strategy is at the zone level, then any item/location within that zone that meets an exclusion rule should exclude the entire worksheet line item. Also, if there is a primary area that is being brought into the worksheet, the secondary areas attached to the primary area should run through all candidate rules as well.
Two types of candidate rules can be run:
Inclusion (to flag an item on a worksheet as having met a rule)
Exclusion (to prevent the item from making the worksheet)
For regular price strategies, when an item meets an inclusion rule it simply means that the rule column on the worksheet will populate and the user can see the rules are met. It should be noted that for regular price strategies they are simply flags or alerts, no processing takes place against them.
For the clearance strategy, when an item meets an inclusion rule the system is triggered to propose a markdown and populate the rule column. The markdown that is proposed is not related to the specific rule that was met, just that the rule was met and clearance proposed. The markdown is based on the clearance strategy and which markdown is next in that item's markdown lifecycle.
All items in the hierarchy level of the worksheet will make it into the worksheet (unless they meet an exclusion rule). Candidate rules are applied at the transaction item/location level. If any transaction/location meets a rule, markdowns are proposed for the transaction/zone. The user can decide if the rule met is inclusive of enough locations in the zone to take action or not. In order to take action against other SKUs in a parent or parent diff (or even a related style), it is important that other items are brought into the worksheet.
The following table lists the fields, operators, and values.
| Field Name | Operators | Values |
|---|---|---|
| Class | =, <, >, <=, >=, <> | LOV-Classes (Dept must be selected first) |
| Clearance | = |
Yes / No |
| Current Margin % | =, <, >, <=, >=, <> | Numeric |
| Department | =, <, >, <=, >=, <> | LOV-Departments |
| Diff ID | =, <> | LOV-Diff IDs |
| First Received Date | =, <, >, <=, >=, <> | Date |
| Weeks since First Received Date | =, <, >, <=, >=, <> | Numeric |
| Item # | =, <, >, <=, >=, <> | LOV-(Dept, Class, or Subclass must be selected first) |
| Item List | =, <> | LOV-Item Lists |
| Last Received Date | =, <, >, <=, >=, <> | Date |
| Weeks since Last Received date | =, <, >, <=, >=, <> | Numeric |
| Markdown # | =, <, >, <=, >=, <> | Numeric |
| Margin Market Basket Code | =, <> | LOV-Margin market Basket Codes |
| Competitive Market Basket Code | =, <> | LOV-Competitive Market Basket Codes |
| Supplier | =, <, >, <=, >=, <> | LOV-Suppliers |
| Projected Sales | =, <, >, <=, >=, <> | Numeric |
| Promotions | = |
Yes / No |
| Replenishment Indicator | = |
Yes / No |
| Retail Label Type | = |
LOV-Label type |
| Retail Label Value | =, <, >, <=, >=, <> | Numeric (Retail Label Type must be selected first) |
| Seasonal Sell Thru | =, <, >, <=, >=, <> | Numeric |
| Season Code | =, <, >, <=, >=, <> | LOV-Season Codes |
| Phase Code | =, <, >, <=, >=, <> | LOV - Phase codes (Season Code must be selected first) |
| Sell Thru | =, <, >, <=, >=, <> | Numeric |
| Package Size | =, <, >, <=, >=, <> | Numeric |
| Package UOM | = |
LOV-UOMs (Package size must be selected first) |
| Store On Order | =, <, >, <=, >=, <> | Numeric |
| Store On Hand | =, <, >, <=, >=, <> | Numeric |
| Subclass | =, <, >, <=, >=, <> | LOV - Subclasses (Department and Class must be selected first) |
| UDA - Value Type | =, <> | LOV-UDAs (Value Type) |
| UDA - Date Type | =, <> | LOV-UDAs (Date Type) |
| UDA - Free Form Text | =, <> | LOV-UDAs (Free Form) |
| UDA Date Value | =, <, >, <=, >=, <> | Date (UDA Date Type must be selected first) |
| UDA Value | =, <, >, <=, >=, <> | LOV UDA values (UDA-Value Type must be selected first) |
| VPN | =, <, >, <=, >=, <> | LOV VPNs (Supplier must be selected first) |
| Weeks of Sales Exposure | =, <, >, <=, >=, <> | Numeric |
| WH On Order | =, <, >, <=, >=, <> | Numeric |
| WH On Hand | =, <, >, <=, >=, <> | Numeric |
This section of the document provides details that pertain to all types of price events and helps provide insight on how to optimize and configure data to improve functionality in RPM.
When creating price events (price change, clearance, or promotions) for a group of items, it is recommended to enter the item data at the highest level possible: Merchandise Hierarchy (department, class, or subclass), Parent Item, Parent Diff Item, Item List, or using a user uploaded Price Event Item List. This is also true for the selection of locations at zone level versus store level. This provides the following advantages:
The future retail tables will have the ability to store data at the highest level possible which, in turn, will ensure that RPM will run as efficiently as possible, including response time for processing and screen flow. This means that if you can create price events at parent, parent/DIFF-1, or item list level versus transaction item level, data will be stored at the higher level. The same is true when selecting locations for your price event. If you create the price events at zone level and use the primary price zone, data will be stored at that level instead of having a record at each store location within a zone. See more information in Primary Price Zone Benefits section.
Creating price events at parent differential level can also impact how data is stored on the RPM future retail tables. RPM will store DIFF-1 level data at higher than transaction level. However, RPM will not store at the higher level if you create your price event at DIFF-2 level.
Example: Parent item t-shirt with two differentiators: color and size. If you know that most of the time you are going to set the same price for items with the same color, you should make sure that color is selected as your DIFF-1 when setting up your items in RMS. If you create your price event using your DIFF-1, RPM will store data on the future retail tables at DIFF-1 level instead of transaction item (one row for each color).
Another example: Parent item yogurt with two differentiators: flavor and size. If pricing by size is most important, you would set up the item using size as the DIFF-1 in RMS. You would then create your price events using DIFF-1 (size).
Creating price events at higher than transaction item level will allow the system generated exclusion (SGE) process to be utilized during approval processing. See more details in the System Generated Exclusion section. Creating price events at the lowest level, transaction item or exploding an item list, will still identify conflicts, but will not automatically create exclusions, and your price event will remain in worksheet status until all conflicts are resolved.
More examples:
If you are setting up a clearance for an entire style, create the data at parent item, or item list level. Do not explode down to transaction item detail.
When creating item lists, or price event item lists, include parent items when you can instead of transaction level items.
If you need to create price events at transaction item level, keep in mind the number of items you are selecting, such as the more items means slower response times.
Data integrity is a critical component when using RPM. The system is data sensitive and it is important that you verify data integrity often, especially after a "go live" or an "upgrade". There is an existing batch job that can help with data validation. It is the status page batch program (statusPageCommandLineApplication.sh). This job, when run, performs data checks to verify that some of the assumptions that the application makes about the data are not violated. The checks are done with SQL counts and each check should return zero rows.
These are the data checks that are performed:
Missing department aggregations-When departments are created in RMS, a row should be inserted into the RPM_DEPT_AGGREGATION table.
Missing primary zone groups-Each merchandise hierarchy (department or lower) should have a row in the RPM_MERCH_RETAIL_DEF table.
Missing item/locations from future retail-When an item is ranged to a location in RMS, a row should be inserted into the RPM_FUTURE_RETAIL table.
Duplicate future retail-There should only be one row in the RPM_FUTURE_RETAIL table per item, location, and action date.
|
Note: For information see the Oracle Retail Price Management Operations Guide. |
RPM was not designed to work as a reporting tool. Therefore, when customers use the "full column detail" feature to view details such as current cost or margin information, it is recommended that only one or two rows be selected before clicking the full column detail button. Using this functionality for events above the parent item level is not recommended.
This functionality should be used as a convenience to quickly see a snapshot of item data. Selection of more than a handful of rows will have an impact to system response times.
When creating a price event, users have the option to add an exception or exclusion to the price event.
Exceptions allow for the detail of a price event to vary for a subset of the original price event detail at an item and/or location.
For example you may want to create a clearance at style or parent item level for 25% off however you want some colors to have a greater reduction in price than the others. Creating an exception allows selected colors to be reduced at 40% off.
Exclusions will remove the item and/or location from the price event. Below are details on exception/exclusion options by price event type.
The following price event types support item/location exceptions:
Price Change (except Link Code type)
Clearance
Simple Promotions
The following price event types support item/location exclusions:
Price Change (except Link Code type)
Clearance
Simple Promotions
Finance Promotions
The following price event types support item exclusions only - location exclusions are not supported:
Transaction Promotions
For more information on creating exceptions or exclusions by price event type see the Oracle Retail Price Management User Guide. RPM also has system generated exclusion functionality that can be setup using a system option. See detail in System Generated Exclusions section of this document.
When approving a price event, the conflict check process can automatically create system generated item exclusions based on a system option tolerance percent.
System generated exclusions may be created during approval process if conflict check is run and finds errors.
Price event types included in automatic exclusion process:
Price Change-Regular and vendor funded (link code is not supported with this functionality).
Clearance-Regular and vendor funded.
Promotions Components Supported: Simple or Threshold-Including customer segment and vendor funded promotion components. (Multi-Buy, Transaction and Finance promotion components are not supported with this functionality.)
|
Note: Price event injector will support automatic exclusion creation. |
The price event creation process remains unchanged until you reach the approval process. When Approve is selected, the conflict checking engine will automatically create exclusions based on a tolerance percent.
Price events must be created at higher than transaction-item level to be eligible for automatic exclusion creation.
Price events created at the following levels are eligible for automatic exclusion creation:
Price changes and Clearance
Parent, Parent Diff/Location, or Zone
Item List/Location or Zone
Price Event Item List (PEIL)/Location or Zone levels
Promotions- Simple or Threshold
Department, Class, Subclass/Location, or Zone
Parent, Parent Diff/Location, or Zone
Item List/Location or Zone
Price Event Item List (PEIL)/Location or Zone levels
To support and manage automatic creation of exclusions for price events, RPM will automatically create merchandise lists that will group exclusion details together into one detail row for display. The new system-created list is used only during the creation of the price event and will not be used with any other functionality.
A system option, System Generated Exclusions Tolerance % determines the percentage of transaction items on a price event that are allowed to error during conflict checking and still move forward with the approval of the price event. The system option will initially be set to default to 0% with a maximum tolerance value of 25%. The value can be updated in RPM.
The same tolerance percent value will be used for promotions, price changes, and clearances. If tolerance levels are exceeded, the price event approval will fail conflict checking, and the status of the price event will be set to Worksheet.
Tolerance values for conflict checking are based off of the number of transaction items that are processed. The number of locations does not impact whether or not the tolerance is met.
System-generated exclusions will display in the multi-record block with one line representing all item exclusions. Users will review the auto-created exclusions to determine the next steps:
Option 1-Fix data to eliminate the exclusion and re-process the data.
Option 2-Leave the exclusions as created and no further action is required. When the price event becomes active, changes to the created exclusions are no longer allowed.
To support the process for creating price events at higher than transaction level, users have the ability to create 'ad hoc' price event item lists for one time use as they are keying a price event. This is done by uploading a spreadsheet during the item selection process of price event creation. The spreadsheet should be saved as a comma delimited file.
Price event item lists can be created for the following price event types: price change, clearance events, and promotion component types: simple, threshold, multi-buy, finance, and transaction, including customer segment and vendor funded.
When a price event item list is selected as the option for "item type", a new button named Upload Spreadsheet is enabled. This provides the ability to upload a previously created spreadsheet with the items that should be included in the price event item list. When the upload spreadsheet button is clicked, a pop up window will appear allowing the user to select a computer file using a browse feature or by manually keying in a spreadsheet file name for upload.
The price event item lists will be created for single use only at the time the price event is created or when a new component detail is added to an existing promotion. Users do not have the ability to re-use a price event item list in RPM. They do, however; have the ability to upload the same list multiple times.
The price event item lists are created in RPM based on the data from the uploaded spreadsheet. Users do not have the ability to make changes to the items associated to the item list once uploaded into RPM. If after uploading and prior to approving the promotion, users can remove the added list and re-upload the revised item list spreadsheet to create a new price event item list. If the price event has been approved, users will need to set the price event back to worksheet status and make necessary changes (remove old list and upload new list) or cancel the price event and create a new price event.
RPM will create price event item lists by validating the item numbers on the spreadsheet. For spreadsheets to be uploaded into RPM successfully you must ensure that no matter what other information resides on the spreadsheet, RPM requires valid item numbers in the first column. If the spreadsheet contains any other data in any other columns, they will be ignored. Valid item numbers require that the items have been set up in RMS and are in a status of "active".
The item number value can reflect parent items, transaction items, or a combination of both. Parent items with differentiators (for example, color/style) are not valid for price event item lists. In the event that a child item for a parent is included in the list along with the parent item, the child item will be removed from the list to ensure that there is no duplication of data. Price event item lists supports having multiple levels of the hierarchy represented in a single list. For example, users can create a file that has item numbers from more than one department, class, or subclass.
|
Note: Merchandise hierarchy levels (department, class, and subclass) are not valid values for the spreadsheet. Options are parent items or transaction items. |
When the price event item list is uploaded, RPM will validate that all of the items included in the spreadsheet are valid RMS item numbers. If items are not found in RMS, or duplicate items are found on the spreadsheet during processing, they will be removed from the creation of the price event item list. RPM will also validate user security. If a user does not have valid security for any items on the spreadsheet they will be removed from the creation of the price event item list. Users will receive a message informing them that some of the items from the upload spreadsheet have been removed.
|
Warning: Not all items uploaded- duplicate or invalid items found. |
|
Note: Items in error will not be displayed. Users are responsible for spreadsheet content and ensuring data accuracy. |
Price event item lists in RPM do not exist as item lists in RMS. RPM will not send price event item list information to RMS.
Users will be able to search for price events (for price changes, clearances, and promotions) using an existing price event item list ID.
Price Event Item List Clean Up:
Unused price event item lists-Batch logic searches for existing price event item list IDs and find any that are not tied to a price event. These price event item lists will be removed from the system.
Purging price events-Batch logic that purges old price events will also purge any price event item lists that are connected to the price event being purged.
|
Note: For more information on the price event item list batch jobs, see the Oracle Retail Price Management Operations Guide. |
This feature provides the ability to create and assign custom attribute values to price events. Customers have the ability to add/view/maintain attributes for the following price event types in RPM; price changes, clearances, and promotions. Custom attributes also are supported when creating price events via the price event injector. Custom attributes can be used to support expanded client functionality such as coupon information, clearance markdown phase or to capture additional information from legacy systems.
Customers are responsible for the set up and configuration of the custom attribute framework along with loading them to the RPM tables. Setting up the custom attribute framework is a backend process that will need to be managed by a system administrator. There is no UI access to create or maintain the custom attribute framework. See the Oracle Retail Price Management Operations Guide for information on setting up the framework.
Multiple tables support storing custom attributes for each type/level of price event:
Price Change Custom Attributes
Clearance Custom Attributes
Promotion Event Custom Attributes
Promotion Header Custom Attributes
Promotion Component Custom Attributes
Promotion Component Detail Custom Attributes
When creating the custom attributes framework, there are a maximum of 22 attributes that can be set up for each price event table. Of those 22 attributes, 10 are allowed to be character based attributes, 10 number based attributes and 2 date based attributes.
The following information needs to be defined when planning the attribute framework:
Custom Attribute ID #—Identifies the type of custom attribute
ID's 1-10 are defined as character based
ID's 11-20 are defined as numeric
ID's 21 and 22 are defined as date based
Label Name—Field name identifier that will display on the custom attribute window. The UI will support displaying 60 characters for the label name.
Display Sequence—Indicates the order in which the attributes should be displayed in the attribute screen from top to bottom. Attributes will be displayed in a single column on the screen.
Enabled–Indicates whether the attribute should be displayed in the UI or not; only enabled attributes will display for update in the attribute screen. If a system administrator changes an existing attribute from enabled to disabled or deletes the attribute, the UI will no longer display the values. The attribute, or any values assigned to the attribute during custom attribute creation will remain on the RPM tables. If required, custom reporting could be created to read all data from the tables.
Once the custom attributes framework has been added to the price event tables and enabled, they become available for use during price event creation. As price events are created or maintained, users will have access to assign custom attribute values by entering them manually in the UI. When making changes to or adding custom attribute values to an already existing price event, maintenance is allowed based on the status of the price event:
Price Changes—Must be in worksheet status
Clearance—Must be in worksheet status
Promotion Event—No status applies, changes are allowed anytime
Promotion Header—All component details attached to the promotion header must be in worksheet status
Promotion Component—All details attached to the component must be in worksheet status
Promotion Component Detail—Must be in worksheet status
RPM will provide wrapper logic for custom validation of custom attribute values, providing the price event type along with the custom attribute values. Specific validation rules will require a custom package function to be written by the system integrator.
Below are some examples of possible validation rules that could be set up by a customer. Another validation option would be to tie into RPM conflict check by setting up custom conflict check rules. See the Oracle Retail Price Management Operations Guide for more information on setting up custom rules.
Validation examples:
Validation on date requirements; customers may choose to only allow dates based on certain rules such as only allowing a future date versus a date in the past.
A customer may choose to provide a list of valid values for an attribute, requiring validation to ensure the correct values are used. Although the user interface editor is freeform, the validation rule would need to contain a list of values to validate against.
There may be a need to have one attribute dependent on another, requiring validation to ensure both fields are entered.
If any custom validation returns error messages, the UI will display all errors returned to the user. However, when this same validation is called by the price event injector batch, only the first error will be recorded on the associated staging table.
|
Note: Reference the Oracle Retail Price Management Installation Guide for more information on configuring custom attribute framework. |
Attributes can be assigned during price event creation via the RPM price event injector, adding attributes to previously created price events is not supported (considered maintenance - can be done via the UI). All price event types that are supported by the price event injector will also support adding custom attributes. The following price event types will support custom attributes via the price event injector: price change create, clearance create and promotion create, assigning custom attributes at multiple levels; event, header, component and component detail. All promotion component types are supported; simple, threshold, multi-buy, transaction, and finance.
When adding custom attribute values via the price injector, no validation will be done to ensure the custom attribute framework exists on the price event attribute tables. Custom attributes loaded that do not match up with the custom attribute framework on the tables, will still flow to the underlying tables, however data will only display in the UI if the attributes structure is enabled. The values assigned to an attribute are free-form and will not be validated unless customer has set up specific validation rules.
Emergency or Same Day Price Event Changes - There is a system option called price change processing days that is set to designate the number of days required between the create date and the effective date of a price event. This rule ensures that price changes, clearance and promotions are created with enough advance timing that stores and other process areas can react accordingly.
A separate security level has been created to give some users the ability to skip this rule and create a price change that is effective immediately. This is usually done as an emergency measure to update the price of an item that is incorrect. Users without the special security will receive an error message if the effective date of a new price event falls before the number of price change processing days.
For example, if the setting for price change processing days is "3" days. The system will enforce a conflict check rule that a price event cannot be created less than three days out unless user has emergency security
|
Note: See more details on application security in the Oracle Retail Price Management Operations Guide. |
When an emergency price event is created the information is passed to POS as soon as the price event is approved. The communication to RMS will also be done on approval; however there is an exception to the timing on when RMS will get the information. Batch processing will be done as a bulk or chunk process; if the price event is large the system will process it via the chunk batch. Price events processed by the chunk batch will update nightly unless the trickle feed batch is also run to update RMS. See the Oracle Retail Price Management Operations Guide for more information on the trickle feed batch process.
Price changes are the pricing events in RPM that affect the regular retail price. When a price change is created, the following information is specified:
The item receiving the price change
Where the price change is occurring
How the price is changing
When the price change will take effect
Why the price change is occurring
When price changes are approved in RPM, they are made available to multiple systems for ticketing and inventory valuation purposes.
There are multiple options for creating price changes in RPM:
Regular Price Change-Used to change the price of an item/location on a specified date.
Vendor Funded Markdown-Deals created in RMS can be associated to price changes (including vendor funded promotions) in RPM.
Link Code Price Change-Link codes should be used for identical items that will always share the same retail price (for example, a retailer wants all 8 oz. packages of frozen vegetables to carry the same price regardless of type). They are used for ease of data entry and considered a point in time price change. See more details in section Link Codes Functional Overview.
Multi-unit Price Change-Multi-unit pricing allows you to manage prices that vary based on the number of units purchased by the customer. Retailers may give customers the option to purchase a single unit of an item at one price, and a case of the same item at a lower price than the single item price times the number of units. For example: Fireplace logs- sold individually for $5.00 each, and case of 6 logs sold for $22.00 (versus $25.00).
|
Note: This functionality is not the same as promotional pricing based on price reductions due to purchase quantity. |
Price Change with Exceptions or Exclusions -Both options are available for all price change types except link code price changes.
RPM provides flexibility on item and location selection when creating price changes. Users have the option to create price changes at the following levels:
Item Selection
Parent Item
Parent Diff Item
Transaction Item
Item List
Price Event Item List
Location Selection
Zone
Location (warehouse or store)
When multiple regular prices are passed for an item, the last regular price passed is the regular price that is used. Normally, only one price change for an item location on a given day is allowed to be created via the user interface in RPM. There can be more than one regular retail price for an item location on the same day only when an "emergency" retail price change is entered and executed by an authorized emergency user. At POS the latest price received (emergency price) is the only "regular" price.
If a price change is created and approved for an item/location that is on an active clearance, the new price change will not take effect in RPM until the clearance is reset (on the reset date). If the item/location that received the price change has a subsequent clearance that falls after the price change is approved, the clearance will be recalculated based on the new item regular retail.
If a price change is created and approved for an item/location that is on an active promotion, the new price change may impact the selling retail of the promotion. Updates to the promotion selling retail will be based on the type of promotion and the defined discount and applied on the effective date of the price change.
For example:
Simple Promo - 10% off defined item
Regular Retail = $10.00 - Promotional Retail = $9.00
If a price change is entered for the defined item, raising the price to $12.00, the promotion selling retail will also change to $10.80 on the effective date of the price change.
Clearances in RPM are defined as a reduction in permanent retail designed to increase demand and move inventory out of a store. These reductions are represented in RPM as clearances which may consist of a single markdown or a series of markdowns. When a clearance is created, the retailer is specifying the items and locations where the clearance is in effect along with the discount or set price for the markdown. Subsequent clearances always need to result in the price of an item decreasing. Clearances may be ended by using the reset function, but if never reset, the items remain on clearance in the specified location(s) indefinitely. If a reset is specified it is considered to be the final step in the clearance.�
There are multiple options for creating clearances in RPM:�
Regular Clearance -Used to markdown the price of an item/location on a specified date, such as end of season holiday merchandise or swimsuits at the end of summer season. Clearance is also used to phase out a color or pattern for an item.
Vendor Funded Markdown-A deal type of "Vendor Funded Markdown" created in RMS can be associated to clearances in RPM to offset the reduction of the permanent price change. The amount to be billed back to the vendor will be calculated based on the stock on hand when the clearance is executed on the effective date.
Clearances with Exceptions or Exclusions-Both options are available when creating clearance. Exceptions allow item locations to have different clearance prices from zone. Exclusions remove the item location completely from a zone level clearance.
RPM provides flexibility on item and location selection when creating clearance. Users have the option to create a clearance at the following levels:
Item Selection: Parent Item, Parent Diff Item, Transaction Item, Item List and RPM Price Event Item List
Location Selection: Zone and Location (warehouse or store)
To end an executed clearance a reset date should be added to the clearance, the option to delete is not allowed.
To end an approved clearance, the option is available via the Maintain Clearance screen. The approved clearance must first be set back to worksheet status, which will kick off conflict check and send a message to consuming systems to remove the clearance. Once in worksheet status, the clearance can be deleted.
If a reset date has been set up for the clearance that is being deleted and only one clearance exists the reset date will be removed when the clearance status is updated to worksheet. If a reset date exists and there are multiple clearances for the same item/location, the reset date will be removed for the clearance that is being deleted however it will not be removed for any other existing clearances. RPM will not remove the reset date as there could be multiple dates that exist at the item location level. Customers will need to manually remove the reset date by clearance to meet their business process needs.
Below find examples of the communication sent to consuming applications for deleting a clearance.
Table 10-1 Scenario: Multiple Clearances -- with same reset dates
| # |
RPM User Interface | Integration to Consuming Systems |
|---|---|---|
|
1 |
Newly created CLR 1 (1st markdown) Approved or Executed Effective Date = JAN/01 Reset Date = MAY/01 |
Create CLR message sent Create CLR Reset message sent Details at item/location level for both messages |
|
2 |
Newly created CLR 2 (2nd markdown) Approved Effective Date = MAR/01 Reset Date = MAY/01 NOTE: reset date must be greater than the start date of the 2nd markdown |
Create CLR message sent No message sent related to clearance reset data because the reset date remains the same. Details at item/location level for both messages |
|
3 |
Un-approve CLR2 This step is required to delete |
Delete CLR message sent at item/location level Note: CLR reset delete is not sent, the last applied reset date remains as MAY/01 for CLR1 |
|
4 |
Delete CLR2 (2nd markdown) |
n/a - no messages are sent |
Table 10-2 Scenario: Multiple Clearances with different reset dates
| # |
RPM User Interface | Integration to Consuming Systems |
|---|---|---|
|
1 |
Newly created CLR 1 (1st markdown) Approved or Executed Effective Date = JAN/01 Reset Date = MAY/01 |
Create CLR message sent Create CLR Reset message sent Details at item/location level for both messages |
|
2 |
Newly created CLR 2 (2nd markdown) Approved Effective Date = APR/01 Reset Date = JUL/01 NOTE: reset date must be greater than the start date of the 2nd markdown |
Create CLR message sent Update CLR Reset message sent Details at item/location level for both messages |
|
3 |
Un-approve CLR2 This step is required to delete |
Delete CLR message sent at item/location level Note: CLR reset delete is not sent, the last applied reset date remains as JUL/01 for CLR1 |
|
4 |
Delete CLR2 (2nd markdown) |
n/a - no messages are sent |
Table 10-3 Scenario: Multiple Clearances with reset dates removed (CLR2)
| # |
RPM User Interface | Integration to Consuming Systems |
|---|---|---|
|
1 |
Newly created CLR 1 (1st markdown) Approved or Executed Effective Date = JAN/01 Reset Date = MAY/01 |
Create CLR message sent Create CLR Reset message sent Details at item/location level for both messages |
|
2 |
Newly created CLR 2 (2nd markdown) Approved Effective Date = APR/01 Reset Date = none (blank) |
Create CLR message sent Delete CLR Reset message sent Details at item/location level for both messages |
|
3 |
Un-approve CLR2 This step is required to delete |
Delete CLR message sent at item/location level Note: CLR reset delete is not sent, the last applied reset date remains as "null" for CLR1 |
|
4 |
Delete CLR2 (2nd markdown) |
n/a - no messages are sent |
When a clearance is created, setting the clearance reset date is optional. Clearance reset is used for two functions. The first returns the item to the last regular selling retail price when the clearance has ended. If an item is being discontinued and will no longer be in stock after the clearance, a reset date may not be used. The item will remain at the last clearance retail as long as it exists in the system. The second function of the reset date allows purge programs to perform defined database maintenance.
Reset dates are stored at the item location level in RPM and will link to all clearances for the item/location. The functionality of adding, updating, or removing a clearance reset for an item location will be validated upon approval/apply via the user interface. The system will ensure that the reset date is not less than or equal to the last approved clearance's effective date for the item/location. All clearances set up for the item/location will be validated and the reset date will be linked to all clearances that exist for the item/location.
When entering/editing a reset date on an existing transaction/location level item, on apply the system will validate that the reset date for the item/location is not less than or equal to the last approved clearance's effective date for the item/location.
When entering/editing the reset date for any level above item/location (for example, parent item, item list or zone), on apply the system will ensure that the reset date is valid for every transaction level item/location combination represented by the higher level being updated. For each item/location the reset date must not be less than or equal to the last approved clearance's effective date for that item/location.
A reset date must be greater than the current system date (vdate) + the price change processing day's system option defined in RPM. This system option is set to designate the number of days required between the create date and the effective date of a price event. Since setting a clearance reset date sets the item location back to the last selling retail it is the same as a "price change" and must follow the system option rule. This rule ensures that price events are created with enough advance timing that stores and other process areas can react accordingly. A separate security level has been created to give some users the ability to skip this rule and create a price change or end a clearance effective immediately or same day. Users without the special security will receive an error message if the effective date of a clearance reset date before the number of price change processing days.
When a clearance reset date is met, the item/location will be set back to the last selling retail on the reset date. If an update to the retail is required, a price change will need to be entered in RPM to reflect the updated retail. If a price change for an item/location that is already on clearance is approved while the clearance is running, the new price change will take effect when the clearance is reset (on reset date). If the item/location that received the price change has a subsequent clearance that falls after the price change is approved, the clearance will be recalculated based on the new item regular retail. When the clearance is executed, the retail of the clearance cannot be recalculated.
If a clearance does not have a reset date associated with the items/locations, it will not be fully purged from the system. When conflict check runs, the future retail purge logic will find clearance related records and attempt to remove historic clearance data. Items/locations on the RPM_FUTURE_RETAIL that are outside the clearance retention period will be purged, however the purge process will retain one record that will remain on the RPM_FUTURE_RETAIL until a clearance reset date has been set.
Users have two options for managing the end of a clearance if they have not entered a reset date during the create process, Maintain Clearances and Create Clearance Resets. Below find more details on each process:
Access the existing clearance via the Maintain Clearances screen and search for the clearance you want to update. Enter the necessary reset date information and click the apply button. You can add a reset date for an approved or executed clearance; it does not need to be set back to worksheet status. Adding or updating a clearance at this level will update each item location on the selected clearance with the reset date. If any of the item locations are also attached to another clearance, a reset date will be associated to the clearance for those item locations.
Access Create Clearance Resets and add/update the reset date by item(s)/location(s) independent of the clearance. This option allows you to select the item(s) and location(s) that require a reset date vs. setting the date for all items on a clearance. On apply the system will add/update the reset details for the selected item(s) and location(s). This may result in having a clearance where only some of the item locations will be reset.
The create clearance reset process provides flexibility on item and location selection. Users have the option to create a clearance reset at the following levels:
Item Selection: Parent Item, Parent Diff Item, Transaction Item, Item List, Price Event Item List
Location Selection: Zone or Location (warehouse or store)
If a reset date already exists for an item/location on clearance, users have the options to remove the reset date.
When you view a clearance in the maintain clearance UI, after highlighting a row in the table, the reset date field in the Clearance Maintenance section is unprotected and blank. If a reset has been setup for one or more items on the clearance the Earliest Reset Date and Latest Reset Date fields will display the reset values. These dates could vary as resets can be set up by item location.
|
Note: The reset date will only display in the Reset Date column on the table if the clearance was created at transaction item/location level as dates can vary by item. |
To remove the reset date(s) click the apply button at the bottom of the screen, leaving the reset date field blank. This will kick off conflict checking and if there are no conflicts found, will remove the reset date for all item locations on the clearance and any other clearances for the item location.
This function also supports removing a reset date for an item location independent of the clearance. To remove a reset date, leave the reset date field blank, enter item and location detail and apply the change. This function will remove the reset data for any clearance(s) set up for the selected item locations.
Below find examples of the communication sent to consuming applications when a reset date is removed from a clearance.
For this example, multiple clearances are set up for the same item(s)/location(s). This process works the same for both maintenance options; Maintain Clearance and Create Clearance Resets.
Table 10-4 Scenario: Removing a Reset Date a Clearance Level
| # |
RPM User Interface | RPM Internal Handling | Integration to Consuming Systems |
|---|---|---|---|
|
1 |
Newly created CLR 1 Approved or Executed Effective Date = JAN/01 Reset Date = none (blank) |
CLR record created CLR Reset record created with "null" effective date |
Create CLR message sent Details at item/location level |
|
2 |
Newly created CLR2 Approved or Executed Effective Date = APR/01 Reset Date = none (blank) |
CLR record created CLR Reset record created with "null" effective date |
Create CLR message sent Details at item/location level |
|
3 |
Add Reset Date to CLR2 Reset Date = JUN/01 |
CLR Reset record updated to JUN/01 |
Create CLR Reset message sent at item/location level |
|
4 |
Remove Reset Date from CLR2 Reset Date = none (blank) |
CLR Reset record updated to "null" |
Delete CLR Reset message sent at item location level Note: Reset delete impacts both CLR1 and CLR2 |
Promotions are events in RPM that discount the price of an item for a defined amount of time. Promotions are set up to apply to the regular retail price, the clearance retail price, or both, and when the promotion ends, the price reverts back to the retail price or clearance retail if the item/location is on clearance. When a promotion is entered in RPM, the retailer specifies the duration of the promotional price, what kind of promotion takes effect, and to which items/locations the promotional price applies.
|
Note: "Apply To" details assigned to a promotion will result in a filtered list of items that is sent to the consuming systems. This applies to all promotion types with an exception of Finance Promotions. Even though Finance Promotions have the Apply To value of a regular retail, clearance retail, or both, the item details are not filtered based on the setting. Systems that consume this promotion type need to filter promotion details based on the Apply To settings. |
RPM supports multiple types of promotion component creation options which are grouped in categories of "simple" and "complex". Of the promotion component types available, only simple falls under the simple category. All other promotion component types; threshold, multi-buy, finance, and transaction are treated as complex. See more details on each promotion type in the following sections.
An additional feature when creating a promotion is the ability to attach a customer segment identifier to the promotion component. Customer segment set up is done in the RMS system. Customer segments can be used for multiple purposes; defining customer profiles such as soccer moms, college students, employee discount perks. When creating a promotion in RPM, you have the option to attach a customer segment type to the promotion. RPM will display a list of valid values via the LOV button or customer segment ID can be keyed on the user interface. This information is sent downstream to the POS system, so that when a customer has proper identification for the customer segment they will receive the promotion discount.
|
Note: There is a conflict check rule that will enforce that there can be only one customer segment promotion for the same item/location/customer segment ID on any date. This rule is in place for all promotion component types (simple, threshold, multi-buy, transaction) with the exception of finance components. Finance components have no impact to the RPM_FUTURE_RETAIL table which is required to enforce the rule. |
For simple promotions, RPM will calculate the promotional retail and update the data on the RPM tables along with making the information available to consuming systems. RPM does not calculate the promotional retail for complex promotions because the discount amount is determined by what is included in the transaction at the point of sale. RPM tables are updated with complex promotion details including the items/locations on promotion; however, no promotional retail is stored. Promotion details for complex promotions are made available to consuming systems for processing.
|
Note: Because RPM does not calculate the promotional retail based on complex promotions, it is possible to create a complex promotion that results in a negative retail. Users must review the data being created to ensure the promotion does not result in a negative retail. |
RPM provides flexibility on item and location selection when creating promotions. All of the following promotion types allow the following levels for item/location selection. See each promotion type for more details.
Item Selection
- Merchandise Hierarchy (Dept, Class, Subclass)
- Parent Item
- Parent Diff Item
- Transaction Item
- Item List
- Price Even Item List
Location Selection
- Zone
- Store (warehouse not valid for promotions)
A simple promotion component consists of an item, item group, or merchandise level that receives a discount at a specific location or group of locations when the customer purchases an item. The discount can be defined as; amount off, percent off or by setting a fixed price.
Amount Off-Buy Flat Screen TV @ $10.00 off.
Percent Off-Buy Flat Screen TV @ 10% off.
Fixed Price-Buy Flat Screen TV (regular retail = $500.00) for $450.00.
No Change- Promote an item at its regular retail
Simple Promotion Components with Exceptions or Exclusions - Both options are available when creating simple promotion components.
A threshold promotion component consists of an item, item group, or merchandise level that receives a discount at a location or group of locations when the customer purchases a quantity or an amount of an item. Users must define the threshold levels before they can create the threshold component. See the Oracle Retail Price Management User Guide on details for setting up a promotion threshold.
It is important to understand that RPM will create a row in the item selection table for each item entered during the item selection process. The promotion component detail will be sent to consuming systems as individual promotions - one for each detail row.
For example:
When creating at transaction item level:
During item selection 3 transaction items are selected/entered with threshold parameters defined as buy a quantity of 3, get 10% off each item.
If a customer purchases 3 transaction items - 1 of each item - the promotion discount will not be applied
If a customer purchases 3 transaction items - 3 of one of the transaction items - the discount of 10% is applied
When creating at parent Item level:
During item selection 3 parent items are selected/entered with threshold parameters defined as buy a Quantity of 6, get 20% off each item.
If a customer purchases 6 child items - 2 under each parent item - the promotion discount will not be applied.
If a customer purchases 6 child items - all under the same parent item - the discount of 20% is applied.
In the examples above, the threshold parameter quantity must be met for each item or in other terms, for each detail row on the item selection table. To create a threshold promotion component for a group of items, enter them in the UI using an item list or a price event item list. This will create one row of item selection detail on the table which will create one promotion for all selected items.
Threshold level can be defined as a single threshold where a customer must purchase an amount or quantity to get a discount. Threshold promotions can also be created with multiple threshold levels where based on the amount or quantity purchased by the customer the discount increases based on threshold details. When creating the threshold details for a threshold promotion component the qualification type will be set to one of two values; threshold level or item level threshold. Below find examples on the different handling for each setting.
Consider a regular price item of $10, buy 3 pay $7.50 each
If the items selected for the promotion are Items A, B, and C;
| Qualification Type = Threshold Level | Qualification Type = Item Level Threshold |
| The promotion is applied if I purchase;
AAA, AAB, AAC, ABB, ABC, ACC, BBB, BBC, BCC, or CCC |
The promotion is applied only if I purchase;
AAA, BBB, or CCC |
Single threshold, qualifier = threshold level.
Buy six pairs of jeans; get 10% off each pair of jeans.
Any combination of designated items will qualify to receive the reward (discount) as long as a total of six units are purchased. The rules will work the same for single or multiple threshold promotions.
Single threshold, qualifier = item level.
Spend $100 on jeans; get 10% off each pair of jeans.
Customer must purchase six pairs of jeans of at least one of the designated items, they cannot mix and match items to meet the threshold. The rules will work the same for single or multiple threshold promotions.
Multiple threshold, qualifier = threshold level.
Buy four t-shirts; get 10% off each t-shirt.
Buy eight t-shirts; get 20% off each t-shirt.
Buy twelve t-shirts; get 30% off each t-shirt.
A multi-buy promotion allows you to define the quantity of items or amount of purchase required for the customer to receive a discount or reward. For example, a promotion might include a reward of a third pair of shoes free with the purchase of any two pairs of shoes from selected items or item groups. Another promotion might allow purchase of any five items from selected item groups at a fixed price or discount. All multi-buy promotion components share common characteristics, and the user creates them in RPM using the same screen flow. Any multi-buy component can be considered as one of the following general types. See the Oracle Retail Price Management User Guide for more details on each of the following types:
Multi-buy "meal deal"-Buy one hamburger sandwich, an order of French fries, and a soda for a fixed price of $5.00.
Multi-buy link saver-Buy a cap and a pair of gloves; get $2.00 off of a winter scarf.
Multi-buy "cheapest free"- Buy three pairs of shoes, get the cheapest pair free.
Multi-buy with multiple buy or reward (get) lists-When you buy one jacket and one pair of slacks, you can get one shirt or two ties at a fixed price of $5.00.
Multi-buy with AND or OR conditions for buy and reward lists- This example works the same as the example above: buy a hamburger or a chicken sandwich and an order of French fries, get a soft drink or ice cream free.
The following are some examples of multi-buy promotions that can be created using the "and/or" conditions, such as use the "and/or" qualifier between buy lists and/or reward lists. And/or conditions are required when creating more than one buy list or more than one reward list.
Buy 1 or more items in item list A or item list B.
Get discount on item list X or item list Z.
Buy 1 or more items in item list A and item list B.
Get discount on item list X and item list Z.
Buy 1 or more items in item list A or item list B.
Get discount of item list X and item list Z.
Buy 1 or more items in item list A or item list B and item list C.
Get discount on item list X or Z.
Multi-buy promotions will also support the following features:
Price Ranges-This feature is optional and is available when creating multi-buy promotion component types with a single buy list and/or a single reward list. Price range is not valid if promotion has more than one buy list and/or reward list.
The user interface allows entry of a minimum limit and/or a maximum limit for items associated to a buy list and/or reward list.
If min/max values are entered for a buy list, customers need to purchase either the amount or quantity specified on items that fall within the min/max price range in order to receive the reward.
If min/max values are entered for a reward list, customers will receive the reward if they select an item from the designated reward items that fall within the min/max value.
The price range is defined based on the purchase of a single item; the reward or discount will not be applied on the sum total value of multiple items. For example, if the price range defined for the buy list items is $45-$100, and the reward discount is 10%, the reward is valid if the price of the units purchased fall within the defined price range. The reward will not be given if the purchase of combining two units of an item falls within the price range.
RPM will not perform any additional validation between the item selection and the price ranges entered in the user interface. For example, RPM will not validate that the items in the selected list fall within the entered price ranges.
Buy one pair of jeans at regular price: price range = $45.00 - $100.00;
Get one t-shirt free: price range = $0.00 - $25.00.
Promotion Limits-This feature is optional and is available when creating multi-buy promotion component types. The discount limit field is a user entered numeric value to indicate the number of times a promotion is applied to a customer's purchase. For example:
Purchase a newly released DVD; get $5.00 off, limit one discount per customer. If customer purchases two of the same DVD, they will still only get $5.00 off one of them.
Buy two pairs of jeans and get one belt free. For this example, the customer is only allowed one free belt no matter how many pairs of jeans are purchased (and as long as two pairs of jeans are purchased).
This type of promotion provides users the ability to create promotions that use credit details along with threshold rules that would give the customers an option to pay back the credit card company without any interest (0%) in a defined timeframe. Customers would not be charged interest if paid in full within the defined duration.
Finance details are set up prior to creating the promotion including:
Credit card type.
Bank Name- For the credit card issuing bank.
BIN- Bank index numbers.
During promotion create users will add threshold details which is the total amount that the customer has to spend in order to qualify for the finance promotion.
Spend $1000 using VISA; receive 0% interest, duration = 18 months.
Finance promotion component exclusions - This promotion component type supports creating exclusions only. Item or location exceptions are not supported.
|
Note: A Finance Promotion provides the ability to set Apply To value of Regular Retail, Clearance Retail or both (regular and clearance). But the item details tied to the promotion are not filtered based on the settings; all designated items are attached to the promotion. Customization is required if consuming systems that consume this promotion type require the promotion data to be filtered based on the Apply to setting. |
A transaction promotion component can have a discount type of either "amount off" or "percent off" that will be taken off the entire purchase (shopping basket) versus specific items in a transaction. This promotion has the same look and feel as setting up a multi-buy promotion; the main difference is that the reward given to the customer is a discount on their entire purchase amount. This type of promotion can be set up at storewide level or by designating specific items to purchase to receive the discount.
Storewide- Spend $200 on any merchandise in store, get $20.00 off entire purchase or order $200.00, get 20% off entire purchase.
Merchandise Hierarchy- Spend $100 on Jeans or Khakis, get 10% off entire purchase.
Both options above refer to purchasing an amount to receive the reward or discount. Users will also have the option to designate a "quantity" to purchase, such as, buy 10 items in the store, get 10% off entire purchase. This option is available for both storewide or by designating a lower level of item selection.
Transaction promotion component item exclusions - This promotion component type supports creating item exclusions only. Location exclusions along with Item or location exceptions are not supported. There are specific rules that must be met on the buy list details, the create/view exclusion button will enable/disable based on the rules.
The button will enable when the following conditions are met:
A single buy list has been created for the promotion component, a buy list must exist before exclusions can be created.
The buy list can contain one or many detail rows however, if there are multiple details rows in the buy list item selection multi-record block, each row must have been created at the same merchandise hierarchy level.
Buy list is created at higher than transaction item level.
The screen capture below shows an example of item selection for the buy list done at class level. The "level" field in the multi-record block must be the same to allow exclusion creation.
In the example shown, the "level" column has Class for both entries--this example supports exclusion creation.
|
Note: Assumption for this scenario is that the departments could vary as long as the "level" is the same (for the example shown, assume that class 6601 is tied to department 10 and class 6602 is tied to a different department. |
This next example is not "supported". The level columns shows Class and Subclass.
The button will be disabled under any of the following conditions:
No buy list has been created for the promotion component.
Buy list has been created that contains more than one row of detail in the item selection multi-record block with varying merchandise hierarchy levels (for example, one row at department, one row at class).
Buy list is created at transaction item level.
More than one buy list exists.
Promotion component is in any status other than worksheet and no exclusions exist.
Once item exclusions have been created, changes or modifications to the buy list item selection detail are not allowed. When a check appears in the checkbox for "item exclusions assigned" the Delete button to remove a buy list detail and the Add Buy List will be disabled. To modify existing buy list item selection detail, exclusions must first be removed.
Retailers need the ability to set up time-based promotions, such as Happy Hour and Door-Buster promotions. Users can enter start and end times, in hours:minutes, when entering start and end dates while setting up or maintaining promotions. Adding this data at the component-level detail allows for business validations, such as conflict checking. When a promotion is approved, the information is sent to consuming systems. Start and end times can be added to the following promotions types, including customer segment and non-customer segment promotions:
Simple promotions
Threshold promotions
Multi-buy promotions
Transaction Promotions
You can also load time-based promotions using the price event injector batch. This functionality is supported for all promotion component types.
When creating promotions, the start and end times shown at header level are protected and defaulted to a start time of 12:00 A.M. and end time of 11:59 P.M. Time-based elements are only added at the component detail level. This allows users to create multiple component details for a promotion with varying start and end times. There is a column that indicates time-based promotion in the multi-records blocks for promotion search results, promotion component header, and the promotion component detail maintenance. The indicator is checked if the promotion has any components that are set up as time based.
Time-based elements for a promotion are based on the time zone for the store location. A promotion that starts at 8:00 A.M. in New York will also start at 8:00 A.M. in California.
Users are also able to enter start and end times when creating emergency promotions. However, RPM is not designed to recognize time as it does for selecting promotion dates (based on business rules), making it possible that the start time for an emergency promotion could be in the past; there are no validation checks to prevent this scenario.
For example, a user creates an emergency promotion to start at 8:00 A.M., ending at 1:00 P.M., but doesn't enter the data into RPM until 9:30 A.M. The system will reflect the entered time values of 8:00 A.M. - 1:00 P.M., sending the data consuming systems.
Start and end times will default at the component detail level to 12:00 A.M. start and 11:59 P.M. end if the user does not enter time values.
Price history in RMS only has the ability to reflect one price value for an item location and date. If multiple overlapping promotions exist for the same item location RMS will reflect the promotion with the latest start time. Because of these rules, it is possible that RMS and RPM current retail could be out of sync.
Example 1: An item location has two overlapping promotions:
Early Bird promotion starting at 6:00 A.M. until 10:00 A.M.
All day promotion starting at 8:00 A.M. until 10:00 P.M.
RMS will reflect the retails for the all day sale because it starts later than the Early Bird sale.
Example 2: An item location has two overlapping promotions; only one is time based:
Early Bird promotion starting at 6:00 A.M. until 10:00 A.M.
Week long promotion, non-time-based 12:00 A.M. - 11:59 P.M.
RMS will reflect the retails for the Early Bird promotion (during the overlap day), because it starts later than the week-long promotion.
The only discrepancy to this rule is when an emergency promotion is created. The emergency promotion will override any other existing promotions.
|
Note: Emergency promotions that are processed through bulk will follow this rule. If they are processed through chunk conflict check processing the updates will only be applied during the day if the Price Event Execution for Emergency Chunk data batch is run. If the batch is not run, data will not be applied until next day. See the Oracle Retail Price Management Operations Guide for more information on this batch. |
Users will have the ability to cancel a time-based promotion. When an active promotion is canceled in RPM, the system will end the promotion at 11:59 P.M. on the current date (Vdate) regardless of what time of the day the promotion was canceled. This process works the same as canceling a non-time-based promotion. It is not realistic for store locations to support real-time promotion cancellations as they would have to be able to react and update promotion signage in-store.
Overlapping promotions are two or more promotion details where the same item/location is on promotion on the same date/time. The following are details on each combination of overlap based on the promotion type.
RPM provides the ability to select how simple overlapping promotions are handled through the system option Simple Promotion Overlap Rule. This system option will determine the rules for handling two or more overlapping simple promotions.
If the value is set to compounding, the selling price is calculated by compounding each (two or more) simple promotion for the overlapping period.
RPM will download the start date and end date for each promotion detail for the overlapping period so that consuming systems will be updated with the compounded selling retail for the overlapping period. This rule is true for all simple promotions created either with the online screens, price event injector, or new item location processing.
The start date and end date of the promotions overlapping period should be separately sent to consuming systems so that when the overlapping period is complete, the selling retail reflects the active promotion post the overlapping period.
POS systems will receive data based on the system option and can determine how to handle based on capabilities.
|
Note: Apply Promo Change Type 1st-This system option will only be used when selling retail calculations are compounded. It will not be used when the system option for overlapping simple promotions is set to non-compounding best deal. |
If the value is set to Non-compounding Best Deal, the selling price is calculated for each (two or more) promotion separately. For the overlapping period, the selling retail with the best deal for the customer should be available in the RPM tables. This same value should be sent to consuming systems. This rule is true for all simple promotions created either with the on line screens, price event injector, or new item location processing.
RPM will extract the appropriate start and end dates for the selling retail based on the overlapping period of the promotions such that the best deal is available as the selling retail for the overlapping period. When the overlapping period is complete, the selling retail based on the active promotion for that period should be available in RPM. The same should be sent to consuming systems.
|
Note: Having more than one fixed price simple promotion for an item location will be valid if overlap rule is set to non-compounding best deal. |
The following is a business example:
| Simple Promotion 1 | Simple Promotion 2 |
|---|---|
| Start Date = 1/15/2013 | Start Date = 2/1/2013 |
| End Date = 2/15/2013 | End Date = 2/28/2013 |
| Discount = 10 % Off | Discount = 15 % Off |
Overlapping period: 2/1/2013 to 2/15/2013
Non-compounding Best Deal:
1/15/2013 to 1/31/2013 - Discount 10%
2/1/2013 to 2/15/2013 - Discount 15%
2/16/2013 to 2/28/2013 - Discount 15%
Compounding
1/15/2013 to 1/31/2013 - Discount 10%
2/1/2013 to 2/15/2013 - Discount 10% + 15%
2/16/2013 to 2/28/2013 - Discount 15%
Complex promotion with a simple promotion:
In this scenario, RPM will assume these promotions will be compounded. RPM does not calculate the promotional retail for complex promotions, so it will send the retail for the simple promotion and promotion details for the complex promotion without the retail to consuming systems.
In cases where a retailer's POS system is a third party system, complex promotions will be applied based on retailer's implementation rules and what their POS system supports.
Overlapping a complex promotion with a complex promotion:
RPM does not calculate the promotional retail for complex promotions so the overlap rules do not apply for this condition. In cases where a retailer's POS system is a third party system, complex promotions will be applied based on retailer's implementation rules and what their POS system supports.
Based on the status of a promotion, some maintenance functions are available. If a promotion has not yet reached active status, users will have the option to set the promotion status back to worksheet, make any necessary changes to the promotion and request approval of the promotion.
If a promotion status is active; meaning the start date is in the past and the end date has not yet been reached, the following changes are allowed:
Update promotion end date:
RPM provides the option to change the end date at header level; however, changing the header level will not automatically change the component detail level. It is recommended to make end date changes at the component detail level; this level also allows changes to time elements if the promotion is time based or users want to add time elements.
SIM can also send an update for an end date on an approved promotion; RPM will unapprove the promotion detail, add the end date change, and reapprove the promotion detail. If there is a conflict an error message will be sent from RPM to SIM through the web service
Cancel promotion:
RPM allows users to cancel one or more component details from an active promotion. Cancellation can also be done at the header level, which will cancel all components attached to the promotion. If a user wants to cancel a subset of items and/or locations from a component detail, they will use the following option.
Cancel items and/or locations:
RPM provides users the ability to cancel items and/or locations off of an active promotion component detail for the following price event types: Simple Promotion or Threshold Promotion.
Canceling items and/or locations can be done at varying levels based on the original promotion detail setup. The item/location window will only allow entry/selection of items based on the original promotion component detail. For example, promotion detail created at Department/Zone level; cancellation is allowed at the following levels:
Department/Store-Stores within a zone can be canceled for the entire department.
Class/Zone or Store-An entire class of items can be canceled either at zone level or by store.
Subclass/Zone or Store-An entire subclass of items can be canceled either at zone level or by store.
Parent/Zone or Store-Parent items can be canceled either at zone level or by store.
Parent Diff/Zone or Store-Parent diff items can be canceled either at zone level or by store.
Transaction Item/Zone or Store-Transaction items can be canceled either at zone level or by store.
For example, promotion created at Parent Item/Zone level; cancel is allowed at the following levels:
Parent/Store-Stores within a zone can be canceled for the parent item.
Parent Diff/Zone or Store-Parent diff item(s) can be canceled either at zone level or by store.
Transaction Item/Zone or Store-Transaction item(s) can be canceled either at zone level or by store.
For example, promotion created with Item List at location level; cancel is allowed at the following levels:
Parent Item/Store-Parent items can be canceled at store level.
Parent Diff/Store-Parent diff items can be canceled at store level.
Transaction Item/Store-Transaction items can be canceled at store level.
|
Note: This feature is only applicable to active promotion price events created as simple or threshold including vendor funded and customer segment. The rules for multi-buy promotions are not valid as changes could compromise the integrity of the scenario. For example, buy sandwich and bag of chips, get drink free. Canceling an item from this type of promotion would make the buy/get rule invalid. |
Add a new promotion component detail:
RPM allows users to add a new promotion component to an existing promotion that has active details under it.
In the scenario where there is an approved promotion that has system created exclusions and the user is adding a new component, the system will process the new component data the same as if it was a new promotion. If during the approval of the new component conflicts are found, exclusions may be automatically created based on the defined tolerance level. The status of the added component or component detail will be approved if tolerance is not exceeded.
|
Note: Tolerance checking will not take into account the previous exclusions it will start counting from zero. |
Users are stopped if they are creating a price change within a set number of days of the start of an approved promotion or vice versa. Conflict checking will stop the user from approving the price change or promotion. The number of days is determined by a promotion constraint variable that is stored at the subclass/location level.
When the user runs conflict checking on a price change record, promotion record, or worksheet status record, promotion constraint checks are run. If a promotion constraint is violated, the user will see a conflict in either the price change or promotion dialog and the price event will not be approved. The user is able to optionally select to ignore promotion constraints on individual price change, promotion, or worksheet detail records so promotion constraint checks are not performed when conflict checking is run.
The pricing strategies front end allows a retailer to define how item retails are proposed when pricing worksheets are generated. The strategies are defined at department, class, or subclass in order to represent which items are affected.
RPM offers six types of pricing strategies:
Area Differential Pricing allows clients to set prices for items at a particular zone or zone group differently than another zone or zone group. The price differential is based on the rules a retailer defines. Area differentials are used when a retailer creates a price change to ensure consistent pricing. Differential pricing cannot be applied to other pricing events, such as clearances or promotions.
Clearance Pricing allows clients to define the method used to clear merchandise by creating markdowns or a series of markdowns.
Competitive Pricing allows a client to define a pricing strategy for their items based on their primary competitor's prices. All locations in a competitive pricing strategy must use the same currency.
Clearance Default allows the user to specify clearance defaults as low as the subclass level and apply the subsequent markdowns in the manual clearance dialog. Pricing worksheets are not generated for this pricing strategy.
Margin Pricing allows a client to define a pricing strategy for items based on margin targets.
Maintain Margin Pricing allows a client to define the pricing strategy for items based on future cost changes. The proposed retails can be based on current or market basket margin percentages.
The future retail tables are the most important tables within RPM. All price event activities need to access and update the future retail tables. Most retailers do their pricing above the item/location level (parent level, zone level, or parent/zone level).
The data in the future retail tables are held at higher levels whenever possible, which can enhance application performance:
The future retail tables will retain retail information at levels above transaction item and location so that this information can be leveraged by the retailer when creating price events at higher levels. Users can create price events at any merchandise hierarchy and location hierarchy level as necessary, the data on the tables will reflect the events at the level created.
The Conflict Review List window displays the price event at the level of the timeline where the conflict occurred, that is, potentially higher than transaction item and location level.
A roll-up batch ensures the system holds future retail data at the highest level possible. This batch looks at lower-level timelines and attempts to roll up to a higher level where timelines match exactly between lower levels and higher levels.
A batch is used to handle a change to a merchandise hierarchy's primary zone group (PZG) definition. This batch explodes all existing timelines in the future retail tables to the transaction item and location level, and then regenerates higher level timelines based on the new PZG definition, followed by roll-up processing to remove unnecessary, non-exceptional data.
Future retail logic includes:
Parent-zone timelines for an item with parent and location, which is part of the primary zone group for the associated merchandise hierarchy.
Item-zone timelines where the item does not have a parent and the location is parent of the primary zone group for the associated merchandise hierarchy.
Parent-location timelines where the item has a parent. These timelines are generated regardless of whether the location belongs to the primary zone group for the associated merchandise hierarchy.
Parent/Diff-zone timelines where the item is parent of diff_1 of the parent item and the location is part of the primary zone group for the associated merchandise hierarchy.
Parent/Diff-location timelines where the item is parent of diff_1 of the parent item. These timelines are generated regardless of whether the location belongs to the primary zone group for the associated merchandise hierarchy.
Price inquiry is designed to allow retailers to retrieve the price of an item at an exact point in time. This price might be the current price of a particular item or the future price. Users can search for prices based on the following search criteria:
Merchandise hierarchy
Dept., Class, Subclass
Item, Item List, Price Event Item List
Parent, Parent/Diff, Transaction Item
Zone group
Zone
Location
Location (warehouse or store)
Date/Time
This feature provides the ability to generate price events via a bulk process that can be loaded into RPM. Price events generated by an external system other than RPM can be staged on tables and processed through a batch job where conflict check and validation rules are processed as data is passed to RPM. Price events can be created in RPM, in either worksheet or approved status.
Functionality supported by the price event injector, includes the following features.
Overall use is as follows:
Zone Group Level Use: This feature provides users the ability to load data at the zone group level versus loading at zone level. This can be done for price changes, clearance and promotions. Allowing this level of data entry will provide a streamlined approach for customers. For example, if a promotion is being created for a zone group that has 10 zones set up and all locations will have the same promotional retail. Users will be able to load one row of data at the zone group level vs. loading 10 rows of data at zone level. Validation will still be done at zone level and data will be set up in RPM at zone level. Once the original staged data at zone group level has been exploded to zone level, any necessary corrections found during conflict check will need to be corrected at zone level versus zone group level via the price event injector.
Automatic Exclusion Creation Details Included in Reporting: This feature will provide details on the price event injector tables that show processing information. Any processed data that have had automatic exclusions created during processing will be flagged as such, providing customers visibility at a high level. For additional information on the details, customers will need to manually view the data in the RPM UI.
Vendor Funded Price Events: This feature provides the ability to create a vendor funded price event by selecting a deal previously created in RMS and attaching it to a price event (price change, clearance or promotion) in RPM. Existing deal details will need to be included in the stage data when creating a vendor funded price event.
Ignore Constraints: This feature defines whether or not promotion constraints are taken into account when conflict checking is performed. The functionality is available for the creation of price changes or promotions. For more information see the promotion constraints section of this document.
Price Guides: This feature provides the ability to use price guides to create a uniform pricing strategy. Price guides will maintain consistent price points, for example, rounded in the same manner or all end in the same digits. Once price guides are defined, they can be used for the following functions: price changes, clearance, and promotions.
Custom Attributes: This feature provides the ability to assign custom attribute values during price event creation, adding attributes to previously created price events is not supported (this is considered maintenance and can be done via the UI). The following price event types will support custom attributes:
Price changes
Clearances
Promotions at multiple levels: header, component and component detail
Simple, threshold, multi-buy, transaction, and finance promotion components
Adding custom attribute values via the price event injector:
Validation will not be done to ensure the custom attribute framework exists on the price event attribute tables.
Custom attributes loaded that do not match up with the custom attribute framework on the tables will flow to the underlying custom attribute tables. However, they will not display in the RPM user interface.
Attribute values are freeform and will not be validated unless customer has set up specific validation rule.
Price change use is as follows:
Create Price Change: This feature provides the ability to create a price change via the price event injector. The following change values are supported: change by amount, changes by percent, fixed price change or link code price change along with creating a vendor funded price change. System generated exclusions may be created during approval process if conflict check is run and finds errors.
Clearance use is as follows:
Create Clearance: This feature provides the ability to create a clearance via the price event injector. The following change values are supported: change by amount, changes by percent, or fixed price change along with creating a vendor funded clearance. System generated exclusions may be created during approval process if conflict check is run and errors are found
Independent Clearance Reset: This feature provides the ability to add a clearance reset date, change a clearance reset date or remove a clearance reset date for designated items/locations independent of the original clearance. Valid item selection includes; parent items, parent/diff items, transaction level items, or the use of an item list.
When submitting clearance resets via the UI the conflict check process understands that there will always be only one date for all of the selected items/locations. Because of the current conflict check handling, a rule is enforced that when submitting clearance resets through the price event injector, you must submit and process records for a single date one at a time. For example, if you are resetting a group of item/locations with a date one week from now and another group of item/locations with a date of two weeks from now, each group should be staged and processed separately. Staging both groups of item/locations at the same time will result in all records in fail/error status.
If duplicate or overlapping data is encountered during processing of clearance resets, the system will skip the duplicate/overlapping records and process all other data. This could happen if the same item/location/date record appears twice on the staging table, or if a parent item is submitted along with one of the child items for the parent. This condition will not be flagged as an error; all data will be processed as submitted.
If records are submitted at parent level, RPM will validate that all child items are set up for a clearance, any child items that are not on an active clearance will be skipped.
Not supported: Manual exceptions, or exclusions.
Promotion use is as follows:
Create Promotion Header: This feature provides the ability to create a new promotion including the promotion header details via the price event injector. This functionality is available when loading the stage tables with NEW promotion details only. This feature also allows the ability to have multiple component details records attached to a single promotional header. Users will have the ability to group component details, allowing for a new promotion to be created with more than one component detail associated to the promotion. Promotion headers can be created for all promotion component types; simple, threshold, multi-buy, transaction, and finance.
Customer Segment Promotions: This feature allows entry of customer segment information that has been previously created in RMS when loading promotion data to the stage tables. This functionality is available when loading the stage tables with NEW promotion details only for all promotion component types; simple, threshold, multi-buy, transaction, and finance.
Create a New Deal in RPM: This feature provides the ability to create a promotion component and attach a newly created deal (not already existing in RMS) to the promotion component. This functionality is available when loading the stage tables with NEW promotion component details for the following promotion types; simple, threshold, multi-buy, and transaction. The feature is not supported for finance promotion components.
Time Based Promotions: This feature allows for a promotion to be created with specific start and/or end time elements defined for the promotion component detail. The functionality is available for all promotion component types; simple, threshold, multi-buy, transaction, and finance. For more details on this promotion feature, see "Time-Based Promotions".
Simple Promotion Components: This feature provides the ability to create a simple promotion component via the price event injector. The following change values are supported: change by amount, changes by percent, fixed price change, exclude, or no change. System generated exclusions may be created during approval process if conflict check is run and finds errors.
Threshold Promotion Components: This feature provides the ability to create a threshold promotion component via the price event injector. The features include the ability to create a single threshold or multiple thresholds along with defining the qualifier as either threshold level or item level. The functionality does not support the set up and creation of the threshold structure tied to a threshold promotion component. The threshold structure must be created via the RPM UI before using the data in the price event injector. The threshold structure will designate the change values for the promotion component. System generated exclusions may be created during approval process if conflict check is run and finds errors.
Multi-Buy Promotion Components: This feature provides the ability to create a multi-buy promotion component via the price event injector. All features supported via the UI will be supported via the price event injector including; various types of multi-buy promotions, multiple buy/reward lists, price ranges and a promotion limit value. For more details, see the "Multi-buy Promotion Component" section of this document. System generated exclusions may be created during approval process if conflict check is run and finds errors.
Transaction Promotion Components: This feature provides the ability to create a transaction promotion component via the price event injector. All features supported via the UI will be supported via the price event injector including storewide level promotions. For more details, see the "Transaction Promotion Component" section of this document. System generated exclusions may be created during approval process if conflict check is run and finds errors.
Finance Promotion Components: This feature provides the ability to create a finance promotion component via the price event injector. When injecting a finance promotion component additional details including credit details and threshold details must be included on the stage tables. For more details, see the "Finance Promotion Component" section of this document.
Not Supported: Manual exceptions or exclusions for any promotion component type.
See the Oracle Retail Price Management Operations Guide for more information on running the price event injector batch jobs.
RPM does not currently support the setup or handling of coupons. Coupon setup and maintenance is done in RMS and the data is passed to consuming systems. See the Oracle Retail Merchandising System User Guide for more details on coupons.
The RPM worksheet functionality is designed to allow for the maintenance of automatically generated price change and clearance proposals resulting from the RPM merchandise extract batch program. These proposed price changes/clearances are the product of existing strategies, calendars and item/location information.
Location moves in RPM allow you to select a location that exists in a zone and move to a different zone within a zone group on a scheduled date. The user will choose to approve the location move. A batch will process all approved location move records, run them for conflict checking and update them to scheduled status. The batch will run immediately before the Location Move Execution batch.
After conflict checking is complete, the process also allows the location to persist most valid pricing events through the move and to smoothly transition out of their old zone pricing strategies into the new zones' pricing strategies. System options provide the user the flexibility to configure location moves. Exclusions may be created during approval process if conflict checking runs and finds errors.
RPM uses a Java architecture built on a layering model. Layers of the application communicate with one another through an established hierarchy and are only able to communicate with neighboring layers. The application is divided into a presentation layer, a middle tier consisting of services and business objects, and a database access/driver layer.
The segregation of layers has the following advantages, among others:
The separation of presentation, business logic, and data makes the software cleaner, more maintainable, and easier to modify.
The look and feel of the application is easily updated because the GUI is not tightly coupled to the back end.
A layered architecture has become an industry standard.
Portions of the data access layer (DAL) can be radically changed without affecting business logic or user interface code.
The application takes advantage of Java database connectivity (JDBC), minimizing the number of interface points that must be maintained.
Market-proven and industry-standard technology is utilized (for example, Java EE, Swing, JDBC, PL/SQL, and so on).
RPM exists on the same database schema as all the other Oracle Retail Merchandising Operations Management applications. As a result, there are a number of options for sharing information between applications.
Information from the RPM application is shared with and retrieved from other Oracle Retail Merchandising Operations Management (MOM) applications by reading directly from MOM application tables, by creating RPM views based on MOM application tables, by directly calling MOM application packages, and by allowing other MOM applications to call RPM packages, batch processes, and the RIB.
The following diagram illustrates the various applications with which RPM interacts in the Merchandising footprint:
RPM and RMS provide a client with flexible options for how to implement both solutions. RPM exists on the same database schema as RMS which allows information to be shared between applications from direct database reads, package calls, and batch processes. RPM uses APIs to facilitate the exchange of information with RMS.
RPM provides the following to RMS:
Price Event Execution—When regular, promotional, or clearance price changes are set to go into effect or end, the PriceEventExecutionBatch processes own the data flow. Once the pricing event has been processed by the batch program, it updates pricing in RMS by interfacing with the RMSSUB_PRICECHANGE API in RMS. Pricing is sent at item location level and supports all location types including wholesale/franchise locations.
Initial Pricing—Initial pricing for items in RMS is dependent upon the primary zone group for the item defined in RPM and characteristics of that zone group. These characteristics include markup percent, markup percent type, and pricing guides. RPM provides this information to RMS through an API (MERCH_RETAIL_API_SQL).
Deal Creation—RPM creates and associates Deals with regular, promotional, and clearance price changes. When this occurs RPM uses an RMS API (PM_DEALS_API_SQL) to create the deal in RMS.
RMS provides the following to RPM:
Foundation Data—Foundation information is essential to RPM functionality. To successfully set up price events RPM needs to know the merchandise hierarchy, the organizational hierarchy, suppliers, and more. RPM is able to access this information through the RMS database.
Item—Price events created in RPM ultimately relate to an item/location. RPM needs to know all approved items currently in the merchandising system, the active, discontinued, or inactive item/location relationships for those items, suppliers with which the items are associated, and more. RPM is able to access this information through the RMS database.
Competitive Pricing Information—RPM has the ability to create price changes based off competitive activity in the marketplace. RPM is able to access this information through the RMS database.
Deals—Deals can be associated to price events (including vendor funded promotions) in RPM. To associate price events to an existing deal RPM needs visibility to the deals currently available in the system. RPM is able to access this information through the RMS database.
Wholesale/Franchise Item Pricing—RMS is responsible for determining wholesale/franchise item pricing which is maintained on the future cost table. RPM uses this information to generate recommended retails for wholesale/franchise business partners.
Store/Warehouse Creation—New stores and virtual warehouses created in RMS must be added to a zone structure in RPM. To do this RMS provides RPM with the store and/or virtual warehouse being added, its pricing location, and its currency (to ensure it is the same as the zone it is being added to). RMS talks directly to RPM, RMS will call an RPM API that will trigger the update process.
Item/Location Creation—When new item/location relationships are established RPM needs to verify that no future retail records currently exist, create an initial future retail record (for sellable items), and determine if there are any existing price events that affect the item resulting in a future retail record for the price event as well. RMS talks directly to RPM, RMS will call an RPM API that will trigger the update process.
Item and Item/Location Deletion – When an existing item or item location is deleted in RMS, RPM will remove all references to that item or item location including table clean up and removing them from existing price events. RMS talks directly to RPM, RMS will call an RPM API that will trigger the update process.
|
Note: The following conditions do not automatically modify existing price events and should be considered manual maintenance.- Merchandise Hierarchy Deletion: Current base functionality in RPM does not process any changes when a merchandise hierarchy; department, class or subclass are deleted in RMS. - Location Deletion: Current base functionality in RPM does not process any changes when a location; warehouse or store, is deleted in RMS. RPM does not validate the status of a specific location during price event creation or maintenance. RPM will continue to calculate retail for items at locations that are closed until all item-location relationships for that location are removed in RMS and the necessary RPM batch processes are run to consume the resulting messages from RMS. |
Item Modification is used to notify RPM when an item has been reclassified. The details of the reclassification are written to an item modification table in RPM for the next batch processing run. RMS talks directly to RPM, RMS will call an RPM API that will trigger the update process.
Department Creation is used to notify RPM when new departments are created in RMS. RPM creates aggregation level information for the new department using predefined system defaults. RMS talks directly to RPM, RMS will call an RPM API that will trigger the update process.
RPM provides ReSA with Promotion Information—RPM needs to provide ReSA with promotion information. ReSA gathers promotion data directly from the RPM promotion tables.
|
Note: ReSA provides no information for RPM. |
RPM provides the following to Allocation:
Future Retail Price Data—Allocation uses future retail price data stored in RPM to provide the total retail value of an allocation. This interface is optional for a retailer and must be configured during implementation. Oracle Retail Allocation uses an API to access this information from RPM.
Promotions—Users in Oracle Retail Allocation can select a promotion from RPM to associate an allocation with. Allocation OI functionality also uses exploded promotion data from RPM.
|
Note: Allocation provides no information to RPM. |
RPM has its workflow and data security managed through an internal system, RSM. RSM is the part of the RPM application that provides a centralized method of authorizing system users.
RSM provides a two-tier security structure that consists of application and data level security. RSM provides centralized administration screens for system administrators to create application and data level permissions.
Additionally, RPM uses a directory service that complies with Light Directory Access Protocol (LDAP) to maintain and authenticate valid users. It is the system administrator's responsibility to ensure all users are set up in LDAP. If a client has an existing LDAP server where users are currently managed, RPM can be pointed to that server to eliminate the redundancy of maintaining multiple user names/passwords for the same user across a clients applications.
Application level security allows applications to limit the business functionality users can access in the system and how they can interact with those functions. To determine the business functionality a user can access, RSM uses named permissions.
Named permissions are pieces of business functionality around which the application has security. For example, if RPM has Promotions functionality surrounded by security, RPM creates a promotions named permission. Named permissions data is sent to the RSM database during installation.
To determine what actions a user can perform for the named permissions, each named permission has defined actions.
Actions define how the user interacts with the functionality contained by the named permission. The types of actions attached to a named permission are as follows:
None-Users associated to the role have access to the permission but no actions.
Edit- Users associated with the role are allowed to see all secured information in a workflow.
View-Users associated with the role are allowed to see all secured information in a workflow, but not make any changes to the data in the workflow.
Approve-Users associated with the role are allowed to change the status of a workflow to Approved.
Submit-Users associated with the role are allowed to change the status of a workflow from Worksheet to Submitted.
Emergency-Users associated with the role are granted special access that goes beyond normal day-to-day access functionality. They can thus bypass normal delays in processing.
Using named permissions and actions, RSM provides a requesting application (RPM in this case) with the application access information it needs to determine what security is enforced for each functional area within the application.
This allows applications to limit users' access to information based on hierarchy (merchandise and location) permissions. Applications either provide the details of these types up front with SQL scripts or dynamically by implementing an RSM interface and exposing it to the RSM service. RSM does not understand application-specific data (for example, RSM does not know the difference between departments and locations). To RSM, the data is a tag (for example, department) and a specific value (for example, 1000). This information is passed back to calling applications, and it is the applications responsibility to apply the data level permissions appropriately.
When application and data level security parameters are defined in RSM, they still need to be associated to users based upon their business roles. To facilitate this process RSM allows a system administrator to create security roles which application and data level security can be associated with. These roles can then be associated with users which causes the users to inherit the security permissions associated with their security role. When a user logs onto RPM, the user is authorized to use the business functionality and data associated with their role. The following diagram illustrates this concept.
All of the following system options are listed and can be viewed and edited through RPM user interface.
System Option name:
RPM_SYSTEM_OPTIONS .COMPLEX_PROMO_ALLOWED_IND
When checked, this field is restricted/disabled in the user interface. This system option defines whether complex promotions can be created and maintained. If the indicator is checked or set to Yes, then all promotion types are available. If the indicator is set to unchecked or set to No, then only simple items and simple hierarchy type promotions can be defined, and threshold and multi-buy should not appear in the promotions dialog.
This system option would be beneficial for those clients who choose to utilize only simple promotions. When indicator is unchecked, only promotion component type simple will appear to the user. If checked all promotion component types will exist.
Valid values: 0 - No (unchecked); 1 - Yes (checked)
Default value: 1 - Yes (checked)
This system option gives the user the option to select whether the item list should be exploded to the item level or left at item list level.
Valid values are:
Y - Yes/Checked. Two options are provided in the Item Level field: Item List and Item (when Item Type = Item List).
N - No/Unchecked. Item Level could only be Item List (when Item Type = Item List)
The default value is N/unchecked.
System Option name: RPM_SYSTEM_OPTIONS .PROMO_APPLY_ORDER
When RPM is installed and system options are saved, this field is restricted/disabled. This system-level indicator is used to assist in the determination of appropriate application order for promotions and components. It is used when higher-level rules and indicators cannot determine which promotion or component should be applied before another and only used for the following scenarios:
None of the components involved have a Fixed Price change type.
Both of the components or promotions have the same ordering indicator setting (either primary or both secondary) and one component has a change type of % Off and one has a change type of Amount Off. The system level indicator will determine, across the company, whether promotion components with a Change Type of % Off or Amount Off should be applied first in relation to the other Change Type. This indicator will only be used for determining application order between components with these two change types, as components with other change types will be governed by other rules.
If two promotions each have two components, and one of the promotions has two components with the preferred change type of amount off and the other promotion only has one component with the preferred change type of amount off, the promotion with two components with the preferred type of amount off is applied first.
The user will make a setting at the system level to specify whether percent off components will be applied before Amount Off components or vice versa. This is a setting that can be changed over time, and will be applied to situations at the time of component approval. However, it can only be updated when there are not any approved or active promotions in the system. If there are any approved or active promotions, this indicator is disabled. In the event a change is made to this system option setting, the change in ordering will not be applied to existing situations where multiple components are already approved. It will only be applied when new components are approved.
Valid values: % off; Amount off
Default value: Amount off
|
Note: This system option will only be used when selling retail calculations are compounded. The rules will not be used when the system option for overlapping simple promotions is set to non-compounding best deal. |
System Option name: RPM_SYSTEM_OPTIONS.CLEARANCE_PROMO_OVERLAP_IND
When checked, this field is restricted/disabled in the user interface. This system option defines whether or not an item/location can be on clearance and promotion at the same time. If the clearance/promotion overlap indicator is checked or Yes, the items that are on clearance will have the discount of the promotion applied to their clearance retail, not the regular price. If the promotion change type is set to Fixed Price, the item can only have the fixed price assigned that is lower than the clearance retail. If the clearance change takes place during the promotion then the promotional markdown will decrease when the clearance goes into effect. If the clearance/promotion overlap indicator is unchecked or No, clearance price changes cannot be submitted or approved where the effective date of the first markdown will fall on or after the start date or on or before the end date of an approved promotion, hence the clearance items cannot be promoted until the clearance resets. When this indicator is set to No, promotions cannot be submitted or approved where the item/locations currently exist on an active clearance or if the promotion start and end dates conflict with a pending approved clearance.
The Clearance/Promo Overlap Indicator is set to Yes. The user attempts to submit a promotion component that will result in the retail being negative, this will fail conflict checking processes. The approved Clearance exists for the same item/location as the promotion, therefore when both the clearance and the promotion component being submitted are applied; the retail will be less than $0.00 at some date and cause a conflict. This example illustrates that even with clearance/promotion overlap system capabilities, conflicts can be encountered.
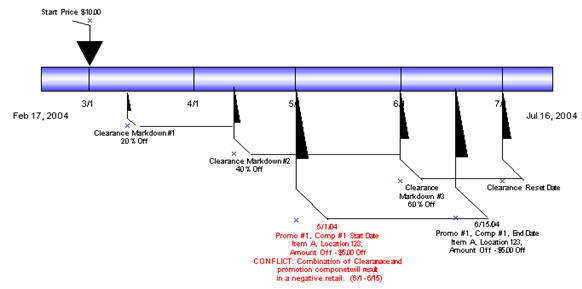
Clearance/Promo Overlap Indicator is set to Yes. The user attempts to submit a Fixed Price promotion component with an Apply to Type of Clearance and Regular that will result in the promotional retail being higher than the Clearance retail at some date. Approved Clearance exists for the same item/location that has a lower Clearance retail than the Fixed Price Promotional retail of the component being submitted.
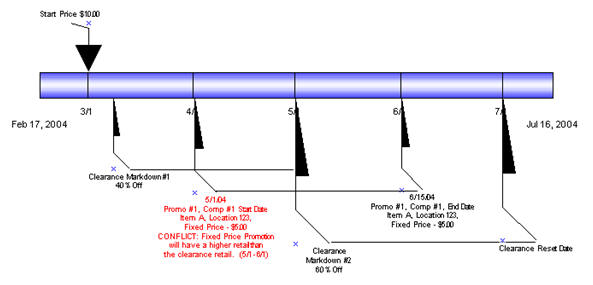
Clearance/Promo Overlap Indicator is set to No. User attempts to submit a promotion component with an Apply To Type of Clearance and Regular that will overlap dates with an existing approved Clearance for the same item/location fails Conflict Checking.

Valid values: 0 - No (unchecked); 1 - Yes (checked)
Default value: 1 - Yes (checked)
System option name: RPM_SYSTEMS_OPTIONS.CLEARANCE_RESET_INQUIRY_MAX
This system option limits the data that is displayed in the clearance reset inquiry list.
Business Example
The Maximum Search Results-Clearances reset inquiry system option is set to 20. A user searches for clearance resets within five departments and returns 80 clearance resets. RPM returns records only up to that established value and displays the following message:
"The number of records that matched your search criteria is greater than the allowed maximum and therefore not all records have been returned. Refine your search criteria to narrow the search so that all valid records can be presented."
The user can then narrow the search criteria down further to one or two departments to show all clearances.
Valid values: 1-999
Default value: 100
System option name: RPM_SYSTEM_OPTIONS.CONFLICT_HISTORY_DAYS_AFTER.
This system option defines the number of days after the vdate (current system date) that a pricing event is displayed to the user in the conflict review check screen.
Valid values: 1-99
Default value: 30
System option name: RPM_SYSTEM_OPTIONS.CONFLICT_HISTORY_DAYS_BEFORE.
This system option defines the number of days before the vdate (current system date) that a pricing event is displayed.
Valid values: 1-99
Default value: 30
System Option name: RPM_SYSTEM_OPTIONS .COST_CALCULATION_METHOD
The cost calculation indicator contains a drop down with the options: Average Location Cost and Highest Location Cost When zones are represented in a price event. This value is used to determine the cost for a zone. The cost is held at location level; therefore, either the highest cost across the locations in the zone or the average (non-zero) cost should be used.
In RPM, the cost calculation method system option is set to Average Location Cost.
A price change is created at the zone level; there are five locations at a cost of 10.00 for four locations and 12.00 for the remaining fifth location. The cost in the price change apply block user interface is illustrated as an average cost or an average of the five locations and is totaled from the FUTURE_COST table in RPM.
Valid values: 0 - Average Location Cost; 1 - Highest Location Cost
Default value: 0 - Average Location Cost
System Option name: RPM_SYSTEM_OPTIONS .DEFAULT_OUT_OF_STOCK_DAYS
This system option defines the number of days that should be added to an item clearance effective date in order to calculate the out of stock date. This default is only applied to generate the out of stock date when the clearance is first created. Existing out of stock values will be used for subsequent markdowns.
System Option name: RPM_SYSTEM_OPTIONS .DEFAULT_RESET_DATE
This system option defines whether a reset date should be defaulted when a clearance is created. When system option is set to No or unchecked, the reset date will appear NULL or blank in the create clearance dialog. However, the user can still manually enter a reset date. When the system option is set to Yes or checked, the reset date is defaulted to one day greater than the out of stock date, the user can edit or delete the defaulted date. Reset date will default one date per item/location.
The default out of stock system option is set to 30 and default reset date system option is checked. A user creates a department zone level clearance. The VDATE is 1/1/09; the effective date is 1/3/09. The reset will default with the date to one day greater than the out of stock date, 2/1/09.
Valid value: 1
Default value: NULL
System Option name: RPM_SYSTEM_OPTIONS.DISPLAY_OR_CONDITION
In the multi-buy promotion type, the user will be able to use both And/Or selections in both the buy and get lists. Example: Buy a sandwich or a wrap and chips and get a soft drink for 50 cents off or a cookie for $1.00 off. The option to select the OR condition is controlled by the DISPLAY_OR_CONDITION system option. If system option is checked, the system will display the AND and OR conditions in the user interface. The system will default to AND. If system option is unchecked, it will display only the AND condition in the multi-buy promotions user interface.
A multi-buy promotion is set up for the following scenario. In order to allow the OR condition the Display AND/OR Condition system option should be checked or Yes to add the OR condition to the multi-buy conjunction dropdown.
Buy a sandwich or a wrap and chips and get a soft drink for 50 cents off or a cookie for $1.00 off. The user would set up the above example in the following manner:
Buy List 1(sandwich) OR Buy List 2(wrap) AND Buy List 3(chips) for -à
Reward 1 (.50 cents off) OR Reward 2(cookie 1.00 off)
Valid values: 0 - No (unchecked); 1 - Yes (checked)
Default value: NULL
System Option name: RPM_SYSTEM_OPTIONS.DISPLAY_CONFILCTS_ONLY
When the system option is set for display conflicts only (the system option is checked), the record that caused the conflict is displayed in the lower portion of the Conflict Review List window, and no others.
When the system option for display conflicts only is unchecked and the days before/after are provided, RPM looks for all records, using the price event's effective date as the point to look forward and back. This returns all records within the window of time calculated.
Multiple records are displayed in the top portion of the Conflict Review List window so that, if one rule returns conflicts for multiple item/locations in a price event, all those conflicts are displayed. This is limited to 100 records maximum.
System Option name:
RPM_SYSTEM_OPTIONS. CONFLICT_HISTORY_DAYS_BEFORE
This option defines the number of days before an effective date that a pricing event appears in the conflict review window. It enables only when the Display Conflicts Only indicator is not checked.
Valid values: 0 - No (unchecked); 1 - Yes (checked)
Default value: NULL
System Option: RPM_SYSTEM_OPTIONS.CONFLICT_HISTORY_DAYS_AFTER
This option defines the number of days after an effective date that a pricing event appears in the conflict review window. It enables only when the Display Conflicts Only indicator is not checked.
Valid values: 0 - No (unchecked); 1 - Yes (checked)
Default value: NULL
System Option name: RPM_SYSTEM_OPTIONS.DYNAMIC_AREA_DIFF_IND
Within the Area differential pricing strategy, this system option controls the ability to modify a secondary zone retail price after a primary zone has been approved. If the checkbox is checked (Y), the batch program Merchandise Extract will create all records, both primary and secondary areas, in New status. If a proposed retail is not available for the primary area, the secondary records should be calculated using the basis retail of the primary area or competitor retail (whichever is lowest).The worksheet will dynamically update the secondary locations based on changes to the primary location and the user will be allowed to edit the secondary areas regardless of the status of the primary records. If the checkbox is not checked (N), the batch program Merchandise Extract will create secondary locations in pending status and the user will not be allowed to edit the secondary locations in the worksheet until the primary area has been approved.
This system option is also responsible for controlling the ability to layer competitive strategies onto an Area Differential Strategy. If the option is checked (Y) then a competitor can be added to the area differential strategy for the secondary zones and the suggested retail price will be the lower price of the two strategies Area Differential and Competitive. The competitor information setup will not be applied in the Price Change dialog when calculating the proposed retail for a secondary area. The competitor information will only be used in the Merchandise Extract batch job and worksheet functionality.
|
Note: The proposed retails are displayed based on the percent higher or lower for the secondary locations. |
Valid values: 0 - No (unchecked); 1 - Yes (checked)
Default value: 0 - No (unchecked)
System Option name: RPM_SYSTEM_OPTIONS. ZERO_CURR_ENDS_IN_DECS
When RPM is installed and system options are saved, this field is restricted/disabled. This value will be used in the Price Guides dialog when a currency is specified that does not contain digits following the decimal in the format. The number selected determines the number of digit fields that should be available in the Ends In definition area.
Valid value: 0-4
Default value: 0
System Option name: RPM_SYSTEM_OPTIONS .EVENT_ID_REQUIRED
When unchecked, this field is restricted/disabled in the user interface, since the restriction cannot be added after promotions have been created. If this value is set to Yes (checked), then when a promotion is created an Event ID MUST be assigned to the promotion and validation will occur in the promotions definition dialog. If the value is set to No (unchecked), then promotions can be created without tying them to Events.
Valid values: 0 - No (unchecked); 1 - Yes (checked)
Default value: 0 - No (unchecked)
System Option name: RPM_SYSTEM_OPTIONS.EXACT_DEAL_DATES
When checked, this field name restricted/disabled in the user interface. This option defines whether or not the dates of a deal associated with a vendor funded promotion must match exactly. If the indicator is set to Y, then only deals with the same begin and end dates as the promotion component being created will appear in the deal LOV in the vendor funded promotions dialog. In the event the indicator becomes selected or checked, it becomes disabled and cannot be modified or unchecked since the restriction cannot be added after promotions and deals have been associated.
If the Exact Deal/Funded Promotion Dates indicator is checked, the user creates a promotion with components start and end dates from 4/1/09 to 4/15/09. Any funding that is created for the component must fall within the promotion component start and end dates.
Valid values: 0 - No (unchecked); 1 - Yes (checked)
Default value: 0 - No (unchecked)
System Option name: RPM_SYSTEM_OPTIONS.FILTER_PRICE_CHANGE_RESULTS This system option will determine whether the Maintain Price Change/Clearance screen should go to the intermediate result screens or go directly to the Price Change/Clearance Editor screen.
Valid values: 0 - No (unchecked); 1 - Yes (checked)
Default value: Yes (checked)
System Option name: RPM_SYSTEM_OPTIONS. LOC_MOVE_PRICE_CHANGES
When a location move occurs, users can determine whether or not the moving location should inherit the new zone's retail based on the setting of this system option. When it is checked, the location will inherit the new zone's retails. If it is unchecked the zone will keep the existing retail as base. When the system option specifies that the location will automatically get the new zone's regular retail, the following will happen for the execution of the location move:
A location level price change will be created with a unique reason code that will identify that the price change was created because of a location move being scheduled. The retail price on this price change will be equal to the items basis zone level retail of the new zone, if there is one. If the zone is not part of the primary zone group, there will be no zone level retail for the item and a price change will not be created. If the current locations retail already equals the zone level retail of the new zone, a price change will still need to be created in case location or zone level retail changes during the execution of the location move (see Execution notes).
This price change will have an effective date equal to the location move execution date.
The price change will be created and will go through conflict checking. If it passes conflict checking, it will be set to approved status. If it fails conflict checking, the price change will still be created but left in worksheet status and reported to the user that it could not be approved.
When a price change is created in approved status, it will be reported to the store through the existing RIB message structure only if the new zones retail is different than the locations previous retail.
The price change will be editable through the user interface after the move is implemented.
Price change will have a system generated reason code.
Valid values: 0 - No (unchecked); 1 - Yes (checked)
Default value: No (unchecked)
System Option name:
RPM_SYSTEM_OPTIONS .LOCATION_MOVE_PROCESSING_DAYS
This field is used to control the number of days from the current date the user is allowed to enter a location move effective date. The minimum value allowed is 1. The earliest effective date that can be selected as the effective date is VDATE + LMLD (Location Move Lead Days). For example, if Location Move Lead Days is set to 2 days, then the earliest location move effective date that can be set up is 2 days from today.
If a location move in failed or approved status has a move date that has already passed the VDATE + LMLD (Location Move Lead Days), then the location move record is locked and no updates are allowed. When users try to update an expired location move record, error message appears, "Effective date of scheduled move cannot be less than today plus Location Move Lead Time." Updates to an expired location move record in any status is not allowed. The following is the illustration of the timeline:
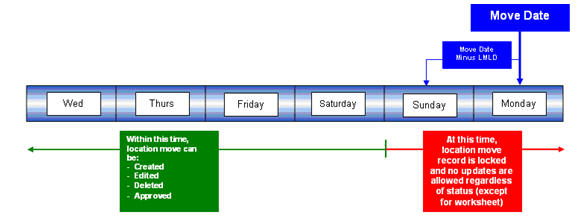
If a location move in worksheet status has a move date that has passed the lockout period (VDATE + LMLD), users get a warning message when trying to edit this record. The warning message displayed is "Date is out of range." Users are still able to make changes to this record but a valid new effective date needs to be re-entered before the batch can process it.
Valid values: 1-999
Default value: 1
System Option name: RPM_SYSTEM_OPTIONS .LOCATION_MOVE_PURGE_DAYS
This system option defines the number of days to wait when purging location move requests. The PurgeLocationMovesBatch program deletes location moves based on their effective date. Location moves are purged regardless of whether they have been run. Location moves are purged when their effective date is LOCATION_MOVE_PURGE_DAYS days in the past.
System Option name: RPM_SYSTEM_OPTIONS.MAX_BUY_LISTS
This system option gives the user the flexibility within the multi-buy promotion functionality to control the number of buy or reward lists within 1 promotion component.
The maximum number of buy lists system option is set to 4. Therefore, a multi-buy/meal deal promotion can be set up for 1 component.
Buy List 1 - Sandwiches
Buy List 2 - Soft Drink
Buy List 3 - Chips
Buy List 4 - Cookies
The addition of Buy list 5- Candy would trigger this message to the user: "The maximum number of Buy lists has been exceeded for a single promotion component. A new list cannot be added."
Valid Value: 1-999
Default value: 4
System Option name: RPM_SYSTEM_OPTIONS.MAX_PROMO_COMP_DETAIL
This system option can restrict the promotion component detail user interface to a predetermined limit. The option is named Maximum Number of Promotion Component Details per Promotion Component. Limitations on the number of promotion component details affect any possible way in which a user can create promotion component details. Item lists, parent, parent diff, or transaction-level item/location combinations that are exploded to the item/location level are controlled through the value set for this system option.
The default setting is 500.
System Option name: RPM_SYSTEM_OPTIONS.MAX_OVRLP_PROM_COMP_DETAIL. The maximum number of promotions that can be created per item/location is controlled by a system option. If this existing system option is enabled, Maximum number of overlapping promotion component details is enabled-and the number of promotions will not pertain to exclusions, only inclusive promotions. The number of exclusions will not be restricted.
|
Note: All promotion component types with the exception of Transaction Promotion Components are included in the overlapping component count for an item/location. |
If Maximum number of overlapping promotion component details is set to six per item/location, the user will be able to create six promotion components for an item/location, If the user attempts to create a seventh promotion component for the item/location, a conflict will be created. Exclusions will not count toward this maximum number of allowed promotions.
Valid values: 1-999
Default value: 4
System Option name: RPM_SYSTEM_OPTIONS.MAX_REWARD_LISTS
This system option allows the user to control the number of buy or get lists in the promotion component.
The maximum number of buy lists system option is set to 4. Therefore a multi-buy/meal deal promotion can be set up for 1 component.
Reward List 1 - Shoes
Reward List 2 - Shirts
Reward List 3 - Hats
Reward List 4 - Gloves
The addition of Reward list 5- Socks would trigger this message to the user: "The maximum number of Reward lists has been exceeded for a single promotion component. A new list cannot be added."
Valid values: 1-999
Default value: 4
System Option name: RPM_SYSTEM_OPTIONS.CLEARANCE_SEARCH_MAX
The following business example explains what happens if the number of rows for the search criteria exceeds the value entered in the new options.
The Maximum Search Results - Clearances system option is set to 20. A user searches for approved clearances within five departments and returns 80 clearances.RPM returns records only up to that established value and displays the following message:
"The number of records that matched your search criteria is greater than the allowed maximum and therefore not all records have been returned. Refine your search criteria to narrow the search so that all valid records can be presented."
The user can then narrow the search criteria down further to one or two departments to show all clearances.
Valid values: 1-999
Default value: 300
System Option name: RPM_SYSTEM_OPTIONS. PRICE_CHANGE_SEARCH_MAX
This option limits the data that is displayed in the price change list. When the user applies item/loc detail to a price change or clearance the system populates the detail table for that price event. In the case where there is a large number of item/locations that exceed the system option setting, on Apply, only a portion of the rows in the table will be populated. RPM returns records only up to that established value and displays a message when exceeded.
The Maximum Search Results - Price Changes system option is set to 20. A user searches for approved price changes within 5 departments and returns 80 price changes. RPM returns records only up to that established value and displays the following message:
"The number of records that matched your search criteria is greater than the allowed maximum and therefore not all records have been returned. Refine your search criteria to narrow the search so that all valid records can be presented."
The user can then narrow the search criteria down further to one or two departments to show all price changes.
Valid values: 1-999
Default value: 300
System Option name: RPM_SYSTEM_OPTIONS.PRICEINQUIRY_SEARCH_MAX
In the Price Inquiry screen, the user can search for a price of an item using the following criteria:
Merchandise hierarchy
Dept., Class, Subclass
Item, Item List, Price Event Item List
Parent, Parent/Diff, Transaction Item
Zone group
Zone
Location
Location (warehouse or store)
Date/Time
Based on the criteria entered the by the user, a listing of item/locations together with the specified prices at a given date are displayed. The resulting information will be available to the user for export. The system option will limit the data that is displayed in the price inquiry search results list. When the Price Inquiry is populated, only a portion of the results are displayed determined by the value set in the Maximum Search Results.
Price Inquiry system option. If the user wants to review the details for the remaining columns, which tend to be the performance intense fields, the user can do so by selecting rows and requesting the additional data.
Valid values: 1-999
Default value: 300
System Option name: RPM_SYSTEM_OPTIONS.WORKSHEET_FILTER_SEARCH_MAX
When the user enables the Minimize Worksheet Data Filter screen system option, this system option will also be enabled and will default a value of 300 which is the recommended setting. Maximum Worksheet Search result is the maximum number of rows that will be displayed based on the respective search criteria.
Based on the criteria entered by the user, the user will be limited to how many item/zone rows are returned when the user performs a search for the worksheet filter functionality.
If the user attempts to bring back too many rows, they will be stopped and given an error message.
Valid values: 1-999
Default value: null
System Option name: RPM_SYSTEM_OPTIONS.WORKSHEET_FILTER_SCREEN
When this system option is enabled, the user is given an optional workflow that includes worksheet data filtering. The user can enter the following search criteria to filter out the items to review.
Clearance Indicator
Primary Competitor Retail Change Indicator
Primary Competitor Alert
Comp A Alert
Cost Changes During Review Period
New Item Location Indicator
Item ID
Parent ID
Link Code
New Retail
Price Change Indicator
Reviewed
The user also can choose the skip filter option from the worksheet status screen to bypass the filtering. If this system option is disabled, the worksheet filter screen is not accessible.
Valid values: 0 - No (unchecked); 1 - Yes (checked)
Default value: 0 - No (unchecked)
System Option name: RPM_SYSTEM_OPTIONS .MULTI_ITEM_LOC_PROMO_IND
When checked, this field is restricted/disabled in the user interface. This system option defines whether an item/location can exist on more than one promotion and more than one component within the promotion. If the indicator is set to Yes (checked), an item can have its retail price affected by more than one promotion at a single time in a given location. If the indicator is set to No (unchecked), only one promotion or promotion component can exist at the same time for a given item/location.
Valid values: 0 - No (unchecked); 1 - Yes (checked)
Default value: No (unchecked)
System Option name: RPM_SYSTEM_OPTIONS REJECT_HOLD_DAYS_PC_CLEAR
This field defines the number of days after the effective date of a rejected price change or clearance when it should be purged from the system.
Valid values: 1- 999
Default values: 30
System Option name: RPM_SYSTEM_OPTIONS REJECT_HOLD_DAYS_PROMO
This field defines the number of days after the end date (or start date for promotions with no end date) of a rejected promotion when it should be purged from the system.
Valid values: 1-999
Default value: 30
System Option name: RPM_SYSTEM_OPTIONS .OPEN_ZONE_USE
When checked, this field is restricted/disabled in the UI. It defines whether different Zone Group types can be used in all the pricing dialogs or if the type of the Zone Group will limit where it can be used. For example, if set to No (unchecked), the zone group can only be used for its designated purpose; promotion zone groups can only be used to create promotions; price change zone groups can only be used to create regular price changes or used in strategies and clearance zone groups can only be used to create clearances or used in strategies. If this option is set to yes, it cannot be changed. Open Zone enables total flexibility in the use of Zone Groups. When the indicator is set to Yes, all zone group types can be used throughout the system's functionality. In addition, clearance zone groups cannot be used to define the pricing strategies of Margin, Competitive, Relationship, and Area Differential.
System Option name: RPM_SYSTEM_OPTIONS.PAST_MARKUP_EVENTS_DISPLAY_CNT
This system option defines the number of past markup impact events displayed for margin visibility.
Valid values: 1-10
Default value: 1
System Option name:
RPM_SYSTEM_OPTIONS .PRICE_CHANGE_PROCESSING_DAYS
This value represents the number of days required between the create date and the effective date. It does not determine the communication processes or timing but simply allows the retailer to ensure that price changes are created with enough advance timing that stores and other process areas can react accordingly. This value will be used in the price change and pricing worksheet dialogs. Security will permit certain users to violate this timeframe and create same day price changes or emergency price events. Therefore, zero is not permitted at the system level.
System Option name:
RPM_SYSTEM_OPTIONS .PRICE_CHANGE_PROMO_OVERLAP_IND
When checked, this field is restricted/disabled in the user interface. The field value indicates whether an item/location can have a price change occur during the middle of an active location. If the indicator is set to Yes (checked), then a price change can take effect during a promotion. If the indicator is set to no (unchecked), then a price change cannot be approved that would take effect during an approved promotion--and a promotion cannot be approved if its dates will overlap an approved price change. If this option is checked, it is recommended that promotion constraints be used to take advantage of the suggested new date functionality. If this functionality is not used, overlaps will be highlighted in conflict checking and changes would have to be entered again using the correct effective dates.
Valid values: 0 - No (unchecked); 1 - Yes (checked)
Default value: No (unchecked)
System Option name: RPM_SYSTEM_OPTIONS.DEFAULT_EFFECTIVE_DATE
This system options allows the user to select the default day of the week for prices to be effective in the worksheet detail dialog for the clearance pricing strategies. When a specified weekday is selected during price strategy create, it will default the effective date in the worksheet detail to the specified day after the review period (plus price change processing days)-ultimately causing the effective date in worksheets to default to the desired day of the week.
Consider the following clearance strategy example.
A client creates a clearance strategy with calendar starting on a Tuesday with a 2-day review period and 26 days between. In this example, it is assumed the batch is run Monday night. The batch will find calendars that have a review period that starts the next day.
Then the client creates a regular calendar starting on a Thursday with a two-day review period and five days between. The intention is to have all price events effective on the following Saturday after the review period. In this example it is assumed the batch is run Wednesday night. The batch will find calendars that have a review period that starts the next day.
Users review the clearance worksheet on Tuesday and Wednesday, and the margin worksheet on Thursday and Friday.
The default effective date functionality will allow the user to default the effective date to the Saturday after the review for both the clearance and margin strategies. When calculating the effective date for the worksheet detail dialog, this new functionality works as base does today in that effective date considers price change processing time when calculating a proper default effective date. In this example price change processing days is set to 1, and thus effective date would fall on the next day (Saturday).
The following business rules apply.
The user can select only one day of the week as a default per strategy.
Pricing Strategy Default Effective Day functionality applies to margin, clearance and competitive strategies only.
The resulting effective date appearing in the worksheet detail defaults to day of the week after the current review period plus price change processing days.
When the system option for the Pricing Strategy Default Effective Day is checked, it is not modifiable.
If two pricing strategies for the same item/location default to the same effective date, conflicts will occur.
Valid values: 0 - No (unchecked); 1 - Yes (checked)
Default value: NULL
System Option name: RPM_SYSTEM_OPTIONS. LOC_MOVE_PS_REVIEW_OVERLAP This field indicates if a location move is allowed to overlap the review period of a pricing strategy. When this system option is checked, it allows pricing strategies with review periods to overlap a location move date. The validation of any worksheet review period will be bypassed and a location move can be scheduled else if unchecked validation will not be bypassed.
If the system option indicates that a move cannot be scheduled if there will be a worksheet review period that overlaps the move date, and a pricing strategy exists with a calendar that will have a review period that overlaps the move date, the move will fail.
If the system option indicates that a move can be scheduled regardless of any worksheet review period, the validation for worksheet review period overlaps will be bypassed.
Valid values: 0 - No (unchecked); 1 - Yes (checked)
Default value: No (unchecked)
System Option name: RPM_SYSTEM_OPTIONS.PROMO_END_DATE_REQUIRED
When checked, this field is restricted/disabled.
Valid values: 0 - No (unchecked); 1 - Yes (checked)
Default values: 0 - No (unchecked)
System Option name: RPM_SYSTEM_OPTIONS .PROMOTION_HIST_MONTHS
This system option defines the number of months after a promotion is completed that is should be purged. This parameter is also used to purge cancelled promotions.
Valid values: 1- 999
Default value: 6
System Option name: RPM_SYSTEM_OPTIONS. LOC_MOVE_PROM_OVERLAP
This field indicates if a promotion will overlap a location move. If checked, the LOC_MOVE_PROM_OVERLAP_BEHAVIOR system option will enable and allow the user to control how the promotion should overlap the location move during scheduling and execution.
This option is within a dropdown box. If selected, it will have the following combinations enabled as options for the user to choose in a combination dropdown list. Only one of the following three options can be selected:
Location will keep running the old zones promotion. Location will not inherit any zone level promotion for the new zone if it overlaps the move date. Zone level promotions for the new zone that start before or on the location move date and end after or on the location move date and the promotion is currently pending, will have an exclusion created for the location that is being moved with a start date equal to the zone promotions start date and an end date equal to the zone promotions end date.
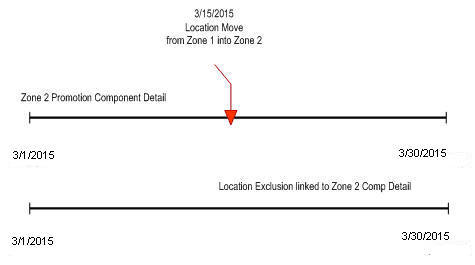
Zone level promotions for the new zone that start before the location move date and end after or on the location move date and the promotion is currently active, will have an exclusion created for the location that is being moved with a start date equal to the current date + 1 and an end date equal to the zone promotions end date.
Promotion will end at the location the evening before the location move date. Location inherits the new zone's promotion that overlaps the move date, but the promotion will only start on the location move date. Zone level promotions for the new zone that start before or on the location move date and end after or on the location move date will have an exception created for the location that is being moved with a start date equal to the move date and an end date equal to the zone promotion's component's end date.
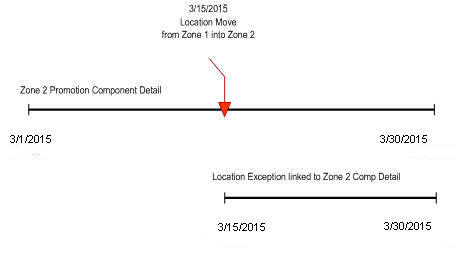
Location will not start the promotion if the zone promotion overlaps the move date. Location will inherit the new zone's promotion that overlaps the move date and will start the same day the zone level promotion starts or will start the day the move is scheduled if the zone level promotion is already active. Zone level promotions for the new zone that start before or on the location move date and end on or after the location move date will have an exception created for the location that is being moved with a start date equal to the zone promotion's start date or current date if the promotion is already active and an end date equal to the zone promotion's component's end date.
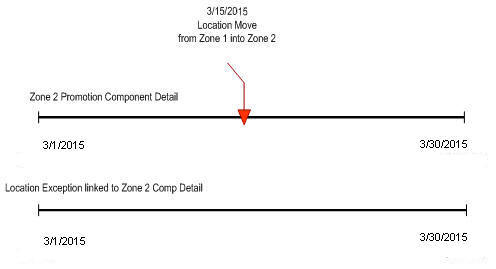
Valid values: 0 - No (unchecked); 1 - Yes (checked)
Default value: No (unchecked)
System Option name:
RPM_SYSTEM_OPTIONS.PROMOTION_SEARCH_MAX
This system option limits the data that is displayed when searching at promotion header level.
Business Example
The Maximum Search Results-Promotion search max system option is set to 20. A user searches for promotions within five departments and returns 80 promotions. RPM returns records only up to that established value and displays the following message:
"The number of records that matched your search criteria is greater than the allowed maximum and therefore not all records have been returned. Refine your search criteria to narrow the search so that all valid records can be presented."
The user can then narrow the search criteria down further to one or two departments to show all clearances.
Valid values: 1-999
Default value: 300
System Option name: RPM_SYSTEM_OPTIONS.CLEARANCE_HIST_MONTHS
Expired clearance records must be purged from the system in order to manage the size of the database. The field holds the number of months past a clearance reset date that should be purged. If a clearance is never reset it cannot be purged, as the item/location still exists as a clearance. In addition, any RPM_FUTURE_RETAIL records associated with a clearance will not be purged until the clearance is reset.
A clearance created prior to the VDATE is completed and now reset. This clearance would be purged with the execution of the clearance purge batch jobs.
A clearance is a candidate for purging if it has:
Completed all markdowns and has been reset.
Been cancelled.
Been deleted.
Two clearance purge programs are run together:
PurgeExpiredExecutedOrApprovedClearancesBatch purges expired executed and/or approved clearances.
PurgeUnusedAndAbandonedClearancesBatch purges unused and/or abandoned clearances.
Valid values: 1-999
Default value: 1 (month)
System Option name: RPM_SYSTEM_OPTIONS RECOGNIZE_WH_AS_LOCATIONS
When checked, this field is restricted/disabled. This system option controls whether warehouses will exist in RPM zones and assigned to regular and clearance price zones. They cannot be assigned to promotion price zones. When the system options is set to Yes, warehouses will appear in the Location LOVs and can be assigned to price zones, pricing strategies, and calendars. In addition, warehouse inventory will be taken into consideration when creating vendor funded markdowns and allows for the revaluation of inventory at a specific warehouse location. When the system option is set to No, warehouses are not available in RPM and will not appear in the Location LOVs. Stock on hand values will be zero and will not be calculated for warehouse locations when set to No..
Valid values: 0 - No (unchecked); 1 - Yes (checked)
Default value: Yes (checked)
System Option name: RPM_SYSTEM_OPTIONS SALES_CALCULATION_METHOD
The value specified is used by the merchandise extract to determine how to populate the Projected Sales column on the worksheet used together with Pricing Strategies. The Smoothed Average Calculation, which populates a table in RMS and is used by RPM to show the projected sales of an item for a time period representing a week. The intent of the smoothed average sales calculation is to represent on a weekly sales basis the number sales units sold at regular price and therefore not affected by a promotion or some sales anomaly.
If a pricing manager in RPM wants to see the sales impact of changing the retail price of table salt by .20 per container, then the unit sales should simply be those that occurred when the item was sold at its regular price and will assume that the change will not slow demand but simply increase sales dollars by .20 per unit. The smoothed average value serves to provide this information in lieu of a more accurate forecast.
Clients using RPM who do not have access to an accurate sales forecast or are not able to accurately represent the regular (non-promotional, non-seasonal) sales of an item but need to use the value in RPM to calculate the sales values in the application, can use the value provided by a program that runs in RMS and calculates a representative value for unit sales of an item per week. If the RPM_IND on SYSTEM_OPTIONS is set to Y, meaning the client is using RPM with RMS, the IF_RPM_SMOOTHED_AVG table will be populated with a sales value in units and a counter value for each item/location combination. The program looks at sales data from Sales Audit and pulls the unit sales values for days when only regular price sales were recorded. If promotional sales were found during the day we assume the unit sales for that day do not represent the typical regular price sales needed in the calculation. The goal is to represent only those sales that occurred at regular price and only on days when no other factors where involved. The sales unit's values for days when only regular price sales were recorded are pulled into the calculation.
Average Tolerance Percent is a value used to determine if a sales amount received falls within a reasonable range to be considered in the calculation. Values that fall outside the range would be considered outliers and are capped at the high or low of the range.
Max Counter Value provides a way to weight the existing sales value on the table against new values received. If the item has a relatively minimal seasonal swing this value can be set higher so the value will remain stable and takes many anomalies to move the value. If the item has a relatively strong seasonal swing the counter should be set to a lower number so that the value is more easily moved to reflect a trend or seasonal shift.
These values are defined in RMS on the Department Maintenance (dept) screen in the Max._Average Counter and Average Tolerance % fields. The values set by the user are store on the DEPS table in RMS and held in the following columns: AVG_TOLERANCE_PCT, MAX_AVG_COUNTER
Valid value: 1
Default value: 1
System Option name: RPM_SYSTEM_OPTIONS. SIM_IND
This field Indicates whether RPM is interfacing with SIM.
Note: The UI system option name is External Prices Allowed.
Valid values: 0 - No (unchecked); 1 - Yes (checked)
Default value: 0
System Option name: RPM_SYSTEM_OPTIONS. SIMPLE_PROMO_OVERLAP_RULE
This system option will determine the rules for handling two or more overlapping simple promotions. When the value is set in the system it will become restricted/disabled. DBA assistance will be required if the system option needs to be changed. Changing the value will impact new promotions or promotions that are unapproved maintained and reapproved. Changes to the value will not impact approved promotions.
See the Overlapping Promotions chapter for more information on Simple Promotion Overlap Rules.
This option allows the user to skip the conflict checking process during the price event Submit action. If this system option is checked, RPM does not perform the conflict checking process (and does not show conflicts, if there are any) when the user performs a price event Submit action.
The price event status is switched to Submit immediately. If this system option is unchecked, RPM runs the conflict checking process (and shows conflicts found) when the user performs the price event Submit action.
This option allows the user to skip the conflict checking process during complex promotion (multi-buy and threshold) approval and disapproval. When the user approves or unapproves a multi-buy or threshold promotion, RPM does not update the future retail table and does not perform conflict validation. RPM populates the payload tables, however, so that RPM can communicate the complex promotion to other systems (through RIB or the flat file extract, for example).
If this system option is selected, RPM does not perform conflict checking, and does not show any conflicts, when the user approves or unapproves a complex promotion. If this system option is not selected, RPM runs a complete conflict checking process and shows conflicts found when the user approves or unapproves a complex promotion.
Choosing this option can dramatically improve the performance of an approval of a large multi-buy or threshold promotion (for example, at department/zone level). You should consider the use of this option carefully, because some functionality is lost with this option. For example:
For overlapping promotions, an item/location in a complex promotion is not considered when validating overlapping promotion counts.
For price change promotion overlaps or clearance promotion overlaps, an item/location in a complex promotion is not considered when validating these types of overlapping.
Complex promotion information is not available in the future retail tables.
Deals cannot be attached to Complex promotions.
Apply To selection during promotion create will not be taken into consideration when applying the promotion details, system will assume Apply To Both Regular and Clearance.
For fixed price promotions, the rule that only one can exist for an item/location/date will not be enforced. For example you could have one fixed price simple promotion and one fixed price complex promotion for the same item/location on the same date.
Although this system option can be changed from one status to the other in the System Options Edit screen, changing this system option could produce unpredictable results when there are active or pending complex promotions.
System Option name: RPM_SYSTEM_OPTIONS. SYS_GEN_EXCLUSION_TOLERANCE
This system option will determine the percentage of transaction items on a price event that are allowed to error during conflict checking and still move forward with the approval process of the price event. The option can be found on the general tab under System Options; System-Generated Exclusions Tolerance %.
The tolerance setting will result in the percentage of transaction item exclusions created that the users will need to review and/or fix. The tolerance percent value will be set up as a system option that will be maintained by the retailer and can be updated as necessary. The default tolerance value will be set to 0%. The maximum tolerance value will be 25%.
If the tolerance percent value is exceeded during conflict checking the price event status will be set to worksheet and error details will be displayed for review by the users. The conflict check process verifies errors by item location; however, the tolerance will be measured based on transaction item only.
Business Examples
Tolerance quantity set to 10%, price event has 200 items, if conflict checking finds an error with a five transaction items at 100 locations the tolerance rule counts as five items against the 200-this scenario passes the tolerance rules resulting in an approved price event.
User creates promotion using an item list with 300 items; the system tolerance is set at 5%. If more than 15 transaction items return errors during conflict check the entire event remains in worksheet status and errors are displayed for review. If less than 15 transaction items return errors the approval process will move forward with exclusions automatically created for any items not passing conflict check.
System Option name: IS_UOM_UNIQUE and UOM_VALUE
This option provides the ability to inform RPM that there is only one unit of measure (UOM) to be used throughout RPM. This is particularly useful to improve performance when a fixed-price price event is created. Previously, when the user created a fixed-price price event without entering a new UOM, RPM validated that all item/locations affected by the price event had a unique UOM. For a very large price event (for example, a promotion at department/zone level), this validation process could cause performance degradation.
For this functionality, there are two system options:
A unique UOM must be used for all items (true/false)
The actual unique UOM that will be used for all items (for example, EACH, LBS)
The Unique UOM is used for all items system option informs RPM that there is only one UOM in RPM. When this system option is selected, RPM does not perform UOM validation when the user creates a fixed-price price event. If this system option is selected, the user must provide a valid UOM to be used throughout RPM as the value of the Unique UOM to be used for all items system option. These two system options are set during the RPM installation. For an existing RPM environment, these system options should be updated from the back end by the database administrator.
System Option name: RPM_SYSTEM_OPTIONS UPDATE_ITEM_ATTRIBUTES
This value is used by the merchandise extract to determine if the following attributes should be updated during each extract that occurs during a worksheet review period. If the Update Item Attributes indicator on System Options is set to Yes, then for every existing worksheet that is in New or Update status and is not ending today, the merchandise extract will update the following information on the worksheet. When this option is set to yes, worksheets will become dynamic and update daily for the entire review period. If this option is set to no, worksheets are static.
Primary Competitor Retail stores the retail price at the primary competitor's store. This value is stored in the COMP_PRICE_HIST table in RMS.
Primary Competitor Store is the Competitor Store associated with the Primary Competitor. This value is stored on the COMP_STORE table in RMS.
Primary Competitor Retail Selling UOM-Primary competitor's retail selling UOM for the item/primary competitor store.
Primary Competitor Retail Standard UOM-Primary competitor's retail UOM or the item/primary competitor store.
Primary Competitor Multi-Units-Multi-unit value at the primary competitor's store. This value is stored on the COMP_PRICE_HIST table in RMS.
Primary Competitor Multi-Unit Retail-Multi-unit retail at the primary competitor's store. This value is stored on the COMP_PRICE_HIST table in RMS.
Primary Competitor Multi-Unit Selling UOM-Primary competitor's retail multi-unit UOM for the item/primary competitor store.
Primary Competitor Boolean
Competitor A Retail-Competitor Store associated to Competitor A. This value is stored on the COMP_STORE table in RMS.
Competitor B Retail-Competitor Store associated to Competitor B. This value is stored on the COMP_STORE table in RMS.
Competitor C Retail-Competitor Store associated to Competitor C. This value is stored on the COMP_STORE table in RMS.
Competitor D Retail-Competitor Store associated to Competitor D. This value is stored on the COMP_STORE table in RMS.
Competitor E Retail-Competitor Store associated to Competitor E. This value is stored on the COMP_STORE table in RMS.
Competitor A Store-Retail price at Competitors A's store. This value is stored on the COMP_PRICE_HIST table is RMS.
Competitor B Store-Retail price at Competitors B's store. This value is stored on the COMP_PRICE_HIST table is RMS.
Competitor C Store-Retail price at Competitors C's store. This value is stored on the COMP_PRICE_HIST table is RMS.
Competitor D Store-Retail price at Competitors D's store. This value is stored on the COMP_PRICE_HIST table is RMS.
Competitor E Store-Retail price at Competitors E's store. This value is stored on the COMP_PRICE_HIST table is RMS.
Pending Cost Change Indicator-Indicates whether there is a pending cost change at any of the locations within the zone on today's date or after. The information on the FUTURE_COST table in RMS will be used to determine the value of this indicator.
Cost Change Alert-Alerts the user if there is a cost change in the x number of days that is set in the aggregation level details.
Current Cost-Current cost of the item/location (value stored on the FUTURE_COST table in RMS). If the location is a zone the cost calculation method from the System Configurations table will be used.
Basis Base Cost-Base cost of the item/supplier/country at the given location. This value is stored on the FUTURE_COST table in RMS.
Reference Warehouse Stock on Hand-Summary of the current stock on hand for the item from the reference warehouses on the strategy (or in the zone). This value is stored on the ITEM_LOC_SOH table in RMS.
Reference Warehouse on Order-Summary of the current on order for the item from the reference warehouses on the strategy (or in the zone). This value is stored on the ORDLOC table in RMS.
Location on Order-Summary of the current on order for the item from the reference stores on the strategy (or in the zone). This value is stored on the ORDLOC table in RMS.
Location Inventory-Summary of the current stock on hand for the item from the stores on the strategy (or in the zone). This value is stored on the ITEM_LOC_SOH table in RMS.
Valid values: 0 - No (unchecked); 1 - Yes (checked)
Default value: Yes (checked)
System Option name: RPM_SYSTEM_OPTIONS .ZONE_RANGING
If this system option is checked, when a user creates a price change/clearance/promotion at a level higher than transaction/location (tran/zone, parent/zone, parent/loc, and so on.) RPM will ensure there is at least one item/location ranged underneath the event. If there is not at least one, then the system will not allow the user to create the event.
If this system option is not checked, then ranging will only be performed on price changes/clearances/promotions created at the transaction/location level and ranging checks will not be performed on events created at any other higher level.
This system option is used so that when setting up promotions at zone and parent level, it checks that locations and parent items are ranged to zones and locations respectively to ensure that promotions are not set up on items where they are not sold.
Valid Value - 0 - No (unchecked), 1 - Yes (checked)
Default value: 1 - Yes (checked)
Unless otherwise noted, the following system defaults can be viewed and edited through RPM user interface.
System Default name: RPM_SYSTEM_OPTIONS_DEF.DEF_CURRENCY
This system default defines the currency code that should appear in each of the dialogs in the system where the user is required to enter a currency. This is used in the pricing guides and price zone dialogs. The values are selected from RMS CURRENCIES table.
Valid values: Currency value extracted from the CURRENCIES table located in RMS Default value: USD
System Default name: RPM_SYSTEM_OPTIONS_DEF.DEF_PRICE_CHANGE_DIFF_TYPE
This field holds a value for the desired default item level in the pricing event dialogs.
Valid values and default value are dependent on the Diff Values set up in RMS.
System Default name: RPM_SYSTEM_OPTIONS_DEF.DEF_WKSHT_PROMO_CONST_IND
This system default determines whether constraint checking is defaulted as checked in the worksheet dialog.
Valid values: 0 - No (unchecked); 1 - Yes (checked)
Default value: Yes (checked)
System Default name:
RPM_SYSTEM_OPTIONS_DEF .DEF_PRICE_CHANGE_ITEM_LEVEL
This is the default indicator to define the item level that will be displayed when the user enters the price change and clearance dialogs.
Valid values: 0 - Parent; 1- Parent/Diff; 2 - Single Item
Default value: 2 - Single Item.
RPM_SYSTEM_OPTIONS_DEF DEF_MAINT_MARGIN_METHOD
This field stores the default method type for the Maintain Margin price strategy.
Valid values: M - Market Basket Margin; C - Current Margin
Default value: NULL
System Default name: RPM_SYSTEM_OPTIONS_DEF DEF_PRICING_STRATEGY
This field holds a value for the default pricing strategy type that displays when the user creates new pricing strategies.
Valid values: 0 - Area Differential; 1 - Clearance; 2 - Competitive; 3 -Margin
Default value: 2 - Clearance
System Default name: RPM_SYSTEM_OPTIONS_DEF .DEF_PRICE_CHANGE_TYPE
This field holds a value for the default price change type that will be displayed when the user is creating either a price change or a promotion.
Valid values: 0 - Change by Percent; 1 - Change by Amount; 2 - Fixed Price
Default value: 1 - Change by Amount
Carefully consider system options setup and system rules.
The rationale for determining the Zone Group, Zone and Location groupings might be based on any factors of the retailer's choosing.
No promotions or pricing events should exist for a Zone prior to deletion.
If a location is not included in a member of the merchandise hierarchies' Primary Zone Groups, zone price is driven from the merchandise hierarchy member's Primary Zone Group's base zone.
A Primary Zone Group can be defined for members of each level of the merchandise hierarchy.
A new store is assigned to a zone in RPM through designation of its Pricing Store at the time of the location's creation.
An item should never be unique compared to the rest of its merchandise hierarchy level in terms of price zones. A category of items should follow the same zone group, ensuring manageability and accountability within the process.
It is an assumption that all locations are assigned to a zone group for regular pricing.
Security control should be considered around zonal maintenance to ensure that restrictions are put in place where necessary.
Security control around Emergency Price Change functionality should be limited.
The more granular level chosen to manage retail prices (for example, location traits, competitive pricing, demographics) the more complicated it can be. Managing numerous Zones can affect overall profit objectives.