| Oracle® Retail Merchandising System/Sales Audit Brazil Localization User Guide Release 14.1.1 E61282-01 |
|

 Previous |
 Next |
| Oracle® Retail Merchandising System/Sales Audit Brazil Localization User Guide Release 14.1.1 E61282-01 |
|
Previous |
Next |
This chapter describes the changes to the forms in the Foundation Data module of the Oracle Retail Merchandising System (RMS). The Organizational Hierarchy, Supplier and Partner Management, and Outside Locations functionalities have been changed to add new fiscal attributes. New localization system option parameters are also added.
The organizational hierarchy enables you to create the relationships that are necessary to support the operational structure of a company. You can create a preferred organizational structure to support consolidated reporting at various levels of the company. Also, you can assign responsibility for any level of the hierarchy to a person or persons in order to satisfy internal reporting requirements.
For Brazil localization, the following forms have been changed in the Foundation Data:
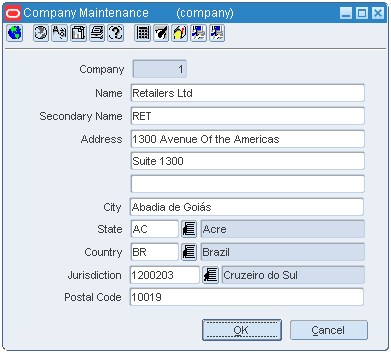
This section describes the updates in the Company Maintenance window to meet the Brazil market requirements.
To view the changes for the Company menu, do the following:
Navigate: From the RMS Start Menu, select Action, then select Organizational Hierarchy, or Action, then select Merchandise Hierarchy. The Organization Hierarchy Main Form or the Merchandise Hierarchy Main Form is displayed.
On the tree structure, select Company.
Click Edit or View. The Company Maintenance window appears.
|
Note: In View mode, the fields are disabled. This is applicable across all windows in RMS. |
The Company Maintenance window include the following two new fields:
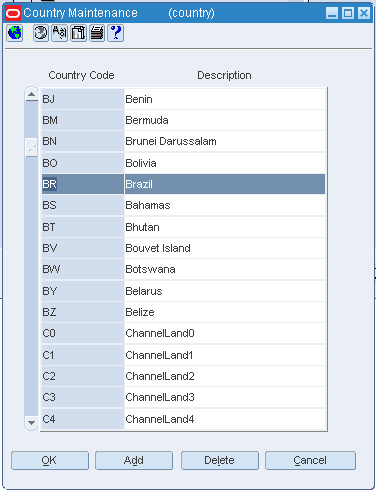
This section describes the updates in the Country Maintenance window to meet the Brazil market requirements.
To view the changes in the Country Maintenance window, do the following:
Navigate: From the RMS Start Menu, select Control, then select Setup. From the Setup, select Country.
In the Contents Of Country window, select View or Edit. The Country Maintenance window appears.
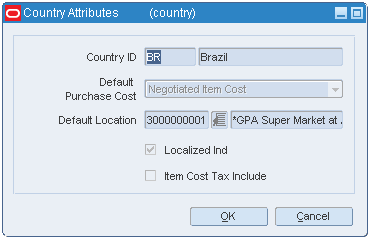
To set up attributes for a country, do the following:
In the Country Maintenance window, set the Country Code as BR. From the Options menu, select Attributes. The Country Attributes window opens.
For Brazil, the Default Purchase Cost LOV displays Negotiated Item Cost (NIC), and Base Cost (BC). This field defines the cost that has to be used to raise a PO.
A new check box, Localized Ind is introduced to indicate whether the Brazil patch is installed. If the Brazil patch is installed, this check box is automatically selected.
Select the Item Cost Tax Include check box to indicate that the item cost entered is inclusive of taxes (NIC) or exclusive of taxes (BC).
|
Note: In RMS, you can set the fiscal attributes for the country only once per installation. |
To view and set the updates in the Localization Flexible Attributes form, do the following:
In the Country Maintenance window, select a country. From the Options menu, select Fiscal Attributes. The Localization Flexible Attributes window appears.
The Country Attributes group displays the fiscal country and code. From the Fiscal Country LOV, select the country. The corresponding fiscal code is displayed.
Click OK to exit the window.
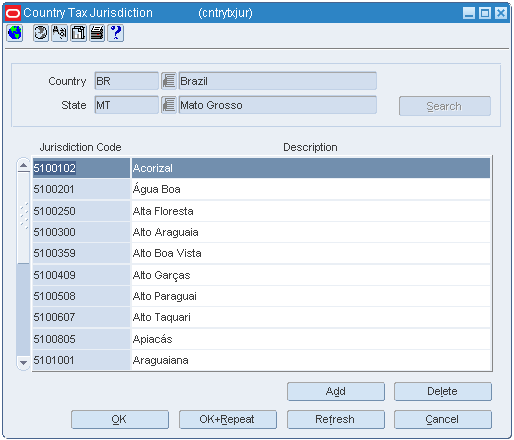
RMS has a new Country Tax Jurisdiction form that enables you to set up tax jurisdictions. It captures the country code, tax/legal jurisdiction code and a description. In Brazil tax rates vary from city to city. The Country Jurisdiction window helps in specifying the tax/legal jurisdiction code, and description. The taxes that are applicable to any location is decided based on the jurisdiction code, and the description provided in the Country Tax Jurisdiction form.
To view the jurisdiction code for the country, do the following:
Navigate: From the RMS Start Menu, select Control, then select Setup. From Setup, select Country Tax Jurisdiction.
In the Contents of Country Tax Jurisdiction, click View. The Country Tax Jurisdiction window appears.
In the Country Jurisdiction window, select the Country and State from the LOV. Click Search.
You can view the Jurisdiction Code, and Description for the selected country and state.
Click OK to exit the Country Tax Jurisdiction window.
To add a jurisdiction code, do the following:
Navigate: From the RMS Start Menu, select Control, then select Setup. From Setup, select Country Tax Jurisdiction.
In the Contents Of Country Tax Jurisdiction, click Edit. The Country Tax Jurisdiction window appears.
In the Country Jurisdiction window, select the Country and State from the LOV.
Click Add. A highlighted blank row is displayed. Enter the Jurisdiction Code and Description for the selected country and state.
Click OK to exit the window.
|
Note: The application does not allow you to delete a jurisdiction code if it is associated with any entity. |
To delete a jurisdiction code, do the following:
Navigate: From the RMS Start Menu, select Control, then select Setup. From Setup, select Country Tax Jurisdiction.
In the Contents of Country Tax Jurisdiction, click Edit. The Country Tax Jurisdiction window appears.
In the Country Jurisdiction window, select the Country and State from the LOV.
Select the record, and click Delete. A confirmation message appears.
Click Yes. The selected Jurisdiction Code and Description are deleted.
Click OK to exit from the window.
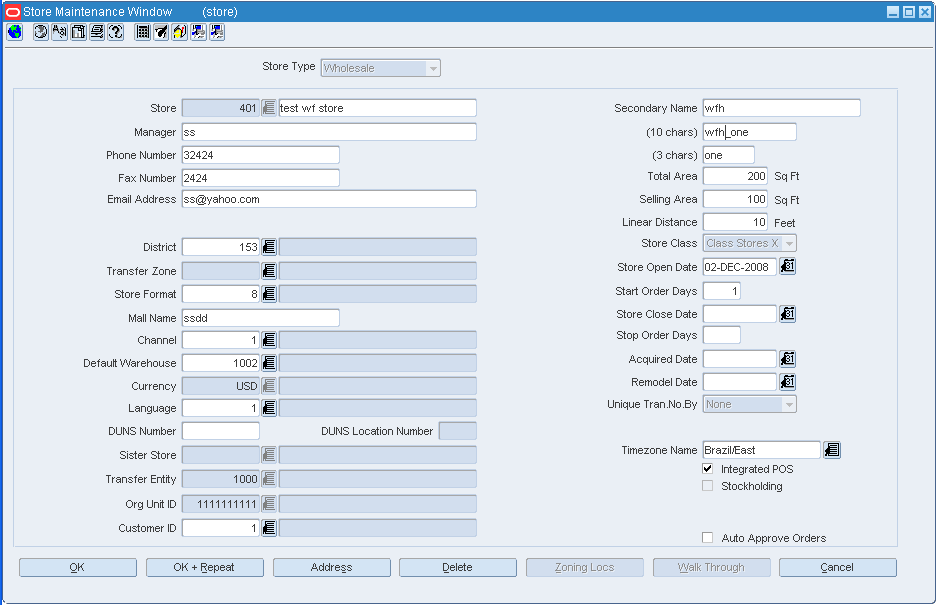
This section describes the updates in the Store Maintenance window to meet the Brazil market requirements.
To view/edit the changes made to the Store Maintenance window, do the following:
Navigate: From the RMS Start Menu, select Action, then select Organizational Hierarchy. The Organization Hierarchy Main Window is displayed.
On the tree structure, select Store.
Click View or Edit. The Store Maintenance window appears.
A new field called Secondary Name has been added. Enter the secondary name of the store here.
Click Address on the Store Maintenance window. A new column called Jurisdiction has been added. This column displays the identification number associated with the tax jurisdiction of the country-state relationship. In this Address window, you can enter multiple addresses for the store.
A new option called Fiscal Attributes has been introduced in the Options menu of the Store Maintenance window. The fiscal attributes window captures the fiscal attributes such as address, and other attributes such as CNPJ/CPF number.
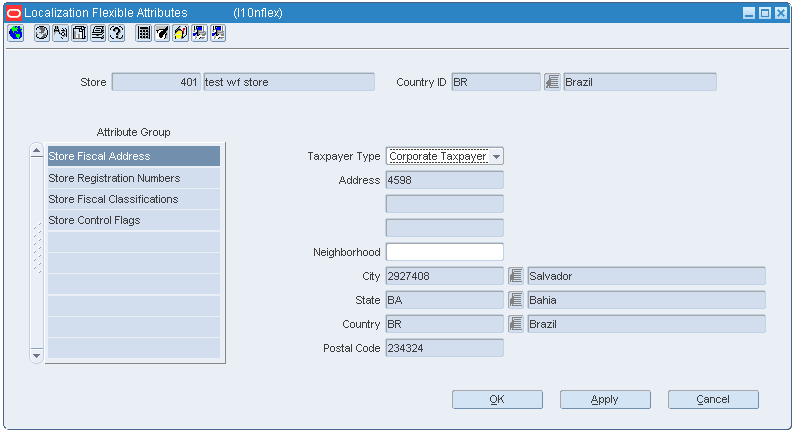
In the Store Maintenance window, from the Options menu, select Fiscal Attributes. The Localization Flexible Attributes window appears.
To edit/view the fiscal attributes of the store, do the following;
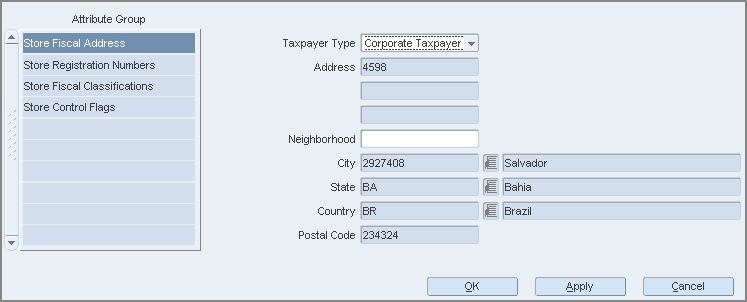
In the Localization Flexible Attributes window, click Store Fiscal Address to edit/view the primary address of the selected store.
|
Note: In View mode, the fields are disabled. |
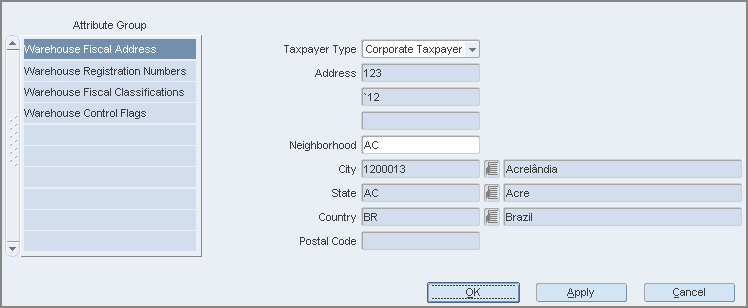
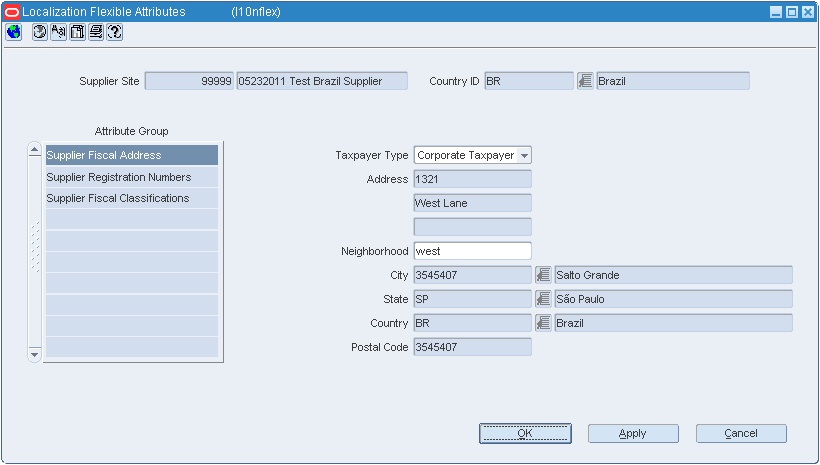
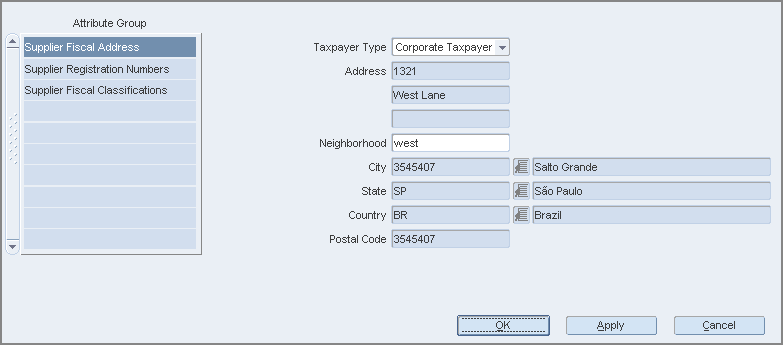
Set the Taxpayer Type to be Corporate Taxpayer. The other option available is Individual Taxpayer.
Enter the Jurisdiction code in the City field.
Click Apply to save the changes.
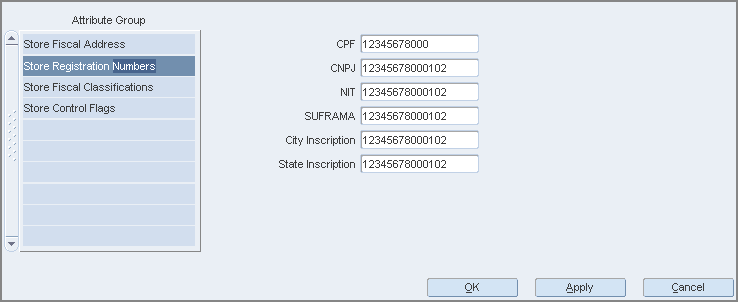
Click Store Registration Numbers to edit/view the following attributes of the store:
CPF – The federal taxpayer number issued by the Brazilian Government to a person. CPF is the short form for Cadastro de Pessoa Física.
CNPJ – Federal taxpayer number issued by the Brazilian Government to a company. CNPJ is the short form for Cadastro Nacional de Pessoas Jurídicas.
NIT – The worker identification number, also know as PIS number is used for the partner master data if the partner is an individual taxpayer and it is ISS contributor.
SUFRAMA – Registration code for the government organ (called SUFRAMA) responsible for the free zone of Manaus
City Inscription – Registration number assigned by a City Municipal Authority
State Inscription – Registration number assigned by the State
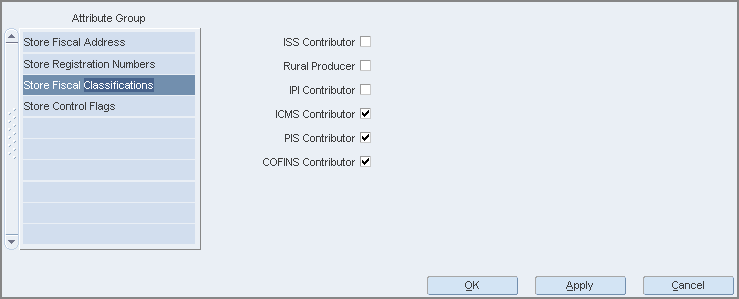
Click Store Fiscal Classifications. The following check boxes appear:
ISS Contributor – Select this check box if the store is a contributor of the Imposto sobre Serviço (ISS). This is the city tax for services sales.
Rural Producer – Select this check box if the store is a rural producer.
IPI Contributor – Select this check box if the store is a contributor of the Imposto sobre Produtos Industrializados (IPI). This is the federal tax.
ICMS Contributor – Select this check box if the store is a contributor of the Imposto sobre Circulação de Mercadorias e prestação de Serviços (ICMS). ICMS is a state tax.
PIS Contributor – Select this check box if the store is a contributor of the Programa de Integração Social (PIS). This is also a federal tax.
COFINS Contributor – Select this check box if the store is a contributor of the Contribuição para Financiamento da Seguridade Social (COFINS).
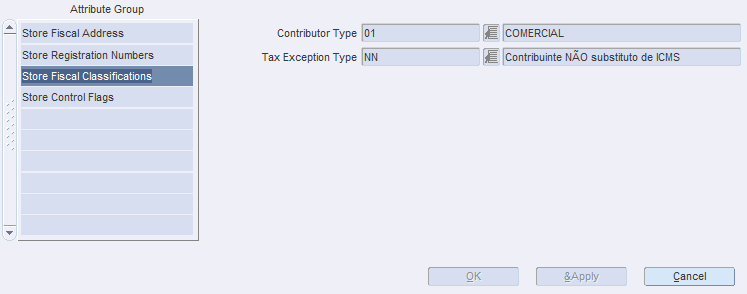
Click Store Fiscal Classifications. The following check boxes are displayed:
Contributor Type: This is the specific classification code provided by Synchro Tax Engine (LOV).
Tax Exception Type: This is the second level of tax classification code provided by Synchro Tax Engine (LOV).
|
Note: Fiscal classification attributes for store may vary depending on the Tax Engine installed. |
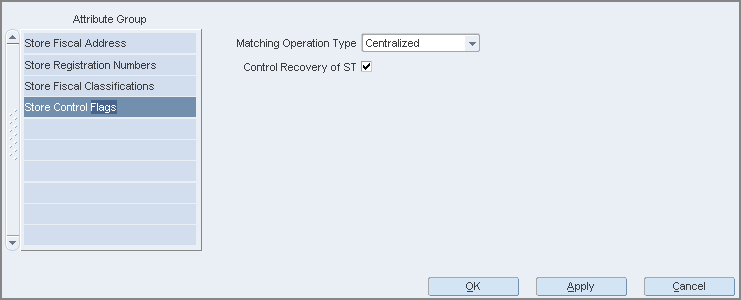
Click Store Control Flags. The following field and check box appear:
The Matching Operation Type list is displayed. In Edit mode, two options are displayed: Centralized or De-centralized.
Select the Control Recovery of ST check box to indicate that the store has control on the recovery of ICMS-ST. ST is the short form of Substituição Tributária.
The Tributary Substitution is the regime in which the responsibility for the tax payment is attributed to a single taxpayer in the commercial chain. This taxpayer is called the Substitute. The taxpayer at the receiving side of the operation with the tax already collected is called Substituted.
For inter-state operations, the rule for tax collection and application follows the legislation of the destination state.
|
Note: The Tributary Substitution feature has been introduced in Warehouse, Supplier, Partners and Outside Locations. |
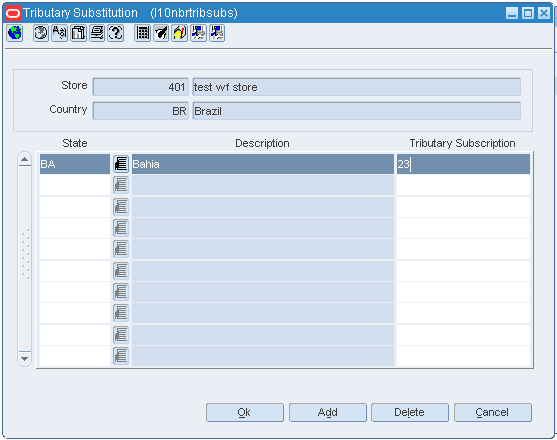
In the Localization Flexible Attributes of the Store, from the Options menu, select Tributary Substitution. The Tributary Substitution window appears.
The Tributary Substitution window displays the state, description and tributary substitution of the store.
To add a Tributary Substitution to the store, do the following:
Click Add to include a Tributary Substitution record for the store.
A row is highlighted. Select the values from the LOV.
Click OK. The record is added to the store.
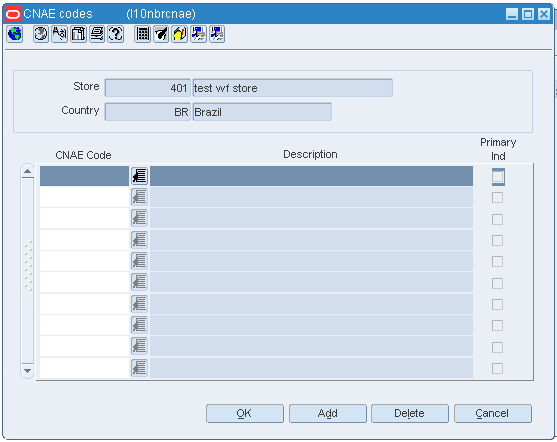
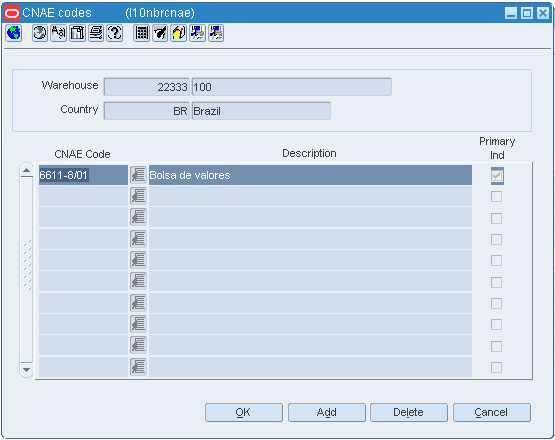
The CNAE Codes displays the National Code of Economic Activity in Brazil. You can assign more than one CNAE code for the same entity.
|
Note: The CNAE Codes feature has been introduced in Warehouse, Supplier, Partners and Outside Locations. |
In the Localization Flexible Attributes window of the Store, from the Options menu, select CNAE Codes. The CNAE Codes window appears.
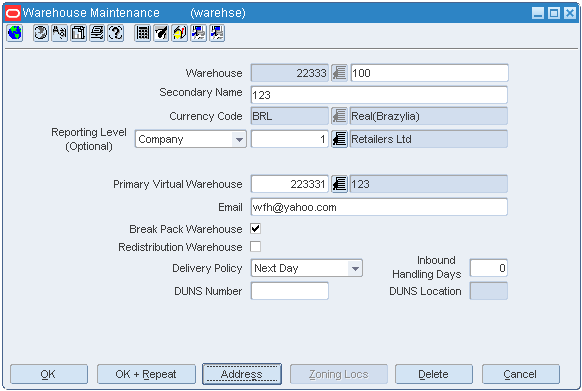
The Warehouse Maintenance window has been changed to suit Brazilian market requirements.
To view the changes made to the Warehouse Maintenance window, do the following:
Navigate: From the RMS Start Menu, select Action, then select Organizational Hierarchy. The Organization Hierarchy Main Window is displayed.
On the tree structure, select Warehouse.
Click Edit/View. The Warehouse Maintenance window appears.
|
Note: In View mode, the fields are disabled. This is applicable across all windows in RMS. |
A new field called Secondary Name has been added. Enter the secondary name of the warehouse here.
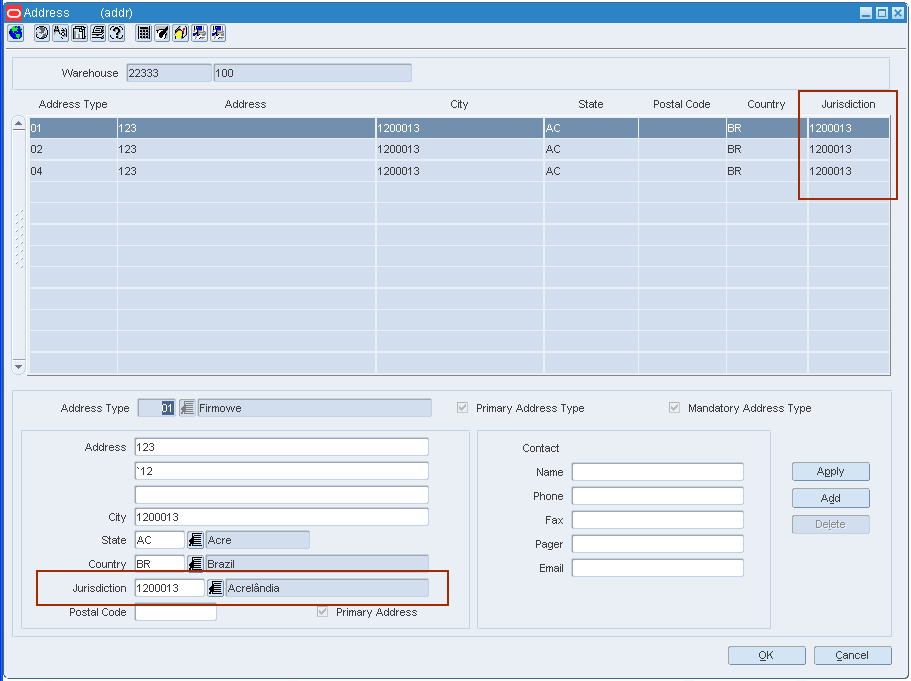
Click Address on the Warehouse Maintenance window. A new column called Jurisdiction has been added to the Address window. This column displays the jurisdiction code depending on the given state, country or state/country combination.
A new menu option called Fiscal Attributes has been introduced in the Warehouse Maintenance window. The fiscal attributes window captures the fiscal attributes such as address, and other attributes such as CNPJ/CPF number.
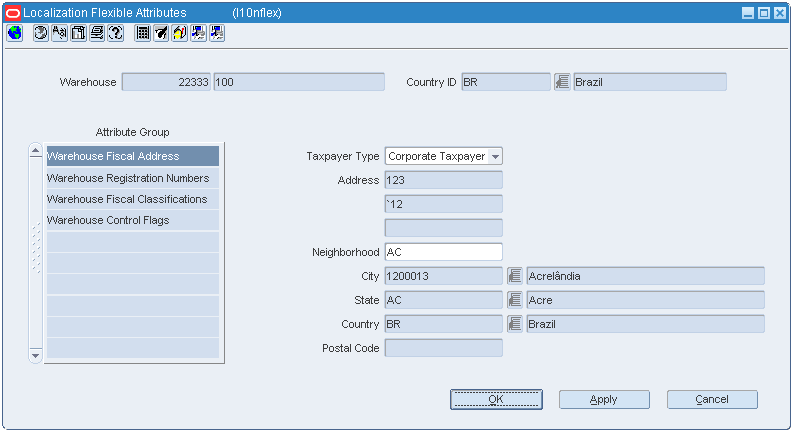
In the Warehouse Maintenance window, from the Options menu, select Fiscal Attributes. The Localization Flexible Attributes window appears.
In the Localization Flexible Attributes window, click Warehouse Fiscal Address to edit/view the address of the selected warehouse.
|
Note: In View mode, the fields are disabled. |
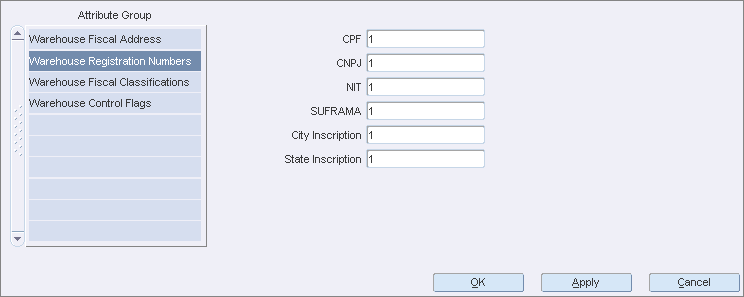
Click Warehouse Registration Numbers to edit/view the following attributes of the warehouse:
CPF – The federal taxpayer number issued by the Brazilian Government to a person. CPF is the short form for Cadastro de Pessoa Física.
CNPJ – Federal taxpayer number issued by the Brazilian Government to a company. CNPJ is the short form for Cadastro Nacional de Pessoas Jurídicas.
NIT – This is also knows as PIS number, and is used for the partner master data if the partner is an individual taxpayer and is an ISS contributor.
SUFRAMA – Registration code for the government organ (called SUFRAMA) responsible for the free zone of Manaus.
City Inscription – Registration number assigned to the warehouse by a City Municipal Authority
State Inscription – Registration number given to the warehouse by the State
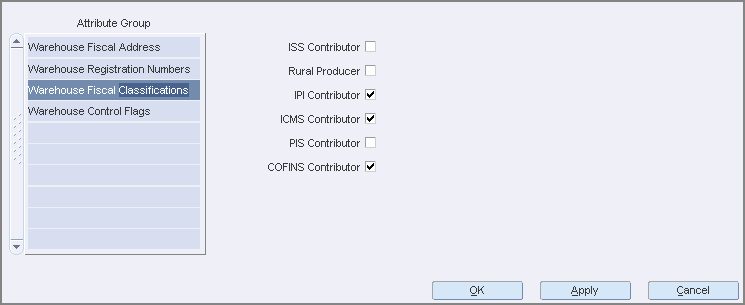
Click Warehouse Fiscal Classifications. The following check boxes are displayed:
ISS Contributor – Select this check box if the warehouse is a contributor of ISS. This is the city tax for services sales.
Rural Producer – Select this check box if the warehouse is a rural producer.
IPI Contributor – Select this check box if the warehouse is a contributor of IPI. This is the federal tax.
ICMS Contributor – Select this check box if the warehouse is a contributor of ICMS. ICMS is a state tax.
PIS Contributor – Select this check box if the warehouse is a contributor of PIS. This is also a federal tax.
COFINS Contributor – Select this check box if the warehouse is a contributor of COFINS.
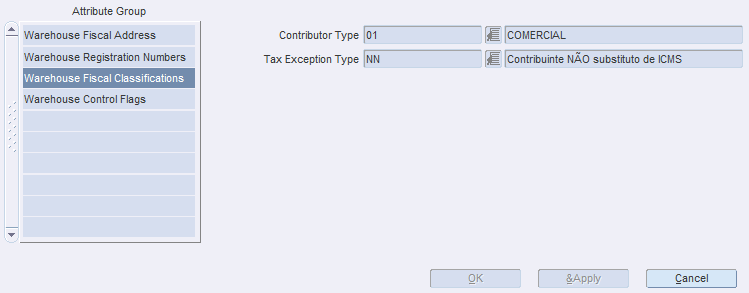
Click Warehouse Fiscal Classifications. The following check boxes are displayed:
Contributor Type: This is the specific classification code provided by Synchro Tax Engine (LOV).
Tax Exception Type: This is the second level of tax classification code provided by Synchro Tax Engine (LOV).
|
Note: Fiscal classification attributes for warehouse may vary depending on the Tax Engine installed. |
Click Warehouse Control Flags. The Matching Operation Type list, and a check box for Control Recovery of ST is present.
In the Matching Operation Type list, select Decentralized or Centralized based on the type of operation. Select the Control Recovery of ST check box to indicate that the location has control on the recovery of the ICMS-ST.
Click OK to exit the window.
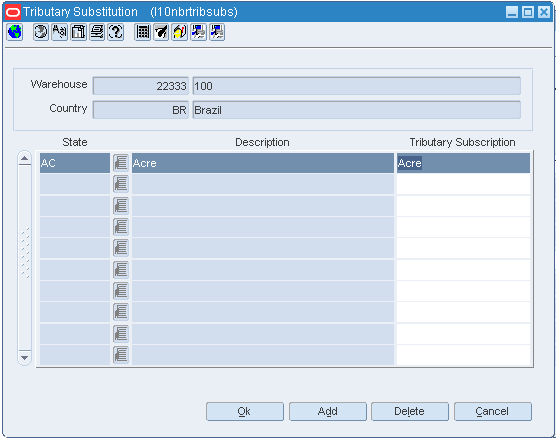
In the Localization Flexible Attributes of the Warehouse, from the Options menu, select Tributary Substitution. The Tributary Substitution window opens.
The Tributary Substitution window displays the state, description and tributary substitution of the warehouse.
To add a record to the warehouse, do the following:
Click Add to include a Tributary Substitution record for the warehouse.
A row is highlighted. Select the values from the LOV.
Click OK. The record is added to the warehouse.
To delete a record for the warehouse, do the following:
Select the record that you want to delete from the Tributary Substitution window.
Click Delete. A confirmation message appears.
Click Yes to delete the record.
In the Localization Flexible Attributes window of the warehouse, from the Options menu, select CNAE Codes. The CNAE Codes window appears.
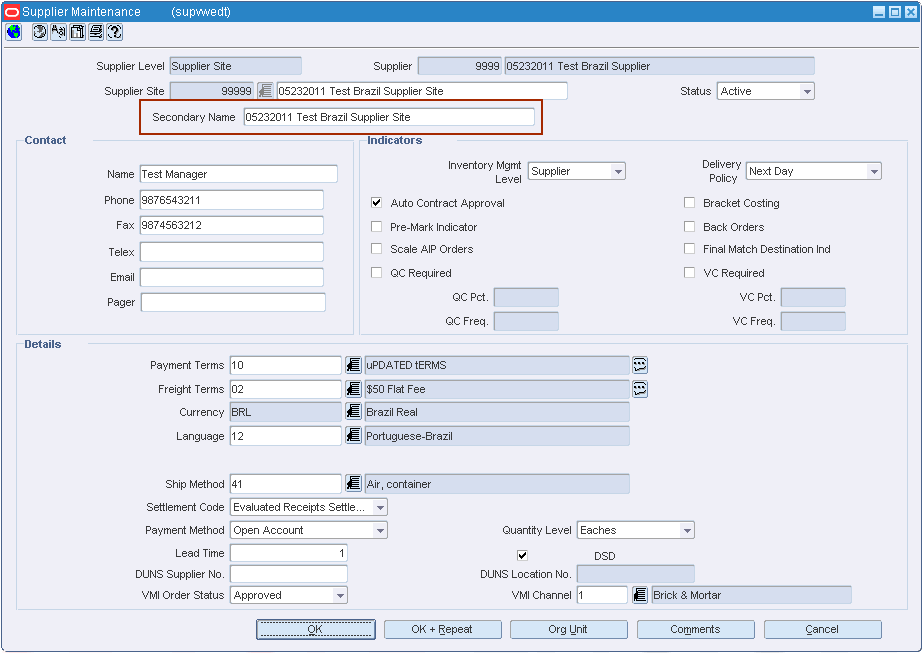
The Supplier Maintenance window has been changed to suit Brazilian market requirements.
Navigate: From the RMS Start Menu, select Control, then Supplier.
In the Contents Of Supplier window, select Maintenance. The Supplier Search window appears.
Search for and retrieve a Supplier in Edit mode. The Supplier Maintenance window appears.
A new field – Secondary Name has been added. Enter the secondary address of the supplier.
The Supplier Maintenance form includes a new Fiscal Attributes menu option. The fiscal attributes window captures the fiscal attributes such as address, and other attributes such as CNPJ/CPF number. The CNPJ code can be changed only by an authorized user and no receiving or cost complement can be made during this change. Additionally, the existing VAT region field on supplier maintenance window has been made non-mandatory when the default tax option is GTAX.
|
Note: The fiscal attributes window of the Supplier Site window is the same as the Supplier Maintenance window. However, the values of the Supplier Site may be different from that of the Supplier. |
In the Supplier Maintenance window, from the Options menu, select Fiscal Attributes. The Localization Flexible Attributes window appears.
In the Localization Flexible Attributes window, click Supplier Fiscal Address to view the address of the selected supplier.
|
Note: In View mode, the fields are disabled. |
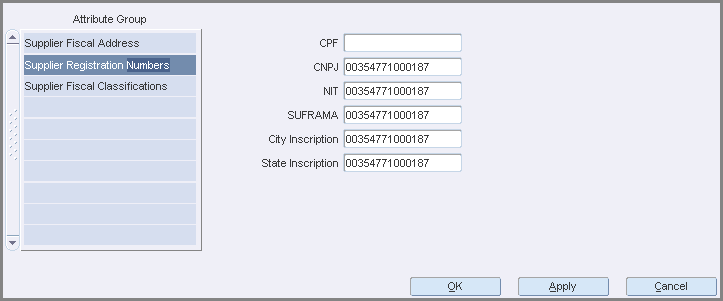
Click Supplier Registration Numbers to view the following attributes of the supplier:
CPF – The federal taxpayer number issued by the Brazilian Government to a person. CPF is the short form for Cadastro de Pessoa Física.
CNPJ – Federal taxpayer number issued by the Brazilian Government to a company. CNPJ is the short form for Cadastro Nacional de Pessoas Jurídicas.
NIT – This is also know as PIS number is used for the Partner master data if the partner is an individual taxpayer and it is ISS contributor
SUFRAMA – Registration code for the government organ (called SUFRAMA) responsible for the free zone of Manaus
City Inscription – Registration number assigned to the supplier by a City Municipal Authority
State Inscription – Registration number assigned to the supplier by the State
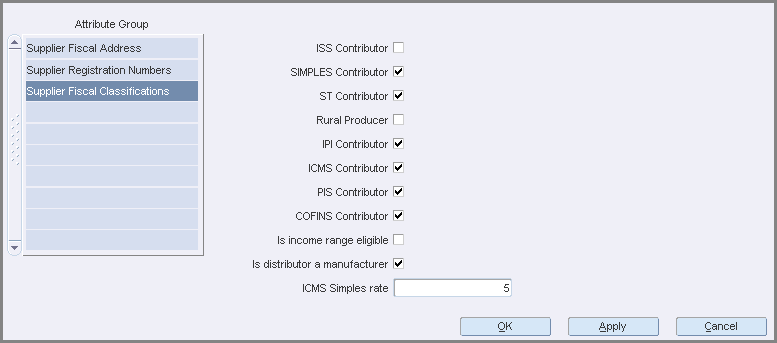
Click Supplier Fiscal Classifications. The following check boxes are present:
ISS Contributor – Select this check box if the supplier is a contributor of ISS. This is the city tax for services sales.
SIMPLES Contributor – Select this check box to indicate that the supplier would participate in the Simplified Tax Program of the Brazilian Government. This is needed to determine the rate of ICMS in tax rules.
ST Contributor – Select this check box if the supplier is a contributor of ICMS-ST.
Rural Producer – If the supplier is a rural producer, select this check box.
IPI Contributor – Select this check box if the supplier is a contributor of IPI. This is the federal tax.
ICMS Contributor – Select this check box if the supplier is a contributor of ICMS. ICMS is a state tax.
PIS Contributor – Select this check box if the supplier is a contributor of the PIS. This is also a federal tax.
COFINS Contributor – Select this check box if the supplier is a contributor of the COFINS.
Is income range eligible – Select this check box if the supplier's income is eligible for tax benefits.
|
Note: In certain states of Brazil, the government has defined a range of income for suppliers. If the supplier is within that specific range, all products supplied by them will have a reduction in the base of calculation for ICMS. |
Is distributor a manufacturer – Select this check box if the supplier is a manufacturer.
|
Note: This is applicable to companies which are into both manufacturing and distribution. In that case, the branches classified as distributors or retailers have similar treatment for tax calculation as the manufacturer. |
ICMS Simples rate – Enter the SIMPLES rate in case the supplier is a SIMPLES contributor.
|
Note: Since there is no tax presented in the NF, it is necessary to know the rate of ICMS the supplier has paid as the rate may vary depending on the size and annual income range of that supplier. |
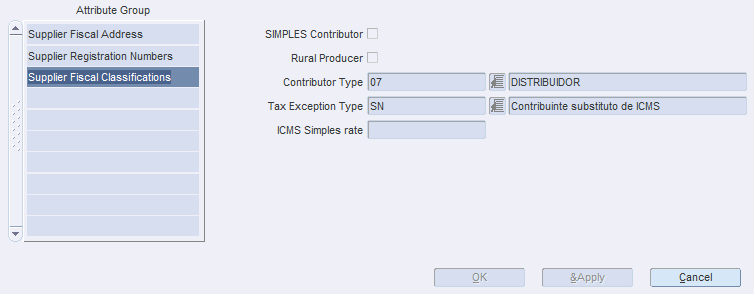
Click Supplier Fiscal Classifications. The following check boxes are displayed:
SIMPLES Contributor: Inform if the supplier is eligible for the SIMPLES tax.
Rural Producer: Inform if the supplier is fiscally classified as Rural Producer.
Contributor Type: This is the specific classification code provided by Synchro Tax Engine (LOV).
Tax Exception Type: This is the second level of tax classification code provided by Synchro Tax Engine (LOV).
ICMS Simples Rate: Inform if the Simples Contributor flag is marked. This should have the SIMPLES rate applicable to the supplier.
|
Note: Fiscal classification attributes for supplier may vary depending on the Tax Engine installed. |
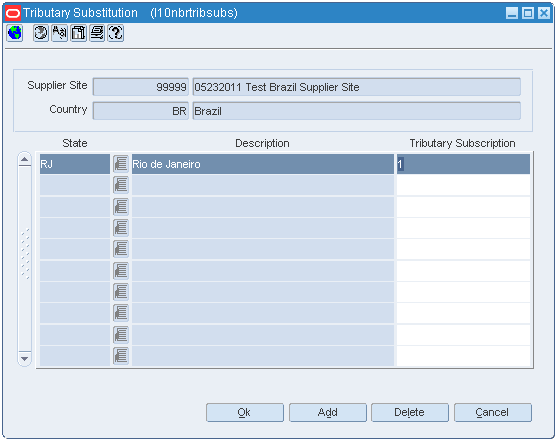
In the Localization Flexible Attributes of the Supplier, from the Options menu, select Tributary Susbstitution. The Tributary Substitution window appears.
The Tributary Substitution window displays the State, Description, and the Tributary Substitution of the supplier.
To add a record to the supplier, do the following:
Click Add to include a Tributary Substitution record for the supplier.
A row is highlighted. Select from values from the LOV.
Click OK. The record is added to the supplier.
To delete a record for the supplier, do the following:
Select the record that you want to delete from the Tributary Substitution window.
Click Delete. A confirmation message appears.
Click Yes to delete the record.
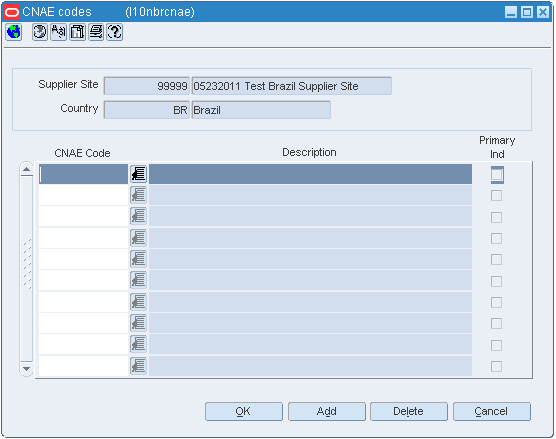
The CNAE Codes displays the National Code of Economic Activity in Brazil. You can assign more than one CNAE code for the same entity.
In the Localization Flexible Attributes window of the Supplier, from the Options menu, select CNAE Codes. The CNAE Codes window appears.
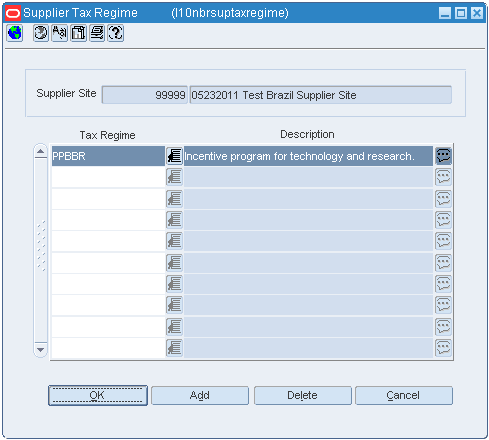
There are various types of tax regimes defined at state level in Brazil. These regimes are eligible for supplier reductions on tax basis. TaxWeb Tax Rules identifies each regime and applies the correct tax calculation if the supplier is classified in any of them. It is possible that one supplier may be classified in more than one regime, but depending on the state the transaction is being made, the regime applicable to that state is calculated.
In the Localization Flexible Attributes window of the Supplier, from the Options menu, select Supplier Tax Regime. The Supplier Tax Regime window appears.
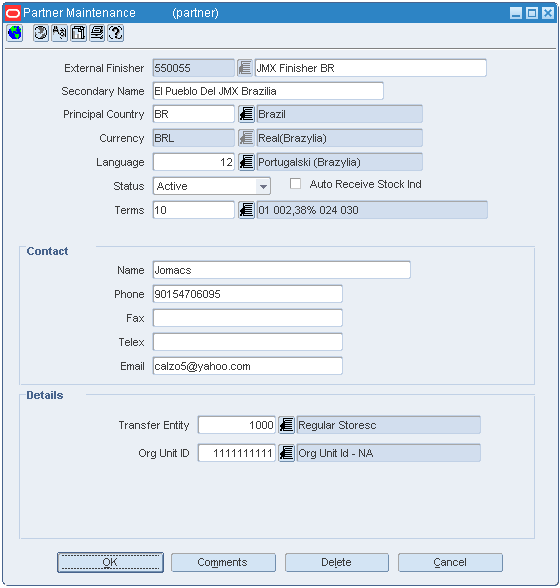
The Partner Maintenance window has been changed to suit Brazilian market requirements.
Navigate: From the RMS Start Menu, select Control, then Partner. The Partner Find window appears.
Search for and retrieve a partner in Edit mode. The Partner Maintenance window appears.
Two new fields have been added to meet the requirements of the Brazilian market. The two fields are:
Secondary Name – Enter the formal name of the partner.
Auto Receive Stock Ind – Select this check box to update the stock for the external finisher after the first leg of the shipment is transferred.
|
Note: The Auto Receive Stock Ind option is highlighted on the Partner Maintenance page only when the Partner Type is chosen as External Finisher on the Partner Find page. |
The Partner Maintenance window includes a new Fiscal Attributes menu option. The Localization Fiscal Attributes window captures the fiscal attributes such as address, and other attributes such as CNPJ/CPF number.
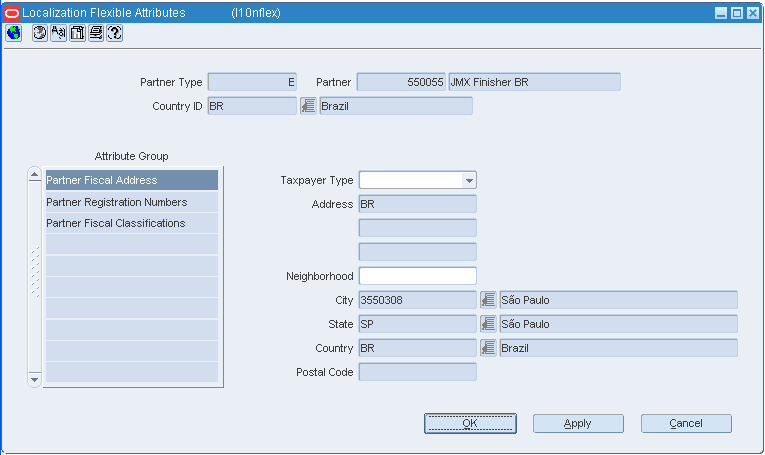
In the Partner Maintenance window, from the Options menu, select Fiscal Attributes. The Localization Flexible Attributes window appears.
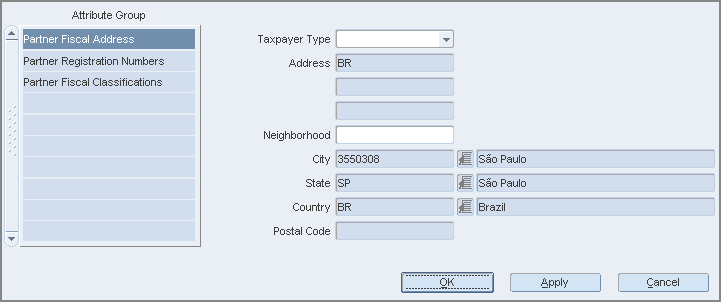
In the Localization Flexible Attributes window, click Partner Fiscal Address to view/edit the address of the selected partner.
|
Note: In View mode, the fields are disabled. |
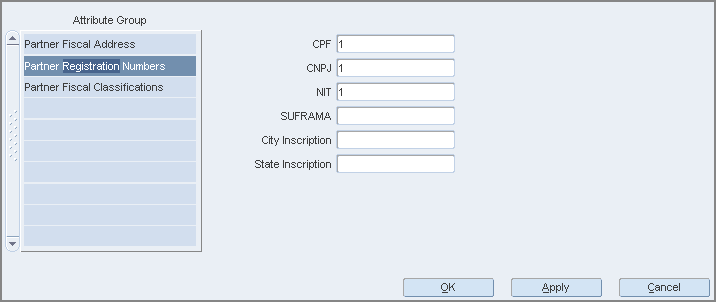
Click Partner Registration Numbers to edit/view the following attributes of the partner:
CPF – The federal taxpayer number issued by the Brazilian Government to a person. CPF is the short form for Cadastro de Pessoa Física.
CNPJ – Federal taxpayer number issued by the Brazilian Government to a company. CNPJ is the short form for Cadastro Nacional de Pessoas Jurídicas.
NIT – This is also know as PIS number, and is used for the Partner master data if the partner is an individual taxpayer and it is ISS contributor.
SUFRAMA – Registration code for the government organ (called SUFRAMA) responsible for the free zone of Manaus.
City Inscription – This is the registration number assigned to the partner by a City Municipal Authority
State Inscription – Registration number assigned by the State authorities
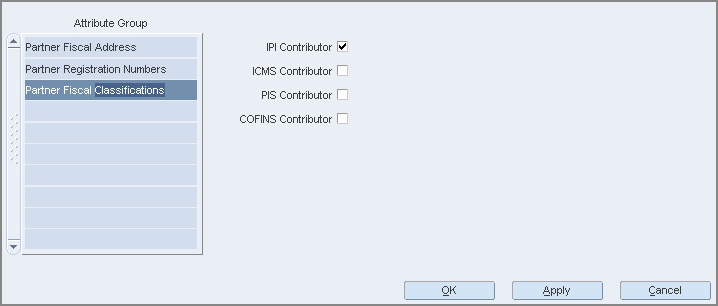
Click Partner Fiscal Classifications. The following check boxes are displayed:
IPI Contributor – Select this check box if the partner is a contributor of IPI. This is the federal tax.
ICMS Contributor – Select this check box if the partner is a contributor of ICMS. ICMS is a state tax.
PIS Contributor – Select this check box if the partner is a contributor of PIS. This is also a federal tax.
COFINS Contributor – Select this check box if the partner is a contributor of COFINS.
Click Partner Fiscal Classifications. The following check boxes are displayed:
Contributor Type: This is the specific classification code provided by Synchro Tax Engine (LOV).
Tax Exception Type: This is the second level of tax classification code provided by Synchro Tax Engine (LOV).
|
Note: Fiscal classification attributes for partner may vary depending on the Tax Engine installed. |
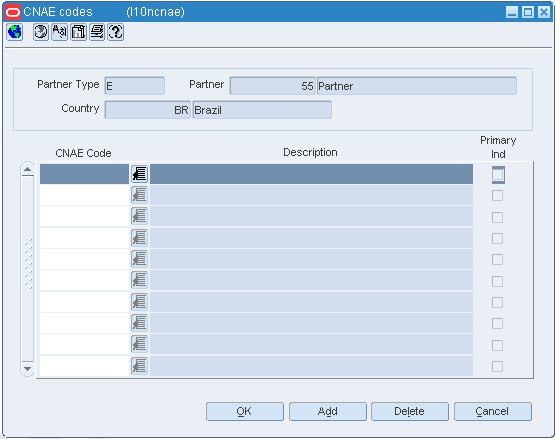
In the Localization Flexible Attributes window of the Partner, from the Options menu, select CNAE Codes. The CNAE Codes window appears.
The CNAE Codes window displays the CNAE Code, and the Description of the partner. A check box for Primary Ind is present.
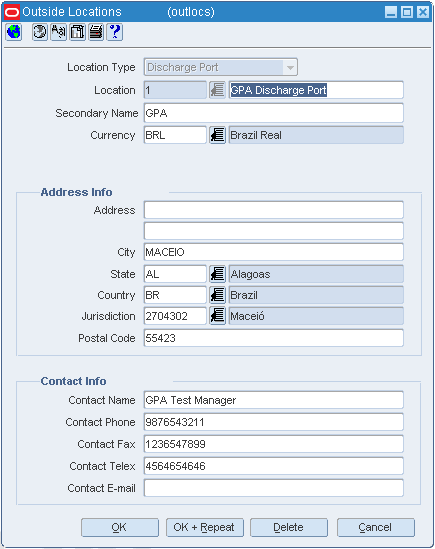
The Outside Locations window has been changed to suit the requirements of the Brazilian market.
Navigate: From the RMS Start Menu, select Control, then Setup. From Setup, select Outside Locations.
In the Contents Of Outside Locations window, select Edit. The Outside Locations window appears.
In order to meet the requirements of the Brazilian market, two new fields have been added:
Secondary Name – Enter the formal name of the Outside Location.
Jurisdiction – Select the ID associated to the tax jurisdiction of the country-state relationship.
The Outside Locations window includes a new Fiscal Attributes menu option. The fiscal attributes window captures the fiscal attributes such as address, and other attributes such as CNPJ/CPF number.
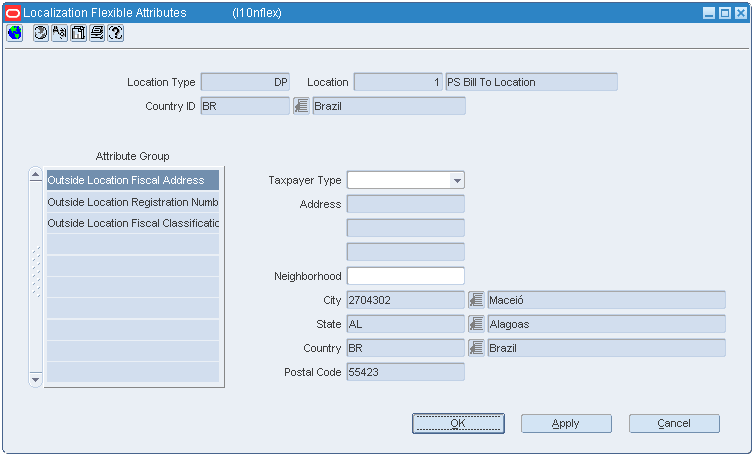
In the Outside Locations window, from the Options menu, select Fiscal Attributes. The Localization Flexible Attributes window appears.
To edit/view the fiscal attributes, do the following:
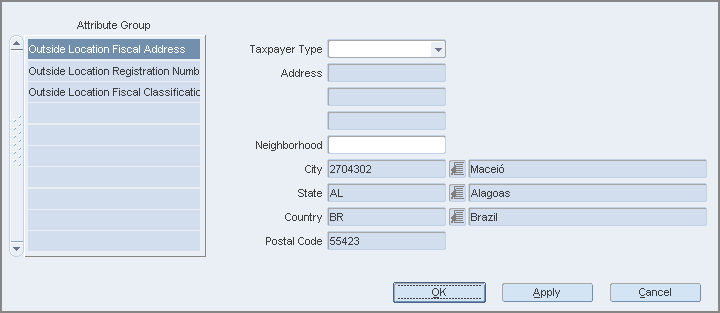
In the Localization Flexible Attributes window, click Outside Location Fiscal Address to edit or view the address of the selected outside location.
|
Note: In View mode, the fields are disabled. |
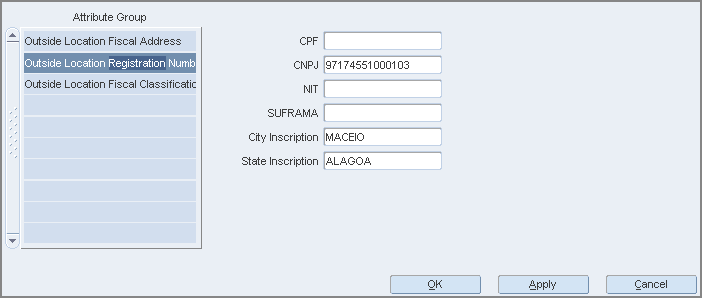
Click Outside Location Registration Numbers to edit/view the following attributes of the outside location:
CPF – The federal taxpayer number issued by the Brazilian Government to a person. CPF is the short form for Cadastro de Pessoa Física.
CNPJ – Federal taxpayer number issued by the Brazilian Government to a company. CNPJ is the short form for Cadastro Nacional de Pessoas Jurídicas.
NIT – This is also know as PIS number is used for the Partner master data if the partner is an individual taxpayer and it is ISS contributor.
SUFRAMA – Registration code for the government organ (called SUFRAMA) responsible for the free zone of Manaus.
City Inscription – Registration number assigned to the outside location by a City Municipal Authority.
State Inscription – Registration number assigned to the outside location by the State.
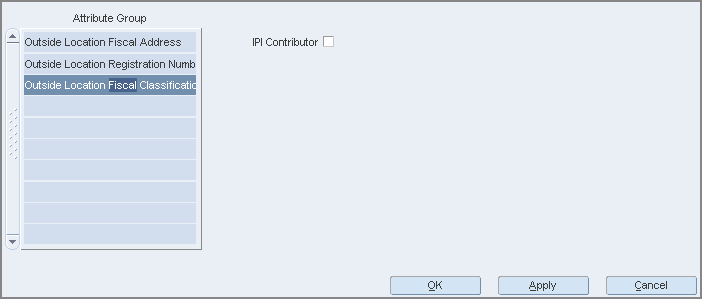
Click Outside Location Fiscal Classifications. Select the IPI Contributor check box for the outside location, if it is applicable for that location.
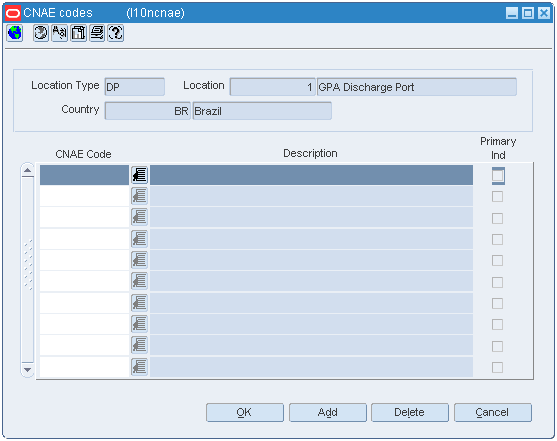
In the Localization Flexible Attributes window of the Outside Locations, from the Options menu, select CNAE Codes. The CNAE Codes window appears.
In Brazil, a single company can have multiple business units. These business units are the actual legal entities of the company. These legal entities can be configured either as individual Set of Books or Transfer Entities within RMS.
When the individual set of books are identified as the legal entity or business unit (based on system options), the fiscal attributes are set up as follows:
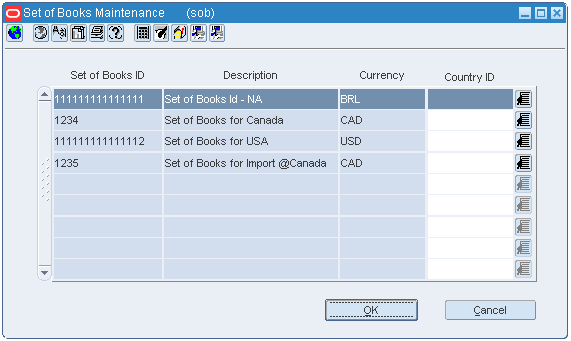
Navigate: From the RMS Start Menu, select Control, then select Setup. From the Setup, select Set Of Books.
In the Contents Of Set Of Books window, select View or Edit. The Set of Books Maintenance window appears.
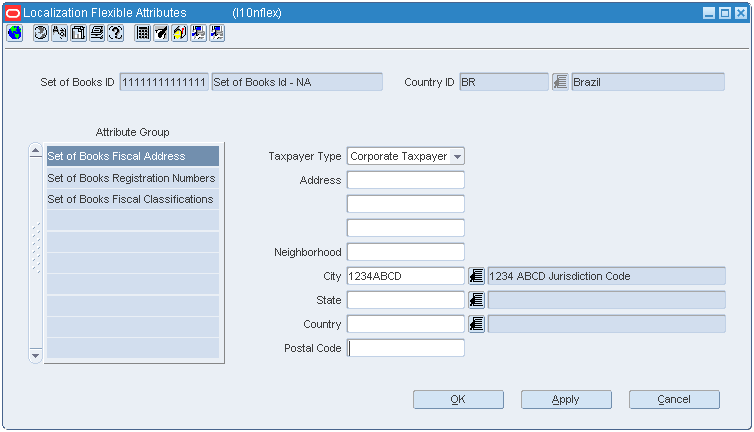
In the Set Of Books Maintenance window, set the Country ID as BR. In the Options menu, the Fiscal Attributes menu item is enabled only after setting the Country ID to Brazil.
From the Options menu, select Fiscal Attributes. The Localization Flexible Attributes window opens.
In this window, you can set the address, registration numbers, and fiscal classifications.
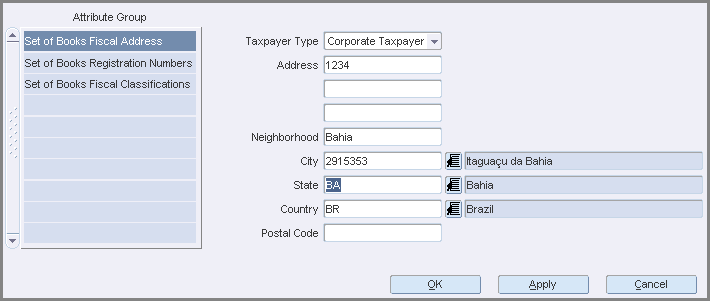
In the Localization Flexible Attributes form, click Set of Books Fiscal Address. Enter the address of the different business units here.
Click the Set of Books Registration Numbers in the Attribute Group column to edit/view the following:
CPF – The federal taxpayer number issued by the Brazilian Government to a person. CPF is the short form for Cadastro de Pessoa Física.
CNPJ – Federal taxpayer number issued by the Brazilian Government to a company. CNPJ is the short form for Cadastro Nacional de Pessoas Jurídicas.
NIT – The worker identification number, also know as PIS number is used for the partner master data if the partner is an individual taxpayer and it is ISS contributor.
SUFRAMA – Registration code for the government organ (called SUFRAMA) responsible for the free zone of Manaus
City Inscription – Registration number assigned by a City Municipal Authority
State Inscription – Registration number assigned by the State
Click the Set of Books Fiscal Classifications in the Attribute Group column. Select the IPI Contributor check box if the business unit is an IPI contributor.
Click Apply to save the changes.
Click OK to close the Localization Flexible Attributes window.
If the transfer entity is considered as the legal entity (based on system options), the fiscal attributes are set up as follows:
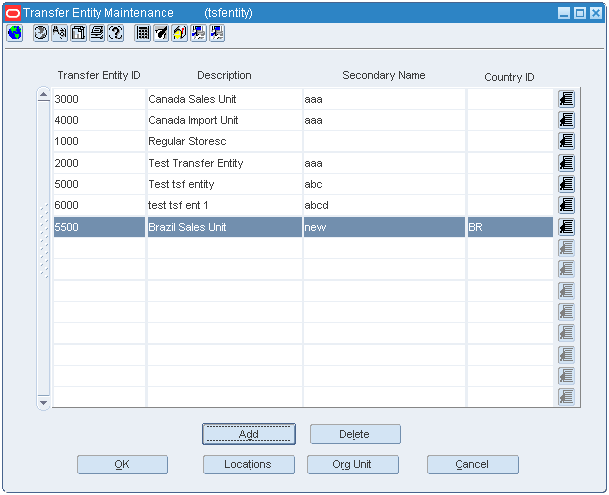
Navigate: From the RMS Start Menu, select Control, then select Setup. From the Setup, select Transfer Entities.
In the Contents Of Transfer Entities window, select View or Edit. The Transfer Entity Maintenance window appears.
In the Transfer Entity Maintenance window, set the Country ID as BR. In the Options menu, the Fiscal Attributes menu item is enabled only after setting the Country ID to Brazil.
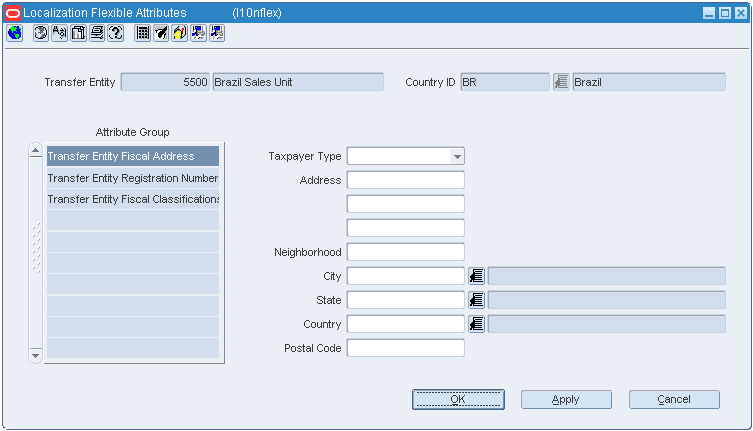
From the Options menu, select Fiscal Attributes. The Localization Flexible Attributes window opens.
In this window, you can set the address, registration numbers, and fiscal classifications of the transfer entities.
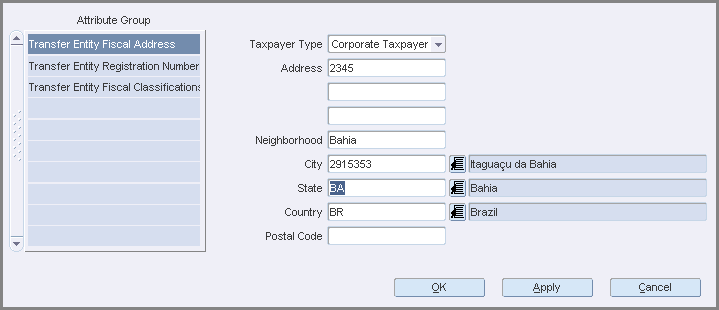
In the Localization Flexible Attributes form, click Transfer Entity Fiscal Address. Enter the address of the different business units here.
Click the Transfer Entity Registration Numbers in the Attribute Group column to edit/view the following:
CPF – The federal taxpayer number issued by the Brazilian Government to a person. CPF is the short form for Cadastro de Pessoa Física.
CNPJ – Federal taxpayer number issued by the Brazilian Government to a company. CNPJ is the short form for Cadastro Nacional de Pessoas Jurídicas.
NIT – The worker identification number, also know as PIS number is used for the partner master data if the partner is an individual taxpayer and it is ISS contributor.
SUFRAMA – Registration code for the government organ (called SUFRAMA) responsible for the free zone of Manaus
City Inscription – Registration number assigned by a City Municipal Authority
State Inscription – Registration number assigned by the State
Click the Transfer Entity Fiscal Classifications in the Attribute Group column. Select the IPI Contributor check box if the business unit is an IPI contributor.
Click Apply to save the changes.
Click OK to close the Localization Flexible Attributes window.
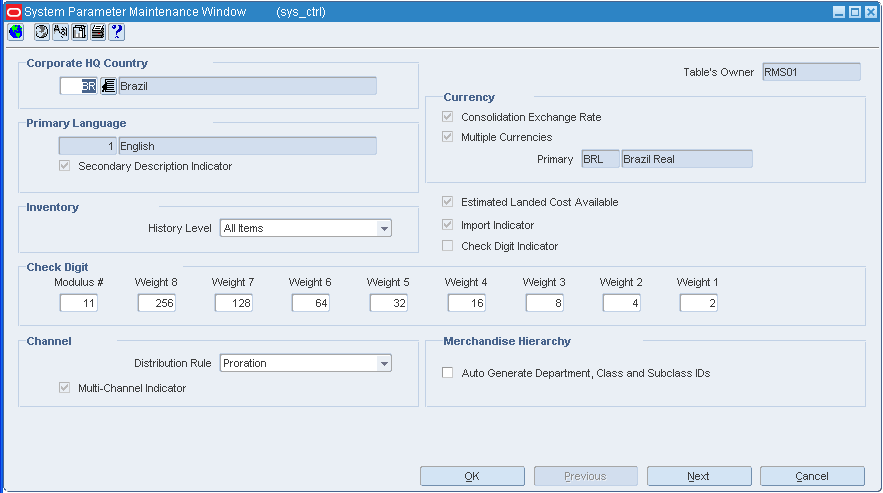
The System Parameter Maintenance window enables you to customize various parameters, defaults, and constants that are used throughout the system. Normally, these elements are set when RMS is installed by the system or database administrator. They tend to remain fixed unless a business practice is changed which necessitates a change in RMS.
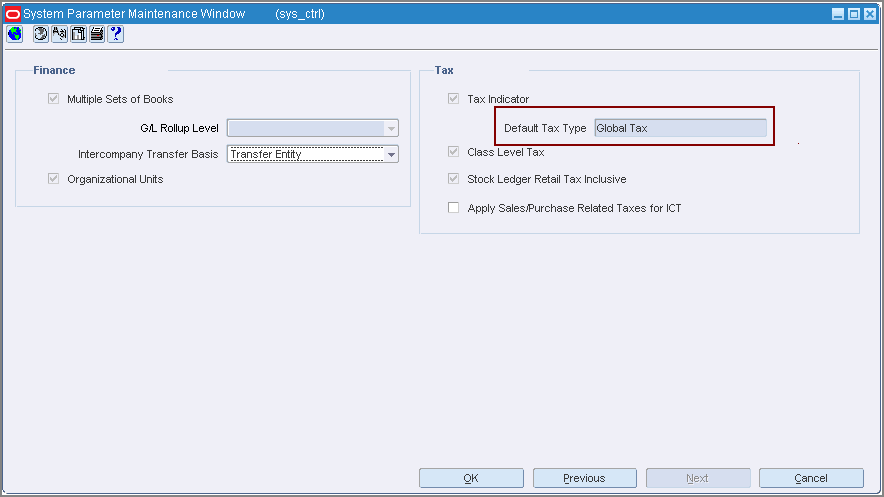
In order to suit the Brazilian requirements, a new tax type, Global Tax, is added to the default tax type LOV for RMS system options.
Navigate: From the RMS Start Menu, select Control, then System. From System, select System Variables. The System Parameter Maintenance window appears.
There are several windows associated with this window.
To view, and edit the values of the various windows that are associated with this window, click Next.
To go back to the previous window, click the Previous button.
To set the options for Brazil, in the Corporate HQ Country field, select BR from the LOV.
In the Tax form of the System Parameter Maintenance window, the Default Tax Type field is set to Global Tax.
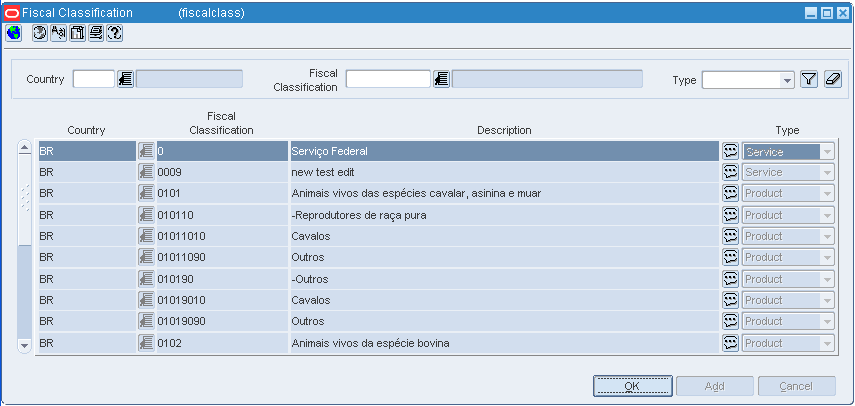
In Brazil, every item has a fiscal classification code called as Nomenclatura Comum do Mercosul or NCM. NCM codes, in general, are a classification of merchandise issued by the Brazilian government and are used to determine the taxes applicable to an item. As NCM codes are applicable to all the Mercosur countries, the new Fiscal Classification window provides the option to capture the country code along with the NCM codes.
To edit/view the fiscal classification, do the following:
Navigate: From the RMS Start Menu, select Items, then Fiscal Classification.
In the Contents Of Fiscal Classification window, select Edit or View. The Fiscal Classification window appears.
|
Note: In View mode, the fields are disabled. |
Select the country from the LOV in the Country field.
Select the NCM codes/fiscal classification in the Fiscal Classification LOV.
From the list in the Type column, select Product. Click the filter button.
The multi-record block displays the country, fiscal classification, description, and the type for the criteria entered in the above fields.
If the Type is Service, the multi-record block displays the Federal Service Codes. TaxWeb Tax Rules supplies these codes.
Click OK to close the window.
After RMS is integrated with TaxWeb Tax Rules, TaxWeb Tax Rules has to manage the NCM codes. The following changes have been made in RMS to use the NCM codes that are provided by TaxWeb Tax Rules:
A new integration mechanism has been provided to consume the NCM codes from TaxWeb Tax Rules.
New tables are introduced to store the NCM details.
TaxWeb Tax Rules provides the necessary updates to NCM codes. TaxWeb Tax Rules manages adding, deleting, and updating the NCM codes.
After an item is approved, you cannot change the fiscal classification of the item. This is because a change in NCM code triggers recalculation of taxes.
If you have to change the fiscal classification, a new fiscal reclassification window has been added. After you capture the reclassification details, the reclassification of NCM code happens on the active date during the nightly batch run.
The fiscal reclassification is possible only for those approved regular items that has item levels less than or equal to the transaction level.
If an item (Level 1) with child items is selected, the fiscal reclassification is applied for all item levels. A warning message is displayed to determine whether you want to continue with the reclassification.
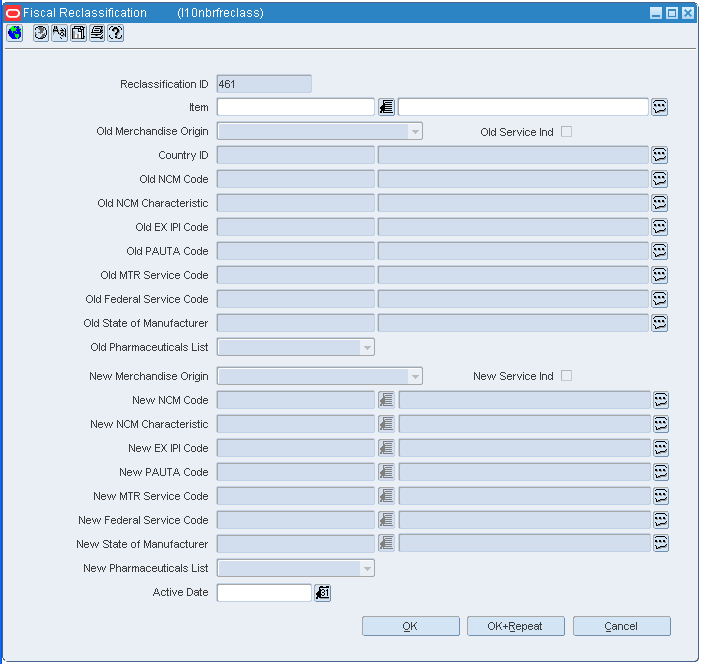
To edit the fiscal classification, do the following:
Navigate: From the RMS Start Menu, select Items, then ReClassification.
In the Contents Of Reclassification window, select Fiscal Reclassification.
In the Contents Of Fiscal Reclassification window, select New. The Fiscal Reclassification window appears.
From the LOV, select the item for which you want to change the fiscal classification.
|
Note: In case the item you have selected is a level 1 item, the application displays the following message:Item x is a Level 1 item. The reclassification will be applied to all the items. Do you want to continue? Click Yes to continue. Else, click No. |
For the selected item, the country, and the old NCM code are displayed.
In addition, the Fiscal Reclassification window displays the following characteristics associated with the old NCM:
EX IPI Code – This is the exception code defined by the Brazilian Government.
PAUTA Code – This is the lowest level code for tax classification. This code represents the item, and is used to calculate the '"pauta", which means a pre-defined base of calculation for ICMS-ST controlled at item level by the Government.
MTR Service Code – Unified service code from TaxWeb Tax Rules system.
Federal Service Code – Service code provided by Federal Government of Brazil (based on the regulation number 116 from July 31st, 2003).
State of Manufacturer – Indicates the state in which the product is manufactured, as the benefits for items varies depending on the state.
Pharmaceuticals List – Three different lists of medicines can be associated to the product and determines the tax calculation behavior. The list contains the following three values:
Negative – The product is associated with the negative list.
Positive – The product is associated with the positive list.
Neutral – The product is associated with the neutral list.
NULL – The product is not associated with any list.
Select the New Merchandise Origin from the list. The following options are available:
National
Service
Foreign Item bought from Brazil vendor
Select the New Service Ind check box to indicate that the item is a service item.
Assign the New NCM Code from the LOV.
The EX IPI Code, PAUTA Code, MTR Service Code, and the Federal Service Code associated with the new NCM are also displayed.
|
Note: The NCM Characteristic, EX IPI and Pauta codes associated to the NCM is defaulted upon entering the new NCM, given that only one NCM Characteristic, EX IPI and Pauta code is associated to the given NCM. If there are multiple characteristics associated to the NCM, no value is defaulted. |
Set an active date in Active Date field. The reclassification of NCM code happens based on the active date set here during the nightly batch run.
Click OK to save the changes and exit the window.
Click OK+Repeat to change the fiscal classification for another approved item.
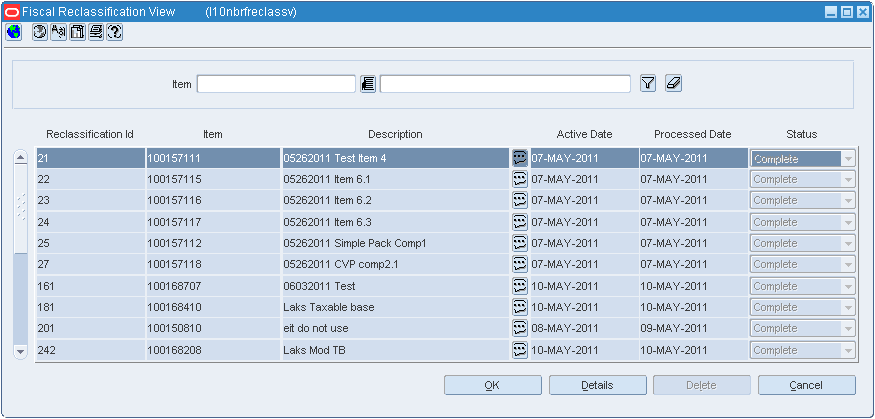
To view/maintain the fiscal reclassification, do the following:
In the Contents Of Reclassification window, select Fiscal Reclassification.
In the Contents Of Fiscal Reclassification window, select View/Maintain. The Fiscal Reclassification View window appears.
Select the item from the Item LOV.
The multi-record block displays the Reclassification Id, Item, Description, Active Date, Processed Date, and the Status.
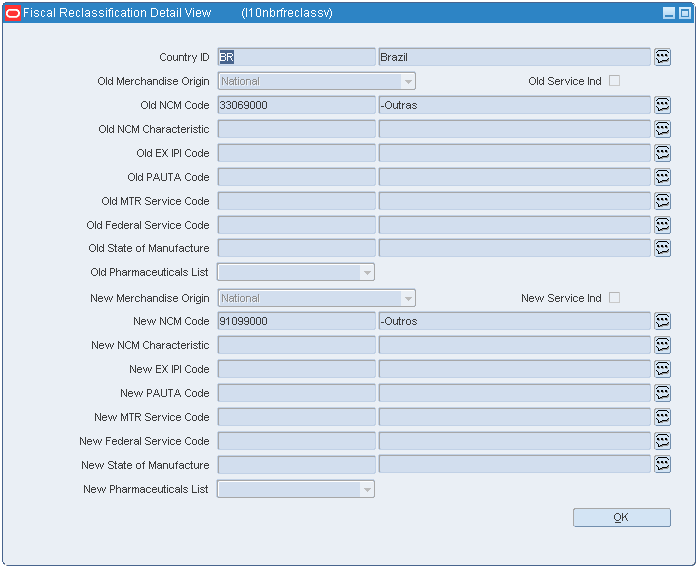
Click Details in the Fiscal Reclassification View window. The Fiscal Reclassification Detail View window appears. This window displays the old NCM code, the new NCM code, and the associated attributes of the two codes.
Click OK to close the window. You will be returned to the Fiscal Reclassification View window.
Click OK in the Fiscal Reclassification View window to exit the window.
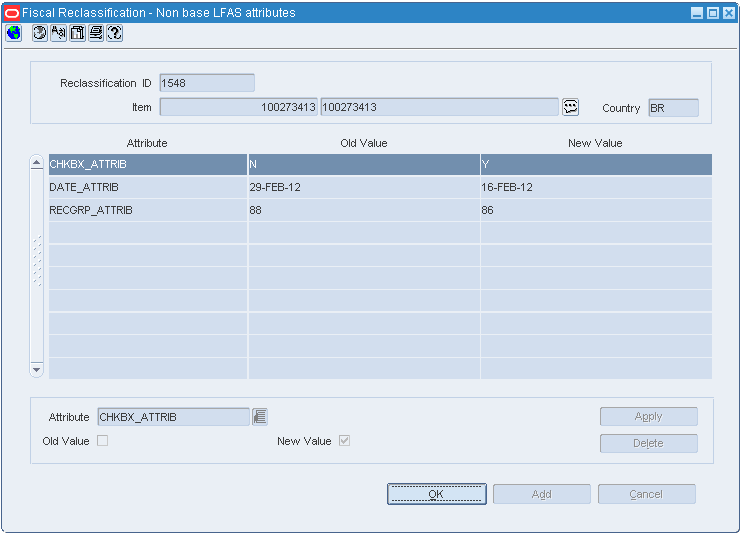
You can add several new attributes to Items and Suppliers through non-base Localization Flexible Attribution Solution (LFAS) for Brazil and extend Retail Tax Integration Layer (RTIL) Tax object. The LFAS supports predefined and configured generic extensions of new attributes.
To capture the old and new values for the non-base LFAS attributes, do the following:
Choose the RMS Start Menu.
Select Items > Reclassification.
In the Contents Of Fiscal Reclassification, select Fiscal Reclassification.
In the Contents Of Fiscal Reclassification, select View/Maintain.
The Fiscal Reclassification View window appears. See Fiscal Reclassification View Window.
In the Fiscal Reclassification View window, select Options > Custom Attributes.
The Fiscal Reclassification - Non base LFAS attributes window appears.
|
Note: The Fiscal Reclassification - Non base LFAS attributes window is available only when the non-base LFAS attributes are defined at the item level. |
Enter the fields in the Fiscal Reclassification - Non base LFAS attributes window as follows:
Table 1-2 Fiscal Classification - Non base LFAS attributes
| Field | Description |
|---|---|
|
Reclassification ID |
The fiscal reclassification ID of an item. The Fiscal Reclassification - Non base LFAS attributes window populates the Reclassification ID by default. |
| Item |
The item ID and description of an item. You can specify an item or choose an item from the list. The Fiscal Reclassification - Non base LFAS attributes window populates the item and description by default. |
|
Country |
The delivery country for an item. The Fiscal Reclassification - Non base LFAS attributes window populates the Country by default. |
|
Attribute |
The non-base LFAS attribute name. |
|
Old Value |
The value of the non-base LFAS attributes prior fiscal reclassification. |
|
New Value |
The value of the non-base LFAS attributes post fiscal reclassification. The same validation available in the LFAS screen for an item is triggered when a new value is entered. |
|
Attribute |
The non-base LFAS attribute of fiscal reclassification item. Depending on the display type of the attribute selected, the old and the new values of the fiscal reclassification is displayed as follows:
|
Click Apply to populate the old and new values of non-base LFAS attributes.
To delete an item, select the item from the multi-record block and click Delete.
Click Add to add a new row in the multi-record block.
Click Cancel to undo the changes you specified in the multi-record block.
Click OK to close the Fiscal Reclassification - Non base LFAS attributes window. The Fiscal Reclassification View window appears.