| Oracle® Retail Fiscal Management User Guide Release 14.1.2.1 E70530-01 |
|

 Previous |
 Next |
ORFM has its own Foundation Data. The foundation data has to be configured for the proper functioning of the ORFM application.
This chapter covers the following sections:
ORFM Foundation Data Setup includes setting up the utilization codes, related parameters, and document type codes.
Requisition Type indicates the type of transaction that ORFM supports. ORFM supports the following requisition types:
Purchase Order (PO) – This Requisition Type is applicable when there is movement of merchandise from a supplier to retailer's location.
Transfer (intra-company) – This Requisition Type is applicable when there is movement of merchandise from one location to another, either a warehouse or a store.
Intercompany Transfer – This Requisition Type is applicable when there is a movement of merchandise between companies.
Return to Vendor (RTV) – This Requisition Type is applicable when the merchandise is returned to the vendor.
Repairing – This Requisition Type is applicable when merchandise is sent out to the external finisher or the supplier for finishing work (such as printing, dyeing, and embroidery) or repair (in the case of damaged goods).
Return Merchandise Authorization (RMA) – This Requisition Type enables the retailer to pick up merchandise that is being returned from the customer.
Inventory Adjustment – This Requisition Type enables total stock-on-hand adjustments or unavailable inventory for one or more item/locations.
Direct NF - This Requisition Type is used to distinguish StandAlone NFs from Other NFs created within ORFM.
Free Form NF - This Requisition Type is applicable when the user wishes to add generic items/services that are not present in RMS to the NF or use fiscal entities that are not defined in RMS. This is a StandAlone NF that is not related to any RMS transaction.
Customer Order Drop Ship - This Requisition Type supports customer orders which will be shipped directly from the supplier to the customer, often referred to as drop ship orders.
Sales: This Requisition Type supports any customer order transaction.
Return NF: This Requisition Type supports automatic return to vendor NF generated, based on discrepancy treatment at receiving.
PO for Rural Producer: This Requisition Type supports generation of Entry NF for Rural Producers.
Stock Out: This Requisition Type supports NFs issued as a result of inventory adjustment.
Nature of Operation (NOP) is a term used in Tax Engine. The nature of operations represents the transactions used to deduce the código fiscal deoperações e prestações (CFOP) codes in tax rules. There can be more than one utilization for the same NOP. For each Tax Engine call to retrieve taxes, ORFM returns the NOP related to the transaction to Tax Engine.
|
Note: ORFM and RMS are integrated with Tax Engine to get the tax break up for the NF. Tax Engine requires NOP to derive the CFOP before tax calculations. Therefore, ORFM maintains the list of NOP and enables you to link utilization and NOP. |
Mode indicates whether the NF is being created for inbound, or outbound operations. The possible values for Mode are Inbound (Entry), and Outbound (Exit).
All merchandise in ORFM is associated with a utilization code. This code provides information about the transaction type and the NF related to the transaction. This information is used to determine the appropriate taxes for the merchandise as well as the impact on warehouse stock and on costs.
Each utilization code is linked to a Requisition Type, a NOP, and one or more document types.
|
Note: The utilization parameters are not available (dimmed) for the StandAlone NF. |
To add a Utilization Code, do the following:
Navigate: From the RMS Start Menu, select Fiscal Management, then Fiscal Configuration.
In the Contents Of Fiscal Configuration, select Fiscal Utilization.
In the Contents Of Fiscal Utilization window, click Edit. The Fiscal Utilization Setup window appears.
|
Note: Click View in the Contents Of Fiscal Utilization window to view the fiscal utilization codes. In the View mode, the multi-record block is non-editable, and the Add and Delete buttons are disabled. |
On the Fiscal Utilization Setup window, click Add. A highlighted blank row appears.
Enter the Utilization Code, and Description. The Utilization Code is the unique identifier for each utilization. The Description column describes the fiscal utilization.
Select the Requisition Type from the list in the Req.Type column. The requisition types are: Purchase Order, Transfer, Return to Vendor, Return Merchandise Authorization, Stock Out, PO for Rural Producer, InterCompany Transfers, Repairing, Return NF, and Sales.
Select the Issue from the list in the Issue column. The issue types are: Issue or Include. The drop-down is enabled if the Requisition Type is either, Direct NF or Free from NF. The drop-down value of Issue indicates that the utilization code is relevant for cases wherein the Retailer is issuing the NF. When utilization codes classified as Issue are used for StandAlone NF creation, the Fiscal number, Serial, and Sub Serial Number fields are populated based on Location sequencing Logic. The drop-down value Include, indicates that the NF is issued by an external system. StandAlone NFs using utilization code classified as Include will have a mode type of entry and it allows for manual entry of the Fiscal number information.
Specify the Nature of Operation.
Enter the mode of operation. The Mode is either Entry or Exit.
The Fiscal Utilization Options menu consists of the following items:
Doc Type
Parameters
Reason Code
The utilization code is linked to one or more document types, and each fiscal document type has to be associated with a utilization code.
To add Doc Type to the Utilization Code, do the following:
Navigate: From the RMS Start Menu, select Fiscal Management, then select Fiscal Configuration.
In the Contents Of Fiscal Configuration window, select Fiscal Utilization.
In the Contents Of Fiscal Utilization window, click Edit. The Fiscal Utilization Setup window appears.
|
Note: Click View in the Contents Of Fiscal Utilization window to view the fiscal utilization codes. In the View mode, the multi-record block is non-editable, and the Add and Delete buttons are disabled. |
In the Fiscal Utilization Setup window, select the Utilization Code for which Doc Types are being defined.
From the Options menu, select Doc Type. The Fiscal Utilization Document Type window appears.
Click Add. A highlighted blank row is displayed.
From the Doc Type ID LOV, select the value.
Click OK to exit the window.
To delete document types, do the following in the Fiscal Utilization - Document Type window:
Select the doc type that you want to delete. Click Delete in the Fiscal Utilization - Document Type window.
A message appears. Click Yes to delete the document type.
Click OK to exit the window.
Parameters are defined for each of the utilization codes.
To associate the parameters with the utilization codes, do the following:
Navigate: From the RMS Start Menu, select Fiscal Management, then select Fiscal Configuration.
In the Contents Of Fiscal Utilization, select Edit. The Fiscal Utilization Setup window appears.
On the Fiscal Utilization Setup window, click the Options menu.
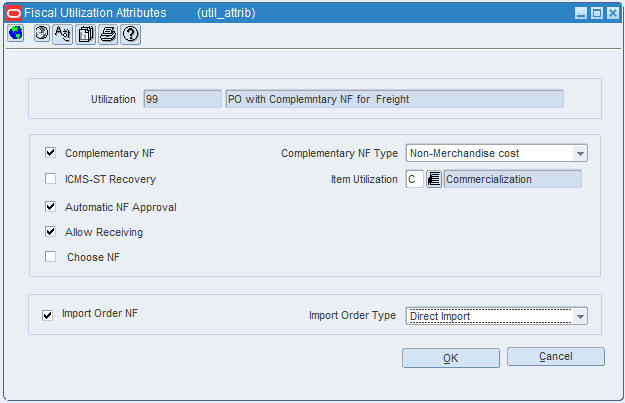
Select Parameters. The Fiscal Utilization Attributes window appears.
Select or deselect the check boxes to configure the parameters for every Utilization Code.
Table 2-1 provides the list of parameters, and their description.
Table 2-1 Parameters of Fiscal Utilization Attributes
| Field | Description |
|---|---|
|
Complementary NF |
When you select the Complementary NF check box, the Complementary NF Type list is enabled. |
|
Complementary NF Type |
Choose the Complementary NF type from the Complementary NF Type list:
|
|
ICMS-ST Recovery |
Select this check box to indicate that the particular transaction is marked for recovery of the Imposto sobre Circulação de Mercadorias e prestação de Serviços-Substituição Tributária (ICMS-ST) tax. This flag is used for entry and exit transactions. If the flag for entry or exit utilization is selected, the FlagGravaHistorico field is sent as the following values:
|
|
Item Utilization |
This field is sent to Tax Rules when populating the Freight Object. Click the Item Utilization LOV to obtain the values. Following are the values displayed in the List of item Utilizations:
|
|
Automatic NF Approval |
Select this check box to validate and approve the fiscal documents automatically. Automatic NF approval is relevant only for outbound NFs generated by ORFM. You may decide to approve all intra-company NFs automatically but manually approve RTV NFs. |
|
Allow Receiving |
This indicator is only used for inbound NFs. Select this check box to enable the schedule submission message flow to the warehouse management system and the store inventory management system. In case of complementary NFs, since there is no receiving, this indicator is disabled. |
|
Choose NF |
Select this check box to choose the referential Fiscal Document. This indicator is relevant for RTV related utilizations only. |
|
Import Order NF |
Select this check box if the utilization ID is for a PO NF of type Import. |
|
Import Order Type |
Choose the Import Order Type from the Import Order Type list:
|
|
Note:
|
The Reason Code is created by the retailer for inventory adjustment and repairing operations. It is used to identify returns and can be configured in the ORFM system.
|
Note: A utilization can have any number of Reason Codes attached to it. However, the Reason Code cannot be attached to utilization if the Reason Code is already attached to any other Utilization ID. The Reason Code LOV shows only the Reason Codes that are not attached to any type of utilization ID. |
To associate Reason Code with the Utilization Code, do the following:
Navigate: From the RMS Start Menu, select Fiscal Management, then select Fiscal Configuration.
On the Fiscal Utilization Setup window, click the Options menu.
|
Note: This option is enabled only if the Requisition Type selected for the Utilization Code is Inventory Adjustment (Stock). |
Select the inventory adjustment for which you want to add the Reason Code. From the Options menu, select Reason Code. The Fiscal Utilization Reason Codes window appears.
Click Add. In the highlighted row that appears, select the reason code from the list.
Click OK. The reason code is associated with the inventory adjustment.
To delete the reason code, do the following in the Fiscal Utilization Codes Reason Codes window:
Select the reason code that you want to delete. Click Delete in the Fiscal Utilization Codes Reason Codes window. A message appears. Click Yes to delete the reason code.
Click OK to exit the window.
The document type codes are defined by the fiscal authorities and each NF must have a document type code at the header level.
To associate Fiscal Document Types with a Utilization Code, do the following:
Navigate: From the RMS Start Menu, select Fiscal Management, then select Fiscal Configuration.
In Contents Of Fiscal Configuration window, select Fiscal Document Types.
In Contents Of Fiscal Document Types, click Edit. The Fiscal Document Type window appears.
Select the document type from the list. The list contains the all possible Fiscal Doc Types. The list displays the Fiscal Document Type ID and Description.
Click Add to add a fiscal document type. A new highlighted row is displayed.
The Description field displays the Fiscal Document Type description.
Click OK to exit the window.
To delete the document type, do the following:
Select the document type that you want to delete. Click Delete. A confirmation message appears.
Click Yes to delete the document type.
Click OK to exit the window.
To associate the document type with the Utilization Code, do the following:
Navigate: From the RMS Start Menu, select Fiscal Management, then select Fiscal Configuration.
Select the document type to which you want to associate a Utilization Code.
Click Util in the Fiscal Document Type window. The Fiscal Doc Type Utilization window appears.
Click Add in the Fiscal Doc Type Utilization window.
A new row appears. Select the Utilization Code from the list.
Click OK to save your changes and exit the window.
To delete the utilization, do the following:
To delete a utilization, select the utilization, and click Delete.
Confirm the deletion in the message that appears. Click OK to exit the window.
Set up the system configuration variables using the System Setup link.
The system options can be set up for the following operations:
Purge
Discrepancy
Fiscal Management
These system options decide when the purge operations have to be implemented.
Table 2-2 Purge System Options
| System Option | Description |
|---|---|
|
History Days for Worksheet Documents |
Number of days a document in worksheet status should reside in active tables |
|
History Days for Deleted Documents |
Number of days a document in inactive status should reside in active tables |
|
History Days for Completed PO Documents |
Number of days a PO document in completed status should reside in active tables |
|
History Days for Completed Documents Other than PO |
Number of days a document in completed status should reside in active tables |
|
History Days for History Tables |
Number of days the data in history table should be maintained |
These system options in ORFM decide what is the action that has to be taken for discrepancy resolution.
While resolving discrepancies, the values on the Purchase Order (PO) may be considered as correct, or the NF values may be considered as correct. In some cases, you can evaluate both the values, and decide what value to choose to resolve the discrepancy. In order to facilitate these requirements following three new system options are introduced:
Table 2-3 Discrepancy System Options
| System Option | Description |
|---|---|
|
Quantity Discrepancy Resolution Rule |
This option can have the following values: System, Nota Fiscal and Reconcile. In case of quantity discrepancy, the system value is the PO value. |
|
Cost Discrepancy Resolution Rule |
This option can have the following values: System, Nota Fiscal and Reconcile. In case of cost discrepancy, the system value is the PO value. |
|
Tax Discrepancy Resolution Rule |
This option can have the following values: System, Nota Fiscal, and Reconcile. In case of tax discrepancy, system values are provided by the Tax Engine. |
For more information about the usage of the system options set for discrepancy, see section Discrepancy Identification and Resolution Process in Chapter 1.
The following system options help the fiscal management system to function successfully:
Table 2-4 Fiscal Management System Options
| System Option | Description |
|---|---|
|
HOUR_FORMAT |
Format to represent fields of hour |
|
PURGE_DAYS |
Days before records are purged from the tables |
|
ORIGIN_CST_IND |
Default Origin Code and CST Type for ICMS tax situation |
|
DOC_TYPE_PO |
Default fiscal doc type code (example: 1 - Nota Fiscal - Modelo 1, 1A) |
|
PERCENT_FORMAT |
Percentage Field Format |
|
NUMBER_FORMAT |
Value Field Format |
|
DEFAULT_PO_TYPE |
Default PO Type when null in ORMS (fiscal utilization code in the Retail Fiscal Management system) |
|
DEFAULT_SALES_TYPE |
Default SALES Type when null in ORMS (fiscal utilization code in the Retail Fiscal Management system) |
|
DEFAULT_COUNTRY |
Default supplier country |
|
DEFAULT_CURRENCY |
Default currency code |
|
DEFAULT_DOCUMENT_TYPE |
Default document type used by the process to create an EDI document based on external systems |
|
TOLERANCES_MANDATORY |
Tolerances are applied or not |
|
DEFAULT_FREIGHT_TYPE |
Default freight type used by the process to create an EDI document based on external systems |
|
QTY_FORMAT |
Quantity Field Format |
|
RFC_REASON |
Return from customer reason code |
|
ORFMI_MIN_DAYS |
Number of days minus the ORFMi date |
|
ORFMO_MIN_DAYS |
Number of days minus the ORFMo date |
|
ORFMO_MAX_DAYS |
Number of days minus the ORFMo date |
|
ORFMI_MAX_DAYS |
Number of days minus the ORFMi date |
|
EDI_DEF_PTNR_ID |
Indicates the default partner id when importing EDI documents |
|
EDI_DEF_PTNR_TYPE |
Indicates the default partner type when importing EDI documents |
|
GET_ORIGIN_DOC_TAXES |
Requisition type for use of parameters of taxes of the origin fiscal document |
|
CHECK_APPROVED_DOCS |
Variable to check whether it is mandatory to approve all fiscal documents before approving the schedule |
|
CALC_TOL_TYPE |
The calculation tolerance type (P/V) |
|
CALC_TOL_VALUE |
The calculation tolerance value |
|
QTY_RESOLUTION_RULE |
Default Resolution Action for Quantity Discrepancies |
|
COST_RESOLUTION_RULE |
Default Resolution Action for Cost Discrepancies |
|
TAX_RESOLUTION_RULE |
Default Resolution Action for Tax Discrepancies |
|
DEFAULT_RMA_UTIL_ID |
Default Utilization ID for RMA |
|
DEFAULT_RMA_DOC_TYPE |
Default Document Type for RMA |
|
DEFAULT_RTV_DOC_TYPE |
Default Document Type for RTVs |
|
DEFAULT_RTV_UTIL_ID |
Default Utilization ID for RTVs |
|
EDI_RTV |
Indicates whether the requisition type for RTV is "ENTRY"' or '"EXIT" |
|
DEFAULT_OUTBOUND_TSF_DOC_TYPE |
Default Document Type for Outbound Transfers |
|
DEFAULT_OUTBOUND_TSF_UTIL_ID |
Default Utilization ID for Outbound Transfers |
|
DEFAULT_INBOUND_TSF_DOC_TYPE |
Default Document Type for Inbound Transfers |
|
DEFAULT_INBOUND_TSF_UTIL_ID |
Default Utilization ID for Inbound Transfers |
|
EDI_TSF |
Indicates whether the requisition type for TSF is "ENTRY" or "EXIT" |
|
DEFAULT_STOCK_DOC_TYPE |
Default Document Type for Inventory Adjustments |
|
EDI_STOCK |
Indicates whether the requisition type for STOCK is "ENTRY" or "EXIT" |
|
TOLERANCES_PRIORITY |
Tolerances Priority is applied: All, Supplier, Location, Company |
|
DEFAULT_RNF_UTILIZATION_ID |
Default Utilization ID for Return NF |
|
HISTORY_DAYS_COMPLETED_NON_POs |
Indicates the number of days for completed docs other than POs |
|
HISTORY_DAYS_COMPLETED_PO |
Indicates the number of days for the completed POs |
|
HISTORY_DAYS_DELETED_DOCS |
Indicates the number of days for the Deleted NF docs |
|
HISTORY_DAYS_HIST_TABLES |
Indicates the number of days the history table can hold the records |
|
HISTORY_DAYS_WORKSHEET_STATUS |
Indicates the number of days the NF can be worksheet status |
|
DEFAULT_NOP |
Default Nature of Operation |
|
DEFAULT_NFE_DOC_TYPE |
Default Document Type for NF-e |
|
RECOVERABLE_TAX_CST |
Value related to the selected CST |
|
DEFAULT_INBOUND_IC_DOC_TYPE |
Default Document Type for Inbound IC Transfers |
|
DEFAULT_INBOUND_IC_UTIL_ID |
Default Utilization ID for Inbound IC Transfers |
|
DEFAULT_OUTBOUND_IC_DOC_TYPE |
Default Document Type for Outbound IC Transfers |
|
DEFAULT_OUTBOUND_IC_UTIL_ID |
Default Utilization ID for Outbound IC Transfers |
|
DEFAULT_RURAL_PROD_UTILIZATION |
Default Utilization ID for Rural Producer NF |
|
DEFAULT_RURAL_PROD_DOC_TYPE |
Default Document Type for Rural Producer |
|
DEFAULT_INBOUND_REP_DOC_TYPE |
Default Document Type for Inbound Repairing Transfers |
|
DEFAULT_INBOUND_REP_UTIL_ID |
Default Utilization ID for Inbound Repairing Transfers |
|
DEFAULT_OUTBOUND_REP_DOC_TYPE |
Default Document Type for Outbound Repairing Transfers |
|
DEFAULT_OUTBOUND_REP_UTIL_ID |
Default Utilization ID for Outbound Repairing Transfers |
|
EDI_REP |
Indicates whether the requisition type for REP is "ENTRY" or "EXIT" |
|
INC_DISC_EXP |
This system option is only applicable when TSF_PURCHASE_PRICE is set as Y. That is, transfer NF cost to be considered is last purchase price and not WAC. It is used to specify inclusion (TRUE) or exclusion (FALSE) of expenses and discounts in the last purchase price. |
|
TSF_PURCHASE_PRICE |
It Indicates whether the cost on the transfer NF generated is WAC N (No) or last purchase price Y (Yes). |
|
DEAL_DEFAULT_UTIL |
It is the default Utilization ID for Deals. |
|
DEAL_DEF_FXMRH_TYPE |
It is the default Document Type for Merchandise Fixed Deals. |
|
DEAL_DEF_FXNMRH_TYPE |
It is the default Document Type for Non-merchandise Fixed Deals. |
|
DEAL_DEF_CMPLX_TYPE |
It is the default Document Type for Complex Deals. |
|
NF_MAX_ITEM_NUMBER |
It is used to capture value for maximum allowable line items (item/container) on NF to be issued. |
|
NF_BREAKUP_TAX_REGIME |
It is used to provide flexibility to retailer to identify an item-location level attribute with valid values as TRUE or FALSE, thereby providing the flexibility to break NF-e for a tax regime based indicator. |
|
DEFAULT_SOFTWAY_DI_UTIL_ID |
It is the default Utilization ID for SOFTWAY direct Import NFs. This Utilization ID could also be used not only for SOFTWAY but with any other third-party Importation Management solution integrated to ORFM. |
|
DEF_SFTW_COMPL_NM_DI_UTIL_ID |
It is the default Utilization ID for SOFTWAY Complementary NF with Non Merchandise Additional Cost. This Utilization ID could also be used not only for SOFTWAY but with any other third-party Importation Management solution integrated to ORFM. |
|
DEF_SFTW_COMPL_CT_DI_UTIL_ID |
It is the default Utilization ID for SOFTWAY Complementary NF with Additional Cost/Tax. This Utilization ID could also be used not only for SOFTWAY but with any other third-party Importation Management solution integrated to ORFM. |
|
NUMBER_FORMAT_4 |
It is the Value Field Format for 4 decimal. |
|
SUGGESTION |
It stores the justification when the Nota Fiscal is deleted by the Retailer. Deletion is possible in PO receiving flow before the NF is sent to physical receiving. |
|
DEFAULT_DISCREP_LEGAL_MESSAGE |
It stores a default legal message used in discrepancy resolution process. The message is posted in SPED integration for the scenario where there is discrepancy in cost or tax and the discrepancy was resolved as System. |
|
STOCK_COUNT_SELECT_DATE |
It is to hold the stock count creation date. |
|
EXT_TAX_PROVIDER |
It indicates which external tax provider is integrated with the system. |
|
DEFT_MULTISITE_CO_OUT_TSF_UTIL |
It indicates the default Utilization ID for Multi-site Customer Order Outbound Transfer. |
|
DEFT_MULTISITE_CO_OUT_IC_UTIL |
It indicates the default Utilization ID for Multi-site Customer Order Outbound Intercompany (IC) Transfers. |
|
DEFT_MULTISITE_CO_IN_TSF_UTIL |
It indicates the default Utilization ID for Multi-site Customer Order Inbound Transfer. |
|
DEFT_MULTISITE_CO_IN_IC_UTIL |
It indicates the default Utilization ID for Multi-site Customer Order Inbound IC Transfer. |
|
DEFT_MULTISITE_CO_OUT_TSF_DOC |
It indicates the default fiscal doc type for Multi-site Customer Order Outbound Transfer. |
|
DEFT_MULTISITE_CO_OUT_IC_DOC |
It indicates the default fiscal doc type for Multi-site Customer Order Outbound IC Transfers. |
|
DEFT_MULTISITE_CO_IN_TSF_DOC |
It indicates the default fiscal doc type for Multi-site Customer Order Inbound Transfer. |
|
DEFT_MULTISITE_CO_IN_IC_DOC |
It indicates the default fiscal doc type for Multi-site Customer Order Inbound IC Transfers. |
|
DEFAULT_DRSP_CO_PO_TYPE |
It indicates the default PO type for Drop Ship Customer Order when null in RMS (fiscal utilization code in ORFM). |
|
DEFAULT_NFCE_DOC_TYPE |
It indicates the default document Type for NFCe. |
|
DEFAULT_NFCE_MODEL_CODE |
It indicates the default document Type for Customer NF-e (NFCe). |
|
DEFAULT_NFE_DOC_TYPE |
It indicates the default document Type for NF-e. |
|
DEFAULT_NFE_IND_TYPE |
It indicates the default NF-e indication. |
|
DEFAULT_NFE_MODEL_CODE |
It indicates the default document Type for NF-e. |
|
REASON_ID_INVADJ_SIM_WS_INT |
This variable holds the reason code used for integration with SIM Inventory Adjustment Web Service. |
|
DEFAULT_DNF_STOCK_DOC_TYPE |
Default Document Type for DNF Inventory Adjustments. |
|
MANUAL_APPROVAL_PROTOCOL_MASK |
This variable holds the format mask for the manual cancellation protocol. |
|
FISCAL_CANCEL_ROLE |
This variable holds the Role that should be associated to users that will be allowed to access the NF cancellation option. |
|
MANUAL_CANCEL_ROLE |
This variable holds the Role that should be associated to users that will be allowed to access the Manual NF cancellation option. |
|
ENABLE_ACCOUTING_REVERSAL |
This variable indicates whether to revert accounting information for cancelled Nota Fiscal. |
|
ENABLE_SIM_WS_INTEGRATION |
This variable identify if when there is a NF cancellation RFM will call the SIM Inventory Adjustment Web Service to. The valid values should be Y or N. |
|
STOCK_REVERSAL_VIRTUAL_STORE |
This variable holds the default virtual store number that will be used in the inventory reversal process to put merchandise back to the Warehouse. |
|
ENABLE_AUTO_UPDATE_ORIGIN_FCI |
It indicates whether the Origin Code and the FCI Number (in Item/Location) should be automatically updated from the receipt of an invoice. |
|
DEFAULT_PRENF_SERIES |
It indicates the default PRENF series. |
|
DEFAULT_JUSTIF_NULLIFICATION |
It indicates the default justification for NF nullification. |
To set up the System Options, do the following:
Navigate: From the RMS Start Menu, select Fiscal Management, then select System Setup.
In the Contents Of System Setup window, select System Options.
In the Contents Of System Options window, click Edit. The System Options window appears.
Click the Variable field LOV to view the description and variables.
Click Add. A new row is displayed.
|
Note: Adding parameters will not have any impact on the system functionality. |
Enter the details in the Variable and Description fields.
Select the Type from the list.
Enter the details in the Value field.
Click OK to exit the window.
Tolerance is the variance allowed between a NF and the requisition document, and also within a NF. If the NF is within tolerances, then the NF can be considered matched (without discrepancy). ORFM supports the following three types of tolerances:
Cost Tolerance: Use it when comparing the unit cost of the item on the PO as against the unit cost of the item on the NF.
Quantity Tolerance: Use it when matching the quantity ordered, against the quantity provided in NF for each item.
Calculation Tolerance: Use it to avoid the NFs from going into discrepancies due to rounding or truncation issues.
|
Note: The cost, and quantity tolerances can be set in the Tolerance Maintenance screen of the ORFM, and calculation can be set as a system variable. |
To set up the tolerances, do the following:
Navigate: From the RMS Start Menu, select Fiscal Management, then select System Setup.
In the Contents Of System Setup window, select Tolerances.
In the Contents Of Tolerances window, click Edit. The Tolerances window appears.
In the Tolerances window, the list in the Level field has two values – Supplier, and Company. Select the level applicable.
The Name field displays the list of all the Supplier names or Company names based on the level selected. Select the supplier, or the company name.
Click Search. The existing tolerances for the supplier or company is displayed in the multi-record block. If there are no tolerances for the selected level, the following message is displayed: "Query caused no records to be retrieved".
If there are tolerances for the selected values, the following parameters are displayed in the multi-record block:
Tolerance Level – Choose from Line Quantity, and Line Cost.
Lower Limit Inclusive – The lower limit for the range. This value is included in the range.
Upper Limit Exclusive – The upper limit for the range. This value is excluded from the range.
Tolerance Type – Select the Requisition Document Tolerance Type from the list. The list includes Percentage or Value.
Tolerance Value – Enter the tolerance value for matching between the NF and the requisition document of the NF.
Click OK to save the changes.
The other options available on the window includes:
Click Add to add a new row in the multi-record block.
Click Delete to delete the selected row from the multi-record block.
Click Refresh to clear the filter criteria, and the data in the multi-record block.
Click Cancel if you do not want to save the changes that you have entered.
|
Note: Select View mode in the Contents Of Tolerances window to view the tolerances. The Add and Delete button in the Tolerances window are disabled. |
Location Fiscal Numbers are numbers assigned to a store/warehouse. In Brazil, the sequence of NF document numbers are controlled and should be correctly followed during the NF issuing process.
Each location controls its own sequence based on the following fields:
Documentation Type
Serial/Sub-serial
Sequence
Effective Date
Any transaction that involves that particular store/warehouse should contain the fiscal numbers falling within a particular range.
To add fiscal numbers, do the following:
Navigate: From the RMS Start Menu, select Fiscal Management, then System Setup. From System Setup, select Fiscal Numbers.
In the Contents Of Fiscal Numbers window, click Edit. The Location Fiscal Numbers window appears.
To add a number, select the store/warehouse from the Location LOV. Click Add. In the multi-record block, a row is highlighted as shown.
Assign values to Location, Document Type, Series Number, Subseries Number, Minimum Fiscal Number, Maximum Fiscal Number, and Effective Date.
Select the row that you want to delete in the Location Fiscal Numbers window.
Click Delete. The following message appears:
Click Yes to delete the row.
In the Contents Of Fiscal Numbers window, click View. The Location Fiscal Numbers window appears.
In the View mode, the Add, and the Delete button are disabled. By default, the Location Fiscal Numbers displays the locations, and their fiscal numbers.
Select the location type from the Location Type list. The Location field is highlighted after selecting the location type.
Select the location from the Location LOV.
Click the filter icon. Based on the filter criteria, the multi-record block displays the Location Type, the Location, and the values associated with the Document Type, Series Number, Subseries Number, Minimum Fiscal Number, Maximum Fiscal Number, and Effective Date.