| Oracle® Retail Fiscal Management/RMS Brazil Localization Implementation Guide Release 14.1.3.1 E91382-02 |
|

 Previous |
| Oracle® Retail Fiscal Management/RMS Brazil Localization Implementation Guide Release 14.1.3.1 E91382-02 |
|
Previous |
This appendix presents a checklist of the most important configurations required to have ORFM and Brazil Localization setup done. It also contains some examples of basic data that can be used to start initial configuration. These basic sample data are optional and are simple suggestion to have an initial environment setup.
The setup and configuration presented here are also present in the ORFM User Guide, Oracle Retail Merchandising System with Brazil Localization Installation Guide, and as a part of Implementation Guide content as well.
The setup for RWMS and SIM is also present in Implementation Guides for these modules but were consolidated here as part of this checklist.
The following topics are covered in this section:
In case of RMS Brazil-On, you should ensure the following system options are setup as per below guidelines:
Table B-1 RMS (Brazil-On) System Options
| Table Name | System Option |
|---|---|
|
SYSTEM_CONFIG_OPTIONS |
BASE_COUNTRY_ID = 'BR', CURRENCY_CODE = 'BRL' MULTI_CURRENCY_IND = 'Y' . |
|
LOCALIZATION_CONFIG_OPTIONS |
DEFAULT_TAX_TYPE = 'GTAX' |
|
FUNCTIONAL_CONFIG_OPTIONS |
ORG_UNIT_IND = 'Y'SUPPLIER_SITES_IND = 'Y' |
|
PRODUCT_CONFIG_OPTIONS |
FINANCIAL_AP = 'O' or 'A' or NULL Note 1: 'O' for EBS Integration, 'A' for RFI Integration and 'Null' if no financial system integrated. Note 2: Enable (Value 'Y') below products only if they are integrated with RMS/RFM else setup as 'N'. RWMS_IND = 'Y', SIM_IND = 'Y', OMS_IND= 'Y' REIM_IND = 'N' ALLOCATION_IND = 'Y' SALES_AUDIT_IND = 'Y' |
|
FINANCIAL_UNIT_OPTIONS |
GL_ROLLUP = 'D' Note: EIT had tested this with GL_ROLLUP value as 'D' |
|
COUNTRY_ATTRIB |
COUNTRY_ID = 'BR' |
|
INV_MOVE_UNIT_OPTIONS |
SHIP_RCV_STORE=NoSHIP_RCV_WH=No |
|
COUNTRY_L10N_EXT |
After ORFM install, Country_L10n_EXT must have a record |
Insert set_of_books_id record for Brazil currency (BRL) in FIF_GL_SETUP table.
Example B-1 Sample set of records to be inserted
Insert into fif_gl_setup (SET_OF_BOOKS_ID,LAST_UPDATE_ID,SEQUENCE1_DESC,SEQUENCE2_DESC,SEQUENCE3_DESC,SEQUENCE4_DESC,SEQUENCE5_DESC,SEQUENCE6_DESC,SEQUENCE7_DESC,SEQUENCE8_DESC,SEQUENCE9_DESC,SEQUENCE10_DESC,CATEGORY_ID,DELIVER_TO_LOCATION_ID,DESTINATION_ORGANIZATION_ID,PERIOD_NAME,SET_OF_BOOKS_DESC,CURRENCY_CODE) values (25000,123456,'DummySeq1','DummySeq2','DummySeq3','DummySeq4','DummySeq5','DummySeq6','DummySeq7','DummySeq8','DummySeq9','DummySeq10',3040,50001,3211,null,'Set of Books Id - USD','USD');
Insert into fif_gl_setup (SET_OF_BOOKS_ID,LAST_UPDATE_ID,SEQUENCE1_DESC,SEQUENCE2_DESC,SEQUENCE3_DESC,SEQUENCE4_DESC,SEQUENCE5_DESC,SEQUENCE6_DESC,SEQUENCE7_DESC,SEQUENCE8_DESC,SEQUENCE9_DESC,SEQUENCE10_DESC,CATEGORY_ID,DELIVER_TO_LOCATION_ID,DESTINATION_ORGANIZATION_ID,PERIOD_NAME,SET_OF_BOOKS_DESC,CURRENCY_CODE) values (26000,123457,'DummySeq1','DummySeq2','DummySeq3','DummySeq4','DummySeq5','DummySeq6','DummySeq7','DummySeq8','DummySeq9','DummySeq10',3042,50002,1131,null,'Set of Books Id - Brazil','BRL');
Following are the instructions to setup General Ledger (GL):
Insert record in FIF_GL_ACCT table for the above created set of book IDs.
Example B-2 Sample set of records to be inserted
Insert into fif_gl_acct (PRIMARY_ACCOUNT,SET_OF_BOOKS_ID,ATTRIBUTE1,ATTRIBUTE2,ATTRIBUTE3,ATTRIBUTE4,ATTRIBUTE5,ATTRIBUTE6,ATTRIBUTE7,ATTRIBUTE8,ATTRIBUTE9,ATTRIBUTE10,ATTRIBUTE11,ATTRIBUTE12,ATTRIBUTE13,ATTRIBUTE14,ATTRIBUTE15,DESCRIPTION1,DESCRIPTION2,DESCRIPTION3,DESCRIPTION4,DESCRIPTION5,DESCRIPTION6,DESCRIPTION7,DESCRIPTION8,DESCRIPTION9,DESCRIPTION10,DESCRIPTION11,DESCRIPTION12,DESCRIPTION13,DESCRIPTION14,DESCRIPTION15) values (1234567,111,'1','1','1','NETSALEDR',null,null,null,null,null,null,null,null,null,null,null,'Company','Area','Dept','Account',null,null,null,null,null,null,null,null,null,null,null);
Insert into fif_gl_acct (PRIMARY_ACCOUNT,SET_OF_BOOKS_ID,ATTRIBUTE1,ATTRIBUTE2,ATTRIBUTE3,ATTRIBUTE4,ATTRIBUTE5,ATTRIBUTE6,ATTRIBUTE7,ATTRIBUTE8,ATTRIBUTE9,ATTRIBUTE10,ATTRIBUTE11,ATTRIBUTE12,ATTRIBUTE13,ATTRIBUTE14,ATTRIBUTE15,DESCRIPTION1,DESCRIPTION2,DESCRIPTION3,DESCRIPTION4,DESCRIPTION5,DESCRIPTION6,DESCRIPTION7,DESCRIPTION8,DESCRIPTION9,DESCRIPTION10,DESCRIPTION11,DESCRIPTION12,DESCRIPTION13,DESCRIPTION14,DESCRIPTION15) values (1,111,'1110','1111','1112','1113','1114','D','1','1','1','1',null,null,null,null,null,null,null,null,null,null,null,null,null,null,null,null,null,null,null,null);
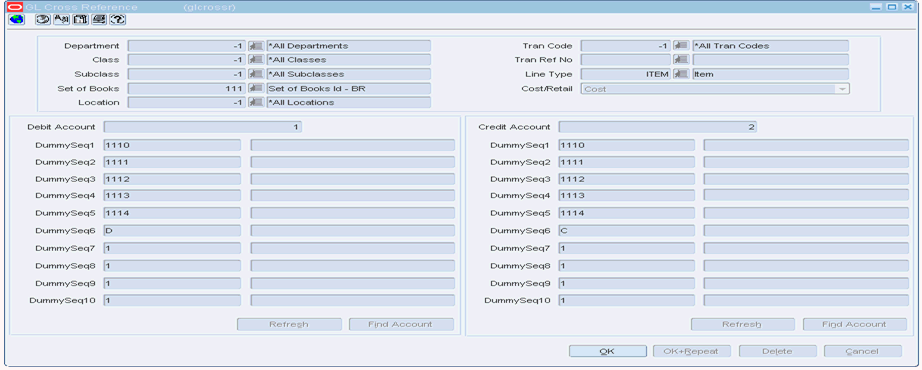
Setup GL Cross Reference for all transaction codes and merchandise hierarchy. You need to specify what transaction code falls under which account type. In RMS Navigate to Finance, then GL Cross Reference, and then New.
After installation is done fm_tran_codes table contains 58 tran_code records.
You must ensure that after running fiscal down load(l10nbr_taxweb_fisdnld) batch following tables have data loaded:
L10N_BR_CNAE_CODES
L10N_BR_FEDERAL_SVC_COD
L10N_BR_UNIFIED_SVC_CODES
L10N_BR_NCM_CHAR_CODES
L10N_BR_NCM_CODES
L10N_BR_NCM_IPI_CODES
L10N_BR_NCM_PAUTA_CODES
FISCAL_ATTRIB_UPDATES
FM_NOP
L10N_BR_NCM_CEST_CODES
L10N_BR_CONTRIB_TYPES
L10N_BR_EXCEPTION_CODES
FM_TAX_CODES
L10N_BR_DIFF_TAX_REGIME
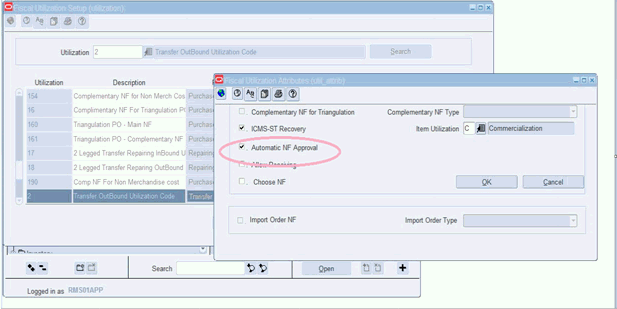
Ensure you have established proper configuration mapping involving requisition, document type, utilization code relationship, and utilization code parameters:
|
Note:
|
ORFM system setup involves the following: System Options, Fiscal Number, Tolerances, and NF-e Configuration setup.
Initial setup is provided through Control scripts that were run during installation. This initial setup allows RFM, after installation process, perform all functions appropriately. System Options that refers fiscal utilizations and document type, all combinations are already in system.
System administration is permitted modify any ORFM system options values to match business needs, but make sure to avoid invalid mask/invalid format error.
Create a Partner in RMS and set the values in the following columns to avoid invalid partner id error while receiving the PO in RWMS:
FM_SYSTEM_OPTIONS .EDI_DEF_PTNR_TYPE= 'E'
FM_SYSTEM_OPTIONS .EDI_DEF_PTNR_ID= partner_id
For the transactions like RTV, Transfer, Inv Adj, and XC Orders whether the NF generated must be in Validated/Approved status depends on the attribute AUTO_APPROVE_IND set for the particular transaction's util_id.
Setup 2 transfer entities (org units) in RMS - 1 for intercompany and 2nd for intracompany transfers.
Ensure that customer order created from external order management system should be a numeric avoiding alpha numeric.
For the SIM to send the pre-shipment message for various transactions, following fields in CONFIG_STORE table should be set to true:
PRESHIPMENT_NOTIFICATION=true
PRESHIPMENT_NOTIFICATION_RETURN=true
PRESHIPMENT_NOTIFICATION_TRANSFER=true
For Over-receiving/Under receiving in SIM, whether to accept the quantity more/less than the ordered quantity depends on the following options which has to be set in CONFIG_STORE table:
CONFIG_STORE.DIRECT_DELIVERY_REMOVE_OVER_RECEIVE='TRUE'(removes the excess qty than the ordered Qty
CONFIG_STORE. DIRECT_DELIVERY_REMOVE_DAMAGES='TRUE'(removes the excess damaged qty than the ordered Qty)
|
Note: A Return NF will be created in ORFM for the excess Qty than the ordered Qty, incase if the above parameters are set to false. |
To enable Brazil localization in RWMS, the following system options should be set up for all facilities:
Set local_brazil and loc_brazil_auto_recv to Y in SCP table
While creating Appointment for PO in RWMS, Schedule Number field should be enabled in ORFM environment. Below is the field in SCP table which should be set to Y in order to enable that field for all facilities.
update scp set scp_current_val='Y' where facility_id='facility id' and scp_name='recv_schedule_nbr'';
You need to setup Warehouse and Store Printers in BI publisher for printing and let NF status to Warehouse and Store personal so that shipping/receiving of inventory can be completed at respective locations.
The steps to configure warehouse and store printer (network printers) in BI publisher: are as follows:
Login to BI Publisher as administrator.
Navigate to Printer Configuration.
Click Add Printer and printer URI name and filter.
|
Note: Network administrator should be able to provide printer URI information. |
Click Save.
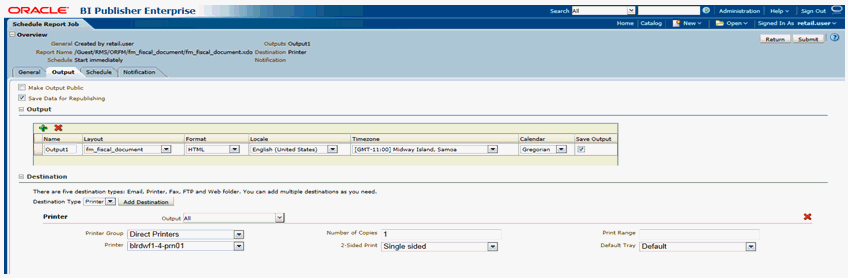
The steps to print NF status to warehouse or store printer setup in BI publisher are as follows:
Login to RMS/ORFM, navigate to Fiscal Management > Receiving/Issue.
Select a schedule in approved status and open Nota Fiscal.
On Fiscal Doc form, click Options > Print Document, BI publisher form appears with fiscal document details.
Go to Output, click Add Destination, select Printer Group, and Printer (configured with above steps) then click Submit.
|
Note: The printer configured here will be setup in RWMS/SIM (details below) as well for it to send printer info to ORFM (part of ship info RIB message) so that ORFM can print NF status to same printer to let RWMS personnel know of NF status and to continue with rest of the shipping or receiving process. |
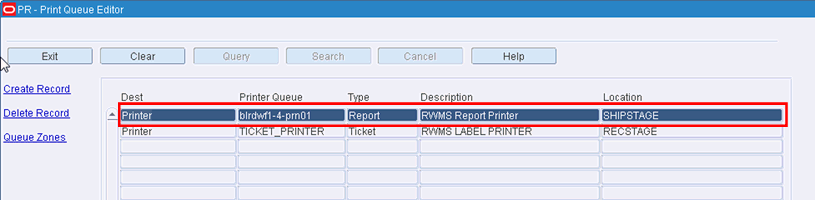
The steps to configure printer (setup in BI publisher) in RWMS are as follows:
|
Note: Part of customer order packing (for wh-c customer order shipping), this printer should be used in packing screen (Processing > Packing). |
Login to RWMS, navigate to Setup - Administration > Print Queue Editor.
Click Create Record > Fill detail Dest=printer, Type=Report, Printer Queue=description=printer name (setup in BI publisher), location=SHIPSTAGE