Oracle® Retail Store Inventory Management
Implementation Guide, Volume 1 -
Configuration
Release 14.1
E53312-03
July 2015
Oracle® Retail Store Inventory Management Implementation Guide,
Volume 1 - Configuration, Release 14.1
E53312-03
Copyright © 2015, Oracle and/or its affiliates. All
rights reserved.
Primary Author: Bernadette Goodman
This software and related documentation are provided
under a license agreement containing restrictions on use and disclosure and are
protected by intellectual property laws. Except as expressly permitted in your
license agreement or allowed by law, you may not use, copy, reproduce,
translate, broadcast, modify, license, transmit, distribute, exhibit, perform,
publish, or display any part, in any form, or by any means. Reverse engineering,
disassembly, or decompilation of this software, unless required by law for
interoperability, is prohibited.
The information contained herein is subject to change
without notice and is not warranted to be error-free. If you find any errors,
please report them to us in writing.
If this is software or related documentation that is
delivered to the U.S. Government or anyone licensing it on behalf of the U.S.
Government, then the following notice is applicable:
U.S. GOVERNMENT END USERS: Oracle programs, including
any operating system, integrated software, any programs installed on the
hardware, and/or documentation, delivered to U.S. Government end users are
"commercial computer software" pursuant to the applicable Federal
Acquisition Regulation and agency-specific supplemental regulations. As such,
use, duplication, disclosure, modification, and adaptation of the programs,
including any operating system, integrated software, any programs installed on
the hardware, and/or documentation, shall be subject to license terms and
license restrictions applicable to the programs. No other rights are granted to
the U.S. Government.
This software or hardware is developed for general use
in a variety of information management applications. It is not developed or intended
for use in any inherently dangerous applications, including applications that
may create a risk of personal injury. If you use this software or hardware in
dangerous applications, then you shall be responsible to take all appropriate
fail-safe, backup, redundancy, and other measures to ensure its safe use.
Oracle Corporation and its affiliates disclaim any liability for any damages
caused by use of this software or hardware in dangerous applications.
Oracle and Java are registered trademarks of Oracle
and/or its affiliates. Other names may be trademarks of their respective
owners.
Intel and Intel Xeon are trademarks or registered
trademarks of Intel Corporation. All SPARC trademarks are used under license
and are trademarks or registered trademarks of SPARC International, Inc. AMD,
Opteron, the AMD logo, and the AMD Opteron logo are trademarks or registered
trademarks of Advanced Micro Devices. UNIX is a registered trademark of The
Open Group.
This software or hardware and documentation may provide access to or
information about content, products, and services from third parties. Oracle
Corporation and its affiliates are not responsible for and expressly disclaim
all warranties of any kind with respect to third-party content, products, and
services unless otherwise set forth in an applicable agreement between you and
Oracle. Oracle Corporation and its affiliates will not be responsible for any
loss, costs, or damages incurred due to your access to or use of third-party
content, products, or services, except as set forth in an applicable agreement
between you and Oracle.
Value-Added
Reseller (VAR) Language
Oracle Retail VAR Applications
The following restrictions and provisions only apply to
the programs referred to in this section and licensed to you. You acknowledge
that the programs may contain third party software (VAR applications) licensed
to Oracle. Depending upon your product and its version number, the VAR
applications may include:
(i) the MicroStrategy Components developed and
licensed by MicroStrategy Services Corporation (MicroStrategy) of McLean, Virginia to Oracle and imbedded in the MicroStrategy for Oracle Retail Data
Warehouse and MicroStrategy for Oracle Retail Planning & Optimization
applications.
(ii) the Wavelink component developed and licensed
by Wavelink Corporation (Wavelink) of Kirkland, Washington, to Oracle and
imbedded in Oracle Retail Mobile Store Inventory Management.
(iii) the software component known as Access Via™
licensed by Access Via of Seattle, Washington, and imbedded in Oracle Retail
Signs and Oracle Retail Labels and Tags.
(iv) the software component known as Adobe Flex™ licensed
by Adobe Systems Incorporated of San Jose, California, and imbedded in Oracle
Retail Promotion Planning & Optimization application.
You acknowledge and confirm that Oracle grants you use
of only the object code of the VAR Applications. Oracle will not deliver source
code to the VAR Applications to you. Notwithstanding any other term or
condition of the agreement and this ordering document, you shall not cause or
permit alteration of any VAR Applications. For purposes of this section,
"alteration" refers to all alterations, translations, upgrades,
enhancements, customizations or modifications of all or any portion of the VAR
Applications including all reconfigurations, reassembly or reverse assembly,
re-engineering or reverse engineering and recompilations or reverse
compilations of the VAR Applications or any derivatives of the VAR
Applications. You acknowledge that it shall be a breach of the agreement to
utilize the relationship, and/or confidential information of the VAR
Applications for purposes of competitive discovery.
The information contained in this document is for
informational sharing purposes only and should be considered in your capacity
as a customer advisory board member or pursuant to your beta trial agreement
only. It is not a commitment to deliver any material, code, or functionality,
and should not be relied upon in making purchasing decisions. The development,
release, and timing of any features or functionality described in this document
remains at the sole discretion of Oracle.
This document in any form, software or printed
matter, contains proprietary information that is the exclusive property of
Oracle. Your access to and use of this confidential material is subject to the
terms and conditions of your Oracle Master Agreement, Oracle License and
Services Agreement, Oracle PartnerNetwork Agreement, Oracle distribution
agreement, or other license agreement which has been executed by you and Oracle
and with which you agree to comply. This document and information contained
herein may not be disclosed, copied, reproduced, or distributed to anyone
outside Oracle without prior written consent of Oracle. This document is not
part of your license agreement nor can it be incorporated into any contractual
agreement with Oracle or its subsidiaries or affiliates.
The VAR Applications contain trade secrets of Oracle and
Oracle's licensors and Customer shall not attempt, cause, or permit the alteration,
decompilation, reverse engineering, disassembly or other reduction of the VAR
Applications to a human perceivable form. Oracle reserves the right to replace,
with functional equivalent software, any of the VAR Applications in future
releases of the applicable program.
Preface................................................................................................................... xv
Audience...................................................................................................................................... xv
Related Documents................................................................................................................... xv
Supplemental Documentation on My Oracle Support............................................. xv
Documentation Accessibility................................................................................................ xvi
Access to Oracle Support................................................................................................ xvi
Customer Support.................................................................................................................... xvi
Review Patch Documentation.............................................................................................. xvi
Improved Process for Oracle Retail Documentation Corrections............................... xvi
Oracle Retail Documentation on the Oracle Technology Network........................... xvii
Conventions............................................................................................................................. xvii
1 Introduction........................................................................................................... 1
Skills Needed for Implementation........................................................................................... 1
Applications.......................................................................................................................... 1
Technical Concepts.............................................................................................................. 2
2 Technical Architecture.......................................................................................... 3
SIM Technology Stack................................................................................................................ 3
Advantages of the Architecture............................................................................................... 3
SIM Technical Architecture Diagrams and Description................................................... 4
Client Tier............................................................................................................................... 4
Middle (Server) Tier............................................................................................................ 5
Database Tier......................................................................................................................... 6
Distributed Topology.................................................................................................................. 6
3 Setup and Configuration....................................................................................... 9
Security........................................................................................................................................... 9
External Authentication/Authorization....................................................................... 9
Internal Authentication/Authorization........................................................................ 9
External/Internal Authentication and Internal Authorization............................... 9
External/Internal Authentication/Authorization................................................... 10
How SIM Associates Menus and Menu Items.................................................................... 12
SIM Permission Definitions............................................................................................. 12
SIM Role Definitions......................................................................................................... 12
External Authentication/Authorization Setup (LDAP)................................................. 14
SIM User Definitions......................................................................................................... 14
SIM User Allowed Stores................................................................................................. 14
SIM User Role Assignments............................................................................................ 14
Oracle Software Security Assurance (OSSA)..................................................................... 15
Setting up LDAP Data for SIM............................................................................................... 15
readme.txt............................................................................................................................ 16
sim_objectclasses.ldif........................................................................................................ 16
sim_add_company.ldif..................................................................................................... 16
sim_add_containers.ldif................................................................................................... 16
sim_data_roles.ldif............................................................................................................ 16
sim_data_stores.ldif.......................................................................................................... 16
sim_data_users.ldif........................................................................................................... 16
sim_data_users_roles.ldif................................................................................................ 16
Using Oracle Virtual Directory to Authenticate SIM....................................................... 17
Internal Authentication/Authorization Setup (SIM)...................................................... 17
SIM User Definitions......................................................................................................... 17
SIM User Allowed Stores................................................................................................. 17
SIM User Role Assignments............................................................................................ 18
External/Internal Authentication/Authorization Setup
(SIM/LDAP)..................... 18
SIM User Definitions......................................................................................................... 18
SIM User Allowed Stores................................................................................................. 18
SIM User Role Assignments............................................................................................ 18
External/Internal Authentication and Internal Authorization
Setup (SIM/LDAP) 18
SIM User Definitions......................................................................................................... 19
SIM User Allowed Stores................................................................................................. 19
SIM User Role Assignments............................................................................................ 19
Time Zones.................................................................................................................................. 19
Defaulting Store Configuration Parameters....................................................................... 19
Data Seeding............................................................................................................................... 19
Data Seeding Components.............................................................................................. 23
Defining Store List............................................................................................................. 24
Executing Data Seeding Scripts...................................................................................... 24
Security FAQ............................................................................................................................... 24
4 Functional Design and
Overviews....................................................................... 25
Store Inventory Management Overview............................................................................. 25
Solution and Business Process Overview............................................................................ 26
Inventory Management........................................................................................................... 27
Inventory Adjustments Functional Overview................................................................... 27
A Summary of Reason Codes and Dispositions......................................................... 28
Wastage Functional Overview....................................................................................... 33
Store Orders Functional Overview................................................................................ 34
Item Requests............................................................................................................................. 35
Price Changes Functional Overview............................................................................. 37
Sequencing Functional Overview.................................................................................. 39
Shelf Replenishment Functional Overview................................................................. 41
Stock Counts Functional Overview............................................................................... 44
Item Basket.......................................................................................................................... 53
Shipping and Receiving Functional Overview.................................................................. 54
Store-to-Store Transfer Functional Overview............................................................ 54
Warehouse Delivery.......................................................................................................... 59
Direct Store Delivery (DSD)............................................................................................ 61
Returns and Return Requests Functional Overview........................................................ 69
Returns.................................................................................................................................. 69
Return Requests.................................................................................................................. 70
Updating Reason Codes................................................................................................... 71
Customer Order Management............................................................................................... 71
Customer Orders................................................................................................................ 72
Customer Order Picking................................................................................................... 73
Customer Order Deliveries.............................................................................................. 73
Customer Order Reverse Picks....................................................................................... 74
Lookups........................................................................................................................................ 75
Item Lookup........................................................................................................................ 75
Supplier Lookup................................................................................................................. 77
Container Lookup.............................................................................................................. 78
Transaction Lookup........................................................................................................... 79
Ticketing Functional Overview...................................................................................... 80
Unique Identification Number (UINs)................................................................................ 83
Functional Overview........................................................................................................ 83
Auto Generated Serial Numbers (AGSNs).................................................................. 84
UIN AutoNumber.............................................................................................................. 85
Auditing............................................................................................................................... 88
UIN Setup............................................................................................................................ 88
UIN Status........................................................................................................................... 89
Resolving UIN Discrepancies......................................................................................... 91
Extended Attributes (including GS1)................................................................................... 93
Functional Overview........................................................................................................ 93
Attributes-Configuration................................................................................................. 95
Attributes-Processing........................................................................................................ 95
5 System and Store
Administration........................................................................ 97
Overview..................................................................................................................................... 97
Product Groups/Scheduler.................................................................................................. 101
Store Administration.............................................................................................................. 102
Set Store Options.............................................................................................................. 102
Store Administration Options Table........................................................................... 103
System Administration.......................................................................................................... 118
Set System Options.......................................................................................................... 118
System Administration Options Tables..................................................................... 119
6 Reporting........................................................................................................... 143
Operational Reports............................................................................................................... 143
Analytical (and Ad Hoc) Reports........................................................................................ 143
Assumptions............................................................................................................................. 143
SIM Reporting Framework................................................................................................... 143
Printing to Local Printers in a Store............................................................................ 143
SIM Operational Reports............................................................................................... 145
Report Formats................................................................................................................. 147
Configuring a Report Printer in SIM.......................................................................... 165
Defining a Session Printer in SIM................................................................................ 166
Uploading Reports........................................................................................................... 166
Setting up Report Formats in SIM............................................................................... 167
SIM Reports Internationalization................................................................................ 170
Number, Date & Currency Format Support............................................................. 174
Report Engine Functional Specification............................................................................ 176
Functional Requirements............................................................................................... 176
Detailed Report Information........................................................................................ 177
Bill of Lading Report............................................................................................................... 185
Printing the Return Bill of Lading............................................................................... 185
Printing the Transfer Bill of Lading............................................................................ 186
7 Internationalization............................................................................................ 187
Translation................................................................................................................................ 187
DAO Layer................................................................................................................................ 188
Tables.................................................................................................................................. 188
Loading Data.................................................................................................................... 188
Retrieving Translations.................................................................................................. 188
Types of Internationalization............................................................................................... 188
Logging...................................................................................................................................... 188
Text...................................................................................................................................... 188
Numbers............................................................................................................................. 189
Dates (PC).......................................................................................................................... 189
Dates (HH)........................................................................................................................ 189
Money................................................................................................................................. 189
Handheld Device Configuration for Japanese Display.......................................... 189
Brazil-Specific Setup.............................................................................................................. 190
Direct Store Delivery...................................................................................................... 190
Internal Deliveries........................................................................................................... 190
Receiver Unit Adjustments........................................................................................... 191
Unsupported Processes.................................................................................................. 191
A Appendix SIM Permissions............................................................................... 193
B Appendix LDAP Schema.................................................................................... 247
Object Classes........................................................................................................................... 247
Directory Entry Structure..................................................................................................... 249
Configuration File ldap.cfg................................................................................................... 249
Sample LDIF Data Files......................................................................................................... 249
Store.................................................................................................................................... 250
Role...................................................................................................................................... 250
User..................................................................................................................................... 250
User’s Role......................................................................................................................... 251
C Appendix Transfer
Localization........................................................................ 253
Process Requirements............................................................................................................ 253
Transfer Zones.................................................................................................................. 253
Auto Receiving................................................................................................................. 253
Buddy Stores..................................................................................................................... 253
Transfer Force Close Indicator..................................................................................... 254
Receive Entire Transfer Parameter............................................................................. 256
Store Receiving................................................................................................................. 256
Dispatching a Transfer................................................................................................... 256
D Appendix UPC Barcode..................................................................................... 259
Differences Between UPC-A and UPC-E........................................................................... 259
Conversion Between UPC-A and UPC-E.......................................................................... 260
Quick Response Codes........................................................................................................... 261
List of Figures
Figure: SIM Technical
Architecture.. 4
Figure: SIM
Deployment.. 7
Figure: Data
Seeding Technical Architecture.. 20
Figure: Business
Process Flow – Inventory Adjustments PC.. 32
Figure: Business
Process Flow - Inventory Adjustment Reason Maintenance PC 33
Figure: Business
Process Flow (non-sale bases). 34
Figure: Store
Orders Business Process Flow – PC.. 35
Figure: Item
Requests Business Process Flow – PC.. 37
Figure: Price
Changes Business Process Flow – PC.. 39
Figure: Sequencing
Business Process Flow – PC.. 41
Figure: Shelf
Replenishment Business Process Flow – PC.. 44
Figure: Business
Flow (Unit, Problem Line, Unit and Amount and Third Party) 50
Figure: Business
Flow – Ad Hoc (PC only). 51
Figure: Business
flow – Third Party.. 52
Figure: Business
Flow - Future Stock Count.. 53
Figure: Store to
Store Transfers Business Process Flow – PC.. 55
Figure: Transfer
Request to Transfer Receipt.. 58
Figure: Warehouse
Receiving Business Process Flow – PC.. 60
Figure: Direct
Store Delivery (new created) Business Process Flow – PC.. 64
Figure: DSD
Multiple Available ASNs Business Process Flow – PC.. 65
Figure: DSD
Updating and Defaulting Cost Business Process Flow – PC.. 66
Figure: Return
Requests Business Process Flow – PC.. 70
Figure: Customer
Order Management Business. 73
Figure: Item Lookup
Business Process Flow – PC.. 76
Figure: Supplier
Lookup Business Process Flow – PC.. 77
Figure: Container
Lookup Business Process Flow – PC.. 78
Figure: Transaction
HIstory Lookup Business Process Flow – PC.. 79
Figure: Ticketing
Business Process Flow – PC.. 82
Figure: Extended
Attribute Setup PC Screen Flow – PC.. 93
Figure: Store
Administration PC Screen Flow... 98
Figure: The Store
Admin Window... 100
Figure: The System
Admin Window... 116
Figure: Local
Printing in a Store.. 142
Figure: BolReturnReport.. 145
Figure: BolTransferReport.. 146
Figure: CustomerOrderBinLabelReport.. 146
Figure: CustomerOrderDeliveryBOLReport.. 147
Figure: CustomerOrderDeliveryReport.. 147
Figure: CustomerOrderPickDiscrepancyReport.. 148
Figure: CustomerOrderPickReport.. 148
Figure: CustomerOrderReport.. 149
Figure: CustomerOrderReversePickReport.. 149
Figure: DirectDeliveryDiscrepantItemsReport.. 150
Figure: DirectDeliveryReport.. 151
Figure: InventoryAdjustmentReport.. 152
Figure: ItemBasketDefaultReport.. 152
Figure: ItemDetailReport.. 153
Figure: ItemRequestReport.. 154
Figure: ReturnReport.. 155
Figure: ShelfReplenishmentReport.. 156
Figure: StockCountAllLocReport.. 157
Figure: StockCountRejectedItemReport.. 158
Figure: StockCountReport.. 159
Figure: StoreOrderReport.. 160
Figure: TransferReport.. 161
Figure: WarehouseDeliveryReport.. 162
Figure: ShelfAdjustmentReport.. 163
Figure: Report
Formats Screen.. 166
Figure: Oracle BI
Publisher Desktop Options in Word.. 168
Figure: TransferReport.rtf. 169
Figure: Localize the
Template.. 169
Figure: Extract
Text for Export to XLIFF File.. 170
Figure: Save the
XLIFF File.. 170
Figure: Template
and Placeholder of the XML Tag.. 172
Figure: Text Form
Field Options Window... 172
Figure: Form Field
Help Text Window... 173
Figure: UPC-A and
UPC-E Differences. 257
Oracle Retail Store Inventory
Management, Implementation Guide,
Volume 1 - Configuration, Release 14.1
Oracle welcomes customers' comments and suggestions on the
quality and usefulness of this document.
Your feedback is important, and helps us to best meet your needs
as a user of our products. For example:
§
Are the implementation steps correct and complete?
§
Did you understand the context of the procedures?
§
Did you find any errors in the information?
§
Does the structure of the information help you with your tasks?
§
Do you need different information or graphics? If so, where, and
in what format?
§
Are the examples correct? Do you need more examples?
If you find any errors or have any other suggestions for
improvement, then please tell us your name, the name of the company who has
licensed our products, the title and part number of the documentation and the
chapter, section, and page number (if available).
Note:
Before sending us your comments, you might like to check that you have the latest
version of the document and if any concerns are already addressed. To do this,
access the Online Documentation available on the Oracle Technology Network Web
site. It contains the most current Documentation Library plus all documents
revised or released recently.
Send your comments to us using the electronic mail address: retail-doc_us@oracle.com
Please give your name, address, electronic mail address, and
telephone number (optional).
If you need assistance with Oracle software, then please contact
your support representative or Oracle Support Services.
If you require training or instruction in using Oracle software,
then please contact your Oracle local office and inquire about our Oracle
University offerings. A list of Oracle offices is available on our Web site at www.oracle.com.
The Oracle Retail Store Inventory Management
Implementation Guide, Volume 1– Configuration provides detailed
information that is important when implementing SIM. The Oracle
Retail Store Inventory Management Implementation Guide, Volume 1– Configuration
provides the following information and more:
§
System and store administration
Details the SIM system and store options. System option
parameters allow a user to change the parameter for the entire system and all
stores. Store option parameters are only specific to the store the current user
is logged in to.
§
Functional design and overview
Provides detailed information concerning the various aspects of
the SIM functional areas.
This document is intended for the Oracle Retail Store Inventory
Management application integrators and implementation staff, as well as the
retailer’s IT personnel.
For more information, see the following documents in the Oracle
Retail Store Inventory Management Release 14.1 documentation set:
§
Oracle Retail Store Inventory Management
Implementation Guide, Volume 2 – Integration with Oracle Retail Applications
§
Oracle Retail Store Inventory Management
Implementation Guide, Volume 3 – Mobile Store Inventory Management
§
Oracle Retail Store Inventory Management
Implementation Guide, Volume 4 – Extension Solutions
§
Oracle Retail Store Inventory Management
Installation Guide
§
Oracle Retail Store Inventory Management
Operations Guide
§
Oracle Retail Store Inventory Management
Release Notes
§ Oracle Retail Store Inventory Management User Guide
The following document
is available through My Oracle Support. Access My Oracle Support at the
following URL:
http://support.oracle.com/
Enterprise Integration Guide (Located in the Oracle Retail Integration
Suite Library on the Oracle Technology
Network)
The Enterprise Integration Guide is an HTML document that
summarizes Oracle Retail
integration. This version of the Integration Guide is concerned with the two integration styles that
implement messaging patterns: Asynchronous JMS Pub/Sub Fire-and-Forget and Web Service Request
Response. The Enterprise Integration Guide
addresses the Oracle Retail Integration Bus (RIB), a fully distributed
integration infrastructure
that uses Message Oriented Middleware (MOM) to integrate applications, and the Oracle Retail Service
Backbone (RSB), a productization of a set of
Web Services, ESBs and Security tools that standardize the deployment.
For information about Oracle's commitment to accessibility, visit
the Oracle Accessibility Program website at http://www.oracle.com/pls/topic/lookup?ctx=acc&id=docacc.
Oracle customers that have purchased support have access to
electronic support through My Oracle Support. For information, visit http://www.oracle.com/pls/topic/lookup?ctx=acc&id=info
or visit http://www.oracle.com/pls/topic/lookup?ctx=acc&id=trs
if you are hearing impaired.
To contact Oracle Customer Support, access My Oracle Support at
the following URL:
https://support.oracle.com
When contacting Customer Support, please provide the following:
§
Product version and program/module name
§
Functional and technical description of the problem (include
business impact)
§
Detailed step-by-step instructions to re-create
§
Exact error message received
§
Screen shots of each step you take
When you install the application for the first time, you install
either a base release (for example, 14.1) or a later patch release (for
example, 14.1.1). If you are installing the base release and additional patch
releases, read the documentation for all releases that have occurred since the
base release before you begin installation. Documentation for patch releases
can contain critical information related to the base release, as well as
information about code changes since the base release.
To more quickly address critical corrections to Oracle Retail
documentation content, Oracle Retail documentation may be republished whenever
a critical correction is needed. For critical corrections, the republication of
an Oracle Retail document may at times not be attached to a numbered software
release; instead, the Oracle Retail document will simply be replaced on the
Oracle Technology Network Web site, or, in the case of Data Models, to the
applicable My Oracle Support Documentation container where they reside.
This process will prevent delays in making critical corrections
available to customers. For the customer, it means that before you begin
installation, you must verify that you have the most recent version of the
Oracle Retail documentation set. Oracle Retail documentation is available on
the Oracle Technology Network at the following URL:
http://www.oracle.com/technetwork/documentation/oracle-retail-100266.html
An updated version of the applicable Oracle Retail document is
indicated by Oracle part number, as well as print date (month and year). An
updated version uses the same part number, with a higher-numbered suffix. For
example, part number E123456-02 is an updated version of a document with part
number E123456-01.
If a more recent version of a document is available, that version
supersedes all previous versions.
Documentation is packaged with each Oracle Retail product
release. Oracle Retail product documentation is also available on the following
Web site:
http://www.oracle.com/technetwork/documentation/oracle-retail-100266.html
(Data Model documents are not available through Oracle Technology
Network. These documents are packaged with released code, or you can obtain
them through My Oracle Support.)
Documentation should be available on this Web site within a month
after a product release.
The following text conventions are used in this document:
|
Convention
|
Meaning
|
|
boldface
|
Boldface type indicates graphical user interface elements
associated with an action, or terms defined in text or the glossary.
|
|
italic
|
Italic type indicates book titles, emphasis, or
placeholder variables for which you supply particular values.
|
|
monospace
|
Monospace type indicates commands within a paragraph,
URLs, code in examples, text that appears on the screen, or text that you
enter.
|
1
Oracle Retail Store Inventory Management (SIM) empowers store
personnel to sell, service, and personalize customer interactions by providing
users the ability to perform typical back office functionality on the store
sales floor. The results are greatly enhanced customer conversion rates,
improved customer service, lower inventory carrying costs, and fewer markdowns.
SIM delivers the information and flexible capabilities that store employees
need to maintain optimal inventory levels and to convert shoppers into buyers.
The SIM solution does the following:
§
Improves perpetual inventory levels by enabling floor-based
inventory management through handheld devices and store PCs.
§
Minimizes the time needed to process receipt and check-in of
incoming merchandise.
§
Receives, tracks, and transfers merchandise accurately,
efficiently, and easily.
§
Reduces technology costs by centralizing hardware requirements.
§
Guides users through required transactions.
§
Allows customizations to the product through an extensible
technology platform.
The retailer’s modifications are isolated during product
upgrades, lowering the total cost of ownership.
The implementer needs an understanding of the applications and
technical concepts described in this chapter.
|
Note
See the Oracle Retail Store Inventory
Management Installation Guide for a list of the Oracle Retail
applications that are certified with this version of SIM.
|
The implementer should understand the interface requirements of
the integrated applications (with or without Retail Integration Bus (RIB) and
data sources for the foundation data. Depending on the version of SIM that you
are using, SIM might be deployed either as:
§
Standalone (that is, without RIB)
§
With Oracle Retail Merchandising System (RMS), Oracle Retail
Price Management (RPM) and Oracle Retail Integration Bus (RIB)
§
With Oracle Retail Merchandising System, Oracle Retail Price
Management, Oracle Retail Warehouse Management System (RWMS) and Oracle Retail
Integration Bus
§
With Oracle Retail Point-of-Service (ORPOS) alone
§
With Oracle Retail Merchandising System, Oracle Retail Price
Management, Oracle Retail Warehouse Management System, Oracle Retail Integration
Bus, and Oracle Retail Point-of-Service
The implementer needs functional knowledge of the following
applications:
§
RMS
§
RIB
§
RPM
§
ORPOS
§
RWMS
The implementer should understand the following technical
concepts:
§
UNIX system administration, shell scripts, and job scheduling
§
Web Logic application server (for Oracle Retail deployments)
§
Performance constraints based on the retailer’s infrastructure
§
Technical architecture, deployment options with load balancer
§
Retailer’s hierarchical (SKU/store/day) data
§
Knowledge of Enterprise-Java including web services, PL/SQL
§
LDAP setup and usage
§
BIPublisher (Oracle printing engine) and Internet printing
protocol
2
This chapter describes the technical architecture for Oracle Retail
Store Inventory Management.
SIM has an n-tier architecture consisting of a client tier, a
middle (server) tier, and a data tier. The client tier contains a PC client (a
Java desktop application) and handheld devices. The middle (server) tier
contains the SIM server (deployed as a J2EE application inside the Oracle
Application Server) and the Wavelink server (a standalone server for the
handheld devices). The data tier consists of an Oracle 11g database and an LDAP
directory.
SIM’s robust distributed computing platform enables enhanced
performance and allows for scalability.
The n-tier architecture of SIM allows for the encapsulation of
business logic, shielding the client from the complexity of the back-end
system. Any given tier need not be concerned with the internal functional tasks
of any other tier.
The following list is a summary of the advantages that accompany
SIM’s use of an n-tier architectural design.
§
Scalability: Hardware and software can be added to meet retailer
requirements for each of the tiers.
§
Maintainability: The separation of presentation, business logic,
and data makes the software cleaner, more maintainable, and easier to modify.
§
Platform independence: The code is written once, but can run
anywhere that Java can run.
§
Cost effectiveness: Open source market-proven technology is
utilized, while object-oriented design increases reusability for faster
development and deployment.
§
Ease of integration: The reuse of business objects and function
allows for faster integration to enterprise subsystems. N-tier architecture has
become an industry standard.
§
High availability: Middleware is designed to run in a clustered
environment or on a low-cost blade server.
§
Endurance: Multi-tiered physically distributed architecture
extends the life of the system.
§
Flexibility: The system allocates resources dynamically based on
the workload.
This section provides a high-level overview of SIM’s technical
architecture. The figure below illustrates the major pieces of the typical
three-tiered SIM implementation.
Figure: SIM Technical
Architecture
SIM can be deployed on a wide variety of clients, including a
desktop computer, a hand-held wireless device, and so on. The GUI is
responsible for presenting data to the user and for receiving data directly
from the user through the front end. The presentation tier only interacts with
the middle tier (as opposed to the database tier). To optimize performance, the
SIM PC front end facilitates robust client-side processing.
The PC side of SIM is built upon a fat client architecture, which
was developed using Swing, a toolkit for creating rich graphical user
interfaces (GUIs) in Java applications.
The handheld communication infrastructure piece, known as the
Oracle Retail Wireless Foundation Server, enables the handheld devices to
communicate with the SIM server. The handheld devices talk to the Oracle Retail
Wireless Foundation Server, which in turn makes calls as a client to the SIM server.
By providing the link between the SIM client and the database,
the middle tier handles virtually all of the business logic processing that
occurs within SIM’s multi-tiered architecture. The middle tier is comprised of
services, most of which are related to business functionality. For example, an
item service gets items, and so on. Within SIM, business objects are beans
(that is, Java classes that have one or more attributes and corresponding
set/get methods) that represent a functional entity. Most business objects have
very few operations; in other words, business objects can be thought of as data
containers, which by themselves have almost no business functionality.
Although the PC client and the handheld client use the middle
tier’s functionality differently, the middle tier is the same for both clients.
For example, the handheld device, used on the fly, performs frequent commits to
the database, while the PC performs more infrequent commits. The application is
flexible in that it accommodates the different styles of client-driven
processing.
The middle tier is designed to operate in a stateless manner,
meaning it receives whatever instruction it needs to access the database from
the client and does not retain any information between client calls. Further,
SIM has failover abilities; if a specific middle tier server fails, processing
can roll over to another SIM server for continued processing.
If the workload warrants, SIM can be vertically scaled by adding
additional application servers. Because SIM servers are running on multiple
application servers in a stateless system, work can be seamlessly distributed
among the servers. The result of this feature is that SIM clients do not need
to know that additional application servers have been added to help with the
workload. SIM application servers can contain multiple containers, each of
which is related to a unique Java Virtual Machine (JVM). Each container
corresponds to a specific SIM instance. Introducing multiple instances of a
container allows SIM retailers to more effectively distribute the processing
among several containers and thereby horizontally scale the platform. As the
request load for a service increases, additional instances of the service are
automatically created to handle the increased workload.
The middle tier consists of the following core components, which
allow it to make efficient and reliable calls to the SIM database:
§
Server services contain the pertinent business logic.
§
DAO classes handle database interaction.
§
Databeans contain the SQL necessary to retrieve data from and
save data to the database.
|
Note
There is at least one databean for every table and view
in the database, but there may be more, used for different specific purposes.
|
Data Access Objects (DAO)
§
DAOs are classes that contain the logic necessary to find and
maintain data persistence. They are used by services when database interaction
is required.
Java Database Connectivity (JDBC)
DAOs communicate with the database through the industry standard
JDBC protocol. In order for the SIM client to retrieve the desired data from
the database, a JDBC connection must exist between the middle tier and the
database. JDBC facilitates the communication between a Java application and a
relational database. In essence, JDBC is a set of Application Programming
Interfaces (APIs) that offer a database-independent means of extracting and/or
inserting data to or from a database. To perform those insertions and
extractions, SQL code also resides in this tier facilitating create, read,
update, and delete actions.
The database tier is the application’s storage platform,
containing the physical data used throughout the application. The database
houses data in tables and views; the data is used by the SIM server and then passed
to the client. The database also houses stored procedures to do data
manipulation in the database itself.
One of SIM’s most significant advantages is its flexible
distributed topology. SIM offers complete location transparency because the
location of data and/or services is based upon the retailer’s business
requirements, not upon technical limitations. SIM’s client server communication
is an EJB call (which uses RMI). Because the server does not have to be in the
same store as the in-store clients, the clients log onto the server over the
wire.
SIM’s client code makes use of helper and framework classes that
contain the logic to look up remote references to EJBs on the server and make
calls to them. These helper and framework contain no business logic but contain
only enough code to communicate with the server.
For example, if a helper class is called by the client to perform
the method update shipment, the helper class appears to have that capability,
though in reality it only behaves as a passage to the EJB remote reference,
which is looked up from the server. The EJB remote reference communicates
across the network with the server to complete the business-logic driven
processing. The server performs the actual update shipment business logic and
returns any return values or errors to the client.
Connectivity between the SIM client and the middle tier is
achieved through the Java Naming and Directory Interface (JNDI), which the SIM
client accesses with the necessary IP address and port. JNDI contains the means
for the client to look up services available on the application server.
The figure below illustrates SIM’s deployment.
Figure: SIM Deployment
3
|
Note
For information about Oracle Single Sign-On and Oracle
Retail Store Inventory Management, see the Oracle Retail
Store Inventory Management Installation Guide.
|
SIM provides role-based user access control in order to manage
application functionality and data available to users.
This role-based user access control allows security to be managed
in a way that corresponds closely to the organization’s structure.
This model provides improved support for customization,
maintenance, and management of security in SIM, simplifying customer
implementations while maintaining a high degree of control and flexibility.
Security is handled by assigning privileges (permissions) to a
role in SIM. These roles are assigned to stores and users (in LDAP or SIM). If
the user does not have permission, the feature will not be available for user.
At this time, SIM secures buttons and drop down values on the PC
and menu options on the handheld.
To allow flexibility on how security is implemented, four modes
of deployment exist:
An external system controls security (LDAP). Users and role/store
assignments are administered in LDAP. Roles are set up in SIM and need to match
those set up in LDAP. Authentication is performed in LDAP. Note that Oracle
LDAP (for example, OID) is the only supported LDAP. This is the default and
recommended model of deployment.
SIM controls all aspects of security. Users, roles,
user/role/store assignments are all administered in SIM. Authentication is
performed in SIM.
A hybrid approach will be used for authentication. Each time a
user is successfully authenticated in an external system, the user information
in SIM will be updated, including password. Then if the external security
system is temporarily unavailable, SIM will try to authenticate the user
internally with the password that was used during the last successful
authentication.SIM will be able to authenticate internally created users as
well in this mode. Note that this is only meant to be used as exception
mechanism and not a permanent deployment model. Also, this is not a two-way
process flow. It is uni-directional from LDAP to internal.
All users and roles are kept in SIM only, but the password can be
handled externally. The external password can be cached in case of connection
failure, but LDAP retains the master password configuration. SIM will check the
password externally. If it cannot be found, SIM will look internally. If LDAP
rejects the password, then the assumption is that the password is externally
controlled. SIM will be able to authenticate internally created users as well
in this mode.
|
Table: LDAP and SIM Process Control
|
|
Mode of Deployment
|
Application Control
|
Process Control
|
|
|
Internal Authentication/ Authorization
|
|
SIM:
§ User
§ Role
§ Store
§ Password
§ Login
|
|
|
External Authentication/ Authorization
|
|
LDAP:
§ User
§ Role
§ Store
§ Password
§ Login
|
|
|
External/Internal Authentication and Internal
Authorization
|
LDAP control
|
LDAP:
§ User
§ Role
§ Store
§ Password
§ Login
SIM:
§ Login (use cache in
case LDAP is not reachable)
|
|
|
External/Internal Authentication and Internal
Authorization
|
SIM & LDAP control
|
LDAP:
§ User
§ Password
§ Login
SIM:
§ User
§ Role
§ Store
§ Login (use cache in
case LDAP is not reachable)
|
|
|
External/Internal Authentication and Internal
Authorization
|
SIM Control
|
SIM:
§ User
§ Role
§ Store
§ Password
§ Login
|
|
|
External/Internal Authentication/ Authorization
|
LDAP control
|
LDAP:
§ Password
§ Login
§ User
§ Role
§ Store
SIM:
§ Login (use cache in
case LDAP is not reachable)
|
|
|
External/Internal Authentication/ Authorization
|
LDAP & SIM control
|
LDAP:
§ Password
§ Login
§ User
§ Role
§ Store
SIM:
§ Role
§ Store
§ Login (use cache in
case LDAP is not reachable)
|
|
|
External/Internal Authentication/ Authorization
|
SIM Control
|
SIM:
§ User
§ Role
§ Store
§ Password
§ Login
|
|
Definition of process controls:
§
User – user create
§
Role – role user assignment
§
Store – store user assignment
§
Password – password creation/maintenance
§
Login – user authentication control
Menus and buttons on the PC are defined in the PC_MENU_ITEM
table. In order to add a new button, a new row must be put into the
PC_MENU_ITEM table.
For more information, see "Update the PC Screen" in Oracle Retail Store Inventory Management Implementation Guide –
Volume 4, Extension Solutions.
The permissions used in SIM are stored in the SECURITY_PERMISSION
table. Permissions are identified by a unique name, which is used by the
application to control user access and in the navigation.xml file to associate
menus with permissions.
Permissions can be associated with a device type (PC, handheld,
server) which is used to retrieve a user’s authorized permissions during log
in. When a user logs in on the PC client, only permissions with a device type
of PC (or no device type) are available to the user.
Permissions can be associated with a permission group, which are
stored in the SECURITY_PERMISSION_GROUP table. Permission groups are sets of
permissions that allow permissions to be filtered by category during role creation
or searches.
For more information, see Appendix A, "SIM Permissions".
A role is a named collection of permissions. Roles are created
and edited in SIM using the security administration screens, and are stored in
the SECURITY_ROLE, SECURITY_ROLE_PERMISSION tables. When using external
security, the role header information is also stored in LDAP as a simRole,
although only the roleName is used by SIM and the role information is retrieved
from the SIM database. Roles can contain any combination of available
permissions and can overlap with other roles.
Roles are associated with a role type, which is defined in the
SECURITY_ROLE_TYPE table. The default role types include Store and Corporate.
Role types are used to control which roles a user is allowed to assign based on
their permissions. A user with permission to assign store roles is not allowed
to assign corporate roles without additional permissions.
The role detail screen also allows the assignment of data
permissions, which control access to specific types of data. For example, data
permissions can be used to control access to specific inventory adjustment
reason codes, item request timeslots, role types, or product group types.
In case external/internal authentication/authorization is used,
LDAP will only need to store those roles assigned to users that are controlled
by LDAP.
Technical Overview
The following describes the technical overview.
User
This class represents the header information for a user. This
includes information such as:
§
username
§
first name
§
last name
§
locale
§
user type
§
user status
§
start/end dates
§
default store ID
§
other state information
User objects are used to hold both internal and cached user data.
Users are primarily identified by their username instead of their database ID.
UserPassword
This class represents a user password. It contains information
for an individual password record such as date and status. It is used for both
current passwords and password history. User password objects are used to hold
both internal and cached password records.
UserRole
This class represents a role assignment for a user. It includes
information such as start/end date, store ID, and other state information. User
role objects are used to hold both internal and cached assignments. A role
assignment with no specified store ID applies to all available stores.
UserStore
This class represents a store assignment for a user. Store
assignments do not exist for super users as they have implicit access to all
stores. User store objects are used to hold both internal and cached
assignments.
Permission
This class represents an individual permission. It is mostly used
when managing roles as it contains additional information used for assignment
to roles, such as description, device type, and permission group. Permissions
with no device type apply to all devices. Permissions are primarily identified
by their name instead of their database ID.
PermissionGroup
Permission groups are used to categorize and filter permissions
for filtering and display purposes. It is mostly used for security management
operations.
PermissionSet
This class represents a set of permissions and any associated
parameters. It is used to hold the set of permissions that have been assigned
to a role. Permission sets are also used to hold the union of permissions for
multiple roles that a user has been authorized to access. This class includes
methods to test for the presence and absence of permissions in the set.
Role
This class represents the header information for a role. It
contains the role name, description, role type, and whether an end date is
required for assignment to a user. It is mostly used for security management
operations. Roles are primarily identified by their name instead of their
database ID.
RoleType
This class represents a role type that has been defined in the
database. Role types are used for filtering and display purposes but are also
used with data permissions to restrict access to functionality for certain
types of roles. It is mostly used for security management operations.
The external security model uses LDAP. In this mode LDAP is the
only responsible application for all security control (with exception of assigning
permissions to roles). LDAP will need to be set up before users can login.
Users are defined in LDAP as simUser records.
User records contain information such as:
§
user name
§
status
§
user type
§
default store
§
locale
§
other data defined by the schema
To log in to SIM, a user must have an active status (0). Users can be assigned start or end dates to restrict
their authorization by date.
Users are assigned stores to which they are allowed access. To
log in to a store, the user must first be assigned to that store. The user’s
allowed stores also restrict which stores the user can be assigned roles for.
Users that are defined as super users are allowed access to all
stores, but still require role assignments in order to gain permissions.
Store assignments are stored in LDAP as userStores attributes in
simUser records.
When a user logs into SIM using the PC client, their default
store is automatically selected. The user can change stores by selecting one of
their allowed stores from the combo box on the main screen.
Users are given permissions by assigning roles to users.
Permissions are never directly assigned to users. A user can be assigned
multiple roles, producing a combined permission set that is the union of the
role permissions.
Role assignments are stored in LDAP for an external model as
simUserRole records, which are child nodes of simUser records. Role assignments
can have start or end dates to restrict their validity by date. The
userRoleStores attribute of the simUserRole record specifies which stores are
valid for the role assignment. If no store is specified then the role
assignment applies to all stores available to the user.
When a user logs into SIM they are given permissions for all
valid role assignments for the store that was selected.
Sensitive information such as user credentials must be encrypted
and stored in a secure location, known as password stores or wallets. These
password stores are secure software containers that store the encrypted user
credentials.
SIM has implemented using wallet alias names in the following
areas:
§
LDAP connection credentials
§
RIB service credentials (publish and subscribe)
§
BIP service credentials
§
Web service consumer credentials (OMS, manifest)
§
WebLogic user credentials (batch, server, wireless users)
SIM uses external secure password stores for the SIM client to
look up SIM remote services:
§
SIM stores the database password in a secure password store for
the database standalone program which invokes sqlplus or sqlldr.
§
SIM stores the application remote login password in a secure
password store for java application programs.
SIM also modifies programs to use security alias names for
accessing database or remote applications:
§
The data seeding (import) program passes the user and password
when invoking the sqlplus and sql loader (sqlldr) inside the program.
§
Any other data import utility or adhoc batch program uses SIM
standard java wrapper to call the stored procedure; if using java wrapper is
not applicable, and if connecting to the database through a database client
utility such as sqlplus or sqlldr, then the secure pass store is used and
tnsalias for database connection credential stored in the wallet must be used.
For more information, see “Appendix: Setting Up Password Stores
with Oracle Wallet” in Oracle Retail Store Inventory
Management Installation Guide.
SIM is intended to work with any Lightweight Directory Access
Protocol (LDAP) product. Out of the box, SIM ships sample .ldif files that can
be used to create data in an LDAP system. We expect customers to use these
files as examples to create their own data load files and hook into their own
pre-existing corporate LDAP authentication system.
Once an LDAP server has been installed, the SIM data schema
(SIM.schema) must be loaded on top of the default LDAP core schema
(core.schema) supplied by the server. The following sample LDIF files are
included in this release at SIM_INSTALL_DIR/sim/application/sim14/ldap. For
more information, see Appendix B, "Appendix: LDAP Schema".
|
Note
The following scripts and configuration files are
provided as examples only. Variations will be necessary to match the data
setup in SIM and the LDAP server that is chosen and installed.
|
Descriptions of the files in the directory and an overview of how
the data needs to be structured in LDAP.
The objectclasses that are used and required by SIM. This file
can be used directly to create the required objectclasses in your LDAP
directory.
The base company container. This file must be modified before it
is imported into your LDAP system.
The containers for holding users, stores, and roles. This file
must be modified before it is imported into your LDAP system.
Sample role data. This file must be modified before it is
imported into your LDAP system.
Sample store data. This file must be modified before it is
imported into your LDAP system.
Sample user data. This file must be modified before it is
imported into your LDAP system.
Sample user role assignment data. This file must be modified
before it is imported into your LDAP system.
|
Note
A simUser can have more than one simStore by simply
repeating the userStores line, but should only have one defaultStore. A
simUserRole can also have more than one simStore by repeating the
userRoleStores line.
|
|
Note
Any user store entry for the user object must have
corresponding Store data populated in the SIM Oracle database to allow a
successful login (table STORE). Any simUserRole object must have
corresponding role and store data populated in the SIM Oracle database.
|
This document explains how to use the Oracle Virtual Directory
(OVD) to authenticate Oracle Retail Store Inventory Management.
The following document is available through My Oracle Support
(formerly MetaLink).
Access My Oracle Support at the following URL:
https://support.oracle.com
Oracle Retail Store Inventory Management: Using Oracle Virtual
Directory to Authenticate Oracle Retail Store Inventory Management (Doc ID: 840179.1).
The default security model in SIM is LDAP authentication
(external authentication). To change the security model to use internal
security, run the following SQL script:
update CONFIG_SYSTEM set CONFIG_VALUE = '0' where config_key =
'SECURITY_AUTHENTICATION_METHOD';
Users are defined in SIM through the UI.
User records contain information such as:
§
user name
§
status
§
user type
§
default store
§
locale
§
other data defined by the UI
To log in to SIM, a user must have an active status. Users can be
assigned start or end dates to restrict their authorization by date.
Users are assigned stores to which they are allowed access. To
log in to a store, the user must first be assigned to that store. The user’s
allowed stores also restrict which stores the user can be assigned roles for.
Users that are defined as super users are allowed access to all
stores, but still require role assignments in order to gain permissions. New
stores are automatically assigned to this user, but role assignments are not.
When a user logs into SIM using the PC client their default store
is automatically selected. The user can change stores by selecting one of their
allowed stores from the combo box on the main screen.
Users are given permissions by assigning roles to users in the
SIM UI. Permissions are never directly assigned to users. A user can be
assigned multiple roles, producing a combined permission set that is the union
of the role permissions.
Role assignments can have start or end dates to restrict their
validity by date.
Since users can have different roles at different stores (for
example, a manager in Store One, but sales associate in Store Two), roles and
stores are assigned as a pair to a user. This allows for very specific setup in
SIM.
When a user logs into SIM they are given permissions for all
valid role assignments for the store that was selected.
This hybrid setup will cache external user role and store
assignment as well as password information. This allows users to continue to
log in when LDAP is down. SIM Internal assigned stores/roles will be added to
the external user assigned roles/stores. In case the user is fully internal to
SIM, SIM password information will be used to authenticate.
It is optional to create a user in SIM, or assign roles and
stores in SIM.
Users are defined in SIM through the UI or in LDAP. If a user at
some point will have SIM-assigned roles/stores, and corporate-assigned
roles/stores, the user needs to be first created in SIM, before that user has
logged in to LDAP. Once cached information is pulled down into SIM, the user
can no longer be created in SIM. The password initially assigned to the user
will be trumped by the password assigned in LDAP.
Users can be created externally, internally or exist both in SIM
and LDAP.
Can be assigned in SIM or in LDAP, or both.
Roles are assigned to SIM or LDAP, or both.
This hybrid setup will only cache password information. Users,
stores and role assignment information are all handled inside of SIM.
This allows corporate control on which users can log in, but
detailed authorization assignments can be controlled by a different group of
users (for example, Store manager). The user will also continue to be able to
log in when LDAP is down.
In case the user is fully internal to SIM, SIM password
information will be used to authenticate.
Users are defined in SIM through the user interface and in LDAP.
The user has to be first created in SIM, before they should log in. The password
initially assigned to the user will be replaced by the password assigned in
LDAP.
Users have to exist both in LDAP and SIM, since LDAP
authenticates and SIM authorizes.
Should only be assigned in SIM.
Roles are assigned in SIM only.
For many SIM retailers, a corporate server is located in a
different time zone than the stores connected to that corporate server. When a
transaction is processed at these respective locations, there is time stamp
information associated with these transactions. SIM has the ability to
reconcile these time zone differences.
SIM requires a valid time zone set up for each store, for stores
imported from external source which have no time zones assigned, the retailer
needs to set valid time zone for the store. SIM store time zone is stored in
column STORE.TIMEZONE.
|
Note
The SIM database view TIME_ZONE_NAMES_V contains a
complete list of time zones.
|
There are a number of store options related to functionality in
SIM. These can be configured at the store level; however it is best to have
reasonable default values for these options so that when new stores are created
in SIM (either through data seeding or by getting a message from the RIB), the
default value will be copied from default configuration for new added store.
SIM data seeding scripts provide a means of importing store
inventory data from external data sources. The data files being imported into
SIM can be exported from ORMS (Oracle Retail Merchandise System), or the
retailer needs to provide their own utility to setup store and store inventory
data in SIM prior to using the SIM application.
|
Note
Data seeding is only applicable for full SIM release to
load store foundation data into SIM after SIM database is installed.
Data seeding and upgrade process are mutually exclusive.
For upgrading from old versions of SIM, see Oracle Retail
Store Inventory Management Upgrade Guide for details.
|
Figure: Data Seeding Technical
Architecture
The inventory base data contains following two categories:
§
Inventory Foundation Data: Inventory data
which are not store specific.
§
Store Inventory Data: Store specific
inventory data.
|
Table: Inventory Base Data - Foundation Data
|
|
Category
|
Table Name
|
Note
|
|
Foundation
|
ADDRESS
|
Seed warehouse, partner, and supplier addresses (store
addresses are seeded as part of store data).
|
|
|
BRAND
|
|
|
|
DELIVERY_SLOT
|
|
|
|
DIFFERENTIATOR
|
|
|
|
DIFFERENTIATOR_TYPE
|
|
|
|
ITEM
|
|
|
|
ITEM_COMPONENT
|
|
|
|
ITEM_HIERARCHY
|
|
|
|
ITEM_IMAGE
|
|
|
|
ITEM_TICKET_TYPE
|
Item ticket type.
This table contains SIM system control data. The external
seeded data are inserted into this table only if the same item ticket types
are not part of the SIM pre-installed system data.
|
|
|
ITEM_UDA
|
|
|
|
PARTNER
|
|
|
|
PARTNER_ITEM
|
|
|
|
RELATED_ITEM_TYPE
|
|
|
|
RELATED_ITEM
|
|
|
|
STORE_TRANSFER_ZONE
|
|
|
|
SUPPLIER
|
|
|
|
SUPPLIER_ITEM
|
|
|
|
SUPPLIER_ITEM_COUNTRY
|
|
|
|
SUPPLIER_ITEM_COUNTRY_DIM
|
|
|
|
SUPPLIER_ITEM_MANUFACTURE
|
|
|
|
SUPPLIER_ITEM_UOM
|
|
|
|
UDA
|
|
|
|
UDA_LOV
|
|
|
|
UIN_LABEL
|
UIN Label
This table contains SIM system control data. The external
seeded data are inserted into this table only if the same item ticket types
are not part of the SIM pre-installed system data.
|
|
|
UOM_CLASS
|
|
|
|
UOM_CONVERSION
|
|
|
|
WAREHOUSE
|
|
|
|
WAREHOUSE_ITEM
|
|
|
Table
3–3 Inventory Base Data - Store Data
|
|
Category
|
Table Name
|
Note
|
|
|
ADDRESS
|
Seed store addresses (warehouse, supplier, and partner
addresses are seeded as part of foundation data).
|
|
Store
|
CONFIG_STORE
|
CONFIG_STORE records are created for each store seeded
into SIM by copying the default settings from CONFIG_STORE_DEFAULT table.
|
|
|
ITEM_PRICE
|
The RMS item location selling unit retail price is seeded
into SIM as initial regular item price.
|
|
|
ITEM_PRICE_HISTORY
|
For each ITEM_PRICE record, a price record is inserted
into ITEM_PRICE_HISTORY.
|
|
|
REPORT_FORMAT
|
REPORT_FORMAT records are created for each store seeded
into SIM by copying the default settings from REPORT_FORMAT_DEFAULT table.
|
|
|
STORE
|
|
|
|
STORE_ITEM
|
|
|
|
STORE_ITEM_STOCK
|
|
|
|
STORE_ITEM_STOCK_NONSELL
|
|
|
|
STORE_SEQUENCE_AREA
|
For each store seeded into SIM, a default record is
created for the store.
|
|
|
STORE_UIN_ADMIN_ITEM
|
|
Following are the main data seeding components and their usage
descriptions:
|
Table: Data Seedling Components and Usage Descriptions
|
|
Component Name
|
Description
|
|
setup
|
Creates temporary objects, it also disable foreign key
constraints, and generate a file which contains the snapshot of the disabled
foreign key constraints file before data seeding process starts.
|
|
Export Foundation Data
|
Export base foundation data (non-store specific data) from
RMS database.
|
|
Export Store Data
|
Export store specific data from RMS database. The process
creates a store_list.dat file which contains each exported store. The export
data file for each store data is contained in the folder which is named by
store ID. See “
Defining Store List“ section for details.
|
|
Import Foundation Data
|
Import inventory foundation data from export data file
into SIM inventory foundation table. See Inventory Base Data – Foundation
Data table for target tables.
|
|
Import Store Data
|
Import inventory store data from export data file into SIM
inventory store table. See Inventory Base Data – Foundation Data table for
target tables. See ““
Defining Store List“ section for details.
|
|
cleanup
|
Remove temporary objects, enable constraints.
|
By default, export store data exports all SIM relevant stores
from RMS into flat files, and import process will import all exported stores
into SIM database.
You only need to define store list in one of the following
scenarios:
Do not export all SIM relevant stores from RMS, only export some
of the stores.
Do not import from all exported stores, only import some of the
exported stores.
1. Create
the store_list.conf file and put it at following location:
<data_seeding_base_dir>/export/store/config
Example:
store_list.cfg
1111
1112
2. Export process: If store_list.cfg file is not defined, then
the export process generates the store_list.dat which contains all SIM relevant
stores from RMS, otherwise only the stores listed in the store_list.cfg file
will be exported.
3. Import process: The import process reads the file
from<data_seeding_base_dir>/data/export/store/ store_list.dat which was
generated by the export store processes, and import store data from export
files for each store listed in the store_list.dat file.
See “Running Data Seeding” in the Oracle
Retail Store Inventory Management Installation Guide for data seeding
execution step details.
The default security model in SIM is LDAP authentication
(external authentication). To change the security model to use internal
security, run the following SQL script:
update CONFIG_SYSTEM set CONFIG_VALUE = '0' where config_key =
'SECURITY_AUTHENTICATION_METHOD';
For internal security, use the installation user created during
application installation to setup SIM configuration and user/role management.
§
The default algorithm used to store passwords in SIM is Secure
Hashing Algorithm (SHA).
§
This can be configured in the server.cfg file to be any algorithm
recognized by the Java encryption API.
When creating roles, job functions and corporate hierarchies must
be considered and taken into account.
4
This chapter provides information concerning the various aspects
of SIM’s functional areas.
SIM empowers store personnel to sell, service, and personalize
customer interactions by providing users the ability to perform typical back
office functionality on the store sales floor. The results are:
§
Greatly enhanced customer conversion rates
§
Improved customer service
§
Lower inventory carrying costs
§
Fewer markdowns
Store Inventory Management ensures that all available salespeople
are on the sales floor selling to customers.
The benefits of the Store Inventory Management solution include:
§
Improve customer service and coverage
§
Ability to perform back office functionality anywhere in the
store, even on Oracle Retail Point-of-Service terminals
§
Improve perpetual inventory levels by enabling floor-based
inventory management through handheld devices and store PCs
§
Minimize the time required to process a receipt and check-in of
incoming merchandise
§
Receive, track, and transfer merchandise accurately, efficiently,
and easily
§
Reduce technology costs by centralizing hardware requirements
§
Easy to use GUI interface guiding users through the required
transactions
§
Extensible technology platform that allows customizations to the
product. This ensures the retailer’s modifications are isolated during product
upgrades and lowering the total cost of ownership.
Store Inventory Management has been specifically designed to meet
the needs of a high turnover labor force by providing easy to use screens that
guide a user through processing a transaction.
Store Inventory Management also provides Store managers and
personnel with the ability to easily perform an array of in store operations:
§
Receive merchandise
§
Replenish stock
§
Manage physical inventories
§
Look up product information
§
Transfer or return stock
§
Adjust inventory
§
Stock counts
§
Order stock
§
Fulfillment Customer Orders
§
Printing Item Tickets and Shelf Edge Labels
Store Inventory Management provides store employees with the
information and flexible capabilities that are needed to maintain optimal
inventory levels in the store and convert shoppers into buyers.
Store Inventory Management manages the inventory movement of
merchandise within the store and provides users with detailed Item/SKU
information needed to perform key tasks. The functionality in SIM includes:
§
Lookups – Item, Supplier, Container, Finisher, Transaction
History
§
Unique Identification Number (UIN) Support
§
Receiving – Warehouse, Supplier, Store
§
Transfers/Transfer Requests
§
Returns/Return Requests
§
Receiver Unit Adjustments
§
Stock Counts
§
Store Ordering
§
Item Requests
§
Sequencing
§
Shelf Replenishment
§
Inventory Adjustments
§
Wastage
§
Price Changes
§
Ticketing
§
Customer Orders - lookup, picking, delivery, and reverse picks
§
Item Basket
§
E-mail Alerts
§
Printing Reports
SIM also has System Administration functionality, which enables
users to configure different parameters within the system based on their
business processes. The system administration screens also contain the ability
to create product groups. A product group is a collection of departments,
classes, subclasses, or items, which can be used to schedule stock counts,
order product, replenish store shelves, and for addressing wastage.
SIM is fully integrated with the Oracle Retail Merchandising
System (RMS), a warehouse management system, an invoice matching system, and
Oracle Retail Sales Audit (ReSA) is through flat file. Most transactions are
direct updates, with only a few using batch processes and some using direct
update integration. Any store using SIM, maintains its own inventory and
reports those numbers to the merchandising system. Most foundation data within
SIM can be populated using the data-seeding program provided.
Deploying SIM as part of the Oracle Retail enterprise ensures the
accuracy and timeliness of all inventory information across the retailer’s
supply chain.
The SIM UI is split up in six parts, each focused on a particular
function in the system:
§
Administration: All administrative information can be found under
this section.
§
Shipping/Receiving: This dialog concerns itself with all shipping
and receiving matters at the store. It includes, warehouse, store and supplier
deliveries as well as returns to these entities.
§
Inventory Management focuses on all the elements that can affect
inventory positions within the store (excluding point-of-sale).
§
Customer Order Management all functions pertaining to the
fulfilling of an order to the customer.
§
Lookups: Under this dialog the user can find detailed information
regarding items, suppliers and containers.
§
Print: The print functions help you manage printing tickets,
labels and reports.
Most of the inventory features discussed in this section is
applicable to both Oracle Retail Mobile Store Inventory Management (the
handheld devices) and the Oracle Retail Store Inventory product (the PC).
The handheld device enables the user to register items for the
different inventory transactions with more accuracy by scanning barcodes and
validating transactions against centrally deployed reference data.
This section details inventory management.
To assist in maintaining perpetual inventory, SIM provides the
ability to create inventory adjustments for all items within a store. SIM
conveys changes to the merchandising system. Inventory adjustment functionality
within the SIM system can be accomplished on a PC-based deployment, on a
wireless handheld device, or on a combination of the two deployment methods.
Inventory adjustment processing within SIM includes the following
features:
§
Reason codes, which correspond to dispositions, can be assigned
to inventory adjustments, thus moving stock to various inventory buckets. This
code not only is used for reporting purposes, but also indicates to the system
whether the amount is to be incremented or decremented and in which inventory
buckets are impacted based upon the disposition associated with the reason
code.
§
Sub-buckets allow for the unavailable inventory to be broken down
further into smaller buckets. Sub-buckets can be assigned to reason codes that
have dispositions moving inventory to or from unavailable stock. Sub-buckets
are configurable per store and can be turned on or off.
– Example
1:
A reason code of Removed for repair would indicate to the
system that the inventory for the selected item is to be decremented from the
available stock on hand (SOH) bucket and incremented in the unavailable SOH
bucket which is for trouble sub-bucket.
– Example
2:
A reason code of Return from repair instructs the system
to move the selected inventory by decrementing the unavailable SOH bucket
(trouble sub-bucket) and incrementing the available SOH bucket.
§
Inventory Adjustments can be saved as In Progress to continue
working on later or confirmed which will move it to a Completed status.
§
All items on an inventory adjustment are grouped together under a
single header transaction. However, the inventory adjustments are sent as
individual line items to the merchandising system.
§
Stock on Hand and Unavailable inventory are not only used to indicate
to a store user what is available to sell, but it also ensures proper
replenishment ordering for all the stores through the central replenishment
system.
§
Manual or automatic adjustments can be made to the SOH inventory
level for an item.
§
System-generated inventory adjustments will not write actual
inventory adjustments within SIM, they will appear as transaction history
records. However, an adjustment will be published to the merchandising system.
– Example:
Receive a DSD with damaged goods. An inventory adjustment is made behind the
scenes to move the goods from available stock to unavailable stock for the
damaged quantity, and this will be used to send on to the merchandising system.
The inventory adjustment will not appear in SIM, rather a transaction history
record for the receipt of damages.
§
The system notifies the merchandise system of all inventory
adjustments, unless otherwise specified in the table below.
§
Templates:
– Templates
allow for quick application and adjusting of the same items, reasons, and
quantities over and over.
– The
template can be created and then it can be applied to an inventory adjustment.
It will default in the items, reasons and quantities from the template.
– A
multiplier can be used when applying the template. It will take all quantities
on the template times the multiplier.
– Once
a template is applied, the quantities can be updated and items can be added or
removed.
§
Serialization support:
– Users
are allowed to move serialized inventory into unavailable inventory positions
or out of unavailable.
– When
using auto generated UINs, it is possible to add new serialized inventory into
the store when selecting a disposition that would normally increase SOH.
– Moving
serialized inventory out of inventory is permitted.
– Serialized
inventory cannot be added on templates.
The following table (shown for example purposes) provides a list
of SIM’s reason codes that are preloaded, their descriptions, dispositions, and
sub-bucket (if configured) that are linked to the reason code.
System reason codes are those used within the SIM system for
making stock on hand updates.
The publish indicator will be used for publishing purposes. All
reason codes have this indicator defaulted to ‘Yes’ on the UI. If it is set to
‘Yes’, then SIM will publish the adjustments that have that reason code. If it
is set to ‘No’, those adjustments for that reason code will not be published.
This indicator can only be modified for those reason codes that are not system
reason codes. For system reason codes, this indicator is ignored as there
instances in the system where things may or may not need to be published.
|
Note
These need to be set up in an identical manner in RMS.
|
|
Table: Preloaded Reason Codes
|
|
Code
|
Reason Description
|
Disposition
|
Sub-bucket
|
UI
|
System
|
Transaction
|
Publish
|
|
1
|
Wastage
|
-Stock on Hand
|
|
No
|
Yes
|
Wastage
|
Yes
|
|
2
|
Shrinkage
|
-Stock on Hand
|
|
Yes
|
No
|
|
Yes
|
|
3
|
Repair - In
|
-Unavailable
|
Trouble
|
Yes
|
No
|
|
Yes
|
|
75
|
Stock Count Unavailable to Missing
|
-Unavailable
|
Trouble
|
No
|
Yes
|
Stock Count (UIN)
|
Yes all types except Unit and Amount
|
|
76
|
Unit Late Sales Increase
|
+Stock on Hand
|
|
No
|
Yes
|
Late Sales
|
Yes
|
|
77
|
Unit Late Sales Decrease
|
-Stock on Hand
|
|
No
|
Yes
|
Late Sales
|
Yes
|
|
78
|
Unit and Amount Late Sales Increase
|
+Stock on Hand
|
|
No
|
Yes
|
Late Sales
|
No
|
|
79
|
Unit and Amount Late Sales Decrease
|
-Stock on Hand
|
|
No
|
Yes
|
Late Sales
|
No
|
|
81
|
Damaged - out
|
-Stock on Hand
|
|
Yes
|
No
|
|
Yes
|
|
82
|
Damaged - Hold
|
+Unavailable
|
Trouble
|
Yes
|
Yes
|
Receiving: Store Transfer, DSD, Wh Delivery
|
|
|
83
|
Theft
|
-Stock on Hand
|
|
Yes
|
No
|
|
Yes
|
|
84
|
Store Use
|
-Stock on Hand
|
|
Yes
|
No
|
|
Yes
|
|
85
|
Repair - Out
|
+Unavailable
|
Trouble
|
Yes
|
No
|
|
Yes
|
|
86
|
Charity
|
-Stock on Hand
|
|
Yes
|
No
|
|
Yes
|
|
87
|
Stock Count In
|
+Stock on Hand
|
|
No
|
Yes
|
Stock Count
|
Yes all types except Unit and Amount
|
|
88
|
Stock Count Out
|
-Stock on Hand
|
|
No
|
Yes
|
Stock Count
|
Yes all types except Unit and Amount
|
|
89
|
Dispose from on Hold
|
-Stock on Hand & -Unavailable
|
Trouble
|
Yes
|
No
|
|
Yes
|
|
90
|
Dispose from SOH
|
-Stock on Hand
|
|
Yes
|
No
|
|
Yes
|
|
91
|
Stock -Hold
|
+Unavailable
|
Trouble
|
Yes
|
No
|
|
Yes
|
|
92
|
Admin
|
-Stock on Hand
|
|
Yes
|
No
|
|
Yes
|
|
93
|
Store Customer Return
|
+Stock on Hand
|
|
Yes
|
No
|
|
Yes
|
|
96
|
Ready to Sell
|
-Unavailable
|
Trouble
|
Yes
|
Yes
|
Receiving: Store Transfer, DSD, Wh Delivery
|
Yes
|
|
180
|
Customer Order Reservations In
|
+Customer Order
|
|
No
|
Yes
|
Reserve POS (pickup) Customer Order
|
Yes
|
|
181
|
Customer Order Reservations Out
|
-Customer Order
|
|
No
|
Yes
|
Cancel Fulfil POS (Pickup) Customer Order
|
Yes
|
|
182
|
Stock In
|
+Stock on Hand
|
|
Yes
|
Yes
|
Moving UIN from another store in Inventory Adjustments
|
Yes
|
|
183
|
Stock Out
|
-Stock on Hand
|
|
Yes
|
No
|
|
Yes
|
|
184
|
Unit Late Inventory Adjustment Increase SOH
|
+Stock on Hand
|
|
No
|
Yes
|
Late Inventory Adjustments
|
Yes
|
|
185
|
Unit Late Inventory Adjustment Decrease SOH
|
-Stock on Hand
|
|
No
|
Yes
|
Late Inventory Adjustments
|
Yes
|
|
186
|
Unit and Amount Late Inventory Adjustment Increase
|
+Stock on Hand
|
|
No
|
Yes
|
Late Inventory Adjustments
|
Yes
|
|
187
|
Unit and Amount Late Inventory Adjustment Decrease
|
-Stock on Hand
|
|
No
|
Yes
|
Late Inventory Adjustments
|
Yes
|
|
|
|
|
|
|
|
|
|
Updating Reason Codes
SIM provides a UI which allows the user to add new reason codes
to synchronize with those setup in RMS. It is also possible to hide them from
users, and it will indicate which are system controlled. A brief description
indicates the disposition of the item for easier setup.
Inventory Adjustment Reason Maintenance UI will allow for
Inventory Adjustment Reasons to be maintained in a UI versus directly through
the database:
§
This screen lists external code, description, disposition,
sub-bucket (if configured) use in UI and system required indicator of all the
available reason codes in SIM.
§
All the system required reason codes would have its system
required indicator checked. Any reason that is marked as system required can
not have its reason code, disposition, sub-bucket, and system required
indicator changed through this UI. Only description and the use UI indicator
are allowed to be modified.
§
The user will not be allowed to delete the inventory adjustment
reason codes that are marked as system required.
|
Note
Some reason codes are flagged as system-required. Do not
remove these reason codes. If they are removed, SIM will not function
properly.
|
§
Only records that have a checked value for the use in UI will be
allowed for use in the inventory adjustment screen.
§
The change made through this UI is not integrated with RMS.
Retailers have to make sure that the changes done in this screen are in sync
with RMS.
Figure: Business Process Flow –
Inventory Adjustments PC
Figure: Business Process Flow -
Inventory Adjustment Reason Maintenance PC

Wastage is the process through which inventory is lost over time
(for example, bananas turning black).
In order to maintain more accurate inventory values, SIM uses two
methods to control wastage:
§
The first method provides users in stores the ability to create
wastage product groups. Variance percentage or standard UOM amounts can be set
up on the wastage product group. Individual items and item hierarchies can be
associated into a product group.
A user can schedule the date when a wastage product group
batch process is run, and inventory adjustments are automatically made based
upon the variances setup on the product group. Inventory adjustments are sent
over the Oracle Retail Integration Bus (RIB) to the merchandising system.
§
The second method is controlled through the sales process. The
external audit system provides a percentage or quantity in its sales upload
file that indicates by how much the inventory needs to be reduced in addition
to the sold quantity.
Each of these methods has a specific use or need. The first
method is usually used when an item’s size is reduced because of not being sold
over time. For example, meat will become lighter as fluids evaporate. Other
items, such as cheese or ham, will only be reduced when the outside layers are
cut off to sell the item.
Figure: Business Process Flow
(non-sale bases)
Store orders are used to create, change and approve orders to a
supplier or transfers requests to a warehouse. When there is a shortage of
items, or demand for particular items increases, store users need to have the
ability to create store orders. The user selects either a warehouse or a
supplier and adds the items and quantities. It then calls order in RMS.
Store ordering functionality is very similar to item request
functionality. Unlike item request functionality, which is only valid for items
that are on the store order replenishment process, store order functionality is
valid for all items, cannot be scheduled and is only available on the PC.
Store Orders also create the purchase order or the warehouse
transfer immediately, while Item Requests depend on replenishment attributes
and the nightly batch run from RMS.
Store order processing within SIM includes the following
features:
§
Create orders for the supplier or the warehouse.
§
Save the creation of the order without approving it.
§
Amend items and orders in SIM that were created either manually
or through replenishment in RMS.
§
Delete pending orders.
§
Approve store orders.
§
Query off-invoice deals when editing an existing Store Order to a
Supplier.
§
Query item's sales and store orders when editing an existing Store
Order.
Figure: Store Orders Business
Process Flow – PC

The item request functionality gives the user the ability to
request inventory for individual items using the replenishment and sourcing
parameters of the merchandising system (RMS) from within the SIM application
directly. It is integrated with RMS, whether it is through RIB or Web-service.
This functionality empowers the store by giving the store user the ability to
manage stock shortages and increased demand using the SIM application.
This functionality differs from that of Store Orders Functional
Overview. In terms of item requests, SIM sends a request to the merchandising
system that is generally processed using the merchandising system replenishment
and sourcing parameters. Store orders functionality, on the other hand, allows
the user direct access to the merchandising system (RMS) and does not enforce
the replenishment or sourcing parameters of the merchandising system.
A SIM user is able to use item request functionality to request
items regardless of the replenishment type normally used by the merchandising
system to replenish the item.
All items are sourced from either a warehouse or through a
supplier depending on the sourcing parameters for the item specified in the
merchandising system. Items specified as using Store Order replenishment (or
items that are not set up for auto-replenishment at all) are sourced through
the creation of one-off purchase orders or warehouse transfer requests only
after the store has requested inventory using the Item Request functionality.
Any quantities requested for items that have a replenishment type
other than Store Order are added above and beyond the quantity that is normally
sourced through the merchandising system on the item’s next replenishment
review date. However, if the requested delivery date falls prior to such an
item’s next replenishment review date, the request is sourced through the
creation of a one-off purchase order or warehouse delivery request instead. All
inventory requested is sourced to the store at the earliest possible date given
the replenishment review date, the supplier or warehouse lead time, and any
other factors that may influence the time it takes a delivery to reach the
store.
For store order replenishment items, the user can specify a time
slot during the day by which the ordered items are to be delivered to the
store. This is useful for ordering breakfast items early morning (doughnuts),
lunch items (sandwiches), and hot meals for the evening. Item requests can be
created with timeslot deliveries for as early as today’s date. Security exists
on the delivery timeslot fields, at both the store level and the user level.
The user cannot delete line items or the master item request if the user does
not have data permissions for a selected timeslot.
In addition to being able to manually create Item Requests, the
SIM user is able to schedule Item Requests for review through front-end product
group screens on a cyclical basis. This functionality facilitates the request
of items that are specified as using Store Order replenishment by allowing the
user to add individual items, as well as entire sections of the merchandise
hierarchy, to an Item Request Product Group. When the Item Request Product
Group is scheduled for review, SIM automatically generates a blank Item Request
and adds all items within the specified merchandise hierarchies that have a Store Order replenishment type to the Item Request, along
with any individual items specified as part of the Item Request Product Group.
The user can then enter the actual quantities of the items necessary, and
submit the request. Note that the user also has the ability to add items that
do not have a Store Order replenishment type to an Item
Request Product Group, but only on an individual item-by-item basis.
The following list summarizes the Item Request functionality that
is available in SIM. Because of this functionality, the SIM user has the
ability:
§
To create an item request product group and schedule it for
review.
§
To manually create an unscheduled item request.
§
To search for and view an item request whether created manually
by a user or automatically by the product group scheduler.
§
To edit a pending item request.
§
To delete a pending item request.
§
To request a pending item request.
§
To save changes to a Pending Item Request without requesting it.
§
To print an Item Request Report.
The SIM database contains a view called the Item_Request_Report_V
that contains all of the data for this report.
Figure: Item Requests Business
Process Flow – PC

The retailer uses price changes to change the price of a
particular item at a location. Price changes are performed only on the PC.
In the merchandising system (such as RMS), users create the
initial retail prices for items that will flow into SIM. After the initial
prices have been set, ensuing control of prices is handled through a price
management system. The price management system uses price zone structures or
different levels to ensure consistent pricing within an area. Regardless of the
level at which the initial prices are set, all prices in RMS and SIM are held
at the item/location level.
Once users are managing prices in a price management system, they
can use a flexible structure to control the retail prices through permanent,
promotion or clearance changes. This functionality allows the user to use
different sets of locations to control the retail prices of items without being
locked into a zone structure. As a result of this flexibility, all prices are
held at the item/location level, while they can be managed at higher levels.
In RMS, an indicator at the item/location level determines
whether SIM users can request changes to an item’s retail price at a specific
location. This indicator is editable and controls behavior going forward but
not in the past.
If SIM users have control of the retail price for an item at a
location, they are able to send price change requests for permanent price
changes, clearances or simple promotions to a price management system. The
price management system checks for any conflicts and provides a response to SIM
regarding the status of the request. If the request is accepted, the price
management system also sends a price change event back to SIM.
SIM users are able to edit and create price events given the
following assumptions and restrictions:
§
The item/location store control-pricing indicator must be set to Y for an item.
§
The price event must not be a complex promotion (such as multiple
promotions or regular price changes on the same day, buy/get, threshold,
min/max).
§
Any change requests, if approved, update the existing price event
in the price management system.
§
SIM can modify the retail price and effective dates for a price
event. If a user requests a new price change for the same item/location/date
instead of changing/correcting the existing price event, the request is sent to
a price management system as a new event request. It undergoes conflict
checking in the price management system. If any conflicts are found with
existing price events, a rejected response is communicated to SIM.
§
If an item/location is not set up for store controlled pricing in
RMS, SIM users view all price events that are sent from a price management
system, but they have no control over them. SIM is unable to create new price
change requests to be sent to a price management system.
§
Communication between SIM and a price management system is
handled by Web service call (providing a direct update connection between the
applications). Normal operation of pricing assumes that a price management
application is available. No manual override is provided within SIM.
§
Time based promotions created in the pricing system can be
interfaced with SIM, but these promotions cannot be created through SIM price
change request.
§
Prices are interfaced to SIM through the RIB or the bulk price
batch.
It is recommended to only run one of the two interfaces at the
time.
Figure: Price Changes Business
Process Flow – PC
Sequencing functionality provides users the ability to know the
relative location of an item in a store. Sequencing a store improves store
processes and reduces the time that employees spend looking for items (during a
stock count, for example). The retailer can sequence all items in the store and
create unique locations to hold the items. The system can prompt users to a
specific location to look for a specific item. Sequencing functionality within
the SIM system can be accomplished on a PC based deployment, on a wireless
handheld device, or on a combination of the two deployment methods.
Sequencing functionality includes two means by which items can be
assigned to places within a store: Macro sequencing and micro sequencing. When
ordering, the system follows this pattern.
Macro sequences represent the highest level of locations that are
set up in the store. The user can create macro locations, assign items to macro
locations, remove items from macro locations, move items within macro locations
and re-sequence an entire macro location (wireless only).
A micro sequence is the lowest (most granular) item location
level.
The following table provides an example of sequencing:
|
Table: Micro Versus Macro Sequencing
|
|
Macro Sequence
|
Micro Sequence
|
|
Produce
|
Oranges
Apples
Bananas
Oranges
|
|
Frozen foods
|
TV dinners
Burritos
Burritos
|
|
Cereal
|
Toasted oats
|
Sequencing is used within Stock Counts and Shelf Replenishment to
aid the user in proceeding to the next item during a count.
Figure: Sequencing Business
Process Flow – PC
The replenishment process attempts to ensure that the shop floor
inventory is set at a level best suited for customers.
Shelf replenishment functionality within SIM is related to the movement
of goods from the back room to the shop floor & backroom to shop-floor. For
example, when a user sees that a certain soda quantity is low, he or she can
instigate a replenishment process so that more of the soda is moved from the
back room when moving goods from backroom to shop-floor.
Shelf replenishment-related processing within SIM includes the
following features:
§
The system calculates what should be held on the shop floor to
ensure that customers’ expectations of availability are maintained. Store
employees are driven to replenish the most urgently needed items first.
§
The system offers a display of the location from which stock can
be replenished to ease the search for stock when the shelf replenishment lists
are being filled.
§
The system allows shelf replenishment requests to be generated on
demand.
§
The system leads the user around the back room in micro sequence
order, so that items can be picked in the most efficient matter.
Replenishment requires the available SOH be divided into three
buckets: shop floor, back room, and delivery bay. Because of these buckets,
shelf replenishment affects almost every area in the application. For example,
inventory adjustments and transfers are affected because the system must take
the inventory buckets into account when engaging in these areas of functional
processing. The system’s available inventory is the sum of the three buckets.
When merchandise becomes available (enters the store through a
transfer, a DSD, and so on), the merchandise is always placed in the back room
bucket.
The user can create a within-day or an end-of-day shelf
replenishment list for capacity based and sales based replenishments. The two
different types of shelf replenishment lists have store level configurations
for the fill level. Typically an end-of-day shelf replenishment list would have
a higher fill level than a within-day shelf replenishment list, as there would
be more time to stock the shelves. The difference between capacity based and
sales based replenishment is that capacity considers the sequencing to fulfill
shop-floor while sales based considers the sales of the item for the day for
replenishments.
When the user creates a capacity based shelf replenishment list,
the system runs a replenishment calculation that checks for those items that
belong to shelf replenishment list product groups. The system takes those items
and compares their capacity to their shop floor SOH. The system then generates
a shelf replenishment list in order of the items that need replenishment the
most and orders them in sequential order for the user. For within-day shelf
replenishment lists the system will stop when the amount to shelf replenishment
is equal to the amount suggested by the system. For end-of-day shelf
replenishment lists the system continues until all items that need replenishing
are replenished.
There are 2 more types of shelf replenishments other than
capacity based and sales based replenishments, they are Display list and AdHoc
Replenish. Adhoc replenishment simply moves the item mentioned on shelf
adjustment list from back room to shop-floor, defining capacity is not a
mandatory feature for this type of shelf replenishment. Display list is a
replenishment method specifically geared towards single unit display items that
are used to sell to customers and are related to each other by style. It
replenishes goods from backroom/ Delivery Bay to shop-floor using Product group
and Display List.
Shelf replenishment lists can be created on the PC or the
handheld and can be fulfilled on either device. If they are created on the PC,
the user is able to action them on the handheld.
Replenishment Calculation Summary
Once the calculation is started, the system engages in the
following processing:
§
The system gets all the items that are sequenced on the shop
floor with capacity in the product group.
§
If a previous shelf replenishment list exists for the selected
group and it is in progress, the system assumes that all of the items on the
shelf replenishment list will be completed. If a previous shelf replenishment
list exists and is not started, the system deletes the old shelf replenishment
list and creates a new one.
§
The system checks and gets the configuration parameters
established through the GUI (group unit of measure, fill percentage, and so
on).
§
The system gets the shelf quantities and available SOH for the
items found.
§
The system converts the quantities to the correct group default
unit of measure.
§
The system compares the shelf quantity to the summed shop floor
capacity for every item to determine the percentage the item is out of stock.
§
Once the out of stock percentage is calculated for every item,
the system orders the items from the highest out of stock percentage to the
lowest. If any of the items have the same out of stock percentage, the system
uses the item that has the least amount on the shelf. For example, if item A
has 10 out of 100 on the shelf, and item B has 1 out of 10 on the shelf, they
both have the same out of stock percentage. However, the system considers item
B a higher priority because there is less of it on the shelf.
§
For each item, the system calculates the replenishment amount
that should be brought from the back room/delivery bay to the shop floor.
Keeping the items in priority order, the system looks at the available SOH, the
items in the back room/delivery bay, and to what percentage the shop floor
needs to be filled. The system takes the inventory from the back room first and
then takes the inventory from the delivery bay. The shop floor quantity can
only be equal or less than the capacity.
§
If the shelf replenishment list type is within day, the system
stops when the amount to replenish is equal to the summed replenish amount
calculated by the system.
§
If the shelf replenishment list type is end of day, the system
continues until all of the items are completed.
§
If the system generated replenishment amount is a decimal, the
system rounds down to the nearest whole number.
§
The system generates and displays the list in sequence order to
the user. If the items are not sequenced in the back room, the system displays
the items in item ID order.
Figure: Shelf Replenishment
Business Process Flow – PC
SIM provides the ability to schedule, perform, and authorize
stock counts. SIM includes the following types of stock counts, each of which
is described in this section:
§
Ad hoc
§
Unit
§
Unit and Amount
§
Problem line
|
Note
The counting processing is identical among the unit only,
unit and amount, and problem line stock count types. What differs among these
three stock count types is either the setup or the items being counted.
|
SIM includes the following types of counting methods for stock
counts, each of which is described in this section:
§
Un-guided
§
Guided
§
Third Party
Portions of the stock count functionality, such as the setup of
product groups, schedules, and authorizations, are performed on the PC only.
The actual counting of inventory can be performed on both the PC and the
wireless device. A master count is created for a single product group and is
then broken down into one or more child counts based on the counting method or
hierarchy breakdown chosen during the product group setup. The user is able to
save the child stock count on the PC or handheld and resume at a later time.
Future Stock Counts
Future stock counts are stock counts for which the scheduled date
has not yet arrived. The user can view a list of future stock counts, and the
user also has the option to generate a future count to view the count details.
The user cannot take any action on a future stock count, the purpose is to
allow the store to view future workload so that the store can plan ahead for
staffing.
Unscheduled Counts – Ad Hoc Stock Counts
An ad hoc stock count is performed by a user walking through the
store scanning any items that need to be counted. They have no group or
schedule functionality associated with them.
Ad hoc stock count processing within SIM includes the following
features:
§
The system creates an inventory snapshot as each item is
identified and added to the stock count.
§
Ad hoc counts can only be initiated on the handheld. Once the
count has been saved on the handheld, it can be completed later on the handheld
or PC; any existing ad hoc stock count can be retrieved and resumed on the
handheld and PC.
§
The system utilizes discrepancy thresholds (established in
administration setup by the retailer) based on a percentage or standard unit of
measure by the item’s class in the merchandise hierarchy.
§
On the PC, the system allows for the authorization of items that
are discrepant (based on the percentage or standard unit of measure
thresholds).
§
Where the authorized item quantities entered by the user differ
from the SOH, the system creates inventory adjustments that are sent to the
merchandising system. See Inventory Adjustments Functional Overview in this chapter.
§
It is possible to have multiple users scan for the same ad hoc
stock count.
§
Since the user determines the order the items are scanned in, and
no predefined list exists, sequencing has no impact to these counts.
Scheduled Stock Counts
Several different scheduled stock counts exist, each with their
own specific differences. They do however have common setup pieces.
§
Individual items or item hierarchies are associated into a single
unit product group for the purpose of scheduling a stock count.
§
Stock Count product groups can be scheduled for a stock count on
a specified day or on scheduled intervals (for example, daily, weekly, monthly,
or annually).
§
One or more stores can be assigned to the scheduled stock count,
and each store will complete their stock count individually.
§
A group of valid stock count items is generated at the store
level using batch processes.
§
Users with proper security are prompted of any discrepancies
outside of set tolerances, and the system can automatically force a recount if
the discrepancies are too high. The system utilizes discrepancy thresholds
(established in administration setup by the retailer) based on a percentage or standard
unit of measure by the item’s class in the merchandise hierarchy.
§
An auto-authorization feature can be selected during the product
group setup. If set up for auto authorization, SIM automatically authorizes the
stock count after the count or re-count has been completed. In this case, no
user intervention is needed to confirm the count. For Sarbanes-Oxley Act or
auditing process requirements, this can be the optimal way to process a unit
and amount count.
§
Retailers can perform their Unit, Problem Line or Unit and Amount
stock counts using different counting methods:
Third Party Stock Counts
These stock counts are scheduled in SIM, but the actual counting
process is performed using the third-party system. Once the physical stock
counting process has been completed, the third-party system exports the results
of the count to SIM.
SIM compares the count information with the stock-on-hand (SOH)
value currently held in SIM. In SIM, users can view all items in the stock
count that are discrepant and non-discrepant when compared to the SOH figure.
Pre-defined variance limits (units, percent, and value difference) are used to
determine which items fall outside the acceptable level and are therefore
considered discrepant.
Any items SIM does not recognize can be added through the
Rejected Items dialog. Items that require UINs can also be assigned UINs
through the Rejected Items dialog.
The items associated to a product group will be associated to a master
stock count when generated, which in turn can be broken down based on the
hierarchy selected by the user during the product group setup (for example
Department, Class, Sub-class).
It is possible to create Third Party Stock Counts for any
merchandise hierarchy level supported in SIM.
For Third Party Stock Counts to work, the third party counter
needs to receive an extract of the items, quantities and UINs to count from
SIM.
This report can be printed to the screen and subsequently saved
by a user. The report only needs to be accessible in the stock count dialogue.
The Third Party Stock Count Extraction Report allows a retailer
to extract the snapshot value and in store UINs in an XML format that should be
counted for a specific stock count. This report may need to be modified by
individual retailers for different third parties when performing a stock count,
and is only meant as a starting point.
If this report is generated before a snapshot is taken, the UIN
and snapshot quantity field will be empty, and so the assumption is that the
extract will be created after the snapshot is taken.
|
Note
This will most often be used to print reports for third
party stock counts, however it should work for all stock count types.
|
This XML report contains the following information:
§
Header:
– Stock
Count ID
– Store
ID
§
Detail
– Item
number (SIM SKU number)
– Item
description
– Total
snapshot quantity for the item
– UINs
for the item
Unguided Stock Counts
When performing a scheduled stock count (unit or unit and
amount), the user is able to scan items on the handheld without being prompted
for which item to scan. This feature is controlled through the product group
setup by choosing Unguided for the counting method. Multiple employees are able
to scan items for the same stock count. This feature is controlled through a
system option.
Unguided stock counts cut down the time it takes to completely
scan a count and provides more flexibility. This process applies to both count
and recount processes.
The items associated to a product group will be associated to a
master stock count when generated, which in turn can be broken down based on
the hierarchy selected by the user during the product group setup (for example
Department, Class, Sub-class).
For unguided counts, the retailer can configure SIM to save the
item count automatically when the user moves on to count a different item. For
example, if the user scans item A three times and then scans item B, the count
value for item A is saved when scanning item B. This automatic save reduces the
need for store personnel to remember to save count values manually and it
allows longer scan times without interrupting the scanning of items for the
count. Users might forget to save, and if the system experiences a problem, the
data recorded up to that point will be saved if SIM is configured to do so.
Guided Stock Counts
Guided stock counts prompt the user for the next item in
sequence. This feature is available for scheduled Unit, Problem Line and Unit
and Amount counts and is controlled through the product group setup by choosing
Guided count method.
SIM generates a master count that is broken down by location. A
Child count is created for every macro location and the user is prompted to
scan the next item based on its location within the store. If an item exists in
multiple locations, the user is warned if the item has not been counted in all
locations.
If sequencing is not set up for the items, the user is prompted
in item order.
It is also possible to have these counts automatically processed,
ensuring no store interference. This automatic third-party process does not
require any counting or approval from store personnel.
Unit-Only Stock Counts
Unit-only stock counts are usually small stock counts setup on a
recurring pattern every few weeks or monthly. Unit-only stock count processing
within SIM includes the following specific features:
§
Setup of the stock count can be done at the item, merchandise
hierarchy level.
§
On the PC, the system allows for the authorization of items that
are discrepant (based on the percentage or standard unit of measure thresholds)
or non-discrepant, or both.
§
Where the authorized item quantities entered by the user differ
from the SOH, the system creates inventory adjustments that are sent to the
merchandising system. See Inventory Adjustments Functional Overview, in this
chapter.
Unit and Amount Stock Counts
Unit and amount stock counts are usually only done once or twice
a year. They are often required by law to be performed once a year and are done
for the entire store or specific merchandise hierarchies. They give the
retailer the ability to consolidate the actual counted quantities for
merchandise and the booking numbers at year end.
Unit and Amount stock count processing within SIM includes the
following features:
§
Setup of the stock count can only be done at merchandise
hierarchy level.
§
Unit and amount counts are scheduled and counted within SIM and
then sent to RMS. RMS accepts the unit variances and the user inputs the
variance amounts in Central Office.
§
Unit and amount product groups are scheduled for a specified day.
The stock count schedule for unit and amount stock counts is sent
to the merchandising system anytime it is created, updated or deleted.
§
One or more stores can be assigned to the scheduled stock count.
§
A stock count item list is generated at the store level using a
batch process that runs daily.
§
On the PC, the system requires the authorization of all items
(based on the value, percentage, or standard unit of measure thresholds).
§
Upon completion of authorization, a flat file is sent to the
merchandising system with a header that contains the stock count ID, stock
count date, and the store number that executed the count. The file contains
details for each item and the quantity counted. This information is then staged
in the merchandising system and can be used for reporting purposes.
|
Note
The Export Results button has
been removed and results will automatically be exported to the merchandising system
upon confirmation of the last child count. The user no longer needs to
manually export the results to the merchandising system using the GUI.
|
Stock Counts UIN Tracking
For items that require UINs, the user must capture the UIN when
performing a stock count on the PC or handheld. The count quantity will always
equal the number of UINs captured for the item.
The count/re-count stages only allow the user to count UINs that
already exist in the store. If a UIN does not exist in the store, the UIN can be
added during the Authorize stage. When the count is confirmed, the UIN is
created for the current store and the status moves to In Stock.
For UINs that have a status of In Stock after the initial count
but move to another status before the count is authorized, SIM does not update
the UIN to In Stock upon confirmation. In order to achieve this, a snapshot of
the status is taken at the time the snapshot is taken. The snapshot will always
be taken at the beginning of the child count, including Unit and Amount counts.
For UINs that exist for the item in the current store but are not
counted on the stock count, the status gets updated to Missing upon
confirmation of the count.
For AGSN items, SIM requires the user to scan the UINs to capture
the quantity as it does for regular serial numbers. During the authorization
process, the user is able to adjust the authorized quantity to account for
items that are missing UIN labels. The user can auto generate UINs during the
authorization process by selecting Auto Generate from
the UIN pop-up.
An audit record is created when the stock count is authorized.
The UIN status at the time of authorization is captured and a UIN
status results file is created for use in other systems.
Problem Line Stock Counts
This functionality gives stores the ability to create automated
stock counts according to predefined criteria (for example, the retailer could
decide to count all of the items that have negative SOH values).
Once stores have established the criteria (based upon problematic
areas), a batch process runs to find any items that meet the criteria. The
found items are added to the scheduled stock count. They are counted in the
same way as in a scheduled unit stock count. Note that problem line stock
counts will be executed every day.
Problem line stock count processing within SIM includes the
following features:
§
Individual items and item hierarchies are associated into a
single problem line product group for the purpose of scheduling a stock count.
§
Problem Line product groups schedules will be defaulted to daily,
every 1 day and cannot be changed.
§
On the PC, the system allows for the authorization of items that
are discrepant (based on the percentage or standard unit of measure thresholds)
and non-discrepant.
§
Where the authorized item quantities entered by the user differ
from the SOH, the system creates inventory adjustments that are sent to the
merchandising system. See Inventory Adjustments Functional Overview in this
chapter.
|
Note
With the exception of the extraction criteria, the
execution (counting, snapshot taking, authorization) is the same as with a
regular unit count.
|
Figure: Business Flow (Unit,
Problem Line, Unit and Amount and Third Party)
|
Note
Third Party count/re-count process is not performed in
SIM, it is performed through the third party system.
|
Figure: Business Flow – Ad Hoc
(PC only)
|
Note
Ad hoc count process is initiated on the handheld by
scanning an item. Once the count has been saved on the handheld, the user is
allowed to complete the count from the handheld or PC. There is no re-count
for Ad Hoc and an Ad Hoc will only have one child count. Authorization occurs
on the PC only.
|
Figure: Business flow – Third
Party

Figure: Business Flow - Future
Stock Count
Item Basket functionality allows the user on the handheld to scan
a list of items. This list of items can be interfaced to other applications
through a web service to aid them in specific tasks. These tasks can range from
line busting (Oracle Retail Point-of-Service), using it for wedding list
generation or simply identifying trouble items.
Specific features include:
§
Identifying a specific type of basket
§
Scanning or entering quantity for the item
§
Entering or auto generating a unique ID for calling it up
§
Edit, delete and add functionality
§
Print ticket functionality for register scanning
The following is an example of a possible business flow for line
busting:
Items are scanned into the Store Inventory Management handheld
and the basket is created in Store Inventory Management. Optionally, the
customer can be presented with a printed ticket containing a barcode, which can
then be presented at checkout.
At an Oracle Retail Point-of-Service terminal, the operator must
enter the unique Item Basket ID or scan the barcode from the ticket printed by
the Store Inventory Management handheld, and the basket details are retrieved
from Store Inventory Management and displayed on Oracle Retail Point-of-Service
for item tender.
If a UIN needs to be captured for an item, Oracle Retail
Point-of-Service will have this responsibility.
SIM has four distinctive shipping and receiving dialogs:
§
Transfers: Store-to-store transfer requests, dispatch,
and receiving.
§
Returns: Warehouse and supplier returns and return
requests and dispatch.
§
Direct store delivery (DSD): Supplier deliveries and
Quick Order Creation.
§
Warehouse delivery.
§
Within SIM, the following areas of functionality are related to
transfers and are discussed in this section:
§
The creation of store to store transfers
§
The receipt of store-to-store transfers
§
E-mail alerts
Store-to-Store Transfers
SIM allows for the lookup, creation, editing, and deletion of store-to-store
transfers. A store-to-store transfer is the movement of stock from one store to
another, within a given company.
This functionality can be performed on the PC deployment, on a
handheld wireless device, or a combination of both. Users can create a transfer
by selecting the receiving store and adding items by scanning and/or engaging
in manual entry. The system verifies the receiving store is approved to receive
the selected items and that the sending store has the available SOH inventory.
A transfer can be immediately sent or saved to be dispatched at a later time.
At the point the transfer is dispatched, SIM decrements the on hand inventory
from the sending store and increments the in-transit inventory for the
receiving store.
The following features of transfer-related functionality within
SIM:
§
Stock is differentiated by different buckets depending on stock
status (for example, in-transit stock, reserved for transfer stock, and so on).
§
The system automatically updates stock inventory on the basis of
the status of the transfer.
§
Buddy store functionality allows for the setup of a group of
stores within a transfer zone in SIM to which the retailer often transfers
items. This shortens the list of values that users select from when they create
a transfer.
|
Note
The retailer continues to have the option of creating a
transfer to any store outside of the buddy store group, as long as it resides
within the transfer zone.
|
§
When saving a transfer before dispatch, SIM will communicate
transfer positions to the external merchandise system and reserve internally
the inventory. This allows for a more accurate replenishment.
An Overview of Stock Movement after a Successful Dispatch
The stock moves from the transfer reserved and transfer expected
buckets.
1. The
transfer reserved quantity for the outbound location decreases as does the SOH
for the outbound location.
2. The
transfer expected for the receiving store results in a stock movement to the in
transit bucket. The transfer quantity is removed from the in transit bucket to
the SOH bucket when the receiving store receives the transfer.
Figure: Store to Store Transfers
Business Process Flow – PC

Transfer Requests
Transfer requests provide stores the ability to request products
from other stores or allow corporate users to move inventory across stores
using the central merchandising system. Transfer Requests are accessed from the
Transfer dialog. SIM allows for the lookup, creation, editing, and deletion of store-to-store
transfer requests.
A store user creates a transfer request by first selecting the
store to request the merchandise from and then adding items to the request.
Once the request has been sent to that store, the user can either accept or
reject the request. Once this is done, an e-mail is sent out to the requesting
store to notify of the response. If the transfer request is rejected, inventory
does not get updated. If the transfer request is accepted, the user is directed
to the transfer create dialog where all of the items and quantities have been
defaulted. From here on, the dialog will act as a regular transfer.
Retailers are only allowed to accept or reject a transfer request
awaiting response on the PC. The actual transfer request can be created on
either the PC or the wireless device.
Transfer Shipment
A Transfer Shipment can be created stand alone or based upon a
transfer request. The transfer request may have been created within SIM or it
may have come in from RMS.
After a request has been approved, or during the creation a new
transfer, the user is able to identify which units should be shipped. Through
the context field, the user can indicate the purpose of the transfer.
A new transfer can be created on the PC or the handheld. SIM
allows the creation, deletion and cancellation of a transfer.
If UINs need to be tracked for an item, the user must enter them
instead of a quantity.
When saving a transfer, SIM reserves the inventory and
communicates this information to RMS. This ensures inventory is not incorrectly
appropriated for other means.
Submitting a transfer is an interim process to save the transfer
and potentially send off a pre-shipment message. Submitting and pre-shipment are
configurable.
Dispatching will decrement the stock on hand at the sending
store.
|
Note
Store to store transfers can be affiliated with a
customer order.
|
Transfers Receiving
The retailer is able to receive against transfers on both the
handheld device and the PC.
On the PC, the store user can select the appropriate dispatched
transfer coming into the users store to receive against.
On the handheld, the retailer can receive a store-to-store transfer
by scanning an item on the transfer.
By scanning or manually entering, the user adds the items to be
received at the transfer, item, or case level. The ability to receive
unexpected items not originally on the delivery is configurable.
In the scenario where a transfer receipt being received is of
substantial size and cannot be completed at one time, the user has the ability
to save the delivery. This allows the user to save what has been received and
return at a later time to continue receiving. Once the user has completed
receipt of the entire transfer, the transfer would then be moved to a Received
status. When the transfer is completed, SIM decrements the inventory from
in-transit status and increments the on hand inventory appropriately. At this point,
changes to the transfer receipt can no longer be made unless the system is
configured to allow for receipt adjustments.
§
During the receiving process, the store user has the opportunity
to record any damaged or missing items on the transfer. An inventory adjustment
record is written for damaged units (with a reason code of damaged-hold) to
adjust the units from Available SOH to Unavailable SOH in the receiving store.
This information is reported to the central merchandising system.
|
Note
E-mails are also sent out to the sending store if a
transfer received contained damaged items.
|
§
When items are received for more than the dispatched quantity,
the system adjusts the difference out of the sending store’s SOH. No inventory
adjustment record is sent to the merchandising system or displayed. An e-mail
notification of the adjustment is sent to the sending store. The e-mail
includes the transfer number, item numbers, and the quantities adjusted out.
§
Depending on the settings, when items are received for less than
the dispatched quantity, the system can adjust the difference in the sending
store’s SOH (no loss) or ignore the missing units (sending or receiving loss).
No inventory adjustment record is sent to the merchandising system or
displayed. An e-mail notification of the adjustment is sent to the sending
store. The e-mail includes the transfer number, item numbers, and the
quantities adjusted in.
§
The inventory is not recognized in SIM until the transfer has
been received.
§
When receiving UINs, the user is restricted to the UINs that were
shipped, or be able to add unexpected UINs depending on configuration.
§
An auto receipt option exists for shipped transfers. This dialog
can be found under the administration section, SIM Stores, Auto-Receive stores.
§
It is also possible to auto-receive in full the moment an ASN
transaction arrives or to auto-receive based on x
number of days after the transfer has shipped. This is configurable through a
system administration parameter. This works in conjunction with the Auto
Receive Stores admin settings, meaning that the store must be setup to be an
auto receive store as well as the other admin settings.
§
Transfer receipts which are associated to a customer order will
prompt the user so that the items can be set aside for the customer. If
configured as such, inventory will be reserved and auto picked.
|
Note
E-mail Alerts: An e-mail alerts batch program will look
at all of the dispatched transfers that have not yet been received within a
configurable number of days and send out an alert to both the sending and
receiving store.
|
Figure: Transfer Request to
Transfer Receipt

The following table represents the different states a request or
transfer can be in, based on the sending store or the receiving store.
For example, a transfer in dispatched status from the sending
locations can be in In Transit or Receiving
status in the receiving store.
|
Table: Different States of a Request or Transfer
|
|
Phase
|
Sending Store Status
|
Receiving Store Status
|
|
REQUEST
|
N/A
|
New Request
|
|
REQUEST
|
Pending Request
|
Awaiting Response
|
|
REQUEST
|
Outbound Rejected Requests
|
Inbound Rejected Requests
|
|
REQUEST
|
N/A
|
Cancelled Request
|
|
TRANSFER
|
In Progress
|
Inbound - Picking
|
|
TRANSFER
|
Dispatched
|
In Transit
|
|
TRANSFER
|
Dispatched
|
Receiving
|
|
TRANSFER
|
Closed
|
Received
|
|
TRANSFER
|
Cancelled Transfer
|
Inbound - Cancelled
|
Warehouse delivery functionality within SIM is utilized when
goods are sent from a warehouse or external finisher to a receiving store.
Warehouse delivery within the SIM system can be accomplished on a PC-based
deployment, on a wireless handheld device, or on a combination of the two
deployment methods.
SIM allows for receiving from any number of company-operated
warehouses or external finishers. These entities must be approved shipping
locations for the receiving store, and the items shipped must be approved for
delivery to the receiving store.
When the transfer or allocation is created, SIM is able to
display this information to the user with the estimated in store date.
The moment the warehouse or external finisher ships the
transfer/allocation, SIM is notified over the RIB and moves inventory into an
In-transit inventory bucket. When the user confirms the receipt of the ASN the
inventory will be moved from In-transit to the Stock on hand (SOH). The
merchandising system will be directly updated with the received information.
Receiving can be done at the following levels:
§
Advanced Shipping Notice – This receiving level assumes a retailer’s
distribution center or warehouse system is very accurate and the store accepts
the entire ASN without checking the content.
§
Container - Store users can scan the barcode on the container
(pallet/distribution unit/carton) within a receipt to find the quantities
contained within and receive all contents.
§
Case/Item - This is the lowest level of the receiving process
where each item is received individually. Additionally, an initial receipt can
be done at a high level and saved to allow for detailed item level receiving at
a later time. The ability to receive unexpected items not originally on the
delivery is configurable.
§
Warehouse Quick Receiving - Warehouse quick receiving allows the
user to scan each container as it comes off the truck. The user can confirm and
reconcile after all the containers have been scanned. This function is only
available on the Hand Held.
During the receiving process, the store user has the opportunity
to record any damaged or missing items on the receipt. An inventory adjustment
record is written for damaged units (with a reason code of damaged-hold) to
adjust the units out of Available SOH and into the Unavailable SOH in the
receiving store. This information is reported to the central merchandising
system. User also have the feature to receive goods directly at shop-floor.
In the scenario where a delivery being received is of substantial
size and cannot be completed at one time, the user has the ability to save the
delivery as In Progress status. This allows the user to save what has been
received and return at a later time to continue receiving. Once the user has
completed receipt of the entire warehouse delivery it would then be moved to a
Received status. At this point, changes to the delivery can no longer be made
unless it is configured for Unit Receiver Adjustments.
When scanning a container that is listed as missing from a
confirmed Advance Shipping Notice (ASN) in Quick Warehouse receiving on the
handheld device, SIM receives the container instead of prompting the user with
an error message. This receiving process follows the same logic as regular
container receiving. The result of this operation is that the receipt is
amended with the missing container now received. A message is sent to RMS to
bring both systems in sync.
It is possible to auto-receive a warehouse delivery. External
finishers and warehouse deliveries can be configured through a system
administration parameter. The store user has the option to auto-receive in full
the moment an ASN transaction arrives or auto-receive based on x number of days after the ETA date.
Warehouse receipts which are associated to a customer order will
prompt the user so that the items can be set aside for the customer. If
configured as such, inventory will be reserved and auto picked.
Figure: Warehouse Receiving
Business Process Flow – PC
Warehouse Quick Receiving
Warehouse quick receiving allows the user to scan each container
as it comes off the truck. The user can confirm and reconcile after all the
containers have been scanned. This acts as a follow up audit after the truck
has been unloaded and has left.
Quick Receiving with Missing Containers
When scanning a container that is listed as missing from a
confirmed Advance Shipping Notice (ASN) in Quick Warehouse receiving on the
handheld device, SIM receives the container instead of prompting the user with
an error message. This receiving process follows the same logic as on the PC.
The result of this operation is that the receipt is amended with the missing
container now received. A message is sent to RMS to bring both systems in sync.
Warehouse Delivery UIN Tracking
When receiving containers using either the handheld or the PC,
SIM validates the container to see if it contains any items that have a Capture
Time of Store Receiving. If any items do, SIM requires the user to scan the
individual UIN numbers within the Container on Handheld, on PC if it
pre-populated it might not need scanning.
If a serial number is not scanned, the quantity on the delivery
will not increase on Handheld. At this time, the ASN message from the warehouse
may or may not include any UIN information depending upon the implimentation.
Now a delivery containing UIN items can also be auto-received.
For AGSN receiving, the user enters the received quantity and
damaged quantity. UINs are not scanned during the receiving process for items
that require AGSNs. SIM generates UINs and prints a ticket for each damaged and
received item upon receipt confirmation. A business process should be put in
place to put the AGSN tickets on the correct items.
Warehouse Quick Receiving allows for a user to quickly receive at
the container level, therefore, if the container has items that require UINs,
the user will be given the option to receive the UINs now or set the container
aside to be received later.
When the delivery is accessed after it has been received, the
user can view the UINs that were created.
External Finisher-Specific Logic
Through the returns dialogue, items can be shipped to an external
finisher for repair. After the finisher has completed the repair work, a
transaction is generated for SIM to receive against. The receipt is done in
the warehouse delivery dialogue where the user can receive against the
transaction, receive a single container or receive the individual item.
If the items were UIN items, the warehouse delivery dialogue will
check to see if the UINs shipped to the finisher are being returned. If they
are UINs that are new, the user can still receive them, but will be asked to
confirm the delivery. Auto-receive will only be valid if Items on the return
matches the delivery.
DSD occurs when the supplier drops off merchandise directly in
the retailer's store. This process is common in convenience and grocery stores,
where suppliers routinely come to restock merchandise. In these cases, the
invoice may or may not be given to the store (as opposed to being sent to
corporate), and the invoice may or may not be paid for out of the register.
The SIM system allows for the retailer to create new delivery
records. The delivery records can be created for a new Purchase Order and the
supplier will be required to be identified by entering in the supplier or
identifying the supplier for an item using the supplier lookup. Deliveries can
also be created for existing purchase orders. This occurs by selecting a
Purchase Order which can be viewed and a delivery can be created against that
purchase order. DSD delivery functionality within the SIM system can be
accomplished on a PC based deployment, on a wireless handheld device, or on a
combination of the two deployment methods.
The retailer can enter invoice information and receive items by
the case/pack or by the item. The retailer can also print a delivery receipt
once all items have been received, and the delivery is finalized. Note that the
system is also able to handle deliveries partially received, allowing for
multiple receipts against a single PO.
Through security permissions, the retailer can prevent users from
over-receiving on the delivery. Once the expected quantity is reached, the user
is prevented from receiving any more units. Receiving of goods can also be
direct to shop-floor directly. Receiving for damages can also be restricted
through security. A system parameter allows the user to receive above the
expected quantity but the stock on hand does not get updated for any units that
exceed the expected quantity. A second system parameter allows the user to
receive damaged units but, as with over-receiving, the stock on hand will not
be adjusted for these units. These over-received and damaged units are moved to
a separate table upon confirmation of the delivery and can be published to an
external system. In case both parameters are setup, the damaged units will be
removed before the undamaged units.
Upon completing the order, the system validates whether the
supplier allows for:
§
any discrepancies
§
only overages, not short receipts
§
no discrepancies based upon a supplier attribute
A security setting dictating whether supplier discrepancies can
be overridden is checked against the receipt. If the discrepancies cannot be
overridden, the receipt is not completed. The user has an option to reject the
entire delivery. If overridden, the receipt process continues on.
|
Note
In a standalone environment, the supplier level indicator
can be manually set up on the supplier in the SIM DB.
|
Upon completing the delivery, the SOH for the store is updated
with the received quantities. An inventory adjustment record is written for
damaged units (with a reason code of damaged) to adjust
the units out of SOH in the receiving store.
The receipt and purchase order information is published to the
RIB for the purposes of the merchandise system.
Depending upon system configurations, users can re-open direct
deliveries and adjust received quantities (within an established number of
days). Corrected data is then processed and resent to the merchandising system.
This unit receiving adjustment functionality is only available on the PC.
If the unit cost configuration is turned on, in certain
conditions, the user will be able to enter a unit cost for DSDs created in SIM.
These costs will be used by the merchandise system to generate a Purchase Order
(PO). When receiving against existing Purchase Orders, SIM cannot update the
cost since it is controlled by the merchandise system. If it is not filled in,
then the merchandise system will default the cost.
Direct Store Delivery receipts which are associated to a customer
order will prompt the user so that the items can be set aside for the customer.
If configured as such, inventory will be reserved and auto picked.
Receiving Against Advanced Shipment Notices (ASN)
Because of receiving-related processing within SIM, the retailer
is able to receive against advanced shipment notices (ASN) on both the handheld
device and the PC. ASNs that originate at the vendor are published to the RIB,
and SIM subscribes to the data.
When a direct delivery is received, SIM checks for a
corresponding open ASN against the PO.
Retailers are prompted as to whether they would like to apply the
ASN to the delivery. If the ASN is applied, the shipped quantities from the ASN
are applied to the quantity received for the direct delivery. Depending on
configuration, if new items are included in the ASN but do not reside on the
original PO, the items are added to the PO. Once the ASN is applied, the
retailer can modify any of the received quantities.
A system option controls whether or not expected quantities are
defaulted in for direct store deliveries with ASNs. This allows more detailed
control by the retailer. If the quantities are not automatically defaulted, the
user can scan each unit individually to ensure that the correct quantities are
recorded. If the quantities are defaulted, only a visual inspection can be
done since scanning the item will automatically increase the received quantity.
Direct Delivery UIN Tracking
Before confirming a receipt for a direct delivery on the handheld
or the PC, SIM validates to see if any items have a Capture Time of Store
Receiving. Serial numbers must be entered or scanned when receiving items that
require UINs. If a serial number is not scanned, the quantity on the delivery
will not increase.
|
Note
If applying an ASN, the user is prompted if the defaulted
quantity is not equal to the number of UINs scanned to be received.
|
The Receive All option will not be available if UINs are required
for at least one of the items on the DSD.
At this time, the ASN message from the supplier may or may not
include any UIN information depending upon the configuration now a delivery
containing UIN items can also be auto-received.
For AGSN receiving, the user enters the received quantity and
damaged quantity. UINs are not scanned during the receiving process. SIM
generates UINs and prints a ticket for each damaged and received item. A
business process should be put in place to put the AGSN tickets on the correct
items.
When the delivery is accessed after is has been received, the
user can view the UINs that were created.
Direct Exchange (DEX) and Network Exchange (NEX) Receiving
Direct Exchange (DEX) and Network Exchange (NEX) are uniform
communications standards. DEX is the means through which a supplier, using a
handheld device, can exchange electronic invoicing information with a store’s
direct store delivery (DSD) system. NEX differs in its delivery system, using
the web as opposed to a hand-held cradle.
SIM is designed to support the integration of a supplier’s DEX/NEX
information into direct delivery-related screens, thereby simplifying the
receiving process. Data is transferred to a store’s DSD system using the
Electronic Data Interchange (EDI) transaction set 894 (delivery/return base
record). With the uploaded data, the store user can view, edit, and confirm the
information contained in the file before receiving the direct delivery.
A system option controls whether or not expected quantities are
defaulted in for direct store deliveries with Dex/Nex. This allows more
detailed control by the retailer. If the quantities are not automatically
defaulted, the user can scan each unit individually to ensure that the correct
quantities are recorded. If the quantities are defaulted, only a visual
inspection can be done since scanning the item will automatically increase the
received quantity.
Existing POs vs. New PO
An existing PO is defined as a PO coming from an external system.
SIM can receive against such POs with or without an ASN.
SIM also has the ability to create POs on the fly. These can be
based on Dex/Nex transactions or be manually entered based on an invoice from
the vendor.
Figure: Direct Store Delivery
(new created) Business Process Flow – PC
Figure: DSD Multiple Available
ASNs Business Process Flow – PC
Figure: DSD Updating and
Defaulting Cost Business Process Flow – PC

Receiver Unit Adjustments
During the receiving process, there are situations where it
becomes necessary to be able to amend a receipt once it has been completed and
sent to the merchandising system for processing. SIM allows users to edit
quantities on receipts from a warehouse, direct delivery, and transfer once
those shipments have been received.
Unit Receiver Adjustments are available depending on system
configurations. There are three separate system configurations corresponding to
each receiving function. The configurations represent the number of days a
receipt can be adjusted. For example, if the configuration is set to zero, this
would disable the unit receiver adjustment functionality. Conversely, if a unit
receiver adjustment were set to a value greater than zero, the receipt would be
available for the specified amount of days. The users can re-open already received
deliveries by clicking Adjust Delivery which is
available on the receiving detail screen, and then modify the received
quantities. Corrected data is then processed and resent to the merchandising
system.
Unit Receiver Adjustments are only available on the PC and uses
the existing receiving screens.
Receiver Unit Adjustments UIN Tracking
When a receipt is adjusted for an item that requires a UIN, the
UIN will need to be added or removed from the transaction. If UINs are added,
the received quantity increases by the number of additional UINs added. If UINs
are removed from the receipt, the received quantity decreases by the number of
UINs removed.
If externally generated receipt adjustments are sent from RMS, an
exception is captured. The SOH and receipt will still be updated for the
receiver unit adjustment on the backend.
For example:
RMS SIM
SOH Rcpt SOH Rcpt
3 3 3 3
External receiver unit adjustment done in for -1.
SOH and receipt updated in both external system and SIM.
RMS SIM
SOH Rcpt SOH Rcpt
RUA -1 -1 -1 -1
2 2 2 2
A business process should be put in place to resolve the
discrepancy on the GUI. See
Resolving UIN Discrepancies for more details.
When entering the DSD, Warehouse Delivery or Transfer dialogues,
the user will be prevented from exiting the RUA transaction until the received
quantity equals the number of UINs.
Receipt Adjustments for Transfers should not be allowed for any
UIN unless the status of the UIN is in In Stock. The reason for this is that
other states such as shipped out, reserved for shipping, unavailable, customer
order reserved and so forth have other business transactions against them. The
item should be removed from those transactions before the adjustment is
allowed. The business workaround would be to add the item back in stock and
then remove it through the adjust transfer dialog.
When adjusting receipts for AGSNs, an AGSN would be added or
removed from the list. When adding units to the receipt of a Warehouse
Delivery, DSD, or Transfer, SIM:
§
Creates AGSNs for items that are added or items that increase in
quantity
§
Prints labels automatically for the newly created AGSNs
§
Associates the AGSN to the item without prompting the user to
add/scan them manually
In case of a RUA that is reducing inventory, the user will be
required to select the AGSN that is being removed from the transaction.
The section describes the returns and return requests.
SIM allows a store user to look up, create, edit, delete, and
complete returns from the store to an external finisher, a company-owned
warehouse or directly to the vendor. Returns functionality within the SIM
system can be accomplished on a PC based deployment, on a wireless handheld
device, or on a combination of the two deployment methods.
If the return is to a warehouse (RTW), the user selects the
appropriate warehouse from a list. If the return is direct to a vendor (RTV),
the user enters the vendor number or uses the search option to identify the
vendor for which the items should be shipped. Lastly for return to finisher,
the user enters or searches for the finisher for which to return the goods.
For the RTV, the user is prompted to enter an authorization code
for the return if the supplier requires a return authorization code.
Return to Finisher and Warehouse have also a context field.
Through the context field, the user can specify the purpose of the return. For
example, the user can indicate the item is being returned for repair. After the
finisher has completed the repair work, a transaction is generated for SIM to
receive against. The receipt is done in the warehouse delivery dialogue. The
context field can only be assigned if the return is created in SIM.
Return to warehouse and finisher require the user to select an
inventory status at the header level of the return to define whether all items
are returned from available or unavailable inventory. The reason codes will be
restricted to those reason codes that have an inventory status corresponding to
the one selected on the header of the transaction. For return to supplier, the
user may return available and unavailable items on the same return transaction,
thus all return to vendor reason codes will be provided.
Once a return is dispatched, the available stock on hand is
decremented. If the user decided during the return process to source the
quantity from unavailable inventory, an additional inventory adjustment is
generated with a reason code of returns that moves the stock from unavailable
to available.
Item quantities can be entered in eaches or cases. Once the
applicable quantities are entered, the user is prompted to enter a reason code
for the return. The reason codes are retailer defined. After the reason code is
selected, the user may either complete the return or save it to be completed at
a later date. Submitting a return is an interim process to save the return and
potentially send off a pre-shipment message. Submitting and pre-shipment are
configurable.
Once a return is dispatched, inventory buckets, available or
unavailable, will be updated based upon the inventory status associated to the
reason code.
Once the return is completed, a return document can be printed to
be used both as a report and/or a packing slip for the shipment.
|
Note
It is only possible to return merchandise directly to the
vendor (RTV) from SIM if the vendor is allowed to receive returns. It may be
a requirement that the vendor is also allowed to do Direct Store Deliveries,
this is based on a configuration.
|
Returns UIN Tracking
For Return to Warehouse and Return to Vendor transactions, the
system will check if the capture time is store receiving for the item. If it
is, the user will be required to enter or scan UINs and the quantity field will
be equal to the number of UINs entered/scanned for the item. Saving the
transaction will move the UINs to Reserved for Shipping status.
If the UIN added to the return is in unavailable status, SIM
assumes the user wants to use unavailable inventory for the return. A separate
check for unavailable inventory is not needed for UINs.
If the UIN is not assigned to the current store, the UIN is not
allowed to be added to the return.
Once dispatched, the UIN will move to Shipped to Warehouse for
RTWs, Shipped to Finisher for Return to Finisher, and Shipped to Vendor for
RTVs.
An audit record is captured for each status change.
Return requests functionality enables return requests to be
fulfilled from a store to a warehouse (RTW), finisher, or to a vendor (RTV)
that were generated using the merchandising system.
A return request might be generated by a safety concern (for
example, glass shards are discovered in a product). The functionality can be
summed up as a return generated by the merchandising system that can be edited
and approved in SIM. Return requests functionality within the SIM system is
accomplished only on the PC-based deployment.
Once SIM receives the return request data, it takes over the
request and allows store users to add, edit, delete, save, and dispatch the
return request. Once the request is deleted or dispatched, a message is sent
back to the merchandising system.
Figure: Return Requests Business
Process Flow – PC

SIM provides a UI which allows the user to add new reason codes
to synchronize with those setup in RMS. Each reason will have an inventory
status of Available or Unavailable. System required reasons will indicated and
defaulted per data seeding.
Those reasons that have an inventory status of unavailable may
also have a sub-bucket assigned if system configured to use sub-buckets.
Upon entering the Customer Order Management dialogue, the user
will see all open transactions that are pertaining to customer orders for the
user's store. Customer Order may be the POS pick up type of customer order, or
they maybe the web order customer orders. The user can use the filter dialogue
to filter the criteria further. From this screen the transactions can be
accessed by double clicking on any of the records in the list.
Transactions will include:
§
Customer Order
§
Pick
§
Delivery
§
Reverse Pick
§
Transfer
§
Direct Delivery
§
Warehouse Delivery
This screen also allows access to the Customer Order and Customer
Order Picking dialogues.
Customer Orders can be viewed from either the Item Detail screen
for a particular item, or from the Customer Order dialogue within Customer
Order Management. Customer Orders are view only and provide information to the
user about the customer order including:
§
Customer Order ID
§
Fulfillment Order ID
– Can
have multiple fulfillment orders per customer order. Only for web order
reservation types.
§
SIM Customer Order ID (internal unique ID)
§
Order Status
§
Reservation Type
§
Order Create Date
§
Order Release Date
§
Order Delivery Date
§
Delivery Type (pick up or shipment)
– Pick
Up for non “web order” reservation types
§
Carrier
§
Service
§
Allow Partial Delivery
§
Notes
– Notes
can be maintained on the customer order, delivery or reverse pick and be stored
on the customer order.
§
Item
§
Item Description
§
UOM
§
Pack Size
§
Remaining Quantity (quantity left to be shipped or picked up)
§
Order Quantity
§
Picked Quantity
§
Delivered Quantity
§
Canceled Quantity
§
Last Update Date
§
Comments
§
Substitute
– The
original item that the current line item was substituted for.
Customer Orders that are “web orders” will have inventory
reserved either upon getting the customer order into SIM from the OMS or it
will happen when receiving a delivery that contains the customer order
(transfer, warehouse delivery, or DSD). This is dependent upon a configuration.
In both cases, the customer order must be in the system in order to reserve the
inventory. When reservation occurs a message is published out from SIM.
Some retailers will want to have a formal customer order picking
process in place to pick the customer orders and set them aside for the
customer. Other retailers will find that this is not necessary and they will
just go and get the items informally when the customer order comes into the
system. Picking is a process that can be configured to be required or optional.
Picking is only used for "web order" reservation type of customer
orders.
In the manual picking process, a retailer may choose to pick by
bin or by customer order. When picking by bin the retailer can pick multiple
customer orders at a time. The retailer will tell the system how many bins to
pick and the system will apply an algorithm to find the oldest customer orders
where there are items with available stock and items left to be picked. The
system will fetch one customer order per bin. When picking by customer order,
the user will tell the system what customer order to be picked and that single
order will be added to the pick.
Once the pick is created the user will walk the store picking the
items prompted on the pick based upon a system suggested pick quantity. As the
items get picked the user would set them aside. Upon completion of the pick,
the pick quantity on the customer order would be incremented and SIM would
publish out a pick message.
During the picking process, it may be necessary to substitute an
item. In order for this to happen, the item on the customer order must first
allow for substitute items. If substitutes are allowed, there are two options
for choosing substitute items based upon configurations. One, the system does
not allow for user discretion and only a list of substitute items provided from
RMS can be used. Second, the system allows for user discretion and the user can
choose from a list of RMS provided substitutes, or choose any substitute item
at will.
There may also be items that are difficult to pick the suggested
pick amount. These items are typically variable weight, each item, such as Lbs,
KG, meters. It is possible to setup tolerances at a sub-class level for
customer order picking, similar to those for Adhoc stock counts. The tolerances
will allow the user to over pick within the defined tolerance. Example: Ordered
2 LBs Bananas. The Fruit sub-class has a tolerance of 10%. User picks 2.1 LBs
which is within the 10% tolerance of 0.2 Lbs.
Customer Order Deliveries allows for the user to fulfill the
customer order by creating a delivery for a customer order. A delivery may be a
shipment to the customer or it can be a pick up for the customer order. For the
POS pick up customer orders, deliveries cannot be created by the user, rather
they will be created upon receiving a customer order fulfillment record from
POS and they will be in a “completed” status and view only. For “web order”
customer orders, the user can create and edit customer order deliveries.
It is possible to create multiple deliveries per customer order
so long as there is a remaining quantity left to be fulfilled. Each delivery
will be listed for the customer order. If picking is configured to be required,
it will be necessary to have everything picked prior to creating the delivery.
When creating the delivery, the user will enter the quantity to be delivered
that is less than what is remaining .The system will validate if a partial
delivery is allowed per the customer order. If it is not the user will be
prompted and the delivery must be delivered in full (unless user has special
security permission to override).
The delivery can be saved, submitted or dispatched. Submitting a
delivery is an interim process to save the transfer and potentially send off a
pre-shipment message. Submitting and pre-shipment are configurable. Once a
delivery is dispatched the stock on hand and reserved quantities will be
decremented from the user's store. The deliveries which are shipments will
publish and ASNOut message.
Canceling of “web order” customer orders might also come into SIM
from an external OMS system. If all of the items being canceled have not been
picked, then a completed status reverse pick will be generated and no action is
needed from the user. The canceled quantity on the customer order will be
incremented. When a cancelation comes into SIM, if there are items to be
physically unpicked, then a reverse pick list will be generated. The reverse
pick will require action. The system will suggest the quantity needed to
reverse pick based upon the cancellation that came into SIM. Upon completion of
the reverse pick, the pick quantity and reserved quantities will be decremented
as well as incrementing the canceled quantity.
A manual reverse pick might also be necessary. This would happen,
for example, when the user discovers that something was picked and has been
damaged. A manual reverse pick may be created in SIM which would reduce the
pick quantities. In this case the reserved quantity and canceled quantity does
not get updated. This is because the items are not canceled, they are just
un-picked.
Reverse picks can be saved to be completed later or completed
now. Reverse Picks are an exception process and therefore they are only
available on the PC application.
Figure: Customer Order
Management Business
This section describes lookups.
SIM provides store users the ability to query basic item
information and search for stock in other store locations. All of the lookup
functions have filter status on which to search. For example, a user can search
for items by item number, description, supplier, and/or merchandise hierarchy.
The information that can be searched on and displayed to the user is as
follows:
§
Search Criteria will always allow for:
– Item
Number (for example, UPC, SKU, UIN, GS1)
– Unique
Identification Number (UIN)
– Item
Description
– Brand
– (Primary)
Supplier Name
– (Primary)
Supplier Number
– Warehouse
– Finisher
– Style
(Parent id)
– Merchandise
Hierarchy
– Ranged
indicator
– User-Defined
Attribute (UDA): UDA Text, Value, or Date
– Inventory
Status (Available or Unavailable inventory)
§
Information Displayed
– Item
Number (SKU)
– Item
Description
– Item
Image
– Supplier
Name
– Supplier
Number
– Primary
UPC/EAN Number
– Brand
– VPN
– Primary
Supplier
– UIN
Detail
– Item/Location
ranging
– Primary
Sequence Location
– Unit
Of Measure
– Store
Pack Inventory
– Concession/Consignment
Item
– Inventory
– defaults to the store the user is logged on to and displays the following
categories in units:
* Total
Stock on Hand
* Available
Stock on Hand
* Shop
Floor
* Backroom
* Unavailable
Stock
* Transfer
Reserved
* RTV
Reserved
* Customer
Order
* Nonsellable
* Ordered
Quantity
* Delivery
Bay
* In
Transit
* Received
Today
– Stock
on hand at other store locations (Stock Locator)
– Customer
Orders
– Nonsellable
(if sub-buckets are configured)
* Department,
Class, and Subclass
– Item
differentiators and their related items
– Primary
Pack Size
– Pricing
– Current and Regular Retail Price
– Price
Status – Clearance, Promotional, Market
– Regular
Multi Price information
– Price
History
– Item
Status – active/inactive
– Next
allocations – Delivery Date, Warehouse, UOM, Quantity, Timeslots
– Replenishment
Method
– Reject
Store Orders – for store orders
– Next
Delivery Date- for auto replenishment items
– UDA
Detail
In an effort to reduce the number of keystrokes, if a lookup on
an item is done during the processing of a separate function (that is, a
transfer), the ability to use the item directly from the search is enabled. For
example, the user can search for an item or supplier directly from the transfer
screen, select Apply, and the information will default into the transfer
currently being created.
The handheld will display the same information but also has a
walk through lookup function. This feature allows the user to scan a specific
item and walk through the different differentiators of the item. The user is
then presented with the on hand positions and details of the found item. This
is especially useful when a customer cannot find the item, but the store has a
very similar item. For example, the user presents a black large T-shirt, but
the item the customer actually wants is a red medium sized T-shirt.
The user will also find in this dialog some rudimentary
information on customer orders.
Figure: Item Lookup Business
Process Flow – PC

Item Image URLs
SIM enables a customer to define a URL to an image for an item.
When the application server is inside a firewall and the referenced images are
outside the firewall, the managed server that runs within the application
server might need to be started with JVM options defining the proxy server
through which URL requests must pass to get outside the firewall, to access
images.
The following is an example of these settings:
export JAVA_OPTIONS="-Dhttp.proxyHost=myproxy.mycompany.com
-Dhttp.proxyPort=80
-Dhttp.nonProxyHosts=localhost|127.0.0.1|*mycompany.com|10.141.*
-Djava.net.preferIPv4Stack=true"
These settings must be passed to the managed server JVM during startup.
This is usually done within the shell script that launches the managed server.
SIM provide users with the ability to query information on
suppliers. Search criteria include: Supplier ID and Supplier Name.
The following is displayed after a search is performed:
§
Supplier Name
§
Supplier Number
§
Supplier HQ Address, Phone, Fax, Contact, E-mail Address
§
Supplier Returns Address, Phone, Fax, Contact, E-mail Address
§
Status of the supplier
§
Returns Allowed indicator
§
Return Authorization Required indicator
As with the item lookup functionality, if a lookup on a supplier
is done during the processing of a separate function (that is, a transfer), the
ability to use the supplier directly from the search is enabled. When accessed
from other areas of the application, item will also be available as a search
criteria.
Supplier Lookup functionality is available on both the handheld
and the PC.
Figure: Supplier Lookup Business
Process Flow – PC
SIM provides users with the ability to query shipping container
information and displays the following:
§
Container ID
§
ASN Number
§
Container Status (Received, In Transit, and so on)
§
Item information
§
Receipt Date and Time
§
From Location
§
Number of Cases
§
Damages
This functionality is available on both the handheld and the PC.
Figure: Container Lookup
Business Process Flow – PC

SIM provides users with the ability to query the transaction
history for a store. It will display all transactions that increase or decrease
sock on hand.
Search criteria will include:
§
From Date
§
To Date
§
Tran Type (for example, Direct Delivery, Return to Vendor)
§
Reason
§
User
The display will include the following:
§
Date
§
Transaction type
§
Transaction ID
§
Item
§
Item Description
§
Reason
§
SOH
§
Unavailable
§
User
Figure: Transaction HIstory
Lookup Business Process Flow – PC
SIM allows stores to print shelf edge labels and item tickets for
stock manually or by scheduling printing using product groups. Groupings of item tickets (batches) can be managed on the PC for
mass printing. Tickets and labels can also be auto-generated when price
changes, description or QR changes are introduced to SIM from external systems.
Tickets can be created on the PC in the following ways:
1. Manual:
a. Individual
ticket—When creating an item ticket, the user provides the quantity of the item
to print and an override price (if necessary). The override price in ticketing
is used to indicate the old price or a special promotion allowing the user to
show the mark down.
|
Note
This override price does not generate a price change.
|
b. Pricing
dialog —Users can also send tickets to the Item tickets dialog to print at a
later time by selecting price changes from the price change list screen and
then and having it added to the Item Tickets dialog.
c. Regular
price changes - Users can also create item tickets for regular price changes:
the price event is selected and the corresponding price event on the Add
Transaction screen is accessed from the Item Ticket Batch List screen. Item
Tickets would then be generated for the items on the price event.
d. Clearance
price events - Users can also create item tickets for clearance price changes:
the price event is selected and the corresponding price event on the Add
Transaction screen is accessed from the Item Ticket Batch List screen. Item
Tickets would then be generated for the items on the price event.
e. Promotion
price events – Users can also create item tickets for promotion price changes:
the price event is selected and the corresponding price event on the Add
Transaction screen is accessed from the Item Ticket Batch List screen. Item
Tickets would then be generated for the items on the price event.
f. Direct
delivery receipts - Users can also create item tickets for received direct
deliveries: the direct delivery is selected and the corresponding received
shipment on the Add Transaction screen is accessed from the Item Ticket Batch
List screen. Item Tickets would then be generated for the items on the direct
delivery receipt for the received quantities.
g. Purchase
Order receipts —Users can also create item tickets for received purchase
orders: the purchase order is selected and the corresponding received shipment
on the Add Transaction screen is accessed from the Item Ticket Batch List
screen. Item Tickets would then be generated for the items on the purchase
order for the received quantities.
h. Transfer
receipts – Users can also create item tickets for received transfers: the
transfer is selected and the corresponding received shipment on the Add
Transaction screen is accessed from the Item Ticket Batch List screen. Item
Tickets would then be generated for the items on the transfer for the received
quantities.
i.
Warehouse delivery receipts - Users can also create item
tickets for received warehouse deliveries: the warehouse delivery is selected
and the corresponding received shipment on the Add Transaction screen is
accessed from the Item Ticket Batch List screen. Item Tickets would then be
generated for the items on the warehouse delivery for the received quantities.
2. Automatic:
a. Item
description changes – The system may be configured to automatically generate a
ticket when item description changes come in from a merchandising system.
b. Price
changes received from an external system – The system may be configured to
automatically generate a ticket when regular price, clearance and promotional
price changes come into SIM from an external price management system.
c. UDA
changes for an item – The system may be configured to automatically generate a
ticket when a UDA is changed for an item from a merchandising system.
d. QR
Code changes - The system may be configured to automatically generate a ticket
when a QR code is changed for an item from a merchandising system.
e. Sequence
Location Change - The system may be configured to automatically generate a
ticket when a sequence location is changed for an item from an external system.
f. Web
Service – The system may be configured to automatically generate tickets when a
third party ticketing service imports the tickets into SIM.
The handheld can only print manual individual created tickets. It
is possible to use belt printers as long as they have their own unique printer
network ID.
Label formats and label quantities will be maintained at the
micro sequence location level for items setup in sequencing. This allows for
defaulting label types based on Primary Location.
Formats are templates created in external systems that define the
layout of how a ticket is printed. Formats are setup in the output tools or
devices used to produce them. An output tool could be a printer or a software
tool such as Oracle Business Intelligence Publisher. SIM only references the
name of the format so it can be referenced by the external printing
application.
Formats may then be assigned to various price events based on
merchandise hierarchy.
Figure: Ticketing Business
Process Flow – PC
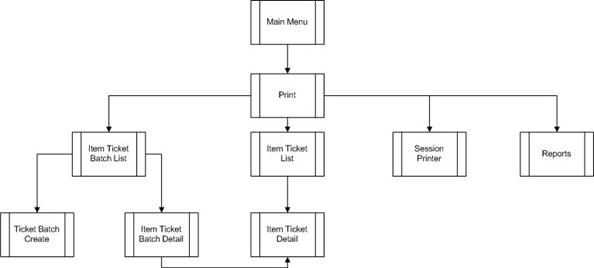
Ticketing UIN Support
SIM automatically prints tickets when a serial number is
auto-generated. A ticket for the AGSN can also be printed using the Item
ticketing dialog. Serial numbers cannot be printed.
The section describes the UINs.
Retailers who sell items such as electronics, cell phones,
weapons, medication, and fresh items often have to track unique numbers or attributes
for a single item or a group of items. These numbers are often called serial
numbers, batches, unique identification numbers, FCC ID, expiration ID, and so
on.
SIM now supports unique identification number logic. The retailer
can track the individual instance of an item in SIM from the moment it enters
the store until the moment it leaves the store, resulting in better inventory
control. UIN tracking is expected to reduce shrinkage, hold stores accountable
for individual items, and increase customer satisfaction.
In SIM, UIN functionality allows the user to:
§
Lookup a UIN
§
View audit trail of UINs
§
Resolve UIN discrepancies
§
Update UIN status
§
Receive UINs (Direct Delivery, Warehouse Delivery, Transfer)
§
Count UINs (Stock Counts)
§
Perform Inventory Adjustments on UINs
§
Prints (Ticketing)
UINs can be captured at the time of sale (Oracle Retail
Point-of-Service) or at the time of store receiving (SIM). If the UIN is
captured at the time of the sale, Point-of-Service captures the UIN and the UIN
is not tracked in SIM. If the UIN is captured at the time of receiving, SIM
captures the serial number when it arrives in the store using a direct store
delivery or warehouse delivery. UINs can also be pre-populated on the delivery.
UINs are not allowed for type 2 items, non-inventory items,
notional packs, non-sellable simple packs, concession items and consignment
items.
SIM also has the ability to auto generate UINs and track the item
with that UIN number. The UINs are created during the receiving process and a
label is generated for each of these units.
Auto-generated serial numbers will be generated during the
receiving process or while performing a stock count or inventory adjustment. If
auto generation is being used during the receiving process, the UIN is captured
and the UIN information is provided to the user after receipt confirmation.
An auto generation process generates UINs in a sequenced order
and assigns to items as needed during DSD receiving, Warehouse Delivery, Transfer
Receiving, Stock Counts and Inventory Adjustments.
The default process uses a sequence generated number and is
configurable so the customer can enter a desired starting point or hook it into
an external service (through customizations).
An audit record is captured for each UIN that has a status
updated.
When an item is scanned during the receiving process, the system
checks to see if a UIN is required to be captured for the item. If the UIN type
is set to Auto Generation (AGSN), the Auto Generation routine will be called
and the generated number is displayed on the UIN pop-up after the items have
been confirmed for the warehouse delivery, DSD, or transfer.
SIM will automatically print an item ticket with the newly
generated UIN number.
|
Note
The print option will only be available for generated
UINs. The user will not be able to print UINs that are not auto generated by
the system.
|
§
UINs are auto-generated upon receipt confirmation of a warehouse
delivery or direct store delivery and labels are printed for each UIN
§
UINs are auto-generated for incoming transfers that are received
from a store that does not capture UINs
§
UINs are auto-generated for inventory adjustments with
disposition movement of OUT -> ATS and a ticket prints automatically
§
Ability to print/re-print AGSN from Item Ticket Detail screen and
UIN Detail screen
§
UINs are auto-generated for receiver unit adjustments where the
quantity has increased
|
Note
For externally created adjustments, manual intervention
is needed.
|
AGSN Auto-Ticket Printing
When a new AGSN item is received, SIM automatically prints a
ticket.
To improve performance while receiving serialized items, the
generated UINs are stored in a print batch table, grouped by a batch ID. This
batch ID is pushed to a staging queue. This ends the receiving operation.
A polling timer picks the staged UIN print batch message and
prints the UINs as a batch through a UIN print batch consumer.
Instead of printing AGSN item tickets directly upon the receipt,
the printing goes through the polling timer. Printing is done asynchronously,
depending on the frequency of the polling timer.
The AGSN report template prints multiple pages (batch UINs) or a
single page (single UIN).
To facilitate the application of serial numbers (UIN), SIM adds a
new process that creates the UIN and tracks the item with that number.
During the receiving process, SIM registers how many units are
received and generates a label for these units. The process will be identical
to how a user receives without capturing UINs, but units are tracked.
The benefits for such a model is the speed of the receiving,
which can be done at container level, and removes difficulties some users
encounter, for example, trying to find the barcode on large items such as a
refrigerator, or determining how to track an item such as a cell phone, which
has three barcodes.
For auto-generated serial numbers, SIM bypasses entering
individual specific serial numbers at the time of receiving and simply accepts
a quantity. This operation is the opposite of normal serial number operations.
The quantity entered is then used to generate serial numbers and assign them to
the particular item.
AutoGenerateSerialNumberDao contains APIs to retrieve a number of
new IDs (or serial numbers) based on the count parameter. This is handled by
getting the next values from the AUTO_GENERATE_SN_SEQ sequence. SIM can be
modified to generate any sort of serial number the user needs by changing
dao.cfg. The user can plug in any class in the AUTO_GENERATE_SERIAL_NUMBER_DAO=xxx
line and implement any process to generate serial numbers.
If a previously existing auto generated serial number is scanned,
it is treated identical to regular serial numbers.
|
Table: Enumerations
|
|
Enumeration
|
Description
|
|
FunctionalArea
|
Describes the business functional area and sometimes phase
of the business process.
|
|
UINType
|
Describes the type of a UIN. Currently only SERIAL and
AGSN are available.
|
|
UINStatus
|
Describes the status of the UIN.
|
|
UINCaptureTime
|
For the specific item and store, it defines the time when
a new UIN may be captured and inserted into the data store. Either SALE or
STORE_RECEIVING.
|
|
UINAvailability
|
Used as a parameter when searching for records based on
availability.
|
|
UINActionType
|
This represents action type that triggered a UIN update
(namely from a web service).
|
|
Table: UINStatus
|
|
Name
|
Code
|
Description
|
Comment
|
|
IN_STOCK
|
0
|
In Stock
|
This status can be sold, inventory adjusted, stock
counted, shipped, reserved for shipping and reserved for sale.
|
|
SOLD
|
1
|
Sold
|
This status is considered a final status and can only be
changed through a stock count, return or inventory adjustment.
|
|
SHIPPED_TO_WAREHOUSE
|
2
|
Shipped To Warehouse
|
This status is considered a final status and can only be
changed through another receipt or special inventory adjustment.
|
|
SHIPPED_TO_STORE
|
3
|
Shipped To Store
|
This status can be changed to in stock when the item is
received, unavailable if the item is damaged during return or removed from
inventory in case it is short received.
|
|
RESERVED_FOR_SHIPPING
|
4
|
Reserved For Shipping
|
This status indicates UIN on return or transfer.
|
|
SHIPPED_TO_VENDER
|
5
|
Ship To Vendor
|
This status is considered a final status and can only be
changed through another receipt or special inventory adjustment.
|
|
REMOVED_TO_INVENTORY
|
6
|
Remove From Inventory
|
Set when an item is removed from stock. Only can be
changed if item is moved back into inventory.
|
|
UNAVAILABLE
|
7
|
Unavailable
|
Set when inventory adjustment is made to unavailable,
damaged received quantities or when item is reserved for customer orders.
|
|
MISSING
|
8
|
Missing
|
Will be set when a stock count can not find the serial
number or the item goes missing during a shipment.
|
|
IN_RECEIVING
|
9
|
In Receiving
|
This means that a receipt is In Process but has not yet
been confirmed. This can occur during DSD Receiving, Warehouse Receive or
Transfer Receiving.
|
|
CUSTOMER_RESERVED
|
10
|
Customer Reseved
|
This status will be set when Oracle Retail
Point-of-Service uses the customer order Web service to communicate a UIN
that is reserved for a customer order.
|
|
CUSTOMER_FULFILLED
|
11
|
Customer Fulfilled
|
This status will be set when Oracle Retail
Point-of-Service uses the customer order web service to communicate a UIN
that is fulfilled for a customer order.
|
|
SHIPPED_TO_FINISHER
|
12
|
Shipped To Finisher
|
The state which an item should be in when receiving from a
Finisher.
|
|
UNCONFIRMED
|
99
|
Unconfirmed
|
This means a UIN has been scanned or entered but has not
yet been processed. The UIN is in a temporary state and can move from None to
any other state during validation. Note: The functional identifier will not
exist until the transaction has been completed.
|
|
Note
§
UIN Open Status = IN_STOCK,
RESERVED_FOR_SHIPPING, UNAVAILABLE, CUSTOMER_RESERVED and IN_RECEIVING.
§
UIN Closed Status = SOLD, MISSING,
SHIPPED_TO_STORE, SHIPPED_TO_WAREHOUSE, SHIPPED_TO_VENDOR,
SHIPPED_TO_FINISHER, REMOVE_FROM_INVENTORY and CUSTOMER_FULFILLED.
|
|
Table: UINAvailability
|
|
Name
|
Description
|
|
OPEN
|
Open
|
|
CLOSED
|
Closed
|
|
ALL
|
All
|
Used as a parameter when searching for records based on
availability.
|
Table: UINActionType
|
|
Name
|
|
SALE
|
|
RETURN
|
|
VOID_SALE
|
|
VOID_RETURN
|
This represents action type that triggered a UIN update (namely
from a web service).
Any time a status change occurs for a UIN, an audit record is
captured and is available for viewing on the UIN History screen.
A store parameter allows the user to turn on/off UIN
functionality by store. Multiple system parameters control the purging of UIN
information.
SIM provides a store/class level setup for UIN attributes. These
attributes can be auto-defaulted in based on a system parameter. When
attributes are added or modified at the class level, the attributes will be
applied to each item/location level for all items that belong to the specified
department/class.
The UIN attributes screen is required for standalone
implementations of SIM. The UIN Attributes screen should not be used if the
retailer plans to pull attributes from an external system.
UIN attributes include the following:
§
Type of UIN (AGSN/Serial Number)
§
Capture Time (Store Receiving/Sale)
§
UIN Label
§
Ticket Format (AGSNs)
§
External system create UIN
Each time an item with a UIN is scanned, SIM captures the status
of that item. Depending on the functional area for which that item is scanned,
a different status will be assigned. This feature allows SIM to ensure data
integrity and provide an audit trail of the life of the item.
Before any transaction is completed (dispatched or confirmed),
SIM validates that the status of the items on the transaction are still valid.
For example, a UIN on a transfer might be invalid if a stock
count cannot find the item and move the Reserved for Shipping
status to missing. The item will stay on the
transaction, but the user must remove it before dispatching. SIM lets the user
know the item is not in a valid status anymore.
UIN Statuses
Unconfirmed
A UIN has been scanned or entered but has not yet been processed.
The UIN is in a temporary state and can move from Unconfirmed to any other
state during validation.
In Stock
The item is in stock and can be sold. This status is usually
achieved after an item is received, returned or when it is fixed from a repair.
In Receiving
A receipt is In Process but has not yet been confirmed. This can
occur during DSD Receiving, Warehouse Receive or Transfer Receiving.
Sold
The item has been sold to a customer. The UIN status can get set
to Sold through the new Point-of-Service Web service.
Reserved For Shipping
Any time a transfer or a return is created and saved the UIN is
marked as Reserved For Shipping. Only UINs in “In Stock” and “Unavailable
status” will be allowed to be shipped.
Shipped To Store
When a store-to-store transfer is dispatched, the status of the
UIN is set to Shipped To Store. In order to update the UIN to Shipped to Store
a UIN must be In Stock or Reserved for Shipping.
Shipped To Warehouse
When a warehouse return is dispatched, the status of the UIN is
set to Shipped to Warehouse. In order to update the UIN to Shipped to Warehouse
a UIN must be In Stock, Reserved for Shipping, or Unavailable status.
Shipped To Vendor
When a vendor return is dispatched, the status of the UIN is set
to Shipped to Vendor. In order to update the UIN to Shipped to Vendor a UIN
must be In Stock, Reserved for Shipping, or Unavailable status.
Shipped To Finisher
When a finisher return is dispatched, the status of the UIN is
set to Shipped to Finisher. In order to update the UIN to Shipped to Finisher a
UIN must be In Stock, Reserved for Shipping, or Unavailable status.
Removed From Inventory
A UIN will be updated to Removed From Inventory using either an
Inventory Adjustment or a Short Receipt. In order to update the UIN to Removed
From Inventory a UIN must be In Stock, Shipped to Store or Unavailable status.
Missing
A UIN will be updated to Missing when performing a stock count.
If an item is not found that is currently In Stock, Reserved for Shipping or
Unavailable, the UIN will be updated to Missing.
Unavailable
A UIN will be updated to Unavailable either through an Inventory
Adjustment or a Damaged Receipt. A UIN must be in either In Stock, Sold,
Shipped to Store, Customer Fulfilled, Removed from Inventory, or Missing Status
before it can be moved to this status.
Customer Reserved
This status will be set when the Oracle Retail Point-of-Service
uses the customer order Web service to communicate a UIN that is reserved for a
customer order:
§
The selling service to validate the item is valid to be sold will
be used to validate that the UIN is available to be reserved.
§
A UIN must be in either In Stock, Customer Order Fulfilled before
it can be moved to this status.
Customer Fulfilled
This status will be set when Oracle Retail Point-of-Service uses
the customer order web service to communicate a UIN that is fulfilled for a
customer order:
§
The selling service to validate the item is valid to be sold will
be used to validate that the UIN is available to be fulfilled.
§
A UIN must be in either In Stock or Customer Order Reserved
before it can be moved to this status.
UINs can be resolved in multiple ways, depending on what the
discrepancy is.
The user can view discrepancies on the Resolution List screen.
The UIN Resolution screen will display all exception records that were created
due to attempting a status change that is not allowed using one of the
following:
§
UIN Update Status Web Service
§
Customer Order Web Service
§
Externally generated Receipt Adjustments
When a UIN store mismatch occurs, an e-mail notification is sent
to the store with which the UIN was originally associated. This applies to
Transfers, Inventory Adjustments and Stock Counts. These discrepancies do not
appear on the Resolution list screen, instead the notification will occur
through an e-mail and can be resolved by adding the item to a Problem Line
stock count or resolving it through an inventory adjustment.
Resolving the UIN record on the UIN Resolution screen does not
resolve the discrepancy on the transaction. The recommendation is to resolve
the discrepancy by fixing the issue on the transaction or by doing an inventory
adjustment:
§
The UIN discrepancy can be resolved directly through the
transaction from where the discrepancy originated. This is the recommended
business process.
§
The user can check the UIN Discrepancies
flag when creating a Problem Line count using Product Group setup. This will
add discrepant UINs to the count and resolve the discrepancy through completion
of the stock count.
§
The status of the UIN can be updated directly from the UIN
resolution screen. This automatically marks the record as resolved.
This does not resolve the inventory discrepancy.
§
The UIN record can be moved to resolved
on the Resolution screen by clicking Resolve from the
UIN (without updating the status or the inventory).
For Third Party stock counts, UIN discrepancies can be resolved
through the Rejected Items screen. If the UIN is not present for an item that
requires a UIN when the third party count is uploaded to SIM, the record will
be written to the Rejected Items table for later resolution. The Rejected Items
screen allows the user to assign a serial number for those items.
Whenever an invalid UIN is scanned on any type of stock count,
the invalid UIN will appear on the Rejected Items screen. A user with the
proper permissions can review the invalid scans and assign a valid UIN to bring
the UIN back into the stock count if desired.
Examples of Resolving Discrepancies
The following includes examples of resolving discrepancies.
Example 1 – Store Mismatch: Allow Unexpected UINs parameter is Set to Yes
1. Transfer
sent from Store A to Store B.
2. Store
B receives the transfer. Item 1 was not on the transaction, however it did get
shipped on the truck so Store B receives the unexpected UIN.
3. The
UIN is now associated with Store B and an e-mail will be sent to Store A to
notify them of the discrepancy. The item/UIN was not on the transaction and
therefore the item/UIN is still reflected in Store A's inventory.
4. The
user can create a problem line stock count at Store A and check the UIN
Discrepancies flag. This action will place Item 1 on the stock count and
resolve the inventory discrepancy once the count is completed. The discrepancy
could also instead be resolved using an inventory adjustment to move the UIN
out of stock.
Example 2 – Store Mismatch: Allow Unexpected UINs Parameter is Set to No
1. Transfer
sent from Store A to Store B.
2. Store
B receives the transfer. Item 1 was not on the transaction, however it did get
shipped on the truck so Store B attempts to receive the unexpected UIN but SIM
does not allow it.
3. The
UIN is still associated with Store A. Store B will have to call Store A and
have them create a new transfer so Item 1 moves out of Store A and into Store
B. An exception record is not created on the Resolution List screen for either
store since SIM never allowed the UIN to change status from one store to
another.
|
Note
If the user chooses to update the status using the
Resolution list screen, they still must create the transfer so that the
inventory gets updated correctly.
|
4. Once
the status has been updated by Store A, the Store B user can now receive the
item.
Example 3 – Resolution List Screen RUA
Updating UIN Status at store you are logged in to.
1. RUA
is done in RMS for Direct Delivery at Store A.
2. Exception
record created for Store A due to the external adjustment and appears on
Resolution List screen in Store A.
3. The
user logs into store A and goes to Resolution List screen to find exception
record.
4. The
user should go to the Direct Delivery and click Adjust
Delivery and manually add or remove UINs as necessary. Adjusting the
delivery will update the UIN to the correct status.
5. Users
can click Resolve from the UIN Resolution screen to
indicate they have manually resolved the discrepancy. The Update
UIN Status button is used as an additional check and allows user to update
status in case it is ever needed. It is a place where the user can update the
status or view an audit trail of the UIN. Ideally, the user will be adjusting
the transaction itself which should update the UIN status to where it needs to
be. For example, removing UIN from DSD moves UIN status to Removed from
Inventory. Adding a UIN to DSD moves UIN status to In Stock.
Example 4 – Resolution List Screen: Customer Order Web Service
1. Customer
Order Web service calls SIM to move item to Customer Order Reserved and the
item/UIN is not in stock.
2. SIM
records a discrepancy error on Resolution List screen.
3. The
user creates an inventory adjustment to bring the UIN In Stock.
4. The
user can log in to the store called by the web service and update the status to
Customer Order Reserved using Resolution List screen.
Example 5 – Update UIN Status Web Service Processing ACTION = SALE or
VOID-RETURN
1. UIN
is found and is in one of the following statuses:
§ Unavailable
§ Sold
§ Reserved for Shipping
§ Shipped to Store
§ Shipped to Warehouse
§ Shipped to Vendor
§ Missing
§ Customer Order
Reserved
§ In Receiving
§ Removed from
inventory
2. UIN
cannot be updated to Sold if it is in one of the statuses from Step 1, so an
exception record is created and appears on the Resolution List screen for the
store.
3. Depending
on the integration, the user must update the status of the UIN manually from
the UIN Resolution List screen and re-process the transaction, or just update
the status of the UIN.
The unified web service will not update the SOH if the
status does not match. The UIN status update web service, on the other hand,
will fail independently from the sales transaction web service or ReSA upload
file. Fixing the problem for the UIN status update web service will only
require a status update. The unified web service call might require a status
update to In Stock and a re-process of the entire record.
|
Note
User might need to remove the UIN from the physical
transaction. Depends on what status it was in. For example, if it was in
Shipped to Store, the user should, from a business perspective, go to the
transfer and remove the item/UIN from the transfer.
|
Example 6 – Update UIN Status Web Service Processing ACTION = RETURN or
VOID-SALE
1. UIN
is found and is in a state other than Sold.
2. Status
cannot be updated since it is not in sold status and exception is created and
appears on Resolution List screen.
3. Access
exception record from Resolution List screen and update the status.
The section describes the Extended Attributes.
Extended Attributes are available on both the PC and the HH. If
extended attributes are enabled, these attributes can hold additional data
about an item on a particular transaction. Some of the attributes available
are Batch/lot numbers, expiration/use by dates, best before/sell by dates and
country of origin. The GS1 DataBar standards include many other attributes.
All of the GS1 DataBar attributes are available for use by the customer if so
desired.
The extended attributes are assigned by
Department/Class/Sub-Class in order to configure which attributes are
applicable for an item belonging to the appropriate merchandise hierarchy.
Once configured, the user is able to add these attributes by scanning a GS1
DataBar on the HH. If the GS1 DataBar is not scan able or not available, the
data may be entered manually on the HH or the PC.
In addition to manually entering the information on the PC, the
information may also be removed and re-entered. Additionally, the feature will
have the capability to define information mutually agreed between trading
partners using AI 90 and other company internal information using AI’s 91 to
99. This will provide additional flexibility to track custom pieces of
information.
In SIM, Extended Attributes maybe be captured in the following
functional areas:
§
Creating or Receiving a Transfer
§
Receiving a Direct Delivery
§
Receiving a Warehouse Delivery
§
Creating an Inventory Adjustment
§
Creating a Return
§
Performing a Stock Count
§
Receiving a Customer Order Delivery
Figure: Extended Attribute Setup
PC Screen Flow – PC
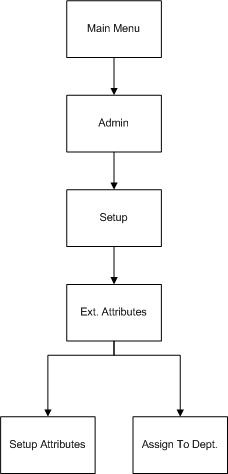
The list of extended attributes is pre-populated based on the
industry standards for the GS1 DataBar. The Name and Description will be
defaulted based on the standards but can be changed to a more meaningful name
for the client. Since the client will likely only use a subset of the
available GS1 codes they will scan on the product, the client may repurpose
some of the codes for capturing data manually.
With the appropriate security permissions, the user is able to
assign the extended attributes to capture for a particular item hierarchy.
This allows the user entering the extended attribute data on the transaction to
capture only the necessary information and provides a more efficient and more
accurate way to manage the data entry. This is especially helpful when
entering the data from the handheld.
The user will also have the ability to assign the order in which
the fields will display for data entry purposes.
A maximum of 10 extended attributes can be assigned to a
department/class/sub-class item hierarchy.
The attributes can either be added by scanning a GS1 DataBar by
using a handheld or the Advanced Item Entry Popup or manually adding the
information from this screen. The attributes captured for the item can also be
removed for either manual capture or from scanning.
The pre-configured fields displayed on this screen will be based
on the item displayed on the top of this screen. The system will display the
extended attributes assigned to this item hierarchy.
There are no validations on the data entered with the exception
of dates entered in date format and fields defined as a number must contain
numbers. These field level definitions are based on the GS1 Industry
Standards. For example, the GS1 Standards define the country of origin to
contain a 3 digit number (ISO) industry standard country code. However, the
system will not validate the 3 digit number is one that is defined by ISO, but
only that the user has entered a number in that field. The client will need to
understand which 3 digit codes to use when manually entering the data in the
form.
The system will only store the unique combination of all fields
on this screen. If the user scans more than one item with the same attribute
values, the quantity will be increased by 1. For example: the user scans each
unit for the same item. There are three units, but two of them have the same
batch, country of origin, and sell by dates, etc. There will be two records
added, one record will have a scan quantity of 1 and the other will have a scan
quantity of 2.
5
This chapter includes information on system and store
administration.
Under the administration section, the user can find all system
setup tasks and often corporate executed tasks:
§
Product Group and Product Group Scheduler
This feature allows customers to set up recurring events
with sets of items.
§
UIN Resolution
The UIN Resolution screen allows the user to view and
resolve UIN status discrepancies. The user can also view an audit trail of the
discrepant item’s UIN history.
|
Note
Resolving discrepancies from the UIN Resolution list
screen does not resolve the inventory discrepancy. See "Resolving UIN Discrepancies"
for more detail.
|
§
Security
The user can create and modify roles. When creating a new
role, it is possible to add a variety of permissions for the handheld or PC. In
addition to general restrictions for functional areas, the user is also able to
secure the different types of product groups that exist and the reason codes a
user has access to for creating inventory adjustments.
§
Technical Maintenance
Several technical functions can be controlled under this
header:
* UI
Configuration
This feature allows the user to configure font type and
size, color scheme and icons by theme. In addition translated values can be
modified through this dialog as well.
* MPS
Worker Types
MPS Worker Types allow the user to identify how often the
system will check the SIM integration layer for new messages generated by
external systems.
* MPS
Staged Messages
The MPS staged messages UI allows a user to validate the
content of message and if needed manually restarts the message for polling
purposes.
§
Print Setup
* Print
Formats
Tickets and labels can be setup here and a default printer
can be assigned to them. In addition, it is possible to assign a default
printer to print reports.
|
Note
Tickets and labels need to be created in the printing
tool used to print them. These screens are just for printer and type setup.
|
* Hierarchy
Format
Formats can be assigned to specific price events (regular
price changes, clearance and promotions) by merchandise hierarchy. The format
assignments can be managed for multiple stores at one time.
* UDA
Print Setup
SIM can automatically generate tickets and labels for
items when user-defined attribute (UDA) values change. The UDA Print Setup
function allows you to define whether new tickets or labels, or both, should be
printed automatically when particular UDA values change.
* Printers
Includes a list of printers, such as the routing code or
network address for a printer, description by which you can identify the
printer within your organization, and the type of printer.
§
Setup
– SIM
Stores
Management of SIM managed stores, setup of buddy stores,
and auto receiving for store transfers.
* SIM
Managed Stores
User can setup those stores that will use SIM. This
prevents the store from publishing RIB Messages to the external system when
auto-receiving.
* Buddy
Stores
SIM allows for the concept of Buddy Stores. Buddy Stores
can be set up to indicate groups of stores that can transfer merchandise from
one store to another. The concept does enforce transfer zones if used in the
Oracle Retail Merchandising System.
* Auto
Receive Stores
SIM allows users to set up Stores at which transfers are
automatically received when shipped.
– Administration
Parameters
SIM has many application parameters that allow clients to
customize the product according to their business. The application parameters
are split into system and store options. System option parameters allow a user
to change the parameter for the entire system and all stores. Store option
parameters are only specific to the store the current user is logged in to.
Additionally, when a new store is added to the enterprise, the store defaults
admin may be used to quickly configure the store.
– UIN
Attributes
Unique Identification Numbers also referred to as UIN’s,
are used to identify pre-defined or system generated serial numbers. There are
various rules based on the type of UIN. If the UIN is system generated, the
label used to print the auto generated SN, may be identified by merchandise
hierarchy.
– Inventory
Adjustment Reason
Inventory adjustment reason codes help control the loss or
unexpected gain of items for the general ledger and stock ledger. SIM has the
ability for the user to set these up to match the external merchandising
system. It is also possible to hide or modify the disposition of the existing
reason codes.
– Return
Reason Codes
Users can add, change, and delete reason codes used for
returns. In addition to showing the reasons for returns, reason codes also
specify how returns affect stock on hand, unavailable inventory, or customer
order reserve inventory. Users can also use sub-buckets, which allows users to
segregate the unavailable inventory bucket into various slots for specific
reasons.
– Tolerances
This section allows for tolerances for Adhoc Stock Counts
as well as Customer Order Picking.
– Extended
Attributes
Retailers may have a need to capture additional data about
an item such as Batch/lot numbers, expiration/use by dates, best before/sell by
dates and country of origin. The list of extended attributes is pre-populated
based on the industry standards for the GS1 DataBar. These attributes can hold
additional data about an item on a particular transaction. The extended
attributes are assigned by Department/Class/Sub-Class in order to configure
which attributes are applicable for an item belonging to the appropriate
merchandise hierarchy.
Figure: Store Administration PC
Screen Flow
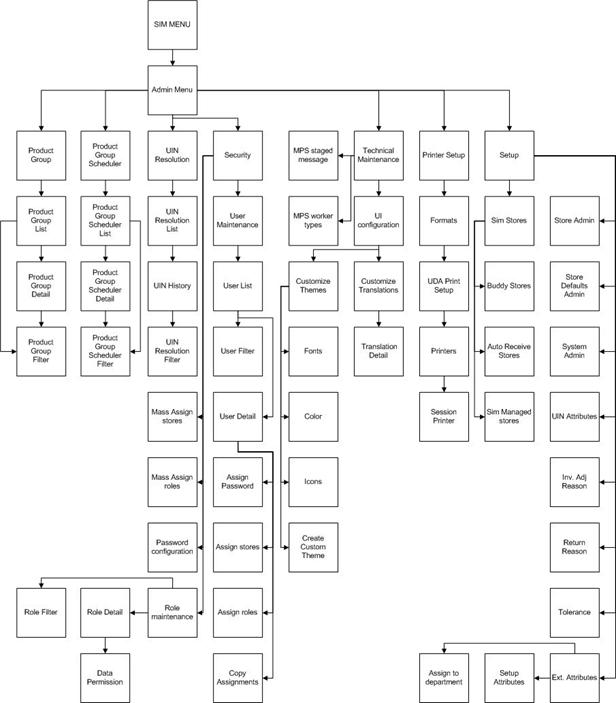
Within the System Administration screens is the ability for a
store user, with the proper security, to create any number of groups of items
to be used within the SIM application. These groups can be comprised of entire
areas of the merchandise hierarchy (for example, an entire subclass) or can be
simply a group of individual and unrelated items. Depending on the product
group, the user can setup additional details such as:
§
Tolerances
§
Counting Method (Guided/Unguided/Third Party)
§
Hierarchy Breakdown
§
Recounts
§
Item Status
§
Stock on Hand
§
Expiration
§
Delivery Dates
§
Auto Authorize
§
Problem Line Parameters
Product groups can be created for:
§
Unit Stock Counts
§
Unit and Amount Stock Counts
§
Problem Line Stock Counts
§
Shelf Replenishment
§
Wastage
§
Item Requests
§
Auto Ticket Print
Once the groups are created, the user has the ability to schedule
how often each group is to be counted or ordered. Using a calendar wizard, the
user selects the count group and whether it is to be counted daily, weekly,
monthly, or yearly. One or more stores can be assigned to the schedule,
depending on stores the user has access to. SIM maintains these schedules and
automatically prompts users to complete the counts at their scheduled times.
Product group schedules can be used for:
§
Unit Stock Counts
§
Unit and Amount Stock Counts
§
Problem Line Stock Counts
§
Wastage
§
Item Requests
§
Auto Ticket Print
§
Shelf Replenishment Lists
The store administration functionality allows you to set values
for options that control a variety of system behaviors. The values of these
system options apply only to your location.
Go to Main Menu > Admin > Setup > Store
Admin.
The Store Admin window opens.
Figure: The Store Admin Window
1. Select
the option that you want to modify.
2. Double-click
the Value field and set the option value in either of these ways:
§ Select a value from
the list.
§ Enter an appropriate
value in the field.
3. Click
Done. You return to the Setup menu. Click Done again to return to the Admin menu.
The following table lists the store administration options in
alphabetical order and describes each option.
|
Table: Store Administration Options
|
|
Topic
|
Store Administration Option
|
Valid Values
|
Default Value
|
Description
|
|
Admin
|
Auto Apply Advanced Item Entry
|
Yes, No
|
No
|
If Yes, auto application to the transaction occurs. Items
are added and UINs are captured, if necessary.
If No, when the item is entered, the item will not be
added to the transaction.
|
|
Admin
|
Enable Item Disposition in Transaction Updates
|
Yes, No
|
Yes
|
If Yes, the system reads the reason code in the web
service message and performs the inventory adjustment. If the reason code is
not present, the system processes the return/void and increments the SOH.
If No, the system does not look for the reason code in the
web service message.
|
|
Admin
|
Manifesting Weight UOM
|
List of weight UOMs from the weight table in DB
|
|
The UOM selected for this configuration will be used as
the Weight UOM for the weight on the BOL in store to store transfers,
customer order deliveries and returns.
|
|
Admin
|
UIN Processing Enabled
|
Yes, No
|
No
|
Dictates whether any of the UIN functionality is available
within SIM for each store.
If the parameter is No, then none
of the UIN buttons or fields will be present in the application.
|
|
Admin
|
Use Advanced Item Entry
|
Yes, No
|
Yes
|
If Yes, the Advanced Item Entry popup window will
automatically be open when entering the functional areas that use the popup.
If No, the Advanced Item Entry popup window will not
automatically be open. The user can still use the 'Scanner' button to open
it.
|
|
Admin
|
Use Extended Attribute Entry
|
Yes, No
|
No
|
If Yes, the user may edit or capture the extended
attributes manually.
If No, the user is not able to edit or manually capture
extended attributes on either the PC or HH.
|
|
Customer Order
|
Auto Pick Mixed Containers
|
Yes, No
|
No
|
If Yes, SIM will auto pick if the containers mixed with
customer orders and non customer orders.
If No, SIM will not do auto pick if the containers mixed
with customer orders and without customer orders.
|
|
Customer Order
|
Auto Pick On Receive - Direct Delivery
|
Yes, No
|
No
|
If Yes, SIM will automatically fill in the pick quantities
on the customer order when receiving the DSD.
If No, SIM will not do anything related to picking at the
time of receiving.
|
|
Customer Order
|
Auto Pick On Receive - Transfer
|
Yes, No
|
No
|
If Yes, SIM will automatically fill in the pick quantities
on the customer order when receiving. This can only happen if the customer
order record has already come into the system. If there is no customer order,
the auto picking will not happen at the time of receiving, rather it will
occur when the customer order comes in.
If No, SIM will not pick when receiving goods in transfer
receiving.
|
|
Customer Order
|
Auto Pick on Receive – Warehouse Delivery
|
Yes, No
|
No
|
If Yes, SIM will automatically fill in the pick quantities
on the customer order when receiving. This can only happen if the customer
order record has already come into the system. If there is no customer order,
the auto picking will not happen at the time of receiving, rather it will
occur when the customer order comes in.
If No, SIM will not pick when receiving goods in warehouse
receiving.
|
|
Customer Order
|
Default Customer Order Picking Method
|
Bin, SIM Customer Order
|
SIM Customer Order
|
Determines the default picking method displayed when
Creating a Customer Order Pick transaction.
|
|
Customer Order
|
Default Number of Bins
|
1-999
|
1
|
Determines the number of bins to default into the Bin Qty
field if the user selects Bin as the pick type when creating the pick.
|
|
Customer Order
|
Dispatch Validate
|
Ship Submit, Ship Direct
|
Ship Direct
|
If Ship Direct, SIM will control all processes. The user
will be able to go from create/edit directly to dispatch.
If Ship Submit, this option will require the user to press
the Submit button, and require a specific press of the dispatch button. An
additional option is that an external system will generate a dispatch message
through a standard web service.
|
|
Customer Order
|
Generate Bins
|
Manual, System
|
System
|
If System, SIM will automatically generate the bin/order
numbers when the pick is created.
If Manual, SIM will need to prompt the user to capture the
bin/order numbers that are being used for the labels on the bins
|
|
Customer Order
|
Handheld Picking Mode
|
Scan Every Item, Enter Pick Quantity
|
Enter Pick Quantity
|
If Enter Pick Qty, the user will need to manually enter
the pick quantity and then scan the item to validate it is the correct item.
If Scan Every Item, on the HH the user will be required to
scan each instance of the item on the pick and then scan the bin, if
required, instead of manually entering a pick quantity for all items picked.
This method ensures every item is validated as the correct item to pick.
|
|
Customer Order
|
Item Substitution - Store Discretion
|
Yes, No
|
No
|
If Yes, the user will be allowed to choose any item to
substitute. An item lookup feature on the PC will allow the user to search
for an item to select.
If No, the user will be restricted to scanning/entering an
item that exists on the list of approved substitute items defined by RMS.
|
|
Customer Order
|
Override Bin Quantity
|
Yes, No
|
No
|
Determines whether or not the user will be allowed to
override the number of bins displayed in the 'Bin Qty' field as defined in
the 'Default Number of Bins' parameter.
|
|
Customer Order
|
Picking Required for Customer Orders
|
Yes, No
|
Yes
|
If Yes, it defines if the customer order must be picked
first in order for it to be delivered.
If No, picking is not required in order to create a
delivery.
|
|
Customer Order
|
Pre-shipment Notification
|
Yes, No
|
No
|
If Yes, SIM will publish a pre-shipment message.
If No, SIM will not publish a pre-shipment message.
|
|
Customer Order
|
Reserve Customer Order Inventory Upon Receiving
|
Yes, No
|
No
|
If Yes, then the customer order reserved will be
incremented upon receiving a delivery (warehouse delivery, store transfer, or
DSD) for a customer order. This is assuming the customer order already exists
in the system.
If No, the customer order reserved is incremented upon the
customer order entering the system.
|
|
Direct Delivery
|
Direct Delivery Auto Remove Damaged Quantity
|
Yes, No
|
No
|
Yes: When confirming the
transaction, all damaged items are removed and put on the audit trail.
No: Any damaged quantities
recorded for the delivery stay on the transaction.
|
|
Direct Delivery
|
Direct Delivery Auto Remove Over Received Quantity
|
Yes, No
|
No
|
Yes: The user is allowed to add
any quantity for the DSD ASN, but any quantity above the expected quantity is
removed from the transaction. After the user confirms the transaction, the
user is prompted that any over-received quantities are removed.
No: Follows standard DSD receiving
process.
|
|
Direct Delivery
|
Direct Delivery Default Delivery Quantities
|
Yes, No
|
No
|
Yes: SIM defaults the quantities
from the Dex/Nex or ASN.
No: Does not default the
quantities. The user can use the scan-scan feature.
|
|
Direct Delivery
|
Direct Delivery Default to Shopfloor Receiving
|
Yes, No
|
No
|
If Yes, SIM defaults the Receive to Shopfloor checkbox to
marked on the Direct Store Delivery Detail screen.
If No, SIM defaults the checkbox to blank.
|
|
Direct Delivery
|
Direct Delivery Invoice Entry
|
Unique
|
Enabled, Disabled, Unique
|
If Enabled, entry of invoice numbers is allowed.
If Disabled, invoice numbers will not be allowed to be
entered and will not be displayed on the screen.
If Unique, entry of invoices is allowed, but not
duplicates. Duplicates are checked by supplier.
|
|
Direct Delivery
|
Direct Delivery Receive Item Capacity
|
Yes, No
|
No
|
If Yes, SIM considers shelf capacity when receving the
delivery to the shopfloor. Excess capacity will be received in the backroom.
If No, SIM does not consider shelf capacity.
|
|
External Finisher
|
External Finisher Auto Receive
|
Not allowed, External Message, Date Driven
|
Not allowed
|
This parameter drives the following functionality:
Not allowed follows standard
receiving process.
External message receives the full
finisher delivery the moment an ASN transaction arrives which indicates that
the delivery needs to be auto-received.
Date Driven looks at a secondary
store option (External Finisher Auto Receive number of Days) to determine how
many days the transaction stays open before the transaction is fully
received. If the parameter is set to 0, the
transaction auto-receives on the ETA date.
|
|
External Finisher
|
External Finisher Auto Receive Number of Days
|
0-99
0 means immediate receiving
1 means today (EOD)
2 means EOD tomorrow
x means EOD x
days starting from today
|
0
|
SIM auto-receives any external finisher delivery ASN that
has not been closed x days after the ETA date or
the create date, depending on whether the ETA date is set or whether the
auto-receive External Finisher delivery parameter is set.
|
|
Item Basket
|
Item Basket Printing
|
Manual, Automatic
|
Manual
|
If the value of this option is Automatic,
Item Basket ticket is printed when the transaction is complete. If the value
is Manual, SIM does not automatically print the
ticket.
|
|
Item Request
|
Display Item Request Delivery Timeslot
|
Yes, No
|
No
|
If the value of this option is Yes,
SIM displays the timeslot information in Item Request and Item Lookup.
|
|
Returns
|
Dispatch Validate
|
Ship Submit, Ship Direct
|
Ship Direct
|
If Ship Direct, SIM will control all processes. The user
will be able to go from create/edit directly to dispatch.
If Ship Submit, This option will require the user to press
the Submit button, and require a specific press of the dispatch button. An
additional option is that an external system will generate a dispatch message
through a standard web service.
|
|
Returns
|
Pre-shipment notification
|
Yes, No
|
No
|
If Yes, SIM will publish a pre-shipment message.
If No, SIM will not publish a pre-shipment message.
|
|
Returns
|
Return Carrier Default
|
Third Party, Sender, Receiver
|
Third Party
|
If Sender, sender will be selected for Carrier Type on
BOL.
If Receiver, receiver will be selected for the Carrier
type on BOL.
If Third Party, third party will be selected for the
Carrier type on the BOL. The type (drop down) will be defaulted to Other.
|
|
Sequencing
|
Assign Shelf Edge Labels
|
Yes, No
|
No
|
If the value of this option is Yes,
users are required to assign shelf edge labels for sequencing.
|
|
Sequencing
|
Display Sequence Fields
|
Yes, No
|
No
|
Indicates whether or not sequencing fields is displayed in
the Item Lookup screen.
|
|
Shelf Replenishment
|
Replenishment – At Case Level
|
Yes, No
|
No
|
If Yes, the UOM, for replenishing the shelves, will
default to Cases on both the PC and HH.
If No, the UOM will default to eaches.
Note: the user may toggle between cases and standard UOM
regardless of the parameter setting.
|
|
Shelf Replenishment
|
Replenishment – Delivery Bay Inventory
|
Yes, No
|
Yes
|
This option allows you to turn on or off the delivery bay
functionality.
|
|
Shelf Replenishment
|
Replenishment – End of Day max. fill %
|
Numeric 0 to 100
|
100
|
This configurable percentage allows each store to set its
own fill percentage for creating end-of-day shelf replenishment lists.
|
|
Shelf Replenishment
|
Replenishment – Handheld Picking Mode
|
Enter Pick Quantity, Scan Every Item
|
Enter Pick Quantity
|
If Enter Pick Quantity, the quantity is entered and then
the item is scanned during the pick process.
If Scan Every Item, the item is scanned every time and the
quantity will be determined by the number of times scanned.
|
|
Shelf Replenishment
|
Replenishment – Item Out of Stock (Standard UOM)
|
Numeric
|
2 (standard unit of measure)
|
Use this option to set a variance for out-of-stock items
on the shelf. The out-of-stock field is used when receiving warehouse
deliveries. If the quantity on the shelf is less than the amount in this
field, the item appears as an out-of-stock item.
|
|
Shelf Replenishment
|
Replenishment – Item Out of Stock %
|
Numeric
|
10
|
Stores can set a variance for out-of-stock items on the
shelf. The out-of-stock field is used when receiving warehouse deliveries. If
the percentage on the shelf (shopfloor divided by capacity) is less than the
percentage specified by this option, the item appears as an out-of-stock
item.
|
|
Shelf Replenishment
|
Replenishment – Item Substitution Store Discretion
|
Yes, No
|
No
|
If Yes, any item may be selected to substitute.
If No, only an approved substitute item may be selected.
|
|
Shelf Replenishment
|
Replenishment – Shopfloor to Capacity
|
Yes, No
|
No
|
If Yes, the shopfloor is set to equal the capacity at the
beginning of each day.
If No, the shopfloor is not reset.
|
|
Shelf Replenishment
|
Replenishment – Within Day Max. fill %
|
Numeric 0 to 100
|
75
|
This configurable percentage allows each store to set its
own fill percentage for creating within-day shelf replenishment lists.
|
|
Shelf Replenishment
|
Shelf Adjustment List Printing
|
Manual, Automatic
|
Manual
|
If Automatic, the report and tickets will print
automatically when performing a shelf adjustment.
If Manual, the user will need to intiate the printing of
the shelf adjustment.
|
|
Stock Counts
|
Display Late Inventory Adjustment Message
|
Yes, No
|
Yes
|
If the value is Yes, when the user is confirming a Stock
Count in the Authorization phase and In Progress Inventory Adjustments exist
with items on the Stock count, a message is displayed alerting the user.
Additionally, if a user is confirming or approving an inventory adjustment
with items on an open stock count, a message is also displayed to the user.
If the value is No, the user is not prompted and the system will ignore any In
Progress inventory adjustments.
|
|
Stock Counts
|
Stock Count Default Timeframe
|
Before Store Open, After Store Close
|
Before Store Open
|
The setting of this option determines when the stock count
is performed in relation to store opening hours for daily sales processing.
It defines the default value for the Stock Count screen.
If RMS is implemented with SIM, this setting must be set
to After Store Close because of the way transactions are processed during a
Unit and Amount Stock Count.
|
|
Ticketing
|
Auto Generate Item Tickets for Clearance Price Changes
|
Yes, No
|
No
|
If Yes, a new item ticket is sent to the ticketing dialog
when a clearance price event comes from the pricing system.
If No, a new item ticket is not generated.
|
|
Ticketing
|
Auto Generate Item Tickets for Promotion Price Changes
|
Yes, No
|
No
|
If Yes, a new item ticket is sent to the ticketing dialog
when a promotion price event comes from the pricing system.
If No, a new item ticket is not generated.
|
|
Ticketing
|
Auto Generate Item Tickets for Regular Price Changes
|
Yes, No
|
No
|
If Yes, a new item ticket is sent to the ticketing dialog
when a regular price event comes from the pricing system.
If No, a new item ticket is not generated.
|
|
Ticketing
|
Auto Generate Shelf Edge Labels for Clearance Price
Changes
|
Yes, No
|
No
|
If Yes, a new shelf label is sent to the ticketing dialog
when a clearance price event comes from the pricing system.
If No, a new shelf label is not generated.
|
|
Ticketing
|
Auto Generate Shelf Edge Labels for Promotion Price
Changes
|
Yes, No
|
No
|
If Yes, a new shelf label is sent to the ticketing dialog
when a clearance price event comes from the pricing system.
If No, a new shelf label is not generated.
|
|
Ticketing
|
Auto Generate Shelf Edge Labels for Regular Price Changes
|
Yes, No
|
No
|
If Yes, a new shelf label is sent to the ticketing dialog
when a clearance price event comes from the pricing system.
If No, a new shelf label is not generated.
|
|
Ticketing
|
Maximum Ticket Quantity to Print
|
1-10000
|
500
|
This determines the maximum ticket size to print in one
command and is used in auto ticket printing batch and Ticketing dialog.
If the ticket quantity is exceeded on the UI, a warning
message is displayed.
If the ticket quantity is exceeded when printing, the
tickets are sent in multiples of the maximum defined.
|
|
Ticketing
|
Send Item Tickets to Ticketing for Description Change
|
Yes, No
|
No
|
If the value of this option is Yes,
a ticket is generated to be printed when the description of an item changes.
|
|
Ticketing
|
Send Item Tickets to Ticketing for QR Code Change
|
Yes, No
|
No
|
Indicates SIM generates a new ticket if the QR code
changes based on the optional time/date. If no time/date is defined, it is
generated immediately; if a time/date exists, it will be generated by a batch
program.
|
|
Ticketing
|
Send Shelf Edge Labels to Ticketing for Description Change
|
Yes, No
|
No
|
If the value of this option is Yes,
a label is generated to be printed when the description of an item changes.
|
|
Ticketing
|
Send Shelf Edge Labels to Ticketing for QR Code Change
|
Yes, No
|
No
|
Indicates SIM generates a new label if the QR code changes
based on the optional time/date. If no time/date is defined, it is generated
immediately; if a time/date exists, it will be generated by a batch program.
|
|
Transfers
|
Dispatch Validate
|
Ship Submit, Ship Direct
|
Ship Direct
|
If Ship Direct, SIM will control all processes. The user
will be able to go from create/edit directly to dispatch.
If Ship Submit, this option will require the user to press
the Submit button, and require a specific press of the dispatch button. An
additional option is that an external system will generate a dispatch message
through a standard web service.
|
|
Transfers
|
Pre-shipment Notification
|
Yes, No
|
No
|
If Yes, SIM will publish a pre-shipment message.
If No, SIM will not publish a pre-shipment message.
|
|
Transfers
|
Store Auto Receive
|
Not Allowed, External Message, Date Driven
|
Not Allowed
|
This parameter drives the following functionality:
Not allowed follows standard
Transfer receive process.
External message receives the full
store delivery the moment a transaction arrives which indicates that the
delivery needs to be auto-received. This feature works in correlation with
the store auto-receive screen information configured under Admin > SIM
Store > Auto-Receive Stores.
Date Driven uses a secondary store
option (Store Auto Receive Number of Days) to determine how many days the
transaction stays open before the transaction is fully received.
|
|
Transfers
|
Store Auto Receive Number of Days
|
0-99
0 means immediate receiving
1 means today (EOD)
2 means EOD tomorrow
x means EOD x
days starting from today
|
0
|
A batch program auto-receives any store transfers that
have not been closed x days after they have been
shipped, if the store auto-receive parameters are set.
|
|
Transfers
|
Store To Store Carrier Default
|
Third Party, Sender, Receiver
|
Third Party
|
If Sender, sender will be selected for Carrier Type on
BOL.
If Receiver, receiver will be selected for the Carrier
type on BOL.
If Third Party, Third Party will be selected for the
Carrier type on the BOL. The type (drop down) will be defaulted to Other.
|
|
Warehouse Delivery
|
Warehouse Auto Receive
|
Not Allowed, External Message, Date Driven
|
Not Allowed
|
This parameter drives the following functionality:
§ Not
allowed follows standard Warehouse receiving process.
§ External
message receives the full warehouse delivery the moment an ASN
transaction arrives. The external message indicates that the delivery needs
to be auto-received.
§ Date
Driven looks at a secondary store option (Warehouse Auto Receive
number of Days) to determine how many days the transaction stays open before
the transaction is fully received. If the parameter is set to 0, the transaction will auto-receive on the ETA date.
|
|
Warehouse Delivery
|
Warehouse Auto Receive Number of Days
|
0-99
§ 0
means immediate receiving
§ 1
means today (EOD)
§ 2
means EOD tomorrow
§ x
means EOD x days starting from today
|
0
|
A batch program auto-receives any warehouse deliveries
that have not been closed x days after the ETA date
or the create date, depending on whether the ETA date is set and whether the
auto-receive warehouse delivery parameter is set.
|
|
Warehouse Delivery
|
Warehouse Default to Shopfloor Receive
|
Yes, No
|
No
|
If Yes, SIM defaults the Receive to Shopfloor checkbox to
marked on the Warehouse Delivery Detail screen.
If No, SIM defaults the checkbox to blank.
|
|
Warehouse Delivery
|
Warehouse Receive Item Capacity
|
Yes, No
|
No
|
If Yes, SIM considers shelf capacity when receving the
delivery to the shopfloor. Excess capacity will be received in the backroom.
If No, SIM does not consider shelf capacity.
|
|
Web Service Enablement
|
Manifest Customer Order Deliveries
|
Yes, No
|
No
|
If Yes, the Manifesting system will be called.
If No, the Manifesting system will not be called.
|
|
Web Service Enablement
|
Manifest Returns - Finisher
|
Yes, No
|
No
|
If Yes, the Manifesting system will be called for Return
to Finisher.
If No, the Manifesting system will not be called.
|
|
Web Service Enablement
|
Manifest Returns - Supplier
|
Yes, No
|
No
|
If Yes, the Manifesting system will be called for Return
to Supplier.
If No, the Manifesting system will not be called.
|
|
Web Service Enablement
|
Manifest Returns - Warehouse
|
Yes, No
|
No
|
If Yes, the Manifesting system will be called for Return
to Warehouse.
If No, the Manifesting system will not be called.
|
|
Web Service Enablement
|
Manifest Store to Store Transfer
|
Yes, No
|
No
|
If Yes, the Manifesting system will be called for Store to
Store Transfers.
If No, the Manifesting system will not be called.
|
|
Web Service Enablement
|
OMS Customer Order Delivery Validation
|
Yes, No
|
No
|
If Yes, the OMS system will be called for validating
delivery status and quantities before completing the dispatch.
If No, the OMS system will not be called.
|
The system administration functionality allows you to set values
for options that control a variety of system behaviors. The values of these
system options are applied to all locations.
The system options are in these general categories:
§
Receiving and shipping options
§
Audit options
§
Transaction adjustment options
§
Days-to-hold options
§
System usability options
§
Customer order
§
E-mail options
§
Stock count options
§
Warehouse receiving options
§
Transfer options
§
Time Zone options
§
Miscellaneous options
Go to Main Menu > Admin > Setup >
System Admin.
The System Admin window opens.
Figure: The System Admin Window
1. Select
the option that you want to modify.
2. Double-click
the Value field and set the option value in either of these ways:
§ Select a value from
the list.
§ Enter an appropriate
value in the field.
3. Click
Done. You return to the Setup menu. Click Done again to return to the Admin menu.
The following tables list the system administration options in
each general category and describe each option.
|
Table: Topic: Admin Options
|
|
System Administration Option
|
Valid Values
|
Default Value
|
Description
|
|
Allow Non-Range Item
|
Yes, No
|
Yes
|
This option gives stores the ability to add non-ranged
items to functional areas in the application.
|
|
Auto Default UIN Attributes
|
Yes/No
|
No
|
Dictates whether SIM auto-defaults in the UIN attributes.
If the parameter is Yes, then when
a new item is created using the RIB, SIM auto-defaults UIN attributes that
were set up at the department class from the SIM UIN Attributes screen.
If the parameter is No, then the
UIN attributes are not defaulted in. Instead, the UIN attributes are
defaulted from the external system. The parameter should be set to No if an external system controls the setup of item UIN
attributes. In this case, SIM must not auto-default the UIN values as this
action can override the intent of the external system.
|
|
Default for date field in external files
|
yyyyMMddHHmmss
|
Date (14)
|
Indicates date/time item was physically counted by the
third party.
|
|
Default UOM
|
Cases, Standard UOM
|
Cases
|
This option allows the store to select the default unit of
measure that the store will normally use. This system option is ignored in
the stock counts functional area.
|
|
DexNex Error Directory
|
Editable text field
|
NA
|
Dictates where the error directory is located for Direct
Delivery DexNex files. For example:
/u00/webadmin/product/10.1.3_9/OAS/user_projects/domains/java_domain/error
n
|
|
DexNex Input Directory
|
Editable text field
|
NA
|
Dictates where the input directory is located for Direct
Delivery DexNex files. For example:
/u00/webadmin/product/10.1.3_9/OAS/user_projects/domains/java_domain/input
See the Oracle Retail Store Inventory
Management Operations Guide for details on DexNex batch file
processing.
|
|
Disable Pack Size
|
Yes, No
|
No
|
This option allows the user to edit the pack size in the
application.
|
|
EMail From Name
|
Editable text field
|
simAlert@my
Company.com
|
When the system sends e-mail alerts, the specified e-mail
address is displayed in the from name.
|
|
Enable Extended Attributes
|
Yes, No
|
No
|
If Yes, the system will capture the extended attributes
when scaning a GS1 DataBar.
If No, the Ext. Attribute button and menu option will not
be available on the PC or HH.
|
|
Enable Multiple Set of Books
|
Enabled, Disabled, SIM Only
|
Disabled
|
If the option is Enabled, SIM is
expected to be in sync with RMS for the purpose of MSOB. If Disabled,
MSOB functionality is disabled. If SIM Only, SIM uses
the organization unit to limit the suppliers available to the store.
|
|
Enable sub buckets
|
Yes, No
|
Yes
|
If Yes, Sub-buckets will be used throughout the
application. The Adjust Unavailable Qty bucket will be divided into
sub-buckets and the sub-buckets will be updated appropriately when inventory
updates are made.
If No, Sub-buckets will not be used in the system, and
they will not be displayed. The adjust unavailable qty will be used.
|
|
Online Help URL
|
Editable text field
|
NA
|
@online.help.url@
|
|
Table: Topic: Audit Options
|
|
System Administration Option
|
Valid Values
|
Default Value
|
Description
|
|
Audit Direct Store Delivery
|
Yes, No
|
Yes
|
Direct store deliveries are tracked with process ID 8
(Direct_Delivery).
|
|
Audit Inventory Adjustment Create
|
Yes, No
|
Yes
|
The creation of inventory adjustments is tracked with
process ID 12 (Inventory_Adjustment_Create).
|
|
Audit Inventory Adjustment Dispatch
|
Yes, No
|
Yes
|
The dispatch of an inventory adjustment is tracked with
process ID 14 (Inventory_Adjustment_Complete).
|
|
Audit Inventory Adjustment Update
|
Yes, No
|
Yes
|
The updating of an inventory adjustment is tracked with
process ID 13 (Inventory_Adjustment_Update).
|
|
Audit Item Requests
|
Yes, No
|
Yes
|
Completed item requests are tracked with process ID 201
(Store_Order_request).
|
|
Audit Price Adjustment
|
Yes, No
|
Yes
|
Price adjustments in the store are tracked by tracking
printing of the tickets. Process ID 15 is used (Price_label_printed).
|
|
Audit Publish Message
|
Yes, No
|
Yes
|
The publishing of Retail Integration Bus (RIB) messages is
tracked using process ID 16 (Publish_Message).
|
|
Audit Receive Message
|
Yes, No
|
Yes
|
The subscription to RIB messages is tracked using process
ID 17 (Receive_Message).
|
|
Audit Return Stock Update
|
Yes, No
|
Yes
|
A return that updates inventory is tracked using process
ID 10 (Return_Stock_Dispatch).
|
|
Audit Security
|
Yes, No
|
Yes
|
Indicates if security information that is created and
changed within SIM should be audited. If Yes,
create/edit roles and failed/successful login attempts are audited.
|
|
Audit Session Timeout
|
Yes, No
|
Yes
|
A session time-out is tracked with process ID 4
(Session_Timeout).
|
|
Audit Stock Count Completed
|
Yes, No
|
Yes
|
Completed stock counts are tracked using Process ID 18
(Stock_Count_Completed).
|
|
Audit Stock Count Processed
|
Yes, No
|
Yes
|
The completion of a recount is tracked using process ID
101 (Stock_Recount_Completed).
|
|
Audit Transfer Dispatch
|
Yes, No
|
Yes
|
When a transfer is dispatched, it is logged using process
ID 5 (Transfer_Dispatch).
|
|
Audit Transfer Receiving
|
Yes, No
|
Yes
|
When a transfer is received, it is logged using process ID
6 (Transfer_receive).
|
|
Audit Transfer Update
|
Yes, No
|
Yes
|
When a transfer is updated, it is logged using process ID
7 (Transfer_update).
|
|
Record an audit record for adjust delivery request
|
Yes, No
|
Yes
|
If this option is set to Yes, the system writes an audit
record to the database when an adjust delivery request is made.
|
|
Table: Topic: Customer Order Options
|
|
System Administration Option
|
Valid Values
|
Default Value
|
Description
|
|
Customer Order Receipt Email Alert
|
Yes, No
|
No
|
If Yes, generate notification for customer order receipts.
|
|
Minutes to Hold New Customer Order Before Sending Email
Alert
|
0-99
|
5
|
Dictates the time interval in minutes to send a follow-up
message to a store associated after a customer order has arrived, but no-one
has accessed the customer order.
|
|
Minutes to Hold Open Customer Order Pick Before Sending
Email Alert
|
0-99
|
15
|
Dictate the time interval in minutes to send a follow-up
message to a store associated after a pick list has been created but no-one
has started the pick list.
|
|
New Customer Order Email Alert
|
Yes, No
|
No
|
If Yes, generates notification for new cross channel
customer orders.
|
|
|
|
|
|
|
|
|
Table: Topic: Direct Delivery Options
|
|
System Administration Option
|
Valid Values
|
Default Value
|
Description
|
|
Add Item to Direct Delivery on Receive
|
Yes, No
|
Yes
|
This option gives the user a notification when a Customer
Order comes into the system.
|
|
Direct Delivery Default Identify by PO
|
Yes, No
|
Yes
|
When starting to identify a direct delivery on the PC, the
user can choose to start with the purchase order number.
|
|
Direct Delivery Preferred Currency
|
Store Currency, Supplier Currency
|
Store Currency
|
This option defaults the store or supplier currency to
newly created POs depending on preference.
|
|
Direct Delivery Send Null Unit Cost
|
Yes, No
|
No
|
If Yes, SIM sends a null unit cost to the merchandising
system, if the Delivery unit cost equals the Supplier Country unit cost.
If No, SIM always sends unit cost to the merchandising
system.
|
|
Disable Supplier Indicator for Purchase Order Creation
|
Yes, No
|
Yes
|
This option allows the system to ignore the create new purchase order for supplier flag. If the option
is set to Yes, the system does not check the flag and
always allows stores to create purchase orders. If the option is set to No, the system verifies when creating a direct delivery
that it is allowed by the supplier.
|
|
Display Unit Cost for Direct Deliveries
|
Yes, No
|
Yes
|
This option allows the user to view and edit the unit cost
on a direct delivery. Regardless of the display option, the system populates
the unit cost for unexpected items or newly created purchase orders in SIM,
if a unit cost is available.
|
|
Enable DSD Pack Receiving
|
Yes, No
|
Yes
|
This option allows packs to be received in direct store
deliveries.
|
|
Number of days received direct deliveries can be adjusted
|
Numeric
|
0
|
This option specifies the number of days received direct
deliveries can be reopened and adjusted. If a direct delivery falls within
the number of days, an Adjust Delivery button is
displayed on the received delivery. The user can edit values and confirm the
delivery.
|
|
Table: Topic: External Finisher Options
|
|
|
System Administration Option
|
Valid Values
|
Default Value
|
Description
|
|
|
External Finisher Enable/Disable
|
Enable, Disable
|
Disabled
|
When this parameter is enabled, the following dialog box
displays the finisher details on the PC:
§ Return Filter
§ Return Details
§ Finisher Lookup
§ Warehouse Delivery
Filter
§ Finisher Details
If enabled, the handheld workflow will display finisher
details.
|
|
|
|
|
|
|
|
|
|
Table: Topic: Purge Options
|
|
System Administration Option
|
Valid Values
|
Default Value
|
Description
|
|
Days to Hold Audit Records
|
Numeric
|
30
|
Records are deleted in which the create date is less than
or equal to the current date minus the number of days to hold.
|
|
Days to hold cancelled templates
|
Numeric
|
30
|
Indicates the number of days that Canceled Templates will
be held in the system before being purged.
|
|
Days to Hold Completed Customer Orders
|
Numeric
|
4
|
Indicates the number of days that Canceled and Fulfilled
Customer Orders will be held in the system before being purged.
|
|
Days to Hold Completed Inventory Adjustments
|
Numeric
|
30
|
Records in Complete status are
deleted, where the inventory complete date is less than or equal to the
current date minus the number of days to hold.
|
|
Days to Hold Completed Purchase Orders
|
Numeric
|
30
|
All records in Closed status are
purged after this number of days, where the complete date (the date of when
all items were received on the order) is less than or equal to the current
date minus the number of days to hold.
|
|
Days to Hold Completed Staging Records
|
Numeric
|
5
|
All successfully processed or deleted records will be
purged where the update date is less than or equal to the current date minus
the days to hold.
|
|
Days to Hold Completed Stock Counts
|
Numeric
|
30
|
Purge any records this number of days after the last stock
count event has occurred. In other words, when the schedule date is less than
or equal to the current date, SIM subtracts the number of days to hold
completed stock counts from the date and deletes when this date is reached. A
record is purged if the stock count has a status of Complete,
except in the case of Unit and Amount stock counts. Unit and Amount stock
counts are deleted only when the status is Authorize Completed.
|
|
Days to Hold Completed UINs
|
Numeric
|
120
|
Indicates how long completed UINs are kept in the system.
Completed UINs are defined as any UIN that is in one of the following
statuses:
§ Sold
§ Shipped to
Warehouse
§ Shipped to Vendor
§ Shipped to Finisher
§ Removed from
Inventory
§ Customer Fulfilled
|
|
Days to Hold Customer Orders
|
Numeric
|
180
|
Indicates the number of days to hold a customer order in
the system.
|
|
Days to Hold Deleted Users
|
Numeric
|
30
|
This will determine the number of days users with a
Deleted status will be held in the system. When the status of the user is
updated to Deleted, the system should capture the date in GMT and use that as
a basis for determining when the user should be purged from the system. All
role, store, password history, and so forth should be purged as well.
|
|
Days to hold expired item price
|
Numeric
|
30
|
Indicates the number of days to hold an expired item price
in the system.
|
|
Days to Hold Expired User Roles
|
Numeric
|
30
|
Store managers have the ability to assign temporary roles
to users in the store. For roles that require an expiration date, after the
number of days as defined by this new parameter, the temporary roles should
be purged from the user.
|
|
Days to Hold In Progress Ad Hoc Stock Counts
|
Numeric
|
1
|
Any ad hoc count with a creation date/time stamp older
than this number of days is deleted.
|
|
Days to Hold Item Requests
|
Numeric
|
30
|
Records are deleted in which the process date is less than
or equal to the current date minus the number of days to hold, for item
requests in Completed or Cancelled
status. Any requests in Pending status are not
purged.
|
|
Days to Hold Item Tickets
|
Numeric
|
15
|
After this number of days, all records in Printed or Cancelled status are
purged from the database, where the status date is less than or equal to the
current date minus the number of days to hold.
|
|
Days to Hold Locking Records
|
Numeric
|
3
|
Locking records are sometimes left behind because of
system crashes or incorrect logout functionality. After this number of days,
these records are deleted.
|
|
Days to Hold Price Change worksheet records
|
Numeric
|
30
|
All price change worksheet records in Completed,
Approved, and Rejected status
are purged after this number of days, where the price change effective date
is less than or equal to the current date minus the number of days to hold.
|
|
Days to Hold Price History
|
Numeric
|
90
|
The LE_HST_ITM_SLS_PRC table is purged so that it contains
at least four historical prices for the item/store. This is consistent with
the four historical prices the user is able to view in Price History within
Item Lookup on the handheld. The Price History table could potentially
contain more than four records, because a minimum of one regular price record
is required to be held in the database. The purge program needs to restrict
these records from being deleted. The Days to Hold Price History parameter
allows the user to keep records beyond the four most recent historical prices
for this number of days, if desired. Prices in the future are not deleted and
are not included in the four historical prices that remain in the database.
|
|
Days to Hold Received Shipment Records
|
Numeric
|
30
|
All records in Complete and Canceled status are purged after this number of days, where
the inventory completed date is less than the current date minus the number
of days to hold.
|
|
Days to Hold Received Transfer Records
|
Numeric
|
10
|
All records in Received, Auto Received, or Canceled status
are purged after this number of days, where completed date is less than or
equal to the current business date minus the number of days to hold. Transfer
requests must also be included in this purge process when the transfer
request record is in Cancelled Request, Completed Approved, or Completed Rejected status.
|
|
Days to Hold Related Items
|
Numeric
|
60
|
Indicates how long related items are kept in the system.
|
|
Days to Hold Resolved UIN Exceptions
|
0 - 999
|
120
|
Indicates how long resolved UIN exceptions are kept in the
system.
The date the exception was resolved is the date the system
uses to determine if the exception is ready to be purged.
|
|
Days to Hold Returns
|
Numeric
|
30
|
All records in Dispatched or Cancelled status for Return to Warehouse and Return to
Vendor/Supplier are purged after this number of days, where the inventory
completed date is less than or equal to the current date minus the number of
days to hold.
|
|
Days to Hold Sales Posting
|
0 - 999
|
120
|
Indicates how long Point-of-Service transactions uploaded
from either Oracle Retail Point-of-Service (ORPOS) or Oracle Retail Sales
Audit (ReSA) are kept in the system.
|
|
Days to Hold Shelf Adjustment Lists
|
Numeric
|
30
|
Indicates how long shelf adjustments should be kept in the
system.
|
|
Days to Hold Shelf Replenishments
|
Numeric
|
30
|
Indicates how long shelf replenishments should be kept in
the system.
|
|
Days to Hold Transaction History
|
Numeric
|
10
|
Indicates how long transaction history should be kept in
the system.
|
|
Days to Hold UIN Audit Information
|
0 - 999
|
120
|
Indicates how long UIN audit information is kept in the
system.
Audit information can be purged for a UIN within the
system. The date the audit transaction was captured is used to determine if
the record needs to be purged.
|
|
Purge Received Transfers
|
Yes, No
|
Yes
|
This option allows received transfers to be purged. This
option works in conjunction with the Days to Hold Received Transfers system
option.
|
|
Table: Topic: Receiving Options
|
|
System Administration Option
|
Valid Values
|
Default Value
|
Description
|
|
|
Disable Damages
|
Yes, No
|
No
|
This option allows the user to receive damages on
transfers, direct deliveries, and warehouse deliveries.
|
|
|
Disable Discrepancy Checks in all Receiving
|
Yes, No
|
No
|
When this option is set to Yes,
the user does not have to go through the discrepancies at the end of
receiving on the handheld. This configuration applies to transfer receiving,
direct deliveries, and to the item level only on warehouse receiving.
|
|
|
Table: Topic: Reporting Options
|
|
System Administration Option
|
Valid Values
|
Default Value
|
Description
|
|
|
Reporting Tool URL
|
|
|
http://<bip_host>:<bip_port>/<bip_deployment>.
This URL is used as the reference to the BIP deployment for printing reports
and viewing reports from the SIM PC client in a browser.
|
|
|
Table: Topic: Returns Options
|
|
System Administration Option
|
Valid Values
|
Default Value
|
Description
|
|
Add Item to Return Requests
|
Yes, No
|
Yes
|
This option gives the user the ability to add items to a return
request (a return generated by an external system).
|
|
Days to send Email alert before not after date for return
requests
|
Numeric
|
2
|
Return requests generated in an external system sometimes
require the return to be dispatched to the warehouse before a certain date.
This option prompts the recipient of the e-mail the specified number of days
before the not after date is reached, if the return was not dispatched.
|
|
DSD delivery supplier for RTV
|
If the DSD delivery supplier for RTV
system option is set to Yes, then the system needs to
check both the DSD indicator and the return-allowed indicator.
If the DSD delivery supplier for RTV
system option is set to No, then only the
return-allowed indicator needs to be validated for supplier returns.
|
Yes
|
This new indicator will check to see if the DSD-allowed
indicator needs to be set in addition to the return allowed values when
creating a supplier return in SIM.
Note: Regardless of the indicator,
SIM should always be able to dispatch the RTV if it was created in an
external system.
|
|
Table: Topic: Security Options
|
|
System Administration Option
|
Valid Values
|
Default Value
|
Description
|
|
Duration Before Failed Login Attempts are Reset (in hours)
|
0 -999
|
24
|
If a successful login is not achieved and the duration as
defined by this new parameter is reached, the previous failure logins will
not be counted toward the maximum number of allowed failure login attempts.
|
|
Maximum Days for Temporary Users End Date
|
0 -999
|
5
|
For users that are defined as temporary, this will limit the
time before Deactivating a temporary user.
If the value is set to 0, then the
temporary user account can have any end date.
|
|
Maximum Number of Allowed Failure Login Attempts
|
0 -999
|
5
|
This is the number of failed login attempts a user can
have before the user account within SIM will be locked. This parameter has no
bearing on the external security system. If the external security system also
provides this functionality, whichever value is lower will lock the user out
first.
If the value is set to 0, then the
user account within SIM will be set to a status of Locked.
|
|
User Security Mode
|
Internal Authentication/ Authorization
|
Internal Authentication/ Authorization
|
Internal Authentication/Authorization: SIM has full
control of Authentication, user creation and store/role assignments.
Internal Authentication/Authorization: Indicates that a
hybrid approach will be used for authentication that allows users to be
managed in an internal systems. SIM will try to authenticate the user
internally with the password that was used during the last successful
authentication.
|
|
Valid Cached User Authentication Duration (in hours)
|
0 -999
|
5
|
When external authentication occurs and the user is
successfully authenticated by the external security system the password will
be cached in SIM. If the external security system is down and the number of
days defined for this parameter have not passed, the password cached in the
system will still be valid for the user and can be used to authenticate the
user if the Authentication Method is set to External/Internal Authentication.
If the value is set to 0, then
the cached authentication information will not be considered valid and will
not be used during the authentication process.
|
|
Valid Cached User Authorization Duration (in hours)
|
0 -999
|
48
|
When external authentication occurs and roles and stores
are passed back to SIM, these values will be cached in SIM. If the external
security system is down and the number of hours defined for this parameter
have not passed, the roles/stores cached in the system will still be valid
for the user and can be applied when the user logs in when the Authentication
Method parameter is set to External/Internal Authorization.
If the value is set to 0, then the
cached authorization information will not be considered valid and will not be
used during the authorization process.
|
|
Table: Topic: Stock Count Options
|
|
System Administration Option
|
Valid Values
|
Default Value
|
Description
|
|
Stock Count Display Default Timeframe
|
Yes, No
|
No
|
This option determines whether the Stock Count Default
Time Frame value is a selectable option on the stock count screens on both
the handheld and the PC.
|
|
Stock Count Lockout Days
|
Numeric
|
If RMS is not installed, 1
If RMS is installed, set to agree with the RMS value for
lockout days
|
This option specifies the lead time required by RMS to
create a unit and value stock count schedule.
|
|
Stock Count Null Count Quantity = 0
|
Yes, No
|
No
|
This option determines whether or not items with a null
count quantity will be interpreted as a zero quantity for Unit, Problem Line
and Ad Hoc stock counts.
|
|
Unguided Stock Count Allow Multiple Users
|
Yes, No
|
No
|
If unguided stock counts are used, this option allows more
then one user to scan simultaneously against the same stock count.
|
|
Unguided Stock Counts -- Automatic Save
|
Yes, No
|
No
|
If the parameter is set to Yes, the physical timestamp is
taken as soon as the item is scanned for the first time, and is saved to the
database along with the count value once the user scans the next item on the
count.
If the parameter is set to No, SIM records the physical
timestamp in memory once a user begins counting. The timestamp and count
value are posted to the database when the user manually saves the count. With
this option, it is assumed the user manually saves the count on a frequent
basis, particularly when moving from one area in the store to another.
|
|
Unit & Amount Stock Count Sales Processing
|
Timestamp Processing, Daily Sales Processing
|
Timestamp Processing
|
This parameter will determine what kind of sales processing
will be used for sales that are uploaded during a unit and amount stock count
process.
If Timestamp Processing, the user will not have to select
a time period for the stock count. Sales data will have a timestamp on when
the sale or return happened. This sales data timestamp will be compared
against the timestamps taken during the stock count.
If Daily Sales Processing, a timestamp will not be used
and the user will need to select whether the stock count will occur before or
after business hours so that SIM will know how to handle late sales.
If RMS is implemented with SIM, the setting must be set to
Daily Sales Processing to correspond with the way RMS processes the
transactions occurring during a Unit and Amount Stock Count.
|
|
Unit Stock Count Sales Processing
|
Timestamp Processing, Daily Sales Processing
|
Timestamp Processing
|
This parameter will determine what kind of sales
processing will be used for sales that are uploaded during a unit stock count
process.
If Timestamp Processing, the user will not have to select
a time period for the stock count. Sales data will have a timestamp on when
the sale or return happened. This sales data timestamp will be compared
against the timestamps taken during the stock count.
If Daily Sales Processing, a timestamp will not be used
and the user will need to select whether the stock count will occur before or
after business hours so that SIM will know how to handle late sales.
|
|
Updating Stock On Hand
|
Discrepant Items Only, All Items
|
Discrepant Items Only
|
This option determines whether the stock on hand will be
updated for all items, both discrepant and non-discrepant items, or for
discrepant items only when authorizing a Unit, Problem Line or Ad Hoc stock
count.
|
|
Table: Topic:Store Orders Options
|
|
System Administration Option
|
Valid Values
|
Default Value
|
Description
|
|
Restrict Store Purchase Orders to Store-Orderable Items
|
Yes, No
|
Yes
|
This option prevents items that are not store-orderable
from being on regular store purchase orders.
|
|
Table: Topic: Time Zone Options
|
|
System Administration Option
|
Valid Values
|
Default Value
|
Description
|
|
Daily GMT Batch Run
|
Yes, No
|
Yes
|
Indicates if the batch programs can be run multiple times
a day.
|
|
Enable GMT for Customer Orders
|
Yes, No
|
Yes
|
Dictates whether the Customer Order data being loaded into
the system is in GMT.
|
|
Enable GMT for Dex/Nex
|
Yes, No
|
No
|
Dictates whether or not the Dex/Nex data being loaded into
the system is in GMT.
|
|
Enable GMT for Direct Deliveries
|
Yes, No
|
No
|
Indicates whether or not the Direct Delivery messages published
by an external system should have dates in GMT or not.
|
|
Enable GMT for Foundation Data
|
Yes, No
|
No
|
Indicates whether or not any foundation data messages is
being loaded into the system are in GMT.
|
|
Enable GMT for Inventory Adjustments
|
Yes, No
|
No
|
Indicates which date/time stamp is used in the inventory
adjustment message when it is being published.
|
|
Enable GMT for Item Requests
|
Yes, No
|
No
|
Indicates whether or not the Item Request message being
published should contain date/time stamps in GMT or not.
|
|
Enable GMT for POS Sale Import process
|
Yes, No
|
No
|
Indicates whether or not the POS Sales data is being
loaded into the system are in GMT.
|
|
Enable GMT for Price Changes
|
Yes, No
|
No
|
Indicates whether price change messages being loaded into
the system are in GMT or not. This also determines if the pricing date fields
need to be converted when pushing data to a price management application.
|
|
Enable GMT for Receiving
|
Yes, No
|
No
|
Indicates whether or not receiving messages need to be
published in GMT or not.
|
|
Enable GMT for ReSA sale import process
|
Yes, No
|
No
|
Indicates whether or not ReSA sales data is being loaded
into the system in GMT.
|
|
Enable GMT for RTVs
|
Yes, No
|
No
|
Indicates whether or not the RTV message being loaded into
the system is in GMT. Likewise, if SIM publishes any RTV message this will
determine which date/time stamp is used on the message as well.
|
|
Enable GMT for Stock Counts
|
Yes, No
|
No
|
Indicates which date/time stamp is used in the stock count
message when it is being published.
|
|
Enable GMT for Store Orders
|
Yes, No
|
No
|
Indicates whether or not the purchase order messages being
loaded into the system has dates in GMT or not. Likewise, if SIM publishes
any purchase order message this will determine which date/time stamp is used
on the message as well.
|
|
Enable GMT for Store Transfers
|
Yes, No
|
No
|
Indicates whether or not the Transfer messages being
loaded into the system from an external system has dates in GMT or not.
Likewise, if SIM publishes any Transfer messages to an external system this
will determine which date/time stamp is used on the message as well.
|
|
Enable GMT for Third Party Stock Counts
|
Yes, No
|
No
|
Indicates whether the date/time stamp in the Third party
stock count file (DSLDAT) is in GMT or not.
|
|
Enable GMT for Vendor ASN
|
Yes, No
|
No
|
Indicates whether or not the Vendor ASN messages being
loaded into the system have dates in GMT or not.
|
|
Enable GMT for Warehouse Transfers
|
Yes, No
|
No
|
Indicates whether or not the transfer messages being
loaded into the system have GMT dates or not. Likewise, if SIM publishes any
transfer message to an external system this will determine which date/time
stamp is used on the message as well.
|
|
|
|
|
|
|
|
|
Table: Topic: Transfers Options
|
|
System Administration Option
|
Valid Values
|
Default Value
|
Description
|
|
Add Item to Transfer on Receive
|
Yes, No
|
Yes
|
This option gives the user the ability to add unexpected
items when receiving a transfer.
|
|
Days to hold Dispatched Transfer before sending e-mail
alert
|
Numeric
|
7
|
After this number of days, an e-mail alert goes to the
sending and receiving stores.
|
|
Number of days received transfers can be adjusted
|
Numeric
|
100
|
This option specifies the number of days received
transfers can be reopened and adjusted. If a transfer falls within the number
of days, an Adjust Delivery button is displayed on the
received transfer. The user can edit values and confirm the transfer.
|
|
Receive Entire Transfer
|
Yes, No
|
No
|
If this option is set to Yes, the
user can only receive the entire transfer exactly as it was sent.
|
|
Transfer Damaged EMail Alert
|
Yes, No
|
No
|
If this option is set to Yes, an
e-mail alert is sent when the receiving store receives goods as damaged.
|
|
Transfer Dispatch EMail Alert
|
Yes, No
|
No
|
If this option is set to Yes, an
e-mail alert is sent when the sending store dispatches a transfer.
|
|
Transfer Force Close Indicator
|
No Loss, Sending Loss, Receiving Loss
|
No Loss
|
This option determines how SIM handles a short receipt
between stores. RMS has a similar system option that needs to be set the same
as in SIM.
§ No
Loss. In this case, the quantity that is short-received on the
transfer between stores is added back into the SOH of the sending location.
§ Sending
Loss. SIM empties the remaining quantity in the transit bucket for the
quantity that was not received. This difference is adjusted in the stock
ledger by RMS for the sending location.
§ Receiving
Loss. SIM empties the remaining quantity in the transit bucket for the
quantity that was not received. This difference is adjusted in the stock
ledger by RMS for the receiving location.
There is no real difference between SL and RL from a SIM
perspective; in both cases, the missing quantities are written off, but from
a financial perspective in RMS, there is a large implication.
|
|
Transfer Over/Under EMail Alert
|
Yes, No
|
Yes
|
If this option is set to Yes, an
e-mail alert is sent when the receiving store receives under/over goods.
|
|
Transfer Request Approve EMail Alert
|
Yes, No
|
Yes
|
If this option is set to Yes, an
e-mail alert is sent when a transfer request has been approved.
|
|
Transfer Request Email Alert
|
Yes, No
|
Yes
|
If this option is set to Yes, an
e-mail alert is sent when a transfer request has been made.
|
|
Transfer Request Reject E-mail Alert
|
Yes, No
|
Yes
|
If this option is set to Yes, an
e-mail alert is sent when a transfer request has been rejected.
|
|
Table: Topic: User Interface Options
|
|
System Administration Option
|
Valid Values
|
Default Value
|
Description
|
|
Display HH Length: Diff 1
|
Numeric
|
6
|
This option sets the display of the first differentiator
on the handheld to the specified number of characters. Because of space
restrictions, no more than 21 total characters can be displayed on a single
line on the handheld. The priority of display is Diff 1, Diff 2, Diff 3, and
Diff 4. If Diff 1 takes up 20 characters, only one character of Diff 2 can be
displayed.
|
|
Display HH Length: Diff 2
|
Numeric
|
6
|
This option sets the display of the second differentiator
on the handheld to the specified number of characters. Because of space
restrictions, no more than 21 total characters can be displayed on a single
line on the handheld. The priority of display is Diff 1, Diff 2, Diff 3, and
Diff 4. If Diff 1 takes up 20 characters, only one character of Diff 2 can be
displayed.
|
|
Display HH Length: Diff 3
|
Numeric
|
6
|
This option sets the display of the third differentiator
on the handheld to the specified number of characters. Because of space
restrictions, no more than 21 total characters can be displayed on a single
line on the handheld. The priority of display is Diff 1, Diff 2, Diff 3, and
Diff 4. If Diff 1 takes up 20 characters, only one character of Diff 2 can be
displayed.
|
|
Display HH Length: Diff 4
|
Numeric
|
6
|
This option sets the display of the fourth differentiator
on the handheld to the specified number of characters. Because of space
restrictions, no more than 21 total characters can be displayed on a single
line on the handheld. The priority of display is Diff 1, Diff 2, Diff 3, and
Diff 4. If Diff 1 takes up 20 characters, only one character of Diff 2 can be
displayed.
|
|
Display Item Description
|
Long Description, Short Description
|
Short Description
|
This option specifies whether the long or short item
description is displayed in SIM. This option applies to both the handheld and
the PC.
|
|
Display Item Image Button
|
Yes, No
|
No
|
If Yes, an Image button is
displayed on the Item Lookup Detail screen.
If No, the button is not
displayed. This allows the retailer to hide the button if the retailer does
not support displaying images.
|
|
Item Request UI Limit
|
Not to exceed the value of the UI performance limitation
configuration setting.
|
2890
|
This option will determine the maximum number of items
allowed on an Item Request.
|
|
Problem Line UI Limit
|
Not to exceed the value of the UI performance limitation
configuration setting.
|
1500
|
This option will determine the maximum number of line
items allowed on a Problem Line stock count.
|
|
Search Limit Default for Container Lookup
|
1 - 999
|
500
|
This parameter indicates the default search limit for
Container Lookup.
|
|
Search Limit Default for Customer Order Management
|
0-999
|
500
|
This parameter indicates the default search limit for
Customer Order Management.
|
|
Search Limit Default for Inventory Adjustments
|
1 - 999
|
500
|
This parameter indicates the default search limit for the
Inventory Adjustment List screen and Filter.
|
|
Search Limit Default for Item Lookup
|
1 - 999
|
500
|
This parameter indicates the default search limit for Item
Lookup.
|
|
Search Limit Default for Price Changes
|
1 - 999
|
500
|
This parameter indicates the default search limit for the
Price Change Filter.
|
|
Search Limit Default for Sequencing
|
1 - 999
|
500
|
This parameter indicates the default search limit for the
No Location List screen filter.
|
|
Search Limit Default for Staged Message Lookup
|
1 - 999
|
500
|
This parameter indicates the default search limit on the
Filter screen for Staged Messages.
|
|
Search Limit Default for Supplier Lookup
|
1 - 999
|
500
|
This parameter indicates the default search limit for
Supplier Lookup.
|
|
Search Limit Default for Ticketing
|
1 – 999
|
500
|
This parameter indicates the default search limit for Ticket
Lookup.
|
|
Search Limit Default for Transaction History
|
1-999
|
500
|
This parameter indicates the default search limit for
Transaction History.
|
|
Search Limit Default for UIN Resolution
|
1 - 999
|
500
|
This parameter indicates the default search limit on the
UIN Resolution List Screen and Filter.
|
|
Shelf Replenishment UI Limit
|
Not to exceed the value of the UI performance limitation
configuration setting.
|
1500
|
This option will determine the maximum number of line
items allowed on a Shelf Replenishment List. This check will occur in
addition to and after the application limits the transaction based on the
pick list system parameters.
|
|
Unit and Amount Count UI Limit
|
Not to exceed the value of the UI performance limitation
configuration setting.
|
10
|
This option will determine the maximum number of line
items allowed on a Unit and Amount stock count. This check will occur in
addition to the Product Group variances values.
|
|
Unit Count UI Limit
|
Not to exceed the value of the UI performance limitation
configuration setting.
|
10000
|
This option will determine the maximum number of line
items allowed on a Unit stock count.
|
|
Table: Topic: UIN Options
|
|
System Administration Option
|
Valid Values
|
Default Value
|
Description
|
|
Allow Unexpected UINs
|
Yes, No
|
Yes
|
If No, SIM rejects the UIN in the
following situations by prompting the user with an error message (EM14r):
§ Unexpected UIN for
a Transfer
§ Inventory
adjustment when UIN was not assigned to the current store
§ Stock Counts, when
the item was not originally assigned to the current store
If Yes, SIM allows the unexpected
UIN for the previous situations and sends an e-mail alert and adds the item
to problem line stock count.
Completing the transaction updates the UIN Status and
updates the store the UIN is assigned to.
|
|
External Finisher UIN Qty Discrep Email Alert
|
Yes, No
|
Yes
|
If Yes, an email notification is generated when there is a
discrepancy with the number of UINs on a Finisher Return and the received
quantity.
If No, an email notification is not generated.
|
|
Over Received Quantity Email Alert
|
Yes, No
|
Yes
|
If Yes, an email notification is generated when more than
the expected quantity has been rec3eived and the store parameter ‘Direct
Delivery Auto Remove Over Received Quantity’ is set to ‘Yes’. The email
alert will list the UINs marked for removal.
If No, an email notification is not generated.
|
|
Secondary ASN UIN Qty Discrep Email Alert
|
Yes, No
|
Yes
|
If Yes, an email notification is generated when there is a
discrepancy with the number of UINs on the secondary ASN and the received
quantity.
If No, an email notification is not generated.
|
|
Warehouse/Store UIN Qty Discrep Email Alert
|
Yes, No
|
Yes
|
If Yes, an email notification is generated when there is a
discrepancy with the number of UINs on an ASN and the received quantity.
If No, an email notification is not generated.
|
|
Table: Topic: Warehouse Delivery Options
|
|
System Administration Option
|
Valid Values
|
Default Value
|
Description
|
|
Add Item to Container on Receive
|
Yes, No
|
Yes
|
This option gives the user the ability to add unexpected
items when receiving a warehouse delivery.
|
|
Number of days received warehouse deliveries can be
adjusted
|
Numeric
|
100
|
This option specifies the number of days received
warehouse deliveries can be reopened and adjusted. If a delivery falls within
the number of days, an Adjust Delivery button is
displayed on the received warehouse delivery. The user can edit values and
confirm the delivery.
|
|
Warehouse Quick Receiving – Automatically confirm ASNs
|
Yes, No
|
No
|
Yes for this option specifies that
the ASN number is confirmed when all containers have been received automatically,
if the ASN is not already confirmed. No for this
option allows a quick QA check, if required, on the handheld; a value of Yes makes this impossible, because the ASN is completed.
|
|
Warehouse Quick Receiving Enabled
|
Yes, No
|
Yes
|
This option allows the handheld to receive containers
directly, without confirming the ASN number. Each container scanned will be
fully received. The ASN number may still need to be confirmed as well.
|
|
Warehouse Quick Receiving – Prompt for received containers
|
Yes, No
|
Yes
|
Yes for this option means that the
user is prompted with an error message if the container is already received.
This slows down processing. For either Yes or No, the container scan does not affect the previously
received units.
|
|
Warehouse Quick Receiving – Receive missing containers
|
Yes, No
|
Yes
|
This option allows Warehouse Quick Receiving to receive
containers after the ASN number is confirmed.
|
6
SIM has the ability to produce reports that retailers can
customize to reflect the unique requirements of their business.
In SIM 14 reports will be accessed through BI Publisher 11g.
Operational reports are generated from within the functional
areas of SIM and include information about pick lists, stock count reports,
shipping documentation, and so on. SIM uses a reporting tool when generating
these reports in order to provide the user with a report formatting/layout
mechanism.
The reporting tool allows the end user to specify the exact data
fields to be displayed on the report (although this data is limited to the SIM
data that is available for the specific operational report). Modifications to
the formatting and data displayed on the report are made using the reporting
tool.
SIM provides the user with a way to identify a single default
report template to use for each of the different operational reports. When the
user generates an operational report from within SIM, the application requests
the report template that matches the default specified for that report.
Analytical reports leverage data in SIM for historical analysis.
Retailers can develop their own and use these reports to make decisions on key
business processes within the store (such as previous days deliveries, number
of items replenished on a given day, and so on).
The reporting tool provides the retailer with a report
formatting/layout mechanism and allows the user to specify the exact data
fields to be displayed on the report. All report metrics and parameters are
defined using the reporting tool (although this data is limited to the SIM data
that is available for the specific report).
§
SIM does not reference any other external security to enforce
privileges for the reporting tool. If a user is given the ability to generate a
report or to launch the reporting tool within SIM, it is assumed that the user
is given the necessary level of access for the reporting tool as well.
§
SIM does not manage any scheduling requirements for analytic (and
ad hoc) reports. Such scheduling should be handled by the reporting tool
itself.
The following section describes the SIM reporting framework.
SIM is able to print to local printers in a store using
BIPublisher, as long as the printers are network-enabled printers that support
internet protocol printing (IPP). SIM uses BIPublisher as the printing engine.
The printers must be network-enabled in order to communicate with BIPublisher.
Figure: Local Printing in a
Store

The following is the workflow for the process of printing locally
in a store:
1. A
retailer makes a request on the HH or PC to print an item.
2. That
request goes to the centrally installed BIPublisher server.
3. The
BIPublisher server receives URLs or parameters, runs a query to retrieve data
to be printed, and formats the data.
4. That
data is then sent back to the store’s network-enabled printers.
SIM tables (STORE_PRINTER) refer only to the logical name of the
printer. That logical name is setup using BIP-admin, for example, myPrinter1. Use BIPublisher to configure myPrinter1
with specifics.
The following are the SIM Operational Reports.
|
Table: Operational
Reports
|
|
Report Name
|
Report Parameters
|
Primary Views or Tables
|
|
BolReturnReport
|
Return_ID, COPIES
|
rprt_return_bol_v
|
|
BolTransferReport
|
Transfer_ID, COPIES
|
rprt_transfer_bol_v
|
|
CustomerOrderBinLabelReport
|
BIN_ID, SIM_CUSTOMER_ORDER_ID, COPIES
|
FUL_ORD, FUL_ORD_BIN
|
|
CustomerOrderDeliveryBOLReport
|
Delivery_Id, Store_Timezone, COPIES
|
RPRT_FUL_ORD_DLV_BOL_V
|
|
CustomerOrderDeliveryReport
|
Delivery_Id, Store_Timezone, COPIES
|
RPRT_FUL_ORD_DLV_V
|
|
CustomerOrderPickDiscrepancyReport
|
Store_Timezone, Pick_Id, COPIES
|
RPRT_FUL_ORD_PICK_DISC_V
|
|
CustomerOrderPickReport
|
Store_Timezone, Pick_Id, COPIES
|
RPRT_FUL_ORD_PICK_V
|
|
CustomerOrderReport
|
Order_Id, Store_Timezone, COPIES
|
RPRT_FUL_ORD_V
|
|
CustomerOrderReversePickReport
|
Reverse_Pick_Id, Store_Timezone, COPIES
|
RPRT_FUL_ORD_RV_PICK_V
|
|
DirectDeliveryDiscrepantItemsReport
|
RECEIPT_ID, COPIES
|
rprt_dsd_discrepant_itm_v
|
|
DirectDeliveryReport
|
Receipt_ID, Store_Timezone, COPIES
|
rprt_dsd_v
|
|
InventoryAdjustmentReport
|
Inv_Adj_ID, Store_Timezone, COPIES
|
RPRT_INV_ADJUST_V, CONFIG_SYSTEM
|
|
ItemBasketDefaultReport
|
ITEM_BASKET_ID, CUST_REF, COPIES
|
No view, report is rendered using pass through parameters
|
|
ItemDetailReport
|
ITEMID, STOREID, Store_Timezone, COPIES
|
STORE_SEQUENCE_ITEM, STORE_SEQUENCE_AREA, REPORT_FORMAT,
ALLOCATION, ITEM, WAREHOUSE, RPRT_ITEM_DETAIL_V
|
|
ItemRequestReport
|
Item_Request_ID, Store_Timezone, COPIES
|
rprt_item_request_v
|
|
ReturnReport
|
Return_ID, Store_Timezone, COPIES
|
RPRT_RETURN_V
|
|
ShelfAdjustmentReport
|
SHELF_ADJUST_ID, Store_Timezone, COPIES
|
RPRT_SHELF_ADJUST_V
|
|
ShelfReplenishmentReport
|
SHELF_REPLENISH_ID, Store_Timezone, COPIES
|
RPRT_SHELF_REPLENISH_V
|
|
StockCountAllLocReport
|
STORE_ID, STOCK_COUNT_ID, COPIES
|
RPRT_STOCK_COUNT_V
|
|
StockCountExportReport
|
STOCK_COUNT_ID, COPIES
|
stock_count_line_item
|
|
StockCountRejectedItemReport
|
STORE_ID, COPIES
|
RPRT_STOCK_COUNT_NOF_V
|
|
StockCountReport
|
STOCK_COUNT_ID, LOCATION_ID, Store_Timezone, PHASE, COPIES
|
RPRT_STOCK_COUNT_V
|
|
StoreOrderReport
|
STORE_ORDER_ID, COPIES
|
print_store_order, print_store_order_item, store
|
|
TransferReport
|
Transfer_ID, Store_Timezone, COPIES
|
RPRT_TRANSFER_V
|
|
WarehouseDeliveryReport
|
Document_ID, Store_Timezone, COPIES
|
RPRT_WAREHOUSE_SHIPMENT_V
|
The following section describes the report formats.
Figure: BolReturnReport

Figure: BolTransferReport

Figure: CustomerOrderBinLabelReport
Figure: CustomerOrderDeliveryBOLReport
Figure: CustomerOrderDeliveryReport
Figure: CustomerOrderPickDiscrepancyReport
Figure: CustomerOrderPickReport
Figure: CustomerOrderReport
Figure: CustomerOrderReversePickReport
Figure: DirectDeliveryDiscrepantItemsReport
Figure: DirectDeliveryReport
Figure: InventoryAdjustmentReport

Figure: ItemBasketDefaultReport
Figure: ItemDetailReport
Figure: ItemRequestReport
Figure: ReturnReport
Figure: ShelfReplenishmentReport

Figure: StockCountAllLocReport
Figure: StockCountRejectedItemReport
Figure: StockCountReport
Figure: StoreOrderReport

Figure: TransferReport

Figure: WarehouseDeliveryReport

Figure: ShelfAdjustmentReport
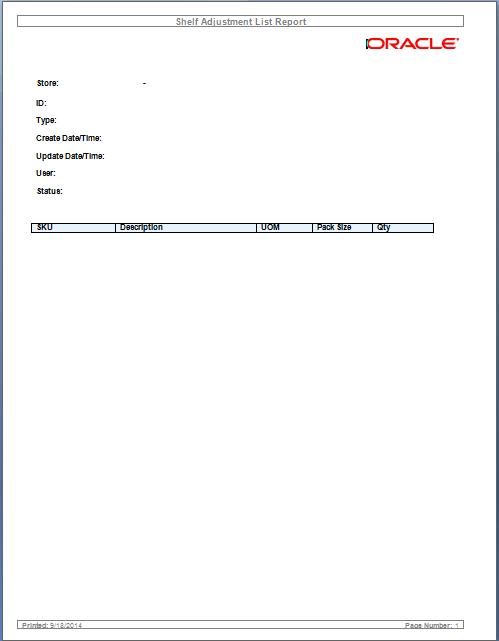
To configure a report printer in SIM, go to Admin > Print
Setup > Printers. A screen opens, displaying a list of retail store
printers. Users can add, delete, and edit printers for the user’s store. The
system will allow a user to use the routing code to setup third party printing
systems. The system can be configured to use either BI Publisher or a third
party printing system, but not both at the same time.
SIM can be setup to automatically print a manifest or
pre-shipment ticket or label to a printer at another location. To configure a
session printer in SIM, go to Print > Session Printer. A screen opens,
displaying the Manifest and Pre-Shipment format. Users can set printers for the
user’s store.
The directory sim/bip_reports holds all SIM reports. For every
report, there would be two folders<report_name>Report.xdm and
<report_name>Report.xdo. These folders can be readily imported to the BI
publisher (BIP) server. All the reports are pre-configured with datasource name
BIP-SIM-DATASOURCE. A datasource with this exact name and appropriate jdbc
connection string will have to be set up on the BIP server. In addition, all
SIM operational reports need to be uploaded to the specific user’s folder that
is accessing SIM reports. They may also be placed in the Guest folder to
provide shared access.
The .rtf templates may be modified or customized as needed using
the BI Publisher Template builder plug-in for Word.
Setting up the BI Publisher Server
1. Create
a user and assign the BI Publisher Scheduler role, in addition to other
reporting roles.
2. Create
a new jdbc connection with datasource name BIP-SIM-DATASOURCE.
3. If
you will print directly to a printer, create the printer in BIP. This printer
server name will be used in STORE_PRINTER.NETWORK_ADDRESS in SIM. If a CUPS
server is used, this will be set as <cups_server_name>/<printer_name> in STORE_PRINTER.NETWORK_ADDRESS.
4. When
STORE_PRINTER.NETWORK_ADDRESS is set to browser (case
insensitive), for any report in SIM, press Print to
launch the report in a browser instead of printing to a physical printer. This
is only possible when using the SIM PC client. This feature is useful in
initial stages of implementation, or if it is preferred to view the report in a
browser.
5. If
STORE_PRINTER.STORE_PRINTER_TYPE_CODE is set to 1 (for
postscript printing), the BI Publisher server will output the report in PDF
format. If the STORE_PRINTER_TYPE_CODE is set to 2 (for
ticket printing), the BI Publisher server will output the report in raw XML
format (also known as DATA format in BI Publisher). This is to enable printing
to a label printer, like Zebra printer, using a Custom Filter in BI Publisher.
Printing Labels and Tickets on a Label Printer
SIM was tested for printing labels and tickets on a Zebra label
and ticket printer. This is achieved by using ZebraLink Enterprise Connector
(ZEC) for Oracle BI Publisher. ZEC intercepts raw XML data coming from Oracle
BI Publisher and applies a ZPL (Zebra Programming Language) template to create
a ZPL stream understood by Zebra printers.
For testing, BI Publisher was configured to output reports in
raw XML format, which was redirected to ZEC to print to Zebra printer. ZEC
works with a wide range of Zebra printers.
Printing Labels and Tickets on a Third Party Printing System
See the Oracle Retail Store Inventory
Management Implementation Guide 4 (Extension Solutions) for suggestions
on configuring SIM to use a third party printing solution.
Setting up SIM
Select the Reporting topic on the SIM System Admin Config screen.
The following options need to be set up:
|
Table: Setting Up SIM Reports
|
|
Option
|
Value
|
|
Reporting Tool URL
|
http://<bip_host>:<bip_port>/<bip_deployment>.
This URL is used as the reference to the BIP deployment for printing reports
and viewing reports from the SIM PC client in a browser.
|
|
Note
<BIP_REPORTS_USER> is the
reports user that has been created in BI Publisher server to access SIM
reports.
|
UDA Print Setup
Go to Admin > Print Setup > UDA Print Setup.
If the UDA is defined on this screen, then when an item UDA is
changed, the item UDA is sent to ticketing for a label, ticket or both, based
upon definition on this screen.
Report Formats are configured in SIM through Admin>
Print Setup > Print Format screen. See the Oracle
Retail Store Inventory Management User Guide to add/modify/delete report
formats. Multiple formats can be defined for each report type. For a report
type, the formats screen enables the user to assign at least one format as the
default format. This screen is also used to manage ticket and label formats.
The user will select Reporting Formats from the Format Category drop down to
work with report formats.
Figure: Report Formats Screen
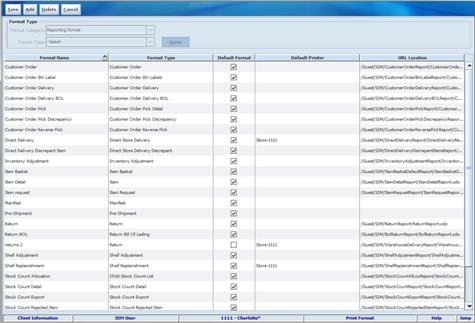
After the SIM reports are uploaded to BI Publisher, the URL
location for each report type must be set as follows:
|
Table: Report URL Locations
|
|
Type
|
URL Location
|
|
Child Stock Count List
|
@reoprt.template.root.folder@/ChildStockCountList All Loc
|
|
Customer Order Report
|
<BIP_SIM_REPORTS_FOLDER>/SIM/CustomerOrderReport/CustomerOrderReport.xdo
|
|
Customer Order Bin Label Report
|
<BIP_SIM_REPORTS_FOLDER>/SIM/CustomerOrderBinLabelReport/CustomerOrderBinLabelReport.xdo
|
|
Customer Order Delivery Report
|
<BIP_SIM_REPORTS_FOLDER>/SIM/CustomerOrderDeliveryReport/CustomerOrderDeliveryReport.xdo
|
|
Customer Order Delivery BOL Report
|
<BIP_SIM_REPORTS_FOLDER>/SIM/CustomerOrderDeliveryBOLReport/CustomerOrderDeliveryBOLReport.xdo
|
|
Customer Order Pick Report
|
<BIP_SIM_REPORTS_FOLDER>/SIM/CustomerOrderPickReport/CustomerOrderPickReport.xdo
|
|
Customer Order Pick Discrepancy Report
|
<BIP_SIM_REPORTS_FOLDER>/SIM/CustomerOrderPickDiscrepancyReport/CustomerOrderPickDiscrepancyReport.xdo
|
|
Customer Order Reverse Pick Report
|
<BIP_SIM_REPORTS_FOLDER>/SIM/CustomerOrderReversePickReport/CustomerOrderReversePickReport.xdo
|
|
Direct Delivery Report
|
<BIP_SIM_REPORTS_FOLDER>/SIM/DirectDeliveryReport/DirectDeliveryReport.xdo
|
|
Direct Delivery Discrepant Items Report
|
<BIP_SIM_REPORTS_FOLDER>/SIM/DirectDeliveryDiscrepantItemsReport/DirectDeliveryDiscrepantItemsReport.xdo
|
|
Inventory Adjustment Report
|
<BIP_SIM_REPORTS_FOLDER>/SIM/InventoryAdjustmentReport/InventoryAdjustmentReport.xdo
|
|
Item Detail Report
|
<BIP_SIM_REPORTS_FOLDER>/SIM/ItemDetailReport/ItemDetailReport.xdo
|
|
Item Basket Default Report
|
<BIP_SIM_REPORTS_FOLDER>/SIM/ItemBasketDefaultReport/ItemBasketDefaultReport.xdo
|
|
Item Request Report
|
<BIP_SIM_REPORTS_FOLDER>/SIM/ItemRequestReport/ItemRequestReport.xdo
|
|
Stock Count Export Report
|
<BIP_SIM_REPORTS_FOLDER>/SIM/StockCountExportReport/StockCountExportReport.xdo
|
|
Return Report
|
<BIP_SIM_REPORTS_FOLDER>/SIM/ReturnReport/ReturnReport.xdo
|
|
Bol Return Report
|
<BIP_SIM_REPORTS_FOLDER>/SIM/BolReturnReport/BolReturnReport.xdo
|
|
Shelf Adjustment Report
|
<BIP_SIM_REPORTS_FOLDER>/SIM/ShelfAdjustmentReport/ShelfAdjustmentReport.xdo
|
|
Shelf Replenishment Report
|
<BIP_SIM_REPORTS_FOLDER>/SIM/ShelfReplenishmentReport/ShelfReplenishmentReport.xdo
|
|
Stock Count Report
|
<BIP_SIM_REPORTS_FOLDER>/SIM/StockCountReport/StockCountReport.xdo
|
|
Stock Count Rejected Item Report
|
<BIP_SIM_REPORTS_FOLDER>/SIM/StockCountRejectedItemReport/StockCountRejectedItemReport.xdo
|
|
Store Order Report
|
<BIP_SIM_REPORTS_FOLDER>/SIM/StoreOrderReport/StoreOrderReport.xdo
|
|
Transfer Report
|
<BIP_SIM_REPORTS_FOLDER>/SIM/TransferReport/TransferReport.xdo
|
|
Bol Transfer Report
|
<BIP_SIM_REPORTS_FOLDER>/SIM/BolTransferReport/BolTransferReport.xdo
|
|
Warehouse Delivery Report
|
<BIP_SIM_REPORTS_FOLDER>/SIM/WarehouseDeliveryReport/WarehouseDeliveryReport.xdo
|
|
Note
<BIP_SIM_REPORTS_FOLDER>
is the folder where SIM reports have been uploaded on the BI Publisher
server. For example, if SIM reports have been uploaded to the Guest folder,
the folder is /Guest.
|
Create a translation (XLIFF) file. For different supported
locales, a separate XLIFF file is provided to the BI Publisher. During run
time, BI Publisher picks up the default template (RTF) file and the
corresponding XLIFF (xlf) file.
Do the following to create an XLIFF file:
1. Install
Oracle BI Publisher Desktop. You will see the following options in Microsoft
Word:
§ Data
§ Insert
§ Preview
§ Tools
§ Help
Figure: Oracle BI Publisher
Desktop Options in Word

2. Open
any existing template in Word, for example, TransferReport.rtf.
Figure: TransferReport.rtf
3. Localize
the template by selecting Tools> Option>
Preview>Locale.
Figure: Localize the Template

This locale name will appear in the source-language
attribute of the XLIFF file.
4. From
the Template Builder menu, select Tool>Translate
Template>Extract Text.
Figure: Extract Text for Export
to XLIFF File

Template Builder extracts the translatable strings from
the template and exports them to an XLIFF (.xlf) file.
5. Save
the XLIFF file.
Figure: Save the XLIFF File

6. The
XLIFF file generated by XML Publisher has the following structure:
<?xml version = '1.0' encoding = 'utf-8'?>
<xliff version='1.0'>
<file source-language="en_US"
target-language="en_US"
datatype="XDO"
original="orphan.xlf"
product-version="orphan.xlf" product-name="">
<header/>
<body>
<trans-unit id="e67afb09"
maxbytes="4000" maxwidth="23" size-unit="char"
translate="yes">
<source>Transfer
Report</source>
<target>Transfer Report IN ENGLISH
LANGUAGE</target>
<note>Text located: header/table</note>
</trans-unit>
<trans-unit id="7f65664e"
maxbytes="4000" maxwidth="23" size-unit="char"
translate="yes">
<source
xml:space="preserve">Printed: </source>
<target
xml:space="preserve">Printed: </target>
<note>Text located: footer/table</note>
</trans-unit>
<trans-unit id="b230538"
maxbytes="4000" maxwidth="26" size-unit="char"
translate="yes">
<source
xml:space="preserve">Page Number: [&0] </source>
<target
xml:space="preserve">Page Number: [&0] </target>
<note>Text located: footer/table</note>
</trans-unit>
The <file> element includes the
attributes source-language and target-language.
The valid value for source-language and target-language is a
combination of the language code and country code:
§
Language Code: the two-letter ISO language code (in lowercase).
§
Territory Code: the two-letter ISO country code (in uppercase).
The <source> element contains a
translatable string from the template in the source language of the template.
The <target> element contains the
translated string as per locale.
Different XLIFF (xlf) files can be created by providing
translated strings to each <target> element and by specifying a
target-language value as per naming convention.
Template/XLIFF(xlf) File Locale Selection Logic
At run time, BI Publisher picks up the default template provided
in <ReportName>.xdo, then applies a translation
based on the user’s selected Report Locale. First, BI Publisher tries to match
an XLIFF file named for the locale, and if an exact match on language-territory
is not found, then BI Publisher tries to match on language only.
For example, if you have a report for which the base template is
TransferReport.rtf, and the locale is Japanese (ja_JP), then the order of
preference in descending order is:
§
TransferReport_ja_JP.rtf
§
TransferReport_ja_JP.xlf
§
TransferReport_ja.rtf
§
TransferReport_ja.xlf
§
TransferReport.rtf
As soon as BI Publisher finds a matched template (RTF)/XLIFF
file, it applies the translation and layout for the report.
BI Publisher supports number, date and currency formats by
specifying BI Publisher format tasks.
1. Open
any existing template in Word, for example, TransferReport.rtf.
Figure: Template and Placeholder
of the XML Tag

|
Click the <ITEM> tag.
In the Text Form
Field Options window, select Regular Text in the Type
list.
|
Figure: Text Form Field Options
Window
1. Click
Add Help Text.
2. In
the Form Field Help Text window, enter the formats for number, currency or
date.
Figure: Form Field Help Text
Window
The following are example formats for number, currency and date:
Example: Number Format
<?format-number; ‘NUMBER’;'999g999D99'?>
Where NUMBER is the <XML> tag.
Example: Currency Format
<?format-currency;CURRENCY;'CurrencyCode'?>
Where CURRENCY is the <XML> tag,
and Currency Code should be ISO specific
(‘JPY’,’USD’).
Example: Date Formats
<?format-date:date_string;
’ABSTRACT_FORMAT_MASK’;’TIMEZONE’?>
or
<?format-date-and-calendar:date_string; ’ABSTRACT_FORMAT_MASK’;’CALENDAR_NAME’;’TIMEZONE’?>
Where:
§
TimeZone is optional.
§
If no format mask is specified, the abstract format mask
"MEDIUM" is used as default.
Additional Setting for Currency Format
The following format should be specified in the xdo.cfg file.
Example: Currency Format in xdo.cfg File
<config version="1.0.0"
xmlns="http://xmlns.oracle.com/oxp/config/">
/*********************************************************************/
<currency-formats>
<currency code="USD"
mask="999D99L"/>
<currency code="JPY"
mask="999D9999X"/>
</currency-formats>
/**********************************************************************/
</config>
The xdo.cfg file should be uploaded to BI Publisher Server in
zipped format along with the xdo, RTF and XLIFF files. See Uploading Reports for more information.
It is possible on the PC to print multiple reports at the same
time to different individual printers or browser sessions.
The handheld will print the report that has been setup as the
default option. If no default printer has been set up, the user is prompted to
select the printer to print to.
The reporting functionality incorporates error handling when
reports are printed. Error handling allows the user to continue in the event
that the printing effort fails.
The following describes the functional requirements.
SIM Report List
The following reports can be printed:
§
Direct Delivery
§
Item Request
§
Shelf Adjustment
§
Shelf Replenishment
§
Customer Order
§
Warehouse Delivery
§
Returns
§
Stock Count/Stock Recount
§
Store Order
§
Transfers
§
Item Report
§
Inventory Adjustment
§
Bill of Lading Report–Returns and Transfers
The following includes detailed report information.
Direct Delivery Report
Direct Delivery occurs when the supplier drops off merchandise
directly to the retailer’s store. This report allows the retailer to print a
delivery receipt once all items have been received and the delivery has been
finalized.
It consists of the following information broken into three
sections:
Header
§
Receipt Date–Date on which the receipt was created
§
Supplier–Supplier for the PO/ASN received
§
Store–Store at which goods were received
§
PO Number–PO against which goods were received
§
Invoice–Invoice number for the receipt
§
Invoice Date–Invoice date for the receipt
§
Comments
Detail
§
Item ID–Item number for each line item received
§
Item Description–Description of item
§
Unit of Measure–Unit of measure for quantity (Cases or Eaches)
§
Quantity Ordered–Quantity ordered according to the PO
§
Quantity Shipped–Quantity shipped according to the shipment
record
§
Quantity Received–Quantity actually received
§
Unit Cost–Unit cost of the direct delivered item–this column is
displayed based on the system parameter
(DISPLAY_UNIT_COST_FOR_DIRECT_DELIVERIES) being set
Totals
Totals are provided for the Ordered/Shipped and Received
quantities.
A section is also provided as a space holder to collect the
signatures of the persons involved in the transaction.
Item Request Report
The item request functionality allows users to request inventory
for individual items to manage stock shortages and increased demand. The
requests are processed by the RMS using the replenishment parameters and
sourcing information setup in RMS. The report allows the store users to print
the details of item requests that have been generated.
The report consists of two sections with the following
information:
Header
§
Store–Store ID and name
§
Request ID–Request ID referencing the request in the SIM system
§
Expiration Date–Date setup to automatically close item requests
that have been automatically generated by the product group scheduler, if no
action has been taken
§
Request Delivery date–Date on which requested product is wanted
at the store
§
User–User who generated the item request
§
Comments–Additional information
Detail
§
Item–Item number for each line item requested
§
Short Description–Description of item
§
SOH–Current available on hand inventory for the item
§
In Transit–Current inventory in transit to the store
§
UOM–Unit of measure for the request
§
Pack Size–Pack size for the item
§
Quantity–Quantity requested
Shelf Adjustment Report
The shelf adjustment report is related to shelf adjustment
functionality in shelf replenishment supported by SIM. Shelf adjustment in SIM
facilitates the creation of item lists for ad-hoc shelf replenishment along
with facilitating movement of product between the back room and the shop floor
and vice versa. Shelf Adjustment list can also be used to create replenishments
of items for display purpose at a store. The shelf adjustment report allows the
users to print the shelf adjustment list for operational purposes especially in
case of on-the-fly movement of products from back room to shop floor and vice
versa.
The report consists of two sections with the following
information:
Header
§
Store- Name and identifier of the store for which the shelf
adjustment was created
§
ID–Shelf adjustment list identifier used to uniquely identify a
shelf adjustment list
§
Type – the type of shelf adjustment list, the types can Move to
Shop-floor, move to backroom, ad-hoc and display list.
§
Create Date/Time–Date/Time when the shelf adjustment list was
created
§
Update Date/Time–Date/Time when the shelf adjustment list was last
updated
§
User–User who generated the shelf adjustment list
§
Status–Current status of the shelf adjustment list
Detail
§
SKU–Item number for each line item on the shelf adjustment list
§
Description–Description of item
§
UOM–Unit of measure for the item on the shelf adjustment list
§
Pack Size–Pack size for the item on the shelf adjustment list
§
Qty– Suggested quantity of the item on the shelf adjustment list
Shelf Replenishment Report
The shelf replenishment report is related to the shelf
replenishment functionality supported by SIM. Shelf replenishment in SIM
facilitates movement of product between the back room and the shop floor, for
the purpose of display or for sale. The shelf replenishment lists generate
replenishment items and quantities that need to be replenished to the shop floor.
The shelf replenishment list report allows the users to print the generated
shelf replenishment list for operational purposes (for example, to use as a
reference for the actual replenishing of product by the store associate).
The report consists of two sections with the following
information:
Header
§
Store- Name and identifier of the store for which the shelf replenishment
was created
§
ID–Shelf replenishment list identifier used to uniquely identify
a shelf replenishment list
§
Shelf replenishment Type: the type of shelf replenishment-
capacity, sales, Ad-hoc, Display List
§
Replenishment Mode: Whether the mode of replenishment is End of
day or Within Day
§
Product Group–Description of the product group, if, used to
generate the shelf replenishment list
§
Hierarchy – Hierarchy details which is populated only for a sales
based replenishment list
§
Shelf adjustment list – Identifier of the shelf adjustment list
if it was used for replenishment list creation
§
Create Date/Time–Date/Time when the shelf replenishment list was
generated
§
User–User who generated the shelf replenishment list
§
Status–Current status of the shelf replenishment list
§
Quantity–Total quantity to be replenished for the items in the
shelf replenishment list.
Detail
§
Item Id–Item number for each line item to be replenished
§
Item Description–Description of item
§
Pick From Area–Identifies where the product is to be replenished
from, could be either the back room or the delivery bay
§
Type – Replenishment Type
§
SUOM–Selling Unit of measure for the item to be replenished
§
Pack Size–Pack size for the item to be replenished
§
Qty– Requested quantity of the product to be replenished
§
Actual Qty–Actual quantity which was replenished for the product
Customer Order Report
The Customer Order Report in SIM displays all created picks and
will allow the user to print a report, create a new pick, filter pick records
and delete a pick.
Header
The report header consists of information for the pick and
contains the following information:
Pick ID–Unique identifier for the pick record
Status–The status of the customer order
Create Date–The date the customer order was created
Complete Date–The date the customer order was complete
Create User–Name of the user who created the customer order
Complete User–Name of the user who completed the customer order
Detail
Item–Unique identifier for the item
Description–Description of item
Primary Loc–The macro sequence location for the item
SIM Customer–The customer order ID number
Bind ID–identifier number for the bind
Fulfillment–ID number that does not need to be unique, the same
ID can exist for more than one customer order ID
UOM–The transaction unit of measure for the item on the customer
order
Pack Size–The size of the pack
Substitute–Y indicates the line item has substitutes and N
indicates the item does not have any substitutes
Adjusted Pick Qty–If cancellations/deliveries have occurred while
the user picked, this field will populate with the adjusted pick quantity based
on those order updates
Pick Qty–Suggested pick quantity generated by the system
Quantity–Actual amount being picked by the user
Type–Displays the type of pick
Pick Qty–Quantity of the product to be picked
Actual Qty–Actual quantity which was picked for the product
Warehouse Delivery Report
Warehouse deliveries in SIM refer to products that are sent from
a warehouse to the receiving store. Receiving for warehouse deliveries can be
either at the shipment, container, or item level. The warehouse delivery report
provides the ability to print details of the warehouse delivery shipments.
The report consists of two sections:
Header
The report header consists of information for the shipment and
contains the following information:
§
From–Originating Warehouse location details
§
To–Destination store location details
§
ASN # - Identifier for the shipment being received
§
Status–Status of the warehouse delivery
§
ETA–Expected arrival date of the warehouse delivery
Detail
The report detail is broken down by containers included in the
shipment and contains the following information:
§
Container–References the container label for the items that were
shipped. A shipment could consist of multiple containers, in which case the
report is grouped by containers
§
Item–Item number for each line item requested
§
Description–Description of item
§
UOM–Unit of measure for the item
§
Pack size–Pack size for the item
§
Expected–Quantity expected in the container
§
Received–Quantity actually received
§
Damaged–Quantity marked as damaged
§
Out of Stock–Indicates weather the product is currently out of
stock at the store
Return Report
The returns functionality allows the store to ship returns either
to the warehouse or directly to the vendor. The returns report can be printed
as used either as a packing slip for the shipment or as a report for
operational records of the store.
The report consists of two sections with the following
information:
Header
§
From–Origin store location and description
§
To–Destination location (could be either warehouse or supplier)
§
Return Number–Reference number that uniquely identifies the
return
§
Authorization Number–An authorization number from the vendor
referencing the document authorizing the return
§
Status/Date–The current status of the return and the date on
which the status was changed.
§
User–User who created the return
§
Not after date–Date after which the return cannot be dispatched
(relevant in case of return requests received from the merchandising system)
§
Comment–Additional information
Detail
§
Item–Item number for each line item on the returned
§
Description–Description of item
§
UOM–Unit of measure for the item
§
Pack Size–Pack size for the item
§
Qty–Quantity returned
§
Reason Code–Reason code for the return
Stock Count Report
SIM provides the functionality to schedule, perform and authorize
stock counts. The stock counts report provides the store users with the ability
to print out scheduled stock counts and use the printed list of record results
of the counting on the printed list before entering them into the system.
The report consists of two sections with the following
information:
Header
§
Description–Master stock count description
§
Date–Scheduled date for the master stock count
§
Total Items–Total number of items in the master stock count
§
Stock count user–User who last saved/completed the stock count
§
Recount user–User who last saved/completed the recount
Detail
§
Child Count Description–description of the child count appears as
a header to the detail section (separate header for each child count). For
guided counts, this will be the macro location name along with
shopfloor/backroom if sequencing is being used.
§
Item–Item number for each line item in the stock count
§
Description–Description of item
§
UOM–Unit of measure for the item
§
Count–Physical count results entered for the stock count
Stock Count Re-Count Report
SIM allows the store users to create and schedule stock counts
that will trigger an automatic recount when the counts fall outside a
pre-defined variance. In case a recount is triggered the stock count recount
report provides store users the ability to print out the stock counts that need
to be recounted and record the results of the recounts.
The report consists of two sections with the following
information:
Header
§
Description–Master stock count description
§
Date–Scheduled date for the master stock count
§
Total Items–Total number of items in the master stock count
§
Stock count user–User who last saved/completed the stock count
§
Recount user–User who last saved/completed the recount
Detail
§
Child Count Description–description of the child count appears as
a header to the detail section (separate header for each child count). For
guided counts, this will be the macro location name along with
shopfloor/backroom if sequencing is being used.
§
Item–Item number for each line item in the stock count
§
Description–Description of item
§
UOM–Unit of measure for the item
§
Count–Physical count results entered for the initial stock count
§
Recount–Count results for the recount of the stock count
Store Order Report
Store orders provide the store users the ability to create and
approve orders to a supplier or transfer requests to the warehouse directly in
the merchandising system. The store orders report allows the users to print out
the report of the order that had been created from the store.
The report consists of two sections with the following
information:
Header
§
Store–Store requesting the order
§
Store Order Number–Unique reference ID in SIM for the store order
§
Status–Current status of the store order. Valid values are Pending, Approved and Cancelled
§
Supplier/Warehouse–Source location for the store order
§
Creation Date–Date on which the store order was created
§
Not before date–Earliest date on which the order can be delivered
at the store
§
Not after date–Expiration date for the order
§
User–User who created the store order
§
Comments–Additional information
Details
§
Item–Item number for each line item in the store order
§
Description–Description of item
§
UOM–Unit of measure for the item (part of the quantity heading)
§
Qty–Requested quantity for the item
§
Unit cost–Unit cost of the requested item
Transfer Report
Transfer functionality allows stores to transfer stock from one
store to another within a company. The transfer report allows the store users
to print out the details of either a transfer or a transfer request. The
printed report can be used either as a dispatch slip for the transfer shipment
or for the store records.
The report consists of two sections with the following
information:
Header
§
Transfer from–Origin store location for the transfer
§
Transfer to–Destination store location for the transfer
§
Transfer number–Unique reference number for the transfer
§
Status/Date–Status of the transfer and the date on which the
status changed
§
Comment–Additional information
§
Dispatched–Date on which the transfer was dispatched
Details
§
Item–Item number for each line item in the transfer
§
Description–Description of item
§
UOM–Unit of measure for the item
§
Dispatched–Quantity of product dispatched
§
Received–Quantity of product received
Item Report
This is an Items report that is printed from the item detail
screen and the handheld. The report is based on the view Itemlocstock. This
report displays the following information:
§
SKU number/UPC
§
Description (long or short depending on parameter setting)
§
Diffs (if any)
§
Merchandise Hierarchy
§
Inventory Position (Available, unavailable, SOH, reserved)
§
Current price
§
Forward looking Delivery information (In transit, on order)
Inventory Adjustment Report
The inventory adjustment report allows the user to select an item
that has been adjusted, and print information out for this. The report could be
used to help as reference why inventory is unavailable (for example, loaning
out for a demo or photoshoot), and confirmation that someone has ownership of
that item.
The report consists of two sections with the following
information:
Header
§
Store–The store ID
§
Adjustment Number–Unique inventory adjustment number in SIM
§
Create Date–Date of creation
§
Complete Date–Date of completion
§
User–User requesting inventory adjustment
§
Status–Status Pending or Completed
§
Comments–Comments, if any
Details
§
Item–Item number
§
Item Description–Item description
§
UOM–Unit of measure
§
Pack Size–Pack size
§
Quantity–Quantity adjusted
§
Reason–Inventory adjustment reason
SIM users can print the Bill of Lading. The printed Bill of
Lading displays the status of the Bill of Lading through the appearance or
absence of watermarks on the Bill of Lading. A generic template for the Bill of
Lading is created and inserted into the format table.
The Bill of Lading report process is designed to allow retailers
to create a Bill of Lading report during a Returns or a Transfer dialogue and
print it.
The Bill of Lading consists of information that identifies the
sender, the receiver and the carrier of the goods. It also lists the goods and
their quantities that are being shipped. It identifies if the shipment is a
result of a return or a transfer.
The process consists of two parts, creating the Bill of Lading
and printing the Bill of Lading.
The Bill of Lading creation occurs in two stages. During the
first stage, the Bill of Lading is automatically created when a shipment is
created and saved. During the second stage, the Bill of Lading is updated when
the retailer adds additional information to the transaction for the purpose of
the Bill of Lading report such as requested pickup date, change of destination
address, carrier name and address and change of motive for the shipment.
Detailed information for a Return or Transfer such as the quantity being
shipped or the items being shipped can be modified at any time prior to the
dispatching of a shipment. The Bill of Lading is updated to reflect these
changes.
The second part of the process occurs when the retailer prints
the Bill of Lading. The Bill of Lading can be printed at anytime during the
creation of a transfer or return. It is printed from the Return List screen or
the Transfer List screen. It can be printed after the Return or Transfer is
canceled (status = canceled) or after the transfer is
dispatched. Each of these scenarios results in a variation of the Bill of
Lading report. For example, if a Bill of Lading is printed prior to
dispatching, the Bill of Lading will have a watermark across the page that
reads DRAFT.
If the Bill of Lading is printed after dispatching it will have
no watermark on it. If the Bill of Lading is printed after the Transfer or
Return has been deleted (status = canceled), the Bill
of Lading will have a watermark across the page that reads Canceled.
Print the Bill of Lading from the Return List screen.
The default filter for the Return List screen will be changed to
include displaying dispatched returns with the current session.
1. If
the return is in the In Progress state, the Bill of Lading prints with the
watermark DRAFT on each page of the Bill of Lading.
2. If
the return has been dispatched and it no longer appears on the List screen. use
the filter to display the dispatched return.
3. The
Bill of Lading prints without any watermarks.
4. If
the return has been cancelled, use the filter to display the cancelled return.
The Bill of Lading will print with the watermark CANCELED on each page of the Bill of Lading.
The Bill of Lading can be printed from the Transfer List screen.
If the Transfer does not appear on the List Screen, the filter must be used to
display the Transfer.
1. If
the transfer is in the In Progress state, the Bill of Lading prints with the
watermark DRAFT on each page of the Bill of Lading.
2. If
the transfer is in the Dispatched state, the Bill of Lading prints without any
watermarks.
3. If
the transfer has been cancelled, the Bill of Lading prints with the watermark CANCELED on each page of the Bill of Lading.
7
Internationalization is the process of creating software that can
be translated easily. Changes to the code are not specific to any particular
market. SIM has been internationalized to support multiple languages.
This section describes configuration settings and features of the
software that ensure that the base application can handle multiple languages.
Translation is the process of interpreting and adapting text from
one language into another. Although the code itself is not translated,
components of the application that are translated may include the following,
among others:
§
Graphical user interface (GUI)
§
Error messages
The following components are not usually translated:
§
Documentation (Online Help, Release Notes, Installation Guide,
User Guide, Operations Guide)
§
Batch programs and messages
§
Log files
§
Configuration Tools
§
Reports
§
Demonstration data
§
Training Materials
The user interface for SIM has been translated into:
§
Chinese (Simplified)
§
Chinese (Traditional)
§
Croatian
§
Dutch
§
French
§
German
§
Greek
§
Hungarian
§
Italian
§
Japanese
§
Korean
§
Polish
§
Portuguese (Brazilian)
§
Russian
§
Spanish
§
Swedish
§
Turkish
The following section describes the DAO layer.
Three tables exist in the database to support
internationalization: TRANSLATION_LOCALE, TRANSLATION_KEY and
TRANSLATION_DETAIL. Details about these tables can be found in the SIM Data
Model documentation. The last remaining table used in the process is the
SECURITY_USER table. The LANGUAGE and COUNTRY columns are used to determine the
country and language of the employee that logs in. Alternatively, the locale
information for an employee can be filled in from an LDAP connection. The
employee’s locale is matched with the TRANSLATION_LOCALE table to retrieve
translation information.
Data load scripts populate the TRANSLATION_LOCALE table on
installation. Upon data load, one record is created in the TRANSLATION_DETAIL
table for each key in the TRANSLATION_KEY table paired with each locale id in
the TRANSLATION_LOCALE table.
When retrieving translations, the displayable text is first
retrieved from the TRANSLATION_DETAIL table for the locale and key involved. If
this value is missing or the DETAIL_VALUE column is empty, then the KEY value
is returned from the TRANSLATION_KEY table as both the key and the value.
When retrieving translations for a locale, the detail value is
read from the TRANSLATION_DETAIL table for the language (with country and
variant set to null). If a country exists in the locale, the country
information is read from the DETAIL table and its values replace those read for
the language. If a variant exists, the variant information is read from the
DETAIL table and its values replace those of the language and country. Of
course, this only occurs if an actual translation is found at the country and
variant level (it will not suddenly null out the language value).
The following section describes the types of
internationalization.
Service layer error message logging does not attempt to translate
the information at this time.
All text such as labels, error messages, and some fixed data, is
translated when displayed on the PC or HH client based on the current user’s
assigned locale. Altering how this functions requires customization.
All numbers are displayed in a localized format on the PC or HH
client based on the locale assigned to the current store being accessed by the
application. Altering how this functions requires customization.
All dates are displayed in a localized format on the PC client
based on the locale assigned to the current store being accessed by the
application. Altering how this functions requires customization.
There are four dates allowed within the system following a
standard java convention: SHORT, MEDIUM, LONG and FULL. In addition, the format
values for each of the date formats will be standard JAVA format sequences by
default. These default values can be overridden in the Date.cfg file by
defining the JAVA format sequence to use for the date format type.
The Date.cfg file keys begin with the 2-character language and
country code for the locale to be formatted. This is followed by the .dateType
to be formatted. The format value must be in standard java convention.
firstDayOfWeek determines the first day of week to be displayed on calendars.
wirelessInput is the entry parser of handheld date entry fields. wirelessOutput
is the date formatting of handheld date entry fields. wirelessDisplay is for
handheld date display only.
Example: Date.cfg
# ENGLISH - AUSTRALIAN
#enAU.firstDayOfWeek=1
#enAU.entryDate=d/MM/yy
#enAU.shortDate=d/MM/yy
#enAU.mediumDate=d/MM/yyyy
#enAU.longDate=d MMMM yyyy
#enAU.fullDate=EEEE, d MMMM yyyy
enAU.monthPattern=MM-dd
enAU.wirelessInput=dd-MM-yy,ddMMyy
enAU.wirelessOutput=dd-MM-yy
enAU.wirelessDisplay=dd-mm-yy
enAU
SimMoney is displayed on the PC & HH clients based on the
locale of the current store. This will not affect the currency of the monetary
unit. For example, if the locale is France and the currency is U.S. dollars,
the currency will display as USD based on formatting rules of France.
This white paper explains how to configure the Wavelink Client to
display Japanese text.
The following document is available through My Oracle Support
(formerly MetaLink). Access My Oracle Support at the following URL:
https://support.oracle.com
Oracle Retail White Paper: Oracle Retail Store
Inventory Management Handheld Device Configuration for Japanese Display (Doc ID: 601817.1)
The business process selected to support SIM in Brazil is based
on the logic that no receipt can take place until a Nota Fiscal (NF) has been
confirmed at the receiving store. A Nota Fiscal document is similar to an
invoice or bill of lading (BOL), but specific to Brazil. It contains
quantities, cost, taxes, to and from location information.
SIM does not have specific Brazil indicators, but rather many
specialized system options and security permissions allowing for a more
flexible deployment. These indicators need to be set in the suggested configuration
or ORFM might not function correctly.
DSDs in Brazil are not allowed to be started until a Nota Fiscal
has been entered. Also, a Nota Fiscal cannot be entered until a PO is created.
As such, users should be set up to not allow DSD PO creation nor should they be
able to create ASNs in SIM.
If any quantities are added above the expected receipt, the user
should remove the physical extra quantities or unexpected items when
confirming. The user must scan the extra quantities, and SIM will prompt the
user that they should be removed. The unexpected items or overage quantities
will be published separately from the expected quantities so ORFM can generate
the necessary return documentation.
The following store/system parameters should be set:
§
Auto Remove DSD over-receiving – True
§
Auto remove DSD damaged items – True
The following security options for both PC and HH should not be
granted:
§
Create Direct Delivery
§
Review Direct Delivery
§
Create new Purchase Order
§
Create new ASN
Warehouse Deliveries and Store to Store Transfer are not allowed
to have any discrepancies from the Nota Fiscal. To enforce this process SIM
will auto receive the warehouse and transfer deliveries coming from ORFM. This
means that no detailed receiving is allowed.
After SIM receives the ASN from the warehouse, or the other
store, SIM will get a second ASN notice that will trigger the auto receiving
process. This means that users should be prevented from adjusting the transfer
of warehouse delivery.
The following store parameters should be set:
§
Warehouse Auto Receive – External message
§
Store Auto Receive – External message
In addition, all stores should be set up for auto-receiving.
Since no receiving is allowed for warehouse deliveries, only the
following security privileges should be granted:
§
Access Warehouse Delivery – This enables the user to view the
warehouse deliveries, but not make any changes. No other Warehouse delivery
privileges should be granted.
Since no receiving is allowed for store deliveries, the following
transfer security privileges should not be granted:
§
Receive all items on transfer
§
Receive all on transfer
§
Receive item on transfer
§
Complete transfer Receipt
§
Receive transfer
§
Add item to transfer receipt
§
Complete transfer receipt
Receiver unit adjustments are not allowed in Brazil, so the
following system options need to be set:
§
Number of days Received Transfers can be adjusted – 0
§
Number of days received warehouse deliveries can be adjusted – 0
§
Number of days Direct Deliveries can be adjusted – 0
Vendor ASNs
Vendor-created ASNs are not supported, since the only valid
receipts that can be made are against the NF.
Serialization
Because detailed receiving is not supported in Brazil, it is not
possible to register or use UINs.
A Appendix
The table
below describes the permissions supported by SIM.
|
Table: SIM Permissions
|
|
Permission
|
Type
|
Topic
|
Usage
|
|
|
Access Admin
|
PC
|
Admin
|
With this permission, the Admin
button on the SIM Login screen is displayed and enabled.
Without this permission, the button is not displayed.
|
|
|
Access Auto-Receive Stores
|
PC
|
Admin
|
With this permission, the Auto-Receive
Stores button on the Store Admin screen is displayed and enabled.
Without this permission, the button is not displayed.
|
|
|
Access Buddy Store
|
PC
|
Admin
|
With this permission, the Buddy Store
button on the Store Admin screen is displayed and enabled.
Without this permission, the button is not displayed.
|
|
|
Access Container Lookups
|
Handheld
|
Admin
|
With this permission the Container Lookup menu option on
the Lookups menu is displayed.
Without this permission the menu option is not displayed.
|
|
|
Access Container Lookup
|
PC
|
Admin
|
With this permission, the Container
Lookup button on the Lookups screen is displayed and enabled.
Without this permission, the button is not displayed.
|
|
|
Access Customize Translations
|
PC
|
Admin
|
With this permission the Customize
Translations button on the UI Config screen is displayed and enabled.
Without this permission, the button is not displayed.
|
|
|
Access Extended Attribute
|
PC
|
Admin
|
With thie permission the Ext. Attribute button on
the Setup screen is displayed and enabled.
Without this permission, the button is not displayed.
|
|
|
Access Extended Attribute Dept. Assign
|
PC
|
Admin
|
With this permission, the Assign to Dept. button on
the Extended Attributes screen is displayed and enabled. Without this
permission, the button is not displayed.
|
|
|
Access Extended Attribute Setup
|
PC
|
Admin
|
With this permission, the Setup Attributes button
on the Extended Attributes screen is displayed and enabled.
Without this permission, the button is not displayed.
|
|
|
Access Finisher Lookup
|
PC
|
Admin
|
With this permission, the Finisher Lookup button on the
Lookups screen is displayed and enabled.
Without this permission the button is not displayed.
|
|
|
Access Formats
|
PC
|
Admin
|
With this permission, the Print Format
button on the Print Setup screen is displayed and enabled.
Without this permission, the button is not displayed.
|
|
|
Access Hierarchy Format
|
PC
|
Admin
|
With this permission, the Hierarchy Format button
on the Print Setup screen is displayed and enabled.
Without this permission, the button is not displayed.
|
|
|
Access Inventory Adjustment Reason
|
PC
|
Admin
|
With this permission the Inv. Adj. Reason
button on the Setup screen is displayed and enabled.
Without this permission, the button is not displayed.
|
|
|
Access Inventory Management
|
Handheld
|
Admin
|
With this permission the Inv. Management menu option on
the Main menu is displayed.
Without this permission the menu option is not displayed.
|
|
|
Access Inventory Management
|
PC
|
Admin
|
With this permission, the Inventory Mgmt
button on the SIM Login screen is displayed and enabled.
Without this permission, the button is not displayed.
|
|
|
Access Item Lookups
|
Handheld
|
Admin
|
With this permission the Item Lookups menu option on the
Lookups menu is displayed.
Without this permission the menu option is not displayed.
|
|
|
Access Item Lookup
|
PC
|
Admin
|
With this permission, the Item Lookup
button on the Lookups screen is displayed and enabled.
Without this permission, the button is not displayed.
|
|
|
Access Lookups
|
Handheld
|
Admin
|
With this permission the Lookups menu option on the Main
menu is displayed.
Without this permission the menu option is not displayed.
|
|
|
Access Lookup
|
PC
|
Admin
|
With this permission, the Lookups
button on the SIM Login screen is displayed and enabled.
Without this permission, the button is not displayed.
|
|
|
Access MPS Staged Messages
|
PC
|
Admin
|
With this permission, the MPS Staged
Messages button on the Technical Maintenance screen is displayed and
enabled.
Without this permission, the button is not displayed.
|
|
|
Access MPS Work Types
|
PC
|
Admin
|
With this permission, the MPS Worker
Types button on the Technical Maintenance screen is displayed and
enabled.
Without this permission, the button is not displayed.
|
|
|
Access Print
|
PC
|
Admin
|
With this permission, the Print button on the SIM
Login screen is displayed and enabled.
Without this permission, the button is not displayed.
|
|
|
Access Printers
|
PC
|
Admin
|
With this permission, the Printers
button on the Print Setup screen is displayed and enabled.
Without this permission, the button is not displayed.
|
|
|
Access Product Groups
|
PC
|
Admin
|
With this permission, the Product Group
button on the Admin screen is displayed and enabled.
Without this permission, the button is not displayed.
|
|
|
Access Product Group Schedules
|
PC
|
Admin
|
With this permission, the Product Group
Schedule button on the Admin screen is displayed and enabled.
Without this permission, the button is not displayed.
|
|
|
Access Report
|
PC
|
Admin
|
With this permission, the Reports
button on the SIM Login screen is displayed and enabled.
Without this permission, the button is not displayed.
|
|
|
Access Return Reasons
|
PC
|
Admin
|
With this permission, the Return Reason
button on the Setup screen is displayed and enabled.
Without this permission, the button is not displayed.
|
|
|
Access Session Printer
|
Handheld
|
Admin
|
With this permission the Session Printer menu option on
the Main menu is displayed.
Without this permission the menu option is not displayed.
|
|
|
Access Session Printer
|
PC
|
Admin
|
With this permission, the Session Printer button on
the Print Setup screen is displayed and enabled.
Without this permission, the button is not displayed.
|
|
|
Access Setup
|
PC
|
Admin
|
With this permission the Setup
button on the Admin screen is displayed and enabled.
Without this permission, the button is not displayed.
|
|
|
Access Shipping and Receiving
|
Handheld
|
Admin
|
With this permission the Shipping/Receiving menu option on
the Main menu is displayed.
Without this permission the menu option is not displayed.
|
|
|
Access Shipping Receiving
|
PC
|
Admin
|
With this permission, the Shipping/Receiving
button on the SIM Login screen is displayed and enabled.
Without this permission, the button is not displayed.
|
|
|
Access SIM Managed Store
|
PC
|
Admin
|
With this permission, the SIM Managed
Stores button on the SIM Stores screen is displayed and enabled.
Without this permission, the button is not displayed.
|
|
|
Access SIM Store
|
PC
|
Admin
|
With this permission, the SIM Stores
button on the Setup screen is displayed and enabled.
Without this permission, the button is not displayed.
|
|
|
Access Store Admin
|
PC
|
Admin
|
With this permission, the Store Admin
button on the Setup screen is displayed and enabled.
Without this permission, the button is not displayed.
|
|
|
Access Store Defaults Admin
|
PC
|
Admin
|
With this permission, the Store Defaults
Admin button on the Setup screen is displayed and enabled.
Without this permission, the button is not displayed.
|
|
|
Access Supplier Lookup
|
Handheld
|
Admin
|
With this permission the Supplier Lookup menu option on
the Lookups menu is displayed.
Without this permission the menu option is not displayed.
|
|
|
Access Supplier Lookup
|
PC
|
Admin
|
With this permission, the Supplier Lookup
button on the Lookups screen is displayed and enabled.It also is required to
display the Primary Supplier button on the Item Detail screen.
Without this permission, the button is not displayed.
|
|
|
Access System Admin
|
PC
|
Admin
|
With this permission, the System Admin
button on the Setup screen is displayed and enabled.
Without this permission, the button is not displayed.
|
|
|
Access Technical Maintenance
|
PC
|
Admin
|
With this permission the Technical
Maintenance button on the Admin screen is displayed and enabled.
Without this permission, the button is not displayed.
|
|
|
Access Tolerances
|
PC
|
Admin
|
With this permission the Tolerances
button on the Setup screen is displayed and enabled.
Without this permission, the button is not displayed.
|
|
|
Access Transaction History
|
PC
|
Admin
|
With this permission the Tran History
button on the Lookups screen is displayed and enabled.
Without this permission, the button is not displayed.
|
|
|
Access UDAs
|
Handheld
|
Admin
|
With this permission the View UDAs menu option is enabled
on the Item Lookup menu.
Without this permission, the menu option is not displayed.
|
|
|
Access UDAs
|
PC
|
Admin
|
With this permission, the UDA option button on the Item
Lookup screen is displayed and enabled.
Without this permission, the option button is not
displayed.
With this permission, the UDA Print Setup button on the
Print Setup screen is displayed and enabled.
Without this permission the screen is not displayed.
With this permission, the UDA Detail button on the Item
Detail screen is displayed and enabled.
Without this permission, the button is not displayed.
|
|
|
Access UI Configuration
|
PC
|
Admin
|
With this permission the UI Configuration
button on the Technical Maintenance screen is displayed and enabled.
Without this permission, the button is not displayed.
|
|
|
Activate Debugging in Client Log
|
PC
|
Admin
|
With this permission, the Repository tab on the Client
Status dialog is displayed, and the debug-activated check box on the Stats
tab will be enabled.
Without this permission, the repository tab is not
displayed and the debug-activated check box will be disabled.
|
|
|
Add Extended Attribute Department
|
PC
|
Admin
|
With this permission, the Add, Save and Cancel
buttons on the Assign Attributes screen are displayed and enabled.
Without this permission, the buttons are not displayed.
|
|
|
Add Inventory Adjustment Reason
|
PC
|
Admin
|
With this permission, the Add
button on the Inventory Adjustment Reason Maintenance screen is displayed and
enabled.
Without this permission, the button is not displayed.
|
|
|
Add Return Reasons
|
PC
|
Admin
|
With this permission, the Add
button on the Return Reason Maintenance screen is displayed and enabled.
Without this permission, the button is not displayed.
|
|
|
Create Product Groups
|
PC
|
Admin
|
With this permission, the Create
button on the Product Group List screen is displayed and enabled.
Without this permission, the button is not displayed.
|
|
|
Create Product Group Schedules
|
PC
|
Admin
|
With this permission, the Create
button on the Product Group Schedule List screen is displayed and enabled.
Without this permission, the button is not displayed.
|
|
|
Create Translations
|
PC
|
Admin
|
With this permission the Create
button on the Translation Details screen is displayed and enabled.
Without this permission, the button is not displayed.
|
|
|
Delete Extended Attribute Department
|
PC
|
Admin
|
With this permission, the Remove button on the
Assign Attributes screen is displayed and enabled.
Without this permission, the button is not displayed.
|
|
|
Delete Inventory Adjustment Reason
|
PC
|
Admin
|
With this permission the Delete
button on the Inventory Adjustment Reason Maintenance screen is displayed and
enabled.
Without this permission, the button is not displayed.
|
|
|
Delete Product Groups
|
PC
|
Admin
|
With this permission, the Delete
button on the Product Group List screen with be displayed and enabled.
Without this permission, the button is not displayed. If
the button is displayed, the user must also have the necessary data
permission for the product group the user is attempting to delete. If the
user is not authorized for the product group type, User is
not authorized to delete this type of Product Group.
|
|
|
Delete Product Group Schedules
|
PC
|
Admin
|
With this permission, the Delete
button on the Product Group Schedule List screen is displayed and enabled.
Without this permission, the button is not displayed. If
the button is displayed, the user must also have the necessary data
permission for the product group that is associated to the product group
schedule that is attempted to be deleted. If the user is not authorized for
the product group type, User is not authorized to delete
this type of Product Group Schedule.
|
|
|
Delete Return Reasons
|
PC
|
Admin
|
With this permission, the Delete
button on the Return Reason Maintenance screen is displayed and enabled.
Without this permission, the button is not displayed.
|
|
|
Delete Staged Messages
|
PC
|
Admin
|
With this permission the Delete
button on the MPS Staged Message Lookup screen is displayed and enabled.
Without this permission, the button is not displayed.
|
|
|
Display Stock Locator
|
Handheld
|
Admin
|
With this permission the Stock Locator option on the Item
Lookup menu is displayed and enabled.
Without this permission, the menu option is not displayed.
|
|
|
Display Stock Locator
|
PC
|
Admin
|
With this permission, the Stock Locator
button on the Item Lookup screen is displayed and enabled.
Without this permission, the button is not displayed.
|
|
|
Edit Extended Attribute Setup
|
PC
|
Admin
|
With this permission, the Save and Cancel
buttons on the Setup Attributes screen are displayed and enabled.
Without this permission, the buttons are not displayed.
|
|
|
Edit Product Groups
|
PC
|
Admin
|
With this permission, when a user double-clicks on an
existing Product Group, the Product Group Detail screen will open. If the
user also has the correct data permission for the product group type, the
screen will open in Edit mode.
Without the necessary data permission for the type, the
screen will open in View-only mode. The user must also have this permission
for each store that is included on the product group. If the user does, then
the user can edit the product group; if the user does not, then the screen
will open in View-only mode.
|
|
|
Edit Product Group Schedules
|
PC
|
Admin
|
With this permission, when a user double-clicks on an
existing Product Group Schedule, the Product Group Schedule Detail screen
will open. If the user also has the correct data permission for the product
group type, the screen will open in Edit mode.
Without the necessary data permission for the type, the
screen will open in View only mode. The user must also have this permission
for each store that is included on the schedule. If the user does, then the
user can edit the schedule; if the user does not then the screen will open in
View-only mode.
|
|
|
Override Price
|
Handheld
|
Admin
|
With this permission the override price on the Ticket
Detail screen is enabled.
Without this permission, the override price is not displayed.
|
|
|
Access Customer Details
|
PC
|
Customer Order
|
With this permission, the Customer
button on the Customer Order Detail screen. This permission is needed to
access the customer details such as name, address for a customer order.
Without this permission, the button is not displayed.
|
|
|
Access Customer Order
|
Handheld
|
Customer Order
|
With this permission, the Customer Orders menu option on
the Cust Ord Mgmt menu is displayed. Without this permission the option is
not displayed.
With this permission, the Customer Orders menu option on
the Item Lookup menu is displayed. Without this permission, the option is not
displayed.
|
|
|
Access Customer Order
|
PC
|
Customer Order
|
With this permission the Customer Order
button on the Customer Order Management List screen is displayed and enabled.
Without this permission, the button is not displayed.
With this permission, when a user double-clicks on an
existing customer order on the Customer Order Management List screen, the
Customer Order Detail screen will open.
Without this permission, when a user double clicks on an
existing customer order on the Customer Order Management List screen, the
user is not allowed to access the transaction.
With this permission the Customer Orders
button on the Item Lookup pop-up search screen is displayed and enabled.
Without this permission the tab will be disabled.
With this permission the Customer Orders
button on the Item Detail screen is displayed and enabled. Without this
permission, the button is not displayed.
|
|
|
Access Customer Order Delivery
|
Handheld
|
Customer Order
|
With this permission, the Deliver Cust Order menu option
on the Cust Ord Mgmt menu is displayed.
Without this permission the option is not displayed.
|
|
|
Access Customer Order Delivery
|
PC
|
Customer Order
|
With this permission, the Delivery
button on the Customer Order List screen is displayed and enabled. Without
this permission, the button is not displayed.
With this permission, the Delivery
button on the Customer Order Detail screen is displayed and enabled. Without
this permission, the button is not displayed.
With this permission, when a user double-clicks on an
existing customer order delivery on the Customer Order Management List
screen, the Customer Order Detail screen will open.
Without this permission, when a user double clicks on an
existing customer order on the Customer Order Management List screen, the
user is not allowed to access the transaction.
|
|
|
Access Customer Order Delivery Attribute
|
Handheld
|
Customer Order
|
With this permission, the Add Ext Attribute menu option on
the Customer Order Summary menu is displayed.
Without this permission, the menu option is not displayed.
|
|
|
Access Customer Order Delivery Attribute
|
PC
|
Customer Order
|
With this permission, the Ext. Attributes button on the
Delivery Summary screen is displayed and enabled.
Without this permission, the button is not displayed.
|
|
|
Access Customer Order Management
|
Handheld
|
Customer Order
|
With this permission, the Customer Order Mgmt menu option
on the Main menu is displayed.
Without this permission the option is not displayed.
|
|
|
Access Customer Order Management
|
PC
|
Customer Order
|
With this permission, the Customer Order
Mgmt button on the SIM Login screen is displayed and enabled.
Without this permission, the button is not displayed.
|
|
|
Access Customer Order Pick
|
Handheld
|
Customer Order
|
With this permission, the Customer Order Pick menu option
on the Cust Ord Mgmt menu is displayed.
Without this permission the option is not displayed.
|
|
|
Access Customer Order Pick
|
PC
|
Customer Order
|
With this permission, the Pick
button on the Customer Order Management List screen is displayed and enabled.
Without this permission, the button is not displayed.
|
|
|
Access Customer Order Reverse Pick
|
PC
|
Customer Order
|
With this permission, the Reverse Pick button
on the Customer Order Detail screen is displayed and enabled. Without this
permission, the button is not displayed.
With this permission, the Reverse Pick
button on the Customer Order List screen is displayed and enabled. Without
this permission, the button is not displayed.
With this permission, when a user double-clicks on an
existing customer order reverse pick record on the Customer Order Management
List screen, the Customer Order Detail screen will open.
Without this permission, when a user double clicks on an
existing customer order reverse pick record on the Customer Order Management
List screen, the user is not allowed to access the transaction.
|
|
|
Cancel Submit Customer Order Delivery
|
Handheld
|
Customer Order
|
With this permission, the Cancel Submit menu option on the
Delivery Summary menu is displayed.
Without this permission the option is not displayed.
|
|
|
Cancel Submit Customer Order Delivery
|
PC
|
Customer Order
|
With this permission, the Cancel Submit
button on the Customer Order Delivery Detail screen is displayed and enabled.
Without this permission, the button is not displayed.
|
|
|
Confirm Customer Order Pick
|
Handheld
|
Customer Order
|
With this permission, the Confirm Now menu option on the
Pick Summary menu is displayed.
Without this permission the option is not displayed.
|
|
|
Confirm Customer Order Pick
|
PC
|
Customer Order
|
With this permission, the Confirm
button on the Customer Order Pick List Detail screen is displayed and
enabled.
Without this permission, the button is not displayed.
|
|
|
Confirm Customer Order Reverse Pick
|
PC
|
Customer Order
|
With this permission, the Confirm
button on the Customer Order Reverse Pick Detail screen is displayed and
enabled.
Without this permission, the button is not displayed.
|
|
|
Create Customer Order Delivery For Pickup
|
Handheld
|
Customer Order
|
With this permission, the Create Delivery menu option on
the Deliver Cust Order menu is displayed. In addition, the option will only
be available for orders with a Reservation Type 'Web Orders' and Delivery
Type 'Pickup'.
Without this permission the option is not displayed.
|
|
|
Create Customer Order Delivery For Pickup
|
PC
|
Customer Order
|
With this permission, the Create
button on the Customer Order Delivery List screen is displayed and enabled.
In addition, the button will only be available for orders with a Reservation
Type 'Web Orders' and Delivery Type 'Pickup'.
Without this permission, the button is not displayed.
|
|
|
Create Customer Order Delivery for Shipment
|
Handheld
|
Customer Order
|
With this permission, the Create Delivery menu option on
the Deliver Cust Order menu is displayed. In addition, the option will only
be available for orders with a Reservation Type 'Web Orders' and Delivery
Type 'Shipment'.
Without this permission the option is not displayed.
|
|
|
Create Customer Order Delivery for Shipment
|
PC
|
Customer Order
|
With this permission, the Create
button on the Customer Order Delivery List screen is displayed and enabled.
In addition, the button will only be available for orders with a Reservation
Type 'Web Orders' and Delivery Type 'Shipment'.
Without this permission, the button is not displayed.
|
|
|
Create Customer Order Pick
|
Handheld
|
Customer Order
|
With this permission, the Create Pick menu option on the
Customer Order Pick menu is displayed.
Without this permission the option is not displayed.
|
|
|
Create Customer Order Pick
|
PC
|
Customer Order
|
With this permission, the Create
button on the Customer Order Pick List screen is displayed and enabled.
Without this permission, the button is not displayed.
|
|
|
Create Customer Order Reverse Pick
|
PC
|
Customer Order
|
With this permission, the Create
button on the Customer Order Reverse Pick List screen is displayed and
enabled.
Without this permission, the button is not displayed.
|
|
|
Delete Customer Order Delivery
|
Handheld
|
Customer Order
|
With this permission, the Delete Delivery menu option on
the Delivery Summary screen is displayed.
Without this permission the option is not displayed.
|
|
|
Delete Customer Order Delivery
|
PC
|
Customer Order
|
With this permission, the Delete
button on the Customer Order Delivery List screen is displayed and enabled.
Without this permission, the button is not displayed.
|
|
|
Delete Customer Order Pick
|
Handheld
|
Customer Order
|
With this permission, the Delete Pick menu option on the
Pick Summary screen is displayed.
Without this permission, the option is not displayed.
|
|
|
Delete Customer Order Pick
|
PC
|
Customer Order
|
With this permission, the Delete
button on the Customer Order Pick List screen is displayed and enabled.
Without this permission, the button is not displayed.
|
|
|
Delete Customer Order Reverse Pick
|
PC
|
Customer Order
|
With this permission, the Delete
button on the Customer Order Reverse Pick List screen is displayed and
enabled.
Without this permission, the button is not displayed.
|
|
|
Dispatch Customer Order Delivery
|
Handheld
|
Customer Order
|
With this permission, the Dispatch Now menu option on the
Delivery Summary screen is displayed.
Without this permission, the option is not displayed.
|
|
|
Dispatch Customer Order Delivery
|
PC
|
Customer Order
|
With this permission, the Dispatch
button on the Customer Order Delivery Detail screen is displayed and enabled.
Without this permission, the button is not displayed.
|
|
|
Dispatch Incomplete Customer Order Delivery
|
Handheld
|
Customer Order
|
With this permission, when the Dispatch Now has been
selected on the Delivery Summary screen and the customer order is incomplete
a warning message is displayed to the user and allowed to cancel or continue.
Without this permission, when the Dispatch Now has been
selected on the Delivery Summary screen when the customer order is
incomplete, an error message is displayed to the user and the user cannot
continue.
|
|
|
Dispatch Incomplete Customer Order Delivery
|
PC
|
Customer Order
|
With this permission, when the Dispatch
button on the Customer Order Delivery Detail screen has been selected and the
customer order is incomplete, a warning message is displayed to the user and
allowed to cancel or continue.
Without this permission, when the Dispatch
button has been selected on the Delivery Summary screen when the customer
order is incomplete, an error message is displayed to the user and the user
cannot continue.
|
|
|
Edit Customer Order BOL
|
PC
|
Customer Order
|
With this permission, the BOL Detail screen will open in
Edit mode. In addition, the View Customer Order BOL permission is required to
gain access to the screen.
Without this permission, the BOL Detail screen is
View-only.
|
|
|
Edit Customer Order Delivery Attribute
|
PC
|
Customer Order
|
With this permission, the Apply, Add, Remove
and Cancel buttons on the Extended Attribute Data Entry screen are
displayed and enabled.
Without this permission, the buttons are not displayed.
|
|
|
Edit Customer Order Delivery For Pickup
|
Handheld
|
Customer Order
|
With this permission, the Edit Delivery menu option on the
Deliver Cust Order menu is displayed. In addition, the option will only be
available for orders with a Reservation Type 'Web Orders' and Delivery Type
'Pickup'.
Without this permission, the option is not displayed.
|
|
|
Edit Customer Order Delivery For Pickup
|
PC
|
Customer Order
|
With this permission, when a user double-clicks on an
existing Customer Order Delivery record, the Customer Order Delivery Detail
screen will open. In addition, only the orders with a Reservation Type 'Web
Orders' and Delivery Type 'Pickup' will be editable.
Without this permission, the screen will open in View-only
mode.
|
|
|
Edit Customer Order Delivery For Shipment
|
Handheld
|
Customer Order
|
With this permission, the Edit Delivery menu option on the
Deliver Cust Order menu is displayed. In addition, the option will only be
available for orders with a Reservation Type 'Web Orders' and Delivery Type
'Shipment'.
Without this permission, the option is not displayed.
|
|
|
Edit Customer Order Delivery For Shipment
|
PC
|
Customer Order
|
With this permission, when a user double-clicks on an
existing Customer Order Delivery record, the Customer Order Delivery Detail
screen will open. In addition, only the orders with a Reservation Type 'Web
Orders' and Delivery Type 'Shipment' will be editable.
Without this permission, the screen will open in View-only
mode.
|
|
|
Edit Customer Order Pick
|
Handheld
|
Customer Order
|
With this permission, the Review Pick menu option on the
Pick Summary screen is displayed.
Without this permission, the option is not displayed.
|
|
|
Edit Customer Order Pick
|
PC
|
Customer Order
|
With this permission, when a user double-clicks on an
existing Customer Order Pick record, the Customer Order Pick Detail screen
will open in an edit mode.
Without this permission, the screen will open in View-only
mode.
|
|
|
Edit Customer Order Reverse Pick
|
PC
|
Customer Order
|
With this permission, when a user double-clicks on an existing
Customer Order Reverse Pick record, the Customer Order Reverse Pick Detail
screen will open in edit mode.
Without this permission, the screen will open in View-only
mode.
|
|
|
Item Substitution For Picking
|
Handheld
|
Customer Order
|
With this permission, the Item Substitution option on the
Pick Detail screen is enabled.
Without this permission, the option is not displayed.
|
|
|
Item Substitution for Picking
|
PC
|
Customer Order
|
With this permission, the Item
Substitution button on the Customer Order Pick Detail screen is
displayed and enabled.
Without this permission, the button is not displayed.
|
|
|
Reject Customer Order
|
PC
|
Customer Order
|
With this permission, the Reject button on the
Customer Order Detail screen is displayed and enabled.
Without this permission, the button is not displayed.
|
|
|
Submit Customer Order Delivery
|
Handheld
|
Customer Order
|
With this permission, the Submit menu option on the
Delivery Summary screen is displayed.
Without this permission, the option is not displayed.
|
|
|
Submit Customer Order Delivery
|
PC
|
Customer Order
|
With this permission, the Submit
button on the Customer Order Delivery Detail screen is displayed and enabled.
Without this permission, the button is not displayed.
|
|
|
View Customer Order BOL
|
PC
|
Customer Order
|
With this permission, the BOL
button on the Customer Order Delivery Detail screen is displayed and enabled.
The BOL Detail screen will open in View-only mode.
Without this permission, the button is not displayed.
|
|
|
Access Direct Delivery
|
Handheld
|
Direct Delivery
|
With this permission the Direct Delivery menu option on
the Shipping/Receiving screen is displayed.
Without this permission the menu option is not displayed.
|
|
|
Access Direct Delivery
|
PC
|
Direct Delivery
|
With this permission, the Direct Delivery
button on the Shipping/Receiving screen is displayed and enabled.
Without this permission, the button is not displayed.
|
|
|
Access Direct Delivery Attribute
|
Handheld
|
Direct Delivery
|
With this permission, the Add Ext Attribute menu option on
the Direct Delivery menu is displayed.
Without this permission, the menu option is not displayed.
|
|
|
Access Direct Delivery Attribute
|
PC
|
Direct Delivery
|
With this permission, the Ext. Attributes button on
the Direct Delivery Detail screen is displayed and enabled.
Without this permission, the button is not displayed.
|
|
|
Access Purchase Order
|
PC
|
Direct Delivery
|
With this permission, the Purchase Order button
on the Direct Delivery List screen is displayed and enabled.
Without this permission, the button is not dis-played.
|
|
|
Access Reject Delivery
|
Handheld
|
Direct Delivery
|
With this permission the Reject Delivery menu option on
the Direct Delivery Detail screen is displayed. The menu option is only
displayed when applying an ASN to a delivery.
Without this permission the menu option is not displayed.
|
|
|
Access Reject Delivery
|
PC
|
Direct Delivery
|
With this permission, the Reject Delivery
button on the Direct Delivery Detail screen is displayed and enable. The
button is only displayed when applying an ASN to a delivery.
Without this permission, the button is not displayed.
|
|
|
Add/Edit Items for Direct Delivery
|
Handheld
|
Direct Delivery
|
With this permission, the Add/Edit menu option on the
Direct Delivery screen is displayed.
Without this permission, the menu option is not displayed.
|
|
|
Add Item Direct Delivery
|
PC
|
Direct Delivery
|
With this permission and the Edit Direct Delivery
permission, the Add Item button on the Direct
Delivery Detail screen is displayed and enabled when editing an existing
Direct Delivery.
Without this permission, the button is not displayed when
editing an existing Direct Delivery. This permission does not apply when
creating a new direct delivery. The Add Item button
will always be available when creating a direct delivery.
|
|
|
Allow Over Receiving for Direct Delivery
|
Handheld
|
Direct Delivery
|
With this permission, the user is allowed to over-receive
quantities for a direct delivery.
Without this permission, the user is not allowed to
over-receive quantities and the message “Quantity received is larger than
expected, reduce the quantity received” is displayed.
|
|
|
Allow Over Receiving for Direct Delivery
|
PC
|
Direct Delivery
|
With this permission, the user is allowed to over-receive
quantities.
Without this permission, the user is not allowed to
over-receive quantities and will be prompted when damaged and received
quantity is larger than the expected quantity.
|
|
|
Allow Receiving Damages for Direct Delivery
|
Handheld
|
Direct Delivery
|
With this permission, the Record Damages menu option on
the Direct Delivery screen is displayed.
Without this permission, the damaged menu option on the
Handheld is not displayed.
|
|
|
Allow Receiving Damages for Direct Delivery
|
PC
|
Direct DeliveryPrimary Loc
|
With this permission, the damaged column on the Direct
Delivery Detail screen is displayed and enabled. This allows the user to add
but not edit damaged items.
Without this permission, the damaged column is not
displayed.
|
|
|
Complete Direct Delivery
|
Handheld
|
Direct Delivery
|
With this permission the Complete Delivery menu option on
the Direct Delivery screen is displayed.
Without this permission the menu option is not displayed.
|
|
|
Confirm Direct Delivery
|
PC
|
Direct Delivery
|
With this permission, the Confirm
button on the Direct Delivery Detail screen is displayed and enabled.
Without this permission, the button is not displayed.
|
|
|
Create Direct Delivery For PO With ASN
|
Handheld
|
Direct Delivery
|
With this permission, the Yes menu option on the screen
with the message An open ASN exits for the purchase order. “Would you like to
apply the ASN?” is displayed.
Without this permission, the message “No open ASNs exist”
is displayed.
|
|
|
Create Direct Delivery For PO With ASN
|
PC
|
Direct Delivery
|
With this permission, the use ASN
button on the ASN List screen is displayed and enabled.
Without this permission, the button is not displayed.
|
|
|
Create Direct Delivery Without ASN
|
Handheld
|
Direct Delivery
|
With this permission, the Yes menu option on the screen
with the message “No open purchase orders exist for the item supplier. Would
you like to create a new one?” is displayed.
Without this permission, the message “No open ASNs exist”
is displayed.
|
|
|
Create Direct Delivery Without ASN
|
PC
|
Direct Delivery
|
With this permission, the Create Delivery
button on the Purchase Order Detail screen is displayed and enabled.
Without this permission, the button is not displayed.
|
|
|
Create Direct Delivery Without PO
|
Handheld
|
Direct Delivery
|
With this permission, the Yes menu option on the screen
with the message “No open purchase orders exist for the item supplier. Would
you like to create a new one?” is displayed.
Without this permission, the message “No POs can be
created for this supplier is displayed.”
|
|
|
Create Direct Delivery Without PO
|
PC
|
Direct Delivery
|
With this permission, the Create Without
PO button on the Direct Delivery List screen is displayed and enabled.
In addition, the Create PO flag must be enabled for the selected Supplier or
system configured to ignore the flag.
Without this permission, the button is not displayed.
|
|
|
Delete Direct Delivery
|
Handheld
|
Direct Delivery
|
With this permission the Delete Delivery menu option on
the Direct Delivery screen is displayed.
Without this permission the menu option is not displayed.
|
|
|
Delete Item Direct Delivery
|
PC
|
Direct Delivery
|
With this permission, the Delete
button on the Direct Delivery Detail screen is displayed and enabled.
Without this permission, the button is not displayed.
|
|
|
Edit Direct Delivery
|
PC
|
Direct Delivery
|
With this permission, when the user double-clicks on an
existing Direct Delivery in the Direct Delivery List screen, the Direct
Delivery Detail screen will open in edit mode.
Without this permission, the screen will open in view-only
mode.
|
|
|
Edit Direct Delivery Attribute
|
PC
|
Direct Delivery
|
With this permission, the Apply, Add, Remove
and Cancel buttons on the Extended Attributes Entry screen are
displayed and enabled.
Without this permission, the buttons are not displayed.
|
|
|
Override Supplier Discrepancies
|
Handheld
|
Direct Delivery
|
With this permission, the user can override the supplier
discrepancies check during the direct delivery receipt.
Without this permission, the message “Quantity received is
larger than expected, reduce the quantity received” is displayed.
|
|
|
Override Supplier Discrepancies
|
PC
|
Direct Delivery
|
With this permission, the user can override the supplier
discrepancies check during the direct delivery receipt.
With this permission, the user can override the supplier
discrepancies check during the direct delivery receipt.
Without this permission, the message “Quantity received is
larger than expected, reduce the quantity received” is displayed.
|
|
|
Receive All Direct Delivery
|
PC
|
Direct Delivery
|
With this permission, the Receive All
button on the Direct Delivery Detail screen is displayed and enabled.
Without this permission, the button is not displayed.
|
|
|
Receive Direct Delivery In Shop Floor
|
Handheld
|
Direct Delivery
|
With this permission the Receive in Shop Floor prompt on
the Direct Delivery Detail screen will be displayed.
Without this permission the prompt is not displayed.
|
|
|
Receive Direct Delivery In Shop Floor
|
PC
|
Direct Delivery
|
With this permission, the Receive in Shop Floor check box
on the Direct Delivery Detail screen is displayed and enabled.
Without this permission, the check box is not enabled.
|
|
|
Review Direct Delivery
|
Handheld
|
Direct Delivery
|
With this permission, the Review Items menu option on the
Direct Delivery screen is displayed.
Without this permission the menu option is not displayed.
|
|
|
Email Alert – AGSN Item on Incoming ASN
|
Server
|
Email
|
With this permission, the user will be notified if an Auto
Generated SN item is on the ASN with pre-generated numbers when processing
thru the RIB.
Without this permission, the user will not be notified.
|
|
|
Email Alert - Customer Order Pick Reminder
|
Server
|
Email
|
With this permission, the user will be notified if the
pick list has been created but not actioned.
Without this permission, the user will not be notified.
|
|
|
Email Alert - Customer Order Receipt
|
Server
|
Email
|
With this permission, the user will be notified when
customer orders are received.
Without this permission, the user will not be notified.
|
|
|
Email Alert - Customer Order Reminder
|
Server
|
Email
|
With this permission, the user will be notified when the
customer order has not been fulfilled.
Without this permission, the user will not be notified.
|
|
|
Email Alert – Finisher Delivery Unable to Auto-Receive
|
Server
|
Email
|
With this permission, the user will be notified when the
finisher delivery UIN qty discrepancy exists on an incoming ASN during batch
processing.
Without this permission, the user will not be notified.
|
|
|
Email Alert – Finisher UIN Discrepancy
|
Server
|
Email
|
With this permission, the user will be notified when a
finisher return received quantity does not match the number of serial numbers
on the return.
Without this permission, the user will not be notified.
|
|
|
Email Alert - New Customer Order
|
Server
|
Email
|
With this permission, the user will be notified when
customer orders are created.
Without this permission, the user will not be notified.
|
|
|
Email Alert – Over Received Quantity
|
Server
|
Email
|
With this permission, the user will be notified when the
number of pre-populated serial numbers exceeds the received quantity.
Without this permission, the user will not be notified.
|
|
|
Email Alert – Receiving UIN Discrepancy
|
Server
|
Email
|
With this permission, the user will be notified when the
number of pre-populated serial numbers does not match the received quantity.
Without this permission, the user will not be notified.
|
|
|
Email Alert –Return Expiration Approaching
|
Server
|
Email
|
With this permission, the user will be notified if the
return expiration date is approaching.
Without this permission, the user will not be notified.
|
|
|
Email Alert – Secondary ASN UIN Discrepancy
|
Server
|
Email
|
With this permission, the user will be notified if the
secondary ASN with pre-populated serial numbers does not match the received
quantity.
Without this permission, the user will not be notified.
|
|
|
Email Alert – Transfer Damaged
|
Server
|
Email
|
With this permission, the user will be notified when
damaged items are received for a transfer.
Without this permission, the user will not be notified.
|
|
|
Email Alert – Transfer Dispatched
|
Server
|
Email
|
With this permission, the user will be notified when a
transfer is dispatched.
Without this permission, the user will not be notified.
|
|
|
Email Alert - Transfer Dispatched Overdue
|
Server
|
Email
|
With this permission, the user will be notified when a
transfer dispatch is overdue.
Without this permission, the user will not be notified.
|
|
|
Email Alert – Transfer Over/Under Received
|
Server
|
Email
|
With this permission, the user will be notified when a
transfer has over/under received quantities.
Without this permission, the user will not be notified.
|
|
|
Email Alert - Transfer Request
|
Server
|
Email
|
With this permission, the user will be notified when a
transfer request is created.
Without this permission, the user will not be notified.
|
|
|
Email Alert – Transfer Request Approved
|
Server
|
Email
|
With this permission, the user will be notified when a
transfer request is approved.
Without this permission, the user will not be notified.
|
|
|
Email Alert – Transfer Request Rejected
|
Server
|
Email
|
With this permission, the user will be notified when a
transfer request is rejected.
Without this permission, the user will not be notified.
|
|
|
Email Alert - Unexpected UIN (Store Changed)
|
Server
|
Email
|
With this permission, the user will be notified when UINs
are discovered at a store where they should not be.
Without this permission, the user will not be notified.
|
|
|
Email Alert – Warehouse Delivery Unable to Auto-Receive
|
Server
|
Email
|
With this permission, the user will be notified when the
delivery includes pre-populated serial numbers and cannot be automatically
received.
Without this permission, the user will not be notified.
|
|
|
Email Alert – Store Transfer Expected Qty Discrepancy
|
Server
|
Email
|
With this permission, the user will be notified when the
delivery includes pre-populated serial numbers and the received quantity does
not match.
Without this permission, the user will not be notified.
|
|
|
Access Inventory Adjustments
|
Handheld
|
Inventory Adjustments
|
With this permission the Inventory Adjustments menu option
on the Inv. Management menu is displayed.
Without this permission the menu option is not displayed.
|
|
|
Access Inventory Adjustment
|
PC
|
Inventory Adjustments
|
With this permission, the Inventory
Adjustment button on the Inventory Management screen is displayed and
enabled.
Without this permission, the button is not displayed.
|
|
|
Access Inventory Adjustment Attribute
|
Handheld
|
Inventory Adjustments
|
With this permission, the Add Ext Attribute menu option on
the Inventory Adj. Summary menu is displayed.
Without this permission, the menu option is not displayed.
|
|
|
Access Inventory Adjustment Attribute
|
PC
|
Inventory Adjustments
|
With this permission, the Ext. Attributes button on
the Inventory Adjustment Detail screen is displayed and enabled.
Without this permission, the button is not displayed.
|
|
|
Complete Inventory Adjustment
|
Handheld
|
Inventory Adjustments
|
With this permission, the Confirm Now menu option on the
Inventory Adjustment Summary screen is displayed.
Without this permission the menu option is not displayed.
The Confirm Later menu option will be available to save the transaction.
|
|
|
Complete Inventory Adjustment
|
PC
|
Inventory Adjustments
|
With this permission, the Confirm
button on the Inventory Adjustment Detail screen is displayed and enabled.
Without this permission, the button is not displayed. The Save button will be enabled to save the transaction.
|
|
|
Create Inventory Adjustment
|
PC
|
Inventory Adjustments
|
With this permission, the Create
button on the Inventory Adjustment List screen is displayed and enabled. The Copy button is also enabled with this permission when the
user is copying completed adjustments.
Without this permission, the button is not displayed.
|
|
|
Delete Inventory Adjustment
|
Handheld
|
Inventory Adjustments
|
With this permission, the Delete Inv. Adj. menu option on
the Inventory Adj. Summary screen is displayed.
Without this permission, the menu option is not displayed.
|
|
|
Delete Inventory Adjustment
|
PC
|
Inventory Adjustments
|
With this permission, the Delete
button on the Inventory Adjustment List screen is displayed and enabled.
Without this permission, the button is not displayed.
|
|
|
Edit Inventory Adjustment
|
Handheld
|
Inventory Adjustments
|
With this permission, the Edit Inv. Adj. menu option in
the Inventory Adj. menu is displayed.
Without this permission, the menu option is not displayed.
|
|
|
Edit Inventory Adjustment
|
PC
|
Inventory Adjustments
|
With this permission, when the user double-clicks on an
existing Inventory Adjustment in the Inventory Adjustment List screen, the
Inventory Adjustment Detail screen will open in edit mode The Add Item button is also displayed and enabled.
Without this permission, the screen will open in View-only
mode.
|
|
|
Edit Inventory Adjustment Attribute
|
PC
|
Inventory Adjustments
|
With this permission, the Apply, Add, Remove
and Cancel buttons on the Extended Attributes Entry screen are
displayed and enabled.
Without this permission, the buttons are not displayed.
|
|
|
Access Item Basket
|
Handheld
|
Item Basket
|
With this permission the Item Basket menu option on the
Inv. Management menu is displayed.
Without this permission the menu option is not displayed.
|
|
|
Add Item to Item Basket
|
Handheld
|
Item Basket
|
With this permission the Add Item option on the Item
Basket summary menu is displayed.
Without this permission the menu option is not displayed.
|
|
|
Create Item Basket
|
Handheld
|
Item Basket
|
With this permission the Create Item Basket menu option on
the Item Basket menu is displayed.
Without this permission the menu option is not displayed.
|
|
|
Delete Item Basket
|
Handheld
|
Item Basket
|
With this permission the Delete Item Basket option on the
Item Basket summary menu is displayed.
Without this permission the menu option is not displayed.
|
|
|
Delete Item from Item Basket
|
Handheld
|
Item Basket
|
With this permission the Delete Item option on the Item
Basket summary menu is displayed.
Without this permission the menu option is not displayed.
|
|
|
Print Item Basket
|
Handheld
|
Item Basket
|
With this permission the Print Ticket option on the Item
Basket summary is displayed.
Without this permission the menu option is not displayed.
|
|
|
Save Item Basket
|
Handheld
|
Item Basket
|
With this permission the Save Basket option on the Item
Basket summary is displayed.
Without this permission the menu option is not displayed.
|
|
|
View Item Basket
|
Handheld
|
Item Basket
|
With this permission the View Details option on the Item
Basket summary is displayed.
Without this permission the menu option is not displayed.
|
|
|
Access Item Requests
|
Handheld
|
Item Requests
|
With this permission the Item Requests menu option on the
Inv. Management menu is displayed.
Without this permission the menu option is not displayed.
|
|
|
Access Item Request
|
PC
|
Item Requests
|
With this permission, the Item Request
button on the Inventory Management screen is displayed and enabled.
Without this permission, the button is not displayed.
|
|
|
Add Items to Item Request
|
PC
|
Item Requests
|
With this permission and the Edit Item Requests
permission, the Add Item button on the Item Request
Detail screen is displayed and enabled when editing an existing Item Request.
Without this permission, the button is not displayed. This
permission does not apply when creating an Item Request. Add
Item button will always be available when creating.
|
|
|
Add or Edit Item For Item Request
|
Handheld
|
Item Requests
|
With this permission, the Edit Item Request menu option on
the Item Request menu is displayed. Without this permission, the menu option
is not displayed.
With this permission, the Add/Edit Item menu option on the
Item Requests Summary screen is displayed. Without this permission the menu
option is not displayed when editing an Item Request.
With this permission, the message “Item is not on the
request. Would you like to add it?” and the Yes and No menu options are
displayed.
Without this permission the message screen is not
displayed. This permission does not apply when creating an item request.
Users will always be able to add and edit items when creating an item
request.
|
|
|
Create Item Request
|
Handheld
|
Item Requests
|
With this permission the Create Item Request menu option
on the Item Requests menu is displayed.
Without this permission the menu option is not displayed.
|
|
|
Create Item Request
|
PC
|
Item Requests
|
With this permission, the Create
button on the Item Request List screen is displayed and enabled. The Add Items button will also be enabled on the Item Request
Detail screen.
Without this permission, the button is not displayed.
|
|
|
Delete Item Request
|
Handheld
|
Item Requests
|
With this permission the Delete Item Request menu option
on the Item Requests menu is displayed.
Without this permission the menu option is not displayed.
|
|
|
Delete Item Request
|
PC
|
Item Requests
|
With this permission, the Delete
button on the Item Request List screen is displayed and enabled. Without this
permission, the button is not displayed.
With this permission, the Item Remove
button on the Item Request Detail screen is displayed and enabled. Without
this permission, the button is not displayed.
|
|
|
Edit Item Request
|
Handheld
|
Item Requests
|
With this permission the Edit Item Request menu option on
the Item Requests menu is displayed.
Without this permission the menu option is not displayed.
|
|
|
Edit Item Request
|
PC
|
Item Requests
|
With this permission, when the user double clicks on an
existing Item Request in the Item Request List screen, the Item Request
Detail screen will open in edit mode.
Without this permission, the screen will open in View-only
mode.
|
|
|
Request Item Request
|
Handheld
|
Item Requests
|
With this permission the Request Item Request menu option
on the Item Requests menu is displayed. Without this permission the menu option
is not displayed.
With this permission the Request Now menu option on the
Item Requests Summary screen is displayed. Without this permission the menu
option is not displayed.
|
|
|
Request Items
|
PC
|
Item Requests
|
With this permission, the Request
button on the Item Request Detail screen is displayed and enabled.
Without this permission, the button is not displayed.
|
|
|
Access Item Ticket
|
Handheld
|
Item Tickets
|
With this permission the Ticket Printing menu option on
the Main menu is displayed.
Without this permission the menu option is not displayed.
|
|
|
Access Item Ticket
|
PC
|
Item Tickets
|
With this permission, the Item Ticket
button on the Print Menu screen is displayed and enabled.
Without this permission, the button is not displayed.
|
|
|
Access Item Ticket Batch
|
PC
|
Item Tickets
|
With this permission, the Item Ticket Batch button
in the Print Menu screen is displayed and enabled.
Without this permission, the button is not displayed.
|
|
|
Access Item Ticket Price Override
|
Handheld
|
Item Tickets
|
With this permission the Ticketing Price Override menu is
displayed and the user can override the price on the Ticket Detail screen.
Without this permission, the menu is not displayed and the
user cannot override the price.
|
|
|
Create Item Ticket
|
PC
|
Item Tickets
|
With this permission, the Create
button on the Item Tickets List screen and the Add Ticket button on
the Item Ticket Batch Detail screen are displayed and enabled.
Without this permission, the buttons are not displayed.
|
|
|
Create Item Ticket Batch
|
PC
|
Item Tickets
|
With this permission, the Create Batch button on
the Item Ticket Batch List screen and Generate Tickets button on the
Add Transaction screen are displayed and enabled.
Without this permission, the button is not displayed.
|
|
|
Delete Item Ticket
|
PC
|
Item Tickets
|
With this permission, the Delete
button on the Item Tickets List, Item Ticket Batch List screens and the Remove
Ticket button on the Item Ticket Batch Detail screens are displayed and
enabled.
Without this permission, the buttons are not displayed.
|
|
|
Edit Item Ticket
|
PC
|
Item Tickets
|
With this permission, when the user double clicks on an
existing Item Ticket in the Item Ticket List or Item Ticket Batch Detail
screen, the Item Ticket Detail screen will open in edit mode.
With this permission, when the user double clicks on an
existing item ticket batch on the Item Ticket Batch List screen, the Item
Ticket Batch Detail screen will open in edit mode.
Without this permission, the screens will open in
View-only mode.
|
|
|
Print Item Ticket
|
PC
|
Item Tickets
|
With this permission, the Print Tickets
button on the Item Ticket List, Item Ticket Detail, Item Ticket Batch List
and Item Ticket Batch Detail screens are displayed and enabled. Without this
permission, the button is not displayed.
Note: If the format type is Auto Generated SN, the
Print Tickets button is controlled by the Print UIN Auto Generate Serial
Number permission.
|
|
|
Update Format Item Ticket
|
PC
|
Item Tickets
|
With this permission, the Update Format button on
the Item Ticket List, Item Tickets Batch List and Item Ticket Batch Detail
screens are displayed and enabled.
Without this permission, the buttons are not displayed.
|
|
|
Update SOH Item Ticket
|
PC
|
Item Tickets
|
With this permission, the Refresh Qty button
on the Item Tickets List, Item Ticket Batch List and Item Ticket Batch Detail
screens are displayed and enabled.
Without this permission, the buttons are not displayed.
|
|
|
Access Price Change
|
PC
|
Price Changes
|
With this permission, the Price Change
button on the Inventory Management screen is displayed and enabled.
Without this permission, the button is not displayed.
|
|
|
Create Price Change
|
PC
|
Price Changes
|
With this permission, the Create
button on the Price Change List screen is displayed and enabled.
Without this permission, the button is not displayed.
|
|
|
Print Item Tickets For Price Changes
|
PC
|
Price Changes
|
With this permission, the Item Tickets
button on the Price Change List screen is displayed and enabled.
Without this permission, the button is not displayed.
|
|
|
Print Shelf Labels For Price Changes
|
PC
|
Price Changes
|
With this permission, the Shelf Labels
button on the Price Change List screen is displayed and enabled.
Without this permission, the button is not displayed.
|
|
|
Access Return Attribute
|
Handheld
|
Returns
|
With this permission, the Add Ext Attribute menu option on
the Returns Summary menu is displayed.
Without this permission, the menu option is not displayed.
|
|
|
Access Return Attributes
|
PC
|
Returns
|
With this permission, the Ext. Attributes button on
the Return Detail screen is displayed and enabled.
Without this permission, the button is not displayed.
|
|
|
Access Returns
|
Handheld
|
Returns
|
With this permission the Returns menu option on the
Shipping/Receiving menu is displayed.
Without this permission the menu option is not displayed.
|
|
|
Access Returns
|
PC
|
Returns
|
With this permission, the Returns
button on the Shipping/Receiving screen is displayed and enabled.
Without this permission, the button is not displayed.
|
|
|
Add Items To Returns
|
PC
|
Returns
|
With this permission, the Edit Returns permission and with
the corresponding data permission for the source of the return, the Add Item button on the Return Detail screen is displayed
and enabled.
Without this permission, the button will not display. If
the user is creating a return, the Add Item button
will always be available.
|
|
|
Add or Edit Items for Return
|
Handheld
|
Returns
|
With this permission and the Edit Returns permission, the
Add/Edit Item menu option on the Return Summary screen is displayed.
Without this permission the menu option is not displayed.
This permission does not apply when creating a return. Users will always be
able to add and edit items when creating a return.
|
|
|
Cancel Submit Return
|
Handheld
|
Returns
|
With this permission and the return is in Submitted
status, the Cancel Submit menu option on the Returns Summary screen is
displayed. Without this permission, the menu option is not displayed.
With this permission, the message “Are you sure you want
to set the return back to pending?” and the Yes and No menu options are
displayed. Without this permission, the message is not displayed.
|
|
|
Cancel Submit Return
|
Handheld
|
Returns
|
With this permission and the return is in Submitted
status, the Cancel Submit button on the Returns
Detail screen is displayed and enabled. Without this permission, the button
is not displayed.
With this permission, the message “Are you sure you want
to go back to Pending status?” is displayed. Without this permission the
message is not displayed.
|
|
|
Create or edit return Context field
|
Handheld
|
Returns
|
With this permission and the return is to Warehouse or Finisher
the Context type menu options on the Context Type menu are displayed and
enabled. Without this permission, the menu is not displayed.
With this permission and the Context Type selected is
PROM, the user is prompted for the Context Value. Without this permission,
the user is not prompted.
|
|
|
Create or edit return Context field
|
PC
|
Returns
|
With this permission, the Context Type dropdown on the
Return Detail screen is displayed and enabled. Without this permission, the
dropdown is not enabled.
With this permission and the Context Type selected is
PROM, the Context Value field on the Return Detail screen is displayed and
enabled. Without this permission, the field is not enabled.
|
|
|
Create Return for External Finisher
|
Handheld
|
Returns
|
With this permission, the Finisher option is available on
the Return Detail menu is displayed
Without this permission, the menu option is not displayed.
Note: A return to finisher may be executed regardless of
this permission, Only created is controlled by this option.
|
|
|
Create Return for External Finisher
|
PC
|
Returns
|
With this permission, the Finisher option on the Return
Detail screen is displayed in the Return Type dropdown.
Without this permission, the option is not displayed.
|
|
|
Create Returns
|
Handheld
|
Returns
|
With this permission the Create Return menu option on the
Returns menu is displayed.
Without this permission the menu option is not displayed.
|
|
|
Create Returns
|
PC
|
Returns
|
With this permission, the Create
button on the Return List Screen is displayed and enabled.
Without this permission, the button is not displayed.
With this permission, the Add Item
button on the Return Detail screen is displayed and enabled.
Without this permission, the button is not displayed.
|
|
|
Delete Items from Returns
|
PC
|
Returns
|
With this permission, (and the corresponding Edit Returns
permission) the Remove Item button on the Return
Detail screen is displayed and enabled.
Without this permission, the button is not displayed.
|
|
|
Delete Returns
|
Handheld
|
Returns
|
With this permission the Delete Return menu option on the
Returns menu is displayed.
Without this permission the menu option is not displayed.
|
|
|
Delete Returns
|
PC
|
Returns
|
With this permission, the Delete
button on the Return List Screen is displayed and enabled. If the user has
the permission, but is not authorized for the source on the return, the
message “User is not authorized to delete this Return” is displayed. Without
this permission, the button is not displayed.
|
|
|
Dispatch Returns
|
Handheld
|
Returns
|
With this permission the Dispatch Return menu option on
the Returns menu is displayed. Without this permission the menu option is not
displayed.
With this permission and dispatch validate store parameter
set to 'Ship Direct', the Dispatch Now menu option on the Return Summary
screen is displayed, when coming from either Create Return or Edit Return.
Without this permission the menu option is not displayed.
|
|
|
Dispatch Returns
|
PC
|
Returns
|
With this permission, the Dispatch
button on the Return List Screen is displayed and enabled. If the user is not
authorized for the source on the return, the message “User is not authorized
to dispatch this Return” is displayed. Without this permission, the button is
not displayed.
With this permission and the corresponding data permission
for the source of the return, the Dispatch button on the Return Detail screen
is displayed and enabled. Without this permission, the button is not
displayed.
|
|
|
Edit Return Attribute
|
PC
|
Returns
|
With this permission, the Apply, Add, Remove
and Cancel buttons on the Extended Attribute Entry screen is displayed
and enabled.
Without this permission, the buttons are not displayed.
|
|
|
Edit Return BOL
|
PC
|
Returns
|
With this permission, the BOL
button on the Return Detail screen is displayed and enabled.This permission
allows the SIM user access to edit a bill of lading associated with a return.
Without this permission, the button is not displayed.
|
|
|
Edit Returns
|
Handheld
|
Returns
|
With this permission, the Edit Return menu option on the
Returns menu is displayed.
Without this permission the menu option is not displayed.
|
|
|
Edit Return
|
PC
|
Returns
|
With this permission and the corresponding data permission
for the source of the return, when the user double-clicks on an existing
return in the Return List screen, the Return Detail screen will open in edit
mode.
Without this permission, the Return Detail screen will
open in view-only mode.
|
|
|
Submit Return
|
Handheld
|
Returns
|
With this permission and dispatch validate store parameter
set to 'Ship Submit', the Submit menu option on the Returns Summary screen is
displayed.
Without this permission, the menu option is not displayed.
|
|
|
Submit Return
|
PC
|
Returns
|
With this permission and dispatch validate store parameter
set to 'Ship Submit', the Submit button on the Return
Detail screen is displayed and enabled.
Without this permission, the button is not displayed.
|
|
|
View Return BOL
|
PC
|
Returns
|
With this permission, the BOL
button is displayed and enabled. The BOL Detail screen will be view-only.
Without this permission, the BOL
button is not displayed.
|
|
|
View Return Details
|
Handheld
|
Returns
|
With this permission the View Details menu option on the
Return Summary screen is displayed, when coming from either Create Return or
Edit Return. The Return Details will be view-only.
Without this permission the menu option is not displayed.
|
|
|
Access Password Configuration
|
PC
|
Security
|
With this permission, the Password
Configuration button on the Security menu is displayed and enabled.
Without this permission, the button is not displayed.
|
|
|
Access Role Maintenance
|
PC
|
Security
|
With this permission, the Role
Maintenance button on the Security menu is displayed and enabled.
Without this permission, the button is not displayed.
|
|
|
Access Security
|
PC
|
Security
|
With this permission, the Security
button on the Admin menu is displayed and enabled.
Without this permission, the button is not displayed.
|
|
|
Access User Maintenance
|
PC
|
Security
|
With this permission, the User
Maintenance button on the Security menu is displayed and enabled.
Without this permission, the button is not displayed.
|
|
|
Assign Password
|
PC
|
Security
|
With this permission, the Assign Password
button on the User Detail screen is displayed and enabled.
Without this permission, the button is not displayed.
|
|
|
Assign User Role
|
PC
|
Security
|
With this permission, the Assign Roles
button on the User Detail screen is displayed and enabled.
Without this permission, the button is not displayed.
|
|
|
Assign User Store
|
PC
|
Security
|
With this permission, the Assign Stores button on the User
Detail screen is displayed and enabled.
Without this permission, the button is not displayed.
|
|
|
Create User
|
PC
|
Security
|
With this permission, the Create button on the User List
is displayed and enabled.
Without this permission, the button is not displayed.
|
|
|
Delete Role
|
PC
|
Security
|
With this permission, the Delete
button on the Role List screen is displayed and enabled.
Without this permission, the button is not displayed.
|
|
|
Delete User
|
PC
|
Security
|
With this permission, the Delete button on the User List
screen is displayed and enabled.
Without this permission, the button is not displayed.
|
|
|
Edit User
|
PC
|
Security
|
With this permission, when the user double-clicks on an
existing user in the User List screen, the User Detail screen will open in
edit mode.
Without this permission, the User Detail screen will open
in view-only mode.
|
|
|
Mass Assign User Role
|
PC
|
Security
|
With this permission, the Mass Assign
Roles button on the Security menu is displayed and enabled.
Without this permission, the button is not displayed.
|
|
|
Mass Assign User Store
|
PC
|
Security
|
With this permission, the Mass Assign Stores button on the
Security menu is displayed and enabled.
Without this permission, the button is not displayed.
|
|
|
Access Sequencing
|
Handheld
|
Sequencing
|
With this permission the Sequencing menu option on the
Inv. Management menu is displayed.
Without this permission the menu option is not displayed.
|
|
|
Access Sequencing
|
PC
|
Sequencing
|
With this permission, the Sequencing
button on the Inventory Management menu is displayed and enabled.
Without this permission, the button is not displayed.
|
|
|
Add Item to Location
|
PC
|
Sequencing
|
With this permission, the Add Item
button on the Micro Sequence Edit screen is displayed and enabled.
Without this permission, the button is not displayed.
|
|
|
Add Locations for an Item
|
PC
|
Sequencing
|
With this permission, the Add Location
button on the Item Locations List screen is displayed and enabled.
Without this permission, the button is not displayed.
|
|
|
Add Sequencing Locations
|
PC
|
Sequencing
|
With this permission, the Add Location
button on the Macro Sequence Edit screen is displayed and enabled.
Without this permission, the button is not displayed.
|
|
|
Apply Class List to Location
|
PC
|
Sequencing
|
With this permission, the Apply Class
List button on the Macro Sequence Edit screen is displayed and
enabled.
Without this permission, the button is not displayed.
|
|
|
Apply Item List to Location
|
PC
|
Sequencing
|
With this permission, the Apply Item List
button on the Micro Sequence Edit screen is displayed and enabled.
Without this permission, the button is not displayed.
|
|
|
Arrange Items Within Location
|
PC
|
Sequencing
|
With this permission, the Move Up
and Move Down buttons on the Micro Sequence Edit
screen is displayed and enabled.
Without this permission, the button is not displayed.
|
|
|
Arrange Sequencing Locations
|
PC
|
Sequencing
|
With this permission, the Move Up
and Move Down buttons on the Macro Sequence Edit
screen is displayed and enabled.
Without this permission, the button is not displayed.
|
|
|
Delete Items from a Location
|
PC
|
Sequencing
|
With this permission, the Remove Item
button on the Micro Sequence Edit screen is displayed and enabled.
Without this permission, this button is not displayed.
|
|
|
Delete Locations for an Item
|
PC
|
Sequencing
|
With this permission, the Remove Item
button on the Item Location List screen is displayed and enabled.
Without this permission, the button is not displayed.
|
|
|
Delete Sequencing Locations
|
PC
|
Sequencing
|
With this permission, the Remove Item
button on the Macro Sequence Edit screen is displayed and enabled.
Without this permission, the button is not displayed.
|
|
|
Edit Items Within A Location
|
PC
|
Sequencing
|
With this permission, when the user double- clicks on an
existing Sequencing Location in the Macro Sequence List screen, the Micro
Sequence List screen will open in edit mode. Without this permission, the
Micro Sequence List screen will open in view-only mode.
With this permission, when the user double-clicks on an
existing Item in the Micro Sequence List screen, the Item Location List
screen will open in edit mode. Without this permission, the Micro Sequence
List screen will open in view-only mode.
With this permission, the Edit Items
button on the Micro Sequence List screen is displayed and enabled. Without
this permission, the button is not displayed.
|
|
|
Edit Sequencing Locations
|
PC
|
Sequencing
|
With this permission, the Edit Locations
button on the Macro Sequence List screen is displayed and enabled.
Without this permission, the button is not displayed.
|
|
|
Sequence Items
|
Handheld
|
Sequencing
|
With this permission the Sequence Item menu option on the
Sequencing menu is displayed.
Without this permission the menu option is not displayed.
|
|
|
Sequence Items Within A Location
|
Handheld
|
Sequencing
|
With this permission the Sequence all items in a location
menu option on the Sequencing menu is displayed.
Without this permission the menu option is not displayed.
|
|
|
Access Shelf Adjustment
|
Handheld
|
Shelf Adjustment
|
With this permission the Shelf Adjustment menu option on
the Shelf Replenishment menu is displayed.
Without this permission the menu option is not displayed.
|
|
|
Create Shelf Adjustment
|
Handheld
|
Shelf Adjustment
|
With this permission the Create menu option on the
Shopfloor Adjust, Backroom Adjust, Display List and Ad Hoc Replenish menu is
displayed.
Without this permission the menu option is not displayed.
|
|
|
Access Shelf Replenishment
|
Handheld
|
Shelf Replenishment
|
With this permission the Shelf Replenishment menu option
on the Inv. Management menu is displayed.
Without this permission the menu option is not displayed.
|
|
|
Access Shelf Replenishment
|
PC
|
Shelf Replenishment
|
With this permission, the Shelf
Replenishment button on the Inventory Management menu is displayed and
enabled.
Without this permission, the button is not displayed.
|
|
|
Action Shelf Replenishment
|
Handheld
|
Shelf Replenishment
|
With this permission the Action Shelf Replen menu option
on the Shelf Replenishment menu is displayed.
Without this permission the menu option is not displayed.
|
|
|
Create Shelf Replenishment
|
Handheld
|
Shelf Replenishment
|
With this permission the Within Day and the End Of Day
menu options on the Shelf Replenishment menu is displayed.
Without this permission the menu options is not displayed.
|
|
|
Create Shelf Replenishment
|
PC
|
Shelf Replenishment
|
With this permission, the Create
button on the Shelf Replenishment List screen is displayed and enabled.
Without this permission, the button is not displayed.
|
|
|
Delete Shelf Replenishment
|
PC
|
Shelf Replenishment
|
With this permission, the Delete button on the
Shelf Replenishment screen is displayed and enabled.
Without this permission, the button is not displayed.
|
|
|
Replenishment Item Substitution
|
Handheld
|
Shelf Replenishment
|
With this permission, the Item Substitution option on the
Pick Detail screen is enabled.
Without this permission, the option is not displayed.
Note: This permission only applies when the user has
selected to allow item substitution when prompted.
|
|
|
Replenishment Item Substitution
|
PC
|
Shelf Replenishment
|
With this permission, the Allow Substitute Item check box
on the Shelf Replenishment Create screen is displayed and enabled.
Without this permission, the check box is not enabled.
|
|
|
Access Ad-Hoc Stock Counts
|
Handheld
|
Stock Counts
|
With this permission the Ad Hoc Stock Count menu option on
the Stock Counting menu is displayed.
Without this permission the menu option is not displayed.
|
|
|
Access Stock Count
|
Handheld
|
Stock Counts
|
With this permission the Stock Counts menu option on the
Inv. Management menu is displayed.
Without this permission the menu option is not displayed.
|
|
|
Access Stock Count Attriubute
|
Handheld
|
Stock Counts
|
With this permission, the Add Ext Attribute menu option on
the Stock Counting menu is displayed.
Without this permission, the menu option is not displayed.
|
|
|
Access Stock Count Attribute
|
PC
|
Stock Counts
|
With this permission, the Ext. Attributes button on
the Stock Count Detail and Stock Re-count Detail screen are displayed and
enabled.
Without this permission, the button is not displayed.
|
|
|
Access Stock Count
|
PC
|
Stock Counts
|
With this permission, the Stock Counts
button on the Inventory Management menu is displayed and enabled.
Without this permission, the button is not displayed.
|
|
|
Amend Stock Count
|
Handheld
|
Stock Counts
|
With this permission, the <amend> option (or Shift-5
function) on the Stock Counting screen is displayed and enabled.
Without this permission, the option is not displayed and
the Shift-5 function is not available.
|
|
|
Amend Stock Re-Count
|
Handheld
|
Stock Counts
|
With this permission the <amend> option (or Shift-5
function) for stock re-counts is displayed and enabled.
Without this permission, the option is not displayed and
the Shift-5 function is not available.
|
|
|
Authorize Stock Count
|
PC
|
Stock Counts
|
With this permission, the Authorize
button on the Child Stock Count List screen is displayed and enabled.
Without this permission, the button is not displayed.
|
|
|
Complete Stock Count
|
Handheld
|
Stock Counts
|
With this permission the Complete Count menu option on the
Stock Counting menu is displayed.
Without this permission the menu option is not displayed.
|
|
|
Complete Stock Count
|
PC
|
Stock Counts
|
With this permission, the Complete
button on the Child Stock Count List, the Stock Count Detail and the Stock
Re-Count Detail Screens is displayed and enabled.
Without this permission, the button is not displayed.
|
|
|
Confirm Authorization Stock Count
|
PC
|
Stock Counts
|
With this permission, the Confirm Authorization
button on the Child Stock Count List screen is displayed and enabled.
Without this permission, the button is not displayed.
|
|
|
Confirm Child Stock Count
|
PC
|
Stock Counts
|
With this permission, the Confirm Child
button on the Stock Count Authorization screen is displayed and enabled.
Without this permission, the button is not displayed.
|
|
|
Count Stock Count
|
Handheld
|
Stock Counts
|
With this permission the Stock Count menu option on the
Stock Counting menu is displayed.
Without this permission the menu option is not displayed.
|
|
|
Create Ad-Hoc Stock Count
|
Handheld
|
Stock Counts
|
With this permission the Create New Count menu option on
the Ad-Hoc Stock Count menu is displayed.
Without this permission the menu option is not displayed.
|
|
|
Delete Stock Count
|
PC
|
Stock Counts
|
With this permission, the Delete
button on the Stock Count List screen is displayed and enabled.
Without this permission, the button is not displayed.
|
|
|
Edit Adhoc Stock Count
|
PC
|
Stock Counts
|
With this permission, when the user double-clicks on an
existing Ad Hoc Stock Count in the Stock Count List screen, the Child Stock
Count List screen will open in edit mode.
Without this permission, the Child Stock Count List screen
will open in view-only mode.
|
|
|
Edit Stock Count Attribute
|
PC
|
Stock Counts
|
With this permission, the Apply, Add, Remove
and Cancel button on the Extended Attribute Entry screen is displayed
and enabled.
Without this permission, the button is not displayed.
|
|
|
Edit Unit Amount Stock Count
|
PC
|
Stock Counts
|
With this permission, when the user double clicks on an
existing Unit and Amount Stock Count in the Stock Count List screen, the
Child Stock Count List screen will open in edit mode.
Without this permission, the Child Stock Count List screen
will open in view-only mode.
|
|
|
Edit Unit Stock Count
|
PC
|
Stock Counts
|
With this permission, when the user double clicks on an
existing Unit Stock Count in the Stock Count List screen, the Child Stock
Count List screen will open in edit mode.
Without this permission, the Child Stock Count List screen
will open in view-only mode.
|
|
|
Recount Stock Count
|
Handheld
|
Stock Counts
|
With this permission the Stock Re-Count menu option on the
Stock Counting menu is displayed.
Without this permission the menu option is not displayed.
|
|
|
Rejected Item Stock Count
|
PC
|
Stock Counts
|
With this permission the Rejected Items
button on the Child Stock Count List screen is displayed and enabled.
Without this permission, the button is not displayed.
|
|
|
Save Child Stock Count
|
PC
|
Stock Counts
|
With this permission, the Save Child
button on the Stock Count Authorization screen is displayed and enabled.
Without this permission, the button is not displayed.
|
|
|
Snapshot Stock Count
|
PC
|
Stock Counts
|
With this permission, the Take Snapshot
button on the Child Stock Count List screen, the Stock Count Detail and the
Stock Re-Count Detail screens is displayed and enabled.
Without this permission, the button is not displayed.
|
|
|
Update Authorization Quantity Stock Count
|
PC
|
Stock Counts
|
With this permission the Update Auth Qty
button on the Child Stock Count List and the Stock Count Authorization
Screens is displayed and enabled.
Without this permission, the button is not displayed.
|
|
|
Access Store Order
|
PC
|
Store Orders
|
With this permission, the Store Orders
button on the Inventory Management screen is displayed and enabled.
Without this permission, the button is not displayed.
|
|
|
Add Item Store Order
|
PC
|
Store Orders
|
With this permission and the Edit Store Orders permission,
the Add Item button on the Store Order Detail screen
is displayed and enabled when editing an existing Store Order.
Without this permission, the button is not displayed. The Add Item button will always be available when creating a
Store Order.
|
|
|
Approve Store Order
|
PC
|
Store Orders
|
With this permission, the Approve
button on the Store Order Detail screen is displayed and enabled.
Without this permission, the button is not displayed.
|
|
|
Cancel Item Store Order
|
PC
|
Store Orders
|
With this permission, the Remove Item
button on the Store Order Detail screen is displayed and enabled.
Without this permission, the button is not displayed.
|
|
|
Cancel Store Order
|
PC
|
Store Orders
|
With this permission, the Delete
button on the Store Orders screen is displayed and enabled.
Without this permission, the button is not displayed.
|
|
|
Create Store Order
|
PC
|
Store Orders
|
With this permission, the Create button
on the Store Orders screen is displayed and enabled. The Add
Item button the Store Order Detail screen will also be enabled.
Without this permission, the button is not displayed.
|
|
|
Edit Store Order
|
PC
|
Store Orders
|
With this permission, when the user double-clicks on an
existing Store Order in the Store Orders screen, the Store Detail screen will
open in edit mode.
Without this permission, the Store Order Detail screen
will open in view-only mode.
|
|
|
Access Templates
|
PC
|
Templates
|
With this permission, the Template button on the Inventory
Adjustment List screen is displayed and enabled.
Without this permission, the button is not displayed.
|
|
|
Apply Templates
|
Handheld
|
Templates
|
With this permission, the Apply Template menu option on
the Inventory Adj. menu is displayed.
Without this permission, the menu option is not displayed.
|
|
|
Apply Templates
|
PC
|
Templates
|
With this permission, the Apply Template button on the
Inventory Adjustment Detail screen is displayed and enabled. The template
dropdown and multiplier is also enabled.
Without this permission, the button is not displayed.
|
|
|
Delete Templates
|
PC
|
Templates
|
With this permission, the Delete button on the Template
List screen is displayed and enabled.
Without this permission, the button is not displayed
|
|
|
Access Transfer
|
PC
|
Transfers
|
With this permission, the Transfers button on the
Shipping/Receiving screen is displayed and enabled.
Without this permission, the button is not displayed.
|
|
|
Access Transfer Attribute
|
Handheld
|
Transfers
|
With this permission, the Add Ext Attribute menu option on
the Transfer Summary menu is displayed.
Without this permission, the menu option is not displayed.
|
|
|
Access Transfer Attribute
|
PC
|
Transfers
|
With this permission, the Ext. Attributes button on
the Transfer Detail screen is displayed and enabled.
Without this permission, the button is not displayed.
|
|
|
Access Transfer Context Field
|
PC
|
Transfers
|
With this permission, the Context Type dropdown on the
Transfer Detail screen is displayed and enabled. Without this permission, the
dropdown is not enabled.
With this permission and the Context Type selected is
PROM, the Context Value field on the Transfer Detail screen is displayed and
enabled.
Without this permission, the field is not enabled.
|
|
|
Access Transfer Request
|
Handheld
|
Transfers
|
With this permission the Create Tsf Request menu option on
the Transfer menu is displayed.
Without this permission the menu option is not displayed.
|
|
|
Access Transfers
|
Handheld
|
Transfers
|
With this permission the Transfers menu option on the
Shipping/Receiving screen is displayed.
Without this permission the menu option is not displayed.
|
|
|
Add Item to Transfer
|
PC
|
Transfers
|
With this permission and the Edit Transfer permission, the
Add Item button on the Transfer Detail screen is
displayed and enabled.
Without this permission, the button is not displayed. The
Add Item button will always be available when creating a transfer.
|
|
|
Add Item to Transfer Receipt
|
PC
|
Transfers
|
With this permission and the Receive Transfer permission,
the Add Item button on the Transfer Detail Screen is
displayed and enabled.
Without this permission, the button is not displayed.
|
|
|
Add Item to Transfer Request
|
PC
|
Transfers
|
With this permission and the Edit Transfer Request
permission, the Add Item button on the Transfer
Detail screen is displayed and enabled.
Without this permission, the button is not displayed. The Add Item button will always be available when creating a
transfer request.
|
|
|
Add or Edit Items On Transfer
|
Handheld
|
Transfers
|
With this permission and the Edit Transfer Permission
(handheld), the Add/Edit Item menu option on the Transfer Summary screen is
displayed.
Without this permission the menu option is not displayed.
The Add/Edit Item menu option will always be available when creating a
transfer.
|
|
|
Amend Transfer Receipt
|
Handheld
|
Transfers
|
With this permission, the <Amend> option on the
Transfer Summary screen is displayed.
Without this permission the option is not displayed.
|
|
|
Authorize Transfer Requests
|
PC
|
Transfers
|
With this permission, the Accept
and Reject buttons on the Transfer Detail screen is
displayed and enabled.
Without this permission, the buttons is not displayed.
|
|
|
Cancel Submit Transfer
|
Handheld
|
Transfers
|
With this permission, the Cancel Submit menu option on the
Transfer Summary screen is displayed.
Without this permission, the menu option is not displayed.
|
|
|
Cancel Submit Transfer
|
PC
|
Transfers
|
With this permission, the Cancel Submit
button on the Transfer Detail screen is displayed and enabled.
Without this permission, the button is not displayed.
|
|
|
Complete Transfer Receipt
|
Handheld
|
Transfers
|
With this permission, the Confirm Receipt menu option on
the Receipt Summary screen is displayed.
Without this permission the menu option is not displayed.
|
|
|
Confirm Transfer
|
PC
|
Transfers
|
With this permission, the Confirm
button on the Receive Transfer screen is displayed and enabled.
Without this permission, the button is not displayed.
|
|
|
Create Transfer
|
Handheld
|
Transfers
|
With this permission the Create Transfer menu option on
the Transfer Menu is displayed.
Without this permission the menu option is not displayed.
|
|
|
Create Transfer
|
PC
|
Transfers
|
With this permission, the Create
button on the Transfer List screen is displayed and enabled. The Add Item button on the Create Transfer screen will also be
enabled.
Without this permission, the button is not displayed.
|
|
|
Create Transfer Request
|
Handheld
|
Transfers
|
With this permission the Create Tsf Request menu option on
the Transfer menu is displayed.
Without this permission the menu option is not displayed.
|
|
|
Create Transfer Request
|
PC
|
Transfers
|
With this permission, the Create Request
button on the Transfer List screen is displayed and enabled. The Add Item button on the Transfer Detail screen will also be
enabled.
Without this permission, the button is not displayed.
|
|
|
Delete Item From Transfer
|
PC
|
Transfers
|
With this permission, the Remove Item
button on the Transfer Detail screen is displayed and enabled when Transfer
is selected.
Without this permission, the button is not displayed.
|
|
|
Delete Item From Transfer Request
|
PC
|
Transfers
|
With this permission, the Remove Item button in the
Transfer Detail screen is displayed and enabled when Transfer Request is
selected.
Without this permission, the button is not displayed.
|
|
|
Delete Items from Transfer
|
Handheld
|
Transfers
|
With this permission the Delete Item menu option on the
Transfer Summary screen is displayed.
Without this permission the menu option is not displayed.
|
|
|
Delete Transfer
|
Handheld
|
Transfers
|
With this permission the Delete Transfer menu option on
the Transfer menu is displayed.
With this permission the Delete Transfer menu option on
the Delete Transfer screen is displayed.
Without this permission the menu option is not displayed.
|
|
|
Delete Transfer
|
PC
|
Transfers
|
With this permission, the Delete
button on the Transfer List screen is displayed and enabled. Without this
permission the menu option is not displayed.
Without this permission, the button is not displayed.
|
|
|
Delete Transfer Request
|
Handheld
|
Transfers
|
With this permission the Delete Request menu option on the
Request Summary screen is displayed.
Without this permission the menu option is not displayed.
|
|
|
Dispatch Transfer
|
Handheld
|
Transfers
|
With this permission, the Dispatch Now menu option on the
Transfer Summary menu is displayed.
Without this permission, the menu option is not displayed.
|
|
|
Dispatch Transfer
|
PC
|
Transfers
|
With this permission, the Dispatch
button on the Transfer Detail screen and the Transfer List screen is
displayed and enabled.
Without this permission, the button is not displayed.
|
|
|
Edit Transfer
|
Handheld
|
Transfers
|
With this permission, the Edit Transfer menu option on the
Transfer menu is displayed.
Without this permission the menu option is not displayed.
|
|
|
Edit Transfer
|
PC
|
Transfers
|
With this permission, when the user double-clicks on an
existing Transfer in the Transfer List screen, the Transfer Detail screen
will open in edit mode.
Without this permission, the Transfer Detail screen will
open in view-only mode.
|
|
|
Edit Transfer Attribute
|
PC
|
Transfers
|
With this permission, the Apply, Add, Remove
and Cancel buttons on the Extended Attributes Entry screen are
displayed and enabled.
Without this permission, the buttons are not displayed.
|
|
|
Edit Transfer BOL
|
PC
|
Transfers
|
With this permission, when the user clicks the BOL button on the Transfer Detail screen, the BOL Detail
screen will open in edit mode.
Without this permission, the BOL Detail screen will open
in view-only mode.
|
|
|
Edit Transfer Request
|
Handheld
|
Transfers
|
With this permission the Edit Tsf Request menu option on
the Transfer menu is displayed.
Without this permission the menu option is not displayed.
|
|
|
Edit Transfer Requests
|
PC
|
Transfers
|
With this permission, when the user double-clicks on an
existing Transfer Request in the Transfer List screen, the Transfer Detail screen
will open in edit mode.
Without this permission, the Transfer Detail screen will
open in view-only mode.
|
|
|
Is Context Field Editable
|
Handheld
|
Transfers
|
With this permission, the Context Field menu options on
the Request Summary menu are displayed and enabled. Without this permission,
the menu is not displayed.
With this permission and the Context Type selected is
PROM, the user is prompted for the Context Value. Without this permission,
the user is not prompted.
|
|
|
Receive All Items On Transfer
|
Handheld
|
Transfers
|
With this permission, the Receive All menu option on the
Transfer Receiving screen is displayed.
Without this permission the menu option is not displayed.
|
|
|
Receive All On Transfer
|
PC
|
Transfers
|
With this permission, the Receive All
button on the Transfer Detail screen is displayed and enabled.
Without this permission, the button is not displayed.
|
|
|
Receive Item On Transfer
|
Handheld
|
Transfers
|
With this permission the Receive Item menu option on the
Transfer Receiving screen is displayed.
Without this permission the menu option is not displayed.
|
|
|
Receive Transfer
|
Handheld
|
Transfers
|
With this permission the Receive Transfer menu option on
the Transfer menu is displayed.
Without this permission the menu option is not displayed.
|
|
|
Receive Transfer
|
PC
|
Transfers
|
With this permission, when the user double-clicks on an
existing Dispatched Transfer in the Transfer List screen, the Transfer Detail
screen will open in edit mode.
Without this permission, the Transfer Detail screen will
open in view-only mode.
|
|
|
Record Transfer Damages
|
Handheld
|
Transfers
|
With this permission the Record Damages menu option on the
Receipt Summary screen is displayed.
Without this permission the menu option is not displayed.
|
|
|
Request A Transfer Request
|
Handheld
|
Transfers
|
With this permission the Request Now menu option on the
Transfer Request screen is displayed.
Without this permission the menu option is not displayed.
|
|
|
Request Transfer Request
|
PC
|
Transfers
|
With this permission, the Request
button on the Transfer Detail screen is displayed and enabled.
Without this permission, the button is not displayed.
|
|
|
Submit Transfer
|
Handheld
|
Transfers
|
With this permission, the Submit menu option on the
Transfer Summary screen is displayed.
Without this permission, the menu option is not displayed.
|
|
|
Submit Transfer
|
PC
|
Transfers
|
With this permission, the Submit button on the Transfer
Detail screen is displayed and enabled.
Without this permission, the button is not displayed.
|
|
|
Transfer Item Review
|
Handheld
|
Transfers
|
With this permission, the Review Item menu option on the
Request Summary screen is displayed. Without this permission, the menu option
is not displayed.
With this permission, the Review Item menu option on the
Transfer Summary screen is displayed. Without this permission, the menu
option is not displayed.
|
|
|
View Details For Transfer
|
Handheld
|
Transfers
|
With this permission the View Details menu option on the
Transfer Summary screen is displayed. Without this permission the menu option
is not displayed.
With this permission the View Details menu option on the
Delete Transfer screen is displayed. Without this permission the menu option
is not displayed.
|
|
|
View Transfer BOL
|
PC
|
Transfer
|
With this permission, when the BOL
button is clicked, the BOL Detail screen will open in View-only mode.
Without this permission, the BOL
button is not displayed.
|
|
|
Access UIN Attributes
|
PC
|
UIN
|
With this permission, the UIN Attributes
button on the Setup screen is displayed and enabled.
Without this permission, the button is not displayed.
|
|
|
Access UIN Resolution
|
PC
|
UIN
|
With this permission the UIN Resolution
button on the Admin screen is displayed and enabled.
Without this permission, the button is not displayed.
|
|
|
Create UIN AGSN Ticket
|
Handheld
|
UIN
|
With this permission, the New AGSN menu option on the
Ticketing Options menu is displayed.
Without this permission, the menu option is not displayed.
Note: The Re-print AGSN Ticket is controlled by the Print
Auto Generated SN permission.
|
|
|
Create UIN AGSN Ticket
|
PC
|
UIN
|
With this permission, the Auto-Generate SN box on the Item
Ticket Detail screen is displayed and enabled.
Without this permission, the check box is disabled.
|
|
|
Create UIN on the Fly
|
Handheld
|
UIN
|
With this permission, the user is allowed to create a UIN
on the fly when creating an inventory adjustment using a reason code of
Disposition Movement from Out (Dist) to Available to Sell (ATS) = UIN Status
in Stock.
Without this permission, the user will not be able to
create a new UIN.
|
|
|
Create UIN on the Fly
|
PC
|
UIN
|
With this permission, the user is allowed to create a UIN
on the fly when creating an inventory adjustment using a reason code of
Disposition Movement from Out (Dist) to Available to Sell (ATS) = UIN Status
in Stock.
Without this permission, the user will not be able to
create a new UIN.
|
|
|
Print UIN Auto Generate Serial Number
|
Handheld
|
UIN
|
With this permission and the Format Type is Auto Generate
SN, the Re-print AGSN menu option on the Ticketing Select Options screen is
displayed.
Without this permission the menu option is not displayed.
Note: The New AGSN print option is controlled by the
Create UIN AGSN Ticket permission.
|
|
|
Print UIN Auto Generated Serial Number
|
PC
|
UIN
|
With this permission and the UIN type is AGSN, the Print Ticket button on the UIN Detail screen is displayed
and enabled. Without this permission, the button is not displayed.
With this permission and the Format type is Auto Generate
SN, the Print Tickets button on the Item Ticket List
and Item Ticket Detail screens and the Select UIN and Remove UIN
buttons on the Item Ticket Detail screen are displayed and enabled. Without
this permission, the buttons are not displayed.
|
|
|
Resolve UIN Exceptions
|
PC
|
UIN
|
With this permission the Resolve
button on the UIN Resolution List screen is displayed and enabled.
Without this permission, the button is not displayed.
|
|
|
Update UIN Status
|
PC
|
UIN
|
With this permission, the Update Status dropdown on the
UIN History screen is displayed and enabled.
Without this permission, the dropdown is not enabled.
|
|
|
View UIN Detail
|
Handheld
|
UIN
|
With this permission, the Serial Number menu option on the
Item Lookup screen is displayed.
Without this permission, the menu option is not displayed.
|
|
|
View UIN Detail
|
PC
|
UIN
|
With this permission the UIN Detail
button on the Item Lookup screen is displayed and enabled. Without this
permission, the button is not displayed.
With this permission the UIN Detail tab on the Item Lookup
pop-up search screen is displayed and enabled. Without this permission the
tab will be disabled.
|
|
|
View UIN History
|
PC
|
UIN
|
With this permission, the View History button
on the UIN Resolution List screen is displayed and enabled. Without this
permission, the button is not displayed.
With this permission, the View History
button on the UIN Detail screen is displayed and enabled. Without this
permission, the button is not displayed.
|
|
|
Access Warehouse Delivery
|
Handheld
|
Warehouse Delivery
|
With this permission the Warehouse Delivery menu option on
the Shipping/Receiving screen is displayed.
Without this permission the menu option is not displayed.
|
|
|
Access Warehouse Delivery
|
PC
|
Warehouse Delivery
|
With this permission, the Warehouse
Delivery button on the Shipping/Receiving screen is displayed and
enabled.
Without this permission, the button is not displayed.
|
|
|
Access Warehouse Delivery Attribute
|
Handheld
|
Warehouse Delivery
|
With this permission, the Add Ext Attribute menu option on
the Warehouse Delivery Summary menu is displayed.
Without this permission, the menu option is not displayed.
|
|
|
Access Warehouse Delivery Attribute
|
PC
|
Warehouse Delivery
|
With this permission, the Ext. Attributes button on
the Warehouse Delivery Detail screen is displayed and enabled.
Without this permission, the button is not displayed.
|
|
|
Access Warehouse Quick Receiving
|
Handheld
|
Warehouse Delivery
|
With this permission the WH Quick Receiving menu option on
the Shipping/Receiving menu is displayed.
Without this permission the menu option is not displayed.
|
|
|
Add Item Warehouse Delivery
|
PC
|
Warehouse Delivery
|
With this permission, the Add Item
button on the Receive Case screen is displayed and enabled.
Without this permission, the button is not displayed.
|
|
|
Allow Receiving Damages for Warehouse Delivery
|
Handheld
|
Warehouse Delivery
|
With this permission, the Record Damages menu option on
the Container Summary screen is displayed.
Without this permission, the menu option is not displayed.
|
|
|
Amend Container
|
Handheld
|
Warehouse Delivery
|
With this permission the Amend menu option on the Identify
Container screen is displayed.
Without this permission the menu option is not displayed.
|
|
|
Amend Warehouse Delivery
|
Handheld
|
Warehouse Delivery
|
With this permission the Amend Delivery menu option on the
Delivery Summary screen is displayed.
Without this permission the menu option is not displayed.
|
|
|
Cancel Warehouse Delivery
|
Handheld
|
Warehouse Delivery
|
With this permission the Cancel Delivery menu option on
the Warehouse Delivery screen is displayed.
Without this permission the menu option is not displayed.
|
|
|
Confirm Warehouse Delivery
|
Handheld
|
Warehouse Delivery
|
With this permission the Confirm Delivery menu option on
the Delivery Summary screen is displayed.
Without this permission the menu option is not displayed.
|
|
|
Confirm Warehouse Delivery
|
PC
|
Warehouse Delivery
|
With this permission, the Confirm
button on the Receive Container screen is displayed and enabled.
Without this permission, the button is not displayed.
|
|
|
Delete Item Warehouse Delivery
|
PC
|
Warehouse Delivery
|
With this permission, the Remove Item
button on the Receive Case screen is displayed and enabled.
Without this permission, the button is not displayed.
|
|
|
Edit Warehouse Delivery
|
PC
|
Warehouse Delivery
|
With this permission, when the user double-clicks on an
existing Warehouse Delivery on the Warehouse Delivery List screen, the
Warehouse Delivery Detail screen will open in edit mode.
Without this permission, the Warehouse Delivery Detail
screen will open in view-only mode.
|
|
|
Edit Warehouse Delivery Attribute
|
PC
|
Warehouse Delivery
|
With this permission, the Apply, Add, Remove
and Cancel buttons on the Extended Attributes Entry screen are
displayed and enabled.
Without this permission, the buttons are not displayed.
|
|
|
Receive All Containers for Warehouse Delivery
|
Handheld
|
Warehouse Delivery
|
With this permission, the Receive All menu option on the
Delivery Information screen is displayed.
Without this permission the menu option is not displayed.
|
|
|
Receive Container Level for Warehouse Delivery
|
Handheld
|
Warehouse Delivery
|
With this permission the Receive Container menu option on
the Container Summary screen is displayed. Without this permission the menu
option is not displayed.
With this permission, the Receive Container menu option on
the Delivery Information screen is displayed. Without this permission, the
menu option is not displayed.
|
|
|
Receive Item Level for Warehouse Delivery
|
Handheld
|
Warehouse Delivery
|
With this permission the Receive Case Level menu option on
the Container Summary screen is displayed.
Without this permission the menu option is not displayed.
|
|
|
Receive Warehouse Delivery
|
PC
|
Warehouse Delivery
|
With this permission, the Receive
button on the Receive Container screen is displayed and enabled.
Without this permission, the button is not displayed.
|
|
|
Receive Warehouse Delivery In Shop Floor
|
Handheld
|
Warehouse Delivery
|
With this permission the Receive in Shop floor prompt on
the Receive Container screen is displayed.
Without this permission, the prompt is not displayed.
|
|
|
Receive Warehouse Delivery In Shop Floor
|
PC
|
Warehouse Delivery
|
With this permission, the Receive in Shop Floor check box
on the Receive Container screen is displayed and enabled.
Without this permission, the check box is disabled.
|
|
|
Record Missing Container
|
Handheld
|
Warehouse Delivery
|
With this permission the Record Missing menu option on the
Discrepancy Alert screen is displayed.
Without this permission the menu option is not displayed.
|
|
|
Unreceive Container
|
Handheld
|
Warehouse Delivery
|
With this permission the Un-Receive menu option on the
Identify Container screen is displayed.
Without this permission the menu option is not displayed.
|
|
|
Unreceive Warehouse Delivery
|
PC
|
Warehouse Delivery
|
With this permission, the Un-Receive
button on the Receive Container screen is displayed and enabled.
Without this permission, the button is not displayed.
|
|
B Appendix
This appendix discusses the object classes specified for the SIM
application security model. The LDIF file used to create the object classes can
be found in sim_objectclasses.ldif.
For more information, see "Setting up LDAP Data for SIM".
There are four SIM-defined Object Classes:
§
simRole
§
simStore
§
simUser
§
simUserRole
They are described in the following tables:
|
Table: simRole Object Class
|
|
Attribute Name
|
Mandatory
|
Description
|
|
roleName
|
Yes
|
Role Name.
Syntax: String.
|
|
Type
|
No
|
Type of a Role – Store or Corporate.
Syntax: String.
|
|
Description
|
No
|
Description of a Role.
Syntax: String.
|
|
Table: simStore Object Class
|
|
Attribute Name
|
Mandatory
|
Description
|
|
storeID
|
Yes
|
Store ID.
Syntax: String.
|
|
Table: simUser Object Class
|
Attribute Name
|
Mandatory
|
Description
|
|
superUser
|
Yes
|
Is user a superuser?
Syntax: Boolean (TRUE or FALSE)
|
|
empStatus
|
Yes
|
Employee’s status (0 = active, 1 = inactive, 2 =
deleted, 3 = locked).
Syntax: Integer
|
|
preferredCountry
|
No
|
Preferred country code.
Syntax: String
|
|
preferredLanguage
|
No
|
Preferred language code.
Syntax: String
|
|
Mail
|
No
|
E-mail address.
Syntax: String
|
|
telephoneNumber
|
No
|
Telephone number.
Syntax: String
|
|
externalID
|
No
|
External system ID.
Syntax: String
|
|
Supervisor
|
No
|
Supervisor.
Syntax: String
|
|
description
|
No
|
Descriptions or comments.
Syntax: String
|
|
startTimestamp
|
No
|
Start date.
Syntax: Generalized Time
|
|
endTimestamp
|
No
|
End date.
Syntax: Generalized Time
|
|
defaultStore
|
No
|
DN of the default store.
Syntax: String
|
|
userStores
|
No
|
DN of User’s stores, multiple values.
Syntax: String
This attribute is only used if the user is not a
super-user. Super-users do not use store assignments.
|
|
|
Table: simUserRole Object Class
|
Attribute Name
|
Mandatory
|
Description
|
|
roleName
|
Yes
|
Role assignment name.
Syntax: String
|
|
userRole
|
Yes
|
DN of role.
Syntax: String
|
|
userRoleStores
|
Yes
|
DN of stores that user role is assigned, multiple
values.
Syntax: String
|
|
StartTimestamp
|
No
|
Start time.
Syntax: Generalized Time
|
|
EndTimestamp
|
No
|
End time.
Syntax: Generalized Time
|
|
For this example, the name of the retail company is MyCompany and the parent directory of the SIM entries is cn=SIM,dc=mycompany,dc=com.
There are two subtrees for Roles and Stores:
cn=SIMRoles,cn=SIM,dc=mycompany,dc=com
cn=SIMStores,cn=SIM,dc=mycompany,dc=com
Users are stored in the following directory:
cn=Users,dc=mycompany,dc=com
A configuration file called ladp.cfg is located in the SIM Server
at sim-home/files/prod/config. See Chapter 2, "Backend System
Configuration" in Oracle Retail Store Inventory
Management Operations Guide for more information.
The keys SIM_DN and BASE_DN are defined in ldap.cfg. The BASE_DN
is the directory where the User container is located; and the SIM_DN directory
contains the parent directories for the Role and Store. For example:
BASE_DN= dc=mycompany,dc=com
SIM_DN= cn=SIM,dc=mycompany,dc=com
Sample data entries are described in this section.
For this example, the name of the retail company is MyCompany and the parent directory of the SIM entries is cn=SIM,dc=mycompany,dc=com.
DN of Store:
storeId=xxxx,cn=SIMStores,cn=SIM,dc=mycompany,dc=com
Where xxxx is a store ID. The following
is a sample LDIF file that adds the entry for Store 7000:
dn: storeId=7000,cn=SIMStores,cn=SIM,dc=mycompany,dc=com
changetype: addobject
Class: simStore
storeId: 7000
DN of Role:
roleName=xxxx,cn=SIMRoles,cn=SIM,dc=mycompany,dc=com
Where xxxx is a roleName defined in the
SIM database (SECURITY_ROLE.name). The following is a sample LDIF file that adds
the entries for ADMINISTRATOR and MANAGER:
dn: roleName=ADMINISTRATOR,cn=SIMRoles,cn=SIM,dc=mycompany,dc=com
changetype: addobject
Class: simRole
roleName: ADMINISTRATOR
type: Corporate
description: Corporate Administrator
dn: roleName=MANAGER,cn=SIMRoles,cn=SIM,dc=mycompany,dc=com
changetype: addobject
Class: simRole
roleName: MANAGER
type: Store
description: Store Manager
DN of User:
cn=xxxx,cn=Users,dc=mycompany,dc=com
Where xxxx is the username of an user.
The following is a sample LDIF file that adds a User Entry. The username is superuser1 and the default store is 7000,
and has access to stores 7000, 7010 and 7011.
|
Note
The attributes cn and uid should be the same, and are the login ID of the user.
|
dn: cn=superuser1,cn=Users,dc=mycompany,dc=com
changetype: addobject
class: top
objectclass: organizationalpers
onobjectclass: orcluser
objectclass: person
objectclass: orcluserv2
objectclass: inetorgperson
objectclass: simUser
cn: superuser1
uid: superuser1
superUser: TRUE
empStatus: 0
preferredCountry: US
preferredLanguage: en
givenname: superuser1
middleName: M1
sn: Superuser1
mail: superuser1@mycompany.com
telephoneNumber: 800-111-2222
externalId: superuser1
supervisor: X
description: SIM Store ID 7000 Super User.
startTimestamp: 20071026000000Z#
endTimestamp:
defaultStore:
storeId=7000,cn=SIMStores,cn=SIM,dc=mycompany,dc=com
userStores: storeId=7000,cn=SIMStores,cn=SIM,dc=mycompany,dc=com
userStores: storeId=7010,cn=SIMStores,cn=SIM,dc=mycompany,dc=com
userStores: storeId=7011,cn=SIMStores,cn=SIM,dc=mycompany,dc=com
userpassword: welcome1
DN of user role:
roleNa
me=xxxx,cn=user1,cn=Users,dc=mycompany,dc=com
Where xxxx is the role assigned to an user with username user1.
The following is a sample LDIF file that will add an entry for MANAGER role for
user User1:
dn: roleName=MANAGER,cn=user1,cn=Users,dc=mycompany,dc=com
changetype: add
objectclass: simUserRole
roleName: MANAGER
userRole: roleName=MANAGER,cn=SIMRoles,cn=SIM,dc=mycompany,dc=com
userRoleStores: storeId=7000,cn=SIMStores,cn=SIM,dc=mycompany,dc=com
userRoleStores:
storeId=7010,cn=SIMStores,cn=SIM,dc=mycompany,dc=com
userRoleStores:
storeId=7011,cn=SIMStores,cn=SIM,dc=mycompany,dc=com
C Appendix
Transfers allow a retailer to send inventory from one location to
another. Transfer requests provide stores the ability to ask for products from
other stores or allow corporate users to move inventory across stores using
RMS. SIM allows stores to add, edit, delete or send a request to another store
on the PC and Handheld.
Users will only be allowed to accept or reject a transfer request
awaiting response on the PC.
Transfer localization offers the following:
§
Ability to differentiate stock into different buckets depending
on stock status (for example, concept of in-transit stock, reserved for
transfer).
§
Ability to have a system that automatically updates stock
inventory on the basis of the status of the transfer.
§
Ability for the sending store to save the transfer and then later
return to the transfer and cancel, edit or dispatch the transfer.
§
System can be used to transfer stock between stores on the same
site (for example, Main Store to PFS). This would include the ability to
auto-accept stock without scanning items at the moment the transfer is
received.
§
Ability to differentiate stock into different buckets depending
on stock status (for example, Unavailable stock, Stock in transit).
§
Ability to have a system that automatically updates stock
inventory based on the status of the transfer.
§
Ability to alert when the transfer has not been received within a
specific time constraint (report or alert).
§
Automatically create corrective transfers of stock to rectify the
scenarios where the physically shipped stock does not match the stock recorded
on the initial transfer.
The following are process requirements for transfer localization.
SIM enforces transfer zones. Only stores within the same transfer
zone can send inventory to each other or create requests for each other.
If a store has a transfer zone of NULL, then SIM allows any store
to request from or ship to such a store. That means a NULL transfer zone is a
universal store.
This information is populated by RMS.
SIM allows certain stores to be setup for auto receiving.
SIM allows a partial group of stores to be selected that are
preferential entities to ship to.
This indicator is used only for store-to-store transfers.
§
System Admin: Transfer Force Close Indicator for Short Receiving.
– NL
– No Loss
– SL
– Sending Loss
– RL
– Receiving Loss
RMS needs to set up their system to match what SIM has for
this system admin setting.
|
Note
In SIM, the SL and RL attributes appear to function the
same. However, once they reach RMS they operate differently.
|
No Loss
Sending store is incremented or decremented by the
overage/shortage.
|
Table: No Loss Shortage: Shortage is Added Back
to the Sending Store
|
|
Sending Store
|
Receiving Store
|
|
Beginning SOH
|
1000 SOH
|
1000 SOH, 0 In Transit
|
|
Sent quantity 50
|
950 SOH
|
1000 SOH, 50 In Transit
|
|
Received quantity 30 (shortage)
|
970 SOH
|
1030 SOH, 0 In Transit
|
|
Table: Overage: Overage is Always Deducted from
the Sending Store
|
|
Sending Store
|
Receiving Store
|
|
Beginning SOH
|
1000 SOH
|
1000 SOH, 0 In Transit
|
|
Sent quantity 50
|
950 SOH
|
1000 SOH, 50 In Transit
|
|
Received quantity 70 (overage)
|
930 SOH
|
1070 SOH, 0 In Transit
|
Sending Loss
For shortages, no perpetual inventory is sent back to the sending
store. Sending store is financially responsible.
|
Note
This is handled on the RMS side.
|
|
Table: Sending Loss Shortage: Shortage is not
Added Back
|
|
Sending Store
|
Receiving Store
|
|
Beginning SOH
|
1000 SOH
|
1000 SOH, 0 In Transit
|
|
Sent quantity 50
|
950 SOH
|
1000 SOH, 50 In Transit
|
|
Received quantity 30 (shortage)
|
950 SOH
|
1030
, 0 In Transit
|
|
Table: Sending Loss Overage: Overage is Deducted
from the Sending Store
|
|
Sending Store
|
Receiving Store
|
|
Beginning SOH
|
1000 SOH
|
1000 SOH, 0 In Transit
|
|
Sent quantity 50
|
950 SOH
|
1000 SOH, 50 In Transit
|
|
Received quantity 70 (overage)
|
930 SOH
|
1070 SOH, 0 In Transit
|
Receiving Loss
For shortages, no perpetual inventory is sent back to the sending
store. Receiving store is financially responsible.
|
Note
This is handled on the RMS side.
|
|
Table: Receiving Loss Shortage: Shortage is not
Added Back
|
|
Sending Store
|
Receiving Store
|
|
Beginning SOH
|
1000 SOH
|
1000 SOH, 0 In Transit
|
|
Sent quantity 50
|
950 SOH
|
1000 SOH, 50 In Transit
|
|
Received quantity 30 (shortage)
|
950 SOH
|
1030
, 0 In Transit
|
|
Table: Overage: Overage is Deducted from the
Sending Store
|
|
Sending Store
|
Receiving Store
|
|
Beginning SOH
|
1000 SOH
|
1000 SOH, 0 In Transit
|
|
Sent quantity 50
|
950 SOH
|
1000 SOH, 50 In Transit
|
|
Received quantity 70 (overage)
|
930 SOH
|
1070 SOH, 0 In Transit
|
When this parameter is set to No, then
the Transfer detail dialog allows the user to receive more or less. If the
parameter is set to Yes, then the dialog is modified to
only allow the user to receive the entire transfer.
The receiving store in SIM will see the shipped quantities immediately
on dispatch by the sending store. This process will update the in transit
quantities and reduce outstanding transfer values.
|
Note
SIM can be configured to not allow some users to start
receiving these transactions, but this is handled through security.
|
The transfer reserved quantity for the outbound location will
decrease as will the stock on hand for the outbound location.
The receiving location will have its in-transit bucket updated
with the ship quantity. The transfer quantity is removed from the in-transit
bucket to the stock-on-hand bucket when the receiving store receives the
transfer.
The transaction must be recorded in the staging table. A record
is written for the sending store when the transfer is dispatched and a record
is written when the transfer is received by the receiving store.
If the transfer contains packs then the stock movement should
follow additional rules:
§
Non-sellable simple packs – adjust the quantity at the component
level. The pack number will not hold inventory. For example: If a transfer
contains Pack A with a transfer quantity of two, and Pack A is made up of Item
B (quantity of three), then when the transfer is dispatched, the stock-on-hand
for Item B at the sending store is decremented by six (two units of Pack A
multiplied by three units of Item B). The in-transit bucket at the receiving
store, for Item B, is incremented by six.
§
Non-sellable complex packs - adjust the quantity at the component
level. The pack number will not hold inventory. For example: If a transfer
contains Pack A with a transfer quantity of two, and Pack A is made up of Item
B and Item C, then when the transfer is dispatched, the stock-on-hand for Item
B at the sending store is decremented by two (two units of Pack A multiplied by
one unit of Item B), and Item C is decremented by two. The in-transit bucket at
the receiving store is incremented for each item by the respective amount.
§
Sellable simple packs – adjust the quantity at the pack level.
For example: If Pack A is a sellable pack and a transfer is dispatched with a
transfer quantity of five, then the stock-on-hand at the sending store for Pack
A is decremented by five, and the in-transit quantity for the receiving store
is incremented by five.
§
Sellable complex pack – adjust the quantity at the pack level.
Has the same stock movement as the sellable simple pack.
§
If the transfer’s receiving location is an auto close location,
then the transfer is considered received when it is dispatched from the sending
store:
– The
status of the transfer is Received.
– The
received quantity is equal to the transfer quantity.
– The
delivery date and close date equal the dispatch date.
– A
record for the receiving store is inserted into the staging table.
– Stock-on-hand
will be incremented at the receiving location and decremented at the sending
location. The in-transit bucket is not affected.
D Appendix
UPC-E items compress a normal 12-digit UPC-A item into six
digits. SIM has the ability to decompress UPC-E barcodes to UPC-A. A seventh
digit acts as a check digit for the UPC-E number. When the user scans the UPC-E
barcode, SIM finds the UPC-A barcode and displays the item ID associated with
it.
UPC-E is also called zero suppressed UPC because UPC-E compresses
a normal twelve-digit UPC-A number into a six-digit code by suppressing the
number system digit, trailing zeros in the manufacturers code and leading zeros
in the product identification part of the bar code message. A seventh check
digit is encoded into a parity pattern for the six main digits. UPC-E can thus
be uncompressed back into a standard UPC-A twelve-digit number.
|
Note
Most bar code readers can be configured to automatically
convert six-digit UPC-E numbers to twelve-digit UPC-A numbers before they are
transmitted to a host computer.
|
The main difference between a UPC-A symbol and a UPC-E symbol is
the size. The following image presents a UPC-A bar code (left) and the same
data encoded as a UPC-E bar code (right):
Figure: UPC-A and UPC-E
Differences
To convert between UPC-A and UPC-E bar code numbers, you can use
the following table or try online UPC-E converter program. In the following,
the number 0 and each of the letters (a, b, c, d and e) represent individual digits in the bar code message. The
letter X represents the UPC check digit.
|
Table: UPC Conversion Table
|
|
UPC-A Number
|
Equivalent UPC-E
|
Notes
|
|
0ab00000cdeX
|
abcde0X
|
Manufacturer code must have two leading digits with three
trailing zeros and the item number is limited to three digits (000 to 999).
|
|
0ab10000cdeX
|
abcde1X
|
Manufacturer code must have three leading digits ending
with 1 and two trailing zeros. The item number is
limited to three digits.
|
|
0ab20000cdeX
|
abcde2X
|
Manufacturer code must have three leading digits ending with
2 and two trailing zeros. The item number is limited
to three digits.
|
|
0abc00000deX
|
abcde3X
|
Manufacturer code must have three leading digits and two
trailing zeros. The item number is limited to two digits (00 to 99).
|
|
0abcd00000eX
|
abcde4X
|
Manufacturer code must have four leading digits with one
trailing zero and the item number is limited to one digit (0 to 9).
|
|
0abcde00005X
0abcde00006X
0abcde00007X
0abcde00008X
0abcde00009X
|
abcde5X
abcde6X
abcde7X
abcde8X
abcde9X
|
Manufacturer code has all five digits. The item number is
limited to a single digit consisting of either 5, 6, 7, 8 or 9.
|
Not all UPC-A numbers can be compressed to UPC-E. These codes
with a corresponding UPC-E code must have at least four zeros. The requirements
are:
1. If
the manufacturer code ends with 000, 100, or 200, the UPC-E code consists of
the first two characters of the manufacturer code, the last three characters of
the product code, followed by the third character of the manufacturer code. In
this case, the product code must be 00000 and 00999.
2. If
the manufacturer code ends with 00 but does not meet the first requirement, the
UPC-E code consists of the first three characters of the manufacturer code, the
last two characters of the product code, followed by digit 3.
The product code can only contain two digits (00000 to 00099).
3. If
the manufacturer code ends in 0 but none of the
previous qualifies, the UPC-E consists of the first four digits of the
manufacturer code and the last digit of the product code, followed by the digit
4. The product code in this case can only contain one
digit (00000 to 00009).
4. If
the manufacturer code ends with non-zero digit, the UPC-E code consists of the
manufacturer code and the last digit of the product code. In this case the
product case can only be one from 00005 to 00009 because 0 through 4 has been
used for the previous four cases.
For a free web-based utility for converting between UPC-A
and UPC-E, go to the following URL:
http://www.morovia.com/education/utility/upc-ean.asp
Quick Response (QR) Codes are two dimensional bar codes that can
be generated to represent any text, most often a custom URL. They can be read
by a number of mobile applications through a phone’s camera, and provide a way
to hyperlink to the physical world. QR Codes can be placed next to products to
provide further information or digital coupons, even if the QR Code is on a
billboard or store signage. QR Codes and the associated web sites are
controlled by the retailer, thus allowing them to recapture control of product
research in their store, as well as provide value added information and digital
coupons.
QR code functionality in SIM allows the user to:
§
Track the image reference to QR Codes at the item/location/image
type/time level
§
Generate tickets/labels by location when QR codes change based on
time/entry using the existing ticket/label dialogues
§
Configure the generation of tickets and/or labels automatically
§
Print tickets and labels with QR codes
§
Allow external systems to integrate QR references within SIM
By running the batch, SIM creates a ticket or label entry in the
ticketing screen following the standard pattern of ticketing and labeling. This
is configurable.