| Oracle® Retail Store Inventory Management Store User Guide Release 16.0 E76179-08 |
|

 Previous |
 Next |
| Oracle® Retail Store Inventory Management Store User Guide Release 16.0 E76179-08 |
|
Previous |
Next |
This chapter describes inventory adjustments. The following topics are covered:
Overview: Introduction to inventory adjustments.
Functionality: Inventory adjustments and templates.
MAF: Screens.
Technical: Integration with Oracle Retail Integration Bus (RIB), web services, batch, and the database structure.
Inventory Adjustments allow a retailer to change the number of units in stock or mark them as non-sellable due to damage and other reasons:
Inventory adjustments are the manual adjustment of an item's inventory by a store user for a given reason.
Inventory adjustments change inventory positions based upon a reason code which is associated to a disposition. Depending on the disposition, different inventory buckets are updated.
Sub-buckets allow for the tracking of unavailable inventory into smaller buckets such as repair, recall, or damaged. Sub-buckets are system configurable and can be turned off.
Multiple line items can be associated to a single inventory adjustment header transaction.
|
Note: Inventory adjustments are published at the item level to the merchandising system. |
Inventory adjustments can be saved. This allows different people to create and approve the transaction.
Templates allow for quick and easy application of the same inventory adjustment multiple times.
A copy feature exists to replicate a completed adjustment.
Adjustments to stock from other areas of the system do not create inventory adjustment records. They are transaction history records. See "Transaction History" (Stock Count Adjustments, Receiving Damaged goods, Returning of Unavailable stock, Late Sales, Wastage, and Customer Orders).
Inventory Adjustments can be used to adjust inventory in the store up or down, or mark items available or unavailable, for any reason the user should choose. For example, Inventory Adjustments can be used to decrease available sellable stock when items are found to be damaged, thus moving the inventory from Available stock to Unavailable (non-sellable) stock.
Sub-buckets are used to separate unavailable inventory into individual buckets, such as those items that are needed for display ("display" sub-bucket) and those that are needed for repair ("repair" sub-bucket).
A return coming to SIM from the Point of Sale can automatically move an item into available inventory or unavailable inventory or remove it from inventory per the reason on the return.
When a customer makes a return, the associate can assign a reason code on what needs to happen with that item that ties into SIM back to the disposition and possible sub-bucket allowing for additional inventory adjustment processing, such as, an electronic item is returned and the box has been opened. The sales associate marks the item as "requires validation." This reason code moves the item into the "requires validation" sub-bucket, which can then in its turn be analyzed by a technician who can, depending on business process, dispose of the item (remove from stock), return it to the vendor (move to other sub-bucket) or warehouse, or mark it as available for sale (remove from sub-bucket).
Inventory Adjustment Templates can be used for repetitive grouped transactions such as receipts or basket creation use, for example, making Chocolate Chip cookies for a baker. The template would be used to convert 1 kilogram of flour, a dozen eggs, a carton of milk, and 1 kilogram of Belgian chocolate chips into 120 chocolate chip cookies. All ingredients would have reasons that would decrease inventory and the cookies would increase inventory. The template receipt allows the user to reapply the same ingredient ratio multiple times without having to add the individual items to the inventory transaction each time when creating a new batch of cookies.
Complex Packs can be made in a very similar way using templates for basket creation over the holidays. For example: 1 Face Wash, 1 Moisturizer, and 1 Body Spray can be used to create 1 Spa Basket.
Inventory Adjustments exist under the Inventory Management menu. From the Inventory Adjustment List screen, the user can filter the records as needed. The user can then view, create, edit, copy, and apply templates on the Inventory Adjustment Detail screen for an inventory adjustment. Within Inventory Adjustments, the Template dialog lists the templates where the user can filter the templates. The user can also view, create, and edit templates on the Template Detail screen.
This section covers store parameters and security.
Search Limit for Inventory Adjustments
Values: 1 - 999�
Default: 500�
Topic: UI�
Editable: Yes
Defines how many inventory adjustment records are returned in the Inventory Adjustment List screen.
Enable Sub-Bucket
Values: Yes/No
Default: Yes
Topic: Admin
Editable: No
Defines if the retailer breaks their unavailable inventory up into smaller buckets.
If this is set to "No," sub-buckets are not used anywhere in the system.
If it is set to "Yes," the system uses sub-buckets within inventory adjustments and returns.
Search Limit Default for Inventory Adjustments - Mobile
Values: 1 - 999�
Default: 50�
Topic: UI�
Editable: Yes
Default search limit for the Inventory Adjustment List screen.
Display Item Image for Inventory Adjustments - Mobile
Values: Yes/No
Default: No
Topic: Inventory Adjustments
Editable: Yes
If it is set to "Yes," the item image is displayed on the Inventory Adjustment Detail screen.
Security permissions exist for:
Accessing, creating, editing, completing, and deleting inventory adjustments.
Accessing, applying, and deleting templates.
Creating UIN on the Fly.
Edit Quantity (MAF Only).
All permissions exist on the PC, handheld, and MAF applications where applicable.
Data Permissions exist for reason codes:
A user must have the proper permissions for a reason code to proceed with creating, editing, or deleting an adjustment or template for a particular reason code.
Access permissions exist for the Inventory Adjustment Reason Code Maintenance.
|
Note: A very common problem is that a new reason code is created, but is not associated to the role the user has been granted. If that does happen, the user will not be able to use the new reason code. |
This section describes the available screens and templates.
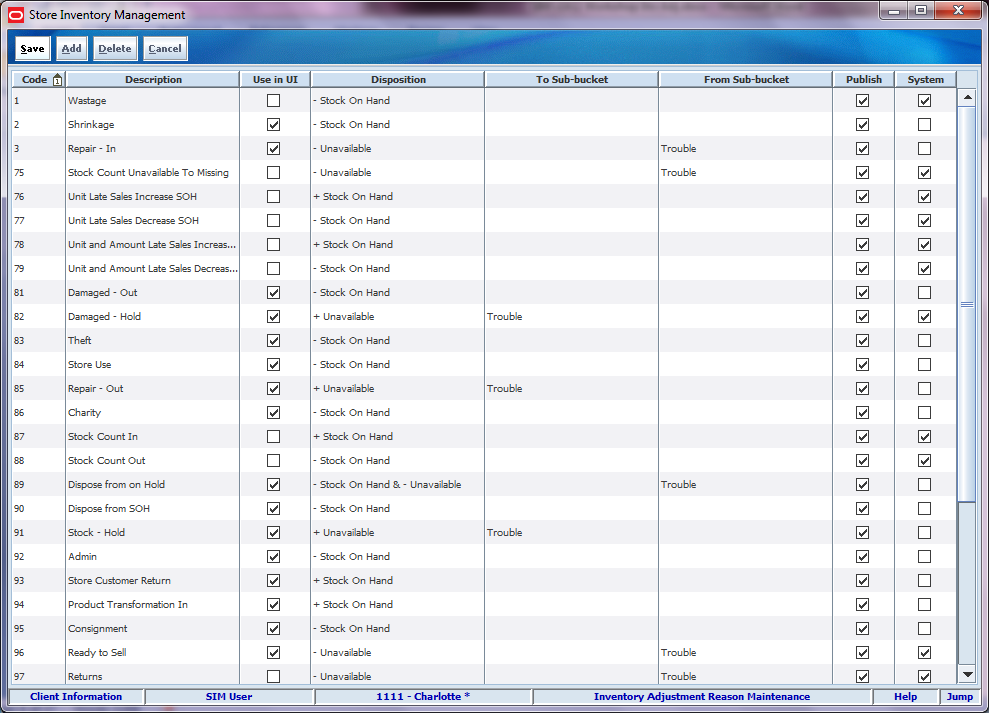
The Inventory Adjustment Reason Maintenance screen is an administrative screen on the PC application for the creation and maintenance of inventory adjustment reason codes. The reason codes are used within inventory adjustments and inventory adjustment templates. Upon initial install, a list of default inventory adjustment reason codes is available. The reason codes defined in SIM need to match that of the merchandising system.
The following table provides the list of SIM Inventory Adjustment reason codes:
| Code | Reason | Disposition | To Sub-Bucket | From Sub-Bucket | UI | System | Transaction | Publish Ind |
|---|---|---|---|---|---|---|---|---|
| 1 | Wastage | -Stock on Hand | No | Yes | Wastage | Yes | ||
| 2 | Shrinkage | -Stock on Hand | Yes | No | Yes | |||
| 3 | Repair - In | -Unavailable | Trouble | Yes | No | Yes | ||
| 75 | Stock Count Unavailable to Missing | -Unavailable | Trouble | No | Yes | Stock Count for UINs | Yes, all types except Unit and Amount | |
| 76 | Unit Late Sales Increase SOH | +Stock on Hand | No | Yes | Late Sales | Yes | ||
| 77 | Unit Late Sales Decrease Sales | -Stock on Hand | No | Yes | Late Sales | Yes | ||
| 78 | Unit and Amount Late Sales Increase SOH | +Stock on Hand | No | Yes | Late Sales | Yes | ||
| 79 | Unit and Amount Late Sales Decrease SOH | -Stock on Hand | No | Yes | Late Sales | Yes | ||
| 81 | Damaged - out | -Stock on Hand | Yes | No | Yes | |||
| 82 | Damaged - Hold | +Unavailable | Trouble | Yes | Yes | Receiving of Damages | Yes | |
| 83 | Theft | -Stock on Hand | Yes | No | Yes | |||
| 84 | Store Use | -Stock on Hand | Yes | No | Yes | |||
| 85 | Repair - Out | +Unavailable | Trouble | Yes | No | Yes | ||
| 86 | Charity | -Stock on Hand | Yes | No | Yes | |||
| 87 | Stock Count In | +Stock on Hand | No | Yes | Stock Count | Yes, all types except Unit and Amount | ||
| 88 | Stock Count Out | -Stock on Hand | No | Yes | Stock Count | Yes, all types except Unit and Amount | ||
| 89 | Dispose from on Hold | -Stock on Hand and -Unavailable | Trouble | Yes | No | Yes | ||
| 90 | Dispose from SOH | -Stock on Hand | Yes | No | Yes | |||
| 91 | Stock - Hold | +Unavailable | Trouble | Yes | No | Yes | ||
| 92 | Admin | -Stock on Hand | Yes | No | Yes | |||
| 93 | Store Customer Return | +Stock on Hand | Yes | No | Yes | |||
| 94 | Product Transformation In | +Stock on Hand | Yes | No | Yes | |||
| 95 | Consignment | -Stock on Hand | Yes | No | Yes | |||
| 96 | Ready to Sell | -Unavailable | Trouble | Yes | Yes | RUA Decrease Receiving | Yes | |
| 98 | Product Transformation Out | -Stock on Hand | Yes | No | Yes | |||
| 180 | Customer Order Reservations - In | +Customer Order | No | Yes | Reserve Customer Order In POS | Yes | ||
| 181 | Customer Order Reservations - Out | -Customer Order | No | Yes | Cancel Fulfill Customer Order in POS | Yes | ||
| 182 | Stock In | +Stock on Hand | Yes | Yes | Moving UIN from another store in Inventory Adjustments | Yes | ||
| 183 | Stock Out | -Stock on Hand | Yes | No | Yes | |||
| 184 | Unit Late Sales Inventory Adjustment Increase SOH | +Stock on Hand | No | Yes | Inventory Adjustment Late Sales Unit | Yes | ||
| 185 | Unit Late Sales Inventory Adjustment Decrease SOH | -Stock on Hand | No | Yes | Inventory Adjustment Late Sales Unit | Yes | ||
| 186 | Unit and Amount Late Sales Inventory Adjustment Increase SOH | +Stock on Hand | No | Yes | Inventory Adjustment Late Sales UA | Yes | ||
| 187 | Unit and Amount Late Sales Inventory Adjustment Decrease SOH | -Stock on Hand | No | Yes | Inventory Adjustment Late Sales UA | Yes | ||
| 188 | Receipt Hold | -Unavailable | Trouble | No | Yes | Receiving Unavailable | Yes |
All reason codes have a disposition associated with them. The disposition is used to define the direction of stock movement for the adjustment. The following table lists the available dispositions:
| From Disposition | To Disposition | Display value |
|---|---|---|
| ATS | DIST | - Stock On Hand |
| ATS | TRBL | + Unavailable |
| DIST | ATS | + Stock On Hand |
| TRBL | ATS | - Unavailable |
| ATS | COR | + Customer Order Reserve |
| COR | ATS | - Customer Order Reserve |
| TRBL | DIST | - Stock On Hand and - Unavailable |
| TRBL | TRBL | -Unavailable and + Unavailable |
Those reason codes that have the "Use in UI" indicator checked appear as reason codes in the Inventory Adjustment dialog.
System reason codes cannot be removed and can only have the description edited. System reason codes are those used within the SIM system for making stock on hand updates, for example, "Stock Count-In" which is used within stock counts.
|
Note: These are not considered inventory adjustments as the stock count itself represents the transaction of the change. |
If the system is configured to use sub-buckets, then the sub-buckets are enabled. Sub-buckets are linked with the inventory adjustment reason codes to make it easy for users to move inventory to, from, and between sub-buckets when adjusting unavailable stock. An example is stock reserved for display or demonstration purposes versus stock that is unavailable because it needs to be repaired. A sub-bucket is a pre-populated list which is defined in the database.
If using sub-buckets, all reason codes that have a disposition which is "to unavailable" stock require a "to sub-bucket" to be selected. Those reason codes that have a disposition which are from unavailable stock require a "from sub-bucket" to be selected.
Note that the -Unavailable and + Unavailable is a disposition used for those retailers that are configured to use sub-buckets. It allows movement of inventory from one sub-bucket to another only within SIM. The inventory stays within the unavailable bucket. These adjustments are not published.
The Publish indicator is used for integration purposes. If this check box is checked, the adjustments associated with that reason code are published upon completion of the adjustment. This indicator can only be modified for those reason codes which are normally editable (non-system reason codes). All reason codes installed on setup have this indicator checked, meaning they are published.
|
Note: A common use of the Publish indicator is the support of initial inventory position seeding from the merchandise system during implementation. Inventory adjustments may come to SIM (through a web service) and SIM then updates the inventory per the adjustment; the adjustments do not get published out to the external system per the Publish indicator. Also, the Publish indicator can be used to update SIM inventory positions in a custom RMS or third-party implementation to sync both inventory positions with the corporate system. |
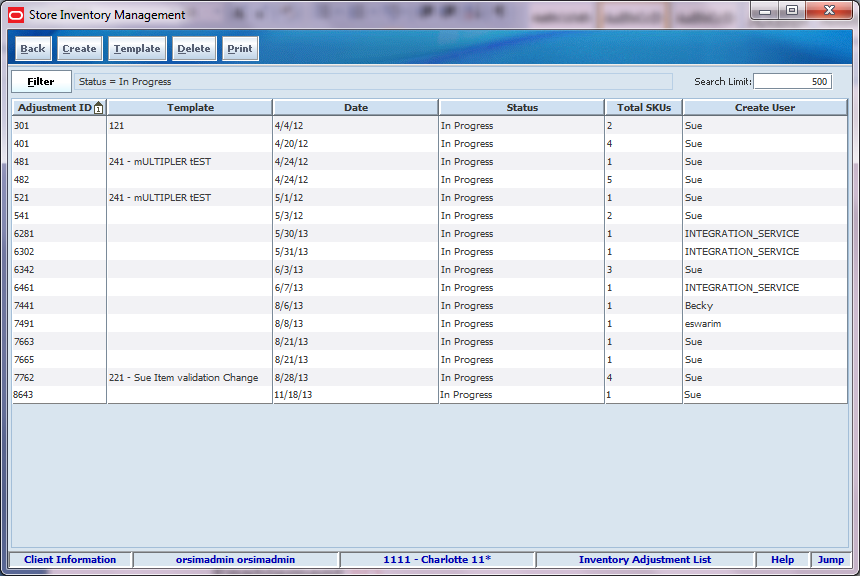
All manually created inventory adjustments as well as those created by an external system, such as through the web service, appear in the Inventory Adjustment list screen. The system defaults to display all "In Progress" status inventory adjustments. The Filter button opens a filter screen allowing for further filtering of the inventory adjustments.
By clicking an adjustment in the list, the user navigates to the Inventory Adjustment Detail screen for that transaction.
Each inventory adjustment is a transaction with one or more items on it with one adjustment ID. The Total SKUs column states how many line items are on the inventory adjustment transaction. Additional header level information for the adjustment is listed including template, date, status, and user.
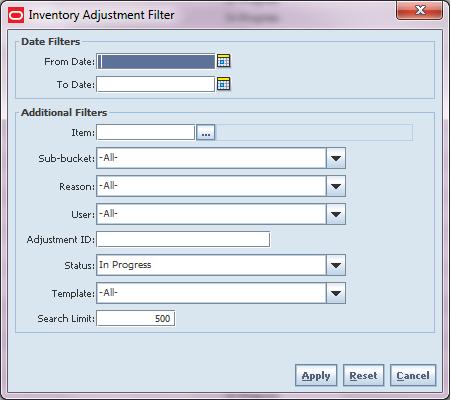
The Inventory Adjustment Filter screen is accessed by clicking the Filter button from the Inventory Adjustment List screen. The user can filter on various search criteria. After applying the filter, the user is returned to the Inventory Adjustment List screen with the adjustments displayed per the entered criteria.
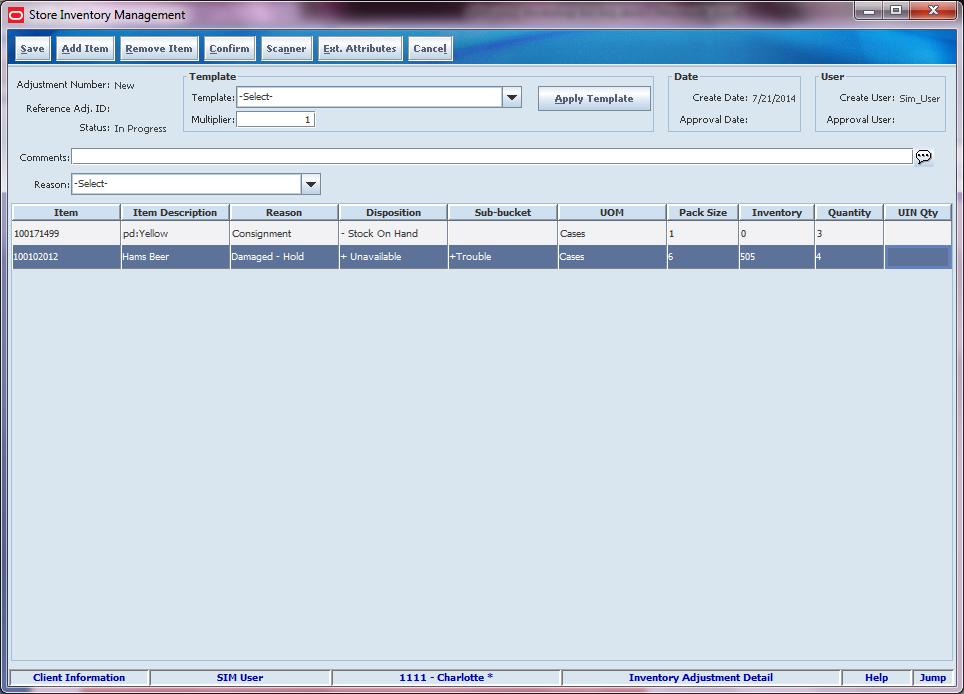
The Inventory Adjustment Detail screen is accessed by clicking the Create button to create a new adjustment or double clicking an adjustment record to view or edit the adjustment. Both of these methods can be used from the Inventory Adjustment List screen.
When creating an inventory adjustment, the user can add multiple items. All of those items are grouped together under a single adjustment ID having one header transaction. The item must be unique on the adjustment.
Reason codes are available at the header level, as well as, the line item level. When selected at the header level, the selected reason code automatically defaults for all of the items being added to the inventory adjustment transaction. The user still has the option of overwriting that reason code at the detail level. Once the reason code is changed at the header, it uses the newly changed reason code for all newly added items from that point onward.
The reason codes have a disposition associated to them which determines stock movement of the item. Once a reason code is selected, the disposition and sub-bucket for the reason is displayed. This is purely informational to aid in making adjustments. Sub-buckets are only displayed if the system is configured for them.
Within the adjustment details, SIM displays the inventory for the item. This quantity represents a different bucket depending on the reason code. If the user selects a reason to take out of available inventory, this field represents the available inventory bucket. If the user takes out of the adjustment unavailable bucket, non-sellable bucket, it shows that quantity.
The quantity being adjusted may exceed available inventory, however, it may not exceed unavailable inventory. The system validates the inventory bucket based upon the disposition associated to the reason code.
For those items that are UIN items, the user may be required to capture UINs:
All non-AGSN (Auto Generated Serial Numbers) UINs require UINs to be captured, regardless of the disposition of stock movement. The quantity field cannot be entered for non AGSN UIN items. It gets updated as the UINs get added and removed from the adjustment.
For AGSN items, if a reason code has a disposition of anything except Out of Stock to In Stock (+Stock on Hand), a UIN is required to be captured. This is because the UIN already exists in the system and the system needs to know which AGSN UIN is being adjusted. In this case, the quantity field cannot be entered; it is updated as the AGSN is added/removed.
For AGSNs being adjusted from Out of Stock to In Stock (+ Stock on Hand), the system auto generates the AGSN number and print upon completion of the adjustment. This means that capturing of the AGSN is not required and the quantity can be entered. However, the user may still capture the serial number if one exists. In this case, the system auto-generates the serial numbers and print for those where the quantity entered exceeds the UINs captured.
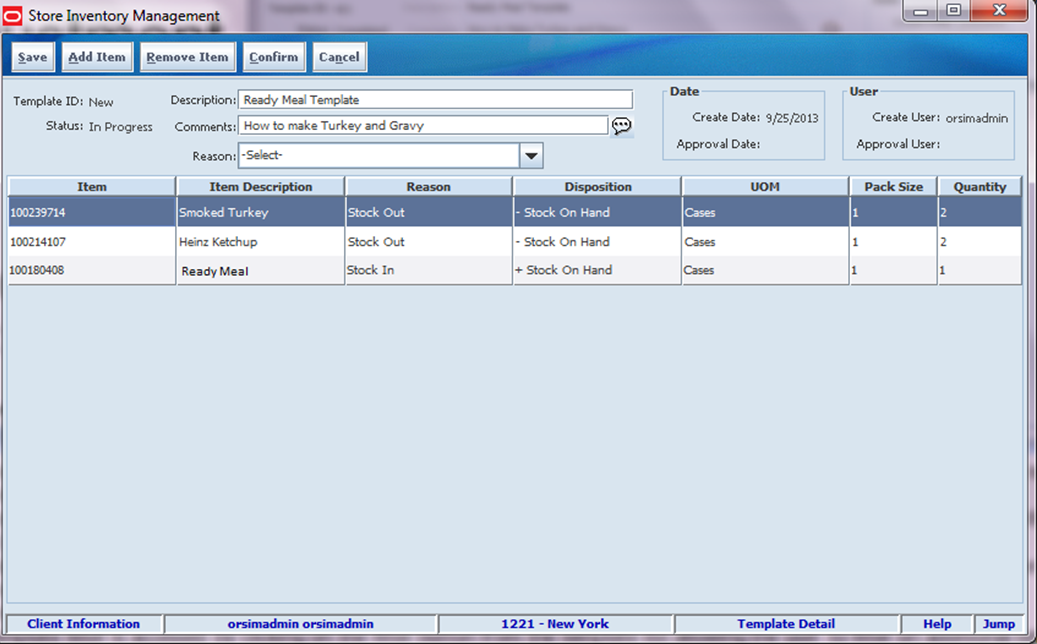
A template can be applied to the adjustment. This is an optional step that allows the user to select a template from the list and apply it which takes all the items, reasons, and quantities from the template and applies them to the adjustment. If needed, the user can enter a multiplier which takes all the quantities from the template and multiplies them by the multiplier. For example: Ham, quantity 1 lb., Bread quantity 2 EA. If the multiplier is 2, it gives Ham, quantity 2 lb., Bread quantity 4 EA. Once a template is applied, the user can still add and remove items as well as update the quantities.
It is possible to copy an existing inventory adjustment. This can occur by entering an existing "Completed" status adjustment and selecting the Copy button. The copy feature is not available if the adjustment contains UIN items. After doing a copy, a new inventory adjustment is created with all of the items, quantities, and reasons which were on the original adjustment. There is a Reference Adjustment ID on the newly copied adjustment which holds the adjustment ID for any inventory adjustment that has been copied.
Lastly, the inventory adjustment can be saved or completed. Saving allows an adjustment to be saved in an "In Progress" status to be completed later. Saving an adjustment does not publish the adjustment nor does it reserve any inventory; it simply saves it. The Save button can be used to implement a Save and Approval process. Confirming the adjustment completes the adjustment. The stock on hand bucket is updated based upon the quantity and reason code disposition.
If the inventory adjustment is first saved, and later the user opens up the transaction and tries to confirm, item level validation is performed again. This is especially important for sub-buckets since it is not allowed to become negative.
Templates are created when the user has items that need to be routinely adjusted. A template for the item, reason, and quantity can be created and then applied to an inventory adjustment to quickly replicate it.Templates are accessed by clicking the Template button on the Inventory Adjustment List screen. This takes the user to the Template List screen which shows by default all "In Progress" or, in other words, saved templates. "In Progress" status templates can be edited. They can also be deleted from the Template List screen. The templates can be filtered further by using the Template Filter.
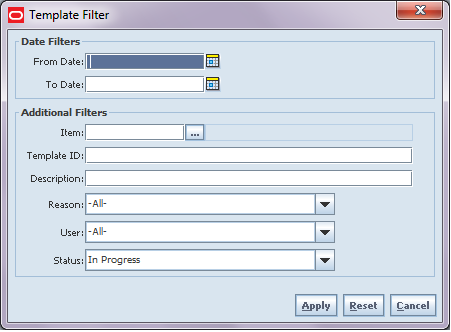
The Template Filter screen is accessed by selecting the Filter button on the Template List screen. The filter allows a user to search for templates using various search criteria. After applying the filter, the user is returned to the Template List screen with the templates displayed per the entered criteria.
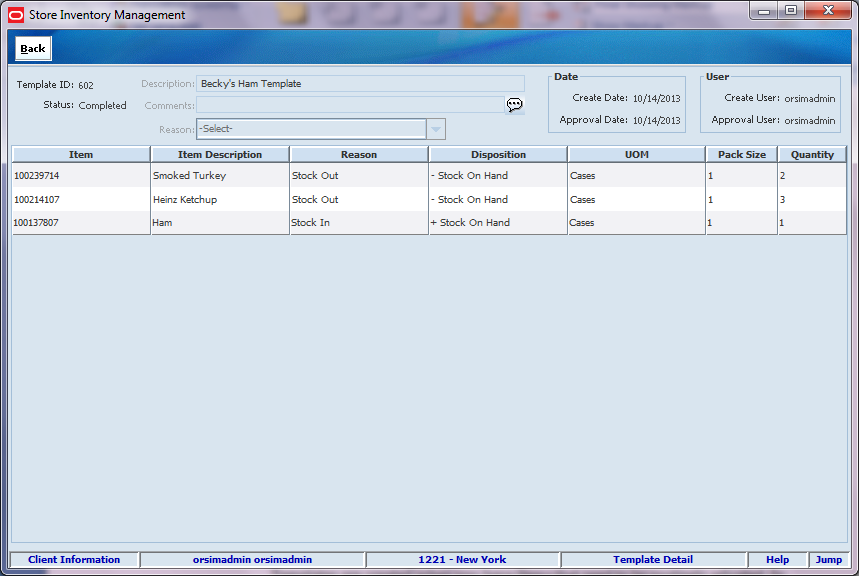
The Template Detail screen is accessed by clicking a template in the Template List screen to view or edit the details of an existing template. To create a new template, click the Create button in the Template List screen.
Creating a template is similar to creating an inventory adjustment. When creating a new template, all templates require a description. The comments, however, are optional. The user enters the items that need to be in the template along with their reason and quantity. The disposition for the reason as well as sub-bucket (if applicable and configured) is displayed to assist.
A few restrictions exist when creating templates:
Reason codes are restricted to those reason codes which do not touch the unavailable inventory or non-sellable bucket.
UIN items cannot be added to templates. The main reason for these restrictions is that template functionality is built out for generic processes and UIN usage and adjusting unavailable inventory is very specific.
Templates can be saved as "In Progress" to edit and complete later, or they can be confirmed which sets the template to a "completed" status. Only completed status templates are available to be applied to an inventory adjustment.
The creation of templates does not exist on the handheld application; however, they can be applied to inventory adjustments on the PC, handheld, and MAF.
All validations and rules for inventory adjustments on MAF are the same as those for the PC application. Inventory Adjustments exist in a small and large form factor on MAF. The following features are available:
Search for inventory adjustments
Create a new inventory adjustment
Create a new inventory adjustment from a template
Copy an existing inventory adjustment
View or edit an existing inventory adjustment
Delete "In Progress" adjustments
Print inventory adjustments
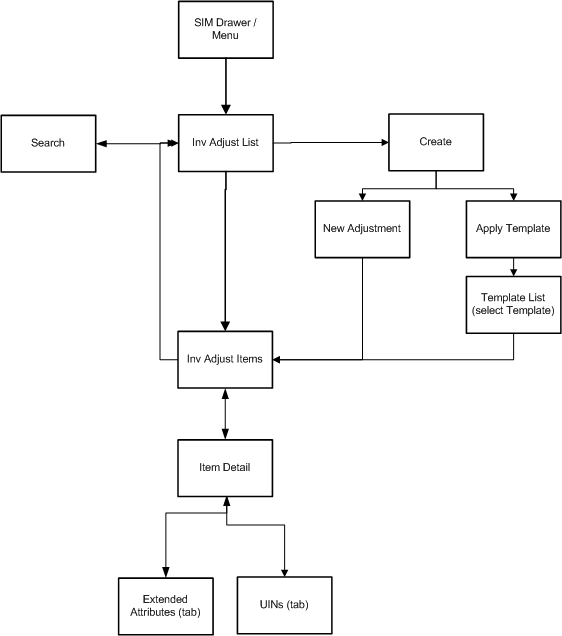
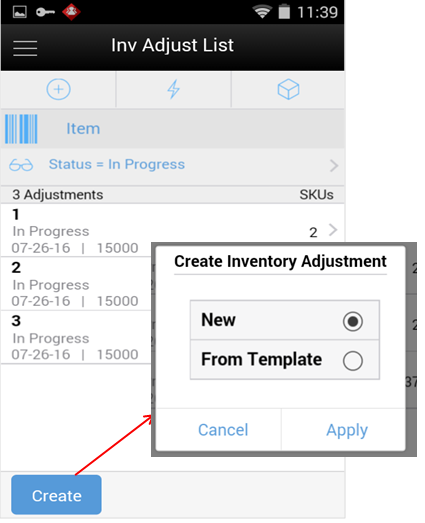
Inventory Adjustments are accessed on MAF through the Inventory Adjustment menu within the drawer. Selecting the menu option takes the user to the Inv Adjust List screen. On this screen, the user has the option to search for adjustment records which will be presented on the Inv Adjust List screen. The user has the option to create an inventory adjustment, apply a template to create an adjustment, or edit or view an adjustment. When creating, editing, or viewing an inventory adjustment, the user is first be directed to the list of items on the Inv Adjust Items screen. The user can add, view, and edit the details of the items on the Item Detail. On the Item Detail screen, there are tabs for UINs as well as Extended Attributes if the system and/or item is configured for these.
When navigating to Inventory Adjustments, the user is taken to the Inv Adjust List screen with the default list being defined for "In Progress" adjustments.
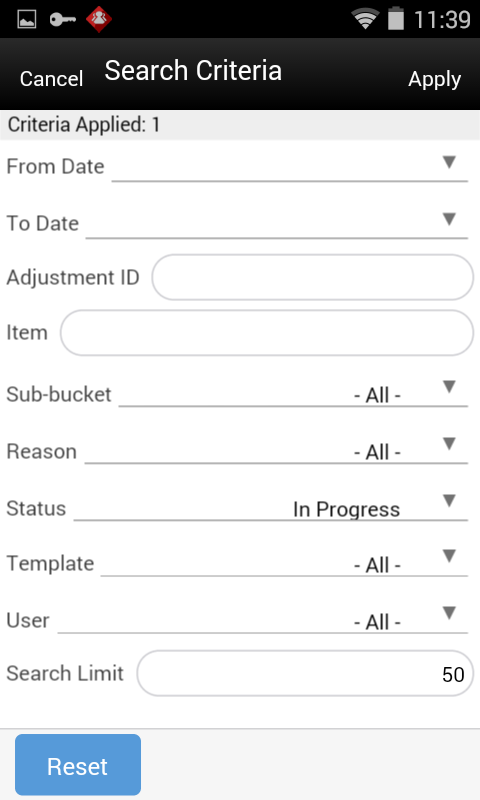
The user can use the search criteria eye glasses to navigate to the Inventory Adjustment Search Criteria screen to enter search criteria for inventory adjustments. When scanning/entering an item in the scan bar, the system adds the scanned item to the entered search criteria and narrows down the current list of adjustments by the item that was scanned.
The Create button prompts the user to create a new adjustment either from scratch or by applying a template. Creating a new adjustment directs the user to the Inv Adjust Items screen with no details (items) to build a new inventory adjustment. Creating an inventory adjustment from template prompts the user to select the template to apply prior to going to the inventory adjustment details. Lastly, selecting an adjustment from the list navigates to the details for that adjustment.
The Inventory Adjustment Search Criteria Screen is accessed by the eye glasses on the Inventory Adjustment List (Inv Adjust List) screen. After applying the search criteria, the results are listed on the Inv Adjust List screen and the criteria applied is shown.
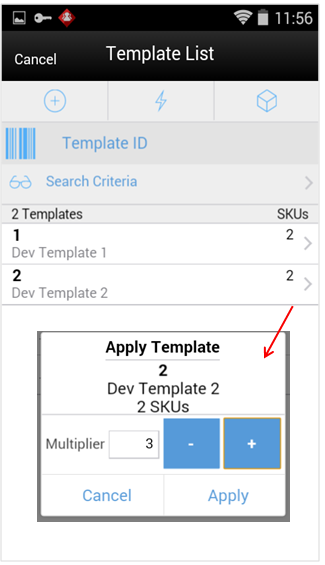
When creating an adjustment by template, the user is taken to the Template List screen. The screen defaults to display all of the "completed" status templates for the user's store. Since only templates which are in "completed" status can be applied to an adjustment, other status templates are not available. Templates are created and maintained on the PC application. Templates can only be applied to an inventory adjustment on MAF.
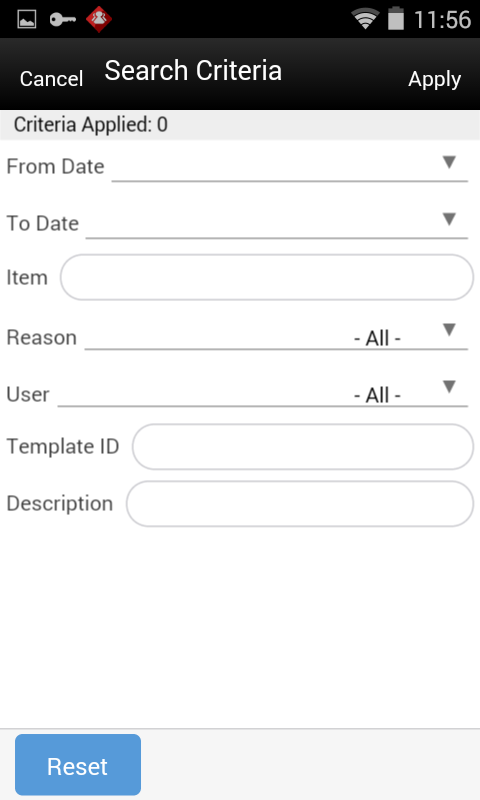
The user can use the search criteria eye glasses to navigate to the Template Search Criteria screen to enter search criteria for templates.
The scan bar on the header allows the user to enter or scan a template ID which is added to the existing search criteria. The system searches for "completed" status templates with that ID and returns it on the Template List screen.
Selecting a template from the list displays the multiplier popup window. This popup allows for the selection of a multiplier to be applied to the template. Whatever quantity is entered here will be multiplied times the quantity of all items on the template. Once the template has been selected and the multiplier has been applied, the system directs to the Inventory Adjustment Detail screen for a new "In progress" inventory adjustment that was generated with the items, reasons, and quantities from the template. All item quantities can be edited and items can be added/removed.
The Template Search Criteria Screen is accessed by the eye glasses on the Template List screen. After applying the search criteria, the results are listed on the Template List screen and the criteria applied is shown. The searched templates returned are a subset of the "completed" status templates.
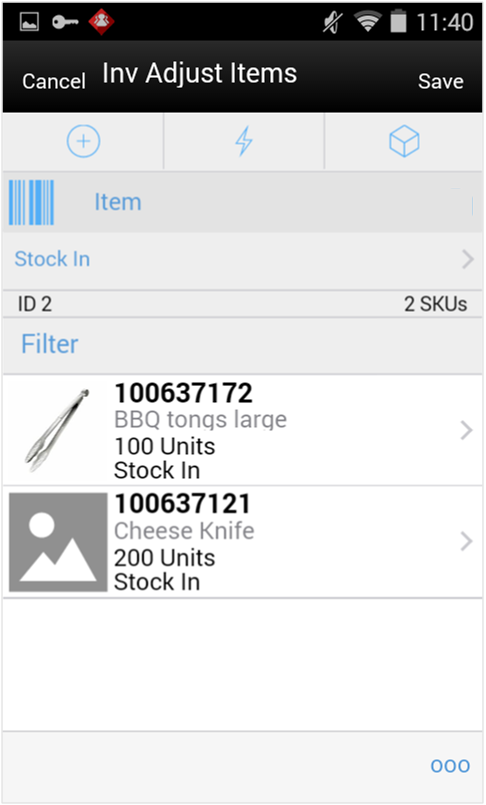
The Inv Adjust Items screen is the screen the user goes to when creating a new adjustment from scratch as well as from applying a template. The items are listed for the adjustment. The item image for the line items is displayed per configuration. The items screen is also what is displayed when selecting an adjustment from the Inv Adjust List screen.
Line items appear in a list and selecting a line item navigates to the item details of that item. If an item has been changed in the current session, it is indicated by a bar on the left of the item. Scrolling in the list of items on the left displays a filter. The filter can be used to narrow down the list of items. Filtering can occur by item ID, description, reason, and unit of measure.
A reason code must first be selected before being able to add or edit an item on the adjustment. The reason code selected here is at the header level and is applied to all newly added items until it is changed to a different reason in which the newly changed reason is added to the items.
Scanning or entering an item in the scan bar navigates to the Item Detail screen for that item. Quantity may be updated depending on the scan mode.
The ellipsis in the lower right hand corner accesses the footer menu which contains all of the functions that can be performed on an inventory adjustment.
Footer Menu
The footer menu is accessed from the ellipsis footer menu on the Inv Adjust Items screen. The menu functions includes the following:
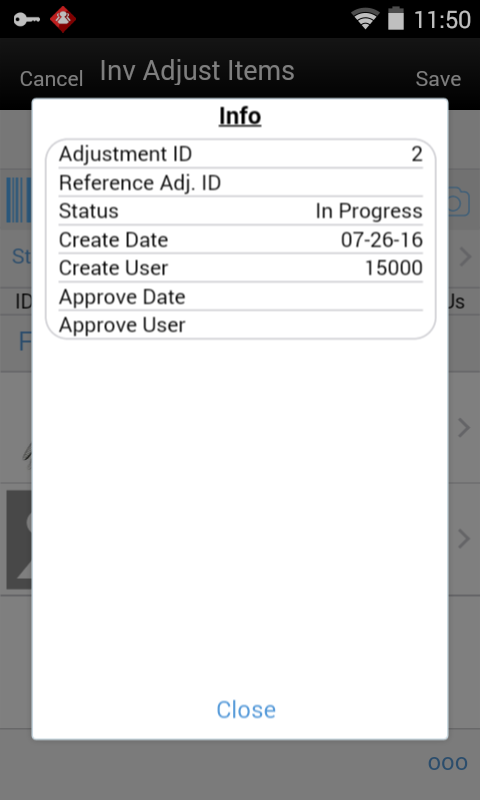
Info: Accesses the Info popup.
|
Note: The Notes option accesses the notes common dialog to capture notes. |
Confirm: Confirms and completes the adjustment. All stock on hand updates are made and the adjustment is published out; this is the same functionality as the PC.
Save: Saves the adjustment in "In Progress" status to be completed later.
Delete: Marks the inventory adjustment to "canceled" status.
Cancel: Exits the adjustment; changes made in that session are not saved.
Print: Displays the common print dialog to print the inventory adjustment report.
Copy: The copy function is only available for those adjustments in a "completed" status. It takes the current adjustment, copies it, and creates a new editable adjustment with a new ID. It references the copied adjustment's ID.
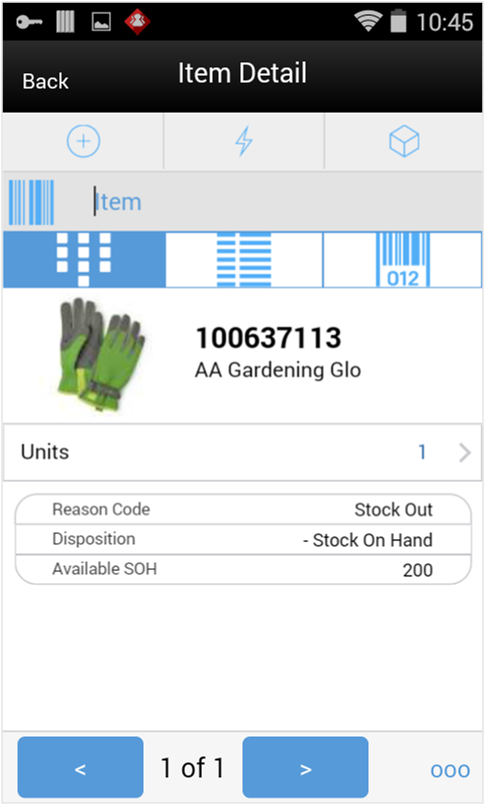
The Item Detail screen is the screen the user goes to when selecting or scanning an item from the Inv Adjust Items screen. Scanning or entering an item on this screen in the scan bar updates the quantity per the scan mode and refreshes the Item Detail screen for the item and quantity scanned. The quantity can be edited and updated manually if permissions allow.
The item information including the image (which is system configured) display in the header. The bottom portion of the screen contains information fields for reason code, disposition, and the stock on hand pertaining to the bucket stock is coming from.
The footer menu, ellipsis button, contains a reset function as well as remove and restore functions. The user can page through existing items on the adjustment using the arrows on the bottom.
The Item Detail screen has an extended attributes tab to add and remove extended attributes if the item is configured as such. There is also a UIN tab to take user to the UIN screen to add/remove UINs for UIN items.
The Info screen is an informational popup that contains read-only information about the header level of the adjustment. Details include adjustment ID, reference adjustment ID, status, create date, create user, approve date, and approval user.
There are two methods of wastage. First method is through sales processing. (See Chapter 7, "Sales Integration.") The second method is when wastage can be set up and scheduled through product groups and product group schedules. It is usually used when an item's size is reduced because of not being sold over time. For example, meat becomes lighter as fluids evaporate.
Variance percentage or standard UOM amounts can be set up on the wastage product group. Individual items and item hierarchies can be associated into a product group. A user can schedule the date when a wastage product group batch process is run; adjustments to inventory are automatically made based upon the variances set up on the product group. Transaction history records are written to record this. Inventory adjustments created in the back end with a reason code of "Wastage" are to be sent over the Oracle Retail Integration Bus (RIB) to the merchandising system.
SIM draws a technical distinction between inventory adjustments that are created manually through screens or through web services and those that are the by-product of another transaction or even, such as a stock count. In technical terms, the phrase Inventory Adjustment refers to those that are manually created (or through the web service), whereas transaction history record or stock history record refers to those events that are produced as the product of an event.
Inventory adjustments are treated exactly the same as all other transactions from a technical design approach, with a header record and detail records. Many different items can be assigned to a single adjustment and that relationship is maintained both at the database and client level.
Inventory adjustments are the first area that uses templates. There are parallel template tables and objects. Adjustments can be created from one of these templates allowing the speed up of work. All tables and objects are kept separate, even though the data is very similar, both for efficiency and the ability to cleanly separate business logic for the two different entities.
Business objects are used within the application code for all business processing. The following business objects are used for inventory adjustments:
| Business Object | Description |
|---|---|
| InventoryAdjustment | Contains header information about an inventory adjustment including status. |
| InventoryAdjustmentLineItem | Contains detailed information about a specific item on the adjustment including reason and quantity. |
| InventoryAdjustmentReason | Contains detailed information about a single adjustment reason including "to" and "from" disposition and whether or not it should be published. |
This section describes the integration of inventory adjustments through RIB, web services, and batch.
Inventory adjustments integrate to RMS at the item level using the RIB. SIM creates the adjustments and groups them together by a header with multiple items, but for integration purposes they are published out at an item level.
Inventory adjustments are published for all manual and external system generated adjustments where the Publish indicator for the reason code is checked. Adjustments are also published for other types of transactions in SIM where the merchandise system is expecting an adjustment for stock on hand updates, for example, receiving a DSD with damaged goods. An adjustment is created behind the scenes only for publishing purposes to notify the merchandising system to move the goods into the unavailable bucket. These system type adjustments are not considered an adjustment within SIM; however, they are published as such for integration purposes.
RIB payloads are used to communicate to external systems through RIB Integration.
The following table shows the list of RIB Payloads available for inventory adjustments.
| RIB Payload | Description |
|---|---|
| InvAdjustDesc | RIB payload that contains information about destination of the adjustment and an InvAdjustDtl. |
| InvAdjustDtl | Contains detailed information about the item adjustment. |
SIM supplies an InventoryAdjustment SOAP web service. The following service operations are supported for this web service:
| Service Operation | Description |
|---|---|
| lookupInventoryAdjustmentReason | Returns all the inventory adjustment reason codes. |
| lookupNonSellableQtyType | Returns all the non-sellable quantity types (or sub-buckets) for inventory quantities. |
| lookupInventoryAdjustmentTemplateHeader | Retrieves header information for inventory adjustment templates based on search criteria. |
| readInventoryAdjustmentTemplateDetail | Reads a single inventory adjustment template in full detail. |
| lookupInventoryAdjustmentHeader | Retrieves header information for inventory adjustments based on search criteria. |
| readInventoryAdjustmentDetail | Reads a single inventory adjustment in full detail. |
| saveInventoryAdjustment | Save an inventory adjustment in an open or "In Pprogress" state. |
| confirmInventoryAdjustment | Confirms an inventory adjustment, updating the inventory positions and closing the adjustment. |
| saveAndConfirmInventoryAdjustment | Performs the functionality of the save operation followed by the functionality of the confirm operation. |
| cancelInventoryAdjustment | Cancels the inventory adjustment. |
The following batch is provided by SIM:
| Batch Name | Description |
|---|---|
| WastageInventoryAdjustments | Batch to execute Wastage Product Groups for Wastage Inventory Adjustments. |
Note that adjustments produced by stock counts, transfers, deliveries, or any other system transaction might trigger an adjustment integration message being sent to an external system are not stored in these tables. The following database tables are used in inventory adjustments:
| Table Name | Description |
|---|---|
| INV_ADJUST | Holds the inventory adjustment records. |
| INV_ADJUST_LINE_ITEM | Holds inventory adjustment line item. |
| INV_ADJUST_LINE_ITEM_ATT | Holds extended attributes associated to line items of inventory adjustments. |
| INV_ADJUST_LINE_ITEM_UIN | Holds the inventory adjustment UIN. |
| INV_ADJUST_REASON | Defines the reason codes that are available for attaching to a stock inventory adjustment. Each reason code contains a disposition. |
| INV_ADJUST_TEMPLATE | Defines the inventory adjustment template. |
| INV_ADJUST_TEMPLATE_ITEM | Defines the inventory adjustment template line item. |