| Oracle® Retail Store Inventory Management Store User Guide Release 16.0 E76179-08 |
|

 Previous |
 Next |
| Oracle® Retail Store Inventory Management Store User Guide Release 16.0 E76179-08 |
|
Previous |
Next |
Within the Store Inventory Management system, several features apply through the application across multiple functional areas. These features include the ways items are scanned and processed as well as how the feature worked based on the type of item and status of the item.
This chapter covers all aspects of item. The following topics are covered:
Technical: Integration with Oracle Retail Integration Bus (RIB), web services, batch, and the database structure.
SIM supports a variety of items, ranging from items for which no inventory is tracked (from non-inventory items and consignment and concession items) to items for which special calculations are needed, such as variable weight or UPC-E items. These items are, most of the time, used in a grocery environment.
The following are supported item barcode types:
VPN
SKU
GS1
Type 2/VPLU (A, B, C, D, E, F, G, H, I, J, K, L)
UPC #
UIN
SIM also has the concept of the GS1 databar. This is an industry standard databar based on the old EAN128 format. It can contain a variety of data such as serial numbers, price, weight, and much more. Oracle has incorporated logic into the barcode tool to allow the scan of these databars and use of the embedded data for serial number, quantity, and price.
Finally, there are serialized items that require a unique item instance for each stocking unit.
SIM provides a benefit that any of these item types can be entered in any field in the dialogue and SIM will find the master item information.
Barcodes of fresh items in grocers often contain different elements beyond just the UPC.
Type - 2 supported formats contain a prefix, UPC, price, and check digit. Based on these elements, SIM will extract the UPC and price, and calculate the weight based on the price.
This calculated weight will be used on the handheld and MAF to increase the scanned quantity. The standard process in SIM for stock counts, receiving, or shipping is to increase the quantity by one. With this functionality, the quantity will be updated with the weight of the item:
Handheld, PC, and MAF recognize Type 2 items and de-construct it in price/item.
Quantity is calculated by using the embedded price.
Update the quantity entry field with the calculated quantity from the barcode.
The following table lists the supported Type 2 formats:
| Format | Description | Prefix Length | Begin Item Digit | Begin Price Digit | Check Digit | Length |
|---|---|---|---|---|---|---|
| A | 1-4-6-1 | 1 | 2 | 6 | 0 | 12 |
| B | 1-5-5-1 | 1 | 2 | 7 | 0 | 12 |
| C | 1-4-6-1 | 1 | 2 | 7 | 6 | 12 |
| D | 1-5-5-1 | 1 | 2 | 8 | 7 | 12 |
| E | 2-4-5-1 | 2 | 3 | 8 | 7 | 12 |
| F | 2-4-5-1 | 2 | 3 | 7 | 0 | 12 |
| G | 2-5-4-1 | 2 | 3 | 8 | 0 | 12 |
| H | 2-5-4-1 | 2 | 3 | 8 | 0 | 13 |
| I | 2-4-6-1 | 2 | 3 | 7 | 0 | 13 |
| J | 2-4-6-1 | 2 | 3 | 8 | 0 | 13 |
| K | 2-5-5-1 | 2 | 3 | 9 | 8 | 13 |
| L | 1-6-5-1 | 1 | 2 | 8 | 7 | 13 |
Each type has a hard-coded algorithm.
Each column in the table is the start of the position in the string (0 means there is no position for it). The description explains the length of the value.
For example, format C 1-4-6-1 for item number 123456789012:
Prefix, position 1: 1
Item number, position 4: 2345
Check digit, position 6: 6
Price: 789012, or 7890.12
The weight is calculated by using the price from the label and dividing it by the current active price on file:
Two decimals are implied in the retrieved value from the barcode.
The currency for the price on the barcode is the currency of the store.
This price can be regular, promotion, or clearance.
The item's SUOM of the weight is implied.
Standard rounding is applied up to a maximum of three decimals.
Example:
Item: 250010001500 is defined as format A; this means that the price is 000150 = $1.50.
The price on file for this item is $3.
The quantity is calculated as follows: 1.5/3 = 0.5.
Sometimes the vendor product number is the easiest way to look up an item. The system will return an item or list of items based on the VPN. This functionality is available in all areas of the application where the user can enter an item as well as on the Advanced Item Entry screen. This feature exists on both the PC and handheld (Wavelink Studio).
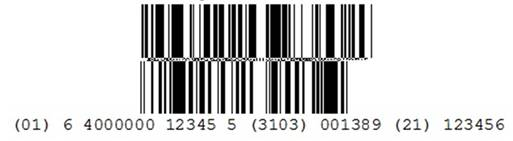
The GS1 DataBar is a barcode symbol with embedded information. This information can be used in the store for sale and supply chain purposes. Information may include item, price, quantity, unique identification number, Country of Origin, Lot, Expiration, as well as many other fields.
The Retail Market is seeing an increase in the use of the GS1 DataBar. SIM has a number of features to assist in the support of the GS1 DataBar.
The example, in the above figure, shows a 2D GS1 Databar.
SIM can accommodate the GS1 DataBar. Throughout SIM, on both the PC and the handheld (Wavelink Studio), where there is an item entry field, the entry or scan is allowed where applicable of a GS1 DataBar. The item will be parsed from the DataBar and used on the transaction.
When entering or scanning a GS1 DataBar, SIM will parse out the item, quantity, price, UIN along with possible other attributes, and apply those to the transaction. The price is used to calculate the quantity of the item. On the PC, when the Advanced Item Entry is not being used and a GS1 DataBar is entered into the Item Entry field, only the item will be parsed for the transaction and the other attributes will not be captured.
GS1 DataBar - Quantity and Price
The quantity will be parsed and applied to the transaction.
Example: 30 lbs. is in the GS1 DataBar, then 30 lbs. will be applied to the transaction.
The price will be used to calculate the quantity, if the quantity is not provided.
The same calculation will be used that is used for Type 2 items. The price from the barcode will be divided by the current price in the system to get the quantity.
Example: An apple is scanned which has a UOM of kg. The price in the ,arcode is $1.50. The price in SIM is $3.00. The quantity will be derived by $1.50 divided by $3.0 to get .5 kg.
SIM is able to provide additional visibility into the items that can be sold individually or as part of a simple or complex pack.
Features include the following:
SOH visibility to items sold individually or as part of a pack
Two indicators used to control the behavior:
Store Pack Inventory Indicator
SOH Inquiry at Pack Level Indicator
Indicators set in the Item Master application (RMS)
Item type in SIM broken out and used to identify:
Simple Pack
Complex Pack
Simple Breakable Pack
Complex Breakable Pack
SIM is able to provide an estimated quantity for the simple or complex pack when it is sold as both an individual component as well as in a pack.
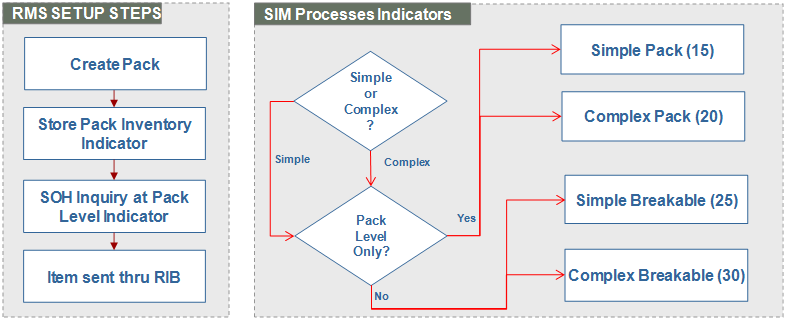
To enable this feature for pack item, there are two indicators used to control the behavior. The Store Pack Inventory indicator tells the system when an item will only be sold and tracked as a pack. When this indicator is not checked, the item can be sold and tracked at the component level with a calculated option at the pack level.
The SOH Inquiry at Pack Level indicator is used to determine if an estimated stock on hand should be calculated for the pack when the item is sold at both component and pack level.
It is critical that the item master have these two indicators set up properly in order for the information to flow into SIM properly.
SIM can categorize the item by identifying whether the pack is breakable or not based on the indicators in RMS. Breakable packs can be transacted similar to non-breakable packs, but inventory for a breakable pack will always be stored at the component level.
When a pack item is created in RMS, the user will need to identify whether the pack is breakable or not by checking the Store Pack Inventory Indicator if the item is tracked and sold as a pack item only. The user will not check the indicator if the item is tracked and sold at both the pack and component level.
Next, the user will need to determine if an estimated stock on hand should be calculated for a breakable pack. he SOH Inventory at Pack Level indicator is checked when an estimate should be calculated.
When the item flows into SIM, additional processing will take place to correctly classify how the item will behave. Basically, there are four groupings of the pack that SIM will identify as the information flows in. SIM uses the type field of 15, 20, 25, and 30 to identify how the item needs to handle other types of processing, such as what displays on a stock count, and so on.
The following examples help illustrate how the calculations take place.
A company is called RKA Coffee House. The company sells various types of coffee and packages the coffee into different configurations as well as providing various gift packs.
Example 1: Simple Pack
Pack Item 500 Medium Roast Coffee 3pk contains:
| Item | Qty | UOM | SOL |
|---|---|---|---|
| 5001 Medium Roast Coffee | 3 | 8oz pkg | 1200 |
Identify the component SOH.
1200
Identify the number of components for the pack.
3
Divide the component SOH by the number needed for the pack.
1200/3 = 400
Display the pack item estimated SOH.
Pack Item 500 Medium Roast Coffee 3pk: SOH ~400
When the user looks up the component item, the SOH will display 1200 units. When the pack item is displayed, the SOH will display the number of packs that could potentially be sold to the customer. Since the component item could potentially be part of another pack configuration, this number is only an estimate. Therefore, the tilde ~ will be placed in front of the calculated SOH.
The next example is more complicated example. The coffee house wants to offer a sampler package in order for a customer to try different types of coffee. The coffee house will put one of each of their types of light and dark roast and two of medium roast coffee. Each of these coffee packages can also be sold individually. Additionally, there will be two of the coffee mugs with the RKA logo on the mug, added to the coffee sampler package.
Example 1: Complex Pack
Pack Item 700 Coffee Sampler contains:
| Item | Qty | UOM | SOL |
|---|---|---|---|
| 4001 Light Roast Coffee | 1 | 8oz pkg | 600 |
| 5001 Medium Roast Coffee | 2 | 8oz pkg | 1200 |
| 6001 Dark Roast Coffee | 1 | 8oz pkg | 500 |
| 7001 Medium Roast Coffee | 2 | Each | 1200 |
Identify the component SOH.
Item 4001: 600
Item 5001: 1200
Item 6001: 500
Item 7001: 1200
Identify the number of components for the pack.
Item 4001: 1
Item 5001: 2
Item 6001: 1
Item 7001: 1
Divide the component SOH by the number needed for the pack.
Item 4001: 600/1 = 600
Item 5001: 1200/2 = 600
Item 6001: 500/1 = 500
Item 7001: 1200/2 = 600
In order to make the Coffee Sampler, all the components and the correct quantity of components are needed. Therefore, take the lowest number calculated in this step.
Display the pack item estimated SOH.
Pack Item 700 Coffee Sampler SOH ~500
In the following example, there can be another pack item as part of the new gift pack.
Example 3: Complex Pack (Simple Pack, Complex Pack, and Individual Items)
Pack Item 750 Coffee Explorer Set contains:
| Item | Qty | UOM | SOL |
|---|---|---|---|
| 5001 Medium Roast Coffee | 2 | 8oz pkg | 1200 |
| 6001 Dark Roast Coffee | 1 | 8oz pkg | 500 |
| Pack Item 900 Passport/Slate/Woodbox Combo contains: | 1 | Pack | |
| 9001 Coffee Passport | 1 | Each | 1200 |
| 9002 Slate Serving Tray w/Chalk | 1 | Each | 600 |
| 9003 Wood Box with Stainless Steel Lid | 1 | Each | 800 |
| Pack Item 800 Set of 4 Ceramic Tasting Cups contains: | 1 | 4ct | |
| 8001 Ceramic Tasting Cups | 4 | 3oz cup | 1000 |
Identify the component SOH.
Item 5001: 1200
Item 6001: 500
Pack Item 900:
Item 9001: 1200
Item 9002: 600
Item 9003: 800
Pack Item 800:
Item 8001: 1000
Identify the number of components for the pack.
Item 5001: 2
Item 6001: 1
Pack Item 900 (1):
Item 9001: 1
Item 9002: 1
Item 9003: 1
Pack Item 800 (1):
Item 8001: 4
Divide the component SOH by the number needed for the pack.
Item 5001: 1200/2 = 600
Item 6001: 500/1 = 500
Pack Item 900 (~600):
Item 9001: 1200/1 = 1200
Item 9002: 600/1 = 600
Item 9003: 800/1 = 800
Pack Item 800 (~250):
Item 8001: 1000/4 = 250
In order to make the Coffee Explorer Set, all the components and the correct quantity of components are needed. Therefore, take the lowest number calculated in this step.
Display the pack item estimated SOH.
Pack Item 750 Coffee Explorer Set SOH ~250
The item lookup feature provides the user with more visibility into the stock on hand for the packs and components of a pack through the Store Pack Inventory Indicator.
If the indicator is checked, inventory will be held at the pack level and not broken down.
If the indicator is not checked, SIM will break down the item to the components on the backend and all inventories will be held at the component level.
Additional information on the pack and components will also be available by pressing the Pack Info button and Component Info button depending on what level is being viewed by the user.
Anywhere there is a SOH value on a screen, it may be estimated (~) if the SOH Inquiry Indicator is checked in RMS. If the indicator is not checked, a Null value will display.
When using the shipping and receiving functions in SIM, the backend processing of breaking down to the component item will be applied and the component items stock on hand will be updated for any breakable pack items.
When performing an inventory adjustment, SIM will need to look to the component items' unavailable stock on hand to determine the available quantity that can be used for the adjustment.
The user will continue to be allowed to sequence both simple and complex breakable packs and the components of those packs. When the Apply Item List button is selected on the Micro Sequence Edit screen, SIM will apply the pack and component item for any breakable packs. Anywhere an item can be entered in the sequencing flow, the user will be allowed to enter either the pack or the component of a breakable pack.
The transaction history will contain the component or the pack item depending on where inventory was updated.
Features:
This section covers system parameters.
Default UOM
Values: Standard UOM/Cases
Default: Cases
Topic: Admin
Editable: Yes
Standard UOM: The system defaults initially to the Standard Unit of Measure.
Cases: The system defaults initially to Cases.
|
Note: The user will still have the ability to toggle between Cases and Standard UOM regardless of the setting. |
Disable Pack Size
Values: Yes/No
Default: No
Topic: Admin
Editable: Yes
Yes: The system allows the user to enter values into the Pack Size fields throughout the product.
No: The system will not allow the user to enter values into the Pack Size fields, but the field will still appear on the screens.
The Default UOM parameter is used to default the unit of measure from within transactions. The selected option will default in the majority of the functional areas though out the application, with the exception of stock counts.
On MAF, the unit of measure is set on the Mode Bar and will initially be set based on the Default UOM parameter. Once the unit of measure is changed, it is changed throughout the application until the user has left the application. However, on the PC and handheld, the unit of measure also will default based on the Default UOM parameter, but this is defaulted every time the user enters a different transaction.
If the standard UOM is Eaches, the user will have the option to choose Units or Cases from the UOM drop down. If there is a transaction UOM, this will also be available (transaction UOM is used with customer order transactions).
Standard UOM of Eaches: the user will only be able to enter a quantity in positive whole numbers for the SUOM of Eaches. It should not display in decimals. Example: 4 units ,not 4.0 units.
The UOM will display as units, not eaches.
Cases: the user will be able to enter a decimal quantity for the case quantity, if the calculated quantity results in a whole number (cannot have a partial unit).
Example: Pack Size 12, Qty 1.5 Cases = 18 Units. This is acceptable as 18 is a whole number.
If the standard UOM is different than Eaches, the user should have that unit of measure along with Cases as UOM options in the UOM drop down. Example: Kg and Cases:
Standard UOM other than Eaches: depending on the UOM the user will be allowed to enter a decimal value for the SUOM quantity.
The quantity will be restricted to a total of 4 digits and three decimal places if it is allowed to enter decimals for that specific unit of measure.
Cases: the user will be able to enter a decimal quantity for the case quantity.
Example: Pack Size 3, Qty 1.5 Cases = 4.5 LBS. This is acceptable as 4.5 LBS is feasible.
|
Note: Inventory will be allowed to hold decimal values for those items that have a standard UOM other than units that allow for decimals. |
When entering all transactions within SIM, the system will use the existing system default unit of measure configuration to determine what the initial unit of measure should be on the transaction, Standard UOM, Cases or Transaction UOM.
If the user chooses to change the unit of measure on the PC or Handheld (Wavelink Studio), the UOM will then "stick" and keep it as such within the transaction. The user can change the unit of measure and it will then "stick" and remember the newly selected unit of measure. The UOM will reset back to the system default upon leaving the transaction.
This feature enables a user who, for example, is scanning a DSD delivery, to switch the unit of measure to cases from standard unit of measure, and can keep scanning new items at the case level without having to constantly switch from standard to case level.
The sticky Unit of Measure changes are on the PC and the handheld (Wavelink Studio) wherever the unit of measure exists and is editable.
On MAF, the unit of measure will default based on the parameter as well, however, once the unit of measure has changed from the Mode Bar, it will stay the same throughout the application. For example, the user is within a Transfer Shipment transaction and changes the unit of measure to cases. If the user goes into a Customer Order Delivery transaction, the unit of measure will remain set to cases. On the PC and handheld, the screens will always revert back to the default unit of measure when going into a different transaction.
For additional details for the MAF U, see Unit of Measure section in Chapter 4, "Common Usability and Navigation."
The following UOM rules are applied throughout the customer order, transfer shipping, and transfer receiving dialogs wherever it refers to the UOM:
Customer Orders
Customer Order Deliveries
Customer Order Picks
Customer Order Reverse Picks
Transfer Shipments
Transfer Receipts
The UOM will be defaulted to the UOM that came on the customer order (Transaction UOM) or, in other words, it will most likely be the Selling UOM.
The user will be able to select/toggle between the Transaction (that is, Lbs, Units, and so on), Standard UOM (that is, Lbs, Units, and so on) and Cases.In the event that the Transaction UOM on the Customer Order /Fulfillment order is not recognized or cannot be converted in SIM, then it will not be used, and only the Standard UOM and Cases will be used with the system defaulting to the Standard UOM.
Sticky UOM will be applicable when the preferred UOM is not available. This means that the system will remember the last UOM mode (standard UOM or cases) and use that throughout the transaction until preferred UOM is possible.
When switching the UOM for the quantities on the screen, it will convert from Transaction UOM to Standard UOM and vice versa as well as from Standard UOM to then cases.
Stock on hand updates to the database are always made in the standard unit of measure, as that is what is held in the database.
All communication with external systems through the RIB will have the quantity in the standard UOM.
The Pack Size represents the quantity of that item within a Case. The Pack Size is set up in RMS when adding the supplier to the item. RMS terminology is Case Size (that is, Case Size in RMS = Pack Size in SIM). Within SIM, the Pack Size for the primary supplier is used (if the supplier is unknown), otherwise it uses the pack size for the supplier that is being used (Returns / DSD / Store Orders).
When referring to the Default Case Size, this is the Case size defined on the item master which is the item's primary supplier Pack size.
The Pack Size is not the number of component items within a Pack Item, rather the number of items within a case (box). Pack Size is used for all types of Items and Packs. If enabled within SIM, the user can override the pack size for all items and packs.
Many screens within SIM allow the user to enter an item quantity in both units and cases. When entering an item quantity in cases, the user has the option of changing the default Pack Size of the case. This feature will allow the customer to disable the Pack Size column on the screens and make the fields "view only."
Editing Pack Size
The pack size cannot be changed from 1 if the UOM is set to the Standard UOM.
When selecting cases, the Pack Size will be allowed to be displayed or changed by the user to a decimal value and allows decimals for any Standard UOM other than eaches.
Example:
Item is kg and has a case size of 15.
If the UOM is set to kg, the quantity can have a decimal (15.5 kg), but the pack size can only be 1 (1 kg).
If the UOM is set to case, but the SUOM = kg, the pack size can be set to a decimal value. Example: case of 15.5kg.
Changing the Quantity and Pack Size
How the Quantity field changes when the Pack Size changes depends on when the user changes the "quantity" and "pack size" fields. Changing the pack size only will not change the quantity of standard unit of measure. Changing the quantity of Cases will change the quantity of standard unit of measure if the pack size is greater than 1.
Example 1:
UOM system parameter set to "Cases":
Access a "saved" return with a return quantity of 10 for Item A and a pack size of 1. Note that UOM is Cases. If the user toggles to "Units," the return quantity will also be 10.
Toggle back to "Cases" and change pack size to 2. Note that the quantity field has changed to 5. SIM calculates the new quantity for Cases based on the new pack size of 2.
Toggle to "Units" and the quantity will still be 10 when displayed in units. The total quantity for units does not change since only the pack size was changed.
Toggle back to "Cases" and change the quantity of Cases from 5 to 10 (pack size still = 2). Now toggle to 'Units' and the quantity will be 20. Units quantity was recalculated based on the new "Cases" quantity with pack size = 2.
The pack size will be stored on the transaction.
On the PC, only one Pack Size can be captured per line item. This will store whatever pack size is on the line item at the time of saving/completing the transaction.
On the handheld and MAF however, the user may have entered various pack sizes and the system will store the last pack size entered on the transaction.
Example 2:
Receive Item A, 10 Cases, Pack Size 10 (100 Units), then receive Item A 10 Cases Pack Size 5 (50 units). This equates to receiving 150 Units with a Pack Size of 5 (30 Cases).
|
Note: Warehouse deliveries are an exception and the Pack Size is not editable for items that exist on the ASN, as it is the Pack Size from the ASN. Unexpected items the Pack Size will be editable per the configuration. |
|
Note: Pack size is displayed on the count/recount detail screen, but is not editable. |
Consistent Scanning - Quantity
The handheld (Wavelink Studio) and MAF consistently addresses scanning throughout the application. The quantity will always be inclusive of all entries and or scans for the item. This quantity will represent the total quantity.
Example:
Scan item A for the first time, the quantity will default to 1 unit. Scan item A two more times, the quantity will increase with each scan to two and then three units.
Scan Item B for the first time. The quantity will default to 1 unit. Scan Item B one more time, for a total quantity of 2.
Scan item A again. It will take the user to the quantity screen with the quantity defaulting to 4. This is derived by taking 3 from the previous scanning of Item A and then adding 1 to this for the scan to get to this screen. It is an all-inclusive quantity. This represents the total quantity at all times to the user.
The handheld (Wavelink Studio) and MAF consistently addresses scanning throughout the application.The quantity will always be inclusive of all entries and or scans for the item. This quantity will represent the total quantity.
Example:
Scan item A for the first time, the quantity will default to 1 unit. Scan item A two more times, the quantity will increase with each scan to two and then three units.
Scan item B for the first time. The quantity will default to 1 unit. Scan item B one more time, for a total quantity of 2.
Scan item A again. It will take the user to the quantity screen with the quantity defaulting to 4. This is derived by taking 3 from the previous scanning of item A and then adding 1 to this for the scan to get to this screen. It is an all-inclusive quantity. This represents the total quantity at all times to the user.
Consistent Scanning also addresses applying quantities from scans based upon the UOM.
For Each or Unit items, the barcode quantity will be added to the quantity on the screen in the mode of the unit of measure on the UI. In other words, the system will take the quantity from the barcode and just add that to the quantity in whatever UOM is displayed on the screen.
For Standard UOM, the quantity from the barcode is added to the quantity on the screen in the standard UOM.
Example: 3 units on the UI. The barcode is scanned for 1 unit; therefore the quantity on the UI is incremented to 4 units.
For Cases, the quantity from the barcode is added to the quantity on the screen in cases.
Example: 10 cases on the screen. Barcode is scanned for 4, now the quantity on the UI increments to 14 cases.
For items that are not eaches, such as pounds, kilograms, meters, and so on, the barcode quantity will be added to the quantity on the screen in the Standard Unit of Measure Mode. So it assumes the quantity is in the standard UOM.
For Standard UOM, the quantity from the barcode is added to the quantity on the screen in the standard UOM.
This is the same as the preceding example for Each items.
For Cases, the quantity is added to the Standard UOM mode and then converted back to cases.
Example: 1.8 cases on the UI; this is equivalent to 18 pounds, as 10 pounds equal one case for this item. The barcode scan is for 4 pounds. The new quantity will equal 22 pounds, which will be converted back to 2.2 cases for the UI.
Barcode Parsing in SIM has become configurable. In the database, a client can define whether the type of barcode will be "Active." If it is "Active," this would mean the system would perform the logic to look for this type of barcode when parsing.
A sequence is also available. This is used to determine the order of parsing of the different types of barcodes.
Example: 111 is scanned. If configured as such, the system will check to see if 111 is a SKU first before checking if 111 is a serial number.
SIM supports the following barcodes: SKU, GS1, UIN, UPC E, and Type 2 A through L. The system will have all of these types per installation, however, SKU will be the only one which is active.
This section cover the advanced item entry functionality.
System Parameters
Use Advanced Item Entry
Values: Yes/No
Default: No
Topic: Admin
Editable: Yes
Yes: The Advanced Item Entry Popup will automatically open when entering the functional areas that use the popup. If there are required fields on the screen, the Advanced Item Entry will give an error to the user informing of the required fields when applying the item.
No: The Advanced Item Entry Popup will not automatically open. The user can still use the Scanner button to open it.
Auto Apply Advance Item Entry
Values: Yes/No
Default: No
Topic: Admin
Editable: Yes
Yes: The Auto Apply checkbox on the Advanced Item Entry popup will default to checked.
No: The Auto Apply checkbox on the Advanced Item Entry Popup will default to unchecked.
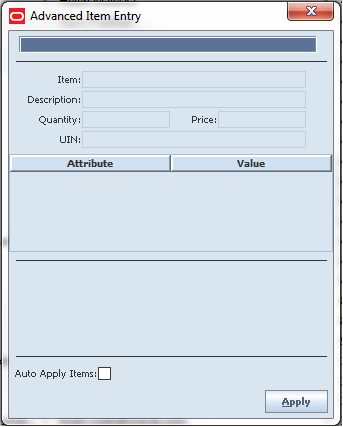
The Advanced Item Entry popup is automatically displayed when creating or editing a transaction. This popup is accessible throughout the application where items may be scanned for a transaction.
The Advanced Item Entry popup behaves as a scan screen allowing the scanning in of items and applying the item to the transaction, just as the scanner does on the handheld (Wavelink Studio). This allows retailers to hook up a wedge scanner to the PC application and perform scanning of items. If the system is configured as such, the Advanced Item Entry will automatically be displayed when creating or editing a transaction. If a retailer does not want this screen to automatically open all the time, the system can be configured so that it will only be available when clicking the Scanner button.
The Advanced Item Entry will accept entry or scanning of the same types of items and barcodes that the item entry field accepts such as item number, UPC, UIN, GS1 DataBar, type 2, and so on. Once an item or barcode is entered or scanned, the system will retrieve the item information and the item and description will be displayed on the popup.
All data in the GS1 DataBar will display on this screen regardless if the extended attribute has been assigned to the department/class/sub-class of the item. For example, the production date may exist in the GS1 DataBar, but the retailer does not use that data element in grocery but uses it in the meat department. The production date will display on the Advanced Item Entry screen when scanned.
When entering or scanning Type 02 items in the Advanced Item Entry window, it will get the price and it will be used to calculate the quantity to apply to the transaction. GS1 DataBars may have UIN, quantity or price used for the quantity scan. All other items will just have a scan of 1 for the quantity and the price is blank.
The Apply button will apply the item, quantity and UIN (if applicable) to the line item on the transaction. If the Auto Apply Items box is checked, the apply step will happen automatically upon scan. This check box can default to be checked based upon a store configuration and unchecked by the user if needed. All existing validations for the item will occur before applying the item to the transaction.
There is a status bar section below the attributes that will display any errors or warnings to the user which may occur upon scanning.
The advanced item entry has slight variations depending on the functional area. The screen above is the generic version that is used through most of the application. An example of a variation would be in the receiving dialogs; there is a radio button to select if the user wants to apply the scans to the regular or damaged quantities on the receipt as well as the capability of looking up an item.
SIM provides the capability to track items by unique identification numbers (UIN). If the user uses unique identification numbers, these numbers are displayed and tracked in a number of functional areas in SIM, including deliveries, transfers, returns, and stock counts. The user can also look up items by UIN.
To ensure accuracy and keep track of the UIN items, UIN items have states that can shift when they are added to different transactions. A full audit trail by user allows for close tracking on what has transpired with those items.
Features
UINs can be of two types:
Serial number
Serial numbers are unique identifiers for individual instances of an item, typically attached to items by the manufacturer. During receiving, the serial numbers must be scanned and associated with items.
Auto-Generate SN (AGSN)
AGSNs are serial numbers generated by SIM that the user can use to identify each instance of an item. SIM can also print item labels that contain the unique AGSNs.
This section describes system parameters, store parameters, and security.
Allow Store UIN Relocation
Values: Enabled/Disabled
Default: Enabled
Topic: UIN
Editable: Yes
Enabled: The UINs being added to a transaction, which did not previously exist at the store but are in the system, can be added to the transaction. Completing the transaction will update the UIN status for the current store and the store the UIN was assigned to previously.
Disabled: The UINs being added to a transaction, which did not previously exist at the store but are in the system, cannot be added to the transaction.
Auto-Default UIN Attributes
Values: Yes/No
Default: No
Topic: Admin
Editable: No
Yes: When a new item is created through the RIB, the UIN attributes default based on the department/class to which the item is assigned.
No: When a new item is created through the RIB, the UIN attributes do not default based on the department/class the item is assigned to, but rather default from an external system.
Search Limit UIN Default for UIN Resolution
Values: 1 - 999
Default: 500
Topic: UI
Editable: Yes
This parameter indicates the default search limit for the UIN Resolution screen.
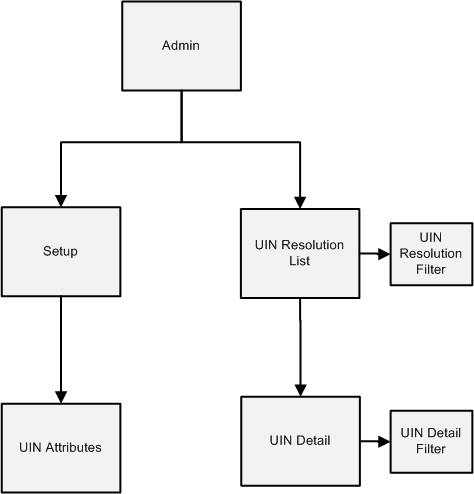
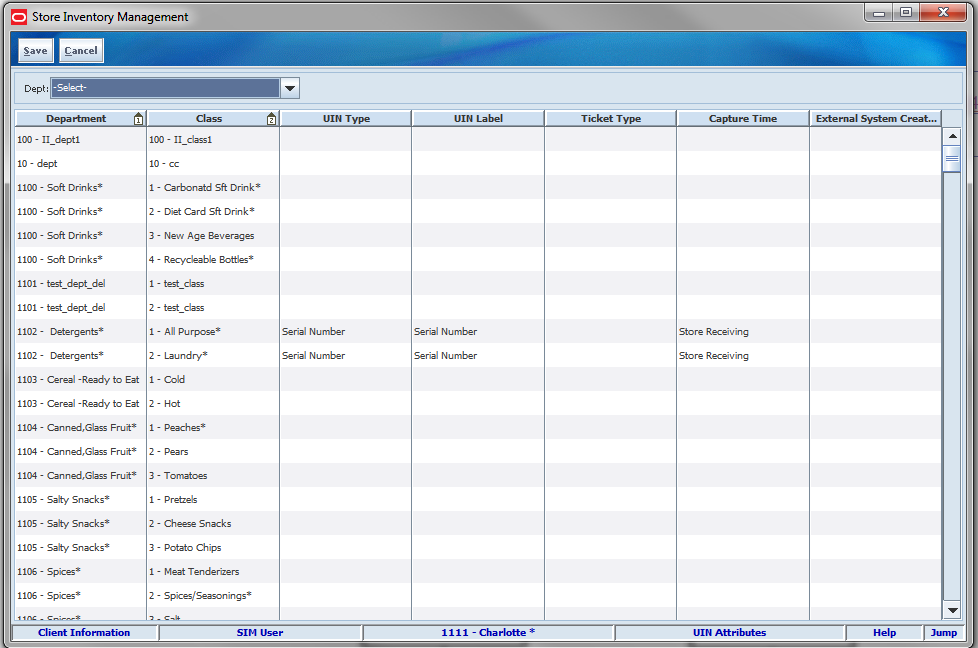
The UIN Attributes screen allows the System Administrator to assign UIN attributes to a Department/Class. It is accessed within the Admin dialog by clicking the UIN Attributes button on the Setup menu.
This screen is editable only when RMS and SIM are not integrated. These values will be coming from RMS and need to be kept in sync. This screen will be pre-populated with all department/class combinations initially and display any values previously set up at the store the user is currently logged into. For non-integrated environments, this screen is used in SIM to indicate which items should have serial number attributes. Even with RMS integrated, SIM can override the RMS settings if the "Auto-default UIN Attributes" is set.
The UIN Type dictates the workflow and can have a value of either Serial Number or AGSN (Auto-generated serial number). The UIN label is used for displaying on various screens and reports and may include Serial Number, IMEI, SIN, License Number, and Part Number. This can also be customized by the customer. The Ticket Format will only be enabled for the UIN Type of AGSN and is used to default the format in which the AGSN will be printed for placing on the item at the time of receiving or other times a new AGSN is needed.
The capture time is used to define when the UIN will first be entering the system. There are two options available, Sale and Store Receiving. Sale is used when UINs will not be tracked in SIM and are only tracked at the time the UIN is sold. Store Receiving is used to capture the UIN any time the UIN is introduced into the SIM application, such as at the time of DSD Receiving. Store Receiving will also automatic capture serial numbers communicated on integration messages.
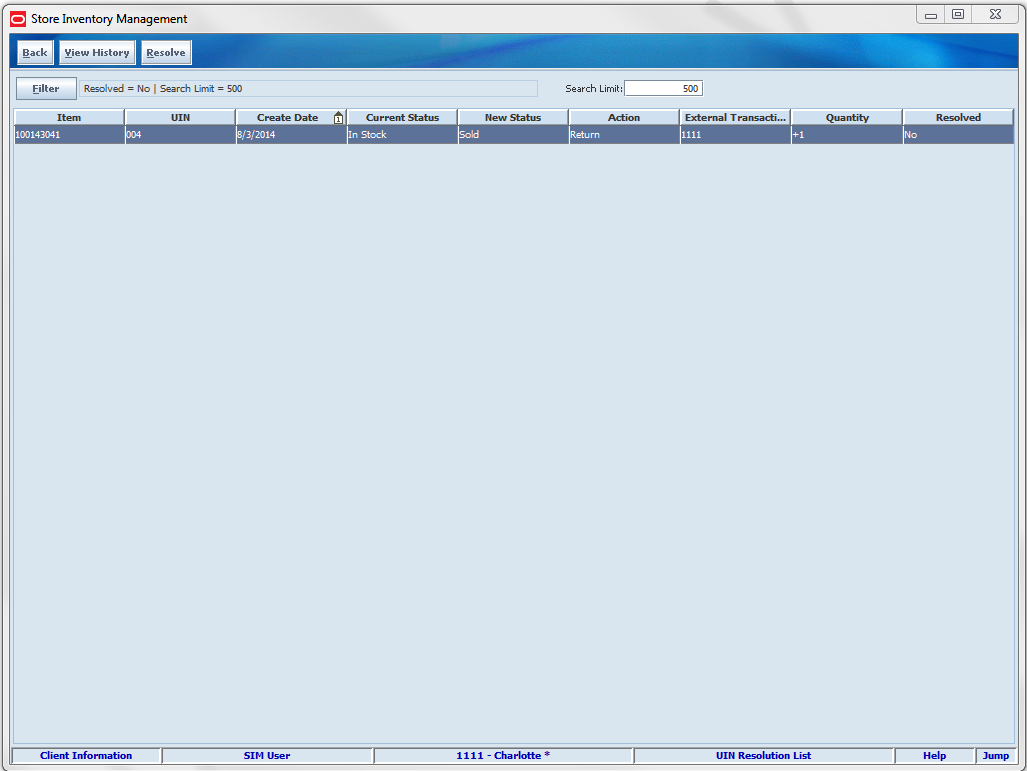
The UIN Resolution List displays all exception records created through the UIN Update Status web service, Customer Order web service, or externally-generated Receipt Adjustments. It is accessed within the Admin dialog by clicking UIN Resolution button on the Admin menu.
When this screen opens, only records not yet resolved are shown. Not every record may need an update. It is up to the user to determine which records need resolution.
Exception records are created when the following services attempt a status change not allowed:
UIN Update Status web service
Customer Order web service
Externally-generated Receipt Adjustments
POS sales / returns will also generate an exception
The UIN record does not automatically mark as resolved when the status update occurs. The user needs to manually mark the record as resolved.
Marking the record as resolved does not resolve the discrepancy on the transaction. The UIN discrepancy can be resolved directly via the transaction from which the discrepancy originated. The user can resolve certain UIN discrepancies by checking the UIN Discrepancies flag when creating a product group for a Problem Line stock count. This will add the items to the problem line stock count if SIM has more/less active UINs then stock on hand. This type of problem can be resolved through any stock count as it will bring the number of active UINs back in sync with the stock on hand.
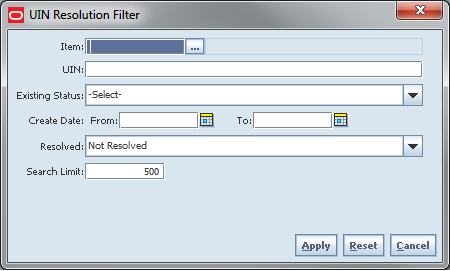
The UIN Resolution Filter screen is accessed by clicking the Filter button from the UIN Resolution List screen. The user can filter on various search criteria. After applying the filter, the user will be returned to the UIN Resolution List screen with the UINs displayed per the entered criteria.
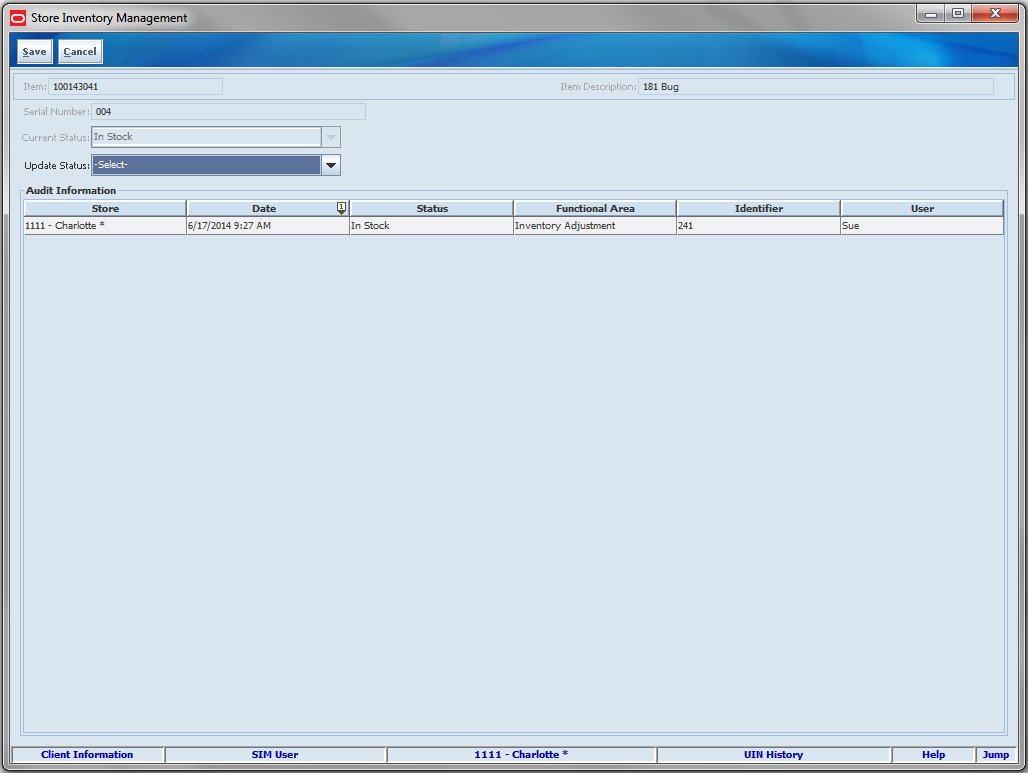
The UIN History screen displays audit records for each UIN status update. It is accessed within the Admin dialog by clicking a record and the View History button on the UIN Resolution List screen.
Every time a status change occurs for a UIN, an audit record is captured. All functional areas will have an identifier, however, for manual transactions, the functional area field displays "Manual."
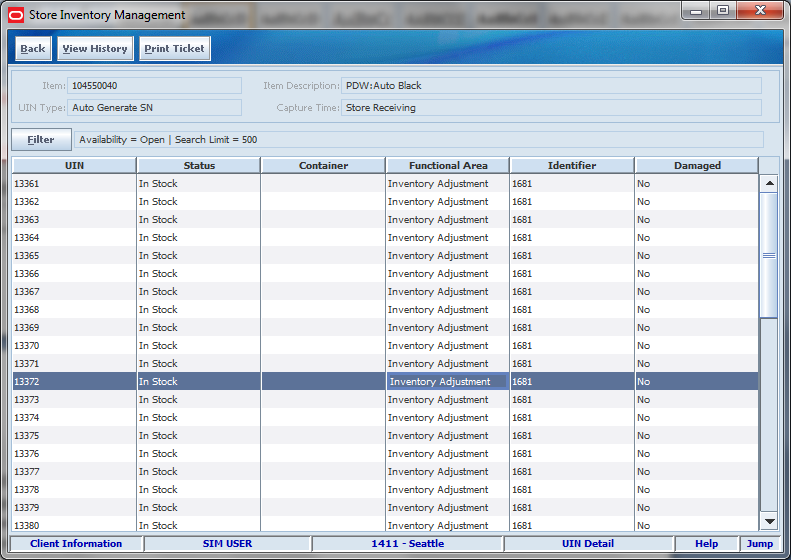
The UIN Detail screen displays the details for the selected UINs. It is accessed within the Lookups dialog. The user can use Item Lookup to search for the UIN item and click the UIN Details button to display the details.
All UINs in an "Open" status for the store the user is logged into is the default display.
The user is able to update the status by selecting a UIN from the list and then changing the status on the UIN History screen. This screen does not allow for multi-select. An item ticket may also be printed for an AGSN UIN.
For details on printing AGSN UIN tickets, see Chapter 16, "Printing."
for additional details pertaining to UINs, see the specific functional areas.
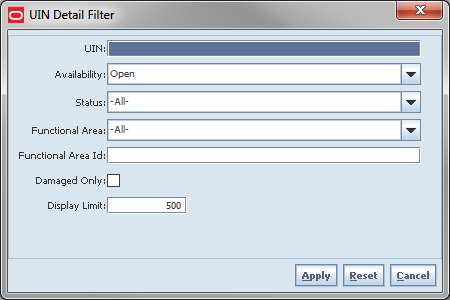
The UIN Detail Filter screen is accessed by clicking the Filter button from the UIN Detail screen. The user can filter on various search criteria. After applying the filter, the user will be returned to the UIN Detail screen with the UINs displayed per the entered criteria.
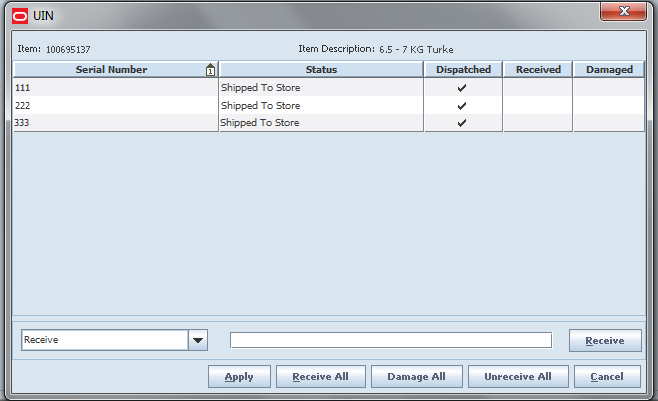
The UIN Popup screen displays UINs for a transaction. It is accessed within the transaction for various functions by clicking the UIN Qty field on the Transaction Detail screen.
This version of the screen will be used at the time of receiving for the following functions:
DSD Receiving
Transfer Receiving (warehouse, store, finisher)
Serial numbers are often predefined and known by the supplier or warehouse. This information is often interfaced on the advanced shipment record (ASN) and then validated in the store to ensure the correct serial numbers are delivered. In the case of very tight inventory supply chain processes, the store may be able to receive all of the serial numbers during the receiving process with a simple push of a button. The system may also be configurable to auto-receive deliveries with notifications to alert users when the number of recorded UINs is different than the shipped qty.
When the UIN serial numbers come with the ASN, the serial numbers will be pre-populated on this screen. A view-only version of this screen will be available after the transaction has been confirmed. In other areas of the application, some of the columns may vary slightly based on where the user is located.
For additional details around UIN processing, see each functional area.
All validations and rules for UINs on MAF is available functionality on the PC and handheld (Wavelink Studio) application.
Features:
Enter UINs
Lookup UIN History
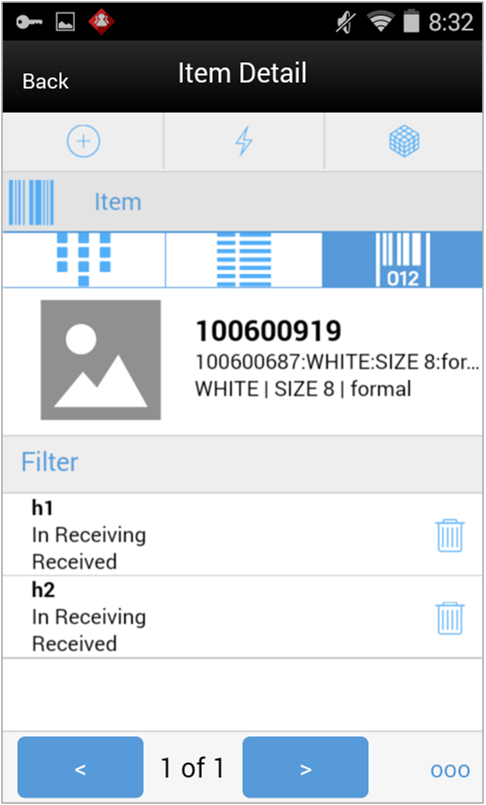
The Item Detail screen also provides the ability to manage the UIN details by selecting the UIN icon. From this screen, the user has the ability to view, add, or edit UINs for an item. All rules and validations on MAF should be the same as that of the PC. The user will need the appropriate security permissions to access the screen.
The above figure is used in Receiving dialogs. The UIN and UIN Status will display in all dialogs. However, there is additional functionality required for Receiving UINs and therefore the screen and functions may vary from the other dialogs.
The user has the ability to scan or enter UINs directly from this screen and can use the right and left arrows to cycle through items. Additional footer menu options are available for the receiving dialogs that allow the user to perform the same functions as those on the PC. The trashcan icon allows the user to remove the UIN.
For the Receiving dialog, the user can receive all, damage all, and unreceive all the UINs by accessing those menu options from the footer menu. Additionally, the user can switch between the damage receiving mode and regular receiving mode.
Since the user is within the Item Detail screen, the user can also remove, restore, and reset the item by accessing those menu options from the footer menu.
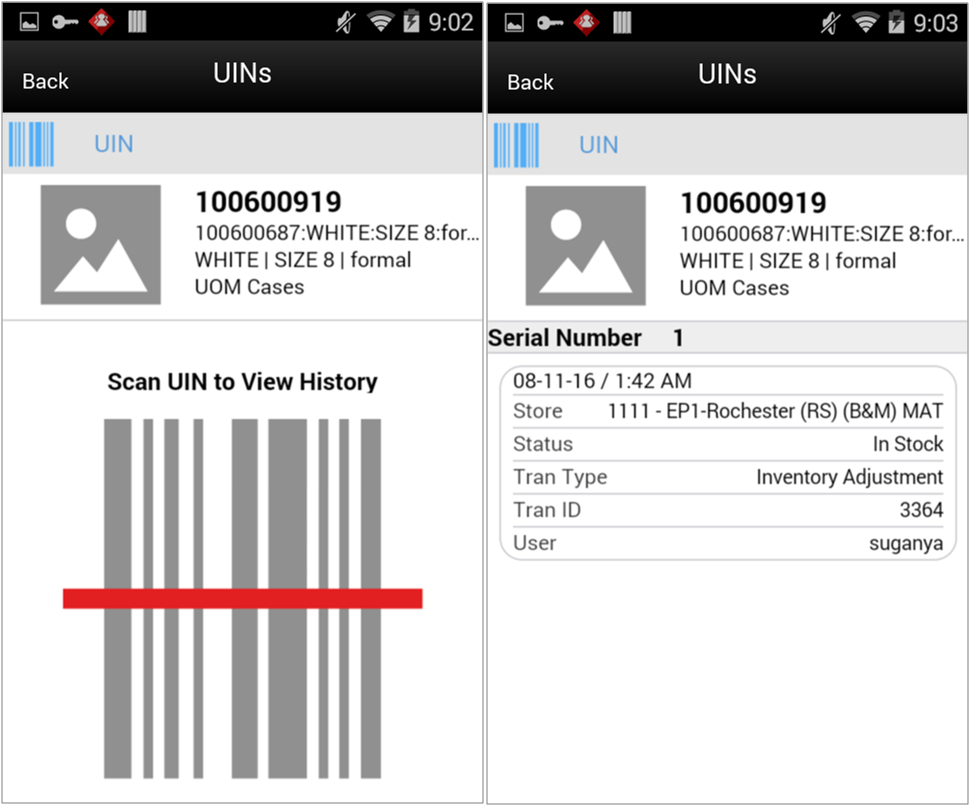
The Item Lookup dialog allows the user to display history for a specific UIN for the selected item. First, the user must enter / scan a UIN to display the history for the item. The history information is grouped together in sets and the user has the ability to scroll through the list. This screen has the same functionality as that of the PC with the exception the UIN status cannot be changed on MAF.
Extended Attributes are available on the PC, handheld (Wavelink Studio), and MAF. If extended attributes are enabled, these attributes can hold additional data about an item on a particular transaction. Some of the attributes available are Batch/lot numbers, expiration/use by dates, best before/sell by dates, and country of origin. The GS1 DataBar standards include many other attributes. All of the GS1 DataBar attributes are available for use by the customer.
The extended attributes are assigned by Department/Class/Sub-Class in order to configure which attributes are applicable for an item belonging to the appropriate merchandise hierarchy. Once configured, the user is able to add these attributes by scanning a GS1 DataBar on the handheld or an MAF device. If the GS1 DataBar is not scan able or not available, the data may be entered manually on the handheld, PC, and MAF.
In addition to manually entering the information on the PC, the information may also be removed and reentered. Additionally, the feature has the capability to define information mutually agreed between trading partners using AI 90 and other company internal information using AI's 91 to 99. This provides additional flexibility to track custom pieces of information.
This section covers system parameters, store parameters, and security.
Enable Extended Attributes
Values: Yes/No
Default: No
Topic: Admin
Editable: Yes
Yes: The system will capture the extended attributes when scanning a GS1 DataBar and additionally may edit or capture the extended attributes manually by setting the store parameter "Use Extended Attribute Entry" to Yes.
No: The Ext Attributes button or menu option will not be available on either the PC, handheld, or MAF regardless of the store parameter.
Use Extended Attribute Entry
Values: Yes/No
Default: No
Topic: Admin
Editable: Yes
Yes: The Ext Attributes button will display on the PC where available in the functional areas that use the popup. There are required fields on the screen, the Extended Attribute popup will give an error to the user informing of the required field when applying the item. The Ext Attributes menu option will be made available on the handheld where the feature is made available in the functional areas. The Attributes Icon will appear on the Item Detail screen where the feature is made available in the functional area.
No: Neither the Ext Attributes button or menu option will be available.
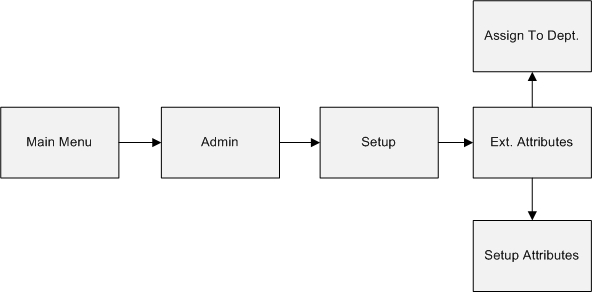
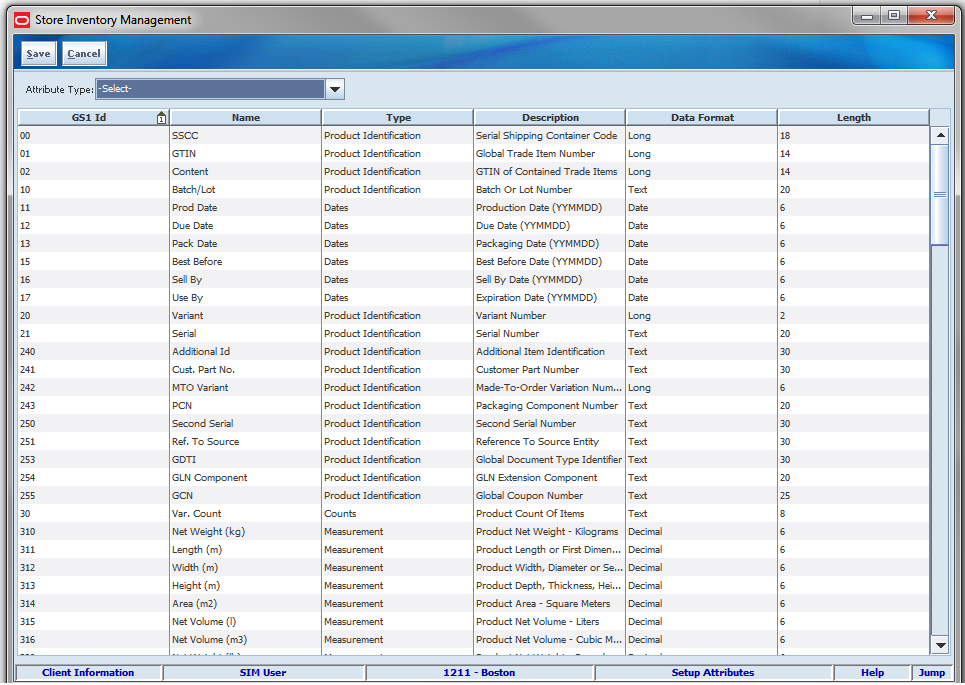
The Setup Attributes screen displays additional attributes which can be captured for an item. These attributes are referred to as extended attributes. It is accessed within the Admin dialog by clicking the Setup Attributes button on the Extended Attributes menu.
The list of extended attributes is pre-populated based on the industry standards for the GS1 DataBar. The Name and Description will be defaulted based on the standards, but can be changed to a more meaningful name for the client. Since the client will likely only use a subset of the available GS1 codes they will scan on the product, the client may re-purpose some of the codes for capturing data manually. The Type field allows the client to group their attributes in any fashion they desire. Once there are values in the Type field, the filter on the top of the screen may be used. This field will be blank initially.
The format and length of the field cannot be changed.
Changes to the Name will update the name displayed for the field on the following screens:
Assign Attributes Screen
Extended Attribute Entry Popup
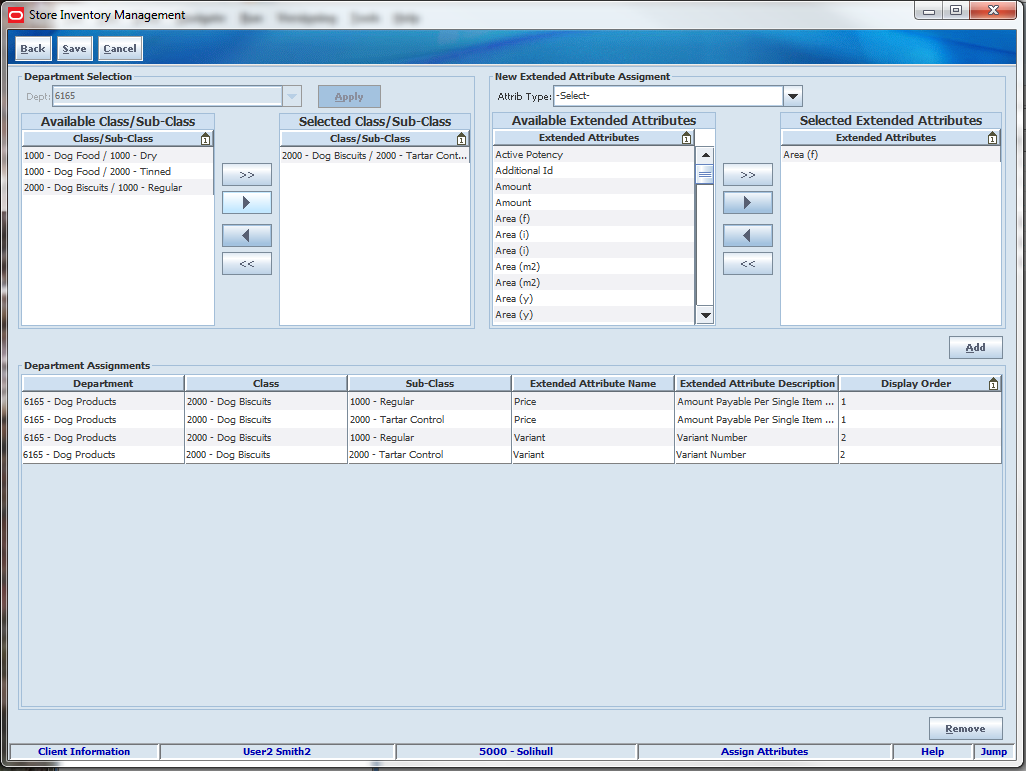
The Assign Attributes screen allows the user to assign specific attributes to an item hierarchy. These attributes are referred to as extended attributes. It is accessed within the Admin dialog by clicking the Assign To Dept button on the Extended Attributes menu.
With the appropriate security permissions, the user is able to assign the extended attributes to capture for a particular item hierarchy. This allows the user entering the extended attribute data on the transaction to capture only the necessary information and provides a more efficient and more accurate way to manage the data entry. This is especially helpful when entering the data from the handheld (Wavelink Studio).
The user also has the ability to assign the order in which the fields will display for data entry purposes. A maximum of 10 extended attributes can be assigned to a department/class/sub-class item hierarchy.
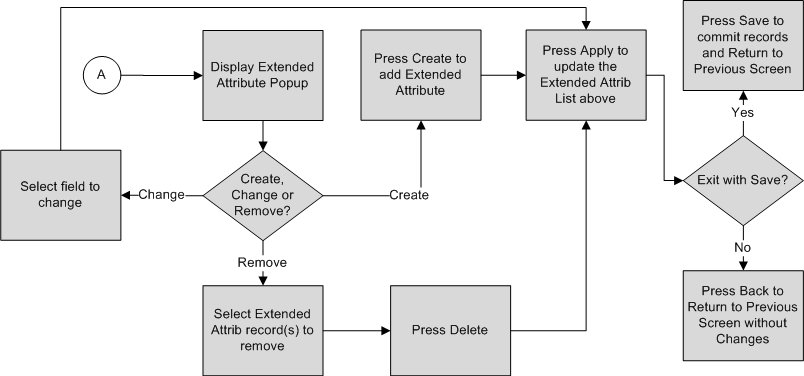
The Extended Attributes Entry popup allows the user to add or remove additional data stored for an item. It is accessed within each dialog by clicking the Ext Attributes button within each functional area. The button will only appear if the user has security permissions and the feature has been enabled for the store location.
With the appropriate security permissions, the user is able to view, cancel, add, or remove extended attributes on the PC and MAF. The user can only add, and cannot view, edit, or remove extended attributes on the handheld (Wavelink Studio).
This popup screen is accessible from the following dialogs on the PC:
Transfer Shipment
Transfer Receiving
DSD Receiving
RTV Shipment
Stock Count
Customer Order Delivery
The attributes can either be added by scanning a GS1 DataBar by using a handheld (Wavelink Studio) or MAF device, the Advanced Item Entry Popup, or manually adding the information.
The pre-configured fields displayed on this screen will be based on the item displayed on the top of this screen. The fields are based on the Department/Class/Sub-Class the item belongs to, which are assigned to the item hierarchy on the Attribute Assignment screen. The fields will display in the order defined on the Attribute Assignment screen. The system will display the extended attributes assigned to this item hierarchy. There is an additional field called Scan Qty that will always exist on this screen and is not assigned on the Attribute Assignment screen. All fields are optional.
There are no validations on the data entered with the exception of dates entered in date format and fields defined as a number must contain numbers. These field level definitions are based on the GS1 Industry Standards. For example, the GS1 Standards define the country of origin to contain a three-digit number (ISO) industry standard country code. However, the system will not validate the three-digit number is one that is defined by ISO, but only that the user has entered a number in that field. The client will need to understand which three-digit codes to use when manually entering the data in the form.
The system will only store the unique combination of all fields on this screen. If the user scans more than one item with the same attribute values, the scan quantity will be increased by 1. For example: the user scans each unit for the same item. There are three units, but two of them have the same batch, country of origin, and sell by dates,and so on. There will be two records added, one record will have a scan quantity of 1 and the other will have a scan quantity of 2.
The scan quantity for all of the attribute records may add up to the total received quantity for the item but is not validated. When the user manually adds an attribute record, the scan quantity will automatically increase by one. The system will not update the received quantity for manually entered records or if the scan quantity attribute is manually updated. This is merely for informational purposes only.
If an item is removed from a transaction, all extended attribute data stored with that item transaction will also be removed. In reverse, setting the quantity of an item to 0, or canceling an item, will not remove the GS1 databar attributes.
Extended Attributes exist in a small and large form factor on MAF.
Features:
Enter Extended Attributes
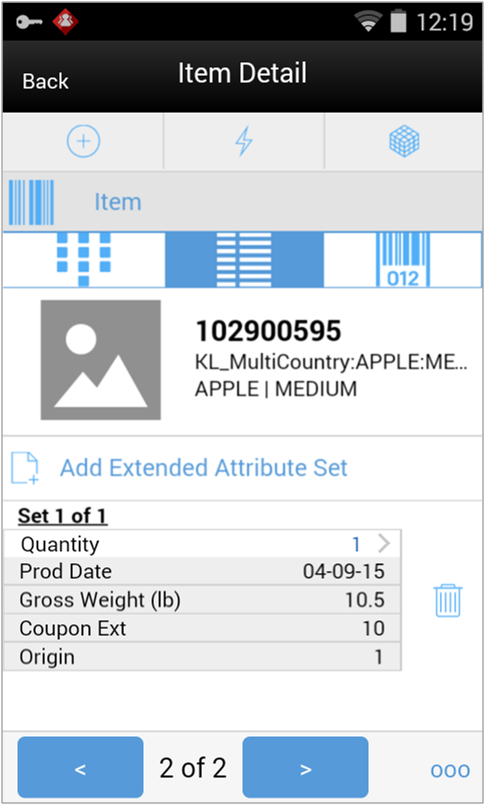
The user goes to the Item Detail when selecting or scanning an item from a transaction list screen. From this screen, the user has the ability to view, add, or edit attributes for the item by selecting the Attribute icon. All rules and validations on MAF should be the same as that of the PC. The user will need the appropriate security permissions to access the screen.
The attributes are displayed as a set of attributes. The user can scroll down to view the additional sets. The trashcan icon allows the user to remove an attribute set and the undo arrow allows the user to restore the attribute set. The user can tap the Add Extended Attribute Set bar to enter new data.
Using the right and left arrows at the bottom of the screen will move the user to the next item in the transaction. The user can also remove, restore, and reset the item by accessing those menu options from the footer menu.
There are five different statuses for an item: Active, Inactive, Temporary/Auto-Stockable (Q-Status), Discontinued, and Deleted. Depending on the status of an item, certain functions may not be allowed. When an item is currently not ranged to a store, the item may be assigned a temporary active status if the system is configured to allow the user to range an item. SIM will treat the item as though it were in an active status with no functional restrictions.
System Parameters
Allow Non-Ranged Items
Values: Yes/No
Default: Yes
Topic: Admin
Editable: Yes
Yes: The store is allowed to add a non-ranged item to a transaction
No: The store is not allowed to add a non-ranged item to a transaction
Temporary/Auto-Stockable (Q-Status)
Before an item can be used by a store in SIM, the item needs to be ranged. Ranging an item depends on two factors, the item host system (for example, RMS) and whether SIM allows the ranging of items. If the system parameter "Allow Non-Ranged Items" is enabled, SIM allows the store to add non-ranged items to transactions.
When SIM temporarily ranges an item, the item is assigned the status of "Q." This status is treated as though it is an active item. The item is ranged and set to Active status when RMS sends the item/location relationship. This will happen after the transaction that ranges the item in SIM is completed. There can be a delay, or it could never happen if the transaction is never approved.
Discontinued
When an item is discontinued, the item cannot be ordered from a supplier, but it can be transferred from a warehouse or store. Discontinued items can appear on stock counts and it is possible to ship to a finisher.
Inactive
When an item is inactive, the item cannot be ordered from a supplier (that is, Item Request, Store Orders) and cannot be transferred in from a warehouse or store if the receiving location is inactive or deleted for the item. All other transfers are acceptable.
Inactive items are not allowed for Finishers.
If the item in an inactive status is on a delivery (DSD/Warehouse Delivery), the item may be received or the item may be added to the delivery. An inactive item may be received on a transfer, but cannot be transferred to another store when it is inactive at the destination store.
Inactive items are not allowed to be ordered or added to an item request.
Deleted
When an item is deleted, the item cannot be ordered from a supplier. Deleted items will be prohibited on Item Requests and cannot be transferred out from a warehouse or store if the item status in the receiving location is deleted. All other transfers are acceptable.
Deleted items are not allowed for Finishers.
If the item in a deleted status is on a delivery (DSD/Warehouse Delivery), the item may be received or the item may be added to the delivery. A deleted item may be received on a transfer, but cannot be transferred to another store when it is deleted at the destination store.
It is not possible to create price changes, clearances or promotions for deleted items.
When an item is set up in the Merchandising system, the user enters a description for the item. The short description of an item is a product of the first 20 characters of the long description and is often used for POS receipt printing, but does not always offer enough detail to a user in helping to identify the item. SIM allows the customer to choose between displaying the long item description and the short item description on the PC, handheld, and MAF.
System Parameters
Display Item Description
Values: Short Item Description/Long Item Description
Default: Short Item Description
Topic: UI
Editable: No
Short Item Description: The description displayed everywhere in SIM will be the short item description.
Long Item Description: The description displayed everywhere in SIM will be the long item description.
Display HH Length: Diff x (x=1-4)
Values: 0 - 20
Default: 0
Topic: UI
Editable: Yes
This parameter determines the number of characters for each diff to display for the differentiators if values are provided from the Merchandising system. There are four diff settings.
Display Item Description Diffs - mobile
Values: Yes / No
Default: Yes
Topic: UI
Editable: No
Yes: A second item description line for diffs will be used wherever an item description is displayed on the MAF device.
No: The second line will not be displayed for the item description on MAF.
If set to Long Item Description, SIM will display the long description. The Merchandising system concatenates the diff descriptions with the long item description so the user is able to view all diff information. The diffs display in order from Diff 1 to Diff 4.
On the PC, the item description field will truncate if necessary.
On the Handheld (Wavelink Studio), there will be two lines dedicated to the item description field. The first line is the Item Description and the second line will be for any Diffs. The length of each diff displayed is controlled by the "Display HH Length: Diff x" parameter.
|
Note: On the handheld, if displaying the long description, the Diffs may display as part of the long description (if sent that way from the merchandising system) as well as separately on the second line for displaying the Diffs (per diff display configurations). |
The item description on the MAF will take up one or two lines depending on an system configuration:
If the system admin, "Display Item Description Diffs - mobile" is set to Yes. the system will display two lines for the item description. Line one will be the item description, short or long, per the system configuration. Line two will be the diffs for the item, diff 1, diff 2, diff 3, diff 4. If there are no diffs for the item, the second line will be blank.
If the system admin, "Display Item Description Diffs - mobile" is set to No, the system will display one line for the item description. Line one will be the item description, short or long, per the system configuration.
The Advanced Item Entry dialog allows adding items to a transaction on the PC only and can leverage a wedge scanner.
UIN Attribute Configuration and resolving UIN discrepancies is only on the PC.
Viewing UIN history details is available on the PC, MAF small, and MAF large.
Adding, editing, and removing UINs on a transaction exists on the PC, handheld, MAF small, and MAF large form factor.
Extended Attribute configuration is only on the PC.
Adding, editing, and removing extended attributes on a transaction exists on the PC, MAF small, and MAF large form factor.
Extended Attributes can only be added to a transaction on the handheld (Wavelink Studio). Editing and removing is not available.
This section covers integration, batch, and the database structure.
Items have many different ways in which they need to be used within the system, so numerous different business objects represent different concepts of the usage of item.
| Business Object | Description |
|---|---|
| Item | A small view of basic item information that can be held on several other business objects. |
| ItemDetailVo | Single business object that contains nearly all the information about an item. |
| ItemType | Enumeration of item types within SIM. Each item is assigned a type at the store level:
0 - Normal Item 5 - Consignment Item 10 - Concession Item 12 - Non-Inventory Item 15 - Simple Pack 20 - Complex Pack 25 - Simple Breakable Pack 30 - Complex Breakable Pack |
| ItemVo | A small view of basic item information that is returned as the result of an item search. |
| OrderItem | Contains information about an item that could be used for ordering and thus this business object is used for item requests and store orders. |
| RelatedItem | Contains information about an item related to another item, most specific the item differentiators. |
| RetailItem | Contains information about an item needed for ticketing, such a price and ticket format information. |
| SaleItem | Contains information about an item needed for an item basket. |
| StockItem | Contains item and inventory information as well as a series of APIs for updating inventory correctly. This is the primary business object used on most transaction line items. |
| SupplierItem | Represents the information about an item at a supplier. |
| UINDetail | Contains detailed information about a specific item UIN including the UIN type, the functional area it belongs to, and the status. |
| UINProblemDetail | Contains details of the problem that occurred processing a UIN including the old and new UIN status and a Boolean value indicating whether the problem is resolved or not. |
SIM supports UINs (serial numbers). UINs need to exist independently as their own concept as well as be associated to various transactions as they are being processed. Multiple business objects representing a UIN exist to handle this in the most efficient manner possible.
| Business Object | Description |
|---|---|
| UinDetail | Complete information about a UIN. |
| UinValue | Basic information about a UIN necessary to process a transaction. |
SIM supports extended attributes during the adding of item detail to transaction. An extended attribute captures not only the item and quantity, but any additional information within the barcode that has been configured to be captured by the system. When a GS1 compliant barcode is scanned, the application can parse out the selected attributes and associated them with the line item. These extended attributes are persisted along with the transaction in a database table ending with _ATT.
| Business Object | Description |
|---|---|
| BarcodeAttributeAdmin | Contains detailed information for GS1 Barcode. |
| MdseHierarchyAttribute | Contains Barcode Attribute information for a specific item hierarchy. |
| ExtendedAttribute | An extended attribute consists of a barcode and quantity and multiple BarcodeAttributes associated to that particular extended attribute. |
| BarcodeAttribute | A barcode contains one single pairing of information within an extended attribute. |
This section covers integration through RIB and web services.
Items come to SIM from a merchandising system through the RIB (items, item loc messages). SIM also gets information about items associated to a supplier through the RIB. Extended attributes are not received or sent on RIB payloads.
| RIB Payload | Description |
|---|---|
| ItemDesc | This payload contains information about an item. It contains a wide variety of information about the item including suppliers, UPCs, ticketing information, image information, UDAs, and related items. |
| ItemLocDesc | This payload contains information about an item at a specific location. |
| ItemSupDesc | This payload contains information about an item for a specific supplier. |
| ItemSupCtyDesc | This payload contains information about an item for a specific supplier within a specific country. |
SIM supplies SOAP web services for retrieving information about items (StoreItem) and information about item inventory (StoreInventory).
In addition, item information is transmitted for detailed line items for transactional web services such as those for Commerce Anywhere, Inventory Adjustments, Transfers to Store, Transfers to Warehouse, Transfers to Finisher, and Return to Vendor (RTV). The line item details include UINs as well as any extended attributes for read and save operations.
The following service operations are supported for the StoreItem web service.
| Service Operation | Description |
|---|---|
| lookupItemHeaderByItem | Retrieves basic item header information through simplified item search criteria. |
| lookupItemHeaderBySource | Retrieves basic item header information through source (supplier, warehouse, finisher) search criteria. |
| lookupItemHeaderByUDA | Retrieves basic item header information through user defined attributes search criteria. |
| lookupItemHeaderByInventory | Retrieves basic item header information through inventory search criteria. |
| lookupRelatedItem | Retrieves a list of related items for a specific item and store. |
| readItemDetail | Retrieves detailed information about a single item at a single store. |
| saveItemImage | Saves information about an image or QR code for a specific item. |
The following service operations are supported for the StoreInventory web service.
| Service Operation | Description |
|---|---|
| lookupAvailableInventory | Retrieves inventory availability information for multiple items at multiple stores. |
| lookupAvailableInventoryAllStores | Retrieves inventory availability information for a single item at all stores. |
| lookupInventoryInStore | Retrieves the inventory information for multiple items at multiple stores. |
| lookupInventoryInTransferZone | Retrieves the inventory information for items within a transfer zone for a specific store. |
| lookupInventoryForBuddyStores | Retrieves the inventory information for items a buddy store of a specific store. |
| lookupFutureInventory | Retrieves future inventory information for a specific item and store. |
The following batch is provided by SIM:
| Batch | Description |
|---|---|
| UINAttributeImport | This batch is used to load bulk setup of item UIN attribute configurations by department and class. These are used as determine UIN information for specific items within the system. |
The following database tables are used:
| Table Name | Description |
|---|---|
| BARCODE_ATTRIBUTE | Holds GS1 barcode attribute configuration for a store. |
| BARCODE_PROCESSOR | Barcode format processor definition. It contains the name (identifier code) for the barcode type as well as a description, whether or not it is active, and what order to process it in. |
| ITEM | This table contains one record for each item defined for the company. It contains the base information for an item that is consistent across all locations. |
| ITEM_COMPONENT | Defines all of the items contained within a simple or complex pack item. For a simple pack, there will be only one record for the pack item listing its member item. For a complex pack, more than one record can exist. |
| ITEM_HIERARCHY | Item hierarchy table that defines department, class, and sub-class information available for an item. |
| ITEM_HIERARCHY_ATTRIB | Holds extended attributes assigned to item hierarchies within a store. |
| ITEM_IMAGE | This table holds the item image information. |
| ITEM_QR_CODE | This table contains the item QR code image. |
| ITEM_UIN | This table contains information about UINs. It is specific to the UIN itself and not associated to any particular transaction. |
| ITEM_UIN_PROBLEM | Contains Item UIN problem records along with the old and new status of the UIN. Also contains the resolved column which indicates whether the problem has been resolved or not. |
| RELATED_ITEM | This table contains the associated between an item and second item that is related in some manner. |
| RELATED_ITEM_TYPE | This table contains the type of relationship available for an item. |
| STORE_ITEM | This table contains the information for an item at a specific store. |
| STORE_ITEM_STOCK | This table contains the inventory information for an item at a specific store. |
| STORE_ITEM_STOCK_HISTORY | This table contains the movement of stock on hand positions over time. |
| STORE_ITEM_STOCK_NONSELL | This table contains the unavailable inventory separated into specific sub-buckets by reason code. |