| Oracle® Retail Trade Management User Guide Release 14.1 E56591-01 |
|

 Previous |
 Next |
As commercial invoices are received from trading partners and suppliers, they can be recorded in the obligations module. The expenses can be recorded at a variety of levels. The levels are:
Applies to a unique shipment and container combination.
Applies to a unique shipment, container and purchase order combination.
Applies to a unique shipment, container, purchase order, and item combination.
Applies to a unique shipment and bill of lading or air waybill combination.
Applies to a unique shipment, bill of lading or air waybill and purchase order combination.
Applies to a unique shipment, bill of lading or air waybill, purchase order, and item combination.
Applies to a unique shipment.
Applies to a unique shipment and purchase order combination.
Applies to a unique shipment, purchase order, and item combination.
Applies to a unique purchase order.
Applies to a unique purchase order and item combination.
Applies to all transportation records associated with a unique purchase order.
Applies to a unique customs entry.
Applies to a ASN.
Applies to a unique ASN and purchase order combination.
Applies to a unique ASN and carton combination.
Each shipment is designated by a unique combination of vessel, voyage, and estimated departure date. For obligations at the purchase order header and purchase order/item level, you can allocate costs to one or more locations.
When the obligation is complete, you can approve the costs. The costs are transmitted to the actual landed cost module. If you have access to the Oracle Retail Invoice Matching product, non-merchandise invoices are created automatically from approved obligations.
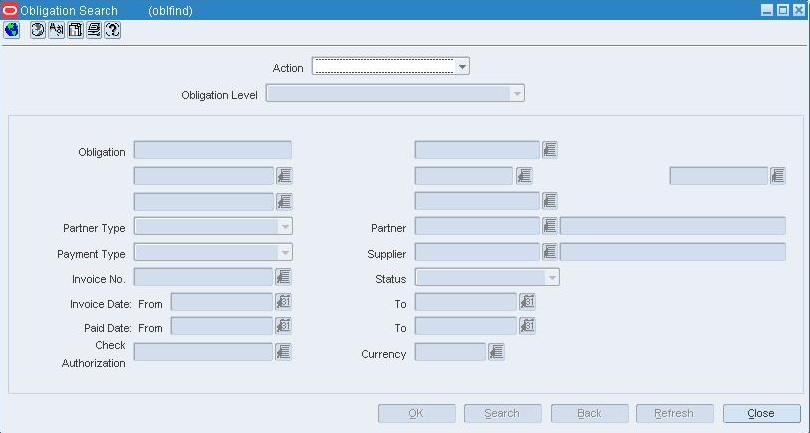
Navigate: From the main menu, select Finance > Obligation Maintenance. The Obligation Search window opens.
In the Action field, select New.
In the Obligation Level field, select the appropriate level.
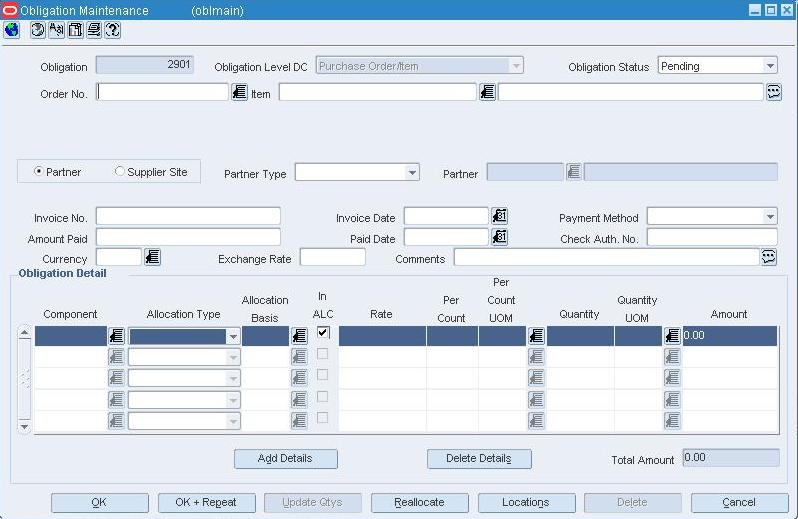
Click OK. The Obligation Maintenance window opens.
In the variable fields, enter the appropriate ID, or click the LOV button and select the variable.
|
Note: Depending on the obligation level, the following fields are enabled: BL/AWB, Container, Entry No, Order No, Item, Vessel, Voyage/Flight, Est Depart Date. |
Select either the Partner or Supplier option.
If you select Partner, select the type of partner in the Partner Type field.
In the Partner or Supplier field, enter the ID of the vendor, or click the LOV button and select the vendor.
To enter basic invoice information, enter the invoice number, invoice date, method of payment, amount paid, payment date, check authorization number, currency code, exchange rate, and comments in the appropriate fields.
Click Add Details.
In the Component field, enter the code for the component, or click the LOV button and select the component.
In the Allocation Type field, select the appropriate option.
If you select Amount in the Allocation Type field, enter the quantity, unit of measure, and amount in the appropriate fields.
If you select Unit of Measure in the Allocation Type field, enter the allocation basis, rate, per count, unit of measure, quantity, and amount in the appropriate fields.
Select the In ALC check box next to each cost component that you want to include in actual landed cost calculations.
|
Note: Costs can be allocated to locations if the obligation is entered at the purchase order header or purchase order/item level. |
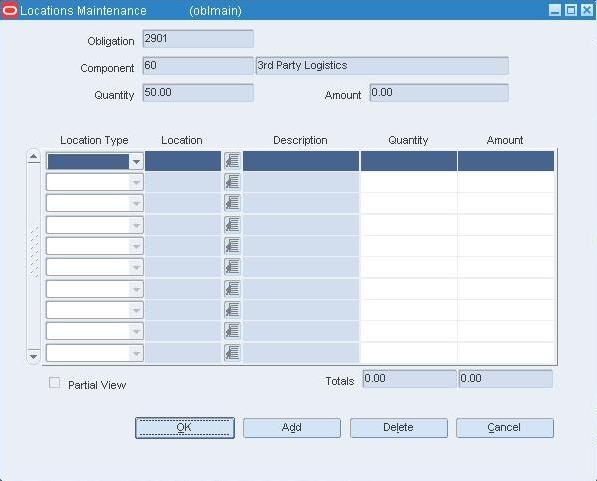
Select a cost component and click Locations. The Locations Maintenance window opens.
In the Location Type field, select the type of location.
In the Location field, enter the ID of the location, or click the LOV button and select the location.
In the Quantity field, enter the number of units that were received at the location.
In the Amount field, enter the cost allocated to the location.
Click OK to save your changes and close the window.
Navigate: From the main menu, select Finance > Obligation Maintenance. The Obligation Search window opens.
Search for and retrieve an obligation in Edit mode. The details appear in the Obligation Maintenance window.
In the Obligation Status field, select Approved. The costs are allocated to the actual landed cost module.
|
Note: If you have access to Oracle Retail Invoice Matching, a non-merchandise invoice is written in approved status after you approve an obligation. Subsequently, the approved costs are posted to financials. |
Click OK to close the window.
Navigate: From the main menu, select Finance > Obligation Maintenance. The Obligation Search window opens.
In the Action field, select either Edit or View.
In the Obligation Level field, select the appropriate level.
|
Note: Depending on the obligation level, the following fields are available:
|
Enter additional criteria as desired to make the search more restrictive.
Click Search. The Obligation Search window displays the obligations that match the search criteria.
Select a task:
To perform another search, click Refresh.
To display the details of an obligation, select a record and click OK. The Obligation Maintenance window opens.
Click Close to close the window.
Navigate: From the main menu, select Finance > Obligation Maintenance. The Obligation Search window opens.
Search for and retrieve an obligation in View mode. The Obligation Maintenance window opens.
To view the allocation of a cost component to a location:
|
Note: Allocations to locations can be viewed for obligations at the purchase order header or purchase order/item level. |
Select a cost component and click Locations. The locations appear in the Locations Maintenance window.
Click OK to close the window
Click OK to close the window
Navigate: From the main menu, select Finance > Obligation Maintenance. The Obligation Search window opens.
Search for and retrieve an obligation in Edit mode. The Obligation Maintenance window opens.
|
Note: Allocations to locations can be edited for obligations at the purchase order header or purchase order/item level. |
Edit the enabled fields as necessary.
To edit the allocation of a cost component to a location:
Select a cost component and click Locations. The Locations Maintenance window opens.
To add a location, click Add. Next enter the details on the next available line.
To delete a location, select the location and click Delete. When prompted to delete the location, click Yes.
Click OK to close the window.
To reallocate the edited costs, click Reallocate.
Click OK to save your changes and close the window.
Navigate: From the main menu, select Finance > Obligation Maintenance. The Obligation Search window opens.
Search for and retrieve an obligation in Edit mode. The Obligation Maintenance window opens.
Click Delete.
When prompted to delete the record, click Yes.
Click OK to save your changes and close the window.