| Oracle® Retail Warehouse Management System UI User Guide Release 14.1 E58327-01 |
|


 Previous |
 Next |
| Oracle® Retail Warehouse Management System UI User Guide Release 14.1 E58327-01 |
|
Previous |
Next |
WIP (work in process) codes may be assigned to containers in order to direct personnel in the distribution center to perform value added services to the contents of the container. The system understands from the WIP code where the container must be staged in order for a certain activity to be performed on the container.
In the processing module, you can accomplish the following tasks:
Assign WIP codes to containers.
Process WIP code activities.
Verify that the WIP codes were processed.
Business Process
WIP codes may be assigned to individual containers. As an alternative, you can apply a WIP code to all containers that are associated with an appointment, ASN, purchase order, item, location, distro, wave, or destination. It is necessary to assign the WIP codes in sequential order; that is, in the order that the work must be performed.
Merchandise is routed to the staging location for each WIP on a container's WIP list in sequential order. When the activity required by a WIP code is performed, the DC personnel must indicate when the activity was started and when it was finished. These time stamps allow the system to track the status of each WIP code.
The implied status of a WIP code may be:
Next: An activity has not been started, but the previous WIP code in the WIP list is Closed.Open: An activity has not yet been started.In progress: A start time has been entered for the activity, but not an end time.Closed: An end time has been entered for the activity.
Before merchandise is placed in inventory or shipped, a quality check can be performed. During the quality check, you can assign trouble codes as necessary, adjust quantities, or record dimensions and attributes for containers and items.
This chapter contains the following topics:
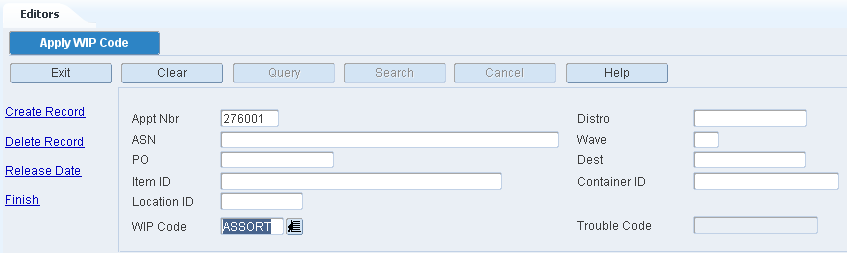
The Apply WIP Code Editor allows you to apply WIP codes and Trouble Codes to containers using multiple selection criteria. These codes may be applied as part of the receipt planning process, inventory management process, or stock distribution process. You can enter criteria in one or more fields in order to include all containers that are associated with the an appointment, ASN, purchase order, item, location, distro, wave, or destination; or you can choose to enter a specific container ID.
After entering the selection criteria, you can enter either the WIP code or the Trouble Code to be assigned to or deleted from the selected containers. If you enter a Trouble Code, the appropriate WIP code is automatically entered.
To apply WIP codes, navigate to Processing > Apply WIP Code. The Apply WIP Code window opens.
Add a WIP Code to Multiple Containers
WIP codes cannot be assigned to containers in Manifested (M) or Shipped (S) status.
On the Apply WIP Code window, enter the criteria for the set of containers that you want to edit.
In the WIP Code field, enter the WIP code, or click the LOV button and select the WIP code.
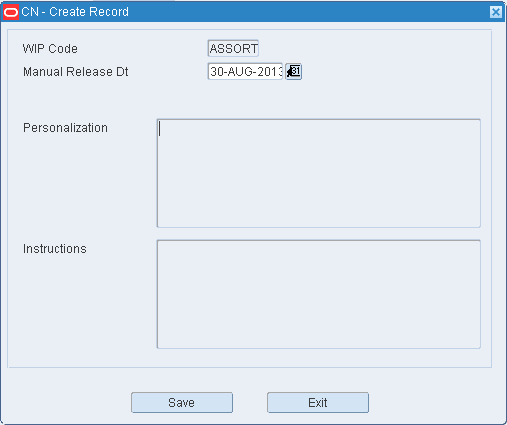
Click Create Record. The Create Record window opens.
[Optional] In the Manual Release Dt field, enter the date, or click the Calendar button and select a date.
Click Save.
When prompted to continue, click Yes.
Delete a WIP Code from Multiple Containers
On the Apply WIP Code window, enter the criteria for the set of containers that you want to edit.
In the WIP Code field, enter the WIP code, or click the LOV button.
Click Delete Record.
When prompted to continue, click Yes.
Add a Trouble Code to Multiple Containers
Trouble codes may be added to containers with a status of Appointed (A), Inventory (I), Distributed (D), or Troubled (T).
On the Apply WIP Code window, enter the criteria for the set of containers that you want to edit.
In the Trouble Code field, enter the trouble code, or click the LOV button.
Click Create Record.
When prompted to continue, click Yes.
Delete a Trouble Code from Multiple Containers
On the Apply WIP Code window, enter the criteria for the set of containers that you want to edit.
In the Trouble Code field, enter the trouble code, or click the LOV button and select the trouble code.
|
Note: Deleting a trouble codes does not cause its associated WIP code to be deleted. |
Click Delete Record.When prompted to continue, click Yes.
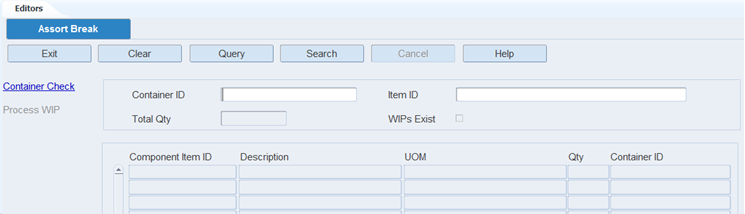
The Assort Break is used to view and break the component items related to a master item. It also provides the ability to process any WIP Codes associated to the master or child item IDs.
Assortment: The parent item is known, but the child items must be identified and split into their own containers prior to putaway. Adjustments are made to inventory in order to account for the child items.
Break pack: The child items are known, but they must be split into their own containers prior to putaway.
To view the Assort Break Editor, navigate to Processing > Assort Break Editor. The Assort Break Editor window opens.
Display the Component Item IDs for a Container
Click the Query button.
In the Container ID query field, enter a container ID, or click the LOV button and select the container.
Click the Search button. The Component Item IDs for the specified container is displayed.
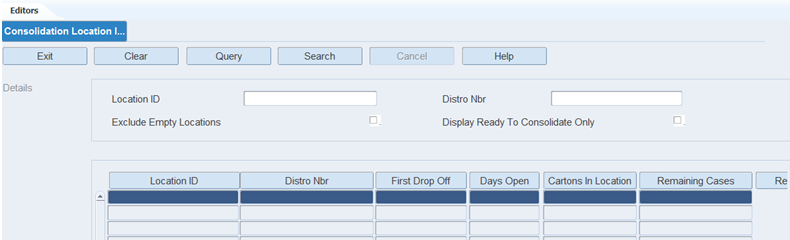
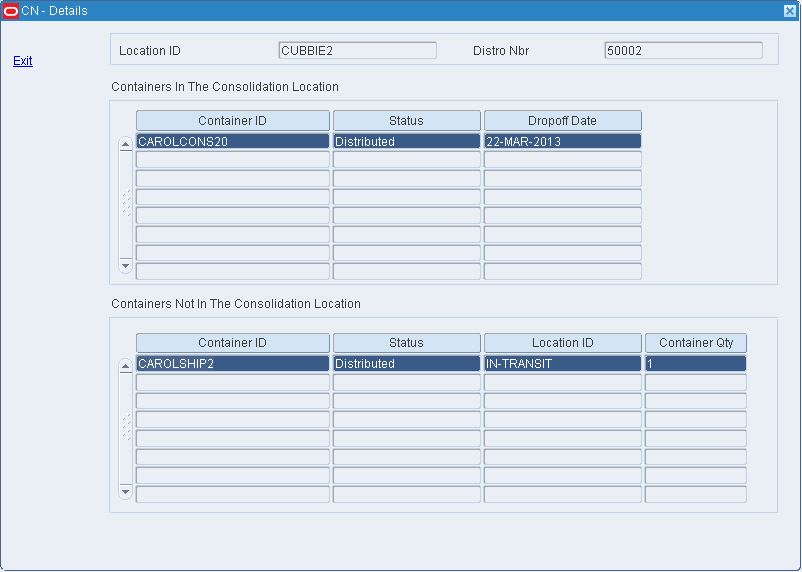
The Consolidation Location Inquiry is a view-only screen which displays information about the locations defined as the Consolidation type locations within the warehouse facility.
To view the Consolidation Location Inquiry, navigate to Processing -> Consolidation Location Inquiry. The Consolidation Location Inquiry window opens.
There are several query criteria to filter the information desired. Using this screen, you can review information such as all the consolidation type locations present within the warehouse, associated consumer direct stock order in a location, and whether the contents in the location are ready to be consolidated or not.
Display All Consolidation Type Locations
On the Consolidation Location Inquiry screen, click Search to view all consolidation type locations.
Display a Subset of Consolidation Type Locations
|
Note: It is possible to query for a distro which is not yet associated to any consolidation location. In such a case, an error message is displayed. However, the details link is enabled, so the user can view all the containers associated with it, which are outside the consolidation location currently. |
If any consolidation type locations are currently displayed, click the Clear button.
Click the Query button. An LOV is displayed next to Location ID and Distro Nbr fields.
Enter any desired criteria or a combination of criterion to filter the results.
Location ID: You can either manually enter (or partially enter) or click the LOV and select the desired consolidation locations for their information to be displayed.
Distro_nbr: You can query by entered distro number (partial entry allowed).
Exclude Empty locations: If this field is checked, only consolidation locations associated with a distro, at the moment, are displayed.
Display Ready to Consolidate Only: If this field is checked, only those consolidation locations are displayed which have all the containers against the associated distro.
Click the Search button. The consolidation type locations that match the selection criteria are displayed.
The following details are displayed:
Location ID - The consolidation location ID.
Distro_nbr - The distro associated to the consolidation location. In case of an empty consolidation location, this is left blank.
First Dropoff - Date of placing the first carton in the consolidation location. In case the location is empty, the field is blank.
Days open - The number of days the consolidation location has been associated with the current distro. In case the location is empty, the field is blank.
Cartons in location - All the cartons on a distro present in the consolidation location. This excludes any cartons present outside the location.
Remaining cases - The number of containers on the same distro which are not present in the consolidation location or consolidation processing area (where the containers are sent from the consolidation locations), but are consolidation-eligible. Any P status containers are also included in the calculation. In case of no outstanding containers, the field is set to 0.
In the case of pallets with cases (labeled or unlabeled), the total number of outstanding cases is either the sum of the total number of child cases present on the pallet. For Unit picked totes, the count is always calculated as 1.
Ready to Consolidate flag - If all the consolidation-eligible containers on the distro are present in the consolidation location, this flag is set to Y on the screen.
View Details of the Consolidation Type Location
On the Consolidation Location Inquiry screen, select the consolidation type location that you want to view in detail.
Click Details. The Details screen displays details of the containers present in the consolidation location, as well as the containers on that distro which are not yet present in the consolidation location but might be eligible for consolidation.
The Details screen has two blocks. The upper block titled Containers in The Consolidation Location displays details of the containers present in the consolidation location - Container ID, Status, Dropoff Date (date when the container was placed in the consolidation location).
The lower block displays details of containers on the distro which are not consolidation eligible - Container ID, Status, Location ID, Container Quantity.
Containers displayed in the lower block may also include containers which are present in the consolidation processing area. Only master containers are displayed in the Container ID field, and the corresponding case quantity (labeled or unlabeled) is displayed in the Container Qty field.
Exit the Consolidation Location Inquiry Window
Click the Exit button to close the window.
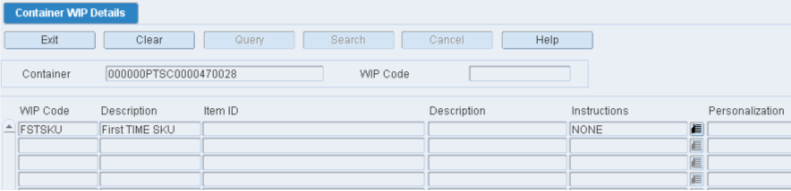
The Container WIP Details screen allows you to view details of the WIP codes that are assigned to a container. The details include special instructions and personalization information when applicable.
To view WIP details by container, navigate to Processing > Container WIP Details. The Container WIP Details window opens.
|
Note: You can also access this window from the Container WIP Editor window. |
Display the WIP List for a Container
If the WIP list for a container is currently displayed, click the Clear button.
Click the Query button.
In the Container ID query field, enter a container ID, or click the LOV button and select the container.
Click the Search button. The WIP list for the specified container is displayed.
Exit the WIP Detail Window
Click the Exit button to close the window.
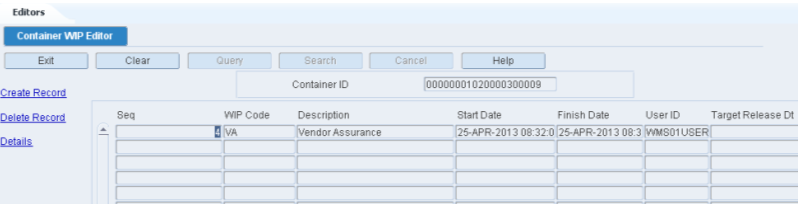
The Container WIP Editor allows you to view and apply WIP codes to a container.
The status of each WIP code opens:
If the Start Date and Finish Date are entered, the WIP code is Closed.
If only the Start Date is entered, the WIP code is In Progress.
If neither the Start Date nor Finish Date are entered, but the previous WIP code is Closed, the WIP code is Next.
You can access the WIP Detail window in order to view additional details about a selected WIP code.
To maintain WIP lists by container, navigate to Processing -> Container WIP Editor. The Container WIP Editor window opens.
|
Note: You can also access this window from the Stock Order Inquiry Screen window. |
Display the WIP List for a Container
If the WIP list for a container is currently displayed, click the Clear button.
Click the Query button.
In the Container ID query field, enter a container ID, or click the LOV button and select the container.
Click the Search button. The WIP list for the specified container is displayed.
Add a WIP Code to the WIP List
|
Note: If you do not want the new WIP code to be placed last in the list, select the WIP code that should precede the new one before you begin this procedure. |
On the Container WIP Editor window, click Create Record. The Create window opens.
In the WIP Code field, enter the WIP code, or click the LOV button and select the WIP code.
[Optional] In the Manual Release Dt field, enter the date, or click the Calendar button and select a date.
Click Save.
Delete a WIP Code from the WIP List
On the Container WIP Editor window, select the WIP code that you want to delete from the WIP list.
Click Delete Record.
When prompted to delete the record, click Yes.
Exit the Container WIP Editor Window
Click the Exit button to close the window.
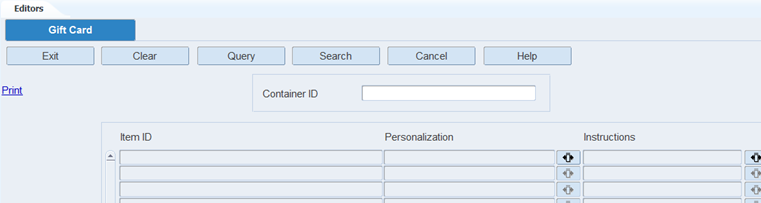
The Gift Card Screen allows you to print the gift cards that are to be shipped with items ordered by customers.
You can provide personalized gift card for a specified item ordered by a customer.
To generate a gift card, navigate to Processing -> Gift Card. The Gift Card window opens.
Display Items by Container
If items are currently displayed, click the Clear button.
Click the Query button.
In the Container ID query field, enter the ID of the container.
Click the Search button. The items that need gift cards appear.
Generate the Gift Card Report
On the Gift Card Report window, select the item that you want to process.
Click Save. The report is sent to the default destination.
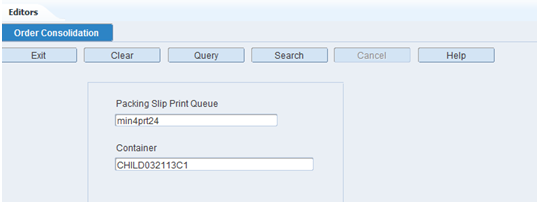
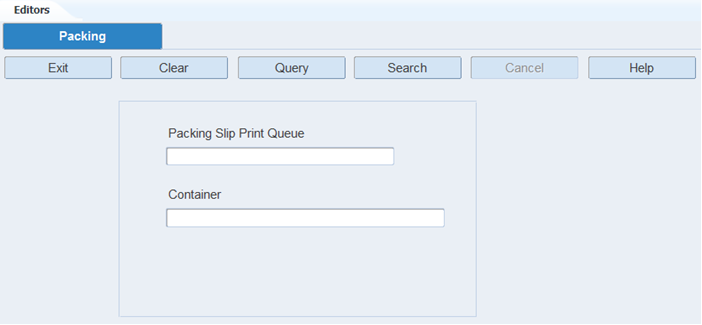
The Order Consolidation screen allows you to combine different physical containers into one or more containers from the same distro (this is used specifically for consumer direct orders). The consolidation is optional but when used, may reduce the outbound freight expense.
To consolidate orders navigate to Processing -> Order Consolidation Editor. The Order Consolidation window opens.
Display Order Consolidation Details
|
Note: The Packing Slip Print Queue field is enabled if the System Control Parameter (SCP) packing_slip_qty is set to a value greater than zero, and is disabled if packing_slip_qty is set to 0. |
If Packing Slip Print Queue is enabled, click the Query button.
In the Packing Slip Print Queue field enter the print queue, or click the LOV and select the print queue.
In the Container field, enter or scan the container ID.
Click Search. The details of the container are displayed on the Order Consolidation screen.
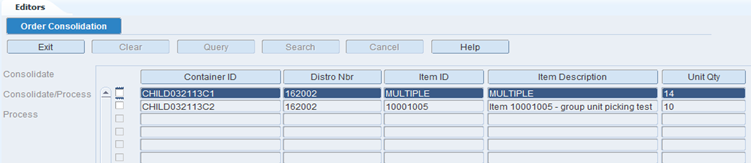
Consolidate Orders
On the Order Consolidation screen, select the containers to be consolidated using the check box.
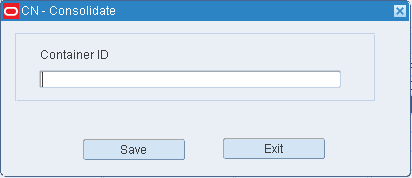
Click Consolidate. The Consolidate screen opens.
On the Consolidate screen, enter the container ID in the Container ID field. The containers being consolidated may be consolidated into a new container ID or consolidated into one of the check box selected container IDs.
Click Save. The consolidated container is displayed as a row in the Order Consolidation screen. Use the Process link to process this container.
Consolidate/Process Orders
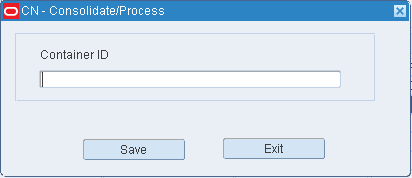
On the Order Consolidation screen, select the containers to be consolidated/processed using the check box.
Click Consolidate/Process. The Consolidate/Process screen opens.
On the Consolidate/Process screen, enter the container ID in the Container ID field. The containers being consolidated/processed may be consolidated/processed into a new container ID or consolidated/processed into one of the check box selected container IDs.
Click Save. The container is consolidated/processed at the order consolidation station.
Process Orders
|
Note: The following SCPs must be set for processing a container:
|
On the Order Consolidation screen, select the container to be processed using the check box.
|
Note: Only one container can be processed at a time. |
Click Process.
Click Yes when asked to confirm. The order is processed at the order consolidation station.
Exit the Order Consolidation Window
Click the Exit button to close the window.
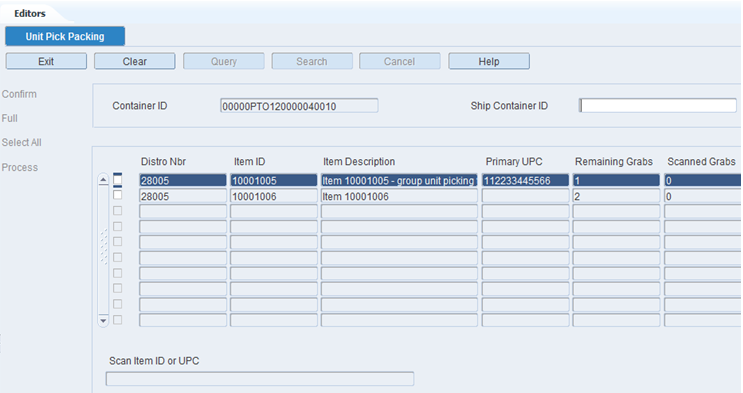
The Packing Screens allow you to pack consumer direct orders. Based on the type of container scanned (pick type and/or pallet configuration), the system presents one of three different screens:
Unit Pick Packing screen
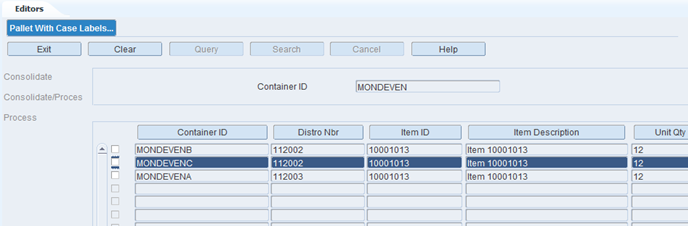
Pallet With Case Labels Packing screen
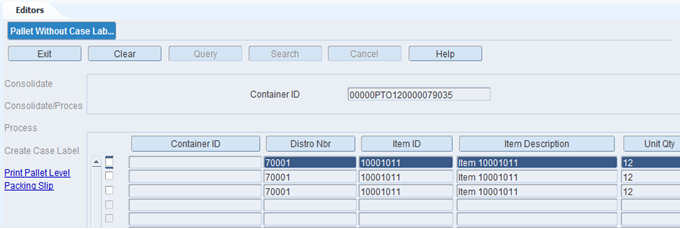
Pallet Without Case Labels Packing screen
To pack containers navigate to Processing -> Packing. The Packing window opens.
Display Order Details
|
Note: The Packing Slip Print Queue field is enabled if the System Control Parameter (SCP) packing_slip_qty is set to a value greater than zero, and is disabled if packing_slip_qty is set to 0. |
If Packing Slip Print Queue is enabled, click the Query button.
In the Packing Slip Print Queue field enter the print queue, or click the LOV and select the print queue.
In the Container field, enter or scan the container ID. You can enter the ID of a container entered that is a pick to tote from unit picking or a pallet that contains cases that are either labeled or not labeled.
Click Search.
When the container ID entered is that of a consumer direct container with a destination ID that is a virtual store, one of the three screens is displayed allowing the packing process to be executed. The screen displayed is based upon the pick type and/or case label.
|
Note:
|
If the container entered/scanned is a pick to tote from unit picking, the Unit Pick Packing screen is displayed.
The scanned container (case/tote) is displayed in the Container ID field.
In the Ship Container ID field, enter a ship container ID. You can either enter a new container ID in this field or use the original container ID as is.
|
Note: If the original container ID is used as the Ship Container ID and processing has begun, you cannot exit the screen until the container (case/tote) is processed. |
Once you enter the Ship Container ID, you can start processing. The grab quantity for the items in the container can be confirmed as follows:
If the item ID has at least one RWMS resident UPC code, scan the item ID or the UPC code in the Scan Item ID or UPC field.
If the item ID does not have an RWMS resident UPC, confirm the grab quantity through a manual entry of the item ID count.
|
Note: To confirm the item ID quantity through manual entry, the user attribute pack_scan_upc_not_reqd must be enabled for the user ID. |
Confirm Grab Quantity
On the Unit Pick Packing screen, once you have manually entered the count in the Scanned Grabs field, click Confirm to confirm the quantity.
Indicate Shipping Container is Full
On the Unit Pick Packing screen, click Full.
By clicking Full, the system provides the ability to complete packing of the current shipping container and open a new shipping container to process the remaining units.
Select All Items
On the Unit Pick Packing screen, click Select All to select all the applicable check boxes.
|
Note: The applicable check boxes may vary based on the item ID/UPC data and whether the user attribute pack_scan_upc_not_reqd is applied. |
Process the Shipping Container
|
Note: The following SCPs must be set for processing a container:
|
On the Unit Pick Packing screen, click Process.
Click Yes when asked to confirm. The container is processed.
Exit the Unit Pick Packing Window
Click the Exit button to close the window.
If the container scanned is a pallet with labeled cases, the Pallet With Case Labels Packing screen is displayed.
Consolidate Containers
|
Note: You can consolidate containers having the same Distro Nbr using this screen. |
On the Pallet With Case Labels Packing screen, select the containers to be consolidated using the check box.
Click Consolidate. The Consolidate screen opens.
On the Consolidate screen, enter the container ID in the Container ID field. The containers being consolidated may be consolidated into a new container ID or consolidated into one of the check box selected container IDs.
Click Save. The consolidated container is displayed as a row in the Pallet With Case Labels Packing screen. Use the Process link to process this container.
Consolidate/Process Orders
|
Note: You can consolidate containers having the same Distro Nbr using this screen. |
On the Pallet With Case Labels Packing screen, select the containers to be consolidated/processed using the check box.
Click Consolidate/Process. The Consolidate/Process screen opens.
On the Consolidate/Process screen, enter the container ID in the Container ID field. The containers being consolidated/processed may be consolidated/processed into a new container ID or consolidated/processed into one of the check box selected container IDs.
Click Save. The container is consolidated/processed.
Process Orders
|
Note: The following SCPs must be set for processing a container:
|
On the Pallet With Case Labels Packing screen, select the container to be processed using the check box.
|
Note: Only one container can be processed at a time. |
Click Process.
Click Yes when asked to confirm. The container is processed at the packing station.
Exit the Pallet With Case labels Window
Click the Exit button to close the window.
If the container scanned is a pallet without labeled cases, the Pallet Without Case Labels Packing screen is displayed.
Create Case Labels
|
Note: Except for when processing at the pallet level, each case/row must be assigned a container ID before further processing |
On the Pallet Without Case Labels Packing screen, select the row for which a container ID must be assigned.
Click Create Case Labels. The Container ID field is enabled for that row.
Enter the container ID.
Consolidate Containers
|
Note: You can consolidate containers having the same Distro Nbr using this screen. |
On the Pallet Without Case Labels Packing screen, select the containers to be consolidated using the check box.
Click Consolidate. The Consolidate screen opens.
On the Consolidate screen, enter the container ID in the Container ID field. The containers being consolidated may be consolidated into a new container ID or consolidated into one of the check box selected container IDs.
Click Save. The consolidated container is displayed as a row in the Pallet Without Case Labels Packing screen. Use the Process link to process this container.
Consolidate/Process Orders
|
Note: You can consolidate containers having the same Distro Nbr using this screen. |
On the Pallet Without Case Labels Packing screen, select the containers to be consolidated/processed using the check box.
Click Consolidate/Process. The Consolidate/Process screen opens.
On the Consolidate/Process screen, enter the container ID in the Container ID field. The containers being consolidated/processed may be consolidated/processed into a new container ID or consolidated/processed into one of the check box selected container IDs.
Click Save. The container is consolidated/processed.
Process Orders
|
Note: The following SCPs must be set for processing a container:
|
On the Pallet Without Case Labels Packing screen, select the container to be processed using the check box.
|
Note: Only one container can be processed at a time. |
Click Process.
Click Yes when asked to confirm. The container is processed at the packing station.
Print Pallet Level Packing Slip
|
Note: If the pallet scanned is for a single SKU and a single distro number, the Print Pallet Level Packing Slip link is enabled. |
On the Pallet Without Case Labels Packing screen, click Print Pallet Level packing Slip.
Click Yes when asked if you want to process the pallet. Packing slip is printed for the entire pallet and the pallet is processed.
|
Note: Operationally, the pallet may then be shrink wrapped and shipped using the manifest system. The execution of the manifest system functionality is through a manual scan |
Exit the Pallet Without Case labels Window
Click the Exit button to close the window.
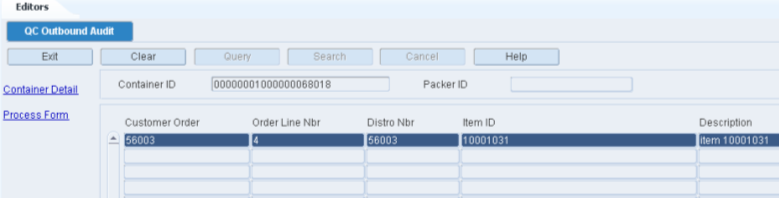
The QC Outbound Audit allows you to perform a quality audit on the contents of an outbound container. If necessary, you can adjust the quantity, and identify the person who packed the container.
You can access the WIP Audit Outbound window in order to view details about any WIP codes that are associated with a selected line item.
To process outbound containers, navigate to Processing -> QC Outbound Audit. The QC Outbound Audit window opens.
Display the Details of an Outbound Container
If the details of a container are currently displayed, click the Clear button.
Click the Query button.
In the Container ID query field, enter a container ID, or click the LOV button and select the container.
Click the Search button. The contents of specified container appear.
Assign a Packer to the Container
On the QC Outbound Audit window, double-click the Packer ID text box. The Packer Editor opens.
Enter the ID of the packer, or click the LOV button and select the packer.
Click Save to save any change and close the Packer Editor window.
Adjust the Quantity of an Item
On the QC Outbound Audit window, double-click the line item that you want to edit. The Modify Quantity window opens.
Enter the actual quantity in the container.
Click Save.
When prompted to provide a reason for the adjustment, select the reason and click OK.
Process the Quality Audit
On the QC Outbound Audit window, click Process Form.
When prompted to confirm that the quality audit is done, click Yes.
Exit the QC Outbound Audit Window
Click the Exit button to close the window.
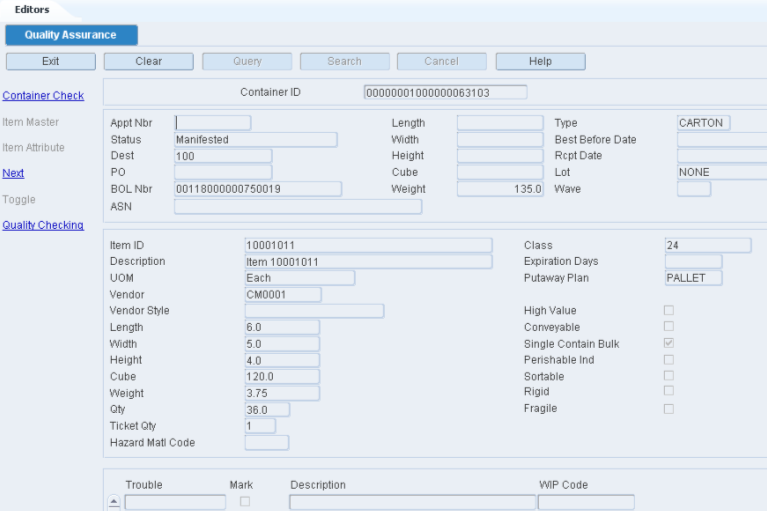
The Quality Assurance screen allows you to view details about a container and its contents. You can also apply trouble codes to the container.
There are four blocks in this window:
Query block: Identify the container that you want to retrieve.
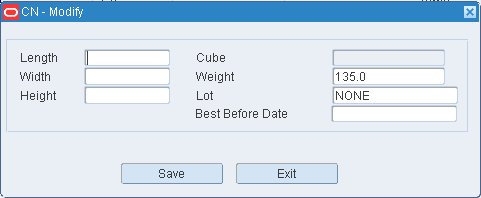
Container block: Displays container details. You can edit the dimensions, weight, lot number, and best before date. You can access the Container Checking window in order to view or edit the contents.
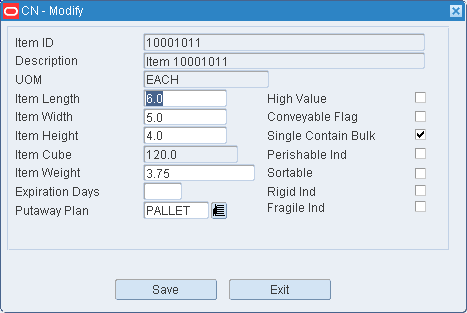
Item block: Displays item details. You can edit the dimensions, weight, and several attributes of the item. You can access the Item Master Editor window in order to view or edit additional item details.
Trouble code block: Displays a list of trouble codes. You can mark the trouble codes that you want to assign to the container.
To process containers for quality assurance, navigate to Processing -> Quality Assurance. The Quality Assurance window opens.
Display Container Details
If the details of a container are currently displayed, click the Clear button.
Click the Query button.
In the Container ID query field, enter a container ID, or click the LOV button and select the container.
Click the Search button. The details for the specified container are displayed
|
Note: There are four blocks in this window. From top to bottom, they are referred to as the Query block, Container block, Item block, and Trouble Codes block. |
Edit Container Details
On the Quality Assurance window, click Next to place the cursor in the Container block.
Double-click any field in the Container block. The Modify window opens.
Edit the dimensions, weight, lot number, and best before date as necessary.
Click Save to save any changes and close the Modify window.
Edit Item Details
On the Quality Assurance window, click Next to place the cursor in the Item block.
Double-click any field, in the Item block. The Modify window opens.
Edit the dimensions, weight, and additional details as necessary.
Click Save to save any changes and close the Modify window.
Assign Trouble Codes to the Container
On the Quality Assurance window, click Next to place the cursor in the Trouble Codes block.
Select the trouble code that you want to assign to the container.
Click Toggle.
When prompted to confirm the action, click Yes. A Y (Yes) appears in the Mark field to indicate that the trouble code is assigned to the container.
|
Note: To clear a marked trouble code, select the trouble code and click Toggle. The Y no longer appears in the Mark field. |
Process the Quality Assurance Check
On the Quality Assurance window, click Next to place the cursor in the Container block.
Click Quality Checking. The QA check is completed and the fields are cleared.
Exit the Quality Assurance Window
Click the Exit button to close the window.
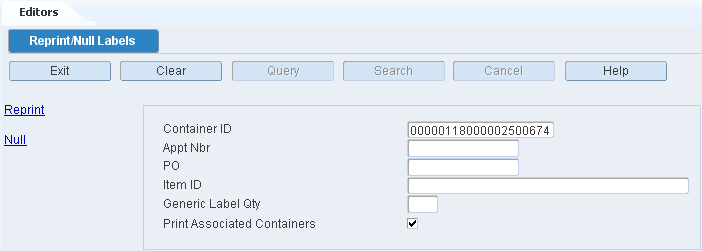
The Reprint/Null Labels screen allows you to reprint labels or null labels for appointments or received containers. You may need to reprint labels if the labels produced were damaged in some way (unreadable barcodes). You may need to null labels if the appointment details are wrong or if the amount received was less than previously communicated. You can null labels at the container, appointment, or purchase order level. If the labels have been applied to a container, they cannot be nulled. This screen also allows you to print generic labels at any time.
To reprint labels, navigate to Processing -> Reprint/Null Labels. The Reprint/Null Labels window opens.
In the Container ID field, enter the ID of the container.
To reprint labels for the child containers of a master container, click the Print Associated Containers check box.
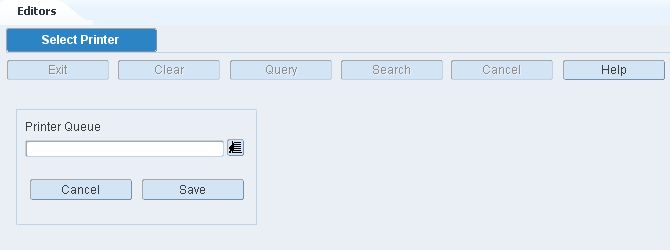
Click Reprint. The Select Printer window opens.
Click the LOV button and select the Printer Queue.
Click Save. The labels are sent to the selected destination.
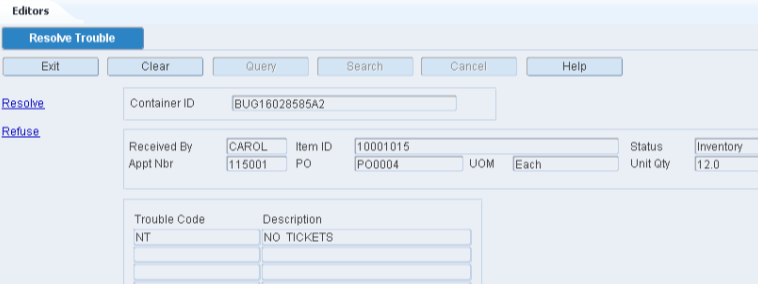
The Resolve Trouble screen allows you to resolve the troubled status previously assigned to refuse to specific containers.
Troubled merchandise is found in containers with a status of T (Troubled). By deleting the trouble codes associated with the container, you indicate that the issues concerning the troubled merchandise have been resolved. If all the trouble codes for a container are resolved, the status of the container changes to I (Inventory).
You can refuse merchandise that has not yet been received. Such merchandise is found in containers with a status of A (Appointed). When you refuse a container, you are prompted to generate the Refusal Advice report. The status of the container changes to R (Return to vendor).
To resolve troubled merchandise, navigate to Processing -> Resolve Trouble. The Resolve Trouble window opens.
Display the Details of a Container
If any details are currently displayed, click the Clear button.
In the Container ID field, enter the ID of a troubled container, or click the LOV button and select the container.
Click the Search button. The details for the specified container are displayed.
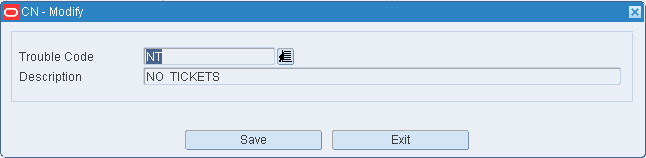
Edit a Trouble Code Assigned to a Container
On the Resolve Trouble window, double-click the trouble code that you want to edit. The Modify window opens.
In the Trouble Code field, enter a different trouble code, or click the LOV.
Click Save to save any changes and close the Modify window.
Resolve Troubled Merchandise
On the Resolve Trouble window, select the trouble code that you want to remove.
Click Resolve.
When prompted to delete the record, click Yes. The trouble code is no longer assigned to the container.
Refuse Troubled Merchandise
|
Note: Only merchandise that has not been received can be refused. |
On the Resolve Trouble window, click Refuse.
Click the LOV button and select the Printer Queue.
Click Save. The Refusal Advice report is sent to the selected destination.
Exit the Resolve Trouble Window
Click the Exit button to close the window.
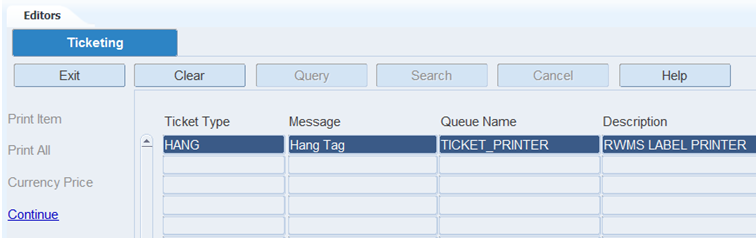
The Ticket Editor allows you to define and view a list of ticket types. You can enter a message, the maximum quantity, and printer information.
To maintain ticketing, navigate to Processing -> Ticketing. The current print queues for tickets appear in the Ticketing window.
Edit a Print Queue
On the Ticketing window, double-click the print queue that you want to edit. The Modify window opens.
In the Queue field, enter the name of a print queue, or click the LOV button.
Click Save to save any change and close the window.
Display Container/Items to be Ticketed
On the Ticketing window, select a print queue and click Continue. The Ticketing (container/item) window opens.
Click the Query button.
In the Container ID query field, enter the container ID, or click the LOV button.
Click the Search button.
|
Note: If the container is a master container, ticketing information opens for the labeled child containers. |
Edit Ticketing Information for a Container/Item
On the Ticketing (Container/Item) window, double-click the item that you want to edit. The Modify window opens.
Edit the ticket type, retail price, and ticket quantity as necessary.
Click Save to save any changes and close the Modify window.
Print Tickets for One or all Items in a Container
A trailer ticket is printed after a string of tickets are printed for a container. The user ID and container ID are printed on the trailer ticket. If a container has more than one item ID and/or ticket type, a trailer ticket is generated for each ticket type.
On the Ticketing (container/item) window:
Select an item and click Print Item in order to print tickets for the selected item.
Click Print All in order to print tickets for all the items.
When prompted to confirm the request, click Yes. The tickets are sent to the selected destination.
Exit the Ticketing Window
Click the Exit button to close the window.
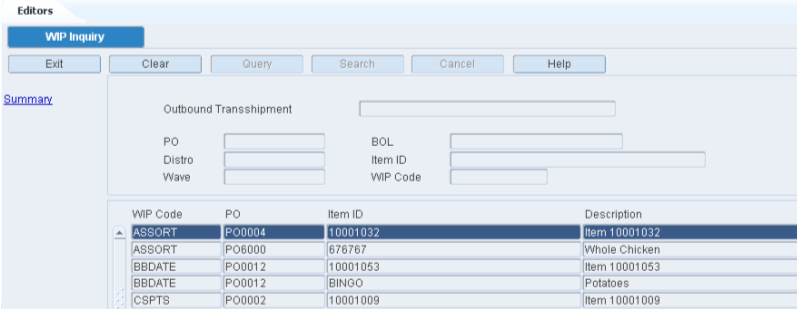
The WIP Inquiry allows you to view all or a subset of open WIP codes. You can view the WIP codes by purchase order, distro, wave, bill of lading, item, or WIP code.
You can view the number of containers by status that are associated with a selected WIP code.
To view WIP codes, navigate to Processing -> WIP Inquiry. The WIP Inquiry window opens.
Display all Open WIP Codes
Click the Query button.
Display a Subset of the Open WIP Codes
If any WIP codes are currently displayed, click the Clear button.
In one or more of the query fields, enter the desired criteria.
Click the Search button. The open WIP codes that match the criteria appear.
View Open WIP Codes by Container Status
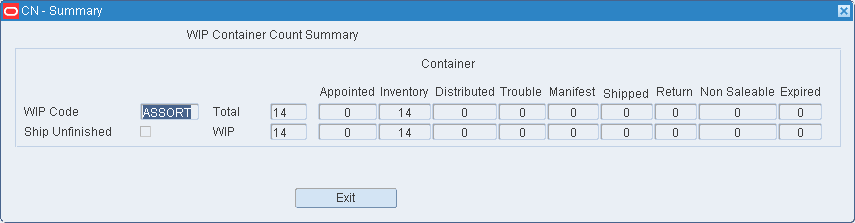
On the WIP Inquiry window, select the WIP code for which you want to view a summary.
Click Summary. The container count is summarized in the WIP Container Count Summary window.
|
Note: The container status may be: Appointed (A), Inventory (I), Distributed (D), Troubled (T), Manifested (M), Shipped (S), Return to vendor (R), Not Saleable (N), and Expired (X). |
Click Exit to close the WIP Container Count Summary window.
Exit the WIP Detail Window
Click the Exit button to close the window.