| Oracle® Retail Warehouse Management System Radio Frequency User Guide Release 15.0 E66770-01 |
|


 Previous |
 Next |
| Oracle® Retail Warehouse Management System Radio Frequency User Guide Release 15.0 E66770-01 |
|
Previous |
Next |
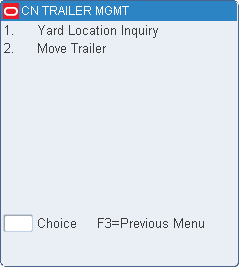
The More Options menu provides the following two options:
On the Main Menu screen, select More Options. The More Options menu screen opens.
From the More Options menu, select Trailer Mgmt. The Trailer Mgmt menu screen opens.
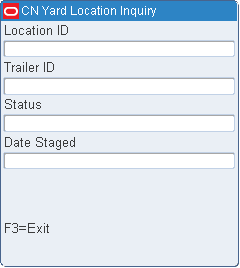
The Yard Location Inquiry screen allows you to view trailer information for a specific yard location.
On the Trailer Menu screen select Yard Location Inquiry. The Yard Location Inquiry screen opens.
On the Yard Location Inquiry screen, enter the ID of a valid yard location in the Location ID field. The details are displayed on the Yard Location Inquiry screen.
Press the F3 (Exit) key to exit the Yard Location Inquiry screen.
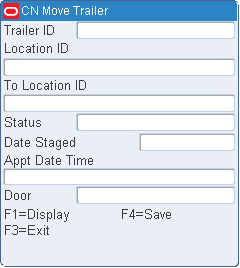
The Move Trailer screen allows you to move a trailer from one yard location to another.
On the Main Menu screen, select More Options -> Trailer Mgmt. On the Trailer Menu screen, select Move Trailer. The Move Trailer screen opens.
On the Move Trailer screen, enter the ID of a valid trailer in the Trailer ID field. The details are displayed on the Move Trailer screen.
In the To Location field, enter the ID of the new location for the trailer.
Press the F4 (Save) key.
When prompted to acknowledge the action, press the Enter key.
The Labor Standard Review screen allows the user to see if they achieved the system calculated Labor Standard after the task has been completed. Users can view the Labor Standard results based on the System Control Parameter DISPLAY_STANDARD. When this SCP is set to Yes, the system displays the labor Standard results of tasks performed and when set to No, it prohibits access to the screen.
|
Note: If the user has access to the screen and the SCP DISPLAY_STANDARD is set to No, then the screen is not accessed and the user gets a message indicating they do not have permissions.If the user does not have permissions to access this screen, this SCP does not come into play for that user. |
The Labor Standard Review Screen will show the user the most recent task completed with the percent of Standard Achieved. If the user presses the previous key the system will then proceed to the task previously completed and show the details. The user can continue to press the previous key to review previously completed tasks within the last 12 hours. If the user presses F6 Aggregate the system will provide an aggregate percent of standard based on the activity group(s) that they completed tasks within the last 12 yours.
|
Note: None of the fields in this screen are editable. |
On the Main Menu screen, select More Options. The More Options menu screen opens.
From the More Options menu, select Labor Standard Review. The Labor Standard Review menu screen opens.
In the Activity Group field, you will find the current activity group you having been working in or the word multiple if in the last 12 hours you worked in more than one activity group.
In the Activity Code field, you will find the Activity Code for the Assignment being displayed below.
In the Assignment field, you will find the Assignment Number for that specific task being displayed (completed).
In the Start Time field, you will find the timestamp when you physically started working on the task.
In the End Time field, you will find the timestamp when you physically ended working on the task.
The Actual time is the total time between the start and end timestamp which includes performing all of the task elements and any travel required.
The Allotted Time field is the system calculated labor Standard for this specific task. It includes all the elements applied (physical, system, and exception), all allowances applied, (global, elemental, and training) factors applied, conditions applied, and travel required.
The % of Standard field reports to the user if they achieved standard or failed to meet standard. A percentage of 1 or under means they achieved standard and a percentage above 1 means they failed to meet standard.
The RF Predictive Labor Standard provides clients with immediate awareness of how long an accepted activity will take to complete if completed as planned. The time allotted is the result of summing all elements, factors, conditions, allowances and travel times together and posting the resulting planned time to the RF gun upon acceptance of an activity.
The following procedure describes how to setup the RF Predictive Labor Standard.
To display the RF Predictive Labor Standard, set the enable_labor_mgnt flag to Yes in the system parameter table. When set to No, the field is unavailable. The field only populates on the first window for any activity. The predictive time appears in the title bar on the far left hand side as shown in Figure 11-7.
The RF Predictive Labor Standard only displays for those activities where the Display Labor Prediction flag is set to Yes in the Activity Editor. If set to No, the activity does not show predictive time.
These supported Activities can be set to Yes:
BD_REPLEN
BP_REPLEN
BR_REPLEN
BT_REPLEN
B_PICK
CD_REPLEN
CE_REPLEN
CF_PICK
CO_REPLEN
CP_REPLEN
CR_REPLEN
CS_REPLEN
CT_REPLEN
C_PICK
PL_REPLEN
PR_REPLEN
PTS_CASE
PTS_UNIT
PT_REPLEN
TRANSPORT_MOVE
TRANSPORT_PUTAWAY UP_REPLEN
U_PICK
U_PICK_GROUP