| Oracle® Retail Merchandise Financial Planning Retail User Guide for the RPAS Fusion Client Release 14.1 E55781-01 |
|

 Previous |
| Oracle® Retail Merchandise Financial Planning Retail User Guide for the RPAS Fusion Client Release 14.1 E55781-01 |
|
Previous |
The Purchase Order (PO) View is an add-on module for Merchandise Financial Planning (MFP). It provides users with an interface to view open or pending purchase orders in the Retail Merchandising System (RMS). This is of assistance to users engaged in tasks such as reviewing merchandising plans or the Open to Buy (OTB) budget.
PO View operates broadly as follows:
RMS acts as the system of record for purchasing data.
A set of read only database views are created in RMS as part of the PO view installation process. These database views contain information on Open and Pending orders in RMS. This data can be referenced by the PO View in MFP.
When the user makes a selection of data in a view in MFP and invokes PO View, a subset of data from the RMS Database Views is read into the PO View.
Using the read only information in PO View, the user can modify the order quantities in the view in MFP. As this stage, the order quantities in RMS remain unchanged.
Once committed, the updated order quantities will be transferred back to RMS in order to update the required order quantities. The exact method and timing of the transfer of information will be retailer specific, as will be the method of updating order quantities in RMS.
Before being used, PO View must first be configured. It requires the following actions to be carried out.
|
Note: This information is intended as a summary only. For full information, see the Oracle Retail Predictive Application Server Configuration Tools User Guide. |
Create database views in RMS
PO View is not designed to integrate with the main tables in the RMS database. Instead it references a simplified set of data out of specially created read only database views. These database views are created as part of the PO View installation process. They will only contain information on pending or open orders.
Update the Manifest File for PO View
A manifest file is an XML file used to configure details of functionality in the Fusion Client. The existing manifest file has to be updated for the PO View functionality. It requires the following information to be updated or edited:
Datasource
The manifest file must contain details of the data source where the purchase order information is to be read from. The same data source information must also exist for the Web Logic server.
Selection
The manifest file allows the PO View to be configured to accept different selection options for the Location and Product dimensions. Possible selection options for Product dimension are Department, Class and Subclass. Possible selection options for the Location dimension are Company, Chains, Channels, Districts, Regions, Areas and Stores.
Metrics
The implementer can specify which metrics will show and which will be hidden in the Order Item Details section of the PO View. The options available are Quantity Ordered, Quantity Received, Quantity Cancelled, Quantity Open, Quantity Ordered Unit Cost, Quantity Received Retail, Quantity Cancelled Unit Cost and Quantity Open Unit Cost.
Configuring the Fusion Client for PO View
In order to get PO View to launch from within the MFP Fusion Client, changes need to be made to the Fusion Client configuration file.
The range of purchase orders displayed will depend on the selection made on the Worksheet. (This will be the intersection of Product-Location-Calendar dimension). Depending on what is selected, users can retrieve purchase orders for a single product at a single location, orders at subclass level at a single location, orders at department level for multiple locations or other combinations of dimensions. The exact options available can be configured in the manifest file.
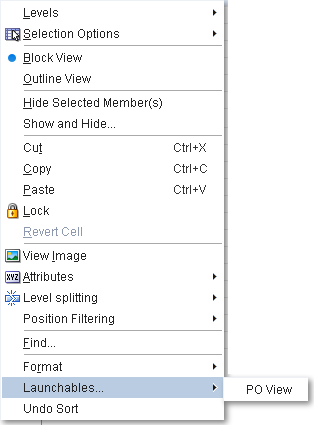
When working with PO View, the levels available for a dimension determine the purchase orders that can be selected. These are specified in the All Measures dialog box. This may be accessed on one of two ways:
Double clicking the Measure buttons in the Page Edge
Right clicking on a column or row header
This will bring up the right click menu, allowing the levels to be selected by checking or unchecking them. Selecting the levels option in the right hand menu will also being up the All Measures dialog box.
The Levels tab in the All Measures dialog box allows users to specify the levels to display in the pivot table.
When the required levels for each measure have been selected, the user needs to select the data for which to display all open purchase orders. There are three basic ways of doing this:
Highlighting a row header and right clicking
If the user highlights a row header and right clicks, the right click menu will come up. If PO View is launched, this will bring up all open purchase orders associated with that row - in this example, this will bring up all orders for a specific department across all locations.
Highlighting multiple rows will enable orders for those rows to be brought across all locations.
Highlighting a column header and right clicking
If the user highlights a column header and right clicks, the right click menu will come up. If PO View is launched, this will bring up all open purchase orders associated with that column - in this example, this will bring up all orders for all departments for a specific location.
Highlighting multiple columns will enable orders for those columns to be brought across all departments.
Highlighting a group of cells and right clicking
Highlighting a group of cells and right clicking to bring up the right click menu will select a sub-set of data for specific departments in specific locations.
|
Note: When right clicking, ensure the mouse pointer is over the cell border and not over any editable value. |
PO View is intended as an aid to users updating plans in MFP. It provides a read only view of data on open or pending orders from RMS. This in turn allows order quantities to be adjusted in MFP.
If the selected data contains cells where no information exists in RMS, a warning will be generated. One way this may occur is when the hierarchies in MFP do not match the hierarchies in RMS.
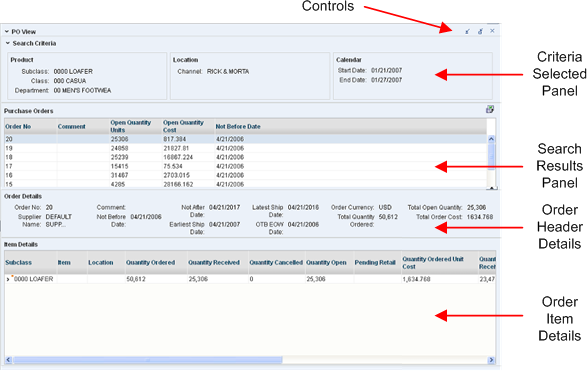
The PO View Window has the following parts:
Controls
The controls allow the user to minimise, restore or close the PO View Window. Unlike the main view, the PO View Window is a pop-up window that can be closed.
Criteria Selected Panel
This panel has read only information on the product, location and calendar (date) information used to select the purchase orders.
Search Results Panel
The Search Results Panel contains a list of all orders matching the selected criteria. It only contains header level data. The rows are sortable. By default they are sorted based on the Not Before Date.
Order Header Details
This section contains details of the order highlighted in the Search Result Panel. This includes more detailed information including the total quantity of outstanding items.
Order Item Details
This section contains full details of the order highlighted in the Search Result Panel. The first row will be selected by default when the PO view opens.
The precise fields shown are dependent on what is specified in the Manifest File when PO View is configured. The level of detail can be specified from the right click menu.
The item can be displayed as a single line of data. Or it could be expanded out in order to show (for example) order quantities for each location referenced by the order.
PO View is a read only view. It can be used in parallel with specific MFP views is specified taskflow by:
Alternately maximizing and minimizing PO View while editing data in the MFP worksheet.
Tiling the PO View along with the pertinent MFP view so that both views are visible.
PO View does not dynamically update, so if a different set of data is required, the user can switch back to the worksheet, select another set of data and relaunch PO View.
When using PO View, users need to take into account the schedule for transferring updated purchase order quantities back from MFP to RMS. Until this data is read into RMS and the order quantities updated, the latest changes in MFP will not be reflected in the data being read by PO view from the RMS database views.