| Oracle® Retail Predictive Application Server Administration Guide for the Fusion Client Release 14.1 E59119-01 |
|

 Previous |
 Next |
| Oracle® Retail Predictive Application Server Administration Guide for the Fusion Client Release 14.1 E59119-01 |
|
Previous |
Next |
This chapter describes the setup and configuration process for creating OBIEE reports.
In order to display OBIEE reports in the Fusion client, you must complete the following:
Configure access control in OBIEE so that the Fusion Client users can access the reports
Configure OBIEE connection information in the Fusion Client
Create and update the report configuration metadata file (reportConfig.xml) in the Fusion Client install directory
Create report launch points for RPAS worksheets, in the Fusion Client task flow configuration file (TaskFlowMultiSolution.xml), which is located in the Fusion Client install directory.
This section describes the tasks necessary to set up OBIEE reports:
Configuring access control to OBIEE
Configuring OBIEE connection information
To configure access control in OBIEE, you must create an impersonator user. The Fusion Client uses this user's credentials to make the connection to OBIEE at runtime. You must also add each RPAS user to OBIEE, adding the user to the BIConsumers group. At runtime, the logged-in user is given access to only those reports that the corresponding user added to OBIEE has access to. (In practice no special permission assignments must be performed if reports grant read/execute access to the BI Consumers Role.)
At a high level, to add the impersonator user, you must create a user in the security realm associated with OBIEE and assign the user a name (for example, BIImpersonator). In the Enterprise Manager tool launched on the WebLogic Admin server associated with OBIEE, give this user the permission of type "oracle.security.jps.permission" for the resource called "oracle.bi.server.impersonateUser".
For greater details about this process, see section 1.9.1 on the following web page (which is part of the Oracle Fusion Middleware Guide for OBIEE Enterprise Edition 11g Release 1):
http://docs.oracle.com/cd/E23943_01/bi.1111/e10545/embedding_adf.htm
OBIEE connection information is configured using the Fusion Middleware Enterprise Manager tool. It is a web application that is accessed using the following URL:
http(s)://<application-server-host-name>:<application-server-port-number>/em
where the application server is the machine where the AdminServer of the WebLogic domain is deployed.
To access the Enterprise Manager, you must extend the WebLogic domain. To do this, use the utility
<weblogic-install-dir>/oracle_common/common/bin/config.sh
Do the following:
Select the update an existing domain option.
Specify the domain location directory.
Select the product template Oracle Enterprise Manager.
Ensure that the em application is targeted to the AdminServer.
Launch the Enterprise Manager in a browser
Log in as the WebLogic admin user.
Once you have logged in, complete the following steps:
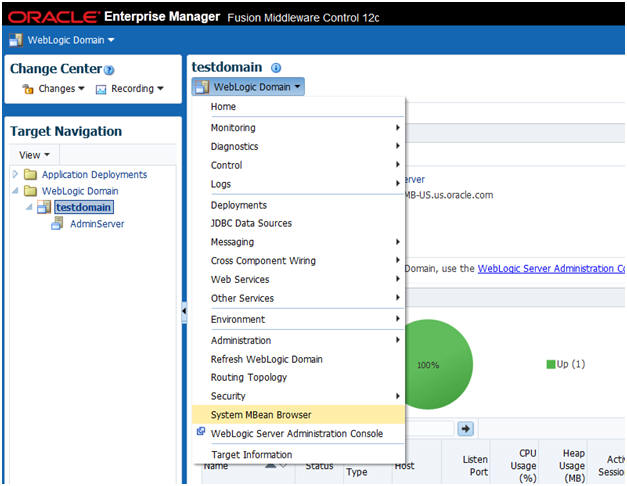
Select the System MBean Browser menu option for the WebLogic domain.
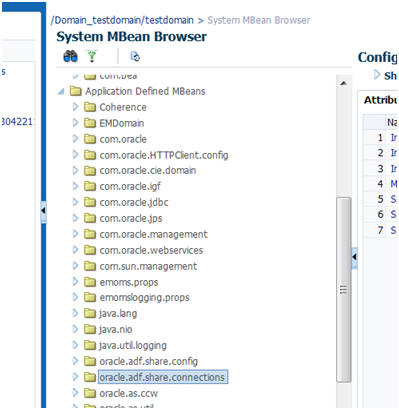
Locate the node oracle.adf.share.connections in the MBean Tree.
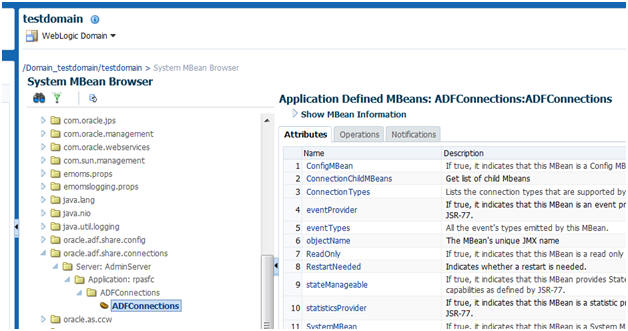
Expand the node and its children successively until you locate the node with the name of the Fusion Client application. This name is the one that was assigned to the input.app.name install property during the install process.
Nested inside that node, you see the node called ADFConnections. Click that node.
Click the Operations tab and then click the CreateConnection operation. You see the screen shown in Figure 20-4.
Specify BISoapConnection for the Connection Type and provide a Connection Name.
Click Invoke. You see a confirmation message.
Click Refresh to refresh the MBean tree with the new connection node.
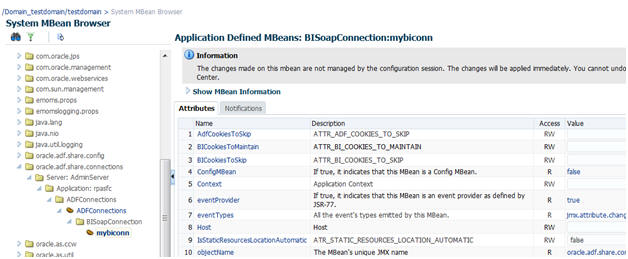
Select the mybiconn node, as shown in Figure 20-5.
Use the values shown in the following table to fill in the form fields.
| Field Number | Field Name | Field Value |
|---|---|---|
| 5 | Context | analytics |
| 8 | Host | <The OBIEE server host name> (for example obiee.example.com) |
| 11 | Password | <The impersonator user's password>(for example, obieePass) |
| 12 | Port | <The OBIEE server port number> (for example, 9704) |
| 13 | Protocol | http or https |
| 18 | StaticResourcesLocation | <the full URL for the OBIEE analytics web application> (for example, http://obiee.example.com:9704/analytics) |
| 21 | Username | <the impersonator user> (for example, BIImpersonator) |
Click Apply.
To save the connection details, select the ADFConnections node in the MBean tree and then select the Operations tab. Click the save operation (which is #18 in the list).
Click Invoke. You see a confirmation message. The connection is ready for use in the Fusion client.
To configure OBIEE reports, you must run the Report Metadata Extractor utility, edit the report.Confi.xml that the utility generates, and map the filter parameters, as described in this section.
The Report Metadata Extractor utility is a command line utility that you use to extract report metadata from an OBIEE server in order to create an initial version of the file reportConfig.xml. This file defines the structure (metadata) of all of the available OBIEE reports in the format required by the Fusion Client. You must edit the initial version of this file in order to remove any unnecessary reports, keeping only those that are required.
Some of the reports in the file have filters. In order to use those filters when you launch a report, you must correctly map each filter parameter to some RPAS dimension and to a level within that dimension. Since the initial reportConfig.xml file that is generated by the utility does not contain the mappings, you must add them manually.
To run the Report Metadata Extractor utility, complete the following:
Locate rptconfgen.jar, which is the executable file for the utility. You can find it in the tools subdirectory of the Fusion Client install directory.
Make sure that the java executable from the Java 7 distribution is in the path environment variable.
Run java -jar rptconfgen.jar -host <host name> -port <port number> (default: 9704) -username <username>
where
| host | The host name of the WebLogic server associated with OBIEE |
| port | The port number of the analytics web application running on the WebLogic server |
| username | The user name in the OBIEE security realm designated as the BI impersonator user for accessing reports from the Fusion Client. For more information, see the OBIEE documentation. |
Example: java -jar rptconfgen.jar -host <host name> -port <port number> (default: 9704) -username <username>
The file reportConfig.xml is created in your current directory. Once you have generated this file, you must edit it, as described in the next section.
You must make the following updates to the reportConfig.xml file that you generated with the utility:
Update the RPAS dimensions and levels that must be mapped to filter parameters. The generated file contains placeholder names for the dimension names and the level names. The dimension placeholder name takes the form of "dim" followed by a number (for example, dim3). The level placeholder name takes the form of "fixlevelname".
Every level element is enclosed within its own dimension element. If this is not correct, you must modify this by gathering multiple levels under one dimension element and deleting the now-empty dimension elements.
You must determine the value of the passPositionLabel attribute of level by trial and error.
For all report elements, a single connection ID called c1 is defined as a report parameter. You must define an OBIEE presentation services connection with this name.
The following example procedure is for an OBIEE analysis called "revenue_quantity_1" in the context of an RPAS workbook.
Complete the following steps to generate reportConfig.xml:
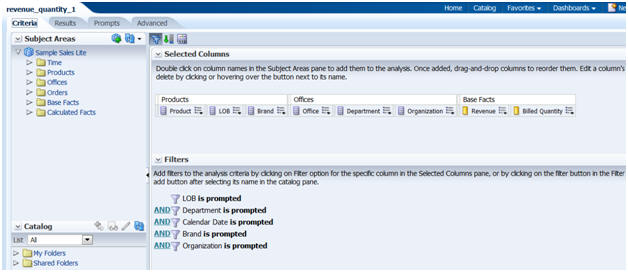
If the analysis has any filters, make all the filter parameters "prompted", as shown in Figure 20-6.
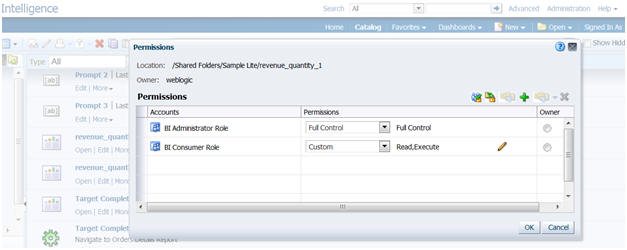
Make sure that the analysis is accessible for users with the BI Consumers Role, as shown in Figure 20-7.
Run the utility to generate a reportConfig.xml file.
java -jar rptconfgen.jar -host <hostname> -port <portnum> -username <username>
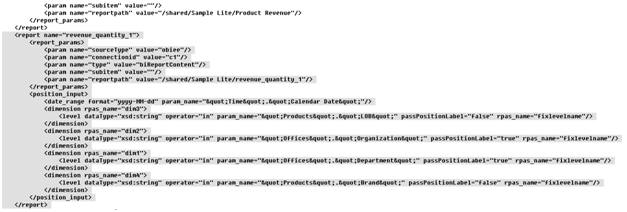
Locate the report in the generated reportConfig.xml file, as shown in Figure 20-8.
Copy and paste the report into the actual reportConfig.xml file that is located in the <FC install dir>/rpas directory.
Once you have generated the reportConfig.xml file, you must edit the file.
Editing the OBIEE connection ID
Edit the OBIEE connection ID as follows.
The connectionid parameter in the report_params section has a placeholder value of c1. Replace that value with the correct connection ID that you have previously assigned to this OBIEE server's connection.
Editing the Filter Parameter Mappings
Filter parameters and their mappings are specified in the position_input section. Note the following about the example:
A date_range element has been created for the Time.Calendar Date filter parameter.
Each of the other parameters are specified in level elements, and each level element is enclosed within its own dimension element.
To edit the filter parameter mappings, complete the following:
Map the (non-date) filter parameters to the RPAS hierarchy levels in order to convert the worksheet selection context into filter parameter values. See the example mappings in the following table.
| Filter Parameter | RPAS Dimension and Level |
|---|---|
| Product.LOB | prod->CLASS |
| Product.Brand | prod->DEPARTMENT |
| Offices.Departments | loc->DISTRICT |
| Offices.Organization | loc->COMPANY |
Gather the two product parameters and the two office parameter within two dimension elements. Edit the rpas_name attributes of the dimension and level elements based on the information in above table.
Set the passPositionLabel attributes to "true" in all cases, so that the label (which OBIEE recognizes) is passed instead of the RPAS name (which is typically internal to the RPAS domain.)
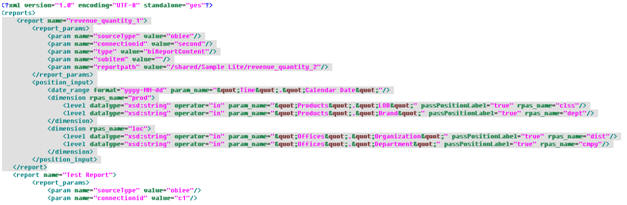
After you make these changes, you see something similar to the results shown in Figure 20-9.
Completing the Process
Once you are done editing the file, complete the following steps to finalize the process.
Configure report launch points in the file Taskflow_MultiSolution.xml. For example, launch point declarations look like this:
<module reportName="revenue_quantity_1" name="obiee" bundle="obiee" label="rq1.label"
resource_bundle="oracle.rgbu.ard.util.i18n.SolutionResourceBundle"/>The label "rq1.label" is a resource key. The key value is to be specified in the MultiSolutionTaskFlow.properties file.
Restart the application server to view the new report in the worksheets configured as launch points.