| Oracle® Retail Predictive Application Server Administration Guide for the Fusion Client Release 14.1 E59119-01 |
|

 Previous |
 Next |
| Oracle® Retail Predictive Application Server Administration Guide for the Fusion Client Release 14.1 E59119-01 |
|
Previous |
Next |
Oracle Single Sign-On (SSO) provides users with the ability to sign on to multiple web-based applications using a single user ID and password.
This chapter includes the following sections:
For more information on SSO, see the Oracle Retail Predictive Application Server Installation Guide.
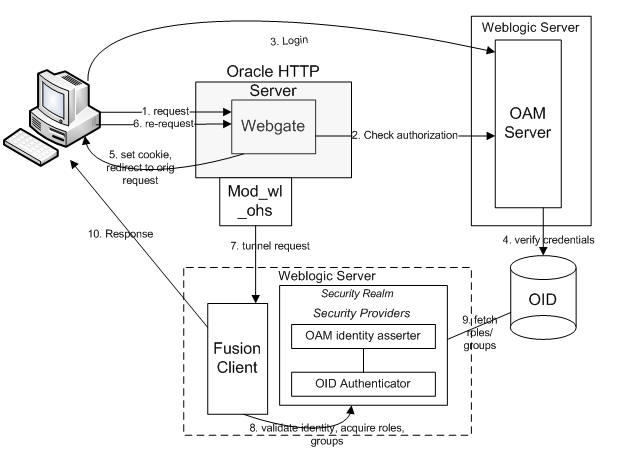
The RPAS Fusion Client requires perimeter authentication for SSO deployments. User requests are authenticated at a front-end web server that is configured as a reverse proxy server. The authentication function is usually performed by a plug-in component known as a gateway. The requests are then passed to the Fusion Client. The first time a user request is received, a vendor-specific Identity Assertion component, which is plugged into the WebLogic server, is used to validate the identity of that user. In addition, a custom authentication provider must be configured and plugged into the WebLogic server. The authentication provider retrieves the user's roles and groups from the SSO environment's identity store (for example, an LDAP server such as Oracle Internet Directory).
Figure 7-1 illustrates the SSO topology:
The Fusion Client is certified to work with Oracle 11g SSO; however, it can also work with any vendor-supplied SSO infrastructure that provides the same functionality as described above.
To set up SSO authentication, you must do the following:
Configure a reverse proxy web server between the user and the WebLogic server to be able to:
intercept requests
perform authentication and create an identity asserter in the request
tunnel requests to the WebLogic server
Configure a matching Identity Assertion component on the WebLogic server to read and validate the Identity Assertion token
Configure a matching authentication provider on the WebLogic server to fetch roles and groups from your identity store.
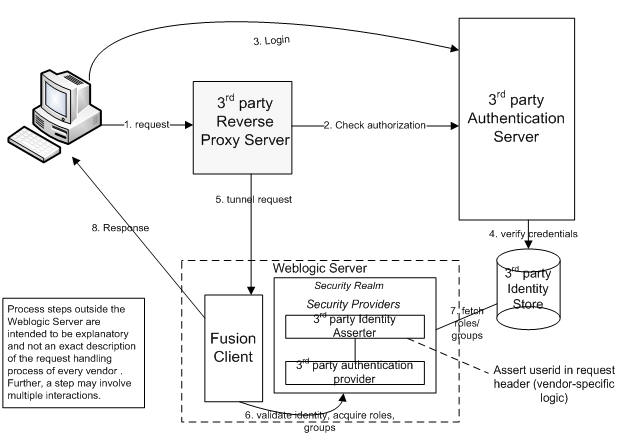
Figure 7-2 illustrates a sample SSO deployment:
The following sections provides general instructions for setting up the Fusion Client to work with SSO authentication.
The Identity Assertion component is responsible for extracting the vendor-specific user identity token from the user request, validating the token, and extracting the user identity from the token. This identity token is placed in the request by the front-end web server after the user is authenticated against the SSO identity management system. Note that the Identity Assertion component must be aligned with the SSO token generation process.
WebLogic provides vendor-specific Identity Asserters. To see the list of available ones, in the WebLogic Admin console, go to Security Realms > Default Realm > Providers and click New. You see the Type drop-down list, from which you can select the appropriate vendor-specific Identity Asserter.
To add an Identity Asserter, you must implement the Identity Asserter API and place the jar file in the appropriate location. For more information, see http://docs.oracle.com/cd/E21764_01/web.1111/e13718/ia.htm#i1115766.
For more information about any vendor-specific Identity Asserter, consult the appropriate vendor documentation.
You must install and configure the appropriate vendor-specific authentication provider that is supported by WebLogic. If your SSO vendor is not supported, you can find instructions on how to create a custom authentication provider here: http://docs.oracle.com/cd/E21764_01/web.1111/e13718/atn.htm#i1188880.
You must observe the following order when setting up the Identity Asserters and authentication providers on WebLogic:
Third-party Identity Asserter. Control flag setting = OPTIONAL.
Third-party authentication provider. Control flag setting = OPTIONAL.
Default authentication provider (already exists). control flag setting = SUFFICIENT.
Note that if you set the control flag to REQUIRED for either the third-party Identity Asserter or the third-party authentication provider, then WebLogic users will not be able to access the WebLogic Admin console.
Once you have set up the SSO environment, you must configure the Fusion Client application to use the SSO environment. Oracle Single Sign-On (SSO) is configured for the RPAS Fusion Client via the RPAS installer. However, you can also manually configure SSO for the Fusion Client.
|
Note: Manual configuration is only recommended for advanced users. |
|
Note: To avoid authentication issues with SSO users, select the Use Retrieved User Name as Principal check box and then restart the WebLogic server. This option is available in the OID provider on the Provider Specific tab in the Users section. |
For information about using the RPAS installer to configure SSO, see the Oracle Retail Predictive Application Server Installation Guide.
To convert a non-SSO deployment of the RPAS Fusion Client to use SSO, complete the following steps:
Locate the Fusion Client ear file called rpas.ear.
Make a temporary folder called tmp. In that folder, extract the rpas.war file from the rpas.ear file.
mkdir tmp
cd tmp
jar xvf ../rpas.ear rpas.war
Extract the web.xml and weblogic.xml files from the rpas.war file:
jar xvf rpas.war WEB-INF/web.xml
jar xvf rpas.war WEB-INF/weblogic.xml
Edit web.xml as follows:
From the beginning of the file, search for the string SSO. The first match is a security-constraint XML element. Uncomment this element.
To uncomment the element, modify the element from this:
<!--element start>…</element end-->
To this:
<element start>...</element end>
Search for the next occurrence of SSO. This match is the login--config XML element. Uncomment this element.
Save the web.xml file.
Edit weblogic.xml as follows:
From the beginning of the file, search for SSO. This locates the security-role-assignment XML element. Uncomment this element.
Save the weblogic.xml file.
Update rpas.war while in tmp folder:
jar uvf rpas.war WEB-INF/web.xml
jar uvf rpas.war WEB-INF/weblogic.xml
Update rpas.ear while in tmp folder. Delete the tmp folder after you are finished.
jar uvf ../rpas.ear rpas.war
cd ..
rm -rf tmp
Update config.properties in the Fusion Client configroot folder.
Set isSSO=true.
Save.