| Oracle® Retail Predictive Application Server User Guide for the Fusion Client Release 14.1 E59121-01 |
|

 Previous |
 Next |
| Oracle® Retail Predictive Application Server User Guide for the Fusion Client Release 14.1 E59121-01 |
|
Previous |
Next |
You can use the print and export functionality to export data in the current slice of a view to Microsoft Excel or a delimited file and print it.
Additionally, you can adjust the page setup options before printing and exporting the data. These print settings are persisted in the Fusion Client for the selected view.
|
Note: The exact way the print and export functions operate may depend on the browser being used for the Fusion Client. The description below is based on the behavior in Internet Explorer. You may need to change the configuration settings in other browsers (such as Firefox or Google Chrome) before files can be printed or exported. |
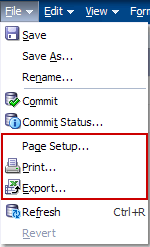
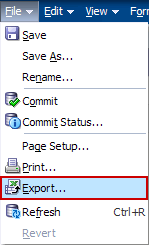
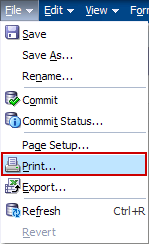
The page setup, print, and export options are located in the File menu.
In addition, print and export icons are located in the toolbar. In both, an Excel spreadsheet is produced for output.
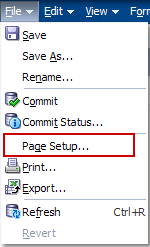
The page setup option is available in the File menu, as shown in Figure 15-3.
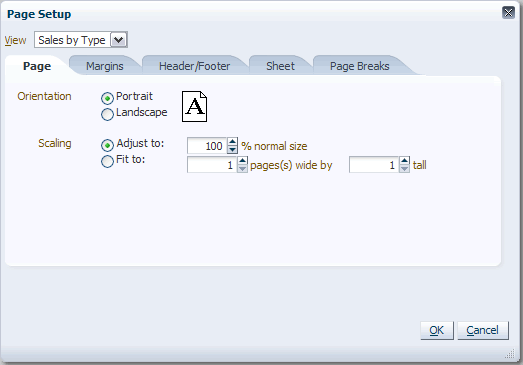
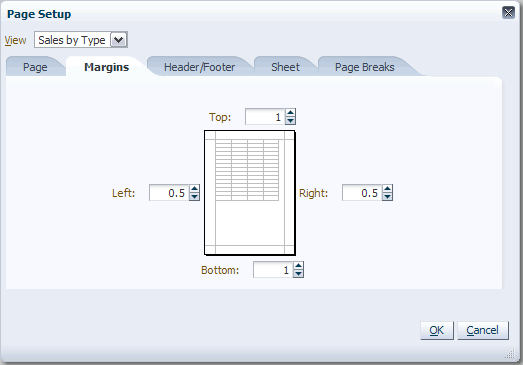
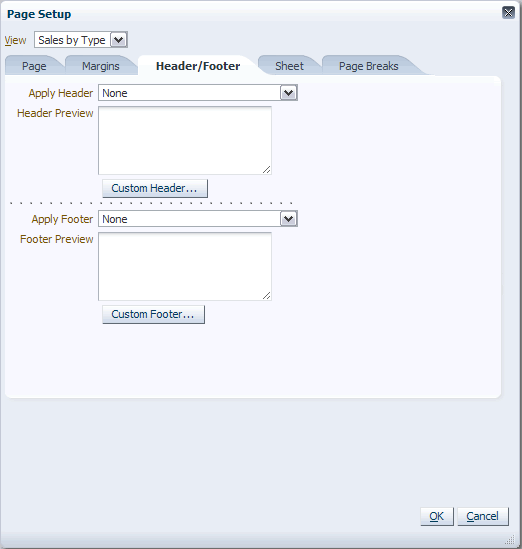
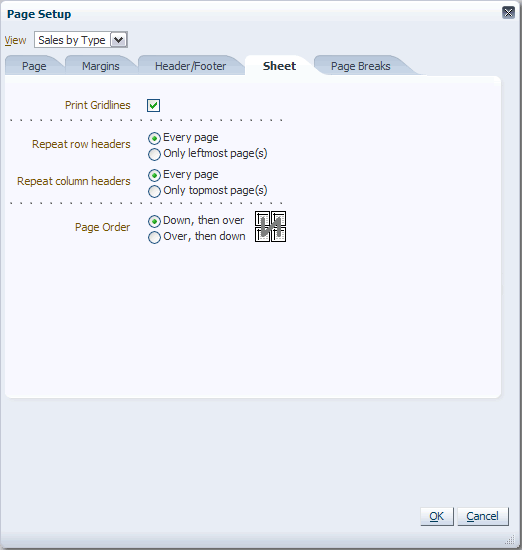
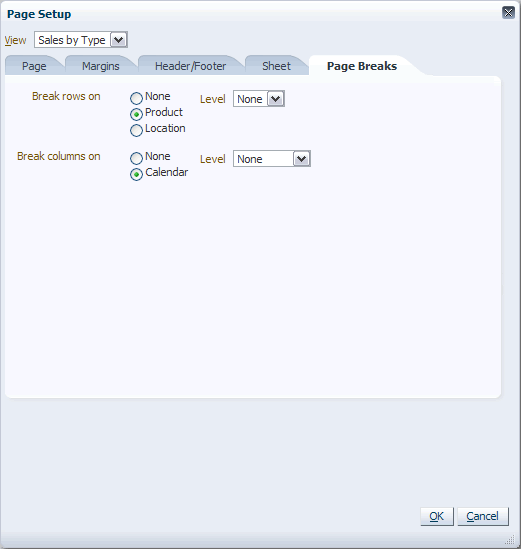
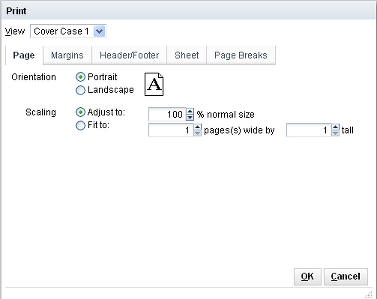
The Page Setup dialog box (Figure 15-4) contains five tabs: Page, Margins, Header/Footer, Sheet, and Page Breaks.
Page settings are applied per view. The View drop-down list contains a list of views of the current workbook. By default, the displayed view is selected. Selecting the view in the View drop-down sets the view in all tabs of this dialog box.
The settings created in the Page Setup dialog box are passed to Microsoft Excel and used when printing the data.
The five Page Setup tabs are described in the next sections.
You can use the Export functionality to export a slice to a text file or to Microsoft Excel. These options are described in the following sections.
|
Note: Before exporting a view, ensure that the Internet Explorer automatic prompting for file downloads security setting for downloads is set to Disable.If you are using other browsers, you may need to adjust specific settings in those browsers in order to get the Save dialog box to appear during the export process for text or Excel files. |
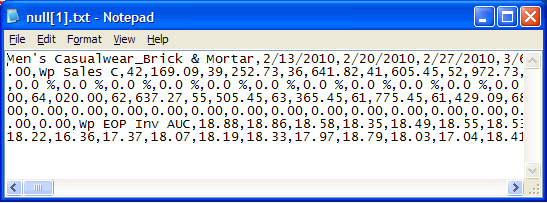
When a slice is exported to a text file, the data is exported row by row, with each item of data separated by a specified delimiter. This means the page setup options are not required.
Select the Export option from the File menu.
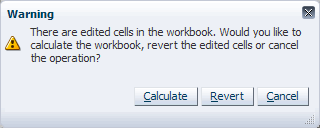
If you have edited the view, a warning message appears, asking if you want to calculate the workbook, revert the cells, or cancel the export.
Click Calculate to calculate the workbook and open the File Download dialog box.
Click Revert to revert the edited cells and open the File Download dialog box.
Click Cancel to cancel the operation.
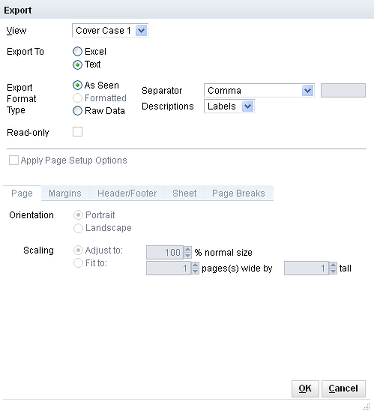
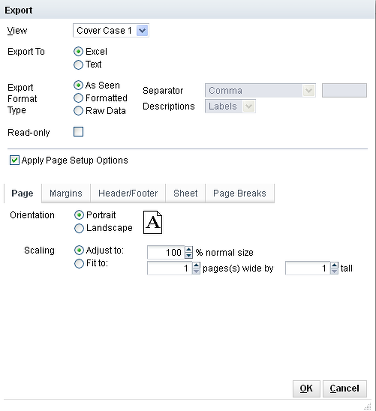
The Export dialog box appears.
Set the Export To radio button to Text. This specifies that the output is to be in text format. It also ensures that options such as Separator and Descriptions are available for selection and not grayed out. The lower part of the dialog box (used for exporting to Excel spreadsheets) is grayed out and unavailable).
Select the following options:
View: Choose the view that you want to export.
Export Format Type: Choose As Seen or Raw Data. (The Formatted option is not available when you are exporting to a text file.)
Choose As Seen if you want the data to be exported as it appears in the Fusion Client.
Choose Raw Data if you want the exported data in the text file to appear with no number formatting.
For instance, if you have entered 12588.687 and the number formatting is configured to have a scale of 1, a precision of 2, the separator turned on, and a prefix of $, the number appears as $12,588.69 in the pivot table. This number appears in the text file in the following ways, depending on the exported format type:
As Seen: $12588.69
Raw: 12588.687
|
Note: Data types other than integer and float are not supported. If a view contains columns with data types other than integer and float, the data is exported as it appears in the Fusion Client. If a worksheet contains a mix of columns with integer or float data types with other data types, the exported file contains the appropriate formatting for the supported data types based on the options selected during the export. Data in the columns of the unsupported data types appears as it is seen in the Fusion Client.Date or any type of picklists are exported as a string. |
Separator: Choose Comma, Tab, Space, or Other (Please specify). The default separator is Comma.
If you choose Other (Please Specify), you must enter a character in the text box. This character will act as the separator.
Descriptions: Choose either Labels or Names to be displayed as a header in the exported data. The default is Labels.
|
Note: The Apply Page Setup Options and Read-only options are not applicable to text file exports. |
Click OK.
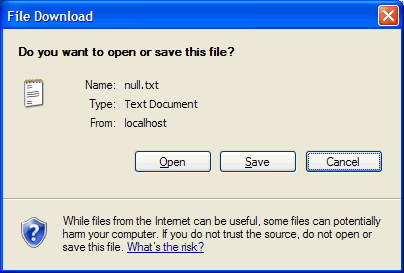
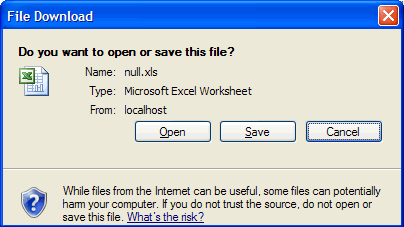
The File Download dialog box appears. You can choose to either Open the text file or Save it to a location on your computer.
If you chose Open, the text file opens. If you chose Save, you can open the file from the location you saved it.
You can export data to Microsoft Excel using two options. You can use the Export option in the File menu to set export options before exporting. Or, you can use the Export icon in the toolbar to bypass the export options and export the slice directly to Excel.
|
Note: The export functionality is certified with Microsoft Excel 2003 and 2007. |
|
Note: After exporting a worksheet to Excel, the Export to Excel dialog may not automatically dismiss. You can click Cancel to dismiss the dialog and continue with your work. |
To export the slice to Microsoft Excel with the Export option in the File menu, complete the following steps:
Select the view that you want to export.
Select the Export option from the File menu.
If you have edited the view, a warning message appears, asking if you want to calculate the workbook, revert the cells, or cancel the operation.
Clicking Calculate calculates the workbook and opens the File Download dialog box.
Clicking Revert reverts the edited cells and opens the File Download dialog.
Clicking Cancel cancels the operation.
The Export dialog box appears.
Set the Export To radio button to Excel. This grays out some options associated with exporting to a text file. It also enables the Apply Page Setup Options check box.
Select the following options:
View: Choose the view that you want to export.
Export Format Type: Choose As Seen, Formatted, or Raw Data.
Choose As Seen if you want the data to be exported as it appears in the Fusion Client.
Choose Formatted if you want the data to be exported to Excel in raw format (meaning that the Fusion Client formatting has been removed) and then have the Excel-based formatting automatically applied within Excel. Only the formatting selected in the Fusion Client is applied in Excel. After the data is exported, you can apply more formatting within Excel.
Choose Raw Data if you want the exported data in Excel to appear with no number formatting.
For example, if you have entered 12588.687 and the number formatting is configured to have a scale of 1, a precision of 2, the separator turned on, and a prefix of $, the number appears as $12,588.69 in the pivot table. This number appears in Excel in the following ways, depending on the exported format type:
As Seen: $12588.69
Formatted: $12,588.69 (the raw number, 12588.687, is formatted in Excel to display as $12588.69)
Raw: 12588.687
|
Note: Data types other than integer and float are not supported. If a view contains columns with data types other than integer and float, the data is exported as it appears in the Fusion Client. If a worksheet contains a mix of columns with integer or float data types with other data types, the exported file contains the appropriate formatting for the supported data types based on the options selected during the export. Data in the columns of the unsupported data types appears as it is seen in the Fusion Client.Date or any type of picklists are exported as a string. Boolean data types are exported with formatting compatible with Excel. When you use the formatted option and use a scale factor of anything besides 1000, the value in Excel is displayed as the raw formatted value, not the scaled formatted value. For percentages, a scale factor of .01 displays as a percent in Excel. |
Read-only: Select this check box if you want the exported data to be read-only. This prevents the data from being updated when opened in Microsoft Excel.
|
Note: The Separator and Descriptions options are not applicable to Microsoft Excel exports. |
If the Apply Page Setup Options check box has been selected, the tabs concerning page setup will be enabled. Options include Page, Margins, Header/Footer, Sheet and Page Breaks. These options function in an identical manner to those accessed by the Page Setup option on the File menu. For more information, see Page Setup.
Click OK.
The File Download dialog box appears. You can choose to either Open the Microsoft Excel file or Save it to a location on your computer.
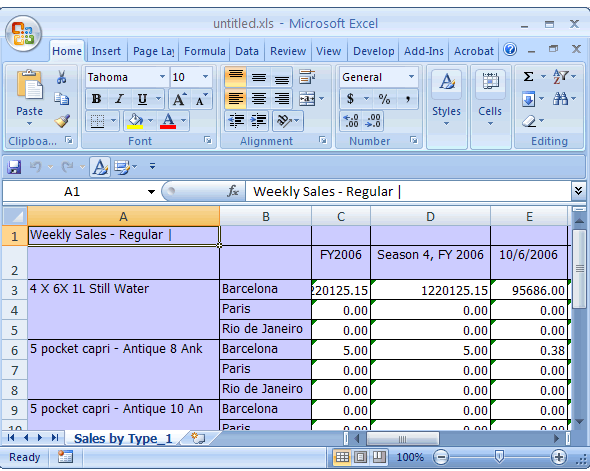
If you chose Open, Microsoft Excel opens and the slice appears in a spreadsheet. If you chose Save, you can open the file from the location you saved it.
To export the slice to Microsoft Excel with the Export icon in the toolbar, complete the following steps:
Select the view that you want to export.
Click the Export icon in the toolbar.
If you have edited the view, a warning message appears, asking if you want to calculate the workbook, revert the cells, or cancel the operation.
Clicking Calculate calculates the workbook and opens the File Download dialog box.
Clicking Revert reverts the edited cells and opens the File Download dialog box.
Clicking Cancel cancels the operation.
The File Download dialog box appears. You can choose to either Open the Microsoft Excel file or Save it to a location on your computer.
If you choose Open, Microsoft Excel opens and the slice appears in a spreadsheet. If you choose Save, you can open the file from the location where you saved it.
You can print data to an Excel spreadsheet by use the Print option in the File menu or on the toolbar.
The print functionality is similar to the export functionality, except that the print functionality always applies the page setup options before exporting to Microsoft Excel.
Print also differs from export because the exported data is always read-only and as a result the cells in the spreadsheet are protected against changes. If required, cell protection can be removed using Excel functionality to enable the spreadsheet to be edited.
|
Note: This example is based on using Internet Explorer.If you are using other browsers, you may need to adjust specific settings in those browsers so that the Print functionality operates as specified below. |
To print the slice with the Print option in the File menu, complete the following steps:
Select the view that you want to print.
Select the Print option from the File menu.
If you have edited the view, a warning message appears, asking if you want to calculate the workbook, revert the cells, or cancel the operation.
Click Calculate to calculate the workbook and open the File Download dialog box.
Click Revert to revert the edited cells and open the File Download dialog box.
Click Cancel to cancel the operation.
The Print dialog box appears. Select the view you want to print.
It is possible to make changes to the page set-up options using the Page, Margins, Header/Footer, Sheet or Page Breaks tabs. For more information, see Page Setup.
Click OK.
The File Download dialog box appears. You can choose to either Open the Microsoft Excel file or Save it to a location on your computer.
If you chose Open, Microsoft Excel opens and the slice appears in a spreadsheet. If you chose Save, you can open the file from the location where you saved it.
From Microsoft Excel, click the Print option in the main menu.
To print the slice with the Print icon in the toolbar, complete the following steps:
Select the view that you want to export.
Click the Print icon in the toolbar.
If you have edited the view, a warning message appears, asking if you want to calculate the workbook, revert the cells, or cancel the operation.
Clicking Calculate calculates the workbook and opens the File Download dialog box.
Clicking Revert reverts the edited cells and opens the File Download dialog box.
Clicking Cancel cancels the operation.
The File Download dialog box appears. You can choose to either Open the Microsoft Excel file or Save it to a location on your computer.
If you chose Open, Microsoft Excel opens and the slice appears in a spreadsheet. If you chose Save, you can open the file from the location you saved it.
From Microsoft Excel, click the Print icon.