| Oracle® Retail Predictive Application Server and Applications Security Guide Release 14.1.1 E61143-01 |
|

 Previous |
 Next |
| Oracle® Retail Predictive Application Server and Applications Security Guide Release 14.1.1 E61143-01 |
|
Previous |
Next |
This chapter contains information on securing the RPAS server.
RPAS allows administrators to put users into distinct groups. A group is similar to a traditional database role in that it allows the administrator to configure authorization settings for several users at once. The main difference, however, is that user and group have a hierarchical relationship where settings are always stored at the user level, and group is a rollup of user. User groups are typically assigned based on a common business role such as Planners, in order to facilitate managing the authorization settings at the group level.
The group that a user rolls up to is referred to as the primary group. A user can also be associated with other groups using the Other Groups property. The Other Groups property is not used for authorization purposes, but instead allows a user to save workbooks and formatting in a way that it is visible to users whose primary group is one of those Other Groups. This behavior is typically used by people that need to support other users rather than an end-user. An example of this would be a team whose job is to set up the formatting for all of the other project groups.
When a user is added, a position is created for the user in the metadata dimension User. Similarly, when a group is added that group gets a position in the metadata dimension Group. Frequent adding and dropping of users and groups can eventually exhaust the list of available positions in these dimensions, and will require reindexing of these dimensions.
Additionally, when a user is added, a directory is created for the user in the /users directory of the domain root. In global domains, this directory is created in the master, and all subdomains. This directory serves as a workbook repository, as well as a cache for some metadata such as MRU lists. When a user is deleted, these directories, as well as any workbooks created by that user, will be deleted with the user.
For more information for the Fusion Client, see Chapter 6: User Maintenance in the Oracle Retail Predictive Application Server Administration Guide for the Fusion Client. For more information for the Classic Client, see Chapter 5: User Maintenance in the Oracle Retail Predictive Application Server Administration Guide for the Classic Client.
User accounts can be marked as locked by the domain administrator. This prevents the user from logging on with the RPAS Client. The account remains locked until the administrator re-enables the account. The domain administrator can set or clear account lockouts by using the User Management utility or the Edit User workbook.
This section deals with authorizing access.
Currently, workbook access is either granted or denied. If users have been granted access to a workbook, they can open, modify, and commit the workbook. No distinction is made between read-write-commit, read-write, and read-only access. Workbook access is automatically granted to the user that built it, and it may be shared with multiple groups or the world.
|
Note: A user must have access to the workbook template in order to access the workbook, even if the workbook has world or group access rights. |
Users with administrator status automatically have access to all workbook templates. By default, administrators have access to all workbooks that are saved with world access. If a workbook is saved with group access, administrators can only access the workbook if they are members of the default user group of the user who saved the workbook.
The Open dialog initially shows only workbooks owned by the current user and in domains for which the user has position level security access. This is not the same as workbook access, however, and a user may have access to workbooks saved by others in other domains by using View > Other Domains in the Open dialog by others Word or Group.
Another aspect of workbook security is the ability to set limits for the number of workbooks that a user can have saved at any given time. Limits can be set for a user per template, for a user group per template, or for a template for all users. The limits are evaluated in the above order, which means that a limit defined at user-template overrides any values defined at group-template or template. If the above limits are not defined, the default value is one billion.
The limits are checked when the workbook build process is initiated. When the limit is reached, an error message displays informing the user that the workbook build process cannot complete because the limit has been reached. The message also lets the user know what that limit is. The wizard process then terminates.
Administrative users have full access to all workbook templates, regardless of the access rights that other admin users may assign to them in the Security workbook. The administrative user can build the Security workbook to change the access right back, so the nominal assignment does not matter for administrative users.
Non-administrative users do not have access to Security template and User Administration template groups even if the administrator inadvertently assigns them access rights.
Measures have access rights; these are read-write, read-only, or denied. Measures that are read-write or read-only may be selected in the extra measures and insert measure dialogs. RPAS ensures that read-only measures are not editable by the user, and the presence of read-only measures does not affect the ability to commit a workbook.
Measure security can be specified and changed through the Security Administration workbook. The Measure Rights view allows Read Only, Deny, or Read/Write access to a measure to be specified for each user.
A workbook template can override the security of a measure, but it can only narrow the security of that measure. For example, a measure can have read-write access for a user and a template can specify that all users have read-only access to the measure when a workbook is built. However, if the measure security is read-only, the template can not expand the security of that measure to read-write. Measures that are explicitly made read-only by a workbook template are not expanded to read-write access by RPAS.
|
Note: Refer to the Oracle Retail Predictive Application Server User Guide for the Fusion Client or the Oracle Retail Predictive Application Server User Guide for the Classic Client for more information on the Measure Analysis workbook. |
Position Level Security allows access control for dimensions on a position-by-position basis. This capability is completely optional. If position level security is not explicitly defined and configured, all users in a domain have access to all positions in all hierarchies. After the position level security is defined, access to a position can be granted or denied for individual users, users in a group, or for all users.
Position level security can be defined at levels (dimensions) at or above base (such as class in the product hierarchy) in any hierarchy other than calendar. As positions are added at a level/dimension lower in the hierarchy than where the position level security is maintained, access to those positions is automatically granted if a user has access to the parent position. In other words, if security is maintained at the subclass level, users are automatically granted access to all the SKUs in a given subclass if they have access to that subclass. This includes those that were added after security was established.
Exactly one dimension in each hierarchy can be defined as the security dimension for the hierarchy. If a security dimension is defined for the hierarchy, all dimensions in the hierarchy have position level security enabled, but position security is set at or above the designated dimension. For instance, if the class dimension is designated as the security dimension, an administrator can maintain access to positions in the class dimension or at any level above class.
The enabling of position level security as well as the specification of the dimension at which position level security will be maintained are managed within the configuration used to define the domain. The RPAS Configuration Tools provide the ability to do this configuration within the Hierarchy Definition Tool. For more information on configuring position level security, consult the RPAS documentation:
For the Fusion Client, see the information on Position Level Security in Chapter 8: System Administration in the Oracle Retail Predictive Application Server Administration Guide for the Fusion Client.
For the Classic Client, see the information on Position Level Security in Chapter 6: System Administration in the Oracle Retail Predictive Application Server Administration Guide for the Classic Client.
Additionally, position level security can be enabled on a domain by using the hierarchyMgr utility. This utility allows specification of the security dimension without requiring modifications to the domain's configuration and the application of a domain content patch through the rpasInstall process. For more information on the use of the hierarchyMgr utility, consult the Oracle Retail Predictive Application Server Administration Guide.
After a security dimension is defined for a hierarchy, all users in the domain default to having access to all positions in any dimension in the hierarchy. Additionally, users automatically have access to newly added positions to a domain.
The Security Administration workbook is used to control position access for individual users, user groups, or all users (referred to as world or default access). Three views are provided in this workbook for each hierarchy with a defined security dimension. The default view controls access to positions for all users (for instance, Prod Security Default); one view controls access to positions by user group (for instance, Prod Security Group); and the last view controls access to positions by individual users (for instance, Prod Security User).
Access must be granted at all levels for a user to have access to a position. This means a position must have a value of true at the levels default/world, group, and user. The following table demonstrates how access is granted or denied based on all combinations of settings:
Table 5-1 Granting Access
| Security Set by PositionDenied = FalseGranted = True | Based on settings on left, user is Granted or Denied access | ||
|---|---|---|---|
|
User |
User Group |
World |
Resulting Access |
|
Denied |
Denied |
Denied |
Denied |
|
Denied |
Denied |
Granted |
Denied |
|
Denied |
Granted |
Denied |
Denied |
|
Granted |
Denied |
Denied |
Denied |
|
Denied |
Granted |
Granted |
Denied |
|
Granted |
Denied |
Granted |
Denied |
|
Granted |
Granted |
Denied |
Denied |
|
Granted |
Granted |
Granted |
Granted |
Position-level security is used when a user selects positions in the wizard process before building a workbook. Only positions to which a user has access are available for selection in the 2-tree, which are then included in the build of the workbook.
Note that position-level security, when used for a global domain environment on the same dimension on which it is partitioned, is used to guide a user to the domain or domains that user has access to. If a user only has access to positions within a single local domain, that user will be guided there on New Workbook. If a user has access to more than one, that user will be asked and can choose based on partition-level positions.
Similarly, Open by default only lists workbooks from those domains, and a user is only shown alert counts from those domains.
This section specifies how to set resource limits.
The Workbook Template Limit views are used to limit the number of workbooks that the user can have saved. Limits can be set for a user per template, for a user group per template, or for a template for all users. The limits are evaluated in the above order, which means a limit defined in a user-template overrides any values defined at group-template or template. If the above limits are not defined, the default value is one billion, but it is not displayed in the workbook.
The limits are checked when the user begins the workbook build process. If the limit has been reached, an error message appears that informs the user that the workbook build process cannot complete because the limit has been reached. The wizard process then terminates.
The Max Domain Session Limit view is used to limit the number of user sessions that can be attached to a single domain by all users of that domain. The limit is set at the domain level. In a global domain environment, the same limit is applied individually to each local domain and the master domain.
This limit is checked during user login. If the limit has been reached, an error message appears to inform the user that the login has failed because this limit has been reached.
The Max User Session Limit view is used to limit the number of concurrent user sessions that can be attached to a single domain by the same user at the same time. The limit is set per user so that the administrator can control the maximum number of concurrent sessions that are allowed for an individual user. In a global domain environment, the same limit is applied individually to each local domain and the master domain.
This limit is checked during user login. If the limit has been reached, an error message appears to inform the user that the login has failed because this limit has been reached.
Information on how to set these limits can be found in the following documentation:
For the Fusion Client, see Chapter 8: System Administration in the Oracle Retail Predictive Application Server Administration Guide for the Fusion Client.
For the Classic Client see Chapter 8: System Administration in the Oracle Retail Predictive Application Server Administration Guide for the Classic Client.
The Dimension Modification Rights view allows the administrator to determine which user defined dimensions, if any, a user can modify by using the Hierarchy Maintenance Workbook. The view contains a check box for each available user and dimension combination. A check mark in the cell indicates that the user is permitted to modify the specified user defined dimension. Check mark on regular dimension has no affect.
After changes are made to a user's dimension modification rights, they must be committed before they take effect.
The RPAS_LOG_LEVEL environment variable establishes the minimum logging level used by the RPAS server. Both of the clients have the ability to override this log level (see the Auditing section of the desired client for details), however, if both this method and RPAS_LOG_LEVEL are used, then the logging level with the most granularity is used.
Table 5-2 Auditing
| Client Log Level | RPAS_LOG_LEVEL | Resulting Level |
|---|---|---|
|
Debug |
Info |
Debug |
|
Error |
Info |
Info |
|
None |
<not set> |
None |
That last example illustrates why you should always set the RPAS_LOG_LEVEL variable at the server. By setting this, you prevent the malicious user from setting a log level in the client that would prevent the server from tracking the user's activity.
Logs generated by DomainDaemon are stored in the current working directory for the DomainDaemon application. Once a user is authorized and their connection is moved to an RpasDbServer process, the log file for their activity is stored in their user directory in the domain.
While RPAS can be configured to store any type of data, it is designed to be used with sales history, inventory, and other business related information with low security requirements. It is not intended to be used with any sensitive data such as personally identifiable information or credit card information. It does not have any mechanisms to protect this data such as encryption, and therefore should not be used in this manner.
RPAS supports the concept of blocking some IP addresses in a multi-homed server from being used by the Domain Daemon, thereby limiting the security exposure to external attacks. For example, a server might have a network port to connect to the internal network, and another network port to connect to external networks. In this scenario the Domain Daemon can select the port that accesses the internal network. This way the daemon is less vulnerable to external attacks.
The Domain Daemon also has the flexibility to serve multiple domains, and multiple domain daemons can be started on a single server (Domain Daemon Redundancy). For example, on a single server we can have Domain Daemon DD1 servicing Domains D1 and D2, plus Domain Daemon DD2 also servicing Domains D1 and D2. In this scenario the system will continue servicing requests even in the case where DD1 gets compromised.
Secure Socket Layer (SSL), a protocol for securing network connections, is used by RPAS to provide secure communication between the RPAS Client and server processes. In RPAS 14.1.1, SSL protocol version TLSv1.2 is used.
This section covers the following topics:
SSL can provide two benefits to a networked application: Encryption and Authentication. Both of these benefits are typically handled by an exchange of SSL certificates. SSL certificates are based on the PKI (public-key infrastructure model), and consist of both public key certificates and private key (root) certificates. Private keys are stored in an application's key store, and are not shared with any other application. Public keys are distributed to other applications that you wish to communicate with, and are stored inside their trust stores.
SSL operates in three deployment models with varying degrees of security:
One-way SSL: With one-way SSL, the server is required to present a certificate to the client, but the client is not required to present a certificate to the server. This creates an environment where the server will accept connections from any client, but the client can only connect to a single server.
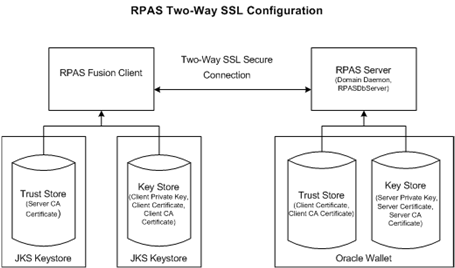
Two-way SSL: With two-way SSL, both the server and the client are required to present their certificates. This is typically used in an environment where a single client connects to a single server. It is possible to add additional clients and servers to this deployment model by creating additional certificates and propagating the public keys to the appropriate trust stores.
Anonymous SSL: With anonymous SSL, neither the server nor the client is required to present certificates. The encryption algorithms used for the session are exchanged during the SSL handshake. This model provides encryption, but not authentication and is susceptible to man-in-the-middle attacks. Because of this, it should be limited to test environments only, and should never be implemented in production.
The orapki tool is used to create SSL certificates, as well as Oracle wallets. The Oracle wallet serves as both the key store and trust store for an application. Details for using the wallet and certificates can be found in the RPAS Classic Client and RPAS Fusion Client Administration Guides.
Certificates need to be signed in order to be used. In most cases, you should get your certificates signed by a Certificate Authority. Many companies have their own Certificate Authority software and can create their own trusted certificates. If this option is not available, then there are trusted vendors such as Entrust or Verisign that can provide signed certificates for you.
Another option is to use the orapki tool to create self-signed certificates. This option is ideally suited for a test environment, but should not be considered for a production environment.
In a Fusion Client deployment, the connection between WebLogic and the RPAS server must be protected with two-way SSL. This establishes a trust chain between the WebLogic layer and the RPAS server that enables users to be authenticated externally. Since RPAS trusts connections coming from the Fusion Client, it does not need to perform redundant user authorization, which simplifies user management on the RPAS server.
The Fusion Client requires its key store and trust store to use the JKS format, which is managed by the keytool utility distributed with the standard JDK. The orapki utility can convert between the Oracle Wallet format and the JKS format, so you can either create all of your wallets with orapki, then convert the client side ones to JKS format, or use keytool to create the JKS wallets and import the certificates.
The RPAS server also supports a special SSL mode which uses two-way SSL solely to authenticate the Fusion Client and establish the trust chain. All communication after the SSL handshake is done in plain-text. This option should only be used if SSL introduces performance issues into an environment, and should not be considered a secure option. Some current server hardware handles SSL at the hardware level, so the cases where this option provides benefit are rare.
Oracle Business Intelligence Enterprise Edition (OBIEE) reports can be displayed in the context of an RPAS workbook. An OBIEE server connection needs to be set up for this purpose. If the OBIEE server and Fusion Client server are communicating over the wide area network rather than over a private network, then it is necessary to encrypt the message traffic using one-way SSL. An SSL certificate needs to be deployed to the OBIEE server, and the Fusion Client needs to access the OBIEE server on the SSL listen port.
For the details on how to set up the SSL connection between the Fusion Client and the OBIEE server, see section 1.5.1, "How to Configure SSL and Create an Oracle BI EE Presentation Services Connection," of the Oracle Fusion Middleware Developer's Guide for Oracle Business Intelligence Enterprise Edition, version 11g Release 1, available at the following URL:
http://docs.oracle.com/cd/E23943_01/bi.1111/e10545/embedding_adf.htm
Following is a summary of the steps:
Deploy an SSL certificate to the WebLogic server hosting the OBIEE application.
The certificate can be a self-signed one if both the OBIEE and Fusion Client servers are in the control of the same business entity. Otherwise, the party controlling the OBIEE server is recommended to acquire and deploy a CA-signed SSL certificate.
If using a self-signed certificate, set the cn field of the identity to the host name of the OBIEE server. Turn off host name verification in the OBIEE server's SSL configuration. Enable use of JSSE SSL.
Turn on the SSL listen port.
Insert the self-signed certificate into the trust store of the JDK used by the WebLogic server on which the Fusion Client is deployed. Also, insert it into the trust store used by this WebLogic server.
In the OBIEE connection setup, specify https for the protocol field, and use the https URL of the OBIEE analytics application for the StaticResourcesLocation field. For more information, see the section on OBIEE connections in the Oracle Retail Predictive Application Server Administration Guide for the Fusion Client.
Because the Classic Client is distributed in a many-to-one fashion, two-way SSL simply is not practical. Due to this, the Classic Client can connect to the RPAS server using either one-way or anonymous SSL.
One Way SSL
With One-Way SSL, the RPAS server authenticates itself to the client via a certificate. Thus, the client has assurance the server is valid
When setting up one-way SSL for the Classic Client, simply create a certificate for the server, export the public key certificate and put it in an Oracle Wallet. This path to this wallet should be referenced in either the foundation.fcf file, or the WebLaunch configuration. It is possible to have a single wallet out on a shared drive that all of the clients will reference, but be careful to secure the folder so that only authorized users can get access to the wallet.
Anonymous SSL
The Classic Client can connect to the RPAS server using anonymous SSL without creating or sharing any certificates. However, due to the lack of authentication and the susceptibility to man-in-the-middle attacks, this should only be done in a test environment.
Setting the SSL Type
When launching the DomainDaemon process, the SSL type needs to be specified on the command line. Which type you choose depends on which client you are using and the desired level of security.
Table 5-3 SSL Options
| SSL Type | Client | Certificates Needed | Data Encryption | Recommended for Production |
|---|---|---|---|---|
|
1 |
Classic |
Server only |
Y |
Y |
|
2 |
Fusion |
Client and Server |
Y |
Y |
|
3 |
Classic |
None |
Y |
N |
|
4 |
Fusion |
Client and Server |
N |
N |
Setting Cypher Suite
In addition to setting the SSL Type, the Domain Daemon also allows you to specify the cipher suite to be used for all incoming connections. This enables a system administrator to change the suite if the one being used is compromised. The list of supported cipher suites should expand over time. When a cipher suite is deemed insecure, it will be deprecated in the next release. Whenever a deprecated cipher suite is selected, a warning message will be written to the console.
For 14.1.1, RPAS supports the following cipher suites:
Further information can be found in the following RPAS documentation:
For the Fusion Client, see the information on implementing SSL in Chapter 8: System Administration in the Oracle Retail Predictive Application Server Administration Guide for the Fusion Client.
For the Classic Client, see the information on implementing SSL in Chapter 8: System Administration in the Oracle Retail Predictive Application Server Administration Guide for the Fusion Client.