| Oracle® Retail POS Suite Implementation Guide, Volume 1 – Implementation Solutions Release 14.1 E54475-02 |
|


 Previous |
 Next |
| Oracle® Retail POS Suite Implementation Guide, Volume 1 – Implementation Solutions Release 14.1 E54475-02 |
|
Previous |
Next |
This chapter provides information on implementing the following features:
The bill pay feature in Point-of-Service enables retailers to accept bill payments from their customers and interface with their billing system to record the payments. This feature is primarily intended for telecom service providers who run their outlet stores primarily in developing markets.
Bill Pay provides an ability for a cashier at the store to accept bill payments and provides an integration of Point-of-Service with different billing systems, such as Oracle Billing and Revenue Management (BRM), Amdoc and so on.
Bill Pay provides the retailer with the following capabilities:
Bill Search and Pay: The operator can scan the bill number to get the bill information and options to pay the bill using different tender types. The operator can also look up the bill details on a third-party billing system by providing customer information.
Offline Bill Pay: When the third-party billing system is offline, Point-of-Service can take the payment by capturing the minimum information required for that bill payment and later sending this detail to the billing system when the system is online.
Integration Framework: Enables the service implementers (SI) to integrate Point-of-Service with different third-party billing systems.
Fulfillment automatically creates e-mail messages for customers when certain conditions are met. Each transaction has a status associated with it. As each step in the order process is completed, the status is automatically updated to reflect these changes.
Whenever the order status changes to Filled, Partial, Completed, or Cancelled, an automatic e-mail message is created. The order information is inserted into an e-mail file and sent to the server.
The created e-mail messages are stored in the database. Point-of-Service does not send the e-mail messages to customers. The retailer is responsible for sending the e-mail messages.
The stored messages can be found in the table DO_EMSG.
The following table lists the status values for each e-mail message as found in the column ST_EMSG.
Table 11-1 E-Mail Message Status Values
| Value | E-Mail Message Status |
|---|---|
|
0 |
public static final int MESSAGE_STATUS_NEW |
|
1 |
public static final int MESSAGE_STATUS_REPLIED |
|
2 |
public static final int MESSAGE_STATUS_OUTBOX |
|
3 |
public static final int MESSAGE_STATUS_SENT |
|
4 |
public static final int MESSAGE_STATUS_READ |
For more information about Automated E-Mail Messages and Fulfillment, see the Oracle Retail Point-of-Service User Guide.
Register Cash Notification gives retailers added security and enables stores to manage cash by register and till. Register Cash Notification informs Point-of-Service users when the amount of cash in the register or till is above or below a configurable amount as defined by a set of parameters. Register Cash Notification notifies the Point-of-Service user of the cash discrepancy through a modal message for cash warning over and a non-modal message for cash warning under.
For more information about Register Cash Notification, see the Oracle Retail Point-of-Service User Guide.
Edit the following configuration files to enable Register Cash Notification.
Set the parameters shown the following table:
| Parameter | Description |
|---|---|
| CashAmountOverWarningFloat | If the total cash amount in the cash drawer is greater than or equal to the value of this parameter, a modal warning message is displayed. |
| CashAmountUnderWarningFloat | If the total cash amount in the cash drawer is less than or equal to the value of this parameter, a non-modal warning message is displayed. |
Set the following timing properties for Cash Warning UNDER:
CashDrawerWarning.AnimationDelay=7
CashDrawerWarning.Lifetime=6000
CashDrawerWarning.Waittime=500
Set the following properties for the OVER Dialog Warning:
DialogSpec.OverCashDrawerWarning.title=Cash Drawer Maintenance
DialogSpec.OverCashDrawerWarning.description=Cash Drawer Warning
DialogSpec.OverCashDrawerWarning.line3=Notify a manager
DialogSpec.OverCashDrawerWarning.line8=Press Enter to continue
The scan sheet can be used to provide cashiers with a list of barcodes for items that are too small to have a label or sticker with a barcode, or for a service that carries a charge to the customer but is not tangible and therefore does not contain a sticker or label with a barcode. This functionality is an on-screen scan sheet. The scan sheet is accessed from the Sell item screen.
The scan sheet is represented as a grid. The retailer can configure each square of the grid to their specific needs. For example, one square might contain an icon representing alterations. Once selected, the next step is to go to the alternations detail screen so the user can capture the details needed to complete the alteration for the customer. If the user selects a square that contains an icon for an item, the user is returned to the Sell Item screen, and the item is added to the transaction.
To use a scan sheet, you must set up the following properties.
Edit the following in the <source_directory>\applications\pos\deploy\shared\config\application.properties file:
enableScanSheet – The valid values for this property are true and false. If the value is set to true, the scan sheet button is displayed. If the value is false, the scan sheet button is not displayed on the Sell Item screen.
maxGridSize – The valid value for this property is any number. If it is set to 2, then a grid of 2 by 2 is displayed. If set to 4, a grid of 4 by 4 is displayed.
|
Note: The suggested maximum grid size is 4 by 4. Any parameter value greater than 4 can lead to the display being distorted. |
The following database tables are used to configure a scan sheet configuration:
Table 11-2 CO_CFG_SC_SHT
| COLUMN | TYPE | NULLABLE | COMMENT |
|---|---|---|---|
|
ID_SC_SHT_COM |
NUMBER(38,0) |
No |
Scan Sheet Component ID |
|
ID_ITM |
VARCHAR2(14 BYTE) |
Yes |
Item ID |
|
ID_CTGY |
VARCHAR2(14 BYTE) |
Yes |
Category ID |
|
AI_ORD |
NUMBER(38,0) |
Yes |
Scan Sheet component order |
|
TY_COM |
VARCHAR2(1 BYTE) |
Yes |
Component type: Item(I) or Category(C) |
|
ID_CTGY_PRNT |
VARCHAR2(14 BYTE) |
Yes |
Parent Category ID |
Table 11-3 CO_CFG_SC_SHT_I8
| COLUMN | TYPE | NULLABLE | COMMENT |
|---|---|---|---|
|
ID_SC_SHT_COM |
NUMBER(38,0) |
No |
Scan Sheet Component ID |
|
LCL |
VARCHAR2(10 BYTE) |
No |
@Locale |
|
NM_CTGY |
VARCHAR2(120 BYTE) |
Yes |
@Translatable=Category Name |
|
DO_SC_COM_IMG |
BLOB |
Yes |
Component image |
|
COM_IMG_LOC |
VARCHAR2(200 BYTE) |
Yes |
Component image location URL |
A category of items called Grips can be configured in the scan sheet by running the following insert statements. This creates a scan sheet component without an image.
|
Note: The Grips category is used as an example in this section. |
Insert into CO_CFG_SC_SHT (ID_SC_SHT_COM, ID_ITM,ID_CTGY,AI_ORD,TY_COM,ID_CTGY_PRNT) values (1,null,'grips',1,'C',null);
where:
ID_SC_SHT_COM = 1. This is the unique component ID given to a scan sheet component.
ID_ITM = null. This is applicable in case of an individual item, for example, when TY_COM = 'I'. The value is null as a category is being inserted.
ID_CTGY = 'grips'. This is the ID of the category, applicable in cases when TY_COM = 'C'.
AI_ORD = 1. The order of the component. This determines the position of the component in the scan sheet grid.
TY_COM = 'C'. C indicates a category item. I indicates an individual item.
ID_CTGY_PRNT = null. This is the parent category of the category or individual item being configured.
Insert into CO_CFG_SC_SHT_I8 (ID_SC_SHT_COM, LCL, NM_CTGY) values (1,'en','Grips');
where:
ID_SC_SHT_COM = 1. This is the unique component ID given to a scan sheet component.
LCL = 'en'. This is the locale.
NM_CTGY = 'Grips'. This is applicable only when TY_COM = C. It contains the locale-specific name of the category that is displayed. For individual items, the AS_ITM_I8 short description is shown.
The table CO_CFG_SC_SHT_I8 has two columns for configuring images for a particular scan sheet component: DO_SC_COM_IMG and COM_IMG_LOC.
The image can be stored directly as a blob in the DO_SC_COM_IMG column. There is no generic way of inserting blob data into different types of databases. For the Oracle database, blob data can be inserted using tools such as SQLDeveloper, or writing using a PL/SQL block.
If the item image is not stored in DO_SC_COM_IMG, the image is fetched from the URL specified in the COM_IMG_LOC column. The URL can be a web URL or a file URL pointing to an image stored on the server.
For individual items, if DO_SC_COM_IMG and COM_IMG_LOC are not set, the image configured in AS_ITM_IMG is displayed.
An item that belongs to the Grips category can be configured in the scan sheet by running the following insert statement:
Insert into CO_CFG_SC_SHT (ID_SC_SHT_COM,ID_ITM,ID_CTGY,AI_ORD,TY_COM,ID_CTGY_PRNT) values (13,'1544',null,1,'I','grips');
where:
ID_SC_SHT_COM = 1. This is the unique component ID given to a scan sheet component.
ID_ITM = 1544. This is the item ID.
ID_CTGY = null. This is the ID of the category, applicable in cases when TY_COM = C. The value is null as a single item is being configured.
AI_ORD = 1. The order of the component. This determines the position of the component in the scan sheet grid.
TY_COM = 'I'. I indicates an individual item.
ID_CTGY_PRNT = ’grips'. The parent for this item is grips.
In case of an individual item, no data is required for the CO_CFG_SC_SHT_I8 table unless the user wants to specify an image other than the image configured in the AS_ITM_IMG table.
An individual item that does not belong to any category can be configured in the scan sheet by running the following insert statements:
Insert into CO_CFG_SC_SHT (ID_SC_SHT_COM,ID_ITM,ID_CTGY,AI_ORD,TY_COM,ID_CTGY_PRNT) values (12,'27604',null,12,'I',null);
ID_SC_SHT_COM = 12. This is the unique component ID given to a scan sheet component.
ID_ITM = 27604. This is the item ID.
ID_CTGY = null. This is the ID of the category, applicable in cases when TY_COM = 'C'.
AI_ORD = 12. The order of the component. This determines the position of the component in the scan sheet grid. All components with values less than this value are displayed before this item, and components with a value greater than this come after.
TY_COM = ’I'. I indicates an individual item.
ID_CTGY_PRNT = null. The item does not belong to any category. This item is displayed on the home page.
In case of an individual item, no data is required for the CO_CFG_SC_SHT_I8 table unless the user wants to specify an image other than the image configured in the AS_ITM_IMG table.
The following are sample scripts for reference:
Example 11-1 InsertTableScanSheet.sql
-- ===========================================================================
--
-- Categories --
Insert into CO_CFG_SC_SHT (ID_SC_SHT_COM,ID_ITM,ID_CTGY,AI_ORD,TY_COM,ID_CTGY_PRNT) values (1,null,'grips',1,'C',null);
Insert into CO_CFG_SC_SHT (ID_SC_SHT_COM,ID_ITM,ID_CTGY,AI_ORD,TY_COM,ID_CTGY_PRNT) values (2,null,'handlebars',2,'C',null);
Insert into CO_CFG_SC_SHT (ID_SC_SHT_COM,ID_ITM,ID_CTGY,AI_ORD,TY_COM,ID_CTGY_PRNT) values (3,null,'brakes',3,'C',null);
Insert into CO_CFG_SC_SHT (ID_SC_SHT_COM,ID_ITM,ID_CTGY,AI_ORD,TY_COM,ID_CTGY_PRNT) values (4,null,'seats',4,'C',null);
Insert into CO_CFG_SC_SHT (ID_SC_SHT_COM,ID_ITM,ID_CTGY,AI_ORD,TY_COM,ID_CTGY_PRNT) values (5,null,'locks',5,'C',null);
Insert into CO_CFG_SC_SHT (ID_SC_SHT_COM,ID_ITM,ID_CTGY,AI_ORD,TY_COM,ID_CTGY_PRNT) values (6,null,'jerseys',6,'C',null);
Insert into CO_CFG_SC_SHT (ID_SC_SHT_COM,ID_ITM,ID_CTGY,AI_ORD,TY_COM,ID_CTGY_PRNT) values (7,null,'accessories',7,'C',null);
Insert into CO_CFG_SC_SHT (ID_SC_SHT_COM,ID_ITM,ID_CTGY,AI_ORD,TY_COM,ID_CTGY_PRNT) values (8,null,'tires',8,'C',null);
Insert into CO_CFG_SC_SHT (ID_SC_SHT_COM,ID_ITM,ID_CTGY,AI_ORD,TY_COM,ID_CTGY_PRNT) values (9,null,'hrms',9,'C',null);


-- Individual items those do not belong to any category
Insert into CO_CFG_SC_SHT (ID_SC_SHT_COM,ID_ITM,ID_CTGY,AI_ORD,TY_COM,ID_CTGY_PRNT) values (10,'30020002',null,10,'I',null);
Insert into CO_CFG_SC_SHT (ID_SC_SHT_COM,ID_ITM,ID_CTGY,AI_ORD,TY_COM,ID_CTGY_PRNT) values (11,'30060006',null,11,'I',null);
Insert into CO_CFG_SC_SHT (ID_SC_SHT_COM,ID_ITM,ID_CTGY,AI_ORD,TY_COM,ID_CTGY_PRNT) values (12,'27604',null,12,'I',null);

-- Items those belong to a category
Insert into CO_CFG_SC_SHT (ID_SC_SHT_COM,ID_ITM,ID_CTGY,AI_ORD,TY_COM,ID_CTGY_PRNT) values (13,'1544',null,1,'I','grips');
Insert into CO_CFG_SC_SHT (ID_SC_SHT_COM,ID_ITM,ID_CTGY,AI_ORD,TY_COM,ID_CTGY_PRNT) values (14,'1547',null,2,'I','grips');
Insert into CO_CFG_SC_SHT (ID_SC_SHT_COM,ID_ITM,ID_CTGY,AI_ORD,TY_COM,ID_CTGY_PRNT) values (15,'1565',null,3,'I','grips');
Insert into CO_CFG_SC_SHT (ID_SC_SHT_COM,ID_ITM,ID_CTGY,AI_ORD,TY_COM,ID_CTGY_PRNT) values (16,'3628',null,4,'I','grips');
Insert into CO_CFG_SC_SHT (ID_SC_SHT_COM,ID_ITM,ID_CTGY,AI_ORD,TY_COM,ID_CTGY_PRNT) values (17,'1409',null,1,'I','handlebars');
Insert into CO_CFG_SC_SHT (ID_SC_SHT_COM,ID_ITM,ID_CTGY,AI_ORD,TY_COM,ID_CTGY_PRNT) values (18,'1411',null,2,'I','handlebars');
Insert into CO_CFG_SC_SHT (ID_SC_SHT_COM,ID_ITM,ID_CTGY,AI_ORD,TY_COM,ID_CTGY_PRNT) values (19,'1422',null,3,'I','handlebars');
Insert into CO_CFG_SC_SHT (ID_SC_SHT_COM,ID_ITM,ID_CTGY,AI_ORD,TY_COM,ID_CTGY_PRNT) values (20,'1437',null,4,'I','handlebars');
Insert into CO_CFG_SC_SHT (ID_SC_SHT_COM,ID_ITM,ID_CTGY,AI_ORD,TY_COM,ID_CTGY_PRNT) values (21,'1449',null,5,'I','handlebars');
Insert into CO_CFG_SC_SHT (ID_SC_SHT_COM,ID_ITM,ID_CTGY,AI_ORD,TY_COM,ID_CTGY_PRNT) values (22,'1476',null,6,'I','handlebars');
Insert into CO_CFG_SC_SHT (ID_SC_SHT_COM,ID_ITM,ID_CTGY,AI_ORD,TY_COM,ID_CTGY_PRNT) values (23,'1477',null,7,'I','handlebars');
Insert into CO_CFG_SC_SHT (ID_SC_SHT_COM,ID_ITM,ID_CTGY,AI_ORD,TY_COM,ID_CTGY_PRNT) values (24,'185',null,1,'I','brakes');
Insert into CO_CFG_SC_SHT (ID_SC_SHT_COM,ID_ITM,ID_CTGY,AI_ORD,TY_COM,ID_CTGY_PRNT) values (25,'198',null,2,'I','brakes');
Insert into CO_CFG_SC_SHT (ID_SC_SHT_COM,ID_ITM,ID_CTGY,AI_ORD,TY_COM,ID_CTGY_PRNT) values (26,'194',null,3,'I','brakes');
Insert into CO_CFG_SC_SHT (ID_SC_SHT_COM,ID_ITM,ID_CTGY,AI_ORD,TY_COM,ID_CTGY_PRNT) values (27,'225',null,4,'I','brakes');
Insert into CO_CFG_SC_SHT (ID_SC_SHT_COM,ID_ITM,ID_CTGY,AI_ORD,TY_COM,ID_CTGY_PRNT) values (28,'231',null,5,'I','brakes');
Insert into CO_CFG_SC_SHT (ID_SC_SHT_COM,ID_ITM,ID_CTGY,AI_ORD,TY_COM,ID_CTGY_PRNT) values (29,'2430',null,1,'I','seats');
Insert into CO_CFG_SC_SHT (ID_SC_SHT_COM,ID_ITM,ID_CTGY,AI_ORD,TY_COM,ID_CTGY_PRNT) values (30,'2433',null,2,'I','seats');
Insert into CO_CFG_SC_SHT (ID_SC_SHT_COM,ID_ITM,ID_CTGY,AI_ORD,TY_COM,ID_CTGY_PRNT) values (31,'2435',null,3,'I','seats');
Insert into CO_CFG_SC_SHT (ID_SC_SHT_COM,ID_ITM,ID_CTGY,AI_ORD,TY_COM,ID_CTGY_PRNT) values (32,'3634',null,4,'I','seats');
Insert into CO_CFG_SC_SHT (ID_SC_SHT_COM,ID_ITM,ID_CTGY,AI_ORD,TY_COM,ID_CTGY_PRNT) values (33,'3635',null,5,'I','seats');
Insert into CO_CFG_SC_SHT (ID_SC_SHT_COM,ID_ITM,ID_CTGY,AI_ORD,TY_COM,ID_CTGY_PRNT) values (34,'4527',null,6,'I','seats');
Insert into CO_CFG_SC_SHT (ID_SC_SHT_COM,ID_ITM,ID_CTGY,AI_ORD,TY_COM,ID_CTGY_PRNT) values (35,'3603',null,1,'I','locks');
Insert into CO_CFG_SC_SHT (ID_SC_SHT_COM,ID_ITM,ID_CTGY,AI_ORD,TY_COM,ID_CTGY_PRNT) values (36,'3604',null,2,'I','locks');
Insert into CO_CFG_SC_SHT (ID_SC_SHT_COM,ID_ITM,ID_CTGY,AI_ORD,TY_COM,ID_CTGY_PRNT) values (37,'3606',null,3,'I','locks');
Insert into CO_CFG_SC_SHT (ID_SC_SHT_COM,ID_ITM,ID_CTGY,AI_ORD,TY_COM,ID_CTGY_PRNT) values (38,'3608',null,4,'I','locks');
Insert into CO_CFG_SC_SHT (ID_SC_SHT_COM,ID_ITM,ID_CTGY,AI_ORD,TY_COM,ID_CTGY_PRNT) values (39,'4197',null,1,'I','jerseys');
Insert into CO_CFG_SC_SHT (ID_SC_SHT_COM,ID_ITM,ID_CTGY,AI_ORD,TY_COM,ID_CTGY_PRNT) values (40,'4284',null,2,'I','jerseys');
Insert into CO_CFG_SC_SHT (ID_SC_SHT_COM,ID_ITM,ID_CTGY,AI_ORD,TY_COM,ID_CTGY_PRNT) values (41,'4285',null,3,'I','jerseys');
Insert into CO_CFG_SC_SHT (ID_SC_SHT_COM,ID_ITM,ID_CTGY,AI_ORD,TY_COM,ID_CTGY_PRNT) values (42,'4286',null,4,'I','jerseys');
Insert into CO_CFG_SC_SHT (ID_SC_SHT_COM,ID_ITM,ID_CTGY,AI_ORD,TY_COM,ID_CTGY_PRNT) values (43,'4278',null,5,'I','jerseys');
Insert into CO_CFG_SC_SHT (ID_SC_SHT_COM,ID_ITM,ID_CTGY,AI_ORD,TY_COM,ID_CTGY_PRNT) values (44,'6110',null,6,'I','jerseys');
Insert into CO_CFG_SC_SHT (ID_SC_SHT_COM,ID_ITM,ID_CTGY,AI_ORD,TY_COM,ID_CTGY_PRNT) values (45,'6111',null,7,'I','jerseys');
Insert into CO_CFG_SC_SHT (ID_SC_SHT_COM,ID_ITM,ID_CTGY,AI_ORD,TY_COM,ID_CTGY_PRNT) values (46,'6806',null,8,'I','jerseys');
Insert into CO_CFG_SC_SHT (ID_SC_SHT_COM,ID_ITM,ID_CTGY,AI_ORD,TY_COM,ID_CTGY_PRNT) values (47,'3614',null,1,'I','accessories');
Insert into CO_CFG_SC_SHT (ID_SC_SHT_COM,ID_ITM,ID_CTGY,AI_ORD,TY_COM,ID_CTGY_PRNT) values (48,'3641',null,2,'I','accessories');
Insert into CO_CFG_SC_SHT (ID_SC_SHT_COM,ID_ITM,ID_CTGY,AI_ORD,TY_COM,ID_CTGY_PRNT) values (49,'3214567',null,3,'I','accessories');
Insert into CO_CFG_SC_SHT (ID_SC_SHT_COM,ID_ITM,ID_CTGY,AI_ORD,TY_COM,ID_CTGY_PRNT) values (50,'3889',null,4,'I','accessories');
Insert into CO_CFG_SC_SHT (ID_SC_SHT_COM,ID_ITM,ID_CTGY,AI_ORD,TY_COM,ID_CTGY_PRNT) values (51,'3903',null,5,'I','accessories');
Insert into CO_CFG_SC_SHT (ID_SC_SHT_COM,ID_ITM,ID_CTGY,AI_ORD,TY_COM,ID_CTGY_PRNT) values (52,'4521',null,6,'I','accessories');
Insert into CO_CFG_SC_SHT (ID_SC_SHT_COM,ID_ITM,ID_CTGY,AI_ORD,TY_COM,ID_CTGY_PRNT) values (53,'60080008',null,7,'I','accessories');
Insert into CO_CFG_SC_SHT (ID_SC_SHT_COM,ID_ITM,ID_CTGY,AI_ORD,TY_COM,ID_CTGY_PRNT) values (54,'6299',null,8,'I','accessories');
Insert into CO_CFG_SC_SHT (ID_SC_SHT_COM,ID_ITM,ID_CTGY,AI_ORD,TY_COM,ID_CTGY_PRNT) values (55,'6350',null,9,'I','accessories');
Insert into CO_CFG_SC_SHT (ID_SC_SHT_COM,ID_ITM,ID_CTGY,AI_ORD,TY_COM,ID_CTGY_PRNT) values (56,'3646',null,1,'I','tires');
Insert into CO_CFG_SC_SHT (ID_SC_SHT_COM,ID_ITM,ID_CTGY,AI_ORD,TY_COM,ID_CTGY_PRNT) values (57,'5384',null,2,'I','tires');
Insert into CO_CFG_SC_SHT (ID_SC_SHT_COM,ID_ITM,ID_CTGY,AI_ORD,TY_COM,ID_CTGY_PRNT) values (58,'806',null,3,'I','tires');
Insert into CO_CFG_SC_SHT (ID_SC_SHT_COM,ID_ITM,ID_CTGY,AI_ORD,TY_COM,ID_CTGY_PRNT) values (59,'810',null,4,'I','tires');
Insert into CO_CFG_SC_SHT (ID_SC_SHT_COM,ID_ITM,ID_CTGY,AI_ORD,TY_COM,ID_CTGY_PRNT) values (60,'869',null,5,'I','tires');
Insert into CO_CFG_SC_SHT (ID_SC_SHT_COM,ID_ITM,ID_CTGY,AI_ORD,TY_COM,ID_CTGY_PRNT) values (61,'6202',null,1,'I','hrms');
Insert into CO_CFG_SC_SHT (ID_SC_SHT_COM,ID_ITM,ID_CTGY,AI_ORD,TY_COM,ID_CTGY_PRNT) values (62,'6207',null,2,'I','hrms');
Insert into CO_CFG_SC_SHT (ID_SC_SHT_COM,ID_ITM,ID_CTGY,AI_ORD,TY_COM,ID_CTGY_PRNT) values (63,'6229',null,3,'I','hrms');
Insert into CO_CFG_SC_SHT (ID_SC_SHT_COM,ID_ITM,ID_CTGY,AI_ORD,TY_COM,ID_CTGY_PRNT) values (64,'6211',null,4,'I','hrms');
Insert into CO_CFG_SC_SHT (ID_SC_SHT_COM,ID_ITM,ID_CTGY,AI_ORD,TY_COM,ID_CTGY_PRNT) values (65,'6220',null,5,'I','hrms');
Example 11-2 InsertTableScanSheetI18N.sql
-- ===========================================================================

--

Insert into CO_CFG_SC_SHT_I8 (ID_SC_SHT_COM,LCL,NM_CTGY) values (1,'en','Grips');

Insert into CO_CFG_SC_SHT_I8 (ID_SC_SHT_COM,LCL,NM_CTGY) values (2,'en','Handlebars');

Insert into CO_CFG_SC_SHT_I8 (ID_SC_SHT_COM,LCL,NM_CTGY) values (3,'en','Brakes');

Insert into CO_CFG_SC_SHT_I8 (ID_SC_SHT_COM,LCL,NM_CTGY) values (4,'en','Seats');

Insert into CO_CFG_SC_SHT_I8 (ID_SC_SHT_COM,LCL,NM_CTGY) values (5,'en','Locks');

Insert into CO_CFG_SC_SHT_I8 (ID_SC_SHT_COM,LCL,NM_CTGY) values (6,'en','Jerseys');

Insert into CO_CFG_SC_SHT_I8 (ID_SC_SHT_COM,LCL,NM_CTGY) values (7,'en','Accessories');

Insert into CO_CFG_SC_SHT_I8 (ID_SC_SHT_COM,LCL,NM_CTGY) values (8,'en','Tires');

Insert into CO_CFG_SC_SHT_I8 (ID_SC_SHT_COM,LCL,NM_CTGY) values (9,'en','Heart Rate Monitors');

Insert into CO_CFG_SC_SHT_I8 (ID_SC_SHT_COM,LCL,NM_CTGY) values (10,'en',null);

Insert into CO_CFG_SC_SHT_I8 (ID_SC_SHT_COM,LCL,NM_CTGY) values (11,'en',null);

Insert into CO_CFG_SC_SHT_I8 (ID_SC_SHT_COM,LCL,NM_CTGY) values (12,'en',null);
Item images are maintained in the AS_ITM_IMG table. The table can save the actual image as well as the location of the image:
AS_ITM_IMG.ITEM_IMG_LOC – location of the image.
AS_ITM_IMG.ITM_DET_IMG – image blob.
The images can be loaded through DIMP. The DIMP import jar should contain the image file, if it is to be stored in the database. Otherwise, the location of the image should be mentioned in the DIMP import XML file. The DIMP item import xml file should contain data in the following format:
|
Note: Items in bold in the example need to be updated. |
Example 11-3 ItemImport.xml Sample
<?xml version="1.0" encoding="UTF-8"?>
<ItemImport
   Priority="0"
    FillType="FullIncremental"
    Version="1.0"
    Batch="1"
    CreationDate="2001-12-17T09:30:47.0Z"
    ExpirationDate="2027-12-17T09:30:47.0Z"
    xsi:noNamespaceSchemaLocation="ItemImport.xsd"
    xmlns:xsi="http://www.w3.org/2001/XMLSchema-instance">
    <Item
        ChangeType="UPS"
        ID="1234"
        ImageFileName="name of the image file if the file is part of the JAR"
        ImageLocation="URL of the image">
    </Item>
</ItemImport>
Mobile Point-of-Service does not support the file:\\\ type of URL. The item location needs to be in the following format:
http://<host>:<port>/<path to image>/<image file>
The images can be hosted on a Mobile Point-of-Service server by adding the images to the WAR directory within the Oracle WebLogic domain that hosts the Mobile Point-of-Service application. Following is an example of the path to the image file location:
http://<host>:<port>/mobilepos/image/<image file>
Serial numbering is a system used by manufacturers to be able to trace the history of any finished good that reaches the customers. When customers complain of defective goods, knowing the serial number enables the manufacturer to find out where the raw materials were purchased, who was involved in each production step, as well as which distributors the goods were channeled by.
Retailers that sell such high-valued or high-risk items have to track unique numbers or attributes for a single item or a group of items. This enables the retailer to have a tight control over every unit of every item in the inventory. The sale/return process needs to capture the serial number of the items, reserve/reverse status of item in Store Inventory Management and transmit the serial number to mark the item as sold to Store Inventory Management. The serial number of the sold item also needs to be transmitted with the transaction data to all the downstream applications that require Point-of-Service transaction data.
Point-of-Service supports the sale of serial controlled items. The overall processing of a serial controlled item is broken into the following two parts:
Serial Number Validation: When an item is scanned, if the UIN-required flag is set to Yes, the user is prompted for the serial number. If the UIN capture time is set to StoreReceiving, then the serial number is validated from Store Inventory Management.
Serial Number Status Update: Serial number status is updated in Store Inventory Management based on the stock movement. All the transactions listed in the validation step are sent to Store Inventory Management for update.
|
Notes:
|
The following functionality can be configured to enable the serial numbers functionality.
The property SerializationEnabled=false in application.properties file controls enabling or disabling of the feature. The Point-of-Service client installer sets the value true or false based on whether the user selects the serialization functionality.
Currency rounding enables retailers to round the amount given in cash for change and refunds to a chosen denomination. The amount can be rounded up or down to a specific denomination.
For example, several countries are moving towards eliminating the penny, or one cent coin, as an accepted denomination. Retailers can continue accepting the penny from customers as a part of their payment. When giving change or a refund, the retailer does not use pennies, but instead the change or refund amount is rounded based on the rounding method and denomination they have chosen.
When currency rounding is used, the following information is provided:
A line on receipts shows the amount of rounding adjustment that was made in the transaction.
The Statistical Summary section of the summary reports includes a Cash Rounding Adjustment field which contains the total amount of rounding adjustments made for transactions involving cash given for change and refunds. For more information, see the Oracle Retail Point-of-Service User Guide.
The following rounding methods are supported:
Swedish Rounding–round the change or refund amount to the nearest amount in the selected denomination.
Round Up–round the change or refund amount up to the higher amount in the selected denomination.
Round Down–round the change or refund amount down to the lower amount in the selected denomination.
For examples of these currency rounding methods, see Appendix A.
To use currency rounding, select the method and denomination:
Select the rounding method in the Change Rounding Type parameter. The following values are available:
Swedish Rounding
Round Up
Round Down
Select the denomination in the Cash Rounding Denomination parameter. The following values are available:
0.05
0.10
0.50
1.00
For more information on these parameters and how to set the values, see the Oracle Retail POS Suite Configuration Guide.
Cross-border returns enables the processing of the return of items in a different country than where the items were originally purchased. The system processes the return in the local country's currency and uses the local store's pricing and tax. The original transaction is updated with the return information in order to maintain the correct status of the original transaction and prevent multiple returns against the same item.
To enable cross-border returns:
Set the Allow Cross Border Return parameter value to Yes.
Select the method for determining if a return is a cross-border return in the Determine Cross Border Return Based On parameter. The following values are available:
Country
If the country code of the returning store and country code of the store at which the original sale transaction occurred differ, the return is identified as a cross-border return.
Currency
If the currency code of the returning store and currency code of the store at which the original sale transaction occurred differ, the return is identified as a cross-border return.
Select the method for determining the selling price for the return item in the Return Price for CBR parameter. The following values are available:
Current_Selling_Price
The current selling price of the item is applied to the return item.
Lowest_in_X_days
The lowest price in the X number of days, based on the Return Price Days parameter, is applied to the return item.
For more information on these parameters and how to set the values, see the Oracle Retail POS Suite Configuration Guide.
The customer display is a separate display from the associate-facing Point-of-Service display. It provides a view for the customer of the transaction as the cashier is scanning items and completing the transaction. The following information can be displayed in the transaction panel of the dashboard:
Scrolling receipt with item information including images, description, and price
Transaction summary including subtotal, discounts, quantity purchased, tax, and total
The image and message panels are configurable for the retailer's brand and messaging. The images and messages have start and end dates and times to enable displaying date and time specific promotional material as appropriate.
|
Note: The retailer is responsible for configuring the environment to use dual display. |
The dualDisplayEnabled property in this file controls whether Dual Display is enabled. This feature is not set by the installer and needs to be configured post-installation:
To enable Dual Display, set dualDisplayEnabled=true.
To disable Dual Display, set dualDisplayEnabled=false.
To configure the content for the dual display, set up the following parameters:
Set the messages shown on the display in the Dual Display Marketing Messages parameter. For multiple messages, a carriage return can be used to separate the messages.
If more than one message is defined, set the time used to cycle through multiple marketing messages in the Dual Display Messages Interval parameter. This parameter is only used if more than one message is defined.
For more information on these parameters and how to set the values, see the Oracle Retail POS Suite Configuration Guide.
Point-of-Service has a configurable dashboard that can be displayed on the Main Options screen. The following are displayed in the dashboard:
Graphical reports
The reports are selected from a list of available Point-of-Service reports. The report data is updated in real time.
Messages
The text for the messages is configurable.
To configure the dashboard, set up the following parameters:
To enable the dashboard, set the Enable Dashboard parameter to Yes.
Set up the messages text in the Dashboard Messages parameter.
Select the reports in the Dashboard Reports parameter. This following values are available:
Associate Productivity
Department Sales
Hourly Sales
For more information on these parameters and how to set the values, see the Oracle Retail POS Suite Configuration Guide.
Point-of-Service can be integrated with JavaPOS-compliant fiscal printers. Fiscal printers are receipt printers with sealed fiscal memory. Fiscal printers do not simply print text similar to standard printers; they are used to monitor and memorize all fiscal information about transactions performed at Point-of-Service. A fiscal printer has to accumulate totals, discounts, number of canceled receipts, taxes, and so on and store this information in different totalizers, counters, and the fiscal memory.
Countries such as Brazil, Bulgaria, Greece, Hungary, Italy, Poland, Romania, Russia, Turkey, Czech Republic, Ukraine, and Sweden mandate the integration of Point-of-Service with fiscal printers. Each country has its own requirements on fiscal receipts. Since fiscal rules differ between countries, Point-of-Service uses the JavaPOS Fiscal Printer interface for printing fiscal receipts. The JavaPOS Fiscal Printer interface tries to generalize the common fiscal printing requirements at the maximum extent specifications.
|
Note: Fiscal rules are different among countries. Java POS Fiscal Printer API tries to generalize these requirements by summarizing the common requirements. The retailer is responsible for ensuring all fiscal printing requirements are met for the country when integrating with fiscal printers. |
|
Note: The JavaPOS Fiscal Printer interface does not support barcode printing. The JavaPOS direct IO API can be used as a workaround if the printer supports direct IO commands for barcodes. |
For information about installing the JPOS driver and setting the receipt logo and header lines, see the printer manufacturer's installation and configuration guide.
For Release 14.1, Point-of-Service is tested with an EPSON FP90II fiscal printer for Italy and uses direct IO commands for barcode printing. The barcode direct IO command is configured in DeviceContext.xml and needs to be changed for other printers. For more information, see the Oracle Retail Point-of-Service Installation Guide.
Notifications is the ability to receive messages from an external system or create a message in Central Office and push those messages to Point-of-Service registers and Mobile Point-of-Service devices. Point-of-Service and Mobile Point-of-Service notify the user, through a configurable indicator such as an icon or text on the screen, that a message is available. The store user selects to view a list of messages for the store. This feature can be used to notify store associates that an order has come in that needs to be filled or some other action that is required by a store user.
Point-of-Service must be integrated with Central Office.
The messages are only persisted in and retrieved from the Central Office database.
The user is able to look up all the messages relevant to the current store.
Once a message has been created in Central Office, it cannot be modified or deleted.
Messages are purged in Central Office based on the retention days.
A web service is exposed for the external system, or order management system, to create messages and send them to stores as a notification.
Under the Data Management tab in Central Office, the Notifications subtab is used to create messages that can be sent to the registers and mobile devices running at the stores. The messages can be distributed to any part of the store hierarchy, a list of individual stores, or an ad hoc group of stores. When the Notifications Post Processor runs, the available messages are distributed to the stores.
For information on creating and distributing the messages, see the Oracle Retail Central Office User Guide.
When installing the Point-of-Service client or Mobile Point-of-Service server, select Yes on the Retrieve Notifications installer screen to enable retrieving the messages. For more information, see the Oracle Retail Point-of-Service Installation Guide.
To enable notification messages, set up the following parameters:
To enable messages to be displayed at a Point-of-Service register or mobile device, set the Register Retrieve Notifications parameter to Yes.
To set the maximum number of messages that can be displayed, set the Notifications Maximum Results parameter. This parameter is set to 999 by default.
To set how many days of messages are displayed, set the Days to Retrieve Notifications parameter. This parameter is set to one by default. For example, if this parameter is set to five, messages for the last five days, which includes the current day, are displayed.
For more information on these parameters and how to set the values, see the Oracle Retail POS Suite Configuration Guide.
The Point-of-Service to Store Inventory Management integration provides integration for Point-of-Service to interact with Store Inventory Management for inventory information. The following features are supported for integration with an inventory management system:
Inventory Inquiry: This feature is provided to enable Point-of-Service to check the item inventory in Home Store, Buddy Store, Specific Store, and Transfer zone. The Item Inventory feature is available to Point-of-Service client only when the Point-of-Service client is in the Online mode.
Item Basket: This feature is provided for line busting using the Store Inventory Management handheld. The items in a customer basket are scanned using the Store Inventory Management handheld and staged in the Store Inventory Management database. Point-of-Service can then look up the basket details and add the line items to the sell item screen.
Serial Number Validation and Update: Point-of-Service supports serialized items. The operator is prompted to enter/scan the serial number of the serialized item on the Point-of-Service client. The serial number that is entered is then validated by interfacing with Store Inventory Management. Once the transaction is tendered, the serialized items along with the captured serial number are sent to Store Inventory Management for updating the status of the particular serial number.
Inventory Reservation: Point-of-Service interfaces with Store Inventory Management to send the order transactions so that the items can be marked as reserved in Store Inventory Management. Also, once the items are picked up or delivered to the customer, the status needs to be updated in Store Inventory Management.
Real Time Inventory Status Update: This interface sends Point-of-Service transactions to Store Inventory Management to update the inventory status based on the transactions.
Integration is supported by the following two ways:
The following steps outline the Point-of-Service-to-Store Inventory Management integration approach:
Expose the inventory features from Store Inventory Management in the form of a web service.
Provide pluggable inventory web service interface to integrate Point-of-Service-to-Store Inventory Management.
Point-of-Service client interacts with Point-of-Service server over RMI as in the existing Point-of-Service architecture. Point-of-Service server interacts with inventory web service interface to interact with Store Inventory Management.
Point-of-Service uses the connector framework to achieve a pluggable and extendable integration with Store Inventory Management.
The Point-of-Service to Store Inventory Management integration system is broken into five main sub-systems:
The various functionalities are incorporated in Point-of-Service client by having new tours and new components, namely the ConnectorManager for interaction with the ConnectorTechnician.
The Point-of-Service server contains the connector framework which embeds the integration details. The connector framework is exposed through the ConnectorManager and RetailTransactionTechnician. The connector framework consists of pluggable Formatters (request-response formatting) and Connectors (ORSIMWebServiceConnector) to abstract the connection-specific logic.
The ORSIMWebServiceConnector is in the Point-of-Service server. PSITechnician interacts with PSIInventoryWS_Stub to call InventoryWS over intranet using HTTP/SOAP protocol.
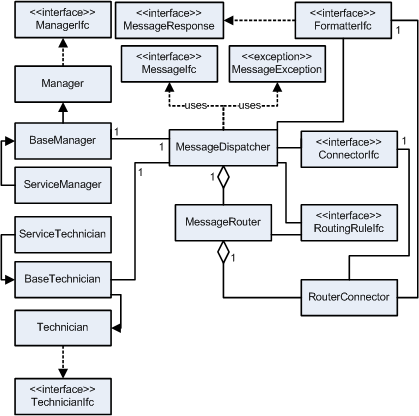
The COMMEXT (Communication Extension Module) is an out-of-the-box integration framework. It provides a very extendable approach to the integrations both online and offline. The Point-of-Service COMMEXT model is as shown in Figure 11-1. The separation of concerns between data structure manipulation or transformation, and handling connectivity to a service is separated between the two components–the formatter and the connector.
The MessageDispatcher is the core of the communication framework. Its primary function is to dispatch messages to mapped routers. In addition, MessageDispatcher performs administrative and control operations on the associated connectors. When invoked, the MessageDispatcher delegates the message handling to a specific MessageRouter.
The MessageRouter coordinates the processing of a message using the associated routing rule and the RouterConnectors.
A RouterConnector provides an association between a message type, connector, and formatter. This decouples the formatting of the message from the chosen connector.
ConnectorIfc handles the communication between the application and the external service. It is responsible for locating the service, establishing a connection, and interacting with the service using appropriate protocols.
FormatterIfc translates the raw data from the message into the format expected by the external service. It also translates the response from the remote service into the format expected by the application.
Once a message has been sent with a request type to the MessageDispatcher it gets the instance of MessageRouter that is configured for that request type from the instantiated list. The processing is then delegated to the MessageRouter. The MessageRouter routes the request message to the list of connectors that are configured for that request. There can be multiple connectors that can be defined to process the same request message.
The connector framework provides all the building blocks to realize any integration requirement with a combination of connectors, formatters, ChainedConnectors, RoutingRules and JMX notifications. The XML configuration ties up the various blocks to implement any integration requirement.
Inventory web service component deployed in Store Inventory Management server provides the entry point into the application for the various functions.
Store Inventory Management inventory database.
The retailer can map the SIM inventory adjustment reason codes with the Point-of-Service reason codes and send it to SIM in the web service call.
SIM uses these reason codes to identify the item disposition against the reason code and updates the inventory buckets appropriately. SIM processes the web service call and increments the SOH, performing the inventory adjustment based on the disposition.
The following item dispositions are the valid mapped dispositions:
Available to Sell (ATS) to TRBL -- This disposition moves the inventory from Available to Unavailable. For the retailer, this means the stock is taken in and made unavailable to sell.
ATS to Distributed (DIST) -- This disposition moves the inventory from Available to Out of inventory. End result the SOH is incremented and then again decremented. For the store person, this means the return is accepted and the item which was returned is not in a condition to keep it back on the rack and it is destroyed.
Error handling is limited to logging errors during the inventory lookup. The exceptions such as IOException and invalidItem that occur during WSService communication are re-thrown as WSException, as well as logged for error tracking and resolution.
Point-of-Service to Store Inventory Management uses Log4J for logging. The following logging levels can be used:
Info: For logging information messages.
Debug: For logging all the debug messages.
Error: For logging application errors.
The logging level can be configured with log4J.xml. See Configuring Logging in Point-of-Service for more information.
The batch files (SIMTlogs) are generated by configuring three XML files, in a manner very similar to the RTLogs:
Entity mapper - SIMTLogExtractConfig.xml
The entity mapper defines the relationships between the various transaction tables in Point-of-Service from which the records are generated. The tables and columns in the transaction tables are joined and fetched per the existing relationships between the entities.
Format configuration file - SIMTLogFormat.xml
The format configuration file defines the format of the SIM transaction logs. The definition is in terms of records and fields.
Entity-mapper file - SIMTLogMappingConfig.xml
The entity mapper configuration file defines the mapping between the tables and columns in the tables defined in the entity mapper file to the records and fields in the SIM transaction logs. Mapper and Accessor classes defined in this file are used to transform the column values and the record structure, respectively.
Following are some differences between the RTLog and SIMTlog:
The file avoids empty spaces by having a pipe ('|') delimiter between each field in the records.
The batch file generation is scheduled by a cron expression, instead of an interval-based timer.
The integration middleware is a component that is responsible for polling the batch file produced by the Oracle Retail POS Suite applications. This component has the following responsibilities:
Polling the physical file system at a specified directory.
Writing the SIMTLog file to a location that SIM expects.
Consuming the batch files in the same order in which they are produced.
Cleaning and archiving the SIMTLog batch file once SIM has consumed the batch file.
Issuing errors occur if the batch file cannot be extracted successfully from a physical directory.
|
Note: The integration middleware is provided by the system integrator. |
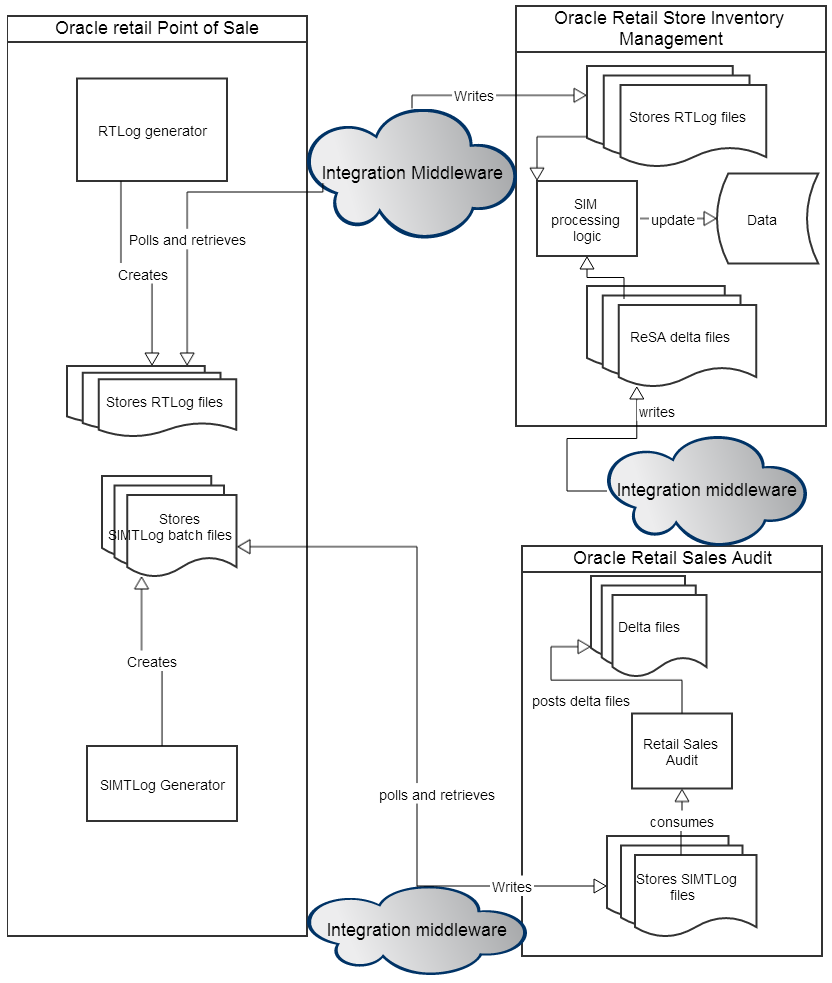
The following figure depicts the three domains that are involved when integrating transaction data within the Oracle Retail suite using SIM batch files for integration:
Preconditions
The following preconditions must be met for the system flow to function correctly when using batch files for integration between Point-of-Service and SIM:
Transport middleware requires read and write access to the physical file system to which SIM writes the batch file.
Transport middleware requires read and write access to the physical file system from which SIM reads the batch files.
Oracle Retail POS Suite requires access to a physical file system to produce the SIMTLog file.
The Point-of-Service client generates transaction data and sends the transaction object structure to the Point-of-Service store server. The Point-of-Service store server populates the JDBC statement type and commits the transaction data to the store database. The Point-of-Service store server also populates the RTLog structure with the appropriate data extracted from the transaction object tree. The time increment at which data is sent to ReSA is dictated by the retailer. If the RTLog is not successfully created due to unsupported mappings, the transaction identifier and exceptional condition is logged in detail on the Point-of-Service store server.
The overall flow is summarized in the following sequence:
RTLog
POS Suite creates the RTLog files.
Transport middleware scans the directory where Oracle Retail POS Suite writes the RTLog file and reads the unprocessed RTLog files.
Transport middleware moves the RTLog file from the physical directory written to by POS Suite to a physical directory on an enterprise server defined by ReSA.
ReSA consumes the RTLog file written to a predefined directory by the transport middleware and executes data cleansing operations to produce audited transaction data.
ReSA outputs audited RTLog-formatted transaction batch files and places the files into directories.
SIMTLog Option for Integration between Point-of-Service and SIM
POS Suite creates the SIMTLog files.
Transport middleware scans the directory where Oracle Retail POS Suite writes the SIMTLog file and reads the unprocessed SIMTLog files.
Transport middleware moves the SIMTLog file from the physical directory written to by POS Suite to a physical directory on an enterprise server defined by SIM.
SIM consumes the SIMTLog file written to a predefined directory by the transport middleware and works with the SIMTLog delta files, if any, and decides on updating the inventory details appropriately.
Filter Configuration
The kind of transactions that are eligible to be exported to SIM from Point-of-Service can be defined in the Server\pos\config\PSITransactionFilterConfig.xml file. This file is common for both the web service option and flat files.
Reason Code Mapping
Point-of-Service and SIM use different reason codes. The mapping between the two is configured in the Server\pos\config\POSToSIMItemDispositionMap.xml file. This file is common for both the web service option and flat files.
RTLog Framework
The RTLog framework uses a cron expression rather than an interval-based timer configuration.
The interval-based timer configuration shown in the following example:
<PROPERTY propname="sleepInterval" propvalue="600"/>
can be replaced with the following cron expression:
<PROPERTY propname="cronExpression" propvalue="0 0/10 * * * ?"/>
The Point-of-Service terminal is the platform that the Point-of-Service client application resides on. The cashier and the store manager interact with the Point-of-Service client application, which generates transaction data. The Point-of-Service client application sends a serialized object structure representing the sales transaction to the Point-of-Service store server residing on the In-Store-Processor (ISP). The ISP is responsible for logging the raw transaction data to the store database. Following are the major components of the integration:
SIMTLog Export Daemon Technician
Processes configuration settings from the Store Sever Conduit XML file. Settings include cronExpression, maximum number of transactions per batch, export directory name, object factory class names, and export configuration files names. Starts the SIMTLogExport Daemon Thread.
SIMTLog Export Daemon Job
Starts the export process on a periodic basis based on the configured cron expression. Calls SIMTLogExportBatchGenerator.
SIMTLog Batch Generator
Creates a list of transactions ready for export and calls the Export File Generator.
Export File Generator
Reads the transactions in the list and formats the export data based on the export configuration files. In this integration, the Point-of-Service store server also maps the transaction object structure to SIMTLog format and places the SIMTLog-formatted transaction into a file.
Following are the individual components that comprise the SIMTLog generation:
SIMTLog Batch Generator
This is an extension of the RTLogBatchGenerator.
Cron Expression
The SIMTLog batch generator runs in a daemon mode, called from the quartz threads, which periodically output SIMTLog files created by pulling transactions from the SIMTLog. In this configuration, ReSA processes one or more RTLog files from any given store.
Maximum Transactions
The Maximum Transactions setting puts a limiton the number of SIMTLog transactions read from the SIMTLog queue during a processing cycle. If the SIMTLog queue depth is less than the maximum transactions setting, the SIMTLog Batch Generator reads the number of transactions equal to the SIMTLog queue depth. If Maximum Transactions is set to -1, there is no limit to the number of SIMTLog transactions.
Adding Data Elements to the SIMTLog Batch File
If data elements need to be added to the TransactionDetail section in the SIMTLog format:
Define the format of the new data in the SIMTLogFormat.xml file:
<RECORD_FORMAT name="TransactionDetail">
<FIELD_FORMAT name="NewDetail" type="char" length="512"/>
Define how the columns in any of the transaction line item level tables, such as OR_LTM, TR_LTM_SLS_RTN_ORD, or TR_LTM_SLS_RTN, will map to the format defined in Step 1. Make the changes in the SIMTLogMappingConfig.xml file:
<TABLE table="TR_LTM_SLS_RTN">
<MAP column="NewDetail " record="TransactionDetail" field=" NewDetail" fieldMapper="oracle.retail.stores.exportfile.simtlog.fieldmappers. NewDetailMapper"/>
Write a FieldMapper class named, for example, NewDetailMapper.java to perform the mapping. Note that this may not be needed if the data is to be sent unchanged from what is fetched from the database.
Transaction Codes in the SIMTLog Format
TransactionCode - The type of sale represented by this line item. Valid values are SALE, RETURN, VOID_SALE, VOID_RETURN, ORDER_NEW, ORDER_FULFILL, ORDER_CANCEL, and ORDER_CANCEL_FULFILL.
Reservation Type - Reservation type if a Point-of-Service transaction is a customer order. Valid values are SPECIAL_ORDER, WEB_ORDER, PICKUP_AND DELIVERY, and LAYAWAY.
The COMMEXT framework is the generic API used by Point-of-Service to communicate with external systems. For integrations that rely on SOAP-based communication such as Commerce Anywhere, Siebel, Central Office, Returns Management, and Store Inventory Management, several common components are leveraged. Many of these components have been designed specifically for use with the Java API for XML web services (JAX-WS).
oracle.retail.stores.commext.connector.webservice.JAXWSWebServiceConnector is the COMMEXT connector for synchronous web service communication with a web service provider using SOAP messages. This COMMEXT connector uses an Adapter Pattern to delegate behavior to a Spring-configured bean. All of the SOAP web service consumers in the release configuration use the generic JAXWSConnector bean.
oracle.retail.stores.common.jaxws.connector.JAXWSConnector is a generic connector bean for synchronous web service communication with a web service provider using SOAP messages. This bean can be configured to provide the implementation to the JAXWSWebServiceConnector for communicating with a specific endpoint. Configured beans of this type are defined in ServiceContext.xml. The JAXWSConnector bean also uses the Adapter Pattern to delegate to a JAX-WS client. The configuration of a JAXWSConnector in ServiceContext.xml includes the following:
How to locate a copy of the WSDL. For more information, see "Configuration Option to Resolve the WSDL Location".
Service name and namespace.
Name of the JAX-WS Service class.
Name of the service class method used to obtain the port. The port is the local object that acts as a proxy for the remote service.
Any JAX-WS handlers to be executed during handling of outbound and inbound messages.
oracle.retail.stores.common.jaxws.JAXWSWebServiceRequest contains all of the request information needed by JAXWSWebServiceConnector to send an outbound message and handle the response. An instance of this class is typically populated in a COMMEXT formatter configured to the JAXWSWebServiceConnector.
oracle.retail.stores.common.jaxws.JAXWSWebServiceResponse is the object returned by the JAXWSWebServiceConnector containing the response data so it can be formatted by the COMMEXT formatter configured to the JAXWSWebServiceConnector.
oracle.retail.stores.common.jaxws.handler.JAXWSHandlerIfc is an interface for a JAX-WS handler. Handlers provide a hook to perform an action before an outbound SOAP message is sent, and before an inbound SOAP response is converted into a Java object. Handlers can be used for many purposes including logging message data, adding security details to outbound messages, and manipulating payload content.
oracle.retail.stores.common.jaxws.handler.BaseHandler is an abstract class that can serve as a parent class for a custom JAX-WS handler. Handler beans are configured in ServiceContext.xml and referenced by the configuration of a JAXWSWebServiceConnector bean.
Initialization of the JAXWSConnector includes obtaining a copy of the WSDL. The JAXWSConnector can be configured to obtain the WSDL directly from the endpoint or it can be obtained locally from a jar on the classpath. Both methods are used in the ServiceContext.xml shipped with Point-of-Service. Advantages to using a local WSDL copy include faster startup times and the ability to initialize the connector when the endpoint is offline:
To obtain the WSDL directly from the endpoint, a URL for the WSDL must be defined for the wsdlLocation property in the bean's XML configuration. The bean's XML configuration must not define an endpointURL property.
To obtain the WSDL from a local copy, the URL for the endpoint must be provided in an endpointURL property in the bean's XML configuration. The bean's XML configuration must define a wsdlLocation using the Spring classpath notation enabling the file to be loaded from a jar on the classpath.
For an example of how to reconfigure a Commerce Anywhere JAXWSConnector to load the WSDL from a local copy, see Appendix B.