| Oracle® Retail Returns Management User Guide Release 14.1 E54473-01 |
|


 Previous |
 Next |
Before performing the steps in this chapter, work through Chapter 9 to determine your return policies.
The following three sections describe data that should be configured prior to configuring return policies:
The remaining section describes how to configure these and other elements for the return policies:
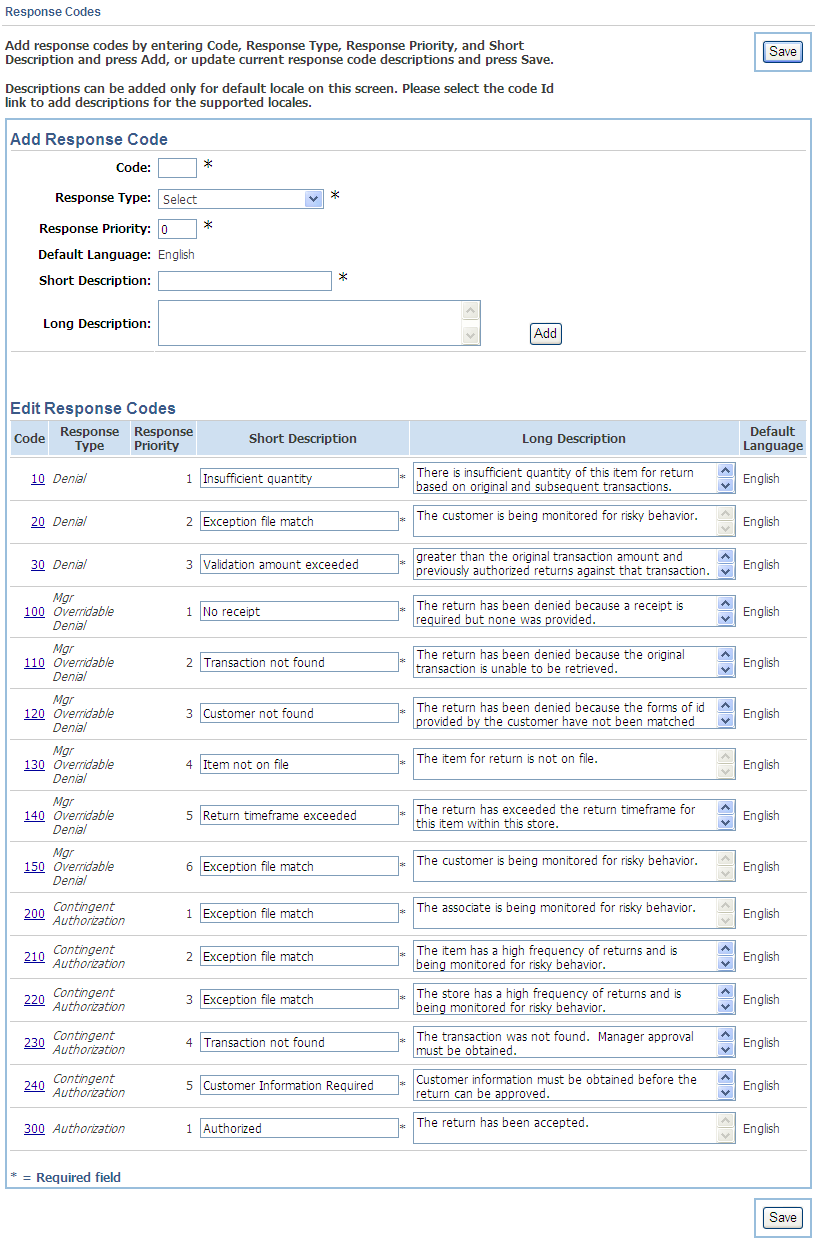
Response codes are the configurable responses that the rules engine carries forward when it proceeds with a Continue or Continue At rule action and records when it hits a Stop Processing action or the end of the policy. Responses consist of a required numeric code, response type, response priority within that type, short description, and optional long description that can be used for scripting customer service responses to customer inquiries.
Select the response type for each response code from the following list:
Denial.
Manager Overrideable Denial—The engine has denied the item but the denial can be overridden at the point-of-sale or point-of-return by a properly authorized user.
Contingent Authorization—The engine has approved the item contingent upon capture of an override at the point-of-sale or point-of-return by a properly authorized user.
Authorization.
Response codes are prioritized within response types. No two response codes of the same response type can have the same priority. The analytic engine evaluates policy rules. After evaluating the first rule, it selects the first response code based on the answer to the rule. It moves on to the second rule. If that results in a higher response type or the same response type with a higher priority, it selects that response code. This continues until the evaluation process is complete.
The Response Codes screen is used to add a response code:
Click the Response Codes left navigation link under the Configuration subtab. The Response Codes screen is displayed.
Enter a code.
Select a response type.
Enter a response priority.
Enter a short description.
Enter a long description if you want to include one.
Click Add.
|
Note: Some response codes cannot be edited. Response codes cannot be edited if they are flagged as non-editable in the database. |
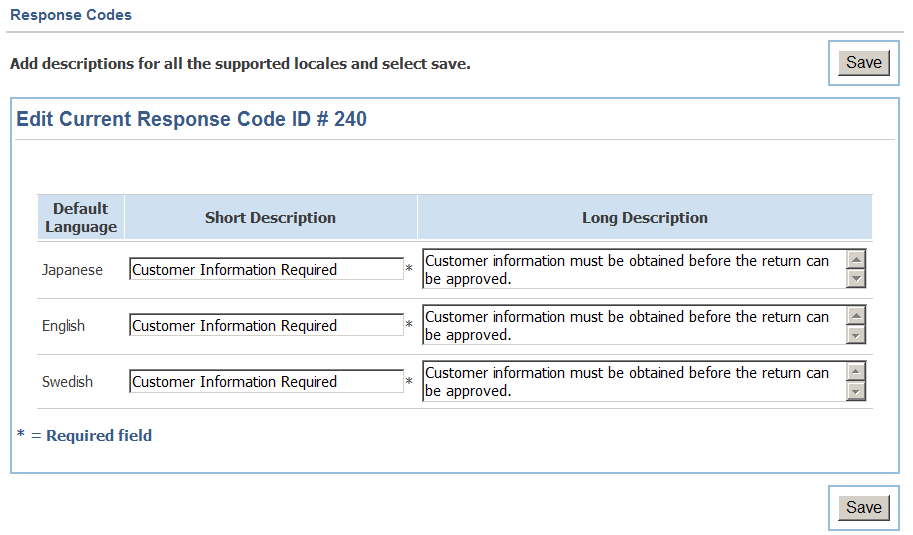
Only the short description and long description for a response codes can be edited. The descriptions can be edited in each supported language.
To edit a response code:
Click the Response Codes left navigation link under the Configuration subtab. The Response Codes screen is displayed.
In the Edit Response Codes section, edit the short description, long description, or both.
For the default language, the changes can be made on this screen.
To edit any of the supported languages:
Click the link in the Code column for the response code you want to edit. The Edit Current Response Code screen is displayed. The response code is shown in all the supported languages.
Edit the descriptions for any of the supported languages.
When you have made all your changes, click Save. The Response Codes screen is displayed
Click Save.
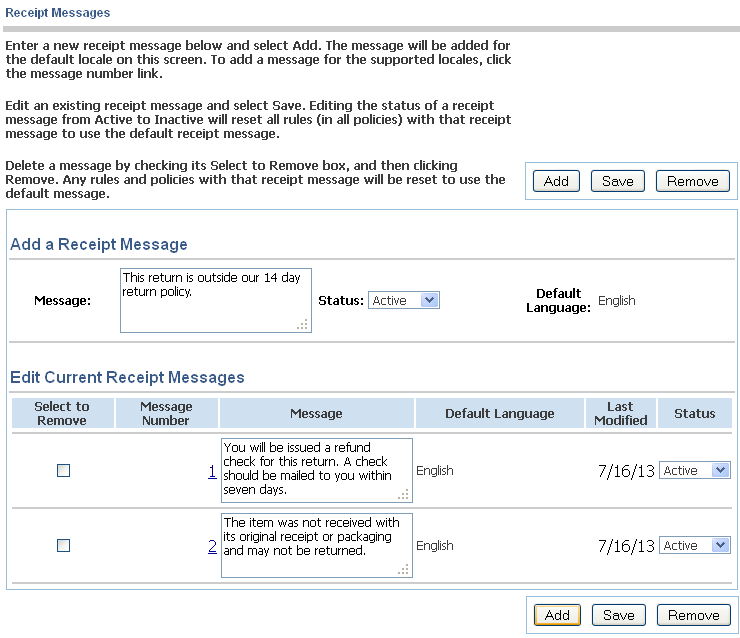
Each rule response can be tied to a specific configurable receipt message. The point-of-return can handle a receipt message in several ways:
Print the message on a receipt
Show the message on-screen to cashiers or customers
Show the message on customer points of interaction associated with registers such as PINPad devices or customer-facing kiosks
Show the message on-screen if the return is being processed through an e-commerce site
A message can contain useful information to shape the customer's return behavior, such as informing the customer why a return was denied or why the return required a manager override or warning the customer that he or she is approaching a limit on return behavior.
|
Note: A message number is automatically assigned when a receipt message is created. If a receipt message is removed, the message number is not reused. |
The Receipt Messages screen is used to add a receipt message:
Click the Receipt Messages left navigation link under the Configuration subtab. The Receipt Messages screen is displayed.
Enter a message.
Select a status.
Click Add. The receipt message is added.
Only the message text and status on receipt messages can be edited. The receipt message can be edited in any of the supported languages. Message number 0 cannot be edited or removed. If you remove a message, all policy rule responses that used the message you delete are reset to use message number 0 (no message).
To edit a receipt message:
Click the Receipt Messages left navigation link under the Configuration subtab. The Receipt Messages screen is displayed.
Edit the message of the receipt.
Select a status.
In the Edit Current Receipt Messages section, edit the message and select a status.
For the default language, the changes can be made on this screen.
To edit any of the supported languages:
Click the link in the Message Number column for the receipt message you want to edit. The Edit Current Receipt Messages screen is displayed. The receipt message is shown in all the supported languages.
Edit the message and select a status for any of the supported languages.
When you have made all your changes, click Save. The Receipt Message screen is displayed.
Click Save.
To remove a receipt message:
Click the Receipt Messages left navigation link under the Configuration subtab. The Receipt Messages screen is displayed.
Check the box in the Select to Remove column for the message you wish to remove.
Click Remove. The Confirm Receipt Messages Removal screen is displayed.
If you want to remove the selected messages, click Yes. The messages are removed.
If you do not want to remove all the messages, click No. The messages are not removed.
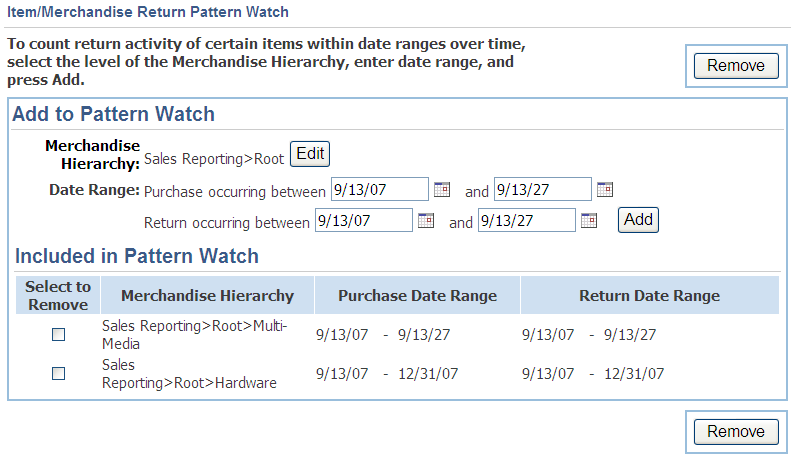
The Return Pattern Watch file enables you to define patterns of purchase and return dates for items so that you can look for instances where customers are consistently returning items after short-term use. For more information on this file, see "Return Pattern Watch" in Chapter 2.
The Item/Merchandise Return Pattern Watch screen is used to add a pattern to the Return Pattern Watch file:
Click the Item/Merchandise left navigation link under the Configuration subtab. The Item/Merchandise Return Pattern Watch screen is displayed.
For each pattern included in the pattern watch, the following information is displayed:
A checked box in the Select to Remove column indicates the pattern is to be removed.
Selected level in the merchandise hierarchy.
Beginning and ending dates to watch for purchases.
Beginning and ending dates to watch for returns.
To select entries representing the desired levels of the merchandise hierarchy, click Edit. The Merchandise Hierarchy screen is displayed. See "Selecting the Merchandise Hierarchy".
Enter purchase dates or click the calendar button to select dates from the calendar.
Enter return dates or click the calendar button to select dates from the calendar.
Click Add.
The Merchandise Hierarchy screen is used to select the merchandise hierarchy level for an item.
To select the hierarchy level:
Select the appropriate levels of the merchandise hierarchy. To see the next level of the hierarchy, click Expand.
Click Done. The Item/Merchandise Return Pattern Watch screen is displayed.
To remove a pattern from the Return Pattern Watch file:
Click the Item/Merchandise left navigation link under the Configuration subtab. The Item/Merchandise Return Pattern Watch screen is displayed.
Check the box in the Select to Remove column for the entry you wish to remove.
Click Remove. The Confirm Return Pattern Watch Removal screen is displayed.
If you want to remove the selected patterns, click Yes. The patterns are removed.
If you do not want to remove all the patterns, click No. The patterns are not removed.
The Return Policies screen is used to edit, add, copy, and remove policies.
For a description of return policies, see Chapter 9.
For information on editing a policy, see "Editing a Return Policy".
For information on adding a policy, see "Adding a Policy".
For information on copying a policy, see "Copying an Existing Policy".
For information on removing a policy, see "Removing an Existing Policy".
A list of default return policies and a list of exception policies is shown. For each policy, the following information is displayed:
For default return policies, a checked box in the Select to Copy column indicates the policy is selected to be copied.
For exception policies, a checked box in the Select to Copy or Remove column indicates the policy is selected to be copied or removed.
Policy name.
Locations covered by the policy.
Items covered by the policy.
For exception policies, the effective date for the policy.
When the policy was last modified.
Status of the policy.
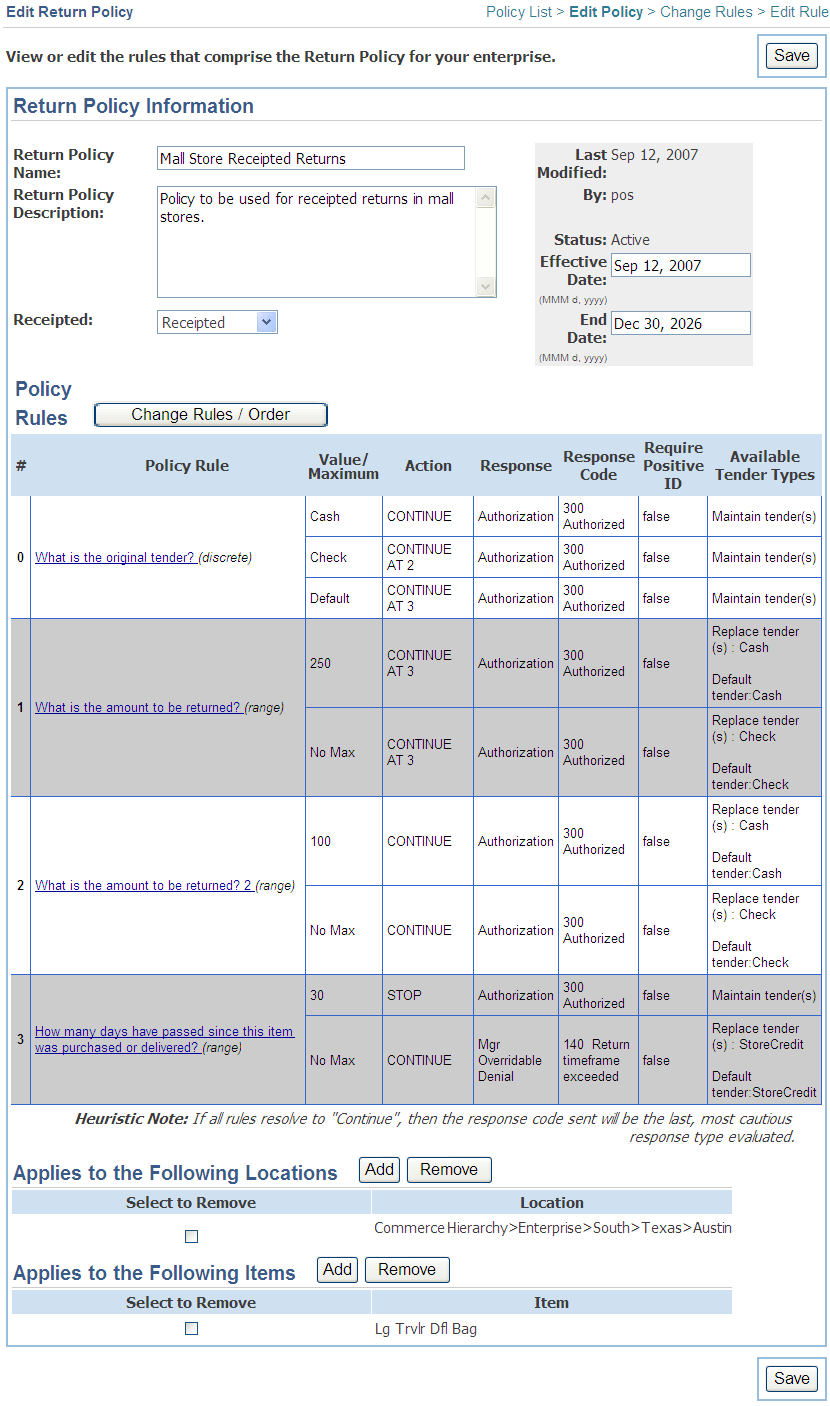
The Edit Return Policy screen is used to change the information that defines a policy.
|
Note: Only the name, description, and policy rules can be changed for the default return policies. |
To edit the policy:
Enter the return policy name.
Enter the return policy description.
Choose whether the policy is receipted or nonreceipted.
Enter or select an effective date (optional) and end date.
To change the policy rules, see "Changing the Rules in a Policy".
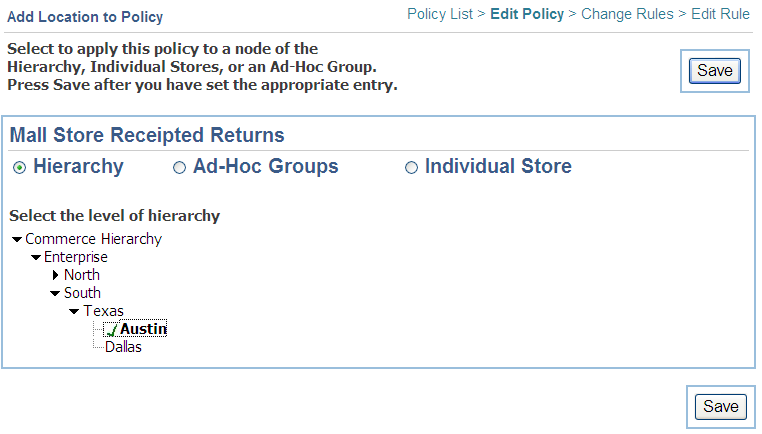
Select the stores to which this policy applies in the Applies to the Following Locations section.
|
Note: At least one store is required. |
To add stores to the list, click Add. The Add Location to Policy screen is displayed.
To remove a store from the list, check the box in the Select to Remove column and click Remove.
Select the items to which this policy applies in the Applies to the Following Items section.
|
Note: At least one item is required. |
To add items to the list, click Add. The Add Item to Policy screen is displayed.
To remove an item from the list, check the box in the Select to Remove column and click Remove.
Click Save. The new policy is created.
The Add Location to a Policy screen is used to add a hierarchy node, individual store, or adhoc group of stores to a policy.
You can add stores by selecting a part of the store hierarchy, selecting store groups from the list of defined groups, or adding individual stores by entering the store numbers.
When you have selected the stores, click Save.
For information on store groups, see "Working with Store Groups" in Chapter 6.
The Add Item to Policy screen is used to add individual items or a level of the merchandise hierarchy to a policy.
You can add items by selecting a part of the merchandise hierarchy or adding individual items by entering the item numbers.
When you have selected the items, click Save.
|
Note: Changes to original default or exception policies do not propagate to policies that were created through copying. |
To copy an existing policy:
Click the Policy Definition left navigation link under the Configuration subtab. The Return Policies screen is displayed.
Check the box in the Select column for the policy that you wish to copy.
Click Copy. The Edit Return Policy screen is displayed. See "Editing a Return Policy".
|
Note: Only exception policies can be removed. Default policies cannot be removed. |
To remove an existing exception policy:
Click the Policy Definition left navigation link under the Configuration subtab. The Return Policies screen is displayed.
Check the box in the Select to Copy or Remove column for the exception policy that you wish to remove.
Click Remove. The Confirm Policy Removal screen is displayed.
If you want to remove the selected policies, click Yes. The policies are removed.
If you do not want to remove all the policies, click No. The policies are not removed.
|
Note: Only exception policies can be added. Default policies cannot be added. |
To add a new exception policy:
Click the Policy Definition left navigation link under the Configuration subtab. The Return Policies screen is displayed.
Click Add. The Edit Return Policy screen is displayed.
Enter a return policy name.
Enter a return policy description.
Choose whether the policy is receipted or nonreceipted.
Enter or select an effective date (optional) and an end date.
Select the stores to which this policy applies in the Applies to the Following Locations section.
|
Note: At least one store is required. |
To add stores to the list, click Add. The Add Location to Policy screen is displayed. You can add stores by selecting a part of the store hierarchy, selecting store groups from the list of defined groups, or adding individual stores by entering the store numbers. When you have selected the stores, click Save.
To remove a store from the list, check the box in the Select to Remove column and click Remove.
Select the items to which this policy applies in the Applies to the Following Items section.
|
Note: At least one item is required. |
To add items to the list, click Add. The Add Item to Policy screen is displayed. You can add items by selecting a part of the merchandise hierarchy or adding individual items by entering the item numbers. When you have selected the items, click Save.
To remove an item from the list, check the box in the Select to Remove column and click Remove.
Click Save. The new policy is added.
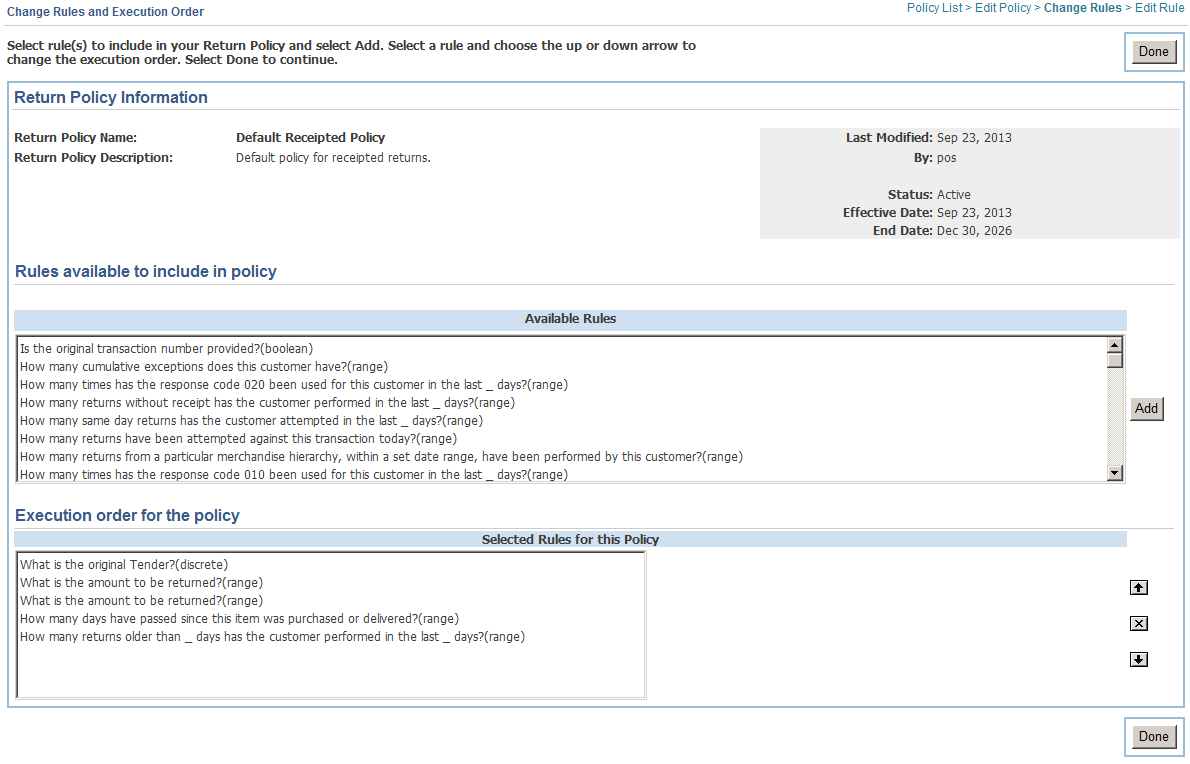
The Change Rules and Execution Order screen is used to change the rules in a policy:
Click the Policy Definition left navigation link under the Configuration subtab. The Return Policies screen is displayed.
Click the policy name. The Edit Return Policy screen is displayed with the current values for the policy shown.
Click Change Rules / Order. The Change Rules and Execution Order screen is displayed.
Make any changes to the included rules and execution order:
To add a new rule to the policy, choose a rule from the Available Rules. Click Add. The rule is added to the Scheduled Rules for this Policy.
To remove an existing rule from the Scheduled Rules for this Policy, choose the rule to be removed and click the X button. You can also choose more than one rule to remove at the same time.
To change the order of the rules in the Scheduled Rules for this Policy, choose the rule to be moved and click the Up or Down arrow.
When you have made all your changes, click Done.
Click Save.
On the Edit Return Policy screen, you can select a policy rule that you want to change. For information on editing a return policy rule, see the following sections:
To edit a boolean rule, see "Configuring a Boolean Rule".
To edit a discrete rule, see "Configuring a Discrete Rule".
To edit a range rule, see "Configuring a Range Rule".
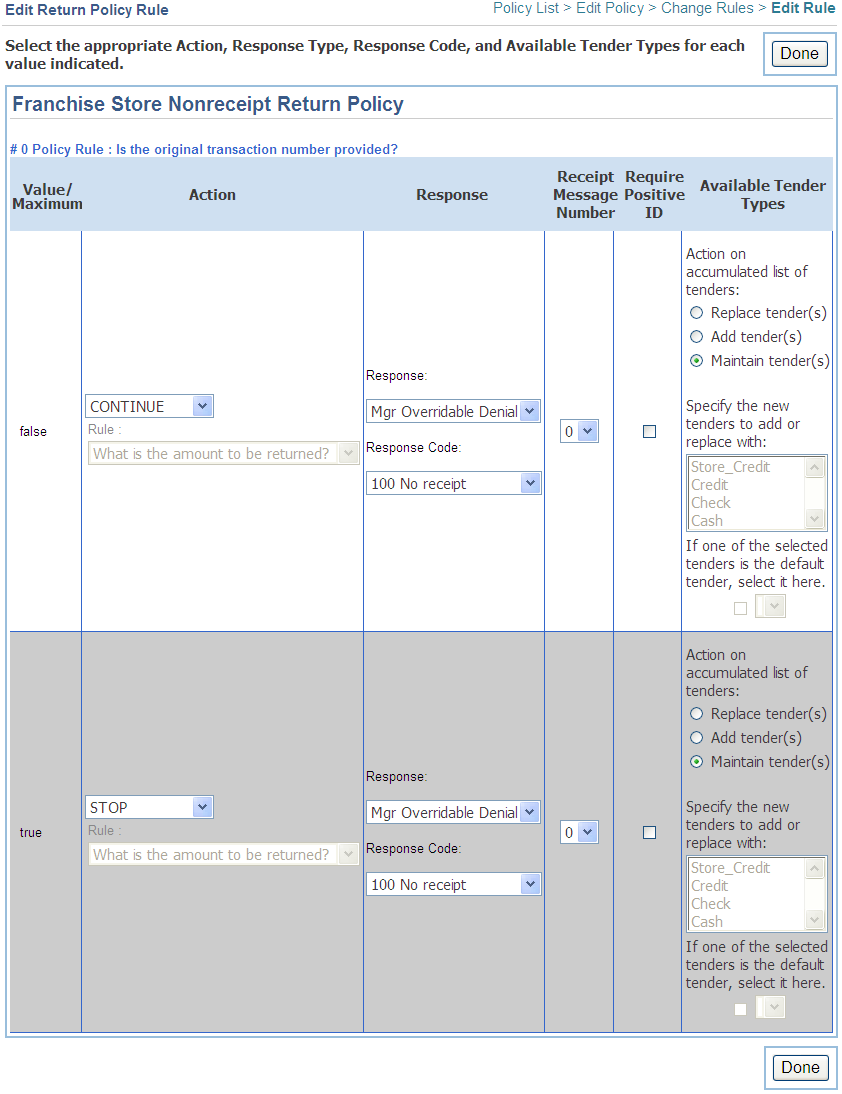
To configure a boolean rule:
Click the Policy Definition left navigation link under the Configuration subtab. The Return Policies screen is displayed.
Click the policy name. The Edit Return Policy screen is displayed.
To configure a boolean rule, click the rule in the Policy Rule column that is a boolean type. The Edit Return Policy Rule screen is displayed.
For each of the true and false responses:
Select the appropriate action: Continue, Continue At, or Stop Processing.
If you select to Continue At a particular rule, select the name of the rule.
Select a response.
Select a response code.
Select a receipt message number.
Check whether this rule requires the collection of positive ID information from the customer.
Select whether to replace tenders with the particular tenders, to add tenders with the particular tenders, or to maintain the list of tenders accumulated thus far.
Check and select a default tender, if necessary.
Click Done.
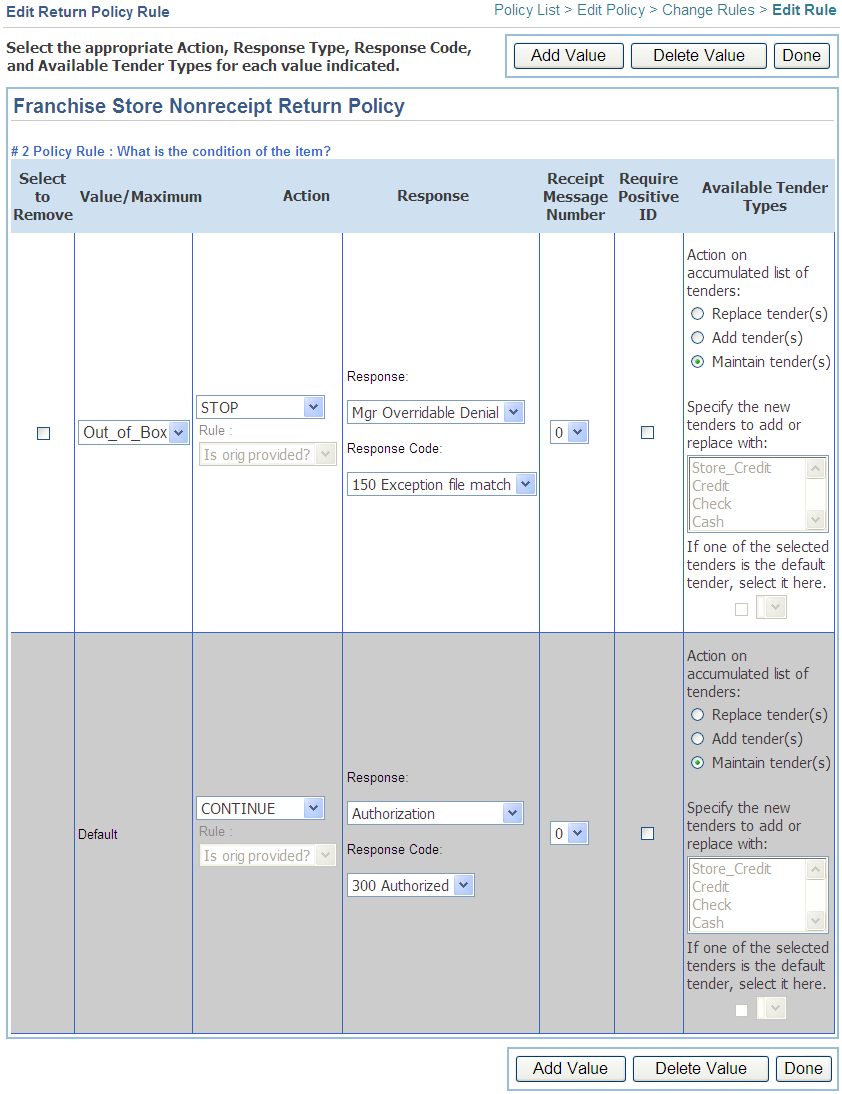
To configure a discrete rule:
Click the Policy Definition left navigation link under the Configuration subtab. The Return Policies screen is displayed.
Click the policy name. The Edit Return Policy screen is displayed.
To configure a discrete rule, click the rule in the Policy Rule column that is a discrete type. the Edit Return Policy Rule screen is displayed.
Add or delete responses for the rule:
|
Note: The Default response is required. It cannot be deleted. |
To add another possible response for the rule, choose Add Value.
To delete a possible response for the rule, choose Remove Value.
For each of the possible responses to the rule:
Select the appropriate action: Continue, Continue At, or Stop Processing.
If you select to Continue At a particular rule, select the name of the rule.
Select a response.
Select a response code.
Select a receipt message number.
Check whether this rule requires the collection of positive ID information from the customer.
Select whether to replace tenders with the particular tenders, to add tenders with the particular tenders, or to maintain the list of tenders accumulated thus far.
Check and select a default tender, if necessary.
Click Done.
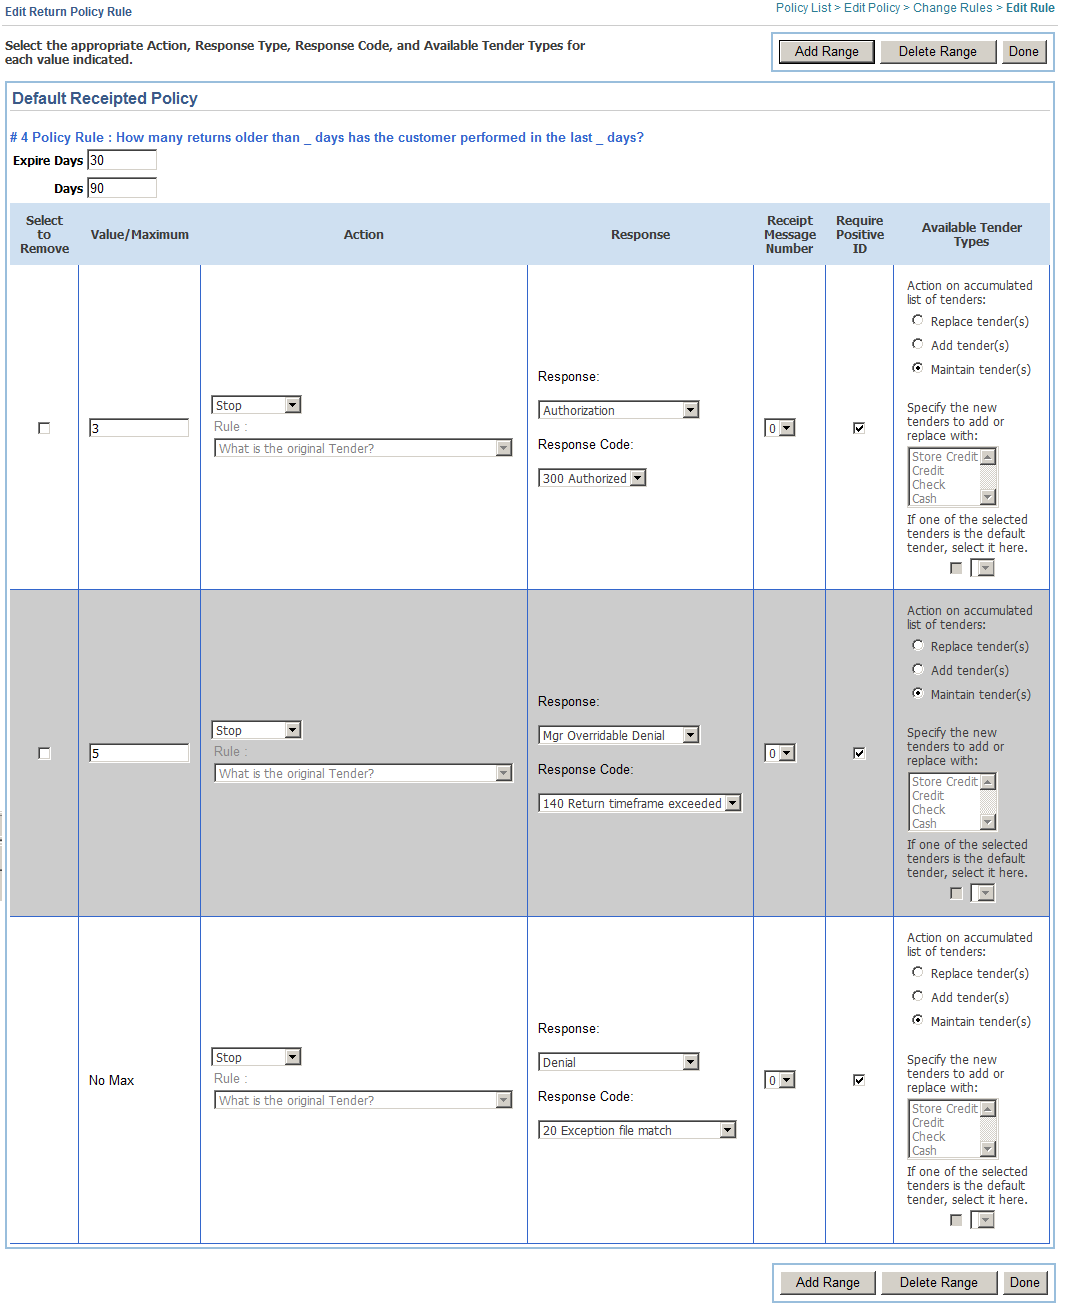
To configure a range rule:
Click the Policy Definition left navigation link under the Configuration subtab. The Return Policies screen is displayed.
Click the policy name. The Edit Return Policy screen is displayed.
To configure a range rule, click the rule in the Policy Rule column that is a range type. The Edit Return Policy Rule screen is displayed.
If the rule includes variables, such as M or X, enter the values for the variables. In the above figure, the 90 in the Days field is the value for M in the "last M days" in the rule.
If a rule has more than one variable, multiple fields are shown for entering the variables. The fields are shown in the same order as the variables appear in the rule.
Add or delete range values for the rule:
|
Note: The No Max response is required. It cannot be deleted. |
To add another possible value for the rule, choose Add Range.
To delete a possible value for the rule, choose Delete Range.
For each of the possible responses to the rule:
Select the appropriate action: Continue, Continue At, or Stop Processing.
If you select to Continue At a particular rule, select the name of the rule.
Select a response.
Select a response code.
Select a receipt message number.
Check whether this rule requires the collection of positive ID information from the customer.
Select whether to replace tenders with the particular tenders, to add tenders with the particular tenders, or to maintain the list of tenders accumulated thus far.
Check and select a default tender, if necessary.
Click Done.