| Oracle® BPEL Process Manager Order Booking Tutorial 10g (10.1.3.1.0) Part Number B28987-01 |
|
|
View PDF |
| Oracle® BPEL Process Manager Order Booking Tutorial 10g (10.1.3.1.0) Part Number B28987-01 |
|
|
View PDF |
This chapter of the tutorial describes how to use a database adapter to commit data to database tables in a one-to-many (1:M) master-detail relationship.
This chapter contains the following topics:
This phase of the tutorial adds to the process you designed in Chapter 9, "Using the File Adapter's Write Functionality". Ensure that you have successfully completed that phase before performing this one. In this phase of the tutorial, you use a database adapter to commit data to database tables in a one-to-many (1:M) master-detail relationship. You perform the following key tasks:
Create a new BPEL process named FulfillOrder.
Configure database connections and create sample database tables.
Create a partner link that uses the database adapter (named DBInsert) to commit data to database tables in a 1:M relationship.
Design the BPEL process to invoke DBInsert.
Design the BPEL process to add transformation logic to transform data required by the database adapter.
Return to the OrderBooking BPEL process and create a partner link (named FulfillOrder) that interacts with the FulfillOrder BPEL process.
Design the BPEL process to invoke FulfillOrder.
Add fault handling and exception management.
Deploy the OrderBooking BPEL process.
Run OrderBooking from Oracle BPEL Control to receive and send data to the database.
This section contains these tasks:
Creating the Order Fulfillment Process and Importing the Schema
Creating a Transform Activity and the Database Record Transformation
Validating, Compiling, and Deploying the FulFillOrder Process
From Oracle JDeveloper, follow these instructions to create the Order Fulfillment process and import the schema.
Caution:
Do not include any special characters in the project name (such as periods) or in any activity or element names. If you do include special characters, errors appear when you attempt to compile your project.Right-click OrderBookapplication and select New Project.
Under Categories, expand General and click Projects.
Under Items, click BPEL Process Project and click OK.
In the BPEL Project Creation Wizard - Project Settings window, enter the following details and click Next.
| Field | Value |
|---|---|
| Name | FulfillOrder |
| Namespace | Accept the default path. |
| Use Default Project Settings | Leave this checked to use the same name for the BPEL process and the BPEL project, and to use the default project directory. |
| Template | Asynchronous BPEL Process |
The bpel.xml, FulfillOrder.bpel, and FulfillOrder.wsdl files are created.
Click the flashlight icon to the right of the Input Schema Element field.
In the Select Schema window, select OrderBookingPO.xsd from the SOA_Oracle_Home\bpel\samples\tutorials\127.OrderBookingTutorial\PracticeFiles directory and click Open.
The Type Chooser window appears.
Expand and select Imported Schemas > OrderBookingPO.xsd > Purchase Order.
Click OK.
The OrderBookingRequestMessage message type is automatically assigned an input message part name of payload and message part element of PurchaseOrder.
Click the flashlight icon to the right of the Output Schema Element field.
The Type Chooser window appears.
Expand and select Imported Schemas > OrderBookingPO.xsd > Purchase Order.
Click OK.
The OrderBookingResponseMessage message type is automatically assigned an output message part name of payload and message part element of PurchaseOrder.
Click Finish.
The GlobalCompany schema is now imported into your project. This schema defines the structure of the purchase order to submit.
The following files appear in the Application Navigator section of Oracle JDeveloper:
The bpel.xml, FulfillOrder.bpel, and FulfillOrder.wsdl files appear under FulfillOrder > Integration Content.
The OrderBookingPO.xsd file appears under FulfillOrder > Integration Content > Schemas.
Double-click OrderBooking.bpel to display the Structure section in the lower left of the window.
Note:
The Diagram tab must be enabled to see the Structure section.Select Save from the File main menu.
Summary:
You now configure Oracle JDeveloper and Oracle BPEL Server to connect to the database instance installed with Oracle BPEL Process Manager.You must create a database connection and database sample tables to use this portion of the tutorial.
This section contains these tasks:
Select Connection Navigator from the View main menu.
Right-click Database in the Connections - Navigator window and select New Database Connection.
This starts the Create Database Connection Wizard.
Click Next on the Welcome window.
Enter myConnection in the Connection Name field of the Type window.
Select Third Party JDBC Driver from the Connection Type list, and click Next.
Enter system in the Username field of the Authentication window.
Enter manager in the Password field.
Leave the remaining fields as they are, and click Next.
Click New to the right of the Driver Class field on the Connection window.
The Register JDBC Driver window appears.
Enter oracle.lite.poljdbc.POLJDBCDriver in the Driver Class field. Ensure that there are no blank spaces at the end of this entry.
Click Browse to the right of the Library field.
The Select Library window appears.
Click New.
The Create Library window appears.
Click Add Entry.
The Select Path Entry window appears.
Navigate to SOA_Oracle_Home/bpel/lib/olite40.jar.
Click Select.
Click OK to close the Select Library and Register JBDC Driver windows.
Enter jdbc:polite4@localhost:1531:orabpel in the URL field of the Connection window.
Click Next.
Click Test Connection on the Test window.
If the connection was successful, the following message appears:
Success!
Click Finish.
Ensure that Oracle BPEL Server is running.
Select Start > All Programs > Oracle - Oracle_Home > Oracle BPEL Process Manager > Developer Prompt to open up an operating system command prompt.
Change directories to the tutorials\127.OrderBookingTutorial directory:
cd tutorials\127.OrderBookingTutorial
polsql.cmd @PracticeFiles\insertTable.sql
Messages appear indicating table creation and sample row insertion into the default Oracle Lite instance.
Select Connection Navigator from the View main menu.
Expand Database.
Right-click myConnection and select SQL Worksheet.
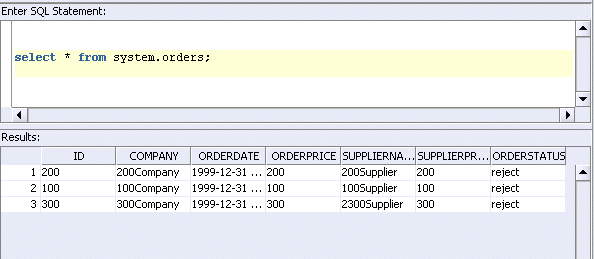
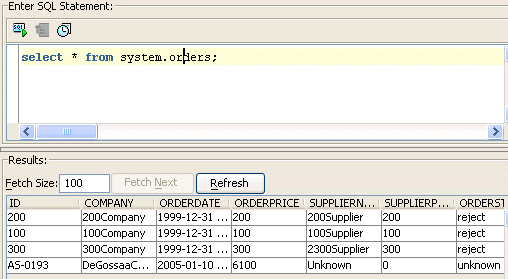
Enter SELECT * FROM system.orders; in the Enter SQL Statement field.
Right-click the statement and select Execute SQL Statement.
The sample table created with data appears in the Results field.
Summary:
You now create a partner link that uses the database adapter to commit data into database tables in a one-to-many (1:M) relationship.Select Application Navigator from the View main menu.
Double-click FulFillOrder.bpel.
Drag and drop a PartnerLink activity onto the right side of the designer window.
Enter DBInsert in the Name field.
Click the third icon at the top (the Define Adapter Service icon). This starts the Adapter Configuration Wizard.

Click Next on the Welcome window.
Select Database Adapter on the Adapter Type window and click Next.
Enter writeDB in the Service Name field on the Service Name window and click Next.
Select the myConnection database connection setting you created in "Creating a Database Connection and Samples Tables" from the list.
Ensure that eis/DB/BPELSamples displays in the Database Server JNDI Name field. The name is case sensitive. Ensure that it correctly matches the case of the connection name.
Click Next.
Select Perform an Operation on a Table.
Unselect Delete.
Click Next.
Click Import Tables.
Click Query.
Select ORDERS and ORDERITEMS.
Click > to move both tables to the Selected field.
Click OK. You are returned to the Select Table window of the wizard.
Select SYSTEM.ORDERS and click Next.
The relationship definitions are automatically created and displayed as 1:M.
Select ORDERITEMS (orders) has a 1:1 Relationship with ORDERS and click Remove Relationship. This ensures that only ORDERS(orderitemsCollection) has a 1:M relationship with ORDERITEMS appears.
Click Next.
Leave all attributes as default for the attributes to return from the query on the page.
Click Next twice.
Click Finish.
The Partner Links window is automatically completed. The window looks as follows:
| Field | Value |
|---|---|
| Name | DBInsert |
| WSDL File | file:/c:/oraJDev/jdev/mywork/OrderBookapplication/FulFillOrder/writeDB.wsdl
Note: This directory path with a drive letter represents an example on Windows operating systems. If running this tutorial on Unix operating systems, your directory path varies. In addition, oraJDev represents the Oracle JDeveloper home directory for this example. |
| Partner Link Type | writeDB_plt |
| Partner Role | writeDB_role |
| My Role | Leave unspecified. |
Click OK.
Select Save from the File main menu.
Note that writeDB.wsdl now appears under FulFillOrder > Integration Content > writeDB. This file contains the parameters you specified with the Adapter Configuration Wizard.
Drag and drop an Invoke activity below the receiveInput Receive activity.
Double-click the Invoke activity to display the Invoke window.
Enter the following details:
| Field | Value |
|---|---|
| Name | writeDBrecord |
| Partner Link | DBInsert |
The Operation (merge) field is automatically filled in.
Click the first icon to the right of the Input Variable field. This is the automatic variable creation icon.
Click OK on the Create Variable window that appears.
A variable named writeDBrecord_merge_InputVariable is automatically created in the Input Variable field. This variable is automatically assigned a message type of OrdersCollection_msg.
Click OK.
Select Save from the File main menu.
Summary:
You now define your transformation logic.Drag and drop a Transform activity below the receiveInput Receive activity.
Double-click the Transform activity to display the Transform window.
Click the General tab.
Enter transformDBRecord in the Name field.
Click the Transformation tab.
Select inputVariable in the Source Variable field and payload in the Source Part field.
Select writeDBrecord_merge_InputVariable in the Target Variable field and OrdersCollection in the Target Part field.
Click the second icon (the Create Mapping icon) to the right of the Mapper File field.

A transformation window for graphically mapping source and target elements appears. This window enables you to drag (map) a source element to a target element. If you instead receive a message saying the file already exists, click the third icon to access the transformation window.
Right-click the source and target schemas (the top-most elements in both lists) and select Expand All.
Drag and drop the following source elements to the following target elements:
| Source | Target |
|---|---|
| po:ID | id |
| po:SupplierName | suppliername |
| po:SupplierPrice | supplierprice |
| po:OrderDate | orderdate |
| po:OrderPrice | orderprice |
| po:OrderStatus | orderstatus |
Select String Functions from the Component Palette section.
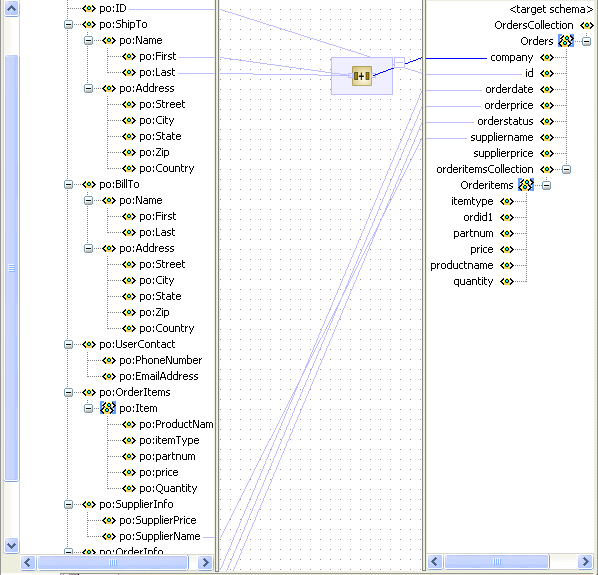
Drag and drop a concat function into the middle of the transformation window.
Go to the po:ShipTo source section.
Go to the po:Name subelement of this section.
Drag the po:First and po:Last source subelements into the concat function. This connects two source lines to the concat function.
Go to the Orders target section.
Drag the company target subelement into the concat function. This connects the target line to the concat function and concatenates the first and last names from the source elements into a single name in the target element.
Right-click the target Orderitems and select Add XSL Node > for-each.
The for-each node appears between orderitemsCollection and OrderItems in the target schema.
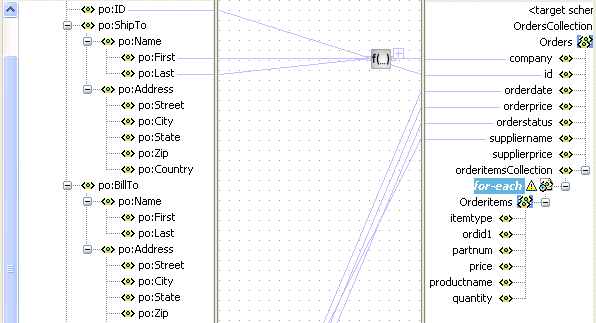
Drag and drop the source po:OrderItems:Item onto the for-each node. This creates a 1:M relationship.
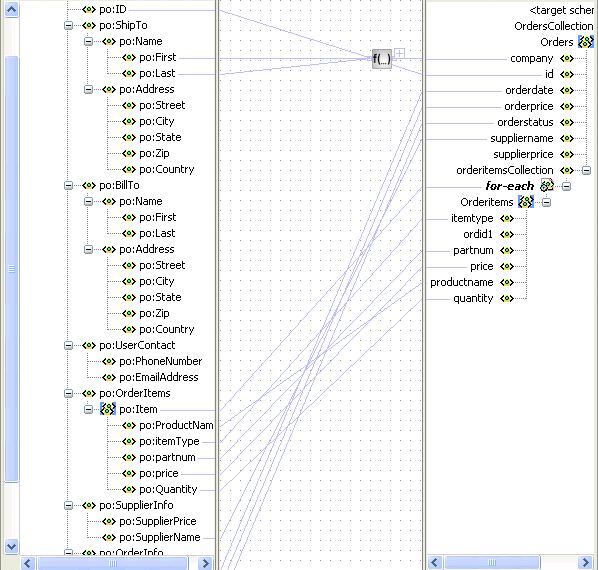
Drag and drop the source po:OrderItems:Item onto the target Orderitems.
Click OK when prompted to confirm your mapping. This creates an automatic mapping of all matching subelements.
Select Save from the File main menu.
Right-click in the transformation mapping window and select Test.
This displays the Test XSL Map window.
Ensure that Generate Source XML Data is selected.
This creates sample XML test data.
Accept all other default settings, and click OK.
Sample test results appear. The source XML and target XML display data side-by-side, with the XSL map data underneath. This is the default layout of test results.
Verify the results.
Select Save from the File main menu.
Click Yes if prompted to save your transformation details.
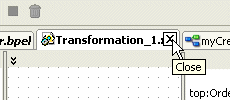
Close the Transformation_1-Source.xml, Transformation_1-Target.xml, and Transformation_1.xsl files by clicking the x button for each in the Title tab.
A translation file named Transformation_1.xsl appears under POAcknowledge > Integration Content in the Application Navigator section.
Go to the Application Navigator section.
Right-click FulfillOrder.
Select Deploy > my_integration_server_connection > Deploy to default domain.
This compiles the BPEL process. Check for errors by clicking the buttons at the bottom of the window. If there are no errors, deployment was successful. If deployment was unsuccessful, see Step 4.
Log into Oracle BPEL Control by selecting Start > All Programs > Oracle - Oracle_Home > Oracle BPEL Process Manager > BPEL Control (or refresh the page if it is already open).
Enter the following details to log into Oracle BPEL Control and click Login:
| Field | Value |
|---|---|
| Username | oc4jadmin |
| Password | password |
Where password is the value you entered during installation.
The Dashboard tab of Oracle BPEL Control appears. Note that your BPEL process, FulfillOrder, now appears in the Deployed BPEL Processes list. Refresh if necessary.
Click FulfillOrder.
Enter information in one of the following ways:
Enter details in all the fields of the HTML Form and click Post XML Message.
Click the XML Source radio button. Use a text editor to copy and paste the contents of OrderBookingPO_1.xml into the field that appears. Click Post XML Message.
Refresh Oracle BPEL Control.
Click the Instances tab at the top.
Click the FulfillOrder instance.
Click the Audit link to view the transformation logic and the output written into the database tables.
Click the More link for each sequence to view the activity details. (Similar instance management can also be obtained in a graphical fashion under the Flow link.)
Return to Oracle JDeveloper.
Select Connection Navigator from the View main menu.
Expand Database.
Right-click myConnection and select SQL Worksheet. Note that right clicking on the connection name fails if the case of the connection name is incorrect.
Right-click the SQL statement you entered in Step 4 and select Execute SQL Statement (for example, SELECT * FROM system.orders;) or manually enter SELECT * FROM orderitems WHERE ordid = 'your_order_number'.
This verifies that the database table is properly inserted.
In this phase of the tutorial, you extend the main OrderBooking process to call the newly created FulFillOrder process as a web service for inserting database tables (through the defined WSDL file).
This section contains these tasks:
Summary:
You now create a partner link for the FulfillOrder service.Go to the OrderBooking process in the Application Navigator section.
Double-click OrderBooking.bpel.
Select Services from the Component Palette section.
Drag and drop a PartnerLink activity from the Component Palette section onto the right side of the designer window.
Enter the following values to create a partner link for the Order Booking process:
Note:
For the WSDL File field below, click the flashlight (the second icon from the left named Service Explorer) to access the Service Explorer window for automatically selecting the FulFillOrder process as a service.| Field | Value |
|---|---|
| Name | FulfillOrder |
| WSDL File | Access this URL by clicking the Service Explorer flashlight icon and expanding and selecting BPEL Services > my_ integration_server_connection > processes > default > FulfillOrder
http://localhost:8888/orabpel/default/FulfillOrder/FulfillOrder?wsdl See Also: "Setting the Hostname in Your Oracle JDeveloper Web Browser Preferences" if you receive a parsing error when attempting to add a WSDL file in the Service Explorer window. |
| Partner Link Type | FulfillOrder |
| Partner Role | FulfillOrderProvider |
| My Role | FulfillOrderRequester |
Click OK.
Select Save from the File main menu.
Summary:
You now create a Scope activity to group all activities that form a logical step to be executed.Select Process Activities from the Component Palette section.
Drag and drop a Scope activity from the Component Palette section to below the SelectSupplier Switch activity.
Double-click the scope icon to display the Scope window.
Enter OrderFulFillment in the Name field of the General tab.
Click OK.
In this phase of the tutorial, you create the Invoke, Receive, and Assign activities inside this Scope activity.
Click the + sign to expand the Scope activity.
Select Save from the File main menu.
Summary:
You now create Invoke and Receive activities.Drag and drop an Invoke activity from the Component Palette section into the OrderFulFillment Scope activity.
Double-click the Invoke icon to display the Invoke window.
Enter the following details:
| Field | Value |
|---|---|
| Name | invokeFulfillOrder |
| Partner Link | FulfillOrder |
The Operation (initiate) field is automatically filled in.
Click the first icon to the right of the Input Variable field. This is the automatic variable creation icon.
Click OK on the Create Variable window that appears.
A variable named invokeFulfillOrder_initiate_InputVariable is automatically created in the Input Variable field. This variable is automatically assigned a message type of FulfillOrderRequestMessage.
Click OK.
Drag and drop a Receive activity from the Component Palette section to below the invokeFulfillOrder Invoke activity inside the OrderFulFillment Scope activity.
Double-click the Receive icon to display the Receive window.
Enter the following details:
| Field | Value |
|---|---|
| Name | receiveFulfillOrder |
| Partner Link | FulfillOrder |
The Operation (onResult) field is automatically filled in.
Click the first icon to the right of the Variable field. This is the automatic variable creation icon.
Click OK on the Create Variable window that appears.
A variable named receiveFulfillOrder_onResult_InputVariable is automatically created in the Output Variable field. This variable is automatically assigned a message type of FulfillOrderResponseMessage.
Click OK.
Select Save from the File main menu.
Drag and drop an Assign activity from the Component Palette section to above the invokeFulfillOrder Invoke activity inside the OrderFulFillment Scope activity.
Double-click the assign icon to display the Assign window.
Click the General tab.
Enter assignDBIn in the Name field.
Click Apply.
Click the Copy Operation tab.
Click Create and select Copy Operation to display the Create Copy Operation window.
| Field | Value |
|---|---|
| From | |
|
Variable |
|
Expand and select Variables > inputVariable > payload |
| To | |
|
Variable |
|
Expand and select Variables > invokeFulFillOrder_initiate_InputVariable > payload |
Click OK to close the Create Copy Operation window and the Assign window.
Select Save from the File main menu.
Drag and drop an Assign activity from the Component Palette section to below the receiveFulfillOrder Receive activity inside the OrderFulFillment Scope activity.
Double-click the assign icon to display the Assign window.
Click the General tab.
Enter assignDBWriteComments in the Name field.
Click Apply.
Click the Copy Operation tab.
Click Create and select Copy Operation to display the Create Copy Operation window.
Note:
Instead of manually entering an expression, you can press Ctrl and then the space bar in the Expression field. Scroll through the list of values that appears and double-click the value you want. Edit the value as necessary. As you enter information, a trailing slash can appear. This means you are being prompted for additional information. Either enter additional information, or press the Esc key and delete the trailing slash to complete the input of information.| Field | Value |
|---|---|
| From | |
|
Expression |
|
concat(bpws:getVariableData('inputVariable','payload','/ns1:PurchaseOrder/ns1:OrderInfo/ns1:OrderComments'), ' - Order FulFillment Complete') |
| To | |
|
Variable |
|
Expand and select > Variables > inputVariable > payload > ns1:PurchaseOrder > ns1:OrderInfo > ns1:OrderComments |
Click OK to close the Create Copy Operation window and the Assign window.
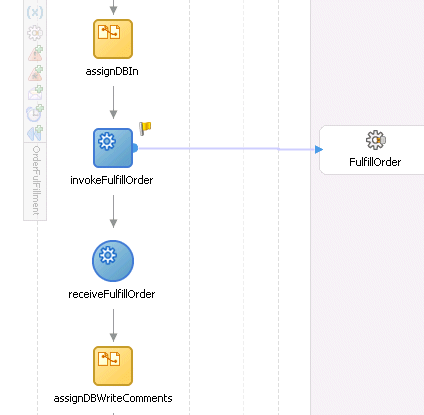
When complete, the designer window looks as follows:
Click the - sign to close the OrderFulfillment Scope activity.
Select Save from the File main menu.
Summary:
You perform database exception handling tasks in the FulFillOrder process by creating a local variable and placing the writeDBRecord Invoke activity in a Scope activity. The local variable is set to false (represented by 0). You attempt to call the external partner service in a While loop activity until the local variable is satisfied (set to 1). The While activity is set to loop a maximum of five times. In the case of an exception, you reset the flag to false (0).Ensure that you are in the FulFillOrder process. If not, double-click FulFillOrder.bpel in the Application Navigator section of the designer window.
Drag and drop a Scope activity from the Component Palette section to below the transformDBRecord Transform activity.
Double-click the Scope icon to display the Scope window.
Enter db_write_scope in the Name field of the General tab.
Click OK.
Click the + sign to expand the Scope activity.
Drag and drop the writeDBrecord Invoke activity into the db_write_scope Scope activity.
Click Add Catch All Branch in the icons on the left side of db_write_scope.
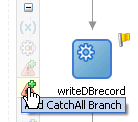
Click the + sign to expand the new branch.
A new box displays to the right with an asterisk and the words Drop Activity Here.
Select Variables > Process > Variables in the Structure section.
Right-click Variables and select Create Variable.
Select Simple Type and click the flashlight icon to the right of the Simple Type field.
Select int.
Click OK to close the Type Chooser window and the Create Variable window.
Drag and drop an Assign activity from the Component Palette section to above the db_write_scope Scope activity.
Double-click the Assign icon to display the Assign window.
Click the General tab.
Enter assign_db_0 in the Name field.
Click Apply.
Click the Copy Operation tab.
Click Create and select Copy Operation to display the Create Copy Operation window.
| Field | Value |
|---|---|
| From | |
|
Expression |
|
'0' |
| To | |
|
Variable |
|
Expand and select Variables > dbStatus |
Click OK to close the Create Copy Operation window and the Assign window.
Drag and drop another Assign activity from the Component Palette section to below the writeDBrecord Invoke activity inside the db_write_scope Scope activity.
Double-click the Assign icon to display the Assign window.
Click the General tab.
Enter assign_db_1 in the Name field.
Click Apply.
Click the Copy Operation tab.
Click Create and select Copy Operation to display the Create Copy Operation window.
| Field | Value |
|---|---|
| From | |
|
Expression |
|
'10' |
| To | |
|
Variable |
|
Expand and select Variables > dbStatus |
Click OK to close the Create Copy Operation window and the Assign window.
Drag and drop a third Assign activity from the Component Palette section into the Catch All branch on the right side of the db_write_scope Scope activity.
Double-click the Assign icon to display the Assign window.
Enter assign_db_error in the Name field of the General tab.
Click Apply.
Click the Copy Operation tab.
Click Create and select Copy Operation to display the Create Copy Operation window.
| Field | Value |
|---|---|
| From | |
|
Expression |
|
bpws:getVariableData('dbStatus') + 1 |
| To | |
|
Variable |
|
Expand and select Variables > dbStatus |
Click OK to close the Create Copy Operation window and the Assign window.
Drag and drop a Wait activity from the Component Palette section into the Catch branch below the assign_db_error Assign activity.
Double-click the Wait activity to display the Wait window.
Enter waitDB in the Name field.
Set the value to 30 seconds in the HH:mm:ss field. This means this block is retried every 30 seconds until the FulFillOrder process is successful (that is, dbStatus is 1).
Click OK.
Drag and drop a While activity from the Component Palette section to immediately above the db_write_scope Scope activity.
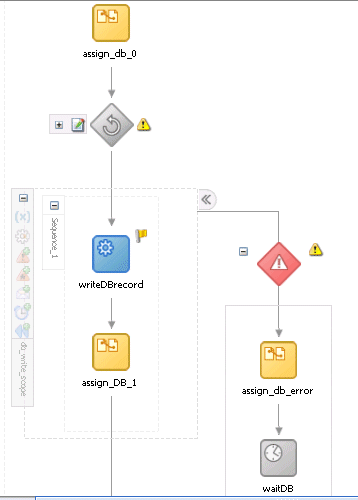
The designer window looks as follows:
Click the - sign to close the db_write_scope Scope activity.
Expand the While activity.
Drag the db_write_scope Scope activity inside the While activity.
Double-click the While activity and press Ctrl and then the space bar to enter the following in the Expression field:
bpws:getVariableData('dbStatus') < 5
Click OK.
Select Save from the File main menu.
Go to the Application Navigator section.
Right-click OrderBooking.
Select Deploy > my_integration_server_connection > Deploy to default domain.
Increment the version number of the project when prompted (for example, enter 1.6) and click OK.
This compiles the BPEL process. Check for errors by clicking the buttons at the bottom of the window. If there are no errors, deployment was successful. If deployment was unsuccessful, see Step 4.
Log into Oracle BPEL Control by selecting Start > All Programs > Oracle - Oracle_Home > Oracle BPEL Process Manager > BPEL Control (or refresh the page if it is already open).
Enter the following details to log into Oracle BPEL Control and click Login:
| Field | Value |
|---|---|
| Username | oc4jadmin |
| Password | password |
The Dashboard tab of Oracle BPEL Control appears. Note that your BPEL process, OrderBooking, now appears in the Deployed BPEL Processes list.
Click the BPEL Processes tab.
Note which OrderBooking version has an asterisk next to the version number. This is the default version.
Click the latest version number of the OrderBooking process. If you have been incrementing the version numbers as described in previous chapters, this is the highest number.
The Managing this BPEL Process window appears.
Scroll down and click Mark as Default to make this the default version of OrderBooking.
Click Done when prompted and note that this OrderBooking version now has an asterisk next to the version number, indicating that it is the default version.
Click the Dashboard tab.
Start the correct OrderBooking version instance in one of the following ways:
Click OrderBooking in the Deployed BPEL Processes list.
Enter details in all fields of the HTML Form and click Post XML Message.
or
Click the XML Source radio button. Use a text editor to copy and paste the contents of the OrderBookingPO_1.xml file into the field that appears. Click Post XML Message.
Optionally copy the OrderBookingPO_1.xml file to the temp directory to invoke the process instance (this assumes you have completed Chapter 8, "Using the File Adapter's Read Functionality").
Complete the manual price quote task for SelectManufacturing by using the graphical user interface JSP page, as described in Step 11.
Return to Oracle BPEL Control.
Refresh Oracle BPEL Control.
Click the Instances tab at the top.
Click the OrderBooking instance.
Click the Audit link to view the transformation logic and the output file written in the temporary directory you specified (drive_letter:\temp on Windows operating systems or /temp on Unix operation systems).
Click the More link for each sequence to view the activity details. (Similar instance management can also be obtained in a graphical fashion under the Flow link.)
Check the contents of the temp directory. An output file named po_timestamp.xml should be created. Verify the attributes (for example the concatenation of the first and last names, and so on).
Select Connection Navigator from the View main menu in Oracle JDeveloper.
Expand Database.
Right-click myConnection and select SQL Worksheet.
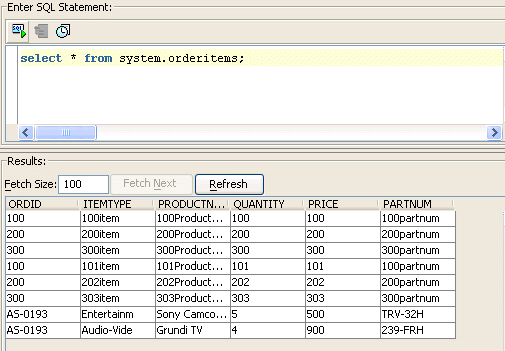
Enter the statement SELECT * FROM system.orderitems; and right-click and select Execute SQL Statement to see your orders persisted in the database.
You have now used the database adapter to commit data to database tables in a 1:M master-detail relationship. You performed the following key tasks:
Created a new BPEL process named FulfillOrder.
Configured database connections and created sample database tables.
Created a partner link that used the database adapter (named DBInsert) to commit data to database tables in a 1:M relationship.
Designed the BPEL process to invoke DBInsert.
Designed the BPEL process to add transformation logic to transform data required by the database adapter.
Returned to the OrderBooking BPEL process and created a partner link (named FulfillOrder) that interacts with the FulfillOrder BPEL process.
Designed the BPEL process to invoke FulfillOrder.
Added fault handling and exception management.
Deployed the OrderBooking BPEL process.
Ran OrderBooking from Oracle BPEL Control to receive and send data to the database