| Oracle® Retail POS Suite Implementation Guide, Volume 2 – Extension Solutions Release 14.1 E54476-02 |
|


 Previous |
 Next |
| Oracle® Retail POS Suite Implementation Guide, Volume 2 – Extension Solutions Release 14.1 E54476-02 |
|
Previous |
Next |
The Tour framework is a component of the Oracle Retail Platform layer of the Point-of-Service architecture. The Tour framework implements a state engine that controls the workflow of the application. Tour scripts are a part of this framework; they define the states and transitions that provide instructions for the state engine that controls the workflow. Java classes are also part of this framework; they implement the behavior that is accessed by the tour engine, based on instructions in the tour scripts.
The tour metaphor helps the user visualize how the Oracle Retail Platform engine interacts with application code. In the following description of the metaphor, the words in italics are part of a simple tour script language that Oracle Retail Platform uses to represent the application elements.
For a moment, imagine that you are a traveler about to embark on a journey. You have the itinerary of a business traveler (changeable at any time), your luggage, and transportation. In addition, you have a video camera (TourCam) to record your tour so you can remember it later.
You leave on your journey with a specific goal to achieve. Your itinerary shows a list of tours that you can choose from to help you accomplish your task. Each tour provides a tour bus with a cargo compartment and a driver. Each driver has a map that shows the various service regions that you can visit. These regions are made up of sites (like cities) and transfer stations (bus stations, airports, and so forth). The maps show a finite number of lanes, which are either roads joining one site to another or aisles within one site. To notify the driver to start the bus and drive, you must send a letter to the driver. The driver reads the name on the letter and looks for a lane that matches the letter.
When a matching letter is found, the driver looks for a traffic signal on the road. If there is no signal, the driver can traverse the road. If there is a signal, the driver can traverse the road only if the signal is green. If the signal is red, the driver attempts to traverse the next alternative road that matches the letter. If the driver cannot find any passable road, he or she returns to the garage. When you arrive at a site or traverse a lane, you may perform an action to achieve your goal, like take a picture of the countryside.
Upon arriving at a transfer station, you immediately transfer to another service, and you load a portion of your cargo onto a shuttle and board the shuttle. The shuttle takes you and your cargo to the bus that runs in the map of the other tour. Upon arrival at the new bus, you unload the shuttle and load the new bus. Then the new driver starts the bus and your journey begins in the new tour. When the transfer tour itinerary is complete, you load whatever cargo you want to keep onto a shuttle and return to the original tour bus. At that time, you unload the shuttle and continue your tour.
These tour script components map to terms in the metaphor. The tour metaphor provides labels and descriptions of these components that improve understanding of the system as a whole.
Table 12-1 includes a metaphor description and a technical description for the basic metaphor components.
Table 12-1 Metaphor Components
| Name | Metaphor Description | Technical Description |
|---|---|---|
|
Service |
A group of related cities, for example ”A Mediterranean Tour” |
An implementation of workflow and behavior for a set of functionality |
|
Bus |
The vehicle that provides transportation from city to city |
The entity that follows the workflow between the sites |
|
Cargo |
The baggage that the traveler takes with him/her from city to city |
The data that follows the workflow, modified as necessary |
|
Site |
A city |
A function point in the workflow |
|
Road |
A path the bus takes to get from one city to another |
A transition that takes place based on an event that changes the state |
|
Aisle |
A path the traveler takes while staying on the same bus in the same city |
An action that takes place based on an event, without leaving the current state |
|
Letter |
A message the bus driver receives instructing him/her to perform an action |
A message that causes a road or aisle to be taken |
When given a use case, create a tour script by identifying components for the tour metaphor. Strategies for identifying components are listed in the table below. The following sections describe each component in more detail.
Table 12-2 includes strategies for identifying components.
Table 12-2 Component Identification Strategies
| Component | How to Identify |
|---|---|
|
Service |
A service generally corresponds to a set of related functionality. |
|
Site |
Sites generally correspond to points in the workflow that need input from outside the tour. Outside input sources include the user interface, the database, and devices among others. |
|
Road |
At a site, look at the ways control can be moved to another site. There is one road for each of these cases. |
|
Aisle |
At a site, there might be a task that you want to handle in a separate module and then return to the site when the task is complete. There is one aisle for each of these cases. |
|
Letter |
Letters generally correspond to buttons on a UI screen and responses from the database and devices. Look for the events that move control from one site to another or prompt additional behavior within a site to help identify letters. |
Follow the naming conventions in the Development Standards when deciding the names for the components. It is important to understand that the tour metaphor is not only used to describe the interaction of the components, but the component's names are used in the code. By convention, a site named GetTender has a Java class in the package named GetTenderSite.java that performs the work done at the site.
Tours provide a way of grouping related functionality to minimize maintenance and increase reusability. All tours provide a bus to maintain state and cargo for data storage. All sites, lanes, and stations contained within a tour have access to these resources. Furthermore, in the Point-of-Service source code, the tours are found in the <source_directory>\applications\pos\src\oracle\retail\stores\pos\services directory. Generally, this chapter uses the word tour to refer to a tour. The word service and phrase service region are used in this section because they are elements in the XML code.
The service region contains all functionality related to running the application when no exceptions are encountered. The following code sample from <source_directory>\applications\pos\src\oracle\retail\stores\pos\services\tender\tender.xml shows the definition of a service and service region in a tour script.
Example 12-1 tender.xml: Definition of Service and Service Region
<SERVICE name="Tender" package="oracle.retail.stores.pos.services.tender" tourcam="ON">
        <SERVICECODE>
   ...definition of letters, siteaction classes, and laneaction classes    ...
        </SERVICECODE>
        <MAP>
                <REGION region="SERVICE" startsite="GetTender">
   ...definition of sites, stations, and lanes     ...
                </REGION>
        </MAP>
</SERVICE>
As shown in the code sample, there are two main sections of a tour script. The SERVICECODE element defines the Java classes in the tour and the letters that may be sent in the tour code or by the user. The MAP element links the classes and letters to the sites and lanes. In the following sections, code samples are shown from both sections of the tour script.
The bus object is passed as a parameter to all tour methods called by the tour engine. Methods can be called on the bus to get access to the cargo, managers and other state information.
Cargo is data that exists for the length of the tour in which it is used. Any data that needs to be used at different tour components such as sites and aisles needs to be stored on the cargo. Cargo always has a Java class. The following code sample from tender.xml defines the Tender cargo.
With the concept of a tourmap, a cargo class can be overridden with another class. This allows you to override the class name for a customer implementation yet still keep the same workflow for the customer as in the product. The following tourmap definition specifies the class to override and the new class to use in place of the original class.
Note that replacewith is a fully qualified classname, with both package and classname specified, unlike the class attribute.
Sites correspond to nodes in a finite state machine and cities in the tour metaphor. Sites are usually used as stopping places within the workflow. Arrival at a site usually triggers access to an external interface, such as a graphical user interface, a database, or a device. Sites always have a corresponding siteaction class.
The tender.xml code sample below contains the site information from the two main parts of a tour script: the XML elements SERVICECODE and MAP, respectively.
Example 12-5 tender.xml: Mapping of Site to SiteAction
<SITE  name="GetTender" siteaction="GetTenderSite">
... definition of lanes ...
</SITE>
With the concept of Tourmap, a site's siteaction can be overridden with another class. This allows you to override the class name for a customer implementation yet still keep the same workflow for the customer as in the product. The following tourmap definition specifies the class to override and the new class to use in place of the original class. Note that replacewith is a fully qualified classname, with both package and classname specified, unlike the class attribute.
System sites are defined by the Oracle Retail Platform engine but can be referenced within a tour script. For example, a road defined by a tour script can have a system site as its destination. Each system site must have a unique name in the tour script file. The following code from tender.xml shows the definition of two system sites. The Final system site stops a bus and returns it to the parent bus, and LastIndexed resumes the normal bus operation after an exception.
Letters are messages that get sent from the application code or the user interface to the tour engine. Letters indicate that some event has occurred. Typically, letters are sent by the external interfaces, such as the graphical user interface, database, or device to indicate completion of a task.
Lanes are defined as roads and aisles. When the system receives a letter, it checks all lanes defined within the current site or station to see if the letter matches the letter for a lane. If no matching lane is found, the letter is ignored. Letters do not have a Java class associated with them.
Standard letter names are used in the application, such as Success, Failure, Undo, and Cancel. The following code sample shows tender.xml code that defines letters. The definition is added to the SERVICECODE XML element.
Roads provide a way for the bus to move between sites and stations. Each road has a name, destination, and letter that activates the road. A road may have a laneaction class, depending on whether the road has behavior; only roads that have behavior require a class. Roads are defined within site definitions because they handle letters received at the site.
Following is tender.xml code that shows the definition of a road. The definition is added to the SERVICECODE XML element. After the first code sample is another sample that maps the road to a site and letter, which is contained in the MAP section of the tour script.
Example 12-9 tender.xml: Definition of Road Class
<LANEACTION  class="ValidCreditInfoEnteredRoad"/>
tender.xml: Mapping of Road to Site
<SITE  name="GetCreditInfo" siteaction="GetCreditInfoSite">
  <ROAD
    name="ValidCreditInfoEntered"
    letter="Valid"
    laneaction="ValidCreditInfoEnteredRoad"
    destination="GetTender"
    tape="ADVANCE"
    record="OFF"
    index="OFF">
  </ROAD>
...other lanes defined...
</SITE>
With the concept of Tourmap, a road's laneaction can be overridden with another class. This allows you to override the class name for a customer implementation yet still keep the same workflow for the customer as in the product. The following tourmap definition specifies the class to override and the new class to use in place of the original class. Note that replacewith is a fully qualified classname, with both package and classname specified, unlike the class attribute.
The COMMON element is defined in the REGION element of the tour script. The COMMON element can contain roads that are available to all sites and stations in a tour. Common roads have the same attributes as roads defined within a site, but they are defined outside of a site so they can be accessed by all sites. If a common road and a tour road are both activated by the same letter, the site road is taken. The following is an example that differentiates common roads from tour roads.
Example 12-11 Example of Common Road
<MAP>
     <REGION region="SERVICE" startsite="Example">
          <COMMON>
               <ROAD name="QuitSelected" letter="exit"
                    destination="NamedIndex"
                    tape="REWIND"/>
                    <COMMENT>
                    </COMMENT>
               </ROAD>
          </COMMON>
          <SITE name="RequestExample" siteaction="RequestExampleSite">
               <ROAD name="ExampleSelected" letter="next"
                     laneaction="ExampleSelectedRoad"
                     destination="ShowExample"
                     tape="ADVANCE"
                     record="OFF"
                     index="ON"/>
                    <COMMENT>
                    </COMMENT>
               </ROAD>
     </REGION>
</MAP>
Aisles provide a means for moving within a site and executing code. Aisles are used when a change is required but there is no reason to leave the current site or station. Each aisle contains a name, a letter, and a laneaction. Aisles always require a Java class because they must have behavior since they do not lead to a different site or station like roads.
Following is the tender.xml code that shows the definition of an aisle. The definition is added to the SERVICECODE XML element. The second code sample from the same tour script maps an aisle to the site and letter, which is contained in the MAP section.
Example 12-13 tender.xml: Mapping of Aisle to Site
<SITE  name="GetCreditInfo" siteaction="GetCreditInfoSite">
  <AISLE
    name="CardInfoEntered"
    letter="Next"
    laneaction="CardInfoEnteredAisle">
  </AISLE>
...other lanes defined...
</SITE>
With the concept of Tourmap, an aisle's laneaction can be overridden with another class. This allows you to override the class name for a customer implementation yet still keep the same workflow for the customer as in the product. The following tourmap definition specifies the class to override and the new class to use in place of the original class. Note that replacewith is a fully qualified classname, with both package and classname specified, unlike the class attribute.
Transfer stations are used to transfer workflow to another tour and return once the tour workflow has completed. A transfer station describes a location where another tour is started and the passenger exits one bus and enters the bus for another tour.
Transfer stations specify the name of the nested tour and define data transport mechanisms called shuttles. Shuttles are used to transfer cargo to and from the nested tour. These shuttles are either launch shuttles or return shuttles. Launch shuttles transfer cargo to the nested tour and the return shuttles transfer newly acquired cargo from the nested tour to the calling tour. Shuttles have Java classes associated with them, but stations do not.
The following code samples from <source_directory>\applications\pos\src\oracle\retail\stores\pos\services\tender\tender.xml contain the station and shuttle information from the SERVICECODE and MAP elements in the tour script, respectively.
Example 12-15 tender.xml: Definition of Shuttle Class
<SHUTTLE class="TenderAuthorizationLaunchShuttle"/>
Example 12-16 tender.xml: Mapping of Station to Service and Shuttle Classes
  <STATION
    name="AuthorizationStation"
    servicename="classpath://com/extendyourstore/pos/services/tender/authorization/Authorization.xml"
    targettier="APPLICATIONTIER"
    launchshuttle="TenderAuthorizationLaunchShuttle"
    returnshuttle="TenderAuthorizationReturnShuttle">
    ...lane definitions to handle exit letter from nested service...
</STATION>
The servicename can be defined as a logical name like ”authorizationService” and mapped to a filename is the tourmap file. The shuttle names can also be overridden in the tourmap file. This allows you to override the class name for a customer implementation yet still keep the same workflow for the customer as in the product. The code samples below illustrate this.
Example 12-17 tourmap.xml: Example of Mapping Servicename
<tour name=”authorizationService”>
<file>classpath://com/extendyourstore/pos/services/tender/authorization/Authorization.xml</file>
</tour>
Example 12-18 tourmap.xml: Example of Overriding Shuttle Name
<SHUTTLE class="TenderAuthorizationLaunchShuttle"
replacewith="oracle.retail.stores.shuttles.NewShuttle"/>
Nested tours operate independently, with their own XML script and Java classes. Stations and shuttles simply provide the functionality to transfer control and data between two independent tours.
Signals direct the tour to the correct lane when two or more lanes from the same site or station are activated by the same letter. The lane that has a signal that evaluates to true is the one that is traversed. Each signal has an associated Java class. Signal classes evaluate the contents of the cargo and do not modify data.
The following code sample lists the tender.xml code that relates to the definition of two roads with Light signals defined. The definition is added to the SERVICECODE XML element, whereas the road description is added to the MAP XML element. The negate tag negates the Boolean value returned by the specified signal class.
Example 12-20 tender.xml: Signal Processing With Negate Tag
<STATION>
  name=”AuthorizationStation”
  <ROAD
    name="AuthorizationRequested"
    letter="Next"
    destination="AuthorizationStation"
    tape="ADVANCE"
    record="OFF"
    index="OFF">
    <LIGHT  signal="IsAuthRequiredSignal"/>
  </ROAD>
  <ROAD
    name="BalancePaid"
    letter="Next"
    destination="CompleteTender"
    tape="ADVANCE"
    record="OFF"
    index="OFF">
    <LIGHT  signal="IsAuthRequiredSignal" negate="Y"/>
  </ROAD>
  ...additional lane definitions...
</STATION>
Continuing the tour metaphor, the bus could break down at any time. If the bus driver detects that the bus has broken down, the bus driver takes the bus to the nearest Garage system site. Once the bus is in the garage, the mechanic assumes control of and diagnoses the breakdown.
If the mechanic is able to restore the cargo to a valid state, the mechanic informs the bus driver by traversing to the Resume system site. The bus driver subsequently resumes driving by resetting the bus at the site where the breakdown occurred.
If the mechanic is not successful in repairing the bus, the mechanic stops the bus, and mails the parent tour a letter informing it of the breakdown.
If there is no mechanic within the tour, the bus driver stops the bus, and mails the parent tour a letter informing it of the breakdown. The bus completes its tour when it arrives at the final site.
The exception region includes the functionality for handling exceptions. It can contain sites, roads, and stations just like the service region. There are two ways to exit the exception region: at the Return system site or the Resume system site. Return shuts down the application, and Resume starts the application at the last visited site or station in the service region.
The mechanic operates within the exception region of the tour. Any exception that occurs within the tour region where the bus driver operates is converted to an Exception letter and is passed to the mechanic. When the exception is being processed, the mechanic assumes control of the bus and processes all incoming letters. If the application developer has created an exception region for the mechanic, the Exception letter is processed using application-specific actions and traffic lights. However, if the exception region does not exist, the mechanic stops the bus and informs the parent bus of the problem.
Depending on the application definition, recovery from exceptions can result in a rollback, resumption, or a restart of the bus.
All the code samples in this chapter have been from tour scripts. Tour scripts exist in the form of one XML file per tour. The tour script refers to Java classes that implement specific behavior, such as the siteaction and laneaction attributes. A tour has the following Java classes, one for:
The cargo
Each site
Each aisle
Each road that implements behavior
Each shuttle
Each signal
Table 12-3 lists methods that the tour engine looks for when it arrives at a specified place in the tour.
TourCam allows you to navigate backward through your application in a controlled manner while requiring minimal programming to accomplish the navigation. It provides the ability to back up from a tour or process by tracking the state of the cargo and the location of the tours. TourCam is turned on or off at the tour level. If there is no reason to back up, TourCam should not be turned on.
The ability to backup or restore data to a previous state is accomplished using TourCam. TourCam is used to record the bus path through the map, as well as the associated cargo changes. TourCam is described using the TourCam metaphor. The words in italics in the following paragraphs are the TourCam-specific terms.
A bus driver records the progress along the bus route using TourCam. The bus driver records snapshots of the passenger cargo immediately before traversing a road. Each snapshot is mounted in a frame within the current tape. The frame is stamped with the current road. Using this method, the bus driver can retrace steps through the map. If the frame is indexed, the driver stops at that index when retracing his steps.
The bus driver may adjust the TourCam tape while the bus traverses a road between sites.
The bus driver can advance the current TourCam tape, and add the next road and snapshot of the cargo as a frame in the tape.
The bus driver can discard the current TourCam tape, and replace it with a blank tape.
The bus driver can rewind the current tape to restore the cargo to be consistent with a previously visited site.
The bus driver can splice the current TourCam tape by removing all frames that were recorded since a previously visited site.
When the passenger wants to back up, they instruct the bus driver to traverse a road whose destination is the Backup system site. The backup road can inform the bus driver to rewind or splice the TourCam tape while retracing its path along the last recorded road. Similarly, the passenger can instruct the bus driver to traverse a road to a specific, previously visited site. That road effectively backs up the bus when it instructs the bus driver to rewind or splice the TourCam tape.
When the passenger wants to end the trip, they instruct the bus driver to travel down a road whose destination is the Return system site. The final road may advance or discard the TourCam tape. A passenger may return to the tour if they back into the parent transfer station. If the TourCam tape is advanced, a return visit retraces the path through the map in reverse order. If the TourCam tape is discarded, all return visits start at the start site, as if the passenger were visiting the tour for the first time.
The TourCam processing model places all undo actions on roads and treats sites and stations as black boxes. The tour attribute that turns TourCam on or off is tourcam. The following code from tender.xml shows the location in the tour script where the tourcam is set. The default value is OFF.
Example 12-21 tender.xml: Definition of tourcam
<SERVICE
    name="Tender"
    package="oracle.retail.stores.pos.services.tender"
    tourcam="ON">
The rest of the TourCam attributes are set on the road element in the MAP section of the tour script. The following code from tender.xml shows a road definition with these attributes set.
Example 12-22 tender.xml: Definition of Road With TourCam Attributes
        <SITE name="GetGiftCertificateInfo" siteaction="GetGiftCertificateInfoSite">
               <ROAD name="GiftCertificateInfoEntered"
                     letter="Next"
                     laneaction="GiftCertificateInfoEnteredRoad"
                     destination="GetTender"
                     tape="ADVANCE"
                     record="OFF"
                     index="OFF">
                ...definitions of lanes...
</SITE>
Table 12-4 lists TourCam attributes and their values.
Table 12-4 Road Tag Element Attributes
| Tag | Description | Values | Default |
|---|---|---|---|
|
tape |
Indicates what tour action to take when traversing the road. |
ADVANCE – Adds a frame representing this road to the tourcam tape DISCARD – Discards the entire tour cam tape REWIND – Back up to the site specified by the ’destination' while calling the backup method on all roads SPLICE – Back up to the site specified by the ’destination' without calling the backup method on any roads |
ADVANCE |
|
record |
Indicates that a snapshot of the cargo should be recorded and saved on the tourcam tape |
ON – Record a snapshot OFF – Do not record a snapshot |
ON |
|
index |
Indicates that an index should be placed on the tourcam tape when this road is traversed |
ON – Place an index on the tape OFF – Do not place an index on the tape |
ON |
|
namedIndex |
Indicates that a named index should be placed on the tourcam tape when this road is traversed |
Any string value is allowed |
None |
|
destination |
Used when the tape has a value of REWIND or SPLICE to indicate where the tourcam should back the bus up to |
<SITENAME> – The name of a site to back up to. The site must be in the current tour. LastIndexed – The backup should end at the site that is the origin of the first road found with an unnamed index. NamedIndex – The backup should end at the at the site that is the origin of the first road found with the named index specified by the named Index. |
None |
Each of the following combinations describes a combination of settings and how it is useful in different situations. The following tables describe the forward and backward TourCam settings:
Table 12-5 describes the forward TourCam settings.
Table 12-5 Forward TourCam Settings
| Settings | Behavior |
|---|---|
|
ADVANCEindex=ONrecord=ON |
This combination permits you to return to the site without specifying it as a destination and storing the state of the cargo. Use this combination if you are entering data and making decisions. The UI provides a method for backing up to the previous step. |
|
tape=ADVANCEindex=OFFrecord=ON |
This combination allows you to track visited sites, and allows you to attach undo behavior. However, you cannot back up to this site. A common scenario for use would be for performing external lookups and the user must backup to the site that started the lookup. This combination is used, rather than the following combination, when changes made to the cargo that must be reversible. |
|
tape=ADVANCEindex=OFFrecord=OFF |
This combination is useful for sites that require external setup from another site, but do not result in a significant change in cargo. You cannot back up to a site that uses these settings and you cannot restore cargo at this site. As with the previous combination, these settings are used for sites that perform external lookups. |
|
tape=ADVANCEindex=ONrecord=OFF |
This combination is used when a site does not do anything of significance to cargo. You would use this setting if a site prompts to choose an option from a list and there is a default, or to respond to a yes/no dialog and you want to ensure the data collected at the site is reset. |
|
tape=ADVANCEnamedIndex=LOGIN |
This combination is used when you want the application to be able to return to a specific index, even if the backup begins in a child tour. |
|
tape=DISCARD |
This combination is used when you want the application flow only to go forward from this site. For example, after a user tenders a credit card for a sale, the user cannot backup to enter, delete or modify items. This setting does not permit you to backup or restore cargo to a previously recorded site. |
Table 12-6 describes the backup TourCam settings.
Table 12-6 Backup Tour Cam Settings
| Settings | Behavior |
|---|---|
|
destination=BACKUPtape=REWIND |
This combination returns the application to the previously marked site and makes the snapshot available for undo. This is the preferred method of performing a full backup with restore. |
|
destination=sitetape=REWIND |
This combination backs up the application until it reaches the specified site. It is only used if the site to which you want to backup does not directly precede the current site or you know that you always want to backup to the specified site. These settings could produce unpredictable results if new sites are later inserted in the map between the current site and the target backup site. |
|
destination=LastIndexed tape=SPLICE |
This combination returns the application to the previously marked site without restoring the cargo. These settings are used in scenarios when the cargo is inconsequential. |
|
destination=sitetape=SPLICE |
This combination backs up the application to the specified site without restoring the cargo. It is used when the cargo is inconsequential, or when you want to loop back to a base site in a tour without permitting backup or undoing cargo after returning to the base site. For example, the application starts from a menu and permits the user to back up until a series of steps are complete, but not afterward. In this case, the final road from the last site returns to the menu. The need to use this combination might indicate a design flaw in the tour. The developer should question whether the series of sites that branch from the menu should be a separate tour. If the answer is no, this combination is the solution. |
|
destination=NamedIndexnamedIndex=LOGIN |
This combination backs up the application to the origin of the road with the specified named index. This is used to back up to a specific index, even if it was set in a parent tour. |
In the absence of TourCam, processing of letters is straightforward. If the letter triggers a lane, the bus simply traverses the lane. With TourCam enabled, the processing of letters must consider the actions required to retrace the path of the bus. If the letter triggers an aisle, the bus traverses the aisle. There is no backup over an aisle. If the letter triggers a road, tape=advance or tape=discard indicate a forward direction, and tape=rewind or tape=splice indicate a backward direction. The destination of the road element is used to indicate the backup destination when tape=rewind or tape=splice. It can be one of the following values: ”LastIndexed”, ”NamedIndex”, or <sitename>.
One of the primary strengths of TourCam is the ability to restore the bus' cargo to a previous state. TourCamIfc provides a mechanism for the bus driver to make and subsequently restore a copy of the cargo when specified by road attributes. Classes that implement TourCamIfc must implement the makeSnapshot() and restoreSnapshot() methods. An example of this is <source_directory>\applications\pos\src\oracle\retail\stores\pos\services\inquiry\giftreceipt\GiftReceiptCargo.java.
Example 12-23 GiftReceiptCargo.java: TourCamIfc Implementation
public class GiftReceiptCargo implements CargoIfc, TourCamIfc
{
        ...body of GiftReceiptCargo class...
        public SnapshotIfc makeSnapshot()
        {
                        return new TourCamSnapshot(this);
        }
        public void restoreSnapshot(SnapshotIfc snapshot) throws ObjectRestoreException
        {
                GiftReceiptCargo savedCargo = (GiftReceiptCargo) snapshot.restoreObject();
                this.setPriceCode(savedCargo.getPriceCode());
                this.setPrice(savedCargo.getPrice());
    }
}
SnapshotIfc provides a mechanism to create a copy of the cargo. The class that implements SnapshotIfc is responsible for storing information about the cargo and restoring it later, by calling restoreObject().
A shuttle allows the optional transfer of cargo from the calling tour to the nested tour during backups. If defined, this shuttle is used during rewind and splice backup procedures. The classname for the shuttle is specified in the tour script using the backupshuttle attribute of the station element.
The files in the Tender package can be found in <source_directory>\applications\pos\src\oracle\retail\stores\pos\services\tender.
Table 12-7 describes resources in the Tender package that are common to all tours.
Table 12-7 Tender Package Components
| Resource | Filename | Description |
|---|---|---|
|
Tour script |
tender.xml |
This file defines the components (sites, letters, roads, and so on) of the Tender tour and the map of the Tender tour. |
|
Tour screens |
tenderuicfg.xml |
This configuration file contains bean specifications and overlay screen specifications for the Tender tour. |
|
Starting site |
GetTenderSite.java |
Tender types are displayed from this site. If the selected tender requires input, it is entered using another site, which then returns control to this site. When the balance due is paid, control is returned to the calling service. |
|
Cargo |
TenderCargo.java |
This class represents the cargo for the Tender tour. |
|
Stations |
Names (stations do not have classes): AuthorizationStation PINPadStation AddCustomer AddBusinessCustomer FindCustomer SecurityOverrideStationLinkCustomerStation |
These stations provide access to other tours. Each of these stations define one or more shuttle classes which are part of the Tender package. The workflows are defined in other packages, but can be called from the Tender tour. For example, AuthFailedRoad is defined in the Tender tour because it handles the exit letter from the Authorization tour. However, Authorization.xml, the workflow for the Authorization tour, is located in |
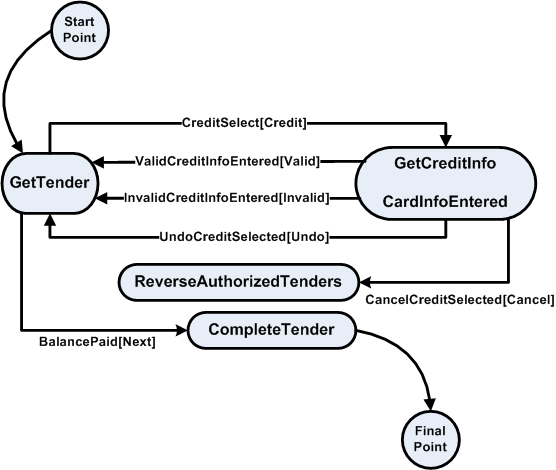
The Tender package is unique in that the workflow is generally similar for all the tender type options available from the main site. For example, if the user chooses to pay by check or credit card, the workflow is similar. When the user cancels the form of payment, the Oracle Retail Platform engine is directed to the ReverseAuthorizedTenders site. When the user decides to undo the operation, the engine is directed back to the GetTender site. The workflow for the credit card tender option is shown in Figure 12-1.