| Oracle® Retail POS Suite Implementation Guide, Volume 5 – Mobile Point-of-Service Release 14.1 E54478-01 |
|

 Previous |
 Next |
| Oracle® Retail POS Suite Implementation Guide, Volume 5 – Mobile Point-of-Service Release 14.1 E54478-01 |
|
Previous |
Next |
This chapter provides information on how to customize the user interface (UI) for the Mobile POS application. Examples of code changes are included.
See the Oracle Retail Point-of-Service Installation Guide for the following information:
Setup for the Mobile POS Xcode project.
Configuration and deployment of the Mobile POS UI distribution certificate.
Consult the following web sites for additional information.
| Web Site | |
|---|---|
| CSS Gradients | http://developer.apple.com/library/ios/#documentation/userexperience/conceptual/mobilehig/IconsImages/IconsImages.html |
| jQuery | http://jquery.com/ |
| jQuery Mobile | http://jquerymobile.com/ |
| PhoneGap | http://phonegap.com |
Customization of Mobile POS should be limited, as much as possible, to the following two files:
mobilepos/www/css/customize.css
mobilepos/www/js/customize.js
These two files are loaded by Mobile POS (in index.html), but are not provided by Oracle. Therefore, any changes you put into these two files will not be overwritten when a new release or patch is installed.
|
Note: The Mobile POS JavaScript code interacts with the iPod Touch or Motorola MC40 device using PhoneGap and several PhoneGap plug-ins. Modification of the PhoneGap plug-ins and development of new PhoneGap plug-ins are not covered in this document. |
The styling of Mobile POS is controlled through Cascading Style Sheets (CSS). The style sheets used by Mobile POS are located in mobilepos/www/css.
To change the styling of Mobile POS, create a file named customize.css in mobilepos/www/css and place the style changes in this file. Although it is not provided in the Mobile POS distribution, customize.css is loaded after all other CSS style sheets, so any styles put into customize.css will override the other styles.
To change the color scheme of the large navigation buttons, create customize.css with the following:
Altering the business flow of or changing the text displayed by the Mobile POS UI requires coding in JavaScript.
Some custom code, such as the modification of displayed text, should not be executed until after the Mobile POS UI has successfully initialized. To handle this situation, bind to the mpos-initialized event in customize.js and provide a function to be executed once mpos-initialized is triggered. Mobile POS triggers this event when it successfully completes initialization.
Example 2-2 Triggering an Event at Completion of Mobile POS UI Initialization
(function()
{
// Wait until mpos-initialized is triggered, indicating that MPOS is
// initialized.
$(document).bind("mpos-initialized", myCustomInitializationFunction);
})();
function myCustomInitializationFunction()
{
// Custom initialization goes here.
console.log("myCustomInitializationFunction");
}
In the JavaScript examples that follow, any reference to myCustomInitializationFunction assumes that it is called in response to the mpos-initialized event shown in Example 2-2.
|
Note: To write to the log file that is accessible from the About page, callconsole.log with the information to be logged. |
This section describes how to customize the iPod Touch display.
To change the name that appears on the iPod Touch screen underneath the application icon:
Open the project in Xcode.
Open the Project Navigator panel (Command-1).
Click mobilepos at the top of the project hierarchy.
In the right panel, click mobilepos under Targets, click the Info tab, and then expand Custom iOS Target Properties.
Change the Bundle display name property to the desired application name and then repackage.
Alternatively, you can do the following:
Edit mobilepos/mobilepos/mobilepos-Info.plist and search for CFBundleDisplayName.
As shown in Example 2-3, change the line following the CFBundleDisplayName line to <string>Application Name</string>. Set Application Name to the name you want to use. Then repackage.
To change the icon that appears on the iPod Touch screen, replace /mobilepos/icon.png and /mobilepos/icon@2x.png and then repackage using Xcode. The icon.png should be sized 57 pixels by 57 pixels, and icon@2x.png should by sized 114 pixels by 114 pixels. For more information, see the following web site:
http://developer.apple.com/library/ios/#documentation/userexperience/conceptual/mobilehig/IconsImages/IconsImages.html
The splash screen, also called the launch image, can be changed by replacing /mobilepos/Default.png and /mobilepos/Default@2x.png and then repackaging the application using Xcode. Default.png should be sized 320 pixels by 480 pixels, and Default@2x.png should by sized 640 pixels by 960 pixels. For more information, see the following web site:
http://developer.apple.com/library/ios/#documentation/userexperience/conceptual/mobilehig/IconsImages/IconsImages.html#//apple_ref/doc/uid/TP40006556-CH14-SW5
This section describes changes that can be made to the style of the Mobile POS UI.
Mobile POS uses the jQuery Mobile JavaScript library to style the UI elements. The styles are defined in mobilepos/www/css/mobilepos.theme.css, which is a copy of one of the five predefined swatches provided by the default jQuery Mobile theme.
To change the color scheme, copy mobilepos.theme.css into customize.css and override the colors. The following properties need to be adjusted:
background
background-image
color
text-shadow
border
jQuery Mobile ThemeRoller is a tool written by the jQuery Mobile development team that can be used to select color combinations that work with jQuery Mobile.
|
Note: Plugging in the style sheet generated by ThemeRoller does not work with this release of Mobile POS. |
An Oracle logo is shown at the top of the login and menu pages. To change the logo, copy a new image file into the mobilepos/www/images folder and then place the following in mobilepos/www/css/customize.css:
Example 2-4 Changing the Corporate Logo
[data-header="banner"]
{
background-image: url("../images/company-logo.png");
}
In Example 2-4, the new logo file is named company-logo.png.
The image is scaled to 29 pixels high. If this height is not appropriate, the values of the height and background-size properties of the [data-header="banner"] CSS selector need to be adjusted as well.
The CSS style definition for the menu buttons is named large-navigation-button. The definition is found in mobilepos/www/css/mobilepos.css.
To change the style of the menu buttons, override the large-navigation-button class by putting in the new style attributes into mobilepos/www/css/customize.css.
To change the color of the menu buttons from a blue gradient to a red gradient, put the following into customize.css:
Example 2-5 Changing the Color of Menu Buttons
.large-navigation-button
{
    background-image: -webkit-linear-gradient(top, #FF170F, #EF5B5B);
}
If you change the background of the menu buttons, you should give a visual indication that the button is pressed by changing the background in the active pseudo-class. One way to do this is to swap the endpoints, as shown in Example 2-6:
The size of the menu buttons is controlled by the size of the image, size of the text font, and padding around the text. Override the following properties in customize.css:
| CSS Selector | Property |
|---|---|
.large-navigation-button img |
height |
.large-navigation-button-text |
font-size |
.large-navigation-button-text |
padding |
To shrink the menu buttons, put the following into customize.css:
.large-navigation-button img
{
     height: 40px;
}

.large-navigation-button-text
{
    padding-left: 5px;
    padding-right: 5px;
    padding-bottom: 5px;
    font-size: 12px;
}
Action buttons appear on the bottom of the screen in the footers. For example, the Pay button on the basket screen is an action button.
The icon displayed on an action button is controlled by the data-icon attribute, which can be seen in the HTML for the page. For example, basket.html shows that the data-icon attribute for the Pay button is mpos-pay.
<li><a href="#" data-icon="mpos-pay" id="basket-pay"></a></li>
To find the file that is used for the button icon, locate the class CSS class selector named .ui-icon- plus the value of the data-icon attribute in mobilepos.css. For example, the CSS class selector for the Pay button is .ui-icon-mpos-pay.
The file that contains the icon is specified in the background property. To change the icon, override the background property of the style in customize.css. Put the following in customize.css to change the Pay button icon to a file named my-pay-icon.png:
Example 2-8 Changing an Action Button Icon
.ui-icon-mpos-pay
{
   background:  url("../images/my-pay-icon.png") 50% 50% no-repeat;
}
Action button icons should be 30 pixels wide by 30 pixels high.
To gain additional content space on the screens with action buttons, the action button text can be hidden and the toolbar decreased in height. To do this, place the following code in customize.css:
Example 2-9 Hiding Action Button Text
[data-footer="square-row"] .ui-btn-text
{
    display: none;
}

[data-footer="square-row"]
{
            height: 45px;
}
This can be applied on a page-by-page basis by pre-pending the page identifier to the CSS selector. The page identifier is found in the HTML for the page. Look for the div with data-role="page". The page identifier is the value of the id attribute. The page identifier for the basket page is basket-page, which is specified by this line in basket.html:
<div data-role="page" id="basket-page" data-theme="o">
Example 2-10 shows the code to place in customize.css to hide the button text only on the basket screen:
The text displayed for field labels, button text, and error messages is read from the resource bundles located in mobilepos/www/js/translations. The resource bundles are named Resources_language-identifier_region-identifier.js. For example, the resource bundle for United States English is Resources_en_US.js.
The content of a resource file is structured as an object consisting of key-value pairs. Mobile POS uses a key string to look up the translated value in the resource file that corresponds to the locale currently configured on the mobile device.
To change the text that is displayed:
Inspect the JavaScript and resource bundles to determine the keys that are being used to retrieve the text from the resource bundle. For example, to change the "Welcome to Mobile POS" text, you can search the resource bundle for this text and see from the following line that the message key is %login-welcome-text-1:
"%login-welcome-text-1": "Welcome to Mobile POS.",
In a function called after Mobile POS is initialized (see "JavaScript Customization File"), construct an object with the message keys found in Step 1 and the new values.
Call Globalize.addCultureInfo to replace the default message key values with the new values.
In Example 2-11, the login screen strings "Welcome to Mobile POS" and "Please Log In" are replaced with "Welcome to Custom Mobile POS" and an empty string.
Example 2-11 Changing Displayed Text
function onCustomMPOSInitialized()
{
  // Load custom strings into the current locale.
  var customStrings =
    {
      "%login-welcome-text-1": "Welcome to Custom Mobile POS",
      "%login-welcome-text-2": "",
    };

  var globalizeLocale = MobilePOSDevice.getGlobalizeLocale();
  Globalize.addCultureInfo(globalizeLocale,
     {
       messages: customStrings
     });
}
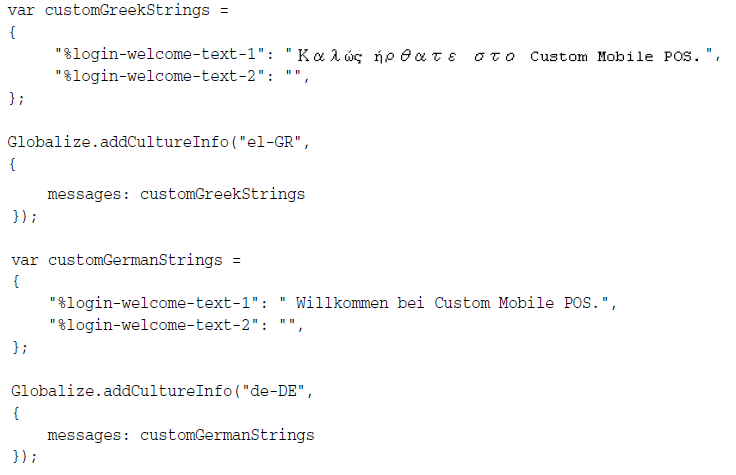
If the implementation of Mobile POS is supporting more than one locale, different values for the keys by language can be implemented by calling Globalize.addCultureInfo and passing in the specific locale.
Figure 2-1 shows how to override the welcome strings for both Greek-Greece and German-Germany:
|
Notes: Some values, such as reason code descriptions, are provided to the UI by the POS Server and cannot be changed on the UI. They must be changed on the server.The resource file name uses an underscore to separate the language and the region. However, the Globalize library uses a hyphen. |
This section describes customizing business flows.
The menu entries are defined in the menuEntries table in menu.js. The JavaScript in menu.js dynamically creates the HTML for the menu page based on the entries in menuEntries.Each entry in menuEntries has the following fields:
| Field | Description |
|---|---|
| id | HTML ID of the menu button. |
| labelKey | Message key used to look up the button text in the resource bundle. |
| permission | POS access point used to enable or disable the button. |
| handler | Function called when button is pressed. |
| img | Path to image to display on the button. |
To remove an item from the menu, call menuController.removeMenuEntry in customize.js after Mobile POS is initialized, passing in the ID of the button you want removed.
Example 2-12 shows how to remove the Close Till button:
To add an item to the menu, call menuController.addMenuEntry in customize.js after Mobile POS is initialized, passing in the index where you want the menu entry inserted, as well as the menu entry fields previously described.
Example 2-13 shows how to add a Settings button to the menu:
Example 2-13 Adding a Settings Button to a Menu
function myCustomInitializationFunction()
{
    // Custom initialization goes here.
    menuController.addMenuEntry(2, "menu-settings", "%settings-menu-button",
    Permission.administration, onMenuSettings, "images/settings.png");
}
For instructions on how to code screens in response to a button click, see "Workflows".
To update an item in the menu, call menuController.updateMenuEntry in customize.js after Mobile POS is initialized. Pass in the ID of the button you want updated as well as the fields you want updated. Specify undefined to leave a field unchanged.
The function signature for menuController.updateMenuEntry is:
function(id, labelKey, permission, handler, img)
The parameters are the same as the fields in the menuEntries table previously described.
Example 2-14 shows how to change the Item Lookup button to show a different icon and to call a different function when clicked:
The number of columns of buttons shown on the menu defaults to 2. To change the number of columns, call MobilePOSConfig.setMenuColumns and specify the new number of columns. See Example 2-15.
The Navigator object defined in navigator.js provides a wrapper for page navigation. This object works with the entries in the NavigationMap to move from page to page.
Navigator uses jQuery Mobile's changePage method to navigate from page to page. For detailed information on changePage, see the following web site:
http://jquerymobile.com/test/docs/api/methods.html
To add a new page, code the following:
Call the addPage method of Navigator, passing in the following values:
page: string used as a key in NavigationMap.
file: name of the HTML file that defines the page structure.
options: object to pass to changePage.
authorization: POS permission to check before navigating to the page. If the permission is not granted to the logged-in user, an exception is thrown.
initFunction: function to be called before navigating to the page.
Insert a new function into Navigator that calls gotoPage, specifying the newly added page.
Develop the HTML for the new page.
Develop any required initialization in the function specified in initFunction.
Add functions to load the page fields and respond to events, such as button clicks.
Example 2-16 defines a settings page that is displayed when a custom Settings button is clicked on the menu:
Example 2-16 Defining a New Settings Page
(function()
{
    // Wait until mpos-initialized is triggered, meaning MPOS is initialized.
    $(document).bind("mpos-initialized", onCustomMPOSInitialized);
})();

function onCustomMPOSInitialized()
{
    // Add the settings page as a new menu item
    menuController.addMenuEntry(2, "menu-settings", "%settings-menu-button",
        Permission.administration, onMenuSettings, "images/settings.png");

    // Add the settings page to the Navigator
    Navigator.addPage("settings", "settings.html", undefined,
        Permission.administration, initSettingsPage);

    Navigator.gotoSettings = function(options)
    {
        this.gotoPage("settings", options);
    };

    // Load custom translation strings.
    var customLanguageBundle =
    {
       "%settings-menu-button": "Settings",
       "%error-header-settings": "Settings Error",
       "%settings-header": "Settings",
       "%settings-1-label": "Setting 1",
       "%settings-2-label": "Setting 2",
       "%settings-cancel-button": "Cancel",
       "%settings-save-button": "Save",
       "%settings-error": "Settings Error"
    };

    Globalize.addCultureInfo(MobilePOSDevice.getGlobalizeLocale(),
    {
       messages: customLanguageBundle
    });
}

function onMenuSettings(event)
{
    try
    {
       Navigator.gotoSettings();
    }
    catch(e)
    {
       handleException(e, "%error-header-settings");
       throw e;
    }
}

function initSettingsPage(options)
{
    console.log("initSettingsPage");
    $("#settings-page").die("pageinit", loadSettingsPageFields);
    $("#settings-page").live("pageinit", options, loadSettingsPageFields);
}

function loadSettingsPageFields(event)
{
    var options = event ? event.data : {};

    try
    {
        $("#settings-header").text(translate("%settings-header"));
        $("#settings-1-label").text(translate("%settings-1-label"));
        $("#settings-2-label").text(translate("%settings-2-label"));

        $("#settings-cancel").buttonText(translate("%settings-cancel-button"));
        $("#settings-save").buttonText(translate("%settings-save-button"));

        $("#settings-cancel").unbind("click", onSettingsCancel);
        $("#settings-cancel").bind("click", onSettingsCancel);

        $("#settings-save").unbind("click", onSettingsSave);
        $("#settings-save").bind("click", onSettingsSave);

        // TODO: Load settings

    }
    catch (e)
    {
        handleException(e, "%settings-error", {});
    }
}

function onSettingsCancel(e)
{
    console.log("Cancel settings");
    Navigator.gotoMenu();
}

function onSettingsSave(e)
{
    console.log("Save settings");
    // TODO: Save settings
    Navigator.gotoMenu();
}
New workflows can be added to Mobile POS by adding one or more new pages for the workflow (see "Adding a New Page") and then chaining the pages together through action buttons in the footer. The first page in the workflow can be triggered by a new menu button (see "Adding a Menu Button"), or it can be triggered in response to some other event.
Suppose a new workflow is needed consisting of two new pages. Develop the navigation of the new workflow:
Create the two new pages according to instructions in "Adding a New Page". In this example, the names of the functions added to Navigator are gotoPage1 and gotoPage2.
On the first page, include back and next buttons:
In the back button handler, call Navigator.gotoMenu.
In the next button handler, call Navigator.gotoPage2.
On the second page, include back and done buttons:
In the back button handler, call Navigator.gotoPage1.
In the done button handler, perform the work of the workflow, then call Navigator.gotoMenu.
To insert a new page into an existing workflow:
Create the new page. See "Adding a New Page".
Determine which Navigator function is used to navigate to the next page in the workflow by inspecting the JavaScript source that controls the page that displays just before the new page.
Override the function found in Step 2 to navigate to the new page created in Step 1. If multiple workflows use the same Navigator function, use the value of $.mobile.activePage[0].id to determine the active page and only override if the active page is part of the workflow being altered.
Update the new page to call the Navigator function found in Step 2, effectively resuming the original workflow.
For example, suppose after a successful tender, a page should be displayed with a script to be read to the customer:
Create the new page. See "Adding a New Page".
Inspect receiptPage.js and ensure that Navigator.gotoMenuOrBasket is called when the user is done with a transaction.
By searching through all of the code, ensure that Navigator.gotoMenuOrBasket is called from multiple places (such as cancel and suspend) and so $.mobile.activePage.id must be used to ensure that the new page is shown only when the active page is the receipt page.
Override Navigator.gotoMenuOrBasket to call the new page if the active page is "receipt-page", the page ID for the receipt page.
Example 2-17 Inserting a Page into an Existing Workflow
function onCustomMPOSInitialized()
{
    // Create new script page
    ...

    // Insert the script page after receipt before basket/menu
    Navigator._gotoMenuOrBasket = Navigator.gotoMenuOrBasket;
    Navigator.gotoMenuOrBasket = function(options)
    {
      var activePageId = $.mobile.activePage[0].id;

      if (activePageId === "receipt-page")
        Navigator.gotoScript();
      else
      Navigator._gotoMenuOrBasket();
}
In the handler for the Done or OK button on the new script page, call Navigator.gotoMenuOrBasket to complete the workflow.
The HTML for a page can be replaced by using Navigator.replacePage. The same JavaScript is executed and styles are applied, provided the HTML elements retain the appropriate IDs and classes. This can be useful for placing additional fields on a screen or changing the look and feel without having to use JavaScript to dynamically add the fields.
Example 2-18 shows replacing the HTML in the login screen, login.html, with customlogin.html:
To add a new dialog a page:
Add a predefined dialog template to the parent HTML page. This is the page, on top of which, the dialog is going to appear.
Example 2-19 Adding a New Dialog to a Page
                <div id="om-add-example-dialog-info" data-role="oraclemodal">
                                <div class="om-title">{Enter Title Here.}</div>
                                 <div id="om-add-example-dialog-info-start" class="om-main">
                                    <form id="example-dialog-info-token-form">
                                                <div class="om-content">
                                                        {Content for dialog goes here}

                                                 </div>
                                                <div class="om-toolbar">
                                                        <button id="add-creditdebit-token-cancel-btn"  data-rel="close"  data-shadow="false" data-inline="true">{Cancel}</button>
                                                        {Define buttons for dialogs}
                                                </div>
                                </form>
                         </div>
            </div>
Add a corresponding JavaScript file for the dialog.
Add this newly created JavaScript file to index.html, so that it can be accessed.
In the page's initialize function, call the <DialogName>.onDialogInit() function.
Once the dialog is initialized, call the <DialogName>.open() function to display the dialog.
The following should be present in the <DialogName>.js file open function, to open a dialog:
$("#om-add-example-dialog-info").oraclemodal("open",dialog.startPaneId);
Similar to the open function, close(), cancel(), and so on, are also available to control the visibility of dialog.
                        $("#om-add-example-dialog-info").oraclemodal("complete");
                        $("#om-add-example-dialog-info").oraclemodal("close");
To insert a static field on a page, use one of the DOM manipulation methods provided by jQuery. The methods that allow insertion outside an existing element are found at the following web site:
http://api.jquery.com/category/manipulation/dom-insertion-outside/
The methods that allow insertion inside an existing element are documented at the following web site:
http://api.jquery.com/category/manipulation/dom-insertion-inside/
Manipulation of the fields in the DOM cannot take place at application startup or initialization. It must take place after the page is loaded into memory. jQuery provides triggers to communicate when a page is loaded (pageinit), about to be shown (pagebeforeshow), or has just been shown (pageshow). These methods are documented at the following web site under page transition events:
http://jquerymobile.com/test/docs/api/events.html
In most cases, placing modification code in a function triggered by pagebeforeshow is sufficient. However, in some cases, such as when working with elements marked up by jQuery, modifications must be made in a function triggered by pageshow. When possible, pagebeforeshow should be used because the user can see the field being added when the insert is done in pageshow.
Example 2-20 shows adding a third welcome line on the login screen by using $.after in a function triggered by pagebeforeshow:
Example 2-20 Adding a Third Welcome Line on the Login Screen
function onCustomMPOSInitialized()
{
  // Load custom translation strings into the current locale.
  var customLanguageBundle =
{
  %login-welcome-text-3": "Have a Nice Day",
};

  Globalize.addCultureInfo(globalizeLocale,
  {
    messages: customLanguageBundle
   });

   // Add third welcome text line
   $("#login-page").live("pagebeforeshow",
   function()
     {
       $("#welcome-text-2").after("<div id='welcome-text-3'></div>");
       $("#welcome-text-3").text(translate("%login-welcome-text-3"));
     });
    }
jQuery provides helper methods that enable the developer to easily set the value of an HTML element. However, the method to use is not always readily evident. Here are rules to follow:
If the HTML element's value is between the beginning and ending tags, such as with paragraphs and divs, use $.text.
If the HTML element's value is set in the value attribute, such as with input, use $.val.
As a special case, if the HTML element is an input of type button or if it is an anchor (link) styled by jQuery mobile, use $.buttonText.
Inserting an API-filled non-input field on a screen is very similar to inserting a static field on a page. The only difference comes in setting the text of the field. Instead of passing a static value to the jQuery method used to set the value ($.text, $.val, or $.buttonText), pass in the value returned from the API call.
For example, to display the number of line items on the payment page, dynamically insert a field on the payment page (see "Inserting a Static Field on a Page"), then populate the field with the number of items in the transaction. The current transaction is available as the Transaction object defined in transaction.js. See Example 2-21.
Example 2-21 Inserting an API-Filled Non-Input Field on a Screen
function onCustomMPOSInitialized()
{
   // Load custom translation strings into the current locale.

   var customLanguageBundle =
     {
         "%payment-lines-label": "Number of Items",
     };

   Globalize.addCultureInfo(globalizeLocale,

     {
        messages: customLanguageBundle
     );

   $("#payment-page").live("pagebeforeshow", function()

       {
           $("#tender-entry").after(
               "<div data-role='fieldcontain'>"
+              "<label for='payment-lines' "
+              "id='payment-lines-label'></label>"
+              "<p id='payment-lines'></p>"
+              "</div>");
           $("#payment-lines-label").text(translate("%payment-lines-label"));
           $("#payment-lines").text(Transaction.getTotalQuantity());
       });
}
Inserting an input field on a screen follows the same pattern as inserting a non-input field on a screen, but an extra step must be taken to ensure that the jQuery Mobile styling is applied. To apply the jQuery Mobile styling, call trigger("create") on the parent of the element inserted. When using the append method, the call to trigger can just be chained to the returned object:
$("#parent").append(newHTML).trigger("create");
Example 2-22 shows inserting a third input field on the login page named Secret:
Example 2-22 Inserting an Input Field on a Screen
function onCustomMPOSInitialized()
{
$("#login-page").live("pagebeforeshow",
 function()
   {
      var secret =
         "<div data-role='fieldcontain' id='secret-container'>"
+        "label for='login-secret' "
+        "id='login-secret-label'>Secret</label>"
+        "<input id='login-secret'/>"
+        "</div>";
      $("#login-fields").append(secret).trigger("create");

      // Shrink top margin of login button to keep entire button on the screen.
      $("#login-button").css("margin-top", "20px");
    });
}
|
Note: Consider usingNavigator to replace the entire HTML page if there are more than a few fields dynamically added. See "Replacing a Page in an Existing Workflow". |
Field validation is performed by functions located in validation.js. Most fields are validated using regular expressions that check both valid characters and overall length, plus additional checks for minimum and maximum values. Some, such as email address validation, are much more involved.
To change the validation of a field, there are two options:
Change the regular expression and other fields used to validate the field. The values are defined in the Validation object defined in validation.js. To change the values, override the current values with the new values.
Example 2-23 shows changing the minimum length of an serial number from 1 to 5:
Example 2-23 Changing Field Validation
function onCustomMPOSInitialized()
{
     Validation.serialNumber =
        { re: /^[0-9a-z]{5,25}$/i, minLength: 5, maxLength: 25 };
}
|
Note: TheminLength value is not actually used in the validation process. It exists so that custom error messages can be specific about the minimum length of a valid serial number. |
The second option is to override the validation function completely. To do this, code the new function in customize.js, using the same function signature. Since customize.js is loaded after validation.js, the customized version will be used.
Screen events, such as a button being clicked, are handled through jQuery event handlers. Documentation on jQuery events is available at the following web site:
http://api.jquery.com/category/events/
How to change the logic behind a screen event depends upon how the screen event is currently handled:
If the event is bound to a named function, replace the named function.
The click event on the basket page action buttons are each bound to named functions, as seen in basketPageActions.js. To replace the functionality of the Reprint button, for example, code a new function for onBasketReprintReceipt in customize.js.
If the event is bound to an anonymous function, use unbind to prevent execution of the anonymous function, then use bind to allow execution of the custom code.
This unbinding and rebinding must take place after the original binding takes place, so further inspection of the code is necessary to determine at what part of the parent page's lifecycle the original binding is taking place. Then, a later stage of the page lifecycle can be used to perform the rebinding. Put another way, if a button click is bound to an anonymous function during a pageinit, the rebind must be performed during pagebeforeshow or pageshow.
For example, suppose the functionality of print receipt is customized and a new page is needed to collect additional information. To switch to this new page instead of immediately printing the receipt, inspect ReceiptPage.js. The Print Receipt button has an anonymous function bound to the click event during pageinit.
To modify this behavior, rebind a new function during pagebeforeshow, as shown in Example 2-24:
Example 2-24 Changing the Business Logic Behind a Screen Event
function onCustomMPOSInitialized()
{
    $("#receipt-page").live("pagebeforeshow",
        function(e)
        {
           $("#receipt-print").unbind("click");
           $("#receipt-print").click(myCustomPrintReceiptFunction);
        });
}

function myCustomPrintReceiptFunction()
{
    Navigator.gotoPrintReceiptPage();
}
The JavaScript objects that make the service calls to the POS Server are accessible by the window.serviceManager object. The objects are returned by calling getService with the name of the service. The following table outlines the different services:
| Service Name | Function |
|---|---|
| account | Gift cards |
| auth | Login, logoff |
| itemlookup | Item lookup |
| lineitem | Add line item, item discounts, item quantity |
| posversion | Mobile POS Server version |
| receipt | Email and print receipt |
| register | Create session, close till |
| tenderline | Tender |
| transaction | Cancel, suspend, transaction discounts |
To use a custom service that uses methods with the same signature, use the overrideService method to install a new service object. Example 2-25 shows how to hook up a custom authorization service:
Example 2-25 Hooking Up a Custom Authorization Service
function MyCustomAuthService ()
{
    this.login = function(userID, password, hostport, version, deviceId, locale,
        timeoutSeconds, successCallback, errorCallback)

        ...
    }

function onCustomMPOSInitialized()
{
   window.serviceManager.overrideService("auth", new MyCustomAuthService());
}
If the method signature changes, ensure that all calls of the method are updated as well. This may necessitate replacing functions in both UI pages and business objects.
For example, if another parameter named secret is needed for logging in, you need to replace the following:
The function that handles the login button click, loginButtonClick, to get the secret from the input field.
The function that calls MobilePOSUser.login, loginWithUserIDPassword, to pass in the secret parameter.
MobilePOSUser.login, to accept the secret parameter and pass it into the login method of the authorization service.
Mobile POS is tolerant of extra information being returned from the server. The difficulty in processing a customized response therefore lies in being able to access the returned information.
With some services, such as transaction and lineitem, the entire transaction is returned and a reference is kept in Transaction._transactionData. In this case, accessing the custom information can be done by adding an access method to Transaction for that field.
However, in cases such as login, the entire response from the POS Server is not retained. In this case, a custom function that replaces the default needs to be written. All of the original functionality of the replaced code must be duplicated for the Mobile POS UI to function correctly.
For example, suppose a modification to the login API on the server returns the employee ID in the reply back to the UI. Since the login method of MobilePOSUser is the method that processes the login response, it needs to be replaced to save the employee ID, as shown in Example 2-26:
Example 2-26 Modification to the Login Method
function myCustomUserLogin(userId, password, successCallback, failureCallback,
    errorCallback)
{
            // All of the code from MobilePOSUser.login
    ...
            this.employeeID = response.employeeID;
}

function onCustomMPOSInitialized()
{
    MobilePOSUser.login = myCustomUserLogin;
}
The defaults object defined in mobilepos.js contains the default settings for some of the functionality of the Mobile POS UI. It does not have corresponding configuration settings in the POS server, including things such as battery level checks and whether to aggregate basket items with identical item numbers. To override these default settings, use the MobilePOSConfig setters defined in config.js.
To change the minimum battery level allowed to start applying payments, call setMinBatteryLevelPayment with the new value as shown in Example 2-27:
Generally, changing the security mechanism involves writing code in customize.js to override the logic in the following:
loginPage.js: add or modify the input fields. See "Inserting an Input Field on a Screen".
loginErrors.js: handle any additional errors that can be returned by the security mechanism.
user.js: receive the new input fields from the UI layer and pass on to AuthService.
authService.js: make the authorization service call. See "Server API Calls".
This section has information for accessing, modifying, or creating Cordova plug-ins:
MobilePosDevicePlugin.java
This file contains a Cordova Plugin class which can be invoked from JavaScript to get device-related information such as the following:
Battery information
Unique identifier
Locale and language
Launch application
Keyboard status
MobilePOSLoggingPlugin.java
This file contains a Cordova Plugin class which can be invoked from JavaScript for logging activities, such as clear logs, email logs, start logging, format log data, and so on.
MobilePOSMotorolaSledPlugin.java
This file contains a Cordova Plugin class which can be invoked from JavaScript for accessing a sled. The following actions can be performed using this plug-in:
Activate Scanner: Activate the scanner for use
Deactivate Scanner
DataFound: Return the data scanned by a sled
querySledInfo: Return sled information
NativeKeyboardOverride.java
This file contains a Cordova Plugin class which can be invoked from JavaScript for the following actions:
Show a customized keyboard according to the field focus in HTML5
Show and hide the native Android keyboard from JavaScript
NetworkActivityPlugin.java
This file contains a Cordova Plugin class which is used to control the spinner which is displayed when some network activity is going on (show spinner/hide spinner).
MobilePOSUserDefaultsPlugin.java
This file contains a Cordova Plugin class which is used to fetch default/user configurations for the application and return them back to JavaScript. Using the application settings returned by this plug-in, all the network calls are structured in JavaScript.
This section has information on adding new hardware.
Customizing Mobile POS to support a new iOS device would most likely involve only style changes in customize.css, provided the following libraries support the new iOS device:
PhoneGap
jQuery
jQuery Mobile
VeriFone Framework
However, if an upgrade to any of these libraries is required to support the new iOS device, additional Objective C or JavaScript programming may be needed to account for the differences between the library version used in the release and the updated library.
Customizing Mobile POS to support a non-iOS device involves significant work. In addition to styling changes to support different screen dimensions, the following PhoneGap plug-ins need to be created on the new mobile OS.
| PhoneGap Plug-in | Description |
|---|---|
DeviceInfo |
Methods for getting information from the device, such as battery level. |
Internationalization |
Method for getting the device's configured language and locale. |
Log |
Methods for writing to the application log file. |
NetworkActivity |
Methods for turning the network activity indicator on and off. |
Sled |
Methods for working with the sled attached to the device. |
UserDefaults |
Methods for getting the login timeout and server setting. |
Source code for the iPod Touch versions of these plug-ins is not available. The methods to implement in each plug-in can be determined by inspecting the JavaScript code that calls the plug-in.
This section provides information on using tablets with the Mobile POS UI.
The Mobile POS UI runs on an iPad and Motorola ET1 out of the box. However, it does not make any attempt to use the extra screen space in a meaningful manner. Instead, existing screen elements are simply stretched or centered.
To truly make good use of the iPad, new screens need to be created that present additional information on each screen, such as combining the item detail screen with the basket screen.
To customize the Mobile POS UI to run on a non-iOS tablet, see "Supporting Alternate Mobile OS Devices".
To support a sled other than the VeriFone VX600, the PhoneGap plug-in that handles the communication between the JavaScript portion of the application and the sled must be replaced. Guidance on how to write PhoneGap plug-ins is available on the PhoneGap web site.
The replacement plug-in must implement all of the methods implemented by the VeriFone VX600 PhoneGap plug-in. The following table lists the methods:
| Method | Description |
|---|---|
activateScanner |
Turns the scanner on. |
activateSwipeDetection |
Activates the magnetic strip reader. |
assignPageCallback |
Specify JavaScript function to call in response to a barcode scan. |
assignSwipeCallback |
Specify JavaScript function to call in response to a magnetic stripe read. |
clearLogFile |
Clears (removes) the physical log file from the device. |
deactivateScanner |
Deactivates the bar code scanner. |
deactivateSwipeDetection |
Deactivates the magnetic stripe reader. |
initializeScanner |
Activates the bar code scanner. |
queryBatteryLevel |
Returns the sled battery level. |
queryDeviceState |
Returns PGCommandStatus_OK if the device is initialized and ready to scan barcodes, otherwise returns PGCommandStatus_ERROR. |
querySledInfo |
Returns sled information in JSON format:
{
    "Serial Number": "value",
    "Model Number": "value",
    "Manufacturer": "value",
    "Hardware Revision": "value",
    "Firmware Revision": "value"
}
|
Specifics on the inputs to and outputs from the plug-in methods can be deduced by inspecting the JavaScript code that calls the plug-ins. Search the JavaScript code for window.plugins.sled. plus the name of the method from the preceding table. For example, search for window.plugins.sled.querySledInfo.