| Oracle® WebCenter Framework Tutorial 10g (10.1.3.2.0) Part Number B31072-02 |
|
|
View PDF |
| Oracle® WebCenter Framework Tutorial 10g (10.1.3.2.0) Part Number B31072-02 |
|
|
View PDF |
In this lesson you will learn how to build your first portlet. After you create the portlet, you will test it, create a simple page, drop the portlet on the page, test it again, then add some additional logic to the portlet. By the end of this lesson, you should have a good handle on what's involved with building and testing a simple portlet.
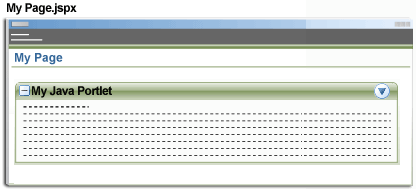
Figure 3-1 shows a conceptual picture of what you'll have at the end of this lesson: a WebCenter application named MySample containing a page called MyPage (MyPage.jspx). You'll also create a portlet called MyJavaPortlet, which you'll place upon MyPage and then customize.
Figure 3-1 MyPage.jspx at the End of Lesson 3
We will build a portlet and test it in the following steps:
The process will be roughly the same no matter what type of portlet you build using JDeveloper.
Before you create a portlet, you must create an application to serve as a container for your portlet. To create an application:
Start up JDeveloper by double clicking jdev.exe wherever JDeveloper resides.
If a Tip of the Day appears, click Close to close it.
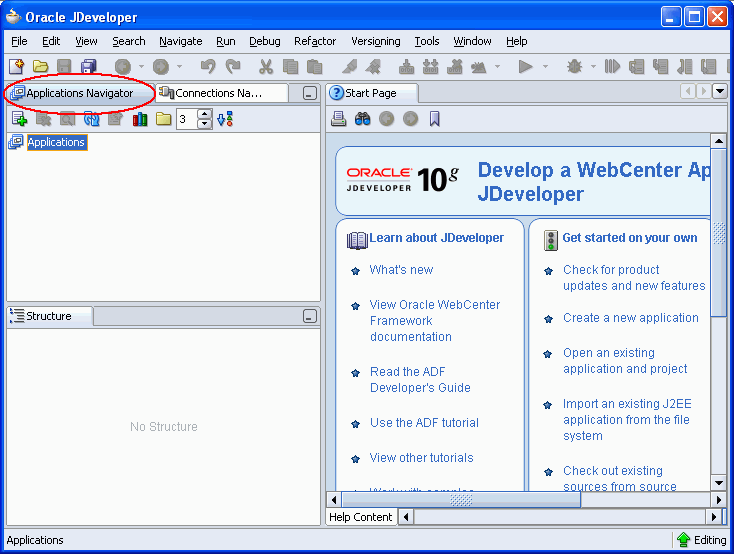
Ensure that the Applications Navigator tab is highlighted (Figure 3-2).
Figure 3-2 Applications Navigator in JDeveloper
In the Applications Navigator, highlight Applications, and right-click.
Select New Application.
In the Application Name field, enter: MySample
Accept the default location for MySample, and make a note of it. You'll need it later when you get to Step 3: Deploying Your Portlet.
From the Application Template pull-down as shown in Figure 3-3, choose WebCenter Application.
This template creates the projects that you need, and helps target JDeveloper so that only those options applicable to a WebCenter application are presented to you.
Click OK.
In the Applications Navigator as shown in Figure 3-4, you can see that a WebCenter application consists of three projects:
Model, in which you define the JavaBeans and other data controls you need if the application is to perform any back-end logic.
Portlets, in which you'll create your portlet.
ViewController, in which you'll create the JavaServer Faces page that will consume the portlet.
Now let's invoke the JSR 168 Java Portlet Wizard to create your portlet.
In the Applications Navigator, right-click Portlets, and select New.
In the Categories pane as shown in Figure 3-5, expand the Web Tier category, and click Portlets.
Notice there are two kinds of portlets you can create:
An Oracle PDK Java portlet. Select this option when the portlet you want to build will be consumed by WebCenter applications, OracleAS Portal, or some other type of Oracle-specific solution. You build an Oracle PDK Java portlet using the APIs provided by the PDK.
A standards-based (JSR 168) Java portlet. Java portlets can be consumed by portals from any vendor that supports the portlet standards. In this tutorial, we're going to build a standards-based (JSR 168) Java portlet.
Highlight Standards-based Java Portlet (JSR 168), and click OK.
This opens the JSR 168 Java Portlet Wizard as shown in Figure 3-6.
Figure 3-6 JSR 168 Java Portlet Wizard Welcome Page
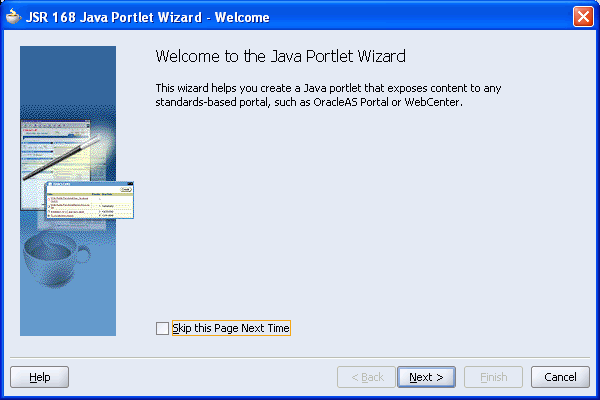
The JSR 168 Java Portlet Wizard generates a skeleton for the portlet, to which you add your own logic. Let's see how this is done.
Click Next to move beyond the Welcome page.
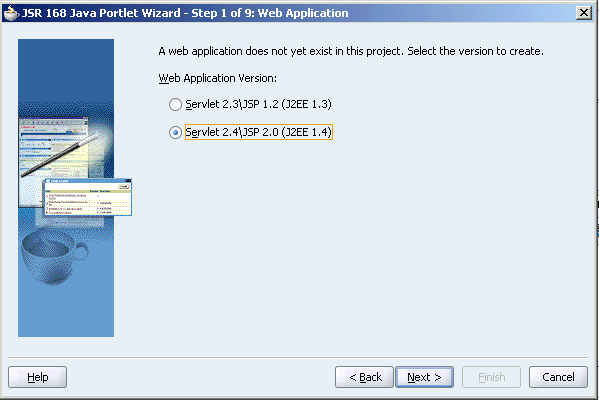
Leave the default specified on the Web Application page (Figure 3-7). The servlet version makes certain tag libraries available. Because they are backward compatible, it's always best to select the latest version, unless you have a specific reason for selecting an older version.
Figure 3-7 Selecting a Web Application Version
Click Next.
On the General Portlet Properties page, change the Name and Class names to MyJavaPortlet (no spaces) as shown in Figure 3-8.
It's usually a good idea to make the class name the same as the display name, so the portlet that displays on the page has the same name as what appears in the Applications Navigator.
Figure 3-8 General Portlet Properties Page
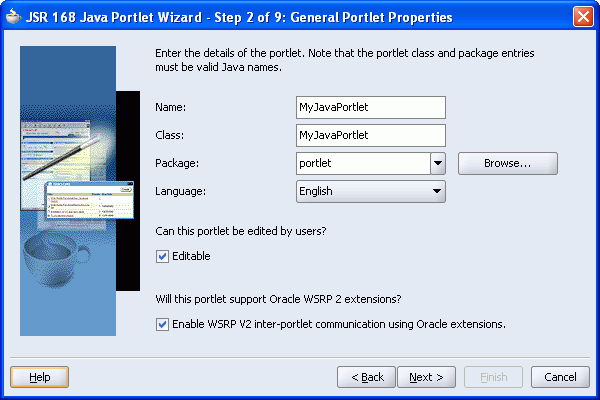
Select Enable WSRP V2 inter-portlet communication using Oracle extensions.
You'll work with WSRP inter-portlet communication later in this tutorial.
Accept the other defaults that appear on the General Portlet Properties page (Figure 3-8).
Make sure the Editable box is checked, as you'll want to allow users to personalize this portlet during runtime. (The Editable box makes the portlet personalizable. A user personalizes a portlet when he or she makes changes that are unique to that user. A user with a higher set of permissions can customize the portlet to make changes that everyone sees. More about this later.)
Click Next.
On the Name and Attributes page, enter the values shown in Figure 3-9.
Table 3-1 Name and Attribution Values
| Property | Value |
|---|---|
|
Display Name |
Name that will appear in the JDeveloper Component Palette. Because you entered MyJavaPortlet as the class name, this field is already populated with that name. |
|
Portlet Title |
Title that will appear on the portlet header. Because you entered MyJavaPortlet as the class name, this field is already populated with that name. |
|
Short Title |
Title that will appear on the portlet header on mobile devices. You can leave this field populated, although we won't use it. |
|
Description |
Description of the portlet. This field is relevant only when the portlet is used in an OracleAS Portal 10g environment. Leave this field blank. |
|
Keywords |
Enter sample, Tutorial. Keywords provide additional information about a page, item, or portlet so that users can locate it during a search. Although keywords are not supported by Oracle WebCenter Suite or OracleAS Portal 10g, they are supported by other vendors from whom you may have obtained a deployment environment. |
Click Next.
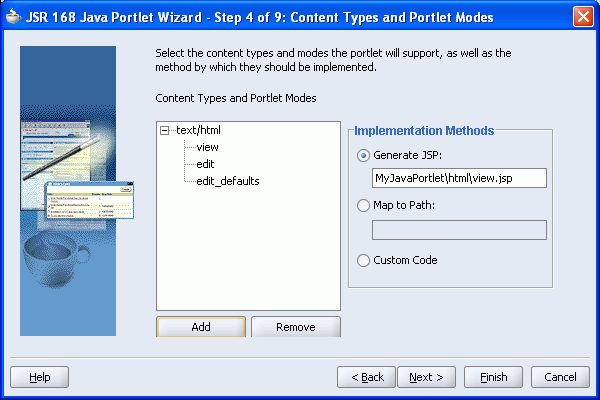
On the Content Types and Portlet Modes page, notice that text/html is the default content type. That means that the portlet will support text encoded with HTML. View and edit are listed as the default portlet modes for text/html. View is always available as a portlet mode; edit mode provides a page that allows users to personalize the portlet instance.
Later on in this tutorial we'll want to test the difference between Personalize and Customize using this portlet. That means we need to enable customization for the portlet now. We do that by adding the edit_defaults content type to the portlet's configuration.
In the Content Types and Portlet Modes pane as shown in Figure 3-10, highlight view, and click Add.
The Portlet Modes window is displayed.
Highlight edit_defaults, and use the arrow to move it to the Selected pane.
Click OK.
Before we leave the Content Types and Portlet Modes page, take a look at the Implementation Methods area as shown in Figure 3-11. These controls enable you to specify whether you want to generate JSP for the portlet, or if you want to use your own custom JSP code. In this lesson, we'll ask JDeveloper to generate JSPs for us.
Figure 3-11 Selecting an Implementation Method
Click Next.
Although you could click Finish here and produce a basic portlet, let's continue working through the wizard so you can see what other options are available.
On the Customization Preferences page as shown in Figure 3-12, enter MyJavaPortlet in the Default Values field.
Because we specified that we want this portlet to be Editable, users will be able to change this title at runtime.
We're not interested in translating for this release, so de-select the Translate check box.
We're not going to do anything with this page now, but in the future you can use it to add other customization options for the portlet. For example, if your portlet accepted a Zip Code parameter, you might want to allow users to personalize the Zip Code label. If this were the case, you would use the Add button to make the Zip Code label personalizable.
Click Next.
On the Security Roles page, click Next.
This page is used to specify which of the application's security roles you want to establish for this portlet.
On the Caching page, click Next.
The settings on this page enable you to define expiry-based caching for your portlet. You do not need any caching conditions now.
On the Initialization Parameters page, click Next.
Initialization parameters provide the Web application developer a way to configure the behavior of the portlet. For this tutorial, no initialization parameters are needed.
On the Portlet Navigation Parameters page, click Next.
Navigation parameters are a WSRP 2.0 feature. This page enables you to specify external parameters to be consumed by the JSR 168 portlet. Navigation parameters are not required for this tutorial.
Click Finish.
After you click Finish, you should be able to locate several newly generated files in the Applications Navigator under the Portlets project. The expanded Navigator looks like Figure 3-13.
Figure 3-13 Files Generated for the New Portlet
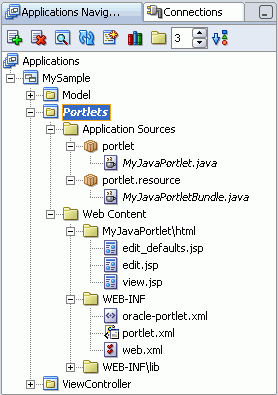
Under Application Sources, in portlet and portlets.resource, two Java classes:
MyJavaPortlet.java (under portlet) is invoked by the portlet container. It contains all the methods required by the portlet standards.
MyJavaPortletBundle.java (under portlet.resource) contains all the translation strings for the portlet.
Under Web Content, MyJavaPortlet\html:
edit_defaults.jsp, which contains the information needed to populate the Customize dialog.
edit.jsp, which contains the information needed to populate the Personalize dialog.
view.jsp, which is invoked when the portlet is sharing the page with other components.
Under Web Content, WEB-INF, two deployment descriptors:
oracle-portlet.xml, which contains information to support Oracle extensions for import/export and inter-portlet communication. It appears because you chose Enable WSRP V2 inter-portlet communication using Oracle extensions on Step 2 of the wizard.
portlet.xml, which specifies all the portlet resources (the information you entered through the JSR 168 Java Portlet Wizard).
web.xml, which specifies the Web application resources.
Now that you've created the portlet, it's time to run it to see what it does. To do that, you first must deploy the portlet to an Oracle Application Server. When you installed JDeveloper, you automatically downloaded a standalone OC4J called WebCenter Preconfigured OC4J, so you can use that. However, you first have to establish a connection between this OC4J and the instance of JDeveloper you're using. Let's do that now.
Part of deploying a portlet includes establishing a connection to whichever application server you are using. In this tutorial, your portlet will be deployed to the WebCenter Preconfigured OC4J. Let's set up a connection to this OC4J.
Start the WebCenter Preconfigured OC4J by clicking the Start WebCenter Preconfigured OC4J icon at the far right of the JDeveloper toolbar (Figure 3-14).
Figure 3-14 Starting the Preconfigured OC4J
Assuming that this is the first time you have started this OC4J, you will see a message asking if you want to install the WebCenter Preconfigured OC4J.
Click Yes.
Wait for the message stating that the OC4J instance has initialized before you proceed (see Figure 3-15).
When you first start the preconfigured OC4J, its readme file displays in the JDeveloper Editor. This document describes how to start, stop, test, and connect to the preconfigured OC4J, lists the port defaults, and provides some useful troubleshooting tips. If you need to access this file in the future, select Help, WebCenter Preconfigured OC4J Readme from the main JDeveloper menu.
The preconfigured OC4J has been installed on your computer, but you still have to establish a connection to it (so JDeveloper knows where to find it).
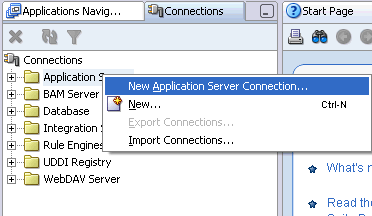
Click Connections Navigator (next to the Applications Navigator).
Right-click the Connections node, and choose New Application Server Connection as shown in Figure 3-16.
Figure 3-16 Connecting JDeveloper to the Preconfigured OC4J
Click Next to exit the Welcome page.
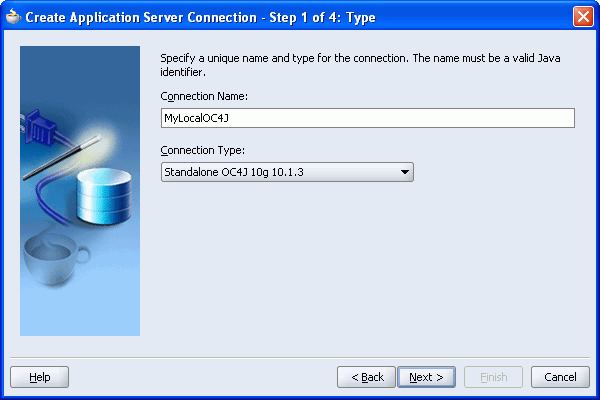
In the Connection Name field, enter: MyLocalOC4J
From the Connection Type list, select Standalone OC4J 10g 10.1.3 as shown in Figure 3-17.
Figure 3-17 Selecting a Connection Name and Type
Click Next.
Enter oc4jadmin as the username, and the password welcome.
welcome is the default password for the WebCenter Preconfigured OC4J.
Select Deploy Password to forgo the requirement of a password each time the connection is established (Figure 3-18).
Click Next.
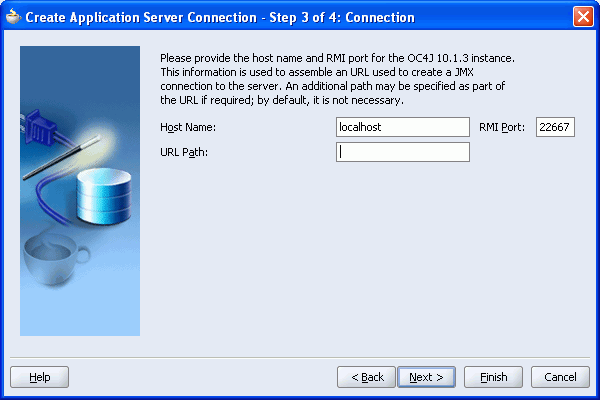
If the WebCenter Preconfigured OC4J resides on your computer, accept the default Host Name localhost.
This tutorial has been written on the assumption that localhost can be used in a URL to successfully refer to the local computer. However, some firewall configurations can block access to this address. If this occurs, either change your firewall configuration to allow localhost or alternatively, enter the fixed IP address of your computer here. If your computer does not have a fixed IP address, as it is configured to use DHCP, then reconfigure your firewall to allow localhost to work.
Change the RMI Port to 22667, the default RMI port for the preconfigured OC4J.
You can leave the URL Path blank. This information is not required (Figure 3-19).
Figure 3-19 Entering Connection Details For the Preconfigured OC4J
Click Next.
Verify the connection by clicking Test Connection.
A success message appears in the Status pane if everything is correct. If the test fails, error messages display in the Status field. Use the Back button to return to earlier wizard pages to correct entries.
Click Finish.
Now that you have established a successful connection, you are ready to include it in a WAR file. WAR stands for web application archive, and it packages together all the resources, portlets, and deployment descriptors required to deploy your portlet.
In this lesson, you'll learn how to deploy the Java portlet to your local WebCenter Preconfigured OC4J. When you deploy a portlet, you package it up so that it can run on a J2EE server. If you're familiar with OracleAS Portal, we're in effect creating a portlet provider, which in the WSRP world is known as a portlet producer.
Display the Applications Navigator.
Right-click the Portlets project, and click New.
In the Categories section, expand General, and click Deployment Profiles.
In the Items section, select WAR File (Figure 3-20).
Click OK.
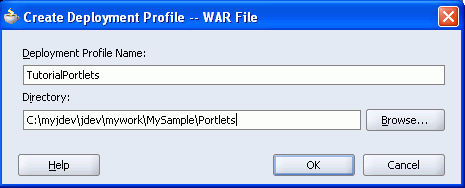
In the Create Deployment Profile - WAR File dialog box(Figure 3-21), enter the following:
Table 3-2 Create Deployment Profile - WAR File
| Setting | Value |
|---|---|
|
Deployment Profile Name |
Enter: |
|
Directory |
Navigate to the directory you chose in step 7 in Step 1: Using the JSR 168 Java Portlet Wizard. You should be able to simply accept the default. |
Figure 3-21 Creating a Deployment Profile -WAR File
Click OK.
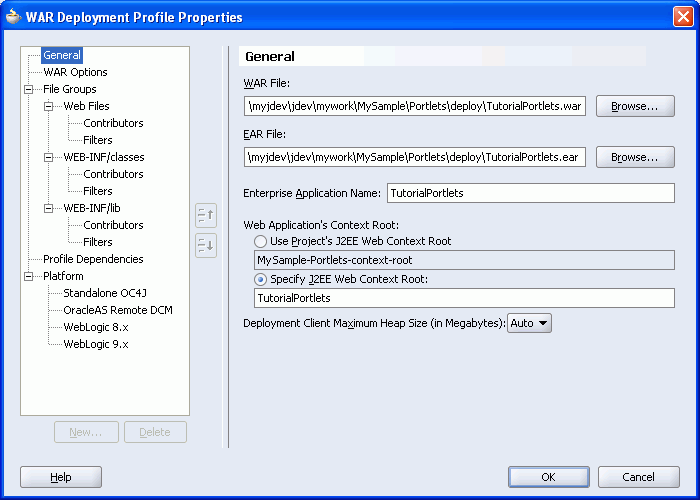
In the WAR Deployment Profile Properties window, select Specify J2EE Web Context Root, and then enter TutorialPortlets as shown in Figure 3-22.
Figure 3-22 Setting WAR Deployment Profile Properties
Click OK.
In the Applications Navigator, expand the Resources node.
You should see the deployment profile TutorialPortlets.deploy as shown in Figure 3-23.
Right-click TutorialPortlets.deploy, and click Deploy To, MyLocalOC4J, the connection you created earlier (see Step 2: Setting Up Your Connection.).
If the Configure Applications window displays during deployment, click OK.
Wait for the Deployment Finished message in the Deployment Log (bottom of the JDeveloper window) to verify that the deployment succeeded.
Now let's run the portlet to make sure it's functioning properly.
Bring up a browser window, and enter this URL:
http://<host>:<port>/<context-root>/portlets/wsrp2?WSDL
where:
| Parameter | Value |
|---|---|
| host | The host name you used to connect to the WebCenter Preconfigured OC4J. Earlier in this lesson, we accepted the default, localhost.
(If you chose to use your computer's IP address, rather than localhost, enter this here instead.) |
| port | The HTTP Listener port. For the WebCenter Preconfigured OC4J, use 6688, the default port on which this preconfigured OC4J listens.Foot 1 |
| context-root | TutorialPortlets, as established in step 8 in this lesson. |
Footnote 1 To change the port on which the preconfigured OC4J listens, go to JDEVHOME\jdev\extensions\oracle.adfp.seededoc4j.10.1.3.2.0\j2ee\home\config\default-web-site.xml and change the following entry: <web-site .... port="6688" ...>
So, for this tutorial the URL looks something like this:
http://localhost:6688/TutorialPortlets/portlets/wsrp2?WSDL
Make a note of this URL. You'll need it in Step 5: Registering Your Portlet with Oracle WebCenter Framework.
In the browser, you should now see XML similar to that shown in Figure 3-24.
Figure 3-24 WSDL Describing Your Portlet as a Web Service
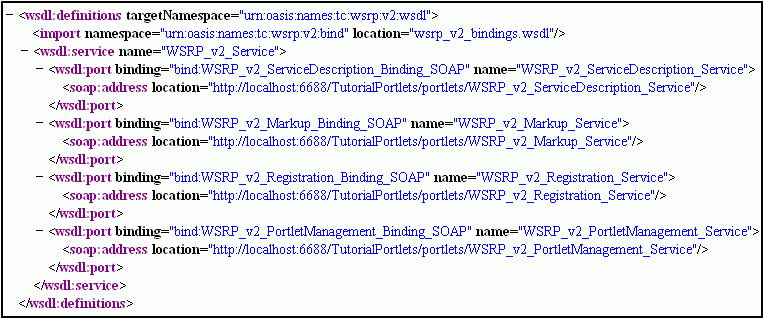
The portlet you just deployed has now been exposed as a Web service. What appears in the browser is the Web Services Description Language (WSDL) that describes this Web service. Assuming your WSDL looks something like Figure 3-24, the next step is to create a JSF page that will consume the portlet.
To create a JavaServer Faces (JSF) page:
In the Applications Navigator, right-click the ViewController project, and select New.
In the Categories pane, under Web Tier, click JSF to create a JavaServer Faces page.
Under Items, select JSF JSP, and click OK.
The JSF JSP Wizard opens.
Click Next to exit the Welcome page.
In the File Name field as shown in Figure 3-25, enter: MyPage
You can accept the default location for the Directory Name.
Under Type, click JSP Document so an XML version of the page (that is, a .jspx file) will be created.
Click Next.
We won't be adding any back-end logic to this page (at least, not in this lesson), so we don't need a new managed bean. Leave the default setting as is (Do Not Automatically Expose UI Components in a Managed Bean) as shown in Figure 3-26.
Figure 3-26 Component Binding Page of the Create JSF JSP Wizard
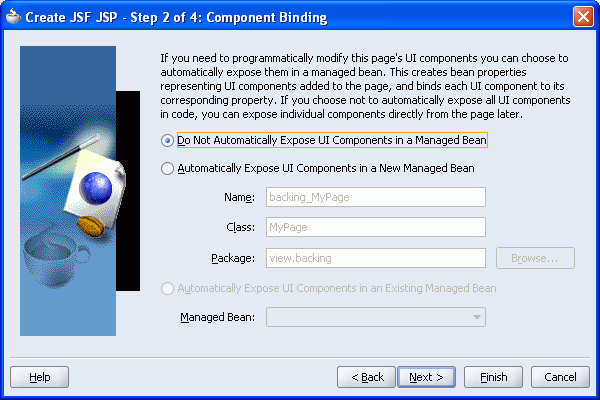
Click Next.
On the Tag Libraries page, use the double arrows to move all the libraries from the Available Libraries pane to the Selected Libraries pane. The following libraries should be included:
ADF Faces Components 10_1_3_2_0
ADF Faces HTML 10_1_3_2_0
ADF Portlet Components 10_1_3_2_0
Customizable Components Core 10_1_3_2
JSF Core 1.0
JSF HTML 1.0
Click Next.
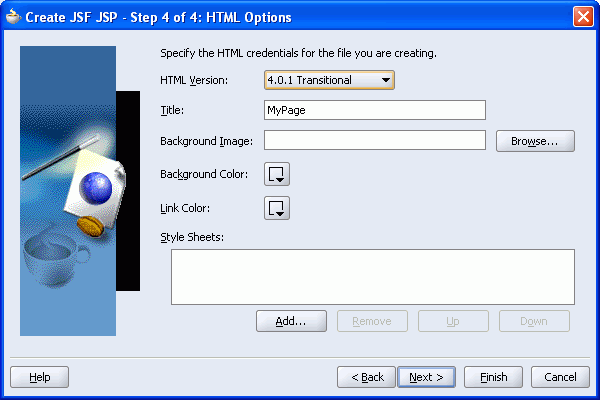
We don't need any special HTML options, so click Finish on the page shown in Figure 3-27.
Figure 3-27 Creating a JSF JSP - HTML Options
You should now be able to see the page as shown in Figure 3-28 you just created in the Applications Navigator, under ViewController, Web Content, MyPage.jspx.
Figure 3-28 MyPage in the Applications Navigator
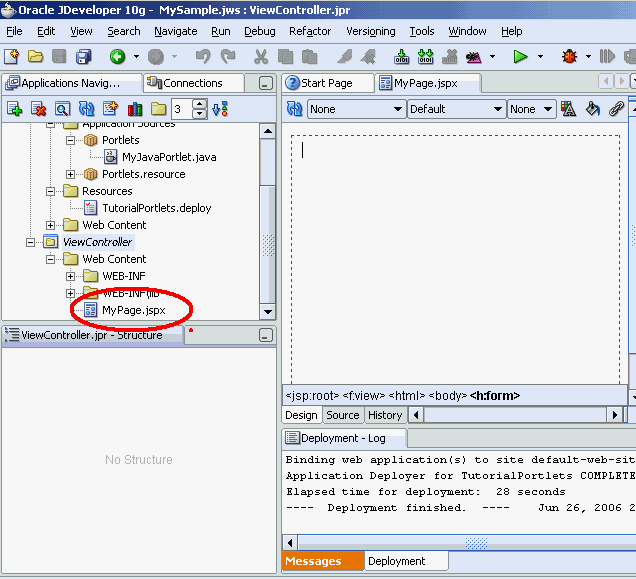
You should also see your page open in the Visual Editor, ready for us to begin adding components.
So far we have created a portlet, a portlet producer, and a JavaServer Faces page. Now we need to tie them all together and tell the page how to access the producer. This is also known as registering the producer with the application.
Right-click ViewController in the Applications Navigator, and click New.
In the New Gallery, under Web Tier, click Portlets as shown in Figure 3-29.
Figure 3-29 New WSRP Producer Registration
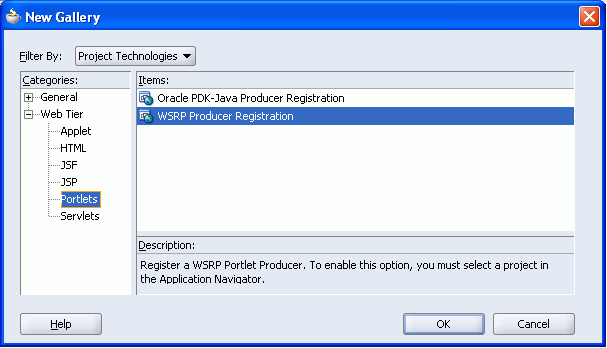
Select WSRP Producer Registration, and click OK.
This opens the WSRP Portlet Producer Registration Wizard.
Click Next to exit the Welcome page.
In the Name field, enter: TutorialProducer
Click Next.
On the Connection page (Figure 3-30), enter the URL you constructed in Step 3: Deploying Your Portlet (sub step 13). For example:
http://localhost:6688/TutorialPortlets/portlets/wsrp2?WSDL
Figure 3-30 New WSRP Producer Connection Details
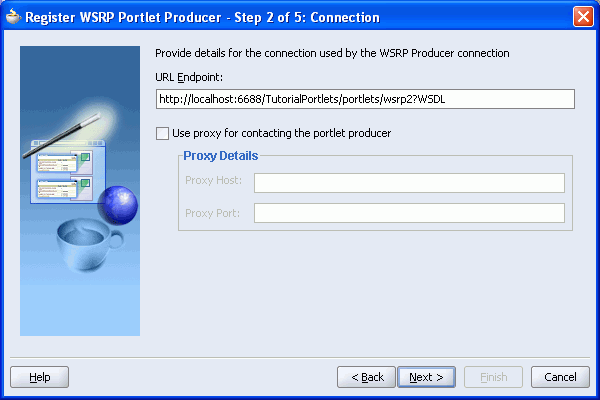
Proxy information isn't necessary for this tutorial as you're using a local preconfigured OC4J.
Click Next.
Click Next again to accept the default timeout value of 30 seconds.
Click Next to accept the default security settings.
On the Key Store page, click Finish.
You should see a message that looks like Figure 3-31.
Figure 3-31 Successfully Registered Portlet Producer
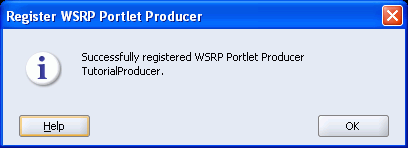
Click OK to close this message box.
A Portlet Producers node now displays in the Applications Navigator as shown in Figure 3-32. Expand this node and verify that TutorialProducer appears there.
Figure 3-32 TutorialProducer in the Applications Navigator
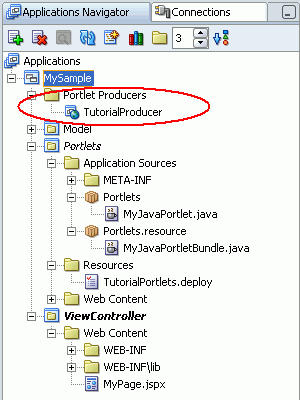
The page now knows where to locate the portlet MyJavaPortlet and how to access it. Let's verify to make sure.
To test the portlet, we'll add it to MyPage.jspx, run the page, and see if the portlet looks as we expect it to.
If MyPage.jspx isn't already open, locate the page name in the Applications Navigator (under ViewController, Web Content) and double-click it.
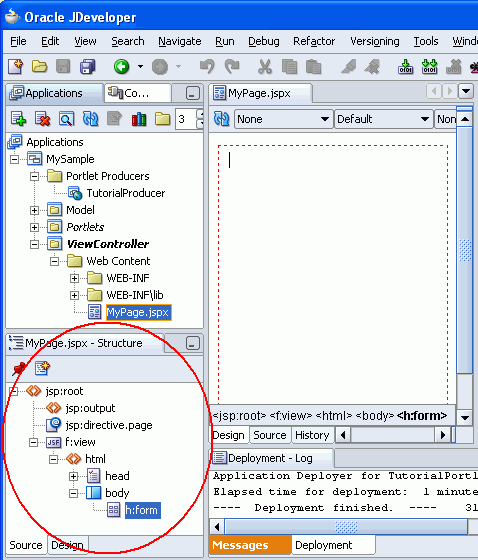
This opens the page in Structure window, as shown in Figure 3-33.
Figure 3-33 MyPage.jspx Open in Structure Window
On the far right side of the JDeveloper window, click the Component Palette drop-down list as shown in Figure 3-34, and verify that TutorialProducer is listed there.
Note:
Sometimes the Component Palette becomes hidden. If you don't see it, select View, Component Palette from the JDeveloper menu.Figure 3-34 TutorialProducer in the Component Palette
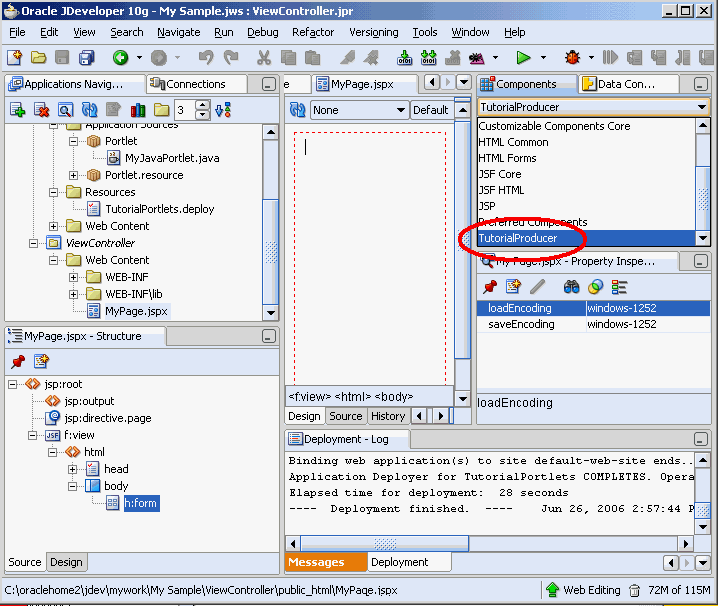
Select TutorialProducer. You should see your portlet MyJavaPortlet listed there.
Select MyJavaPortlet, and drag it across to h:form, the last entry in the Structure window. You want to make sure that the portlet is included IN the form, and the Structure window makes it easy to do this.
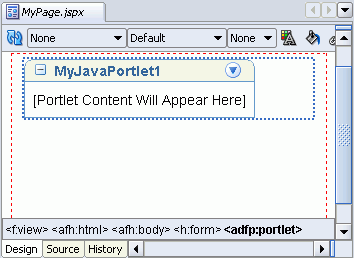
You should now see something that looks like Figure 3-35.
Figure 3-35 MyJavaPortlet Added to MyPage.jspx
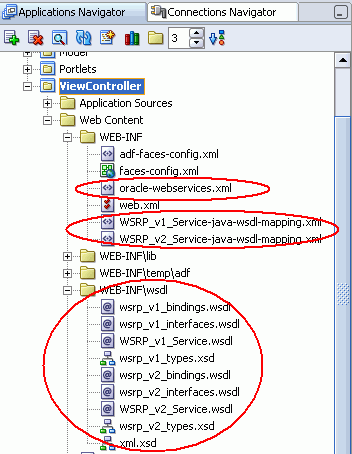
You should be able to locate several newly generated files and folders in the Applications Navigator. The expanded Navigator looks like Figure 3-36. These internal files are created when consuming portlets of WSRP producers. You won't need to edit any of these files.
Figure 3-36 WEB-INF\wsdl Created in Application Navigator
Now let's run the page.
In the Applications Navigator, right-click MyPage.jspx, and select Run.
This may take a few moments. You may notice that the Message Log says Running: Embedded OC4J Server. While the portlet is running in the preconfigured OC4J you downloaded at the beginning of this tutorial, the page itself is running in JDeveloper's embedded OC4J.
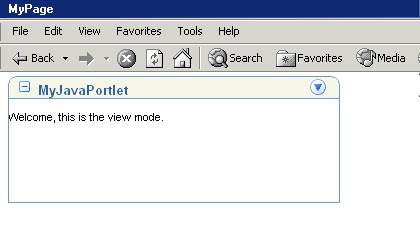
The page should open in a new browser window (Figure 3-37).
Figure 3-37 MyJavaPortlet in a Browser Window
Click the Actions menu on the portlet header.
You should see two options: Refresh and Customize (Figure 3-38). Notice that the Personalize option does not display. MyJavaPortlet does support user personalizations but you'll only see the Personalize option when the portlet appears in an application that implements a security model and you're logged in with valid user credentials. When we get to Chapter 8, "Providing Security", we'll test the Personalize mode.
For now, let's test the Customize mode.
From the Actions drop-down menu, select Customize.
In the Portlet Title field, change the portlet header to something else, such as My First Java Portlet as shown in Figure 3-39.
Click OK.
The portlet is redisplayed in the browser, with the name you chose displayed in the header.
We now know that this portlet is working properly, but it isn't very interesting. Let's now add some logic so that users can paste HTML into a text box for the portlet to render.
In this step, we'll add some code that allows a user to paste HTML into a text box for the portlet to render.
Return to JDeveloper.
In the Applications Navigator, under Portlets, Web Content, MyJavaPortlet\html, double-click view.jsp.
A new editing window opens to the right of the Applications Navigator.
Click the Source tab at the bottom of the new window.
To the existing JSP code, add the lines highlighted in Figure 3-40:
Here is the code to copy and paste:
<%
String[] str = {"Portlet Content"};
PortletPreferences prefs = renderRequest.getPreferences();
str = prefs.getValues("portletContent",str);
for (int i=0; i<str.length; i++)
{
%><%=(i<str.length-1)?str[i]+", ":str[i]%><%}%>
This code will retrieve the preferences set in Personalize or Customize mode and display them in the portlet's View mode so that users can see them.
Click the Save icon in JDeveloper's toolbar.
Double-click edit.jsp to open it in the Visual Editor.
Click the Source tab.
Add the code as shown in Figure 3-41 to implement a form field called Content. Here is the code to copy and paste:
<%
    String[] str = {"Portlet Content"};
    str = prefs.getValues("portletContent",str);
%>
<tr><td width="20%">
  <p class="portlet-form-field" align="right"> Content</p>
</td><td width="80%">
 <textarea rows="10" cols="60" class="portlet-form-input-field" name="portletContent"><%
 for (int i=0; i<str.length; i++)
 {%><%= (i<str.length-1) ? str[i]+", " : str[i] %><%}%>
</textarea>
</td></tr>
Click the Save icon in JDeveloper's toolbar.
Click the Design tab to see the form field you just added as shown in Figure 3-42.
You've edited the file that will store the changes made through Personalize mode, but now you must make the same changes to the file that stores the changes made through Customize mode—that is, edit_defaults.jsp.
Double-click edit_defaults.jsp, and add the same code in the same location. Don't forget to click the Save icon when you are through.
MyJavaPortlet.java, the file containing the java code for this portlet, must now be edited as well.
In the Applications Navigator, under Portlets, Application Sources, portlet, double click MyJavaPortlet.java to open it in the Visual Editor's Source view.
Scroll down to the processAction method and locate the code line that says //Save the preferences. Insert the following two lines of code (indicated in bold):
// Save the preferences.
PortletPreferences prefs = request.getPreferences();
String param = request.getParameter(PORTLETTITLE_KEY);
prefs.setValues(PORTLETTITLE_KEY, buildValueArray(param));
String contentParam = request.getParameter("portletContent");
prefs.setValues("portletContent", buildValueArray(contentParam));
prefs.store();
Click the Save All icon to save your changes to view.jsp, edit.jsp, edit_defaults.jsp, and MyJavaPortlet.java.
Because you've made some changes, you need to redeploy the portlet to your preconfigured OC4J.
In the Applications Navigator, under Portlets, Resources, right-click TutorialPortlets.deploy.
Click Deploy to MyLocalOC4J.
Click OK to dismiss the Configure Application dialog.
Because TutorialPortlets.deploy was already deployed, click Yes to confirm undeploying the original version.
Wait for the Deployment Finished message. Notice how JDeveloper automatically saves and compiles the code before deploying the portlet.
Before running the page again, stop the embedded OC4J Server. Choose Run, Terminate, Embedded OC4J Server from the main menu.
Alternatively, click the red square Terminate icon in the Embedded OC4J Server Log window. It is good practice to stop the embedded OC4J server before testing your pages. JDeveloper will automatically restart the embedded OC4J server, when you run a page.
Make sure that MyPage.jspx appears in the Visual Editor, then click Run > MyPage.jspx.
A new browser window opens displaying MyJavaPortlet.
Select Customize from the drop-down menu.
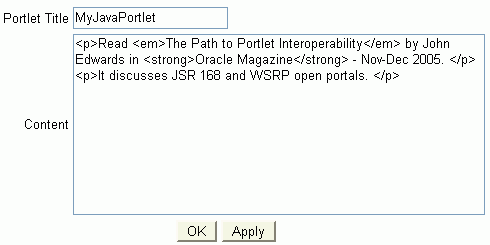
Because we added the Content field, the Customize action now displays a text box that looks like Figure 3-43.
Change the Portlet Title back to MyJavaPortlet.
Copy and paste the following HTML text in the Content field as shown in Figure 3-44.
<p>Read <em>The Path to Portlet Interoperability</em> by John Edwards in
<strong>Oracle Magazine</strong> - Nov-Dec 2005. </p>
<p>It discusses JSR 168 and WSRP open portals. </p>
Figure 3-44 Customize Portlet Title and Content
Click OK.
Your browser should now look like Figure 3-45.
Figure 3-45 New HTML Text in MyJavaPortlet
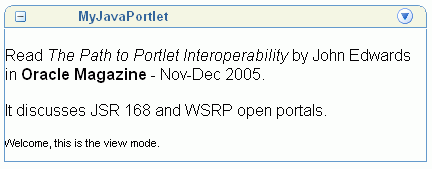
If you want to remove the default text (Welcome, this is the view mode.), simply double-click view.jsp, remove the final line of code, redeploy the portlet to your preconfigured OC4J, then re-run the page.
In the next lesson, you'll add some additional content to your page in the form of images.