| Oracle® WebCenter Framework Building a WebCenter Application Step by Step 10g (10.1.3.2.0) Part Number B31073-01 |
|
|
View PDF |
| Oracle® WebCenter Framework Building a WebCenter Application Step by Step 10g (10.1.3.2.0) Part Number B31073-01 |
|
|
View PDF |
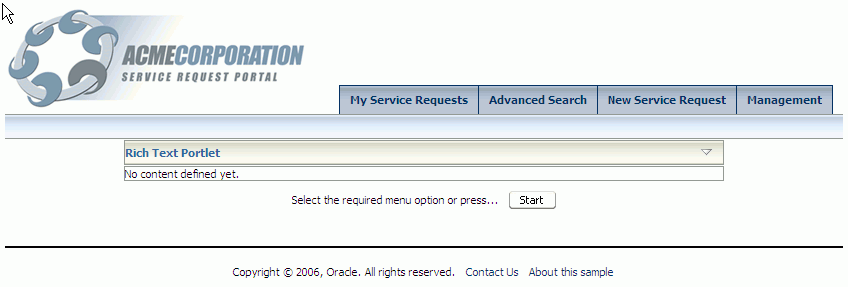
This chapter shows you how to create a welcome page in the SRDemo application and customize it for your users. You will add a rich text component that displays announcement text to the end user and display a file in place from the sample content repository you set up in Chapter 4, "Setting Up Your Content Repository". You will then make the welcome page public so that any user can view it, as well as add a Login link so that users can enter their user ID and password to view information in the application specific to them. The welcome page you create will look like the Figure 5-1.
This chapter includes the following sections:
The steps in this section show you how to add a rich text component to the existing welcome page in the application. This rich text component will display announcements to the public user. The manager of the company, who has site administration access, can update this announcement at runtime.
To add a rich text component:
From the SRDemoSample_Starter application, open the Design view of the SRWelcome.jspx page, located under UserInterface, Web Content, app.
Locate the image acmecenter.jpg.
Click the Source tab to view the source code of the page.
Delete the image from the page by removing the following code:
<af:objectImage height="376"
                 width="800"
                 source="../images/acmecenter.jpg"/>
This snippet of source code should now look like Figure 5-2.
Figure 5-2 panelGroup with the Acmecenter.jpg Deleted

You will now add the Rich Text portlet at this location.
Before you can add the Rich Text portlet, you must first register it. However, to find the registration URL for the Rich Text Portlet Producer, do the following first:
Start the preconfigured OC4J.
If the readme page does not open by default, from the Help menu, select WebCenter Preconfigured OC4J Readme.
On the readme page, click the index page link in the Index Page section.
On the WebCenter Preconfigured OC4J index page, click Rich Text Portlet Producer under WSRP Portlet Producers.
Click WSRP v2 WSDL.
Save the URL from the address bar of the browser. Use this URL during the producer registration.
To register the Rich Text portlet producer, right-click the UserInterface project and choose New.
In the New Gallery dialog box, filter by All Technologies, then choose Web Tier, Portlets, WSRP Producer Registration.
In the Name field, enter RichTextPortletProducer, then click Next.
In the URL Endpoint field, enter the URL for the WSDL of the WSRP v2 Producer in your preconfigured OC4J. This is the URL you saved in step 5.
Click Next, then click Finish.
In the Structure pane, click to select the panelHorizontal component that originally contained the image.
From the Component Palette, choose RichTextPortletProducer, then select Rich Text Portlet from the list. The new portlet displays within the panelHorizontal component.
Select the Rich Text Portlet and open the Property Inspector.
Set the AllModesSharedScreen property to true.
Set the Width to 600 pixels.
Right-click SRWelcome.jspx and go to the page definition.
Edit authorization and grant Customize privilege to manager.
You must do this as managers should be able to customize the content of the Rich Text portlet on the page.
Save the page.
In the Applications Navigator, right-click SRWelcome.jspx and choose Run.
Due to a standard J2EE security constraint on all JSP and JSPX files, you will automatically be redirected to the default SRDemo login page, which is a simple JSP page that contains static HTML. You can log on as three different users: ahunold, sking, and dfaviet as shown in Figure 5-3.
If you log in as sking, then you will see all the tabs, including the management tab shown on the far right in the following figure.
The portlet at runtime looks like Figure 5-4.
Figure 5-4 Tabs Displayed When Logged In As Manager

If you log in as ahunold, you will not see the management tab, because ahunold is not a manager.
In your browser, click the arrow on the Rich Text portlet, then choose Customize to customize the text of the portlet.
Customize the portlet to include the following text:
Welcome to My Acme Corporation!

Introducing the Service Request Portal (Version 5.0)

Here you can get help with questions and/or issues with your My Acme appliance.

View the My Acme page to view your current service request information such as
status, history, and much more. Now available, product manuals for the new
Fridge Freezer F011s appliance.
To format this text:
Note:
To avoid issues with text formatting, first copy this text to Notepad and then copy it from there to your portlet.Select the first sentence and choose a larger font, then click the Bold icon.
To create a hyperlink in the text, select the My Acme text (underlined in the sample text), then click the Hyperlink icon in the Rich Text Editor. Enter the URL you selected into the field, for example:
http://localhost:port/SRDemo/faces/app/SRWelcome.jspx
Users have many options on how to display content by using content management systems. While a common way is to display the content as links, developers may also want to display the content of a text or HTML file directly within the application, due to formatting or for other reasons. Using JCR, you can display the file in place and still manage the content from within the content management system.
The steps in this section show you how to display a file from your content repository on an existing page. This lets you edit the page without changing the application that is rendering the page.
To display a file in place:
If it is not already open, open the existing SRWelcome.jspx page from SRDemoStarter, UserInterface, Web Content, app.
From the ADF Faces Core library, select a panelHorizontal and drag it on to the panelPage, below the panelHorizontal that contains the Rich Text portlet.
Set the panelHorizontal halign to center.
In the Data Control Palette, expand SRContentRepository. You created this data control earlier in Chapter 4, "Step 3: Configuring a JCR Data Control".
Tip:
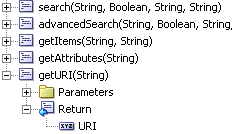
If you cannot see the Data Control Palette, select Data Control Palette from the View menu.Under getURI(String), expand the Return node and drag URI (Figure 5-5) into the panelHorizontal.
Figure 5-5 getURI in the Data Control Palette

From the Create menu, select Text and ADF Output Text.
This displays the Action Binding Editor, as shown in Figure 5-6.
In the Value field for the path parameter, enter /welcome.html.
Click OK.
View the source of the page and add the code shown in Example 5-1 below the OutputText:
Save the file.
Run SRWelcome.jspx.
Enable Public Users to Execute the getURI Method
Since the welcome page is a public page, you must define that the getURI method (used to show the file from the content repository) can be executed by public users.
To change the access privileges:
Open the page definition.
Under bindings in the structure pane, right-click getURI1.
From the pop-up menu, select Edit Authorization.
Refer to the chapter titled "Securing Your WebCenter Application" in Oracle WebCenter Framework Developer's Guide for more information about setting user privileges.
In the dialog box, select invoke against the Anyone role for the method oracle.SRDemo.......getURI1_return.
You should see the welcome page displayed as well as a URL which is produced by the OutputText. Go back to Oracle JDeveloper and delete the OutputText from the structure pane.
You will have noticed that running SRWelcome.jspx redirects you to the default SRDemo application login page. In the initial starter version of the SRDemo, authorization within the application is implemented through J2EE security role membership.
J2EE security secures a path based on roles. Constraints are defined for specific URL patterns and these are mapped to constraints that are in turn mapped to roles. For example, the URL pattern faces/app/* can be mapped to all available roles so that everybody in those specific roles can access all the pages in the application. You can configure constraints for your application to recognize in the web.xml file. For example, you can configure a constraint that maps the manager role to the URL pattern faces/app/manager/* as shown in Example 5-2 (new constraint shown in bold text):
Example 5-2 Example of the Security Constraints in the web.xml file
<!-- Security Constraints ================================================== -->
 <security-constraint>
   <web-resource-collection>
     <web-resource-name>J2EE-Secured-Application</web-resource-name>
     <url-pattern>faces/app/*</url-pattern>
   </web-resource-collection>
   <auth-constraint>
      <role-name>user</role-name>
      <role-name>staff</role-name>
      <role-name>technician</role-name>
      <role-name>manager</role-name>
   </auth-constraint>
 </security-constraint>
<security-constraint>
   <web-resource-collection>
     <web-resource-name>J2EE-Secured-Application</web-resource-name>
     <url-pattern>faces/app/manager/*</url-pattern>
   </web-resource-collection>
   <auth-constraint>
      <role-name>manager</role-name>
   </auth-constraint>
 </security-constraint>
Refer to the chapter titled "Securing Your WebCenter Application" in Oracle WebCenter Framework Developer's Guide for more information about defining security constraints.
At runtime, a deployment descriptor maps the roles to the identity store. The policies, that is, the definition of which users belong to which roles and what they have access to, are specified in a JAZN resource providers, like JAZN-XML, which specifies its settings in the file system-jazn-data.xml or JAZN-LDAP, which can use Oracle Internet Directory. In the Oracle JDeveloper development environment, we use the system-jazn-data.xml file to store this policy information as shown in Example 5-3.
Example 5-3 Definition of the User and Role Mapping in the system-jazn-data.xml File
<role>
  <name>manager</name>
  <members>
   <member>
      <type>user</type>
      <name>sking</name>
   </member>
  </members>
</role>
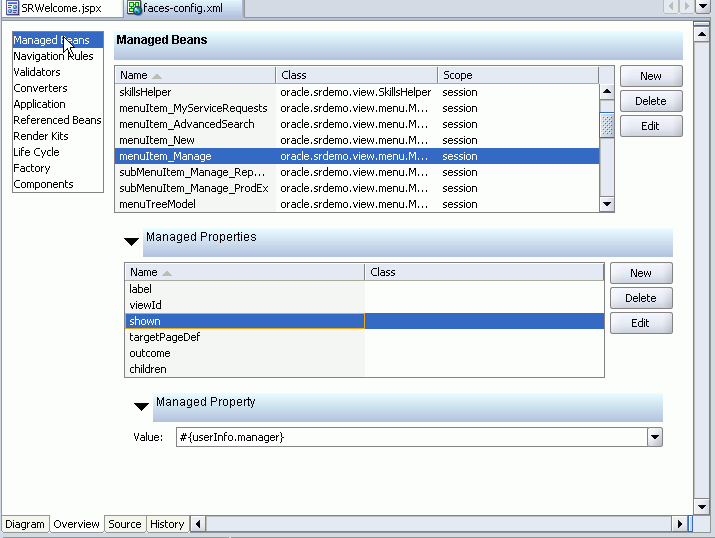
Additionally, Expression Language can be used in the application to show and hide particular menu items like the management tab, which only shows up for managers. Figure 5-7 shows how the management tab is shown or hidden based on the membership of the Manager role.
Figure 5-7 Display of UI Elements Based on Membership

This internally maps to the isManager function in the UserInfo class, which determines membership of the named role as shown in Example 5-4.
Example 5-4 EL to Define What UI Elements Must Be Displayed
/**
  * Function designed to be used from EL for rendering UI Features based on
  * membership of the "manager" role.
  * @return boolean
  */
 public boolean isManager() {
        return (checkIsUserInRole("manager"));
 }
In the WebCenter version of the SRDemo, we want to implement a finer-grained security model, based on the ability to perform a specific action, rather than role membership.
Unlike J2EE security, which is based on URLs, the use of JAAS-based ADF Security allows us to implement different levels of access for a given page. For example, View, Customize, and Edit.
To add ADF security-based global navigation links to the page, perform the following steps:
In the Applications Navigator, open SRWelcome.jspx.
In the Structure pane, navigate to menuGlobal PanelPage facets.
In the design view, drag a menuButtons component onto the menuGlobal.
Next, drag three CommandMenuItems into the menuGlobal facet on the top right corner of the page. You can also drop them into the appropriate node in the structure pane.
For the first commandMenuItem, select the Text property in the Property Inspector and add an expression to the text property by clicking the Bind to Data icon as shown in Figure 5-8. This displays the Bind to Data dialog box.
Under JSP Objects, open the res class and scroll down to the srdemo.menu.home entry. Select this and press the right arrow to return the required expression language, and click OK.
Set the Action property for the commandMenuItem to GlobalWelcomeHome.
The icons for the various skins we are going to use are stored in individual skin images directories and we can use the skin bean (described in chapter 4) to return the directory structure that relates to the current skin which can be wrapped in EL
Set the Icon property for the first commandMenuItem as follows:
/skins/#{skinBean.currentSkin}/skin_images/home.gif
Note:
Some of the skins' icons contain text to indicate the action, while others require a separate text label. The skin bean has a function to define which skins require just an icon and which skins require icons plus text.As the default skin already has labels in the icons, you must turn off the navigation buttons' text labels by setting the Text property of the commandMenuItem to the following:
text="#{skinBean.iconOnly ? null : res['srdemo.menu.home']}"
Repeat the same steps for the other two commandMenuItems and set the properties as follows:
For commandMenuItem two, select GlobalHelp for the Action property and srdemo.menu.help for the Text property.
Set the Icon property for the second commandMenuItem as follows:
/skins/#{skinBean.currentSkin}/skin_images/help.gif
For commandMenuItem three, select GlobalAbout for the Action property and srdemo.menu.info for the Text property.
Set the Icon property for the third commandMenuItem as follows:
/skins/#{skinBean.currentSkin}/skin_images/info.gif
In the Source view, the commandMenuItem definitions will now look like Example 5-5.
Example 5-5 Example Language Used for the Action of a Command Button
<af:menuButtons>
  <af:commandMenuItem text="#{skinBean.iconOnly ? null : res['srdemo.menu.home']}"
                      action="GlobalWelcomeHome"
                      icon="/skins/#{skinBean.currentSkin}/skin_images/home.gif"/>
  <af:commandMenuItem text="#{skinBean.iconOnly ? null : res['srdemo.menu.help']}"
                      action="GlobalHelp"
                      icon="/skins/#{skinBean.currentSkin}/skin_images/help.gif"/>
  <af:commandMenuItem text="#{skinBean.iconOnly ? null : res['srdemo.menu.info']}"
                      action="GlobalAbout"
                      icon="/skins/#{skinBean.currentSkin}/skin_images/info.gif"/>
</af:menuButtons>
In the structure pane, add a goMenuItem right before the first commandMenuItem.
Select the Text property in the Property Inspector and add an expression to the text property by clicking the Bind to Data icon. Under JSF Managed Beans, scroll down to the authNLink entry. Select the label property and press the right arrow to return the required expression language, text="#{authNLink.label }", which is then further updated.
Click OK.
Because some skins have text included in their icons, you must update the text property to allow for icons that contain a label by setting the property as follows:
text="#{skinBean.iconOnly ? null : authNLink.label }"
Set the Destination property to the JSF Managed Beans, authNLink URL as follows:
destination="#{authNLink.URL}"
Set the icon property to a context-sensitive skin icon as follows:
/skins/#{skinBean.currentSkin}/skin_images/#{authNLink.icon}
AuthnLink is a managed bean that keeps track of the user's authenticated state and sets the login and logout link and associated icons automatically. See the chapter titled "Securing Your WebCenter Application" in the Oracle WebCenter Framework Developer's Guide for more information.
Note:
The SRDemo version of the AuthnLink login component defines a boolean managed property (returnHomeOnLogout) that allows the developer to specify that the user should be returned to the application's home page (specified in the authnLink's homePage managed property) rather than staying on the current page when they log out of the application.To display the name of the user who has logged in, open the Component Palette and select JSF HTML and then select OutputFormat. Drag it on the top of infoUser in the Structure pane.
Bind the Value property to srdemo.connectedUser under JSP Objects/res.
Bind the rendered property to #{authNLink.authenticated} under JSF Managed Beans (the value is a boolean that returns true or false based on the authenticated status).
In the Component Palette, select JSF Core and then select a Param component. Drag it to the Structure pane on top of the outputFormat object and set the following properties:
Name: currentUserparam
Value: #{userInfo.userName} (exposing the current user) (under JSF Managed Beans/userInfo)
Set escape: false
Note:
TheAuthnLink.currentUser property also returns the name of the current authenticated user and could be used to display the logged in user. In this case, however, we are using the userInfo bean for backward compatibility with the previous version of the SRDemo application.To make the welcome page ultimately publicly accessible (after ADF Security has been configured), you must define an access policy which states that the page will be viewable by all users, whether they are authenticated or anonymous (that is, available to anyone) To do this, perform the following steps:
Right-click SRWelcome.jspx and go to the page definition.
Edit authorization and grant View privilege to anyone, as shown in Figure 5-9.
This will add the view privilege to the anyone role in the system-jazn-data.xml file. In an application protected by ADF security, (This will be turned on in the next chapter) each user is automatically made a member of this pseudo role (the anyone role principal is automatically added to the user's subject) Therefore, a public page is a special type of secured page that is available to everyone. This is different from J2EE security, in which a public page is defined by the simple lack of security constraints against that page. The ADF security model therefore differentiates between a page secured for public access and the absence of a secured implementation.
Note:
We will run the page after we build the login page and activate ADF Security in the next chapter.In the Applications Navigator, under the Web Content/WEB-INF folder, right-click the orion-web.xml file and choose Properties. The OC4J Web Application Deployment Descriptor dialog box is displayed.
Make sure the Run as Mode and Do as Privileged Mode options under JAZN are already selected, as shown in Figure 5-10.
Click OK.