4 Using Oracle Communicator
This chapter describes the main usage areas of Oracle Communicator. Topics include:
Oracle Communicator Main
The main window for Oracle Communicator shows you your contacts and provides the menus from which you can take most of your actions.
Figure 4-1 Oracle Communicator Main window
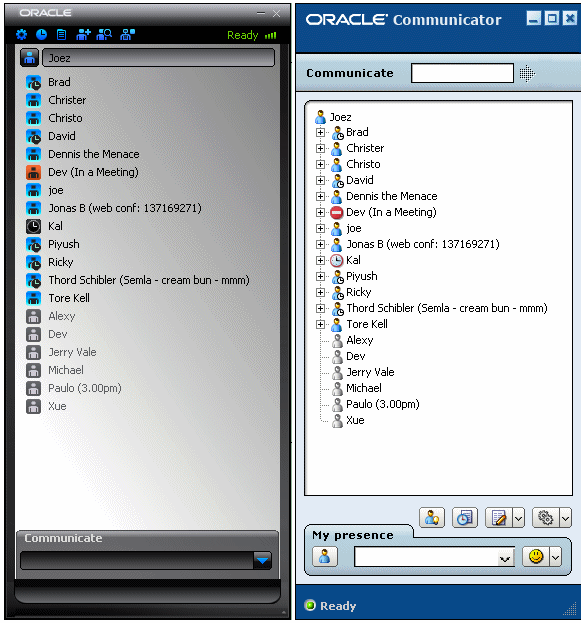
Description of "Figure 4-1 Oracle Communicator Main window"
You can access your Contacts from here, and you can use the menu items:
Settings
Use the Settings Menu to set up your Oracle communicator, and to customize it for your use. For more information on the Preferences, see Get Started.
You also use the Settings menu to access online Help, and to log off and/or exit Oracle Communicator.
History
Oracle Communicator saves History for messages.
Open History
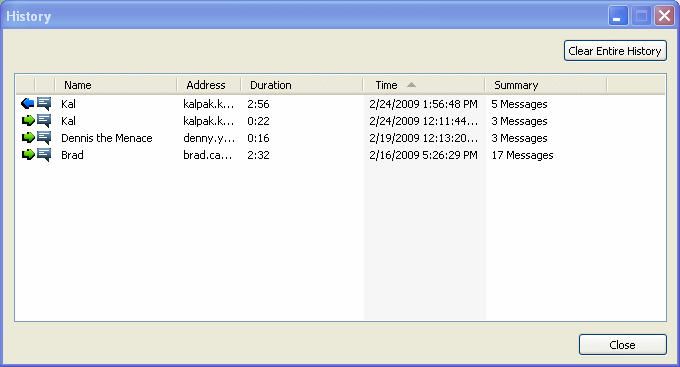
To open History, select History from the Communicate menu or select History from the File menu in the Communication dialog (In the Slate theme, click the Show History icon.). The History dialog appears.
The first column shows an arrow indicating the direction of the record (incoming or outgoing). An arrow pointing to the right indicates an outgoing message; an arrow pointing to the left indicates an incoming message.
Delete History
You can remove individual items from the history by selecting them and pressing the Delete key or right-clicking on one of the items and choosing Delete this entry. If you click Clear Entire History, you will delete all of the records.
Communicate with a Contact in History
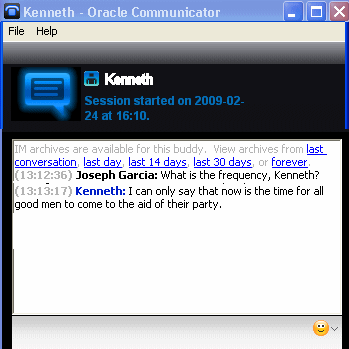
You can double-click on an instant message record to see the contents of that conversation. These contents will appear in a new communications window.
To communicate with a Contact in the History, right-click on any of the sessions and choose an action from the Communicate menu.
Add a Contact from History
You can add a Contact to you Contact List from the History list, if it is not already in your Contact List.
-
Right-click the Contact in the list and select Add to Contact List. Note that if the Contact is already in your Contact List, the Add to contact list menu item is inactivated. The Contact Properties dialog appears.
-
Edit the information in the text boxes or use the Get Info from Server button to get Contact information from the server. See Create a Contact for more information about creating a contact.
Create New Group
You can create a new group using the Create New Group icon on the menu bar. For more information on Creating and otherwise manipulating Groups see Create Groups.
Contacts
There are three Contacts icons on the menu bar that you use to create and manipulate Contacts. They are:
-
Show/Hide offline Contacts that enables you to display only online Contacts, or to display all (online and offline) Contacts.
Understanding the Communications Dialog
The Communications dialog is your main vehicle for communicating with Contacts. To open the Communications dialog, double-click on a Contact in you Contact List.
Communication Dialog
The Communication dialog is the area from which you will take most actions.
Save Message
From the File menu in the Communication dialog you can save a message dialog. Choose File > Save Text to save the text of a communication.
Add Contact from Communication Dialog
If you are communicating with someone who is not already on your Contact List, you can add the person to your Contact List.
-
Select Add Contact from the File menu. The Contact Properties dialog appears.
-
Edit the information in the text boxes or use the Get Info from Server button to get Contact information from the server. See Create a Contact for more information about creating a contact.
If you want to move your Contact List between different computers you can store your Contact List on the server. To do this, select Store Contact List in the Edit Contact List menu.
Instant Message
This section describes the Instant Messaging functionality of Oracle Communicator.
Introduction
Use Instant Messaging to send and receive text messages from your Contacts.
Send an Instant Message
You can send instant messages to your Contacts, or anyone else with a SIP address. There are two kinds of instant messages: text messages and voice messages.
To send an instant text message to a Contact in your Contact List, double-click the Contact name. The Communication dialog appears. Enter a text message in the lower part of the dialog and click Send. Your message has been received by the recipient when it appears in the Message area.
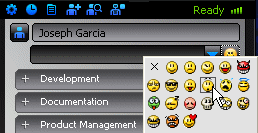
You can also add smileys to your messages. Just click on the Smiley icon and choose one of the Smileys that appear.
Send IMs to People Not in your Contact List
To send an instant message to someone not in your Contact List, enter a SIP address in the Communicate text box in the Main window and select Send Message... from the Communicate menu to the right of the text box. The Communication dialog appears. Write your text message in the lower part of the dialog and click the Send button. Your message has been received when it appears in the Message area.
Quickdial Query
In the Slate theme, Communicate displays a list of Contacts matching your input. For example, if you wanted to see all of the Contacts whose names began with jo, you would enter those letters into the Communicate field. Contacts matching the letters are displayed.
If there aren't any matches, then a list of recently entered values is displayed.
Send a Message to non-Oracle Communicator Users
To send an instant message to someone not in your Contact List, enter a SIP address in the Communicate text box in the Main window and select Send Message... from the Communicate menu to the right of the text box. The Communication dialog appears. Write your text message in the lower part of the dialog and click the Send button. Your message has been received when it appears in the Message area.
File Transfer
If your Oracle Communicator administrator has set up the file transfer capability, you can send and receive files with your Contacts. You can send a file in different ways: from the main window, by entering a SIP address and clicking the Communicate button, or from a Communication dialog by clicking the icon.
Initiate File Transfer
Right-click on the Contact's name and choose Send File.
OR
While in a communication, Click the File menu, and choose Send File.
A Send File dialog appears, enabling you to choose the file you want to send.
Select a File
Choose the file, and click Open. The receiving Contact receives a notification that you are offering to send a file. You can accept or decline.
File Transfer Notification
If you Decline, the sender receives a notification that you have declined the transfer, and the transfer is cancelled.
If you Accept, a Progress dialog appears. When the transfer is complete, the dialog shows that the transfer is done. Dismiss the dialog.
Send a File
You can send a file to your Contacts, or anyone else, as long as they have a SIP address, are using this application and have a service provider that supports file transfer.
-
Right-click a Contact in your Contact List and select Send File... from the menu. To send a file to someone not in your Contact List enter a SIP address in the Address text box in the Main window and select Send File... from the Communicate menu. You can also send a file from the Communication dialog with someone you are already communicating with.
-
In the File Transfer dialog point out the file you want to send and click Open.
-
If the other party accepts the file transfer the application will start sending the selected file. The File Transfer dialog will inform you of the progress of the file transfer and also when it is done. The File Transfer dialog will also inform you if the other party declined.
Receive a File
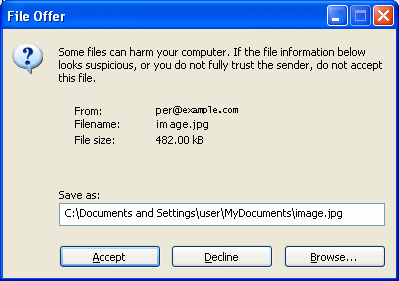
When someone wants to send you a file you will receive a pop-up showing the sender. Click on the pop-up and the File Transfer dialog appears.
To accept choose where to save the file by writing the path or using the Browse button. Then click the Accept button and you will start receiving the file. The File Transfer dialog will inform you of the progress of the file transfer and also when it is done.
To decline the file transfer click the Decline button. The other party will be notified of the decline.
Troubleshooting
This section contains some tips to help you if you encounter a problem. Sections include:
Presence
Presence troubleshooting tips:
Cannot Register
There are several different things that can cause this problem:
-
No network connection: Make sure your dial up connection or network connection is working. See your PC documentation for more details on configuring your network connection.
-
Faulty proxy settings: Make sure your proxy settings are correct. If you do not use a proxy, ensure that you have not checked the Use Proxy Server option in Preferences under Settings in the Main window.
-
Wrong SIP address: The presence server is determined from your SIP address. If it has been incorrectly entered, then the server will not be found. Create a new account with the correct SIP address.
-
Server problem: The presence server you want to use might be unreachable.
Contact your service provider for support if the problem persists.
Cannot Authenticate
Make sure your username and password are entered correctly. These are usually provided by your service provider.
Contact your service provider for support if the problem persists.
Cannot See Anyone in My Policy List
If your Presence Policy list is empty or incomplete, first make sure you are registered. The Presence Policy list is only populated once you have been successfully registered to the server. If you are registered, then the client may be having trouble downloading your policy from the server.
Contact your service provider for support if the problem persists.
Messaging
Messaging troubleshooting tip:
