6 Managing Oracle CQL Rules
This section contains the typical application tasks you can perform with Oracle CEP Visualizer to manage Oracle CQL rules, including:
For more information, see:
-
"Oracle Continuous Query Language (CQL) Example" in the Oracle Complex Event Processing Getting Started
6.1 Using the Query Wizard
Using the Oracle CEP Visualizer, you can manage the Oracle CQL rules in the Oracle CQL processors of an Oracle CEP application.
This section describes the following topics:
-
Section 6.1.1, "How to Create a Rule in an Oracle CQL Processor Using the Query Wizard"
-
Section 6.1.2, "How to Edit a Rule in an Oracle CQL Processor Using the Query Wizard"
-
Section 6.1.4, "How to Edit a Parameterized Query in an Oracle CQL Processor"
-
Section 6.1.6, "How to Delete a Rule in an Oracle CQL Processor"
-
Section 6.1.7, "How to Replace a Rule in an Oracle CQL Processor"
-
Section 6.1.8, "How to View a Rule in an Oracle CQL Processor"
-
Section 6.1.9, "How to Configure Query Wizard Oracle CQL Constructs"
-
Section 6.1.10, "How to Create an Oracle CQL Template for the Query Wizard"
6.1.1 How to Create a Rule in an Oracle CQL Processor Using the Query Wizard
Oracle CEP Visualizer provides a sophisticated Query Wizard to simplify Oracle CQL view and query construction. You can drag and drop Oracle CQL elements to construct a view or query or you can drag and drop a complete Oracle CQL view or query template and customize it to suit your needs. The Oracle CQL Query Wizard is designed to allow business users to efficiently create syntactically correct Oracle CQL views and queries and apply them immediately to a deployed Oracle CEP application.
Using the Query Wizard, you can create Oracle CQL views and query. You cannot create Oracle CQL streams and relations. Your deployed Oracle CEP application must provide the streams and relations. For more information, see Oracle Complex Event Processing Developer's Guide for Eclipse.
Note:
An Oracle CQL query will immediately begin outputting events if its input channels provide input events. If you plan to use a query selector on a channel with an upstream Oracle CQL processor, you may observe unwanted query results on the downstream channel between the time you add the query to the upstream Oracle CQL processor and the time you configure the query selector on the downstream channel. For more information, see Section 4.2.1.3, "Channel Properties: Outbound Channel With Query Selector".Alternatively, you can modify an existing Oracle CQL view or query; see Section 6.1.2, "How to Edit a Rule in an Oracle CQL Processor Using the Query Wizard".
To create a rule in an Oracle CQL processor using the Query Wizard:
-
In the left pane, navigate to and expand the Applications node of the Oracle CEP instance to which the application is deployed.
-
Select appname, where appname is the name of the application you want to use.
-
Select the Oracle CQL processor you wish to use:
-
To use the EPN diagram:
-
Click the Event Processing Network tab.
-
Double-click the Oracle CQL processor you wish to use.
-
-
To use the domain tree:
-
Expand the appname > Stages node, where appname is the name of the application you want to use.
-
Click the Oracle CQL processor you wish to use.
-
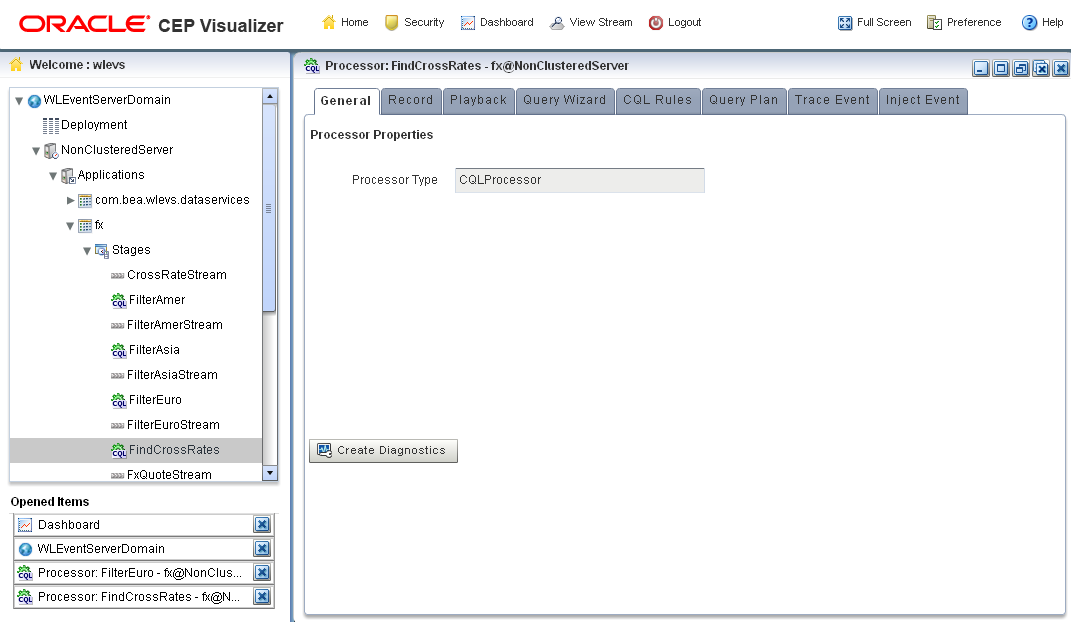
In the right pane, click the General tab
-
The Processor panel is displayed as Figure 6-1 shows.
-
-
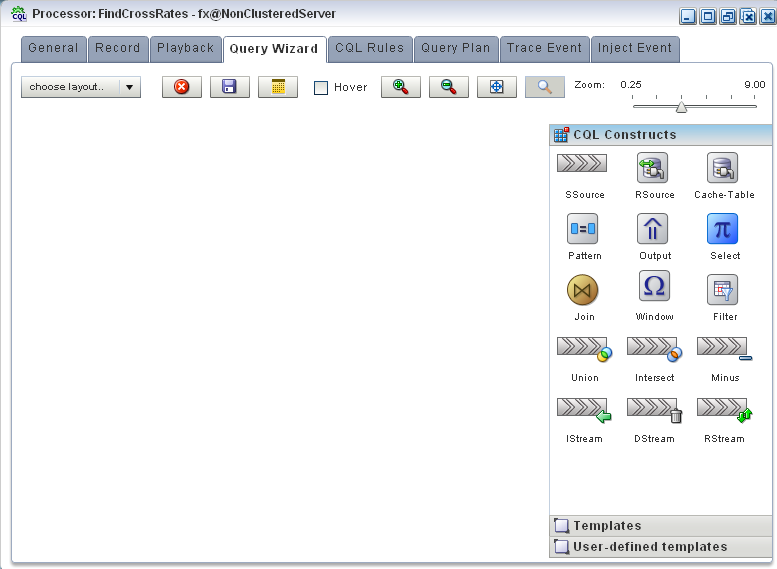
Click the Query Wizard tab.
The Query Wizard tab appears as Figure 6-2 shows.
For information on the various tools along the top of the Query Wizard canvas, see Section 6.1.11, "Managing the Query Wizard Diagram".
-
Decide how you want to create the Oracle CQL statement:
-
To construct the query based on an existing Oracle CEP server template:
-
Click the Templates tab.
-
Select a template and drag and drop it into the canvas.
-
-
To construct the query based on an existing user-defined template:
-
Click the User defined templates tab.
-
Select a template and drag and drop it into the canvas.
Note:
For more information about adding user-defined Oracle CQL statement templates, see Section 6.1.10, "How to Create an Oracle CQL Template for the Query Wizard". -
-
To construct the query one operator at a time or to add additional operators to a template-based Oracle CQL statement:
-
Click the CQL Constructs tab.
-
Select a construct and drag and drop it into the canvas.
-
Repeat until you have added the required constructs to the canvas.
-
-
-
Configure the connections between constructs:
-
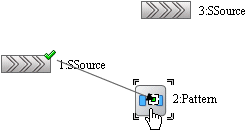
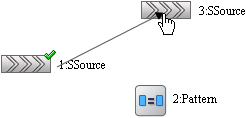
To connect constructs, click on a source construct and drag to a destination construct.
Oracle CEP Visualizer only allows interconnections that conform to Oracle CQL syntax.
Figure 6-3 shows a valid interconnection.
Figure 6-4 shows an invalid interconnection.
For more information about valid Oracle CQL syntax, see "Oracle CQL Statements" in the Oracle Complex Event Processing CQL Language Reference.
-
To abandon a connection attempt, click the Esc key on your keyboard.
-
To delete an existing connection, click on the connection to select it and then click the Delete key on your keyboard.
-
-
Configure each construct by double-clicking the construct and using the editor dialog that appears.
A construct icon without a green check mark is not configured.
A construct icon with a green check mark is configured.
For more information, see:
-
To save your Oracle CQL statement at any time, click the Save Query button.
The All Saved Queries dialog appears as Figure 6-5 shows.
The All Saved Queries dialog lists any saved queries for the processor you are configuring.
Figure 6-5 All Saved Queries Dialog: Saving
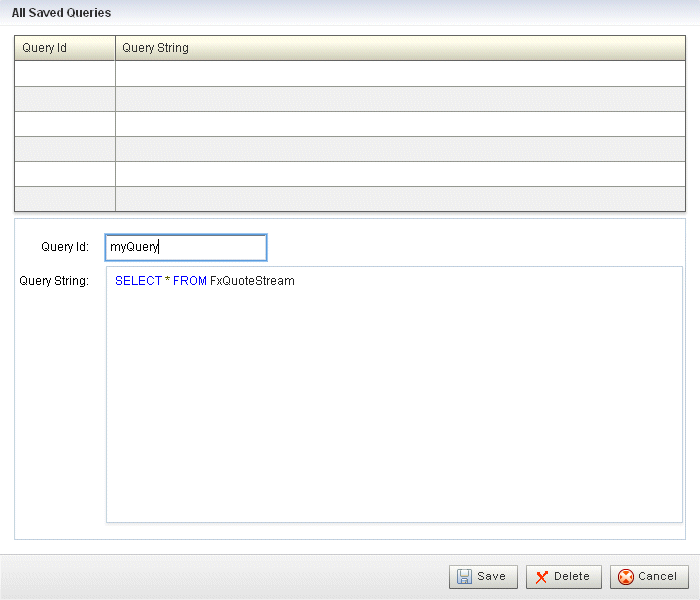
Description of "Figure 6-5 All Saved Queries Dialog: Saving"
-
Enter a query name in the Query Id field and click Save.
A confirmation dialog appears as Figure 6-6 shows.
-
Click OK.
Your query is saved to the local disk of the computer you are currently using. To reload your query, you must access the Oracle CEP Visualizer from the same local host.
-
To reload your Oracle CQL statement after saving, click the Open Query button.
The All Saved Queries dialog appears as Figure 6-7 shows.
Figure 6-7 All Saved Queries Dialog: Loading
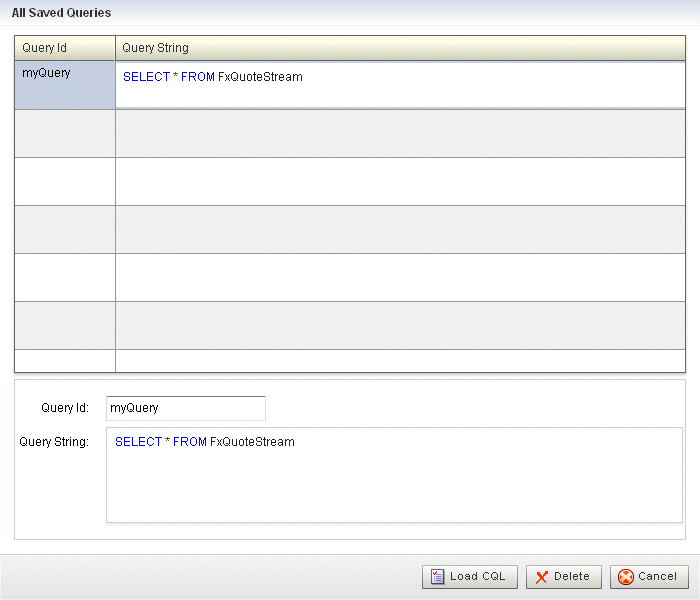
Description of "Figure 6-7 All Saved Queries Dialog: Loading"
-
Select your query and click Load CQL.
The Oracle CQL statement is loaded to the canvas.
-
To inject your Oracle CQL statement into the Oracle CQL processor, edit the Output CQL construct and click Inject Rule.
The rule now appears on the CQL Rules tab.
For more information, see Section 6.1.9.16, "Configuring an Output CQL Construct".
-
After you create a query, update the selector for the outbound channel (the channel down-stream from the Oracle CQL processor you created your query on). This will only work with pre-existing event types.
For more information, see Section 4.2.1.2, "Channel Properties: Outbound Channel".
6.1.2 How to Edit a Rule in an Oracle CQL Processor Using the Query Wizard
Oracle CEP Visualizer provides a sophisticated Query Wizard to simplify Oracle CQL query construction. You can select an existing query on the CQL Query tab and edit the query in the Query Wizard. The Oracle CQL Query Wizard is designed to allow business users to efficiently create syntactically correct Oracle CQL queries and apply them to a deployed Oracle CEP application.
Query Wizard will import a given rule and display it graphically as a set of Oracle CQL operators. You can go into an individual operator and make changes (for example, to change the select expression) without affecting other parts of the Oracle CQL statement.
You can edit existing Oracle CQL queries and views. You cannot edit Oracle CQL streams and relations. Your deployed Oracle CEP application must provide the streams and relations. For more information, see Oracle Complex Event Processing Developer's Guide for Eclipse.
To edit a rule in an Oracle CQL processor using the Query Wizard:
-
In the left pane, navigate to and expand the Applications node of the Oracle CEP instance to which the application is deployed.
-
Select appname, where appname is the name of the application you want to use.
-
Select the Oracle CQL processor you wish to use:
-
To use the EPN diagram:
-
Click the Event Processing Network tab.
-
Double-click the Oracle CQL processor you wish to use.
-
-
To use the domain tree:
-
Expand the appname > Stages node, where appname is the name of the application you want to use.
-
Click the Oracle CQL processor you wish to use.
-
In the right pane, click the General tab
-
The Processor panel is displayed as Figure 6-1 shows.
-
-
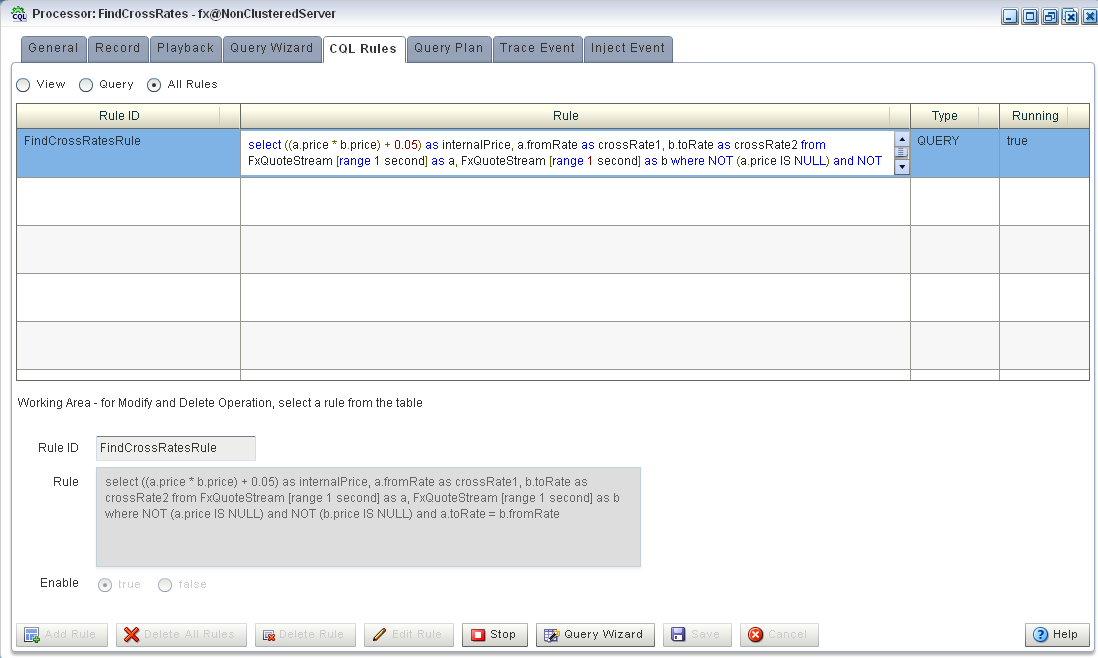
Click the CQL Rules tab.
The CQL Rules tab appears as Figure 6-32 shows.
-
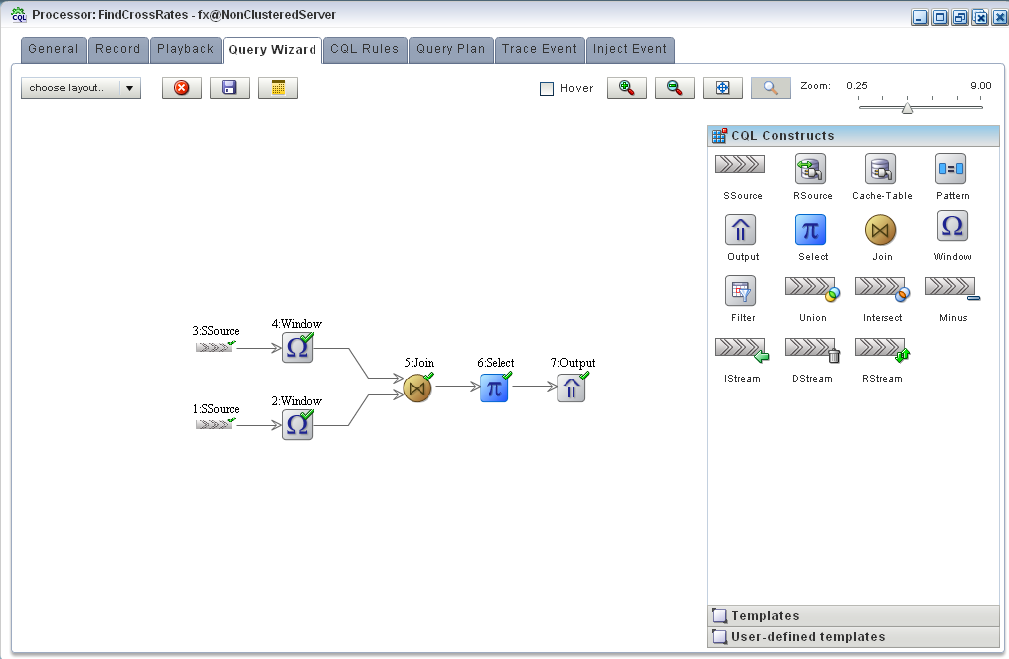
Select the rule you want to edit and click the Query Wizard button.
The Query Wizard opens with the selected rule on the canvas as Figure 6-10 shows.
Figure 6-10 Query Wizard: With Existing Rule
Description of "Figure 6-10 Query Wizard: With Existing Rule"
For information on the various tools along the top of the Query Wizard canvas, see Section 6.1.11, "Managing the Query Wizard Diagram".
-
To view the Oracle CQL statements associated with any operator:
-
Ensure that the Hover check box is checked.
-
Hover the mouse pointer over an operator.
The Oracle CQL statement appears as Figure 6-11 shows.
Figure 6-11 Hovering Over an Oracle CQL Operator

Description of "Figure 6-11 Hovering Over an Oracle CQL Operator"
-
-
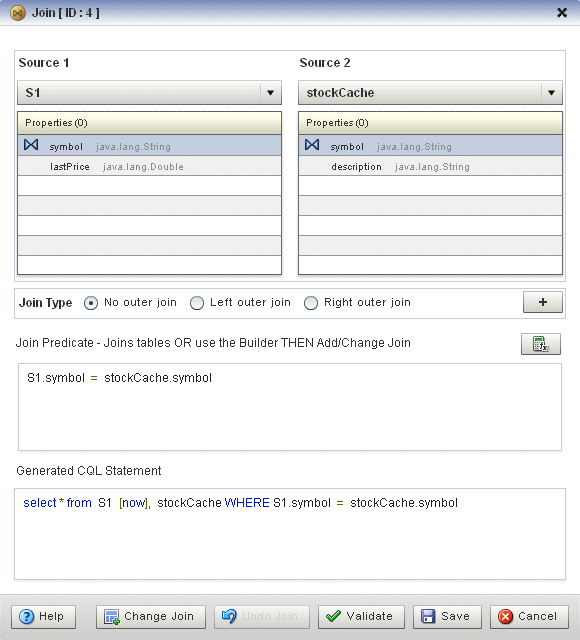
To modify the Oracle CQL statements associated with any operator, double click the operator.
The corresponding editor dialog appears.
Figure 6-12 shows the editor dialog after double clicking the Join operator.
Figure 6-12 Editor Dialog for Oracle CQL Join Operator
Description of "Figure 6-12 Editor Dialog for Oracle CQL Join Operator"
-
Use the editor dialog to modify the operator.
For information on configuring all the Query Wizard editor dialogs, see Section 6.1.9, "How to Configure Query Wizard Oracle CQL Constructs".
-
Click the Add Join button to apply your changes to the generated Oracle CQL statement.
-
Click the Validate button to ensure that your changes are syntactically correct.
Correct any errors before proceeding.
-
Click Save to save your changes.
Your query is saved in memory.
-
Double click your query's Output operator.
-
Click Replace Rule.
The Oracle CQL rule is now changed and the new version appears in the CQL Rules tab.
-
Close the Output construct.
6.1.3 How to Create a Parameterized Rule in an Oracle CQL Processor
You can create a parameterized Oracle CQL query.
Note:
You cannot delete a parameterized query and you cannot edit the Oracle CQL query using the Query Wizard.For more information, see:
-
Section 6.1.4, "How to Edit a Parameterized Query in an Oracle CQL Processor"
-
"Paramterized Queries" in the Oracle Complex Event Processing CQL Language Reference
To create a parameterized rule in an Oracle CQL processor:
-
In the left pane, navigate to and expand the Applications node of the Oracle CEP instance to which the application is deployed.
-
Select appname, where appname is the name of the application you want to use.
-
Select the Oracle CQL processor you wish to use:
-
To use the EPN diagram:
-
Click the Event Processing Network tab.
-
Double-click the Oracle CQL processor you wish to use.
-
-
To use the domain tree:
-
Expand the appname > Stages node, where appname is the name of the application you want to use.
-
Click the Oracle CQL processor you wish to use.
-
In the right pane, click the General tab
-
The Processor panel is displayed as Figure 6-1 shows.
-
-
Click the CQL Rules tab.
The CQL Rules tab appears as Figure 6-32 shows.
-
Click the Query radio button.
-
Click Add Query.
-
Enter a query name in the Query Id field.
-
Enter the Oracle CQL query in the Query field.
Use placeholder characters (
:n) to specify parameterized values. -
Configure the Enable option:
-
To enable the query as soon as it is saved, click true.
-
To keep the query disabled after it is saved, click false.
-
-
Click Save.
A confirmation dialog appears as Figure 6-15 shows.
-
Click OK.
Your query is saved to the local disk of the computer you are currently using. To reload your query, you must access the Oracle CEP Visualizer from the same local host.
-
Edit the parameterized query to add parameter values as Section 6.1.4, "How to Edit a Parameterized Query in an Oracle CQL Processor" describes.
-
After you create a query, update the selector for the outbound channel (the channel down-stream from the Oracle CQL processor you created your query on). This will only work with pre-existing event types.
For more information, see Section 4.2.1.2, "Channel Properties: Outbound Channel".
6.1.4 How to Edit a Parameterized Query in an Oracle CQL Processor
You can edit the parameter values of an existing Oracle CQL parameterized query. You can add a new list of parameter values, modify an existing list of paramter values, or delete an existing list of paramter values.
Note:
You cannot add or remove placeholder characters (:n) nor can you edit the Oracle CQL query using the Query Wizard.For more information, see:
-
Section 6.1.3, "How to Create a Parameterized Rule in an Oracle CQL Processor"
-
"Paramterized Queries" in the Oracle Complex Event Processing CQL Language Reference
To edit a parameterized query in an Oracle CQL processor:
-
In the left pane, navigate to and expand the Applications node of the Oracle CEP instance to which the application is deployed.
-
Select appname, where appname is the name of the application you want to use.
-
Select the Oracle CQL processor you wish to use:
-
To use the EPN diagram:
-
Click the Event Processing Network tab.
-
Double-click the Oracle CQL processor you wish to use.
-
-
To use the domain tree:
-
Expand the appname > Stages node, where appname is the name of the application you want to use.
-
Click the Oracle CQL processor you wish to use.
-
In the right pane, click the General tab
-
The Processor panel is displayed as Figure 6-1 shows.
-
-
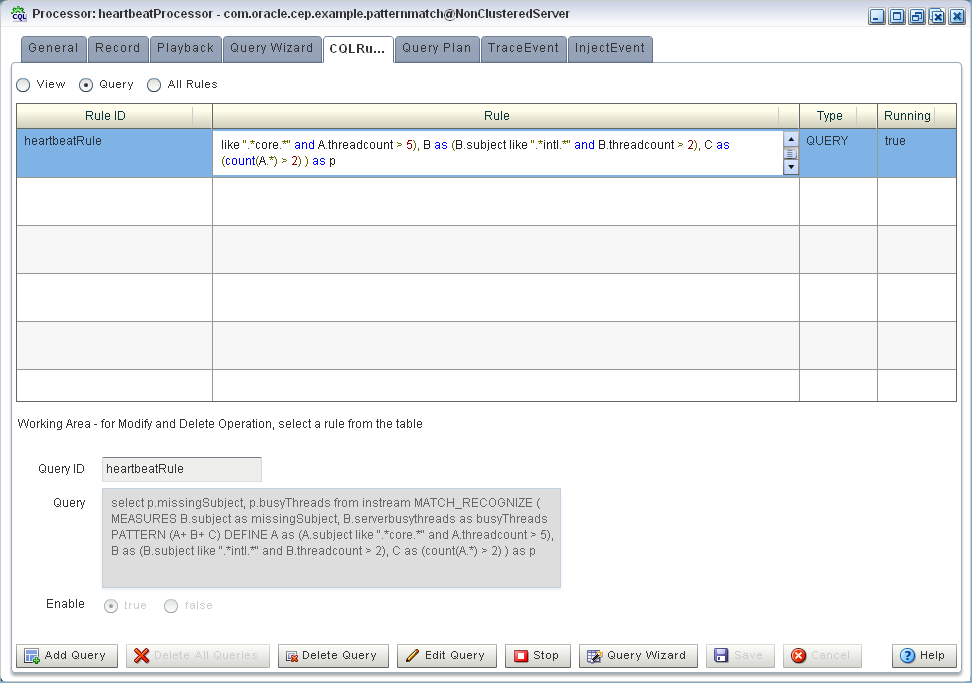
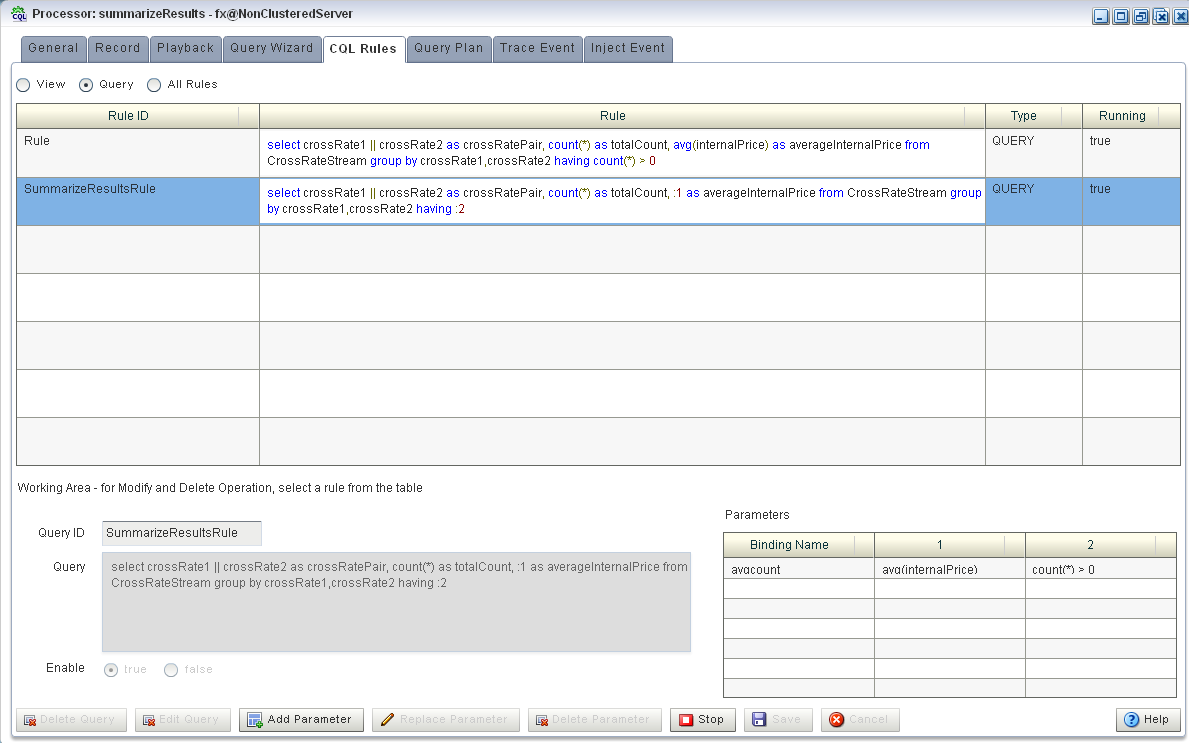
Click the CQL Rules tab.
The CQL Rules tab appears as Figure 6-32 shows.
Figure 6-17 CQL Rules Tab: Parameterized Query
Description of "Figure 6-17 CQL Rules Tab: Parameterized Query"
Note:
The Query Wizard button is not available for parameterized queries. -
Select the parameterized query.
-
Use the CQL Rules tab to modify the paramaterized query:
6.1.4.1 Adding a Parameter
To add a parameter to a paramterized query:
-
Click the Add Parameter button.
The CQL Rules tab changes as Figure 6-18 shows.
-
Enter a binding name in the Binding Name field.
-
Enter the new parameter values as a comma-separated list of values in the Binding Values field.
-
Click Save.
The Add New Binding Dialog appears as Figure 6-19 shows.
-
Click OK.
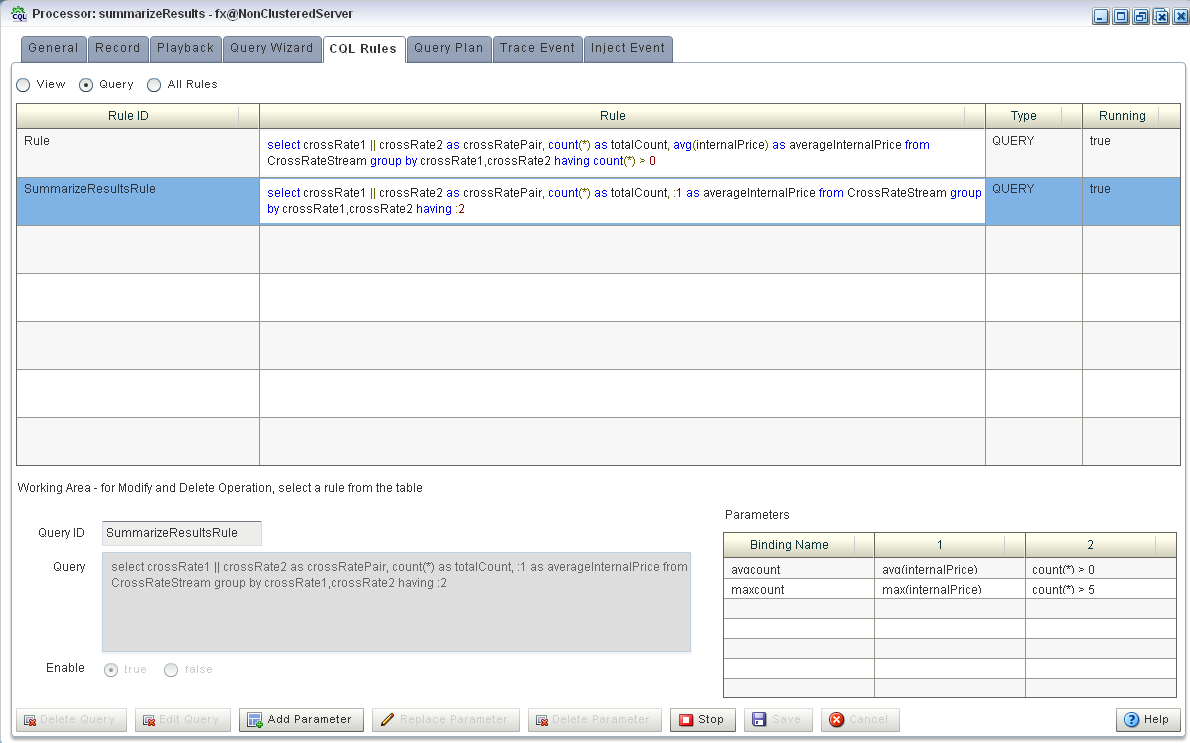
The CQL Rules tab updates to list the new parameter as Figure 6-20 shows.
Figure 6-20 CQL Rules Tab: Add Parameter Complete
Description of "Figure 6-20 CQL Rules Tab: Add Parameter Complete"
6.1.4.2 Replacing a Parameter
To replace a parameter in a paramterized query:
-
Select an existing parameter as Figure 6-21 shows.
Figure 6-21 CQL Rules Tab: Select Parameter

Description of "Figure 6-21 CQL Rules Tab: Select Parameter"
-
Click Replace Parameter.
-
The CQL Rules tab changes as Figure 6-22 shows.
-
Edit the Binding Values field.
-
Click Save.
The Update Binding Dialog appears as Figure 6-23 shows.
-
Click OK.
6.1.4.3 Deleting a Parameter
To delete a parameter in a parametrized query:
-
Select an existing parameter as Figure 6-24 shows.
Figure 6-24 CQL Rules Tab: Select Parameter

Description of "Figure 6-24 CQL Rules Tab: Select Parameter"
-
Click Delete Parameter.
The Delete Binding Dialog appears as Figure 6-23 shows.
-
Click OK.
6.1.4.4 Editing the Query
To edit a parameterized query, you must first delete all query parameters before the Edit Query button is available. For information on deleting parameters, see Section 6.1.4.3, "Deleting a Parameter."
6.1.4.5 Deleting the Query
To delete a parameterized query, you must first delete all query parameters before the Delete Query button is available. For more information, see Section 6.1.4.3, "Deleting a Parameter."
6.1.5 How to Stop and Start a Parameterized Query
When you stop or start a parameterized query, all bindings associated with the parameterized query are stopped or started.
To stop or start a parameterized query, select the query on the CQL Rules tab and click the Stop or Start button.
6.1.6 How to Delete a Rule in an Oracle CQL Processor
You can delete an existing Oracle CQL view or query or delete all Oracle CQL views or queries in an Oracle CQL processor.
To delete a rule in an Oracle CQL processor:
-
In the left pane, navigate to and expand the Applications node of the Oracle CEP instance to which the application is deployed.
-
Select appname, where appname is the name of the application you want to use.
-
Select the Oracle CQL processor you wish to use:
-
To use the EPN diagram:
-
Click the Event Processing Network tab.
-
Double-click the Oracle CQL processor you wish to use.
-
-
To use the domain tree:
-
Expand the appname > Stages node, where appname is the name of the application you want to use.
-
Click the Oracle CQL processor you wish to use.
-
In the right pane, click the General tab
-
The Processor panel is displayed as Figure 6-26 shows.
-
-
Click the CQL Rules tab.
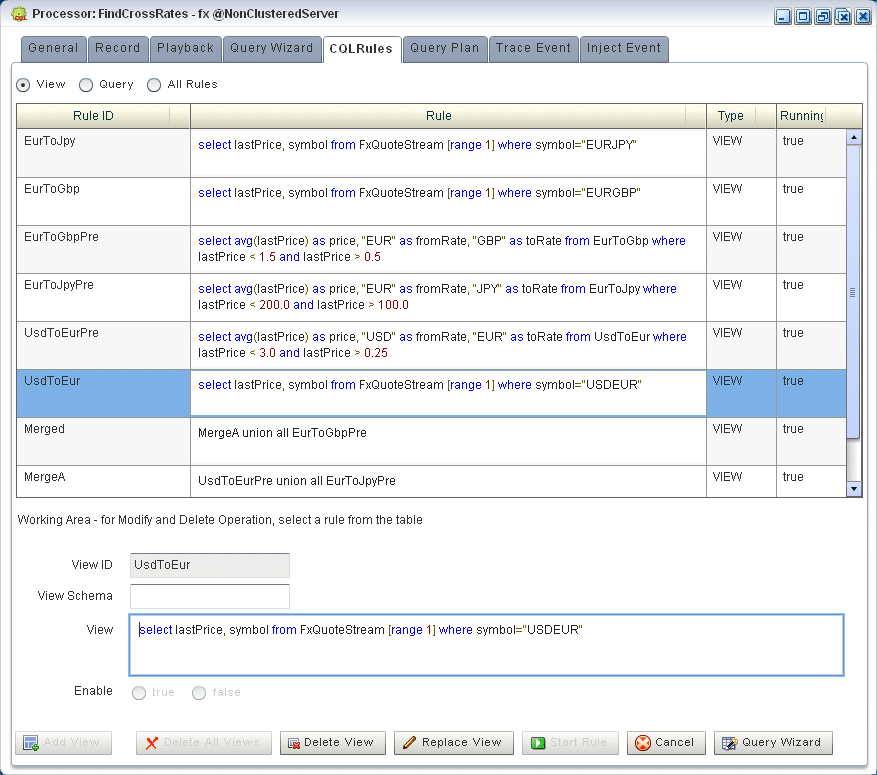
The CQL Rules tab appears as Figure 6-32 shows.
-
Filter the list of rules to show only the type of rule you want to delete:
-
Select View to see only view rules.
-
Select Query to see only query views.
Note:
You cannot add, delete, or modify a single rule if you select All Rules. You must select a particular view or query to add, delete, or modify a single rule. To make changes to either views or queries, you must select View or Query. The All Rules page is a read-only panel.Also note that you can turn off a query dynamically using the Enable radio buttons.
The Delete All Views or Delete All Queries button is active as Figure 6-28 shows.
-
-
Decide what rules you want to delete:
-
To delete a single rule:
-
Select the rule you want to delete.
-
Click Delete View or Delete Query.
A confirmation dialog appears as Figure 6-29 shows.
-
-
To delete all rules:
-
Click Cancel to unselect any rules that may be currently selected.
-
Click Delete All Views or Delete All Queries.
A confirmation dialog appears as Figure 6-30 shows.
-
-
-
Click OK.
6.1.7 How to Replace a Rule in an Oracle CQL Processor
Using Oracle CEP Visualizer, you can replace an existing view or query by either editing the Oracle CQL statement directly or using the Query Wizard.
To replace a rule in an Oracle CQL processor:
-
In the left pane, navigate to and expand the Applications node of the Oracle CEP instance to which the application is deployed.
-
Select appname, where appname is the name of the application you want to use.
-
Select the Oracle CQL processor you wish to use:
-
To use the EPN diagram:
-
Click the Event Processing Network tab.
-
Double-click the Oracle CQL processor you wish to use.
-
-
To use the domain tree:
-
Expand the appname > Stages node, where appname is the name of the application you want to use.
-
Click the Oracle CQL processor you wish to use.
-
In the right pane, click the General tab
-
The Processor panel is displayed as Figure 6-31 shows.
-
-
Click the CQL Rules tab.
The CQL Rules tab appears as Figure 6-32 shows.
-
Filter the list of rules to show only the type of rule you want to replace:
-
Select View to see only view rules.
-
Select Query to see only query views.
-
-
Select the rule you wish to replace.
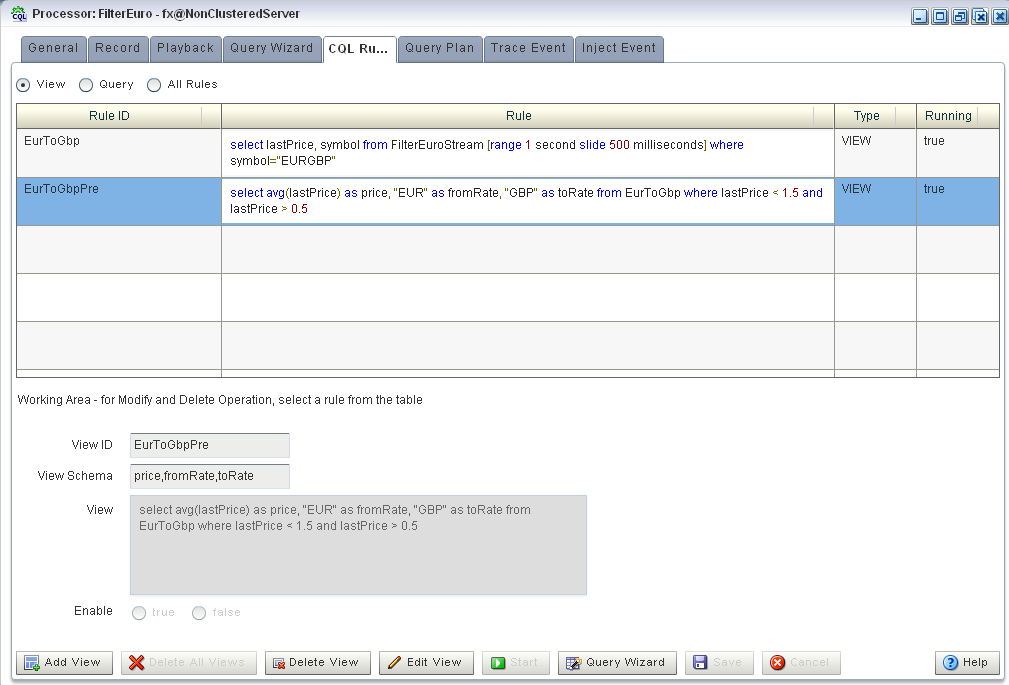
The View or Query field is now editable and the Replace Rule button is active as Figure 6-33 shows.
-
Edit the Oracle CQL statement by doing one of the following:
-
Directly edit the Oracle CQL statement in the View or Query field.
-
Click the Query Wizard button to edit the rule in the Query Wizard.
For more information, see Section 6.1.2, "How to Edit a Rule in an Oracle CQL Processor Using the Query Wizard".
-
-
Commit your changes:
-
If you directly edited the Oracle CQL statement in the View or Query field, click Replace View or Replace Query.
-
If you edited the Oracle CQL statement using the Query Wizard, you commit your changes in the Query Wizard.
For more information, see Section 6.1.2, "How to Edit a Rule in an Oracle CQL Processor Using the Query Wizard".
-
6.1.8 How to View a Rule in an Oracle CQL Processor
Using Oracle CEP Visualizer, you can view the existing rules defined on an Oracle CQL processor.
To view a rule in an Oracle CQL processor:
-
In the left pane, navigate to and expand the Applications node of the Oracle CEP instance to which the application is deployed.
-
Select appname, where appname is the name of the application you want to use.
-
Select the Oracle CQL processor you wish to use:
-
To use the EPN diagram:
-
Click the Event Processing Network tab.
-
Double-click the Oracle CQL processor you wish to use.
-
-
To use the domain tree:
-
Expand the appname > Stages node, where appname is the name of the application you want to use.
-
Click the Oracle CQL processor you wish to use.
-
In the right pane, click the General tab
-
The Processor panel is displayed as Figure 6-1 shows.
-
-
Click the CQL Rules tab.
The CQL Rules tab appears as Figure 6-32 shows.
6.1.9 How to Configure Query Wizard Oracle CQL Constructs
This section describes how to configure the various Oracle CQL constructs that the Query Wizard provides, including:
-
Section 6.1.9.6, "Configuring a Join CQL Construct Using + Syntax"
-
Section 6.1.9.7, "Configuring a Join CQL Construct Using LEFT or RIGHT OUTER JOIN"
-
Section 6.1.9.17, "Configuring an Expression Using the Expression Builder"
6.1.9.1 Configuring an RSource CQL Construct
The RSource Oracle CQL construct represents an Oracle CQL relation that your Oracle CEP application provides or a relation type of view that you create. To create a stream type of source, an SSource, see Section 6.1.9.2, "Configuring an SSource CQL Construct".
For more information and detailed syntax, see:
-
"Streams and Relations" in the Oracle Complex Event Processing CQL Language Reference
-
"Queries, Views, and Joins" in the Oracle Complex Event Processing CQL Language Reference
-
"Oracle CQL Statements" in the Oracle Complex Event Processing CQL Language Reference
To configure an RSource CQL construct:
-
Double click the RSource icon as Figure 6-36 shows.
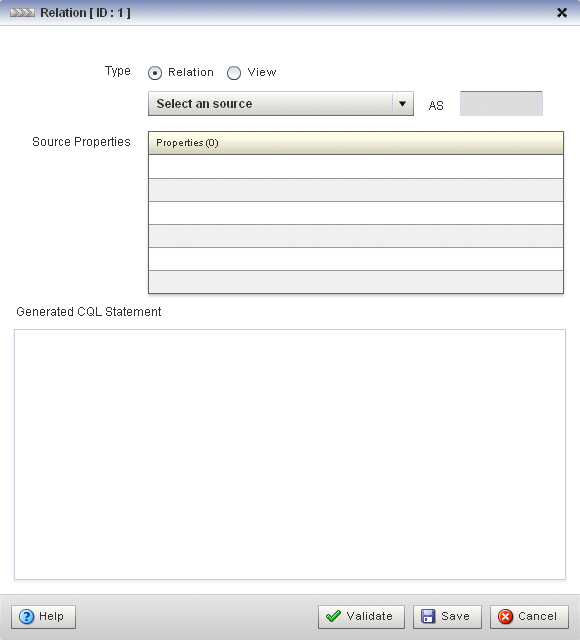
The RSource editor dialog appears as Figure 6-37 shows.
Figure 6-37 Query Wizard RSource Editor Dialog
Description of "Figure 6-37 Query Wizard RSource Editor Dialog"
-
Edit the dialog as Table 6-1 describes.
Table 6-1 Query Wizard RSource Editor Attributes
Attribute Description TypeSelect the type of source:
-
Relation: select this option to process events offered by a relation (query) currently running on this Oracle CQL processor.
-
View: select this option to process events offered by a view currently running on this Oracle CQL processor.
Select a sourceSelect the relation or view to use as the source of events.
AsOptionally specify an alias for this source.
Source PropertiesRead-only list of the properties of the event offered by this source.
Generated CQL StatementRead-only Oracle CQL fragment associated with this CQL Construct.
-
-
Click the Validate button to ensure that your changes are syntactically correct.
Correct any errors before proceeding.
-
Click Save.
The RSource icon displays a green check mark to indicate that it is configured.
6.1.9.2 Configuring an SSource CQL Construct
The SSource Oracle CQL construct represents an Oracle CQL stream that your Oracle CEP application provides or a stream type of view you create. To create a relation type of source, an RSource, see Section 6.1.9.1, "Configuring an RSource CQL Construct".
For more information and detailed syntax, see:
-
"Streams and Relations" in the Oracle Complex Event Processing CQL Language Reference
-
"Queries, Views, and Joins" in the Oracle Complex Event Processing CQL Language Reference
-
"Oracle CQL Statements" in the Oracle Complex Event Processing CQL Language Reference
To configure an SSource CQL construct:
-
Double click the SSource icon as Figure 6-36 shows.
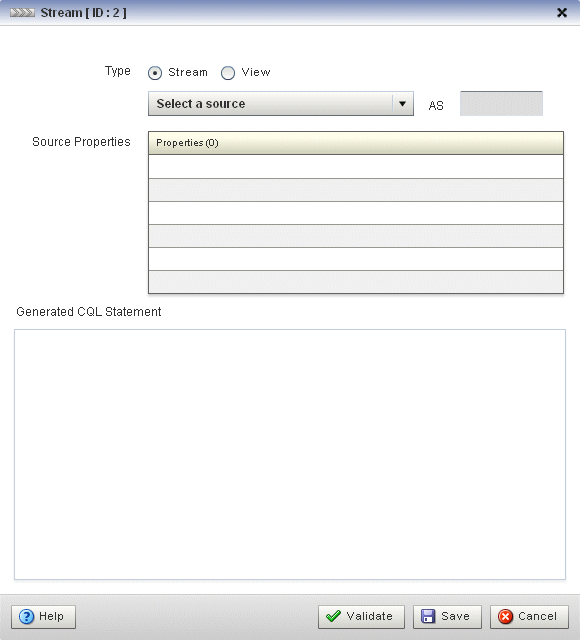
The SSource editor dialog appears as Figure 6-37 shows.
Figure 6-39 Query Wizard Source Editor Dialog
Description of "Figure 6-39 Query Wizard Source Editor Dialog"
-
Edit the dialog as Table 6-1 describes.
Table 6-2 Query Wizard Source Editor Attributes
Attribute Description TypeSelect the type of source:
-
Stream: select this option to process events offered by a stream provided by your Oracle CEP application.
-
View: select this option to process events offered by a view currently running on this Oracle CQL processor.
Select a sourceSelect the stream or view to use as the source of events.
AsOptionally specify an alias for this source.
Source PropertiesRead-only list of the properties of the event offered by this source.
Generated CQL StatementRead-only Oracle CQL fragment associated with this CQL Construct.
-
-
Click the Validate button to ensure that your changes are syntactically correct.
Correct any errors before proceeding.
-
Click Save.
The Source icon displays a green check mark to indicate that it is configured.
6.1.9.3 Configuring a Cache-Table CQL Construct
The Cache-Table CQL construct represents an external relation, usually a pull data source, that a cache or relational database table provides. The only operation that is allowed on the Cache-Table CQL construct is a join with another stream source using the Now window.
For more information, see:
-
"Configuring Access to a Relational Database" in the Oracle Complex Event Processing Administrator's Guide
-
"Configuring an Oracle CQL Processor Table Source" in the Oracle Complex Event Processing Developer's Guide for Eclipse
-
"Configuring Caching" in the Oracle Complex Event Processing Developer's Guide for Eclipse
-
"Configuring an Oracle CQL Processor Cache Source" in the Oracle Complex Event Processing Developer's Guide for Eclipse
-
"Oracle Continuous Query Language (CQL) Example" in the Oracle Complex Event Processing Getting Started
-
Section 6.1.9.6, "Configuring a Join CQL Construct Using + Syntax"
To configure a Cache-Table CQL construct:
-
Double click the Cache-Table icon as Figure 6-40 shows.
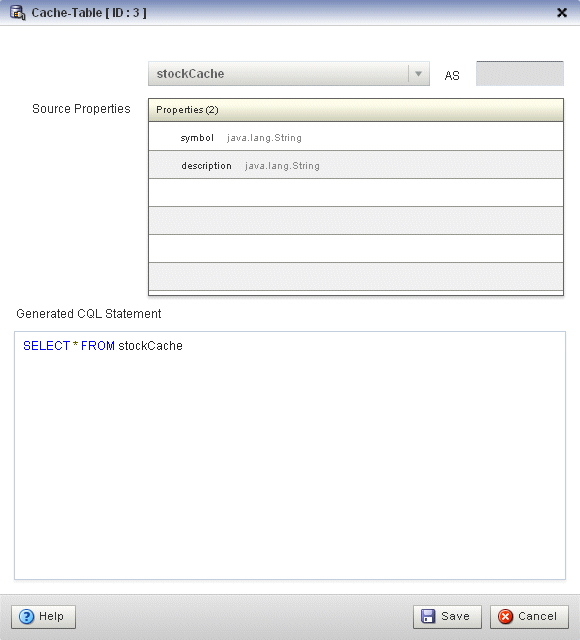
The Cache-Table editor dialog appears as Figure 6-41 shows.
Figure 6-41 Query Wizard Cache-Table Editor Dialog
Description of "Figure 6-41 Query Wizard Cache-Table Editor Dialog"
-
Edit the dialog as Table 6-3 describes.
Table 6-3 Query Wizard Cache-Table Editor Attributes
Attribute Description Select a sourceSelect the cache to use as the source of events.
AsOptionally specify an alias for this source.
Source PropertiesRead-only list of the properties of the event offered by this source.
Generated CQL StatementRead-only Oracle CQL fragment associated with this CQL Construct.
-
Click Save.
The Cache-Table icon displays a green check mark to indicate that it is configured.
6.1.9.4 Configuring a Pattern CQL Construct
The Pattern Oracle CQL construct represents the Oracle CQL MATCH_RECOGNIZE condition. The MATCH_RECOGNIZE condition is the principle means of performing complex event processing. Using its various clauses, you can succinctly express complex conditions among stream elements to perform advanced comparisons optimized for data streams.
The Pattern Oracle CQL construct editor provides a tab for each of the following MATCH_RECOGNIZE sub-clauses:
-
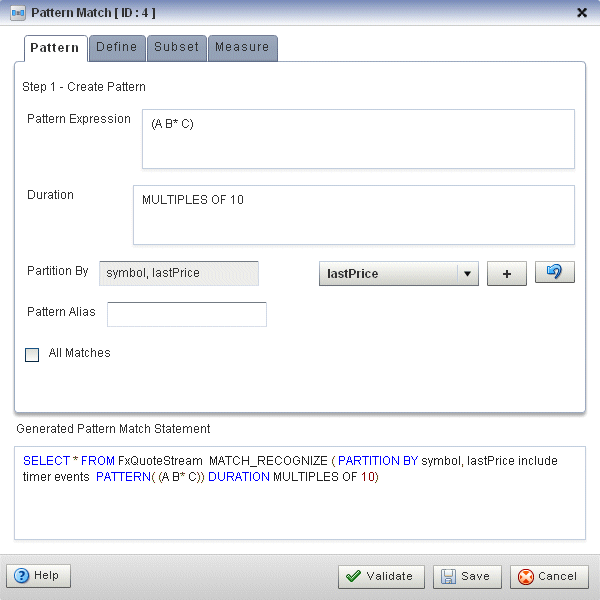
PATTERN: Use this clause to specify quantifiers that constrain and control when conditions in theDEFINEclause match.See Figure 6-43, "Query Wizard Pattern Editor Dialog: Pattern Tab".
-
DEFINE: Use this clause to specify one or more conditions. Specify one or more patterns made up of a pattern identifier, theASoperator, and a condition. The condition can use any stream elements in the schema of the stream, view, or sliding window specified by the identifier you used in your query or view select statement.See Figure 6-44, "Query Wizard Pattern Editor Dialog: Define Tab".
-
SUBSET: Using this clause, you can bind a name to the stream elements that one or more patterns select. You can use this named subset in theMEASUREandDEFINEclauses.See Figure 6-45, "Query Wizard Pattern Editor Dialog: Subset Tab".
-
MEASURE: Use this clause to define expressions in aMATCH_RECOGNIZEcondition and to bind stream elements that match conditions in theDEFINEclause to arguments that you can include in the select statement of a query. You can use any of the Oracle CQL built-in or user-defined functions.See Figure 6-46, "Query Wizard Pattern Editor Dialog: Measure Tab".
For more information and detailed syntax, see:
-
"
MATCH_RECOGNIZECondition" in the Oracle Complex Event Processing CQL Language Reference -
"
PATTERNClause" in the Oracle Complex Event Processing CQL Language Reference -
"
DEFINEClause" in the Oracle Complex Event Processing CQL Language Reference -
"
SUBSETClause" in the Oracle Complex Event Processing CQL Language Reference -
"
MEASURESClause" in the Oracle Complex Event Processing CQL Language Reference -
"Functions" in the Oracle Complex Event Processing CQL Language Reference
-
"Oracle CQL Statements" in the Oracle Complex Event Processing CQL Language Reference
To configure a Pattern CQL construct:
-
Double click the Pattern icon as Figure 6-42 shows.
The Pattern editor dialog appears as Figure 6-43 shows.
Figure 6-43 Query Wizard Pattern Editor Dialog: Pattern Tab
Description of "Figure 6-43 Query Wizard Pattern Editor Dialog: Pattern Tab"
-
Edit the Pattern tab as Table 6-4 describes.
Table 6-4 Query Wizard Pattern Editor Attributes: Pattern Tab
Attribute Description Pattern ExpressionUse this clause to specify quantifiers that constrain and control when conditions in the
DEFINEclause match. For example:(A B* C)
Table 6-5 lists the pattern quantifiers Oracle CQL supports. Use the pattern quantifiers to specify the allowed range of pattern matches. The one-character pattern quantifiers are maximal or "greedy"; they will attempt to match the biggest quantity first. The two-character pattern quantifiers are minimal or "reluctant"; they will attempt to match the smallest quantity first.
For more information, see "
PATTERNClause" in the Oracle Complex Event Processing CQL Language Reference.DurationBy default, Oracle CEP updates the output relation at the time it recognizes a pattern match. Enter a duration value to specify a time delay between when Oracle CEP recognizes a pattern match and when it updates the output relation. You can use either of the following:
-
When you specify a duration like
10, each time Oracle CEP recognizes a pattern match, it delays the specified time interval before updating the output relation. If no input matches the pattern, Oracle CEP does not update the output relation -
When you specify a duration like
MULTIPLES OF 10, each time Oracle CEP recognizes a pattern match, it delays the specified time interval before updating the output relation. If no input matches the pattern or if no input is received, Oracle CEP still updates the output relation. In this case, some terms in the selection may be null and aggregate values may be reset.
For more information, see "
DURATIONClause" in the Oracle Complex Event Processing CQL Language Reference.Partition ByUse this optional clause to specify the stream elements by which a
MATCH_RECOGNIZEclause should partition its results. You can reference any stream elements in the schema of the stream, view, or sliding window specified by the identifier you used in the query or view select statement.To add a stream element to the partition by list, select a stream element from the pull-down menu and click the Add button.
To remove a stream element from the partition by list, click the Undo button.
For more information, see "
PARTITION BYClause" in the Oracle Complex Event Processing CQL Language Reference.Pattern AliasSpecifies the
relation_variableclauseASoperator to define an alias to label the immediately preceding expression in the select list so that you can reference the result by that name. The alias effectively renames the select list item for the duration of the query.Specifying a pattern alias of
itswould correspond to the following example:<query id="detectPerish"><![CDATA[ select its.itemId as badItem from ItemTempStream MATCH_RECOGNIZE ( PARTITION BY ... MEASURES ... PATTERN ... DEFINE ... ) as its ]]></query>For more information, see "Aliases in the
relation_variableClause" in the Oracle Complex Event Processing CQL Language Reference.All MatchesCheck this option to configure Oracle CEP to match overlapping patterns.
Uncheck this option to configure Oracle CEP to match only one pattern.
For more information, see "
ALL MATCHESClause" in the Oracle Complex Event Processing CQL Language Reference.Generated CQL StatementEditable Oracle CQL fragment associated with this CQL Construct.
Maximal Minimal Description 0 or more times
1 or more times.
0 or 1 time.
For more information, see "
PATTERNClause" in the Oracle Complex Event Processing CQL Language Reference. -
-
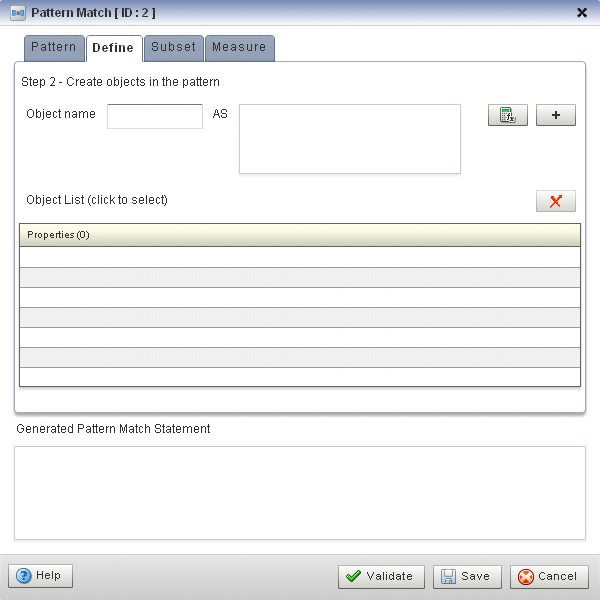
Click the Define tab.
The Define tab appears as Figure 6-44 shows.
Figure 6-44 Query Wizard Pattern Editor Dialog: Define Tab
Description of "Figure 6-44 Query Wizard Pattern Editor Dialog: Define Tab"
-
Edit the Define tab as Table 6-5 describes.
Table 6-6 Query Wizard Pattern Editor Attributes: Define Tab
Attribute Description Object NameEnter an object name as you specified in the Pattern Expression attribute of the Pattern tab (see Table 6-4). For example, if the pattern expression is:
(A B* C)
Then create a definition for each of
A,B, andC.ASDefine an expression by clicking the Expression Builder button.
For example:
A AS  (A.temp >= 25)
B  AS  ((B.temp >= 25) and
            (B.element_time - A.element_time < INTERVAL "0 00:00:05:00" DAY TO SECOND))
C  AS  (C.element_time - A.element_time >= INTERVAL "0 00:00:05:00" DAY TO SECOND)
For more information, see Section 6.1.9.17, "Configuring an Expression Using the Expression Builder".
Object ListA list of the definitions you specify.
To add a definition to the Object List, click the Add button.
To remove a definition from the Object List, click the Delete button.
Generated CQL StatementRead-only Oracle CQL fragment associated with this CQL Construct.
For more information, see "
DEFINEClause" in the Oracle Complex Event Processing CQL Language Reference. -
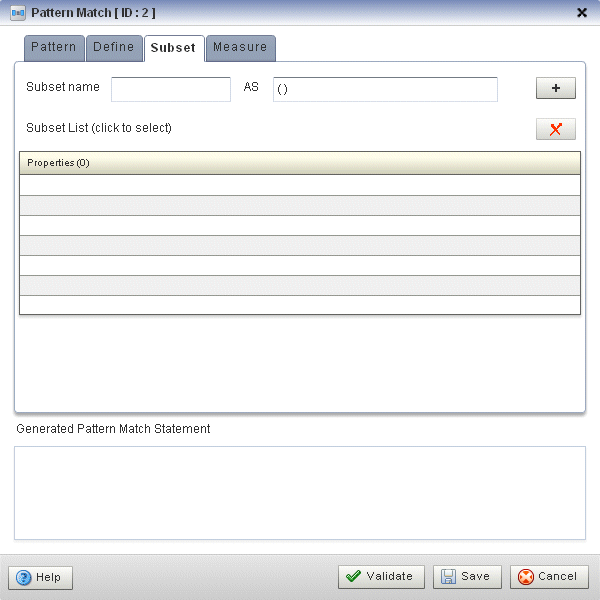
Click the Subset tab.
The Subset tab appears as Figure 6-45 shows.
Figure 6-45 Query Wizard Pattern Editor Dialog: Subset Tab
Description of "Figure 6-45 Query Wizard Pattern Editor Dialog: Subset Tab"
-
Edit the Subset tab as Table 6-7 describes.
Table 6-7 Query Wizard Pattern Editor Attributes: Subset Tab
Attribute Description Subset nameEnter a name for the subset.
ASEnter a list of the object names as you specified in the Pattern Expression attribute of the Pattern tab (see Table 6-4). For example, given the following pattern:
(A W+ X+ Y+ Z+)
You could define subsets such as:
S1 AS (Z)
S2 AS (A)
S3 AS (A,W,Y)
Subset ListA list of the subsets you specify.
To add a subset to the Subset List, click the Add button.
To remove a subset from the Subset List, click the Delete button.
Generated CQL StatementRead-only Oracle CQL fragment associated with this CQL Construct.
For more information, see "
SUBSETClause" in the Oracle Complex Event Processing CQL Language Reference. -
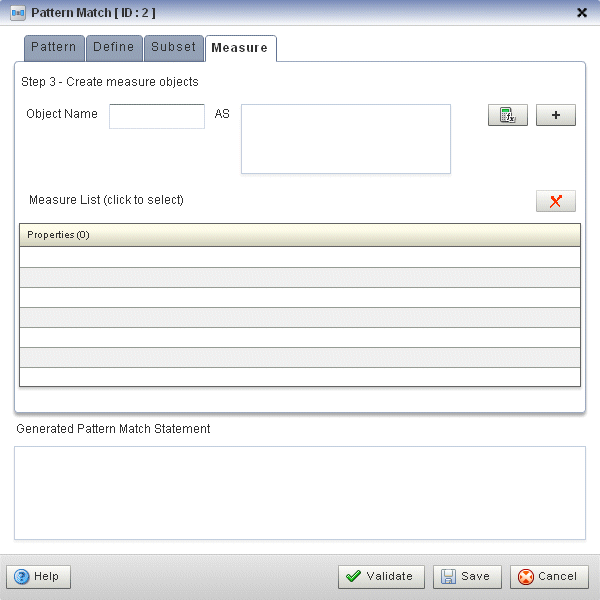
Click the Measure tab.
The Measure tab appears as Figure 6-46 shows.
Figure 6-46 Query Wizard Pattern Editor Dialog: Measure Tab
Description of "Figure 6-46 Query Wizard Pattern Editor Dialog: Measure Tab"
-
Edit the Measure tab as Table 6-8 describes.
Table 6-8 Query Wizard Pattern Editor Attributes: Measure Tab
Attribute Description Object NameEnter an object name as you specified in the Pattern Expression attribute of the Pattern tab (see Table 6-4) or Subset name attribute of the Subset tab (see Figure 6-45).
For example, if the pattern expression is:
(A B* C)
Then you could create a measure for any of
A,B, andC.If you define subsets:
S1 AS (Z)
S2 AS (A)
S3 AS (A,W,Y)
Then you could create a measure for any of
S1,S2, andS3.ASDefine an expression by clicking the Expression Builder button.
For example:
sumDecrArm as sum(S3.c2)
For more information, see Section 6.1.9.17, "Configuring an Expression Using the Expression Builder".
Measure ListA list of the measures you specify.
To add a measure to the Properties list, click the Add button.
To remove a measure from the Properties list, click the Delete button.
Generated CQL StatementRead-only Oracle CQL fragment associated with this CQL Construct.
For more information, see "
MEASURESClause" in the Oracle Complex Event Processing CQL Language Reference. -
Click the Validate button to ensure that your changes are syntactically correct.
Correct any errors before proceeding.
-
Click Save.
The Pattern icon displays a green check mark to indicate that it is configured.
6.1.9.5 Configuring a Select CQL Construct
The Select Oracle CQL construct represents the Oracle CQL SELECT clause. For information on representing the WHERE clause, see Section 6.1.9.9, "Configuring a Filter CQL Construct".
The Select Oracle CQL construct editor provides a tab for each of the following sub-clauses:
-
select_clause: Use this clause to specify the stream elements to select from the stream or view you specify.See Figure 6-48, "Query Wizard Select Editor Dialog: Project Tab".
-
opt_group_by_clause: Use this clause to specify optional grouping conditions your query applies to its results.See Figure 6-49, "Query Wizard Select Editor Dialog: Group Tab".
-
opt_having_clause:Use this clause to restrict the groups of returned stream elements to those groups for which the specifiedconditionisTRUE. If you omit this clause, then Oracle CEP returns summary results for all groups.See Figure 6-50, "Query Wizard Select Editor Dialog: Condition Tab".
-
order_by_clause: Use this clause to specify optional ordering conditions your query applies to its results.See Figure 6-51, "Query Wizard Select Editor Dialog: Order Tab".
For more information, see:
-
"Select, From, Where Block" in the Oracle Complex Event Processing CQL Language Reference
-
"select_clause" in the Oracle Complex Event Processing CQL Language Reference
-
"opt_group_by_clause" in the Oracle Complex Event Processing CQL Language Reference
-
"opt_having_clause" in the Oracle Complex Event Processing CQL Language Reference
-
"order_by_clause" in the Oracle Complex Event Processing CQL Language Reference
-
"Oracle CQL Statements" in the Oracle Complex Event Processing CQL Language Reference
To configure a Select CQL construct:
-
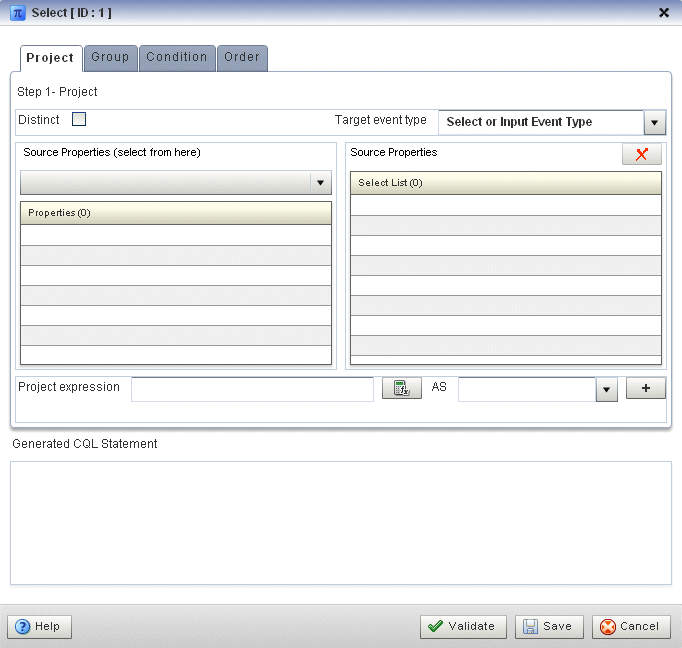
Double click the Select icon as Figure 6-47 shows.
The Select editor dialog appears as Figure 6-48 shows.
Figure 6-48 Query Wizard Select Editor Dialog: Project Tab
Description of "Figure 6-48 Query Wizard Select Editor Dialog: Project Tab"
-
Edit the Project tab as Table 6-9 describes.
The general procedure is:
-
Select a Source.
-
Select a Target event type.
-
Double click a property in the Properties list to add the property to the Project expression field.
-
Click the Expression Builder button and create a Project expression.
-
In the AS field, enter an alias for the project expression result or select one of the Target event type attributes.
-
Click the Add button.
To remove a project expression, select it in the Project predicates list and click Delete.
-
Optionally, check Distinct.
Table 6-9 Query Wizard Select Editor Attributes: Project Tab
Attribute Description DistinctCheck this option if you want Oracle CEP to return only one copy of each set of duplicate tuples selected.
Uncheck this option if you want Oracle CEP to return all tuples selected, including duplicates.
Duplicate tuples are those with matching values for each expression in the select list. Oracle CEP does not support nested aggregations.
Target event typeSelect or input the name of the event expected by the down-stream channel you connected to this Oracle CQL processor.
For more information, see "Event Types" in the Oracle Complex Event Processing Developer's Guide for Eclipse
SourceSelect the name of the stream, relation, or view Source CQL Construct that you connected to this Project CQL construct.
For more information, see Section 6.1.9.1, "Configuring an RSource CQL Construct".
PropertiesRead-only list of the properties of the event offered by this source.
For more information, see Section 6.1.9.1, "Configuring an RSource CQL Construct".
Project PredicatesA list of the project expressions you define.
To add a project expression to the Project Predicates list, click the Add button.
To remove a project expression from the Project Predicates list, select the project expression in the Project Predicates list and click the Delete button.
Project ExpressionsDefine an expression by clicking the Expression Builder button.
For example:
LENGTH( FxQuoteStream.symbol < 100 )
For more information, see Section 6.1.9.17, "Configuring an Expression Using the Expression Builder".
ASEnter an alias for the project expression result or select one of the Target event type attributes.
Generated CQL StatementRead-only Oracle CQL fragment associated with this CQL Construct.
For more information, see "select_clause" in the Oracle Complex Event Processing CQL Language Reference.
-
-
Click the Group tab.
The Group tab editor dialog appears as Figure 6-48 shows.
Figure 6-49 Query Wizard Select Editor Dialog: Group Tab
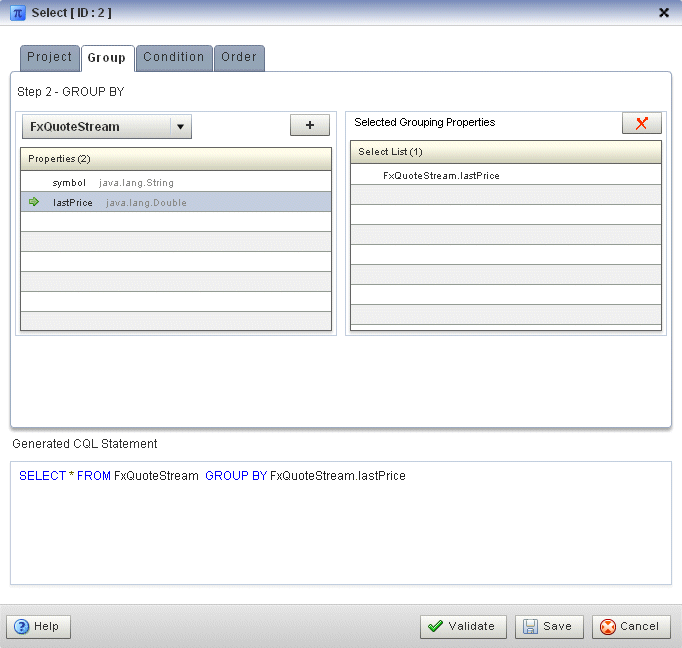
Description of "Figure 6-49 Query Wizard Select Editor Dialog: Group Tab"
-
Edit the Group tab as Table 6-10 describes.
The general procedure is:
-
Select a source from the pull down menu.
-
Select a property in the Properties list.
-
To add the selected property to the Grouping properties list, click the Add button.
To remove a property from the Grouping properties list, select the property in the Grouping properties list and click the Delete button.
Table 6-10 Query Wizard Select Editor Attributes: Group Tab
Attribute Description Select a sourceSelect a source from the pull-down menu.
PropertiesThe properties of the event offered by the selected source.
Grouping PropertiesA list of the grouping properties you define.
To add the selected property to the Grouping properties list, click the Add button.
To remove a property from the Grouping properties list, select the property in the Grouping properties list and click the Delete button.
Generated CQL StatementEditable Oracle CQL fragment associated with this CQL Construct.
For more information, see "opt_group_by_clause" in the Oracle Complex Event Processing CQL Language Reference.
-
-
Click the Condition tab.
The Condition tab editor dialog appears as Figure 6-48 shows.
Figure 6-50 Query Wizard Select Editor Dialog: Condition Tab
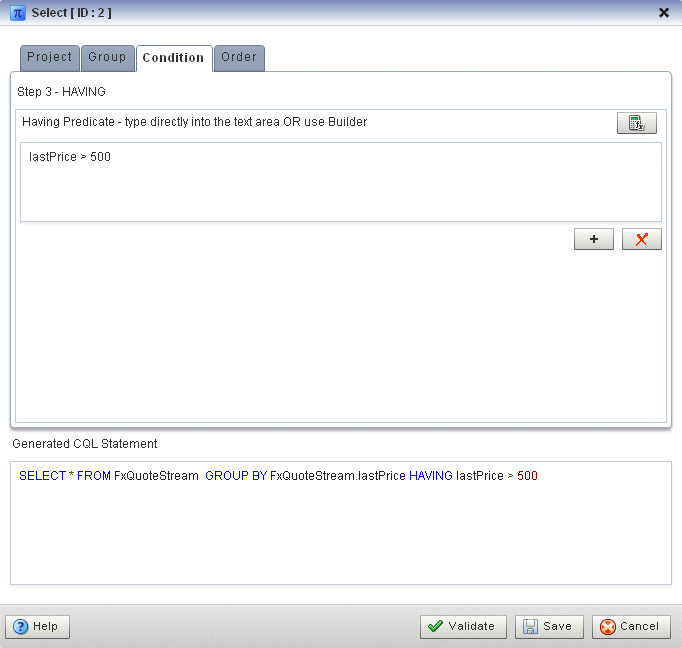
Description of "Figure 6-50 Query Wizard Select Editor Dialog: Condition Tab"
-
Edit the Condition tab as Table 6-11 describes.
Table 6-11 Query Wizard Select Editor Attributes: Condition Tab
Attribute Description Having Predicate
Define an expression by entering a having predicate directly or clicking the Expression Builder button.
For example:
lastPrice > 500
For more information, see Section 6.1.9.17, "Configuring an Expression Using the Expression Builder".
To add a condition expression to the generated CQL statement, click the Add button.
To remove the condition expression from the generated CQL statement, click the Delete button.
Generated CQL StatementEditable Oracle CQL fragment associated with this CQL Construct.
For more information, see "opt_having_clause" in the Oracle Complex Event Processing CQL Language Reference.
-
Click the Order tab.
The Order tab editor dialog appears as Figure 6-48 shows.
Figure 6-51 Query Wizard Select Editor Dialog: Order Tab
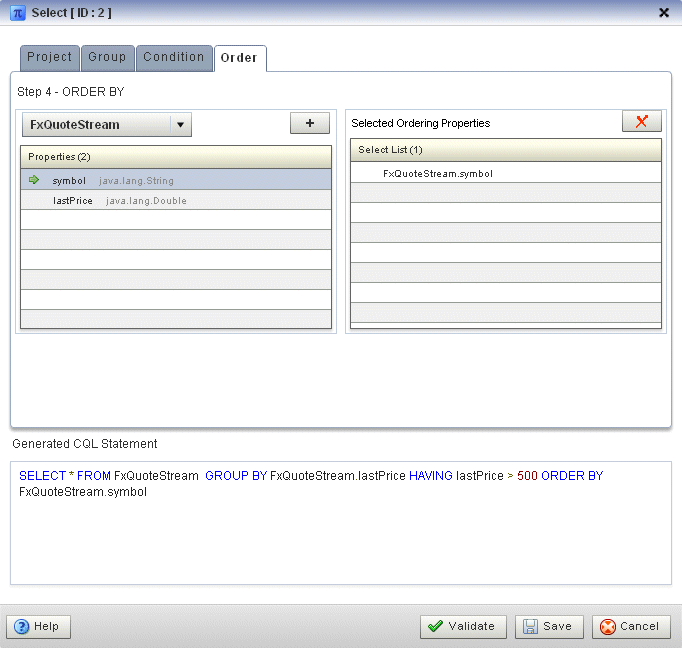
Description of "Figure 6-51 Query Wizard Select Editor Dialog: Order Tab"
-
Edit the Order tab as Table 6-12 describes.
The general procedure is:
-
Select a source from the pull down menu.
-
Select a property in the Properties list.
-
To add the selected property to the Ordering properties list, click the Add button.
To remove a property from the Ordering properties list, select the property in the Ordering properties list and click the Delete button.
Table 6-12 Query Wizard Select Editor Attributes: Order Tab
Attribute Description Select a sourceSelect a source from the pull-down menu.
PropertiesThe properties of the event offered by the selected source.
Ordering PropertiesA list of the ordering properties you define.
To add the selected property to the Ordering properties list, click the Add button.
To remove a property from the Ordering properties list, select the property in the Ordering properties list and click the Delete button.
Generated CQL StatementEditable Oracle CQL fragment associated with this CQL Construct.
For more information, see "order_by_clause" in the Oracle Complex Event Processing CQL Language Reference.
-
-
Click the Validate button to ensure that your changes are syntactically correct.
Correct any errors before proceeding.
-
Click Save.
The Select icon displays a green check mark to indicate that it is configured.
6.1.9.6 Configuring a Join CQL Construct Using + Syntax
The Join Oracle CQL construct represents an Oracle CQL join between two or more sources. You can create and inner joins and left and right outer joins using the (deprecated) + syntax.
Note:
If your Oracle CQL rule uses theLEFT or RIGHT OUTER JOIN clause, see Section 6.1.9.7, "Configuring a Join CQL Construct Using LEFT or RIGHT OUTER JOIN".For more information, see:
-
"Joins" in the Oracle Complex Event Processing CQL Language Reference
-
"Oracle CQL Statements" in the Oracle Complex Event Processing CQL Language Reference
To configure a Join CQL construct:
-
Double click the Join icon as Figure 6-52 shows.
The Join editor dialog appears as Figure 6-53 shows.
Figure 6-53 Query Wizard Join Editor Dialog

Description of "Figure 6-53 Query Wizard Join Editor Dialog"
-
Edit the dialog as Table 6-13 describes.
Table 6-13 Query Wizard Join Editor Attributes
Attribute Description Source 1Select the first source to join.
PropertiesRead-only list of properties of Source 1.
Source 2Select the second source to join.
PropertiesRead-only list of properties of Source 2.
Join TypeSelect the type of join:
-
No outer join: select this option to create a simple join. For more information, see "Inner Joins" in the Oracle Complex Event Processing CQL Language Reference.
-
Left outer join: select this option to create a left outer join. For more information, see "Left Outer Joins" in the Oracle Complex Event Processing CQL Language Reference.
-
Right outer join: select this option to create a right outer join. For more information, see "Right Outer Joins" in the Oracle Complex Event Processing CQL Language Reference.
Join PredicateCreate the Join Predicate by doing either of the following:
-
Click the Plus Sign button to create the join predicate using the Source 1 and Source 2 properties you select.
-
Click the Expression Builder button to create the join predicate using any of the Source 1 and Source 2 properties and Oracle CQL functions and operators.
Generated CQL StatementEditable Oracle CQL fragment associated with this CQL Construct.
-
-
Select a source from the Source 1 pull-down menu.
-
Select a source from the Source 2 pull-down menu.
-
Select a property in the Source 1 Properties list to join on.
-
Select a property in the Source 2 Properties list to join on.
-
Choose the Join Type.
-
Create the Join Predicate by doing either of the following:
-
Click the Plus Sign button to create the join predicate using the Source 1 and Source 2 properties you select.
-
Click the Expression Builder button to create the join predicate using any of the Source 1 and Source 2 properties and Oracle CQL functions and operators.
-
-
To add the join predicate to the generated CQL statement, click the Add Join button.
-
To remove the join predicate from the generated CQL statement, click the Undo Join button.
-
Click the Validate button to ensure that your changes are syntactically correct.
Correct any errors before proceeding.
-
Click Save.
The Join icon displays a green check mark to indicate that it is configured.
6.1.9.7 Configuring a Join CQL Construct Using LEFT or RIGHT OUTER JOIN
The Join Oracle CQL construct represents an Oracle CQL join between two or more sources. You can view the configuration of an Oracle CQL rule using the LEFT or RIGHT OUTER join syntax.
Note:
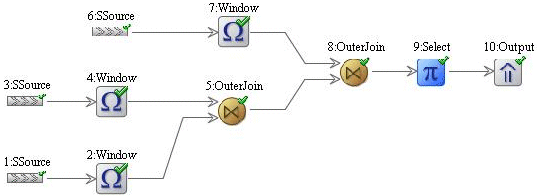
If your Oracle CQL rule uses an inner join or outer join using the deprecated+ syntax, see Section 6.1.9.6, "Configuring a Join CQL Construct Using + Syntax".Figure 6-54 shows an example Oracle CQL outer join in the query constructor.
For more information, see:
-
"Joins" in the Oracle Complex Event Processing CQL Language Reference
-
"Oracle CQL Statements" in the Oracle Complex Event Processing CQL Language Reference
To configure a Join CQL construct using LEFT or RIGHT OUTER JOIN:
-
Double click the Join icon as Figure 6-55 shows.
The Join editor dialog appears as Figure 6-56 shows.
Figure 6-56 Query Wizard Join Editor Dialog: LEFT or RIGHT OUTER JOIN Syntax
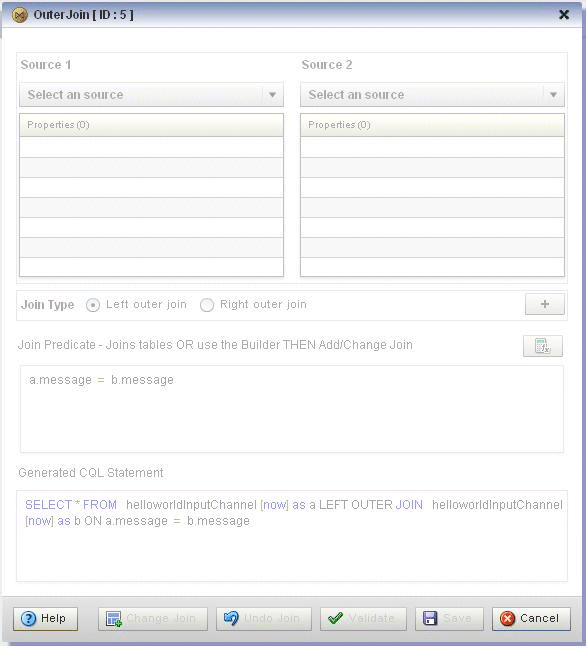
Description of "Figure 6-56 Query Wizard Join Editor Dialog: LEFT or RIGHT OUTER JOIN Syntax"
6.1.9.8 Configuring a Window CQL Construct
The Window Oracle CQL construct represents an Oracle CQL stream-to-relation operator.
For more information, see:
-
"Stream-to-Relation Operators (Windows)" in the Oracle Complex Event Processing CQL Language Reference
-
"Oracle CQL Statements" in the Oracle Complex Event Processing CQL Language Reference
To configure a Window CQL construct:
-
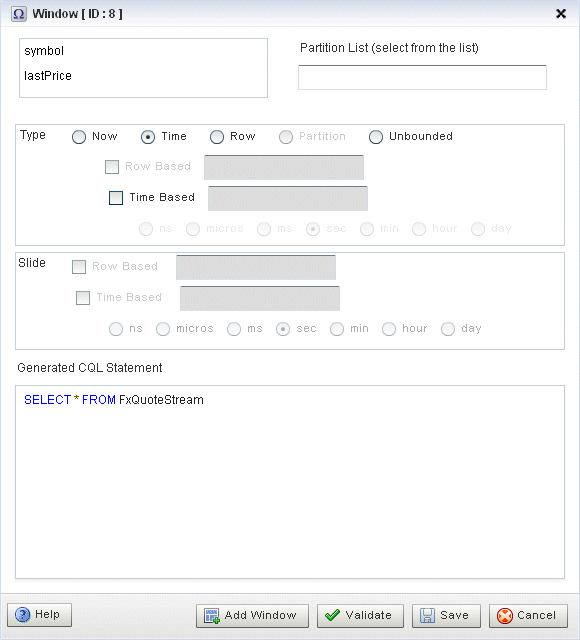
Double click the Window icon as Figure 6-57 shows.
The Window editor dialog appears as Figure 6-58 shows.
Figure 6-58 Query Wizard Window Editor Dialog
Description of "Figure 6-58 Query Wizard Window Editor Dialog"
-
Edit the dialog as Table 6-14 describes.
Table 6-14 Query Wizard Window Editor Attributes
Attribute Description PartitionListSelect one or more stream elements to add to the partition list if you want to create a partitioned window.
To remove stream elements from the Partition List, click and drag to select the values in the Partition List and press the Delete key on your keyboard.
TypeThe type of window to create:
Now: Select this option to create a time-based range window that defines its output relation such that, when
T = 0, the relation at timetconsists of tuples obtained from elements ofSwith timestampt. For more information, see "S[now]" in the Oracle Complex Event Processing CQL Language Reference.Time: Select this option to create a time-based range window that defines its output relation over time by sliding an interval of size
Ttime units capturing the latest portion of an ordered stream. Elements that have been in the window for more thanTtime units are subject to deletion. In this case, the range and slide are equal. For more information, see "S[range T]" in the Oracle Complex Event Processing CQL Language Reference. Optionally, specify a time-based slide for this window using the Slide attribute.Row: Select this option to create a tuple-based window that defines its output relation over time by sliding a window of the last
Ntuples of an ordered stream. For the output relationRofS [rows N], the relation at timetconsists of theNtuples ofSwith the largest timestamps<= t(or all tuples if the length ofSup totis<= N). For more information, see "S[rows N]" in the Oracle Complex Event Processing CQL Language Reference. Optionally, specify a row-based slide for this window using the Slide attribute.Partition: Select this option to create any of the following partitioned windows:
-
"S [partition by A1,..., Ak rows N]" in the Oracle Complex Event Processing CQL Language Reference
-
"S [partition by A1,..., Ak rows N range T]" in the Oracle Complex Event Processing CQL Language Reference
The Partition type is inactive unless you add one or more stream elements to the Partition List. Optionally, specify a time-based slide for this window using the Slide attribute.
Unbounded: Select this option to create a time-based range window defines its output relation such that, when
T = infinity, the relation at timetconsists of tuples obtained from all elements ofSup tot. Elements remain in the window indefinitely. For more information, see "S[range unbounded]" in the Oracle Complex Event Processing CQL Language Reference.SlideSpecify a sliding window:
Row Based: Select this option to create any of the following row-based sliding windows:
-
"S[rows N1 slide N2]" in the Oracle Complex Event Processing CQL Language Reference
Time Based: Select this option to create any of the following time-based sliding windows:
-
"S[range T1 slide T2]" in the Oracle Complex Event Processing CQL Language Reference
-
"S [partition by A1,..., Ak rows N range T1 slide T2]" in the Oracle Complex Event Processing CQL Language Reference
Generated CQL StatementEditable Oracle CQL fragment associated with this CQL Construct.
-
-
If you want a partitioned window, select the stream elements you want in the Partition List.
To remove stream elements from the Partition List, click and drag to select the values in the Partition List and press the Delete key on your keyboard.
-
Select the Type.
The Partition type is inactive unless you add one or more stream elements to the Partition List.
-
Select Row Based or Time Based for the selected type.
-
Enter the size of the window:
-
For a Row Based type, enter a number of rows (tuples or stream elements).
-
For a Time Based type, enter a number of time units and select the time unit.
-
-
Select a Slide:
-
For a Row Based type, enter a number of rows (tuples or stream elements).
-
For a Time Based type, enter a number of time units and select the time unit.
-
-
Click the Validate button to ensure that your changes are syntactically correct.
Correct any errors before proceeding.
-
To add the window to the generated CQL statement, click the Add Window button.
-
Click Save.
The Window icon displays a green check mark to indicate that it is configured.
6.1.9.9 Configuring a Filter CQL Construct
The Filter Oracle CQL construct represents an Oracle CQL WHERE clause. For information on representing the SELECT and FROM clauses, see Section 6.1.9.5, "Configuring a Select CQL Construct".
For more information, see:
-
"opt_where_clause" in the Oracle Complex Event Processing CQL Language Reference
-
"Oracle CQL Statements" in the Oracle Complex Event Processing CQL Language Reference
To configure a Filter CQL construct:
-
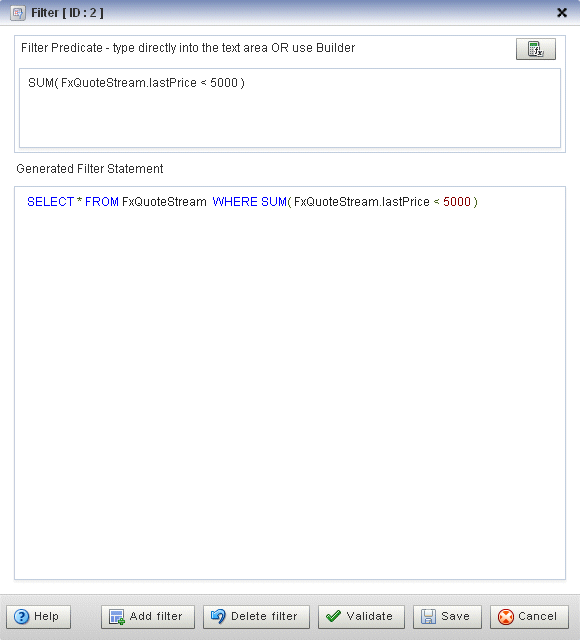
Double click the Filter icon as Figure 6-59 shows.
The Filter editor dialog appears as Figure 6-60 shows.
Figure 6-60 Query Wizard Filter Editor Dialog
Description of "Figure 6-60 Query Wizard Filter Editor Dialog"
-
Edit the dialog as Table 6-15 describes.
Table 6-15 Query Wizard Filter Editor Attributes
Attribute Description Filter PredicateDefine an expression by entering a filter predicate directly or clicking the Expression Builder button.
For example:
SUM( FxQuoteStream.lastPrice < 5000 )
For more information, see Section 6.1.9.17, "Configuring an Expression Using the Expression Builder".
To add the filter predicate to the generated CQL statement, click the Add Filter button.
To remove the filter predicate from the generated CQL statement, click the Delete Filter button.
Generated CQL StatementEditable Oracle CQL fragment associated with this CQL Construct.
-
Define the filter predicate by doing one of the following:
-
Enter the filter predicate directly.
-
Click the Expression Builder button.
For more information, see Section 6.1.9.17, "Configuring an Expression Using the Expression Builder".
-
-
To add a condition expression to the generated CQL statement, click the Add Filter button.
-
To remove the condition expression from the generated CQL statement, click the Delete Filter button.
-
Click the Validate button to ensure that your changes are syntactically correct.
Correct any errors before proceeding.
-
Click Save.
The Source icon displays a green check mark to indicate that it is configured.
6.1.9.10 Configuring a Union CQL Construct
The Union Oracle CQL construct represents an Oracle CQL UNION or UNION ALL clause. You can perform a union between two relations; relation can be emitted either from a view or a channel. You can perform a union between two relations or two streams. You cannot perform a union between a relation and a stream.
For more information, see:
-
"binary" in the Oracle Complex Event Processing CQL Language Reference
-
"BINARY Example: UNION and UNION ALL" in the Oracle Complex Event Processing CQL Language Reference
-
"Oracle CQL Statements" in the Oracle Complex Event Processing CQL Language Reference
To configure a Union CQL construct:
-
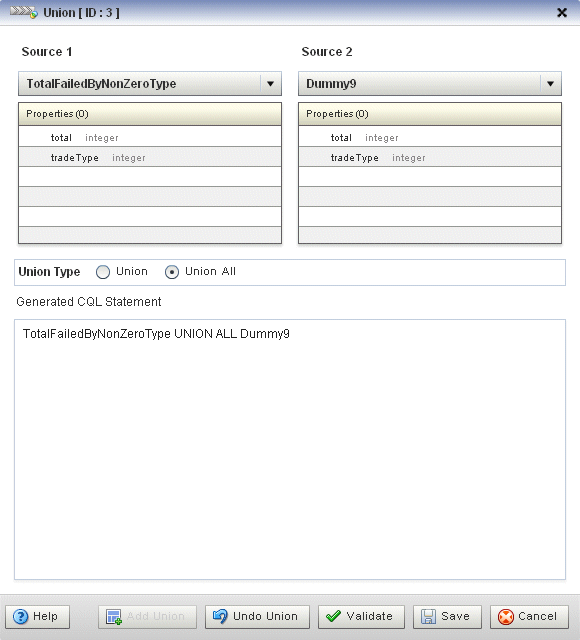
Double click the Union icon as Figure 6-61 shows.
The Union editor dialog appears as Figure 6-62 shows.
Figure 6-62 Query Wizard Union Editor Dialog
Description of "Figure 6-62 Query Wizard Union Editor Dialog"
-
Edit the dialog as Table 6-16 describes.
Table 6-16 Query Wizard Union Editor Attributes
Attribute Description Source 1Select the first source to union.
PropertiesRead-only list of properties of Source 1.
Source 2Select the second source to union.
PropertiesRead-only list of properties of Source 2.
Union TypeSelect the type of union:
-
Union: select this to create a
UNIONstatement. -
Union All: select this option to create a
UNION ALLstatement.
For more information, see "BINARY Example: UNION and UNION ALL" in the Oracle Complex Event Processing CQL Language Reference.
Generated CQL StatementEditable Oracle CQL fragment associated with this CQL Construct.
-
-
Select a source from the Source 1 pull-down menu.
-
Select a source from the Source 2 pull-down menu.
-
Choose the Union Type.
-
To add the union clause to the generated CQL statement, click the Add Union button.
-
To remove the union clause from the generated CQL statement, click the Undo Union button.
-
Click the Validate button to ensure that your changes are syntactically correct.
Correct any errors before proceeding.
-
Click Save.
The Union icon displays a green check mark to indicate that it is configured.
6.1.9.11 Configuring an Intersect CQL Construct
The Intersect Oracle CQL construct represents an Oracle CQL INTERSECT clause. You can perform an intersect between two relations. You cannot perform an intersect between a relation and a stream or between two streams.
For more information, see:
-
"binary" in the Oracle Complex Event Processing CQL Language Reference
-
"BINARY Example: INTERSECT" in the Oracle Complex Event Processing CQL Language Reference
-
"Oracle CQL Statements" in the Oracle Complex Event Processing CQL Language Reference
To configure an Intersect CQL construct:
-
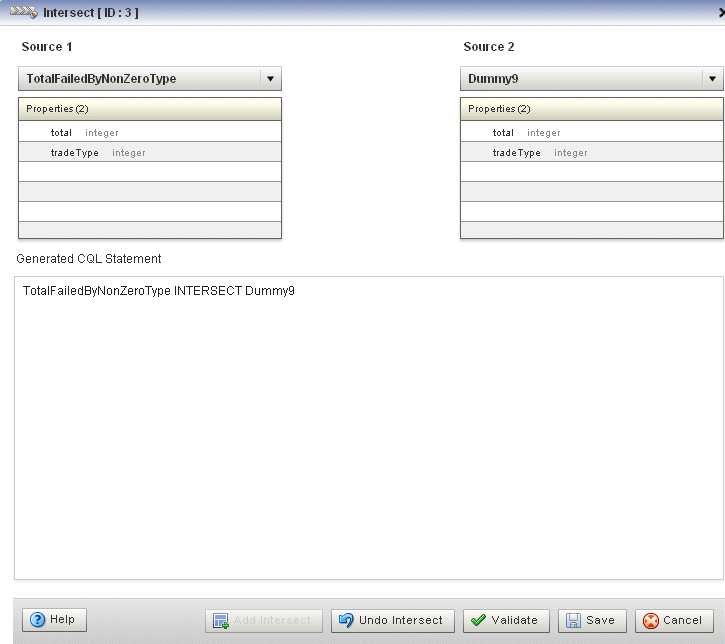
Double click the Intersect icon as Figure 6-63 shows.
The Intersect editor dialog appears as Figure 6-64 shows.
Figure 6-64 Query Wizard Intersect Editor Dialog
Description of "Figure 6-64 Query Wizard Intersect Editor Dialog"
-
Edit the dialog as Table 6-17 describes.
Table 6-17 Query Wizard Intersect Editor Attributes
Attribute Description Source 1Select the first source to intersect.
PropertiesRead-only list of properties of Source 1.
Source 2Select the second source to intersect.
PropertiesRead-only list of properties of Source 2.
Generated CQL StatementEditable Oracle CQL fragment associated with this CQL Construct.
-
To add the intersect clause to the generated CQL statement, click the Add Intersect button.
-
To remove the intersect clause from the generated CQL statement, click the Undo Intersect button.
-
Click the Validate button to ensure that your changes are syntactically correct.
Correct any errors before proceeding.
-
Click Save.
The Intersect icon displays a green check mark to indicate that it is configured.
6.1.9.12 Configuring a Minus CQL Construct
The Minus Oracle CQL construct represents an Oracle CQL MINUS clause. You can perform a minus between two relations. You cannot perform a minus between a relation and a stream or between two streams.
For more information, see:
-
"binary" in the Oracle Complex Event Processing CQL Language Reference
-
"BINARY Example: MINUS" in the Oracle Complex Event Processing CQL Language Reference
-
"Oracle CQL Statements" in the Oracle Complex Event Processing CQL Language Reference
To configure a Minus CQL construct:
-
Double click the Intersect icon as Figure 6-65 shows.
The Minus editor dialog appears as Figure 6-66 shows.
Figure 6-66 Query Wizard Minus Editor Dialog
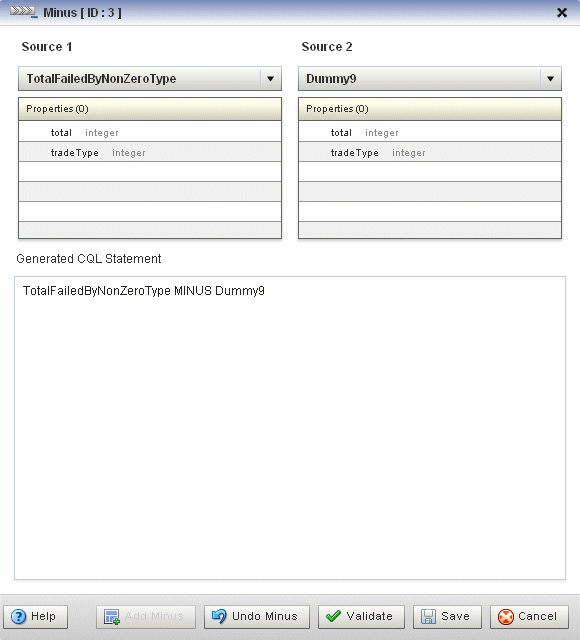
Description of "Figure 6-66 Query Wizard Minus Editor Dialog"
-
Edit the dialog as Table 6-18 describes.
Table 6-18 Query Wizard Minus Editor Attributes
Attribute Description Source 1Select the first source to minus.
PropertiesRead-only list of properties of Source 1.
Source 2Select the second source to minus.
PropertiesRead-only list of properties of Source 2.
Generated CQL StatementEditable Oracle CQL fragment associated with this CQL Construct.
-
To add the minus clause to the generated CQL statement, click the Add Minus button.
-
To remove the minus clause from the generated CQL statement, click the Undo Minus button.
-
Click the Validate button to ensure that your changes are syntactically correct.
Correct any errors before proceeding.
-
Click Save.
The Minus icon displays a green check mark to indicate that it is configured.
6.1.9.13 Configuring an IStream CQL Construct
The IStream Oracle CQL construct represents an Oracle CQL IStream relation-to-stream operator. Istream (for "Insert stream") applied to a relation R contains (s,t) whenever tuple s is in R(t) - R(t-1), that is, whenever s is inserted into R at time t. If a tuple happens to be both inserted and deleted with the same timestamp then IStream does not output the insertion.
For more information, see:
-
"IStream Relation-to-Stream Operator" in the Oracle Complex Event Processing CQL Language Reference
-
"Streams and Relations" in the Oracle Complex Event Processing CQL Language Reference
-
"Oracle CQL Statements" in the Oracle Complex Event Processing CQL Language Reference
To configure an IStream CQL construct:
-
Double click the IStream icon as Figure 6-67 shows.
The IStream editor dialog appears as Figure 6-68 shows.
Figure 6-68 Query Wizard IStream Editor Dialog
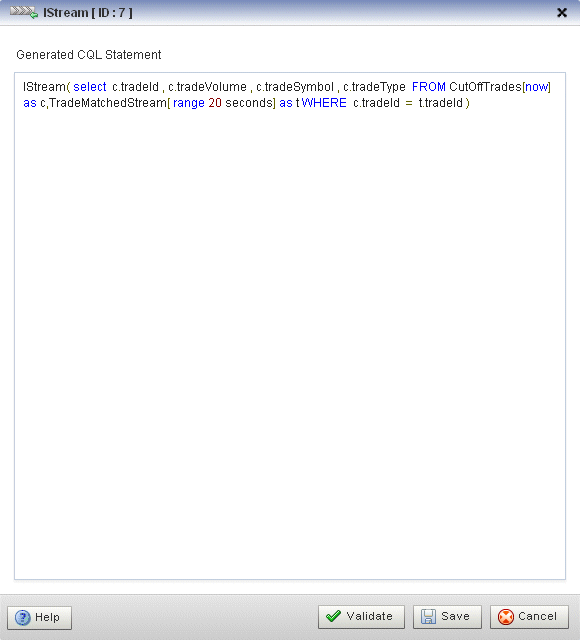
Description of "Figure 6-68 Query Wizard IStream Editor Dialog"
-
Edit the dialog as Table 6-19 describes.
-
Click the Validate button to ensure that your changes are syntactically correct.
Correct any errors before proceeding.
-
Click Save.
The IStream icon displays a green check mark to indicate that it is configured.
6.1.9.14 Configuring a DStream CQL Construct
The DStream Oracle CQL construct represents an Oracle CQL DStream relation-to-stream operator. Dstream (for "Delete stream") applied to a relation R contains (s,t) whenever tuple s is in R(t-1) - R(t), that is, whenever s is deleted from R at time t.
For more information, see:
-
"DStream Relation-to-Stream Operator" in the Oracle Complex Event Processing CQL Language Reference
-
"Streams and Relations" in the Oracle Complex Event Processing CQL Language Reference
-
"Oracle CQL Statements" in the Oracle Complex Event Processing CQL Language Reference
To configure a DStream CQL construct:
-
Double click the DStream icon as Figure 6-69 shows.
The DStream editor dialog appears as Figure 6-70 shows.
Figure 6-70 Query Wizard DStream Editor Dialog
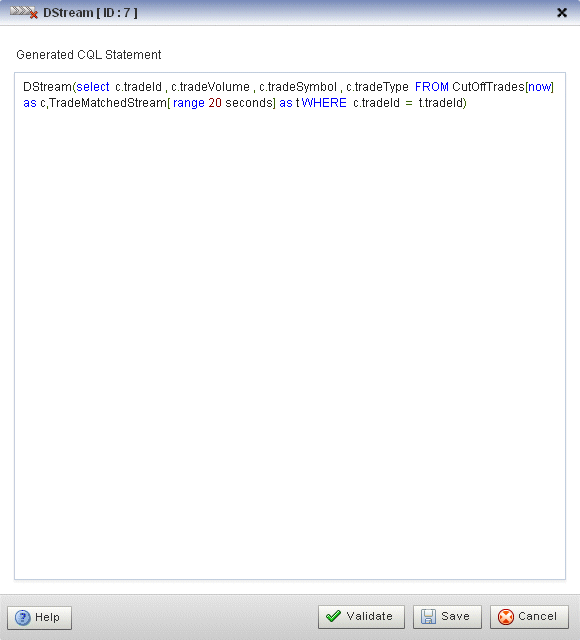
Description of "Figure 6-70 Query Wizard DStream Editor Dialog"
-
Edit the dialog as Table 6-20 describes.
-
Click the Validate button to ensure that your changes are syntactically correct.
Correct any errors before proceeding.
-
Click Save.
The Dstream icon displays a green check mark to indicate that it is configured.
6.1.9.15 Configuring an RStream CQL Construct
The RStream Oracle CQL construct represents an Oracle CQL RStream relation-to-stream operator. The RStream operator maintains the entire current state of its input relation and outputs all of the tuples as insertions at each time step. Since Rstream outputs the entire state of the relation at every instant of time, it can be expensive if the relation set is not very small.
For more information, see:
-
"RStream Relation-to-Stream Operator" in the Oracle Complex Event Processing CQL Language Reference
-
"Streams and Relations" in the Oracle Complex Event Processing CQL Language Reference
-
"Oracle CQL Statements" in the Oracle Complex Event Processing CQL Language Reference
To configure an RStream CQL construct:
-
Double click the RStream icon as Figure 6-71 shows.
The RStream editor dialog appears as Figure 6-72 shows.
Figure 6-72 Query Wizard RStream Editor Dialog
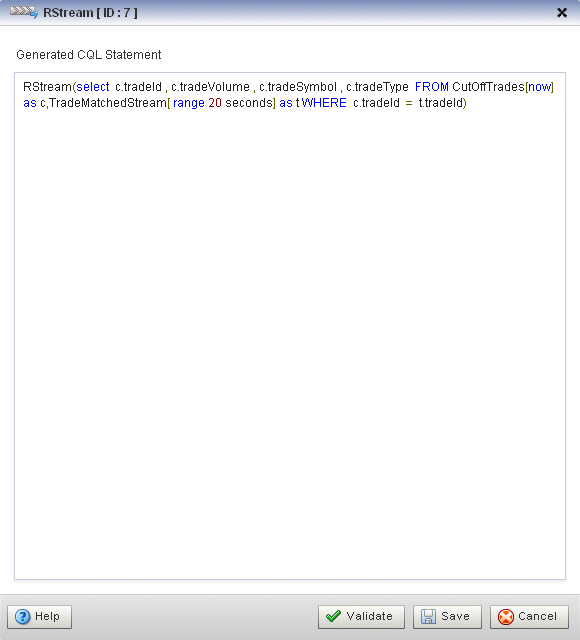
Description of "Figure 6-72 Query Wizard RStream Editor Dialog"
-
Edit the dialog as Table 6-21 describes.
-
Click the Validate button to ensure that your changes are syntactically correct.
Correct any errors before proceeding.
-
Click Save.
The RStream icon displays a green check mark to indicate that it is configured.
6.1.9.16 Configuring an Output CQL Construct
The Output Oracle CQL construct represents the complete Oracle CQL query or view. Using the Output CQL construct, you can:
-
Review and edit the complete Oracle CQL statement.
-
Create a copy of the Oracle CQL statement and inject it into the Oracle CQL processor under a different name. This is a convenient way of duplicating and modifying an existing statement when you need to create multiple statements that share a common structure.
-
Convert between a view and query.
For more information, see:
-
"Queries, Views, and Joins" in the Oracle Complex Event Processing CQL Language Reference
-
"Oracle CQL Statements" in the Oracle Complex Event Processing CQL Language Reference
To configure an Output CQL construct:
-
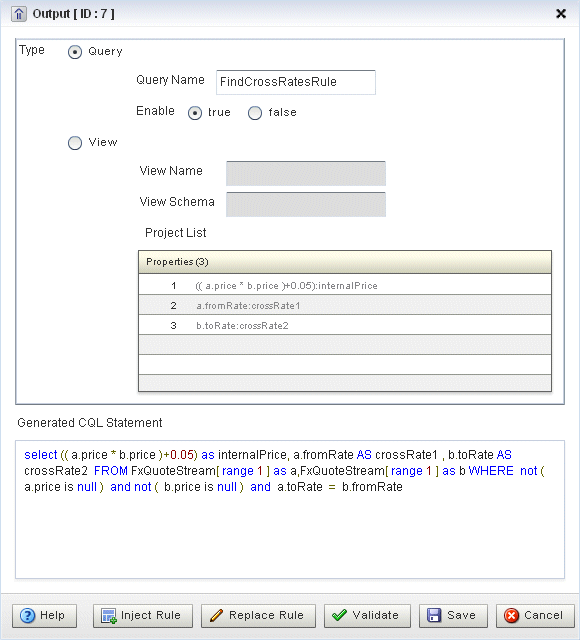
Double click the Output icon as Figure 6-73 shows.
The Output editor dialog appears as Figure 6-74 shows.
Figure 6-74 Query Wizard Output Editor Dialog
Description of "Figure 6-74 Query Wizard Output Editor Dialog"
-
Edit the dialog as Table 6-22 describes.
Table 6-22 Query Wizard Output Editor Attributes
Attribute Description TypeThe type of rule:
-
Query: An Oracle CQL query is an operation that you express in Oracle CQL syntax and execute on an Oracle CQL Processor to process data from one or more streams or views.
-
View: An Oracle CQL view represents an alternative selection on a stream or relation. In Oracle CQL, you use a view instead of a subquery.
For more information, see "Queries, Views, and Joins" in the Oracle Complex Event Processing CQL Language Reference.
Query NameThe name of the query.
EnableSet this option to true to run the rule immediately after saving.
Set this option to false to not run the rule after saving.
A view cannot be enabled or disabled. If the query that uses a view is enabled, then the view is also enabled. If the query that uses a view is disabled, then the view is effectively disabled.
View NameThe name of the view.
View SchemaEditable list of the properties you specify in the
SELECTclause.If you edit the generated CQL statement to add or remove properties from the
SELECTclause, you must make the same change to the View Schema.Project ListRead-only list of the properties you specify in the
SELECTclause.Generated CQL StatementEditable Oracle CQL fragment associated with this CQL Construct.
-
-
To inject a new instance of the entire Oracle CQL rule into the Oracle CQL processor:
-
If you are creating a new rule, Click Inject Rule.
A new instance of the Oracle CQL rule is now visible on the Oracle Rules tab.
-
If you are modifying an existing rule:
-
Click in the Query Name or View Name field and change the query or view name.
-
Click Inject Rule.
A new instance of the Oracle CQL rule is now visible on the Oracle Rules tab with the new name.
-
-
-
To replace an existing instance of the entire Oracle CQL rule in the Oracle CQL processor, click Replace Rule.
The existing instance of the Oracle CQL rule is updated on the Oracle Rules tab with the existing name.
-
Click the Validate button to ensure that your changes are syntactically correct.
Correct any errors before proceeding.
-
Click Save.
The Output icon displays a green check mark to indicate that it is configured.
6.1.9.17 Configuring an Expression Using the Expression Builder
You can use the Query Wizard Expression Builder to construct an expression using various Oracle CQL operators, expressions, built-in single-row and aggregate functions, and user-defined functions.
For more information, see:
-
"Arithmetic Operators" in the Oracle Complex Event Processing CQL Language Reference
-
"Concatenation Operator" in the Oracle Complex Event Processing CQL Language Reference
-
"Expressions" in the Oracle Complex Event Processing CQL Language Reference
-
"Functions" in the Oracle Complex Event Processing CQL Language Reference
To configure an expression using the Expression Builder:
-
Click the Expression Builder button on the CQl construct editor dialog.
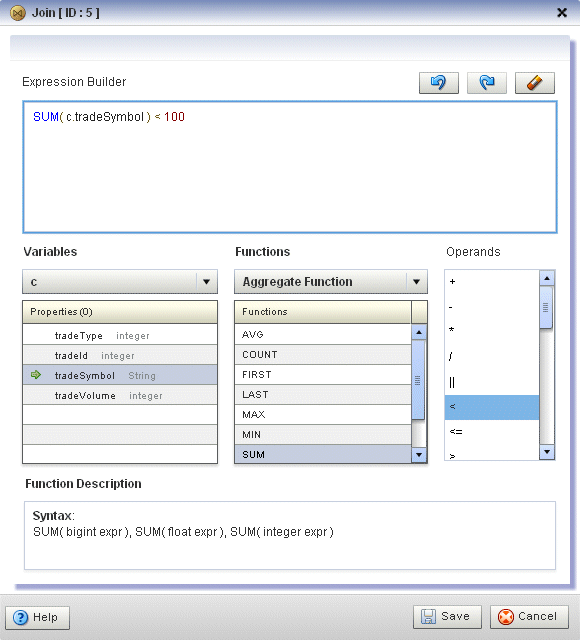
The Expression Builder dialog appears. Figure 6-75 shows the Expression Builder after clicking the Expression Builder button in the Pattern construct editor.
Figure 6-75 Query Wizard Expression Builder
Description of "Figure 6-75 Query Wizard Expression Builder"
-
Edit the dialog as Table 6-22 describes.
Table 6-23 Query Wizard Expression Builder Attributes
Attribute Description Expression BuilderEditable field that contains the expression.
VariablesSelect a source from the Variables pull-down menu to list the properties it provides in the Properties list.
Double-click a property to select it and add it to the Expression Builder at the current insertion point.
FunctionsSelect a function category from the Functions pull-down menu to list the functions it provides in the Functions list.
Select a function to see its syntax in the Function Description field.
Double-click a function to select it and add it to the Expression Builder at the current insertion point.
OperandsDouble-click an operand to select it and add it to the Expression Builder at the current insertion point.
Function DescriptionRead-only field that shows the syntax for the currently selected function.
-
Select a source from the Variables pull-down menu.
-
Select a function category from the Functions pull-down menu.
-
Double-click a function to select it and add it to the Expression Builder.
-
Double-click a property to select it and make it the argument of the function.
-
Use your mouse to position the insertion bar after the closing bracket of the function.
-
Double click an operand to select it and add it to the Expression Builder.
-
Double-click another property or type in a literal value in the Expression Builder.
-
To undo an operation, click the Undo button.
-
To redo an operation, click the Redo button.
-
To clear the Expression Builder, click the Erase button.
-
Click Save to save the expression and return to the CQL construct editor dialog.
6.1.10 How to Create an Oracle CQL Template for the Query Wizard
Oracle CEP Visualizer provides a sophisticated Query Wizard to simplify Oracle CQL view and query construction. You can drag and drop a complete Oracle CQL view or query template and customize it to suit your needs. This procedure describes how to create your own templates and add them to the Query Wizard Templates palette.
An Oracle CQL template is based on the wlevs_queryconstructor_config.xsd from Appendix A, "Oracle CQL Query Wizard Template Schema Reference". However, a user-defined template may contain only the following:
-
select-block -
from-block -
where-block -
Operatorelement and attributesIDandtype -
Operatorelementinputschild element
For more information on using templates to create an Oracle CQL rule, see Section 6.1.1, "How to Create a Rule in an Oracle CQL Processor Using the Query Wizard".
To create an Oracle CQL template for the Query Wizard:
-
Using your favorite editor, create an XML file and add the header shown in Example 6-1.
-
Create a
Ruleelement as Example 6-2 shows. -
Add
Operatorelements to your template as Example 6-3 shows.Configure each
Operatorwith a uniqueIDand specify thetypeattribute.Configure the
Ruleelementrootattribute with theIDof the operator that is the root (or ending point) of your rule. In Example 6-3, theOperatorof typeOutputwith theID10 is the root of the rule.Example 6-3 Rule Element: Operators
<?xml version="1.0" encoding="UTF-8"?> <Rule root="10"> <select-block> <Operator ID="10" type="Output"> </Operator> <Operator ID="9" type="IStream"> </Operator> <Operator ID="7" type="Select"> </Operator> </select-block> <from-block> <Operator ID="1" type="SSource"> </Operator> <Operator ID="2" type="Window"> </Operator> <Operator ID="3" type="SSource"> </Operator> <Operator ID="4" type="Window"> </Operator> </from-block> <where-block> <Operator ID="5" type="Join"> </Operator> </where-block> </Rule> -
Connect your operators together by adding
inputselements as Example 6-4 shows.Example 6-4 Rule Element: Connect Operators
<?xml version="1.0" encoding="UTF-8"?> <Rule root="9"> <select-block> <Operator ID="10" type="Output"> <inputs> <input>9</input> </inputs> </Operator> <Operator ID="9" type="IStream"> <inputs> <input>8</input> </inputs> </Operator> <Operator ID="7" type="Select"> <inputs> <input>5</input> </inputs> </Operator> </select-block> <from-block> <Operator ID="1" type="SSource"> </Operator> <Operator ID="2" type="Window"> <inputs> <input>1</input> </inputs> </Operator> <Operator ID="3" type="SSource"> </Operator> <Operator ID="4" type="Window"> <inputs> <input>3</input> </inputs> </Operator> </from-block> <where-block> <Operator ID="5" type="Join"> <inputs> <input>2</input> <input>4</input> </inputs> </Operator> </where-block> </Rule> -
Save and close your template XML file.
Note:
If you enter double-byte characters in your template XML file, ensure that you save the file using UTF-8 encoding. For more information, see Section 1.5.1, "Configuration File Encoding: UTF-8". -
Copy your template XML file to the
ORACLE_CEP_HOME/user_projects/domains/DOMAIN_DIR/servername/cqltemplatedirectory of your Oracle CEP server, whereORACLE_CEP_HOMErefers to the Oracle CEP installation directory such asd:\oracle_cep,DOMAIN_DIRrefers to the name of your domain directory, andservernamerefers to the name of your server. For example:d:\oracle_cep_home\user_projects\domains\mydomain\myserver1\cqltemplate. -
Add the name of your template XML file to the
ORACLE_CEP_HOME/user_projects/domains/DOMAIN_DIR/servername/cqltemplate/registry.xmlfile.Example 6-5 shows how to register the template XML file
example.xml.Example 6-5 Oracle CEP registry.xml File
<?xml version="1.0" encoding="UTF-8"?>
<templates>
    <template>
        <name>example</name>
        <filename>example.xml</filename>
        <description>This is an example user-defined cql statement</description>
    </template>
</templates>
The
templateelementnamechild element determines the title that the Query Wizard displays in the User-defined templates tab for this template. -
Exit out of the Oracle CEP Visualizer and log back in.
For more information, see Section 2.1, "Starting the Oracle CEP Visualizer".
-
Open the Oracle CQL Query Wizard and locate your template in the User-defined templates tab as Figure 6-76 shows.
Figure 6-76 Query Wizard User-defined templates Tab
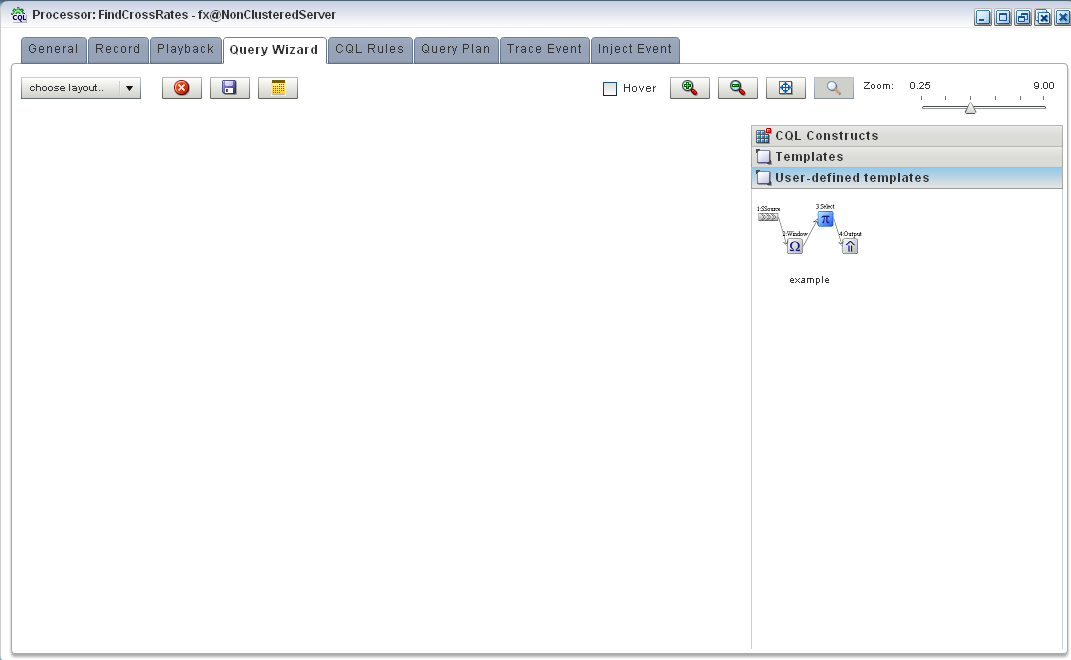
Description of "Figure 6-76 Query Wizard User-defined templates Tab"
For more information, see Section 6.1.1, "How to Create a Rule in an Oracle CQL Processor Using the Query Wizard".
6.1.11 Managing the Query Wizard Diagram
This section describes the various tools along the top of the Query Wizard canvas as Figure 6-77 shows.
You use these tools to manage the Query Wizard diagram of your Oracle CQL statement.
6.1.11.1 Choose Layout
Use the Choose Layout pull-down menu to select alternate ways of distributing CQL constructs and showing their dependencies. You can choose any of:
-
Left-Right
-
Bottom-Top
-
Right-Left
-
Top-Bottom
6.1.11.2 Clear Canvas
Click the Clear Canvas button to erase the current Oracle CQL statement and its diagram from the Query Wizard canvas.
6.1.11.3 Save Query
Click the Save Query button at any time (even if you have not yet completed your Oracle CQL statement) to save your work to your local disk instead of the host.
6.1.11.5 Hover
Check the Hover option to display the Oracle CQL statement fragment associated with a given stage when you hover your mouse pointer over that stage.
Uncheck the Hover option to disable this feature.
6.1.11.6 Zoom In and Zoom Out
Click the Zoom In and Zoom Out buttons to change the zoom level. This is an alternative to using the Zoom slider (see Section 6.1.11.9, "Zoom").
6.1.11.7 Fit Content
Click the Fit Content button to adjust the zoom level automatically to make all of the diagram visible in the current browser window.
6.1.11.8 Toggle Constructs
Click the Toggle Constructs button to alternately hide and show the CQL Constructs and Templates gallery.
6.1.11.9 Zoom
Use the Zoom slider to increase or decrease the zoom level. This is an alternative to using the Zoom In and Zoom Out buttons (see Section 6.1.11.6, "Zoom In and Zoom Out").
6.2 Using the Query Plan
Oracle CEP Visualizer provides a sophisticated Query Plan facility to simplify Oracle CQL query optimization.
Using the Query Plan facility, you can decompose a given Oracle CQL processor into its internal operators, states, and synopsis and you can gather various statistics on these operators such as incoming and outgoing number of messages. The Query Plan facility generates one query plan per Oracle CQL processor and applies to all the queries and views you define on that Oracle CQL processor.
The Oracle CQL Query Plan facility is designed to allow system administrators to efficiently diagnose and optimize Oracle CQL query performance.
This section describes the following topics:
Note:
Before Oracle CEP Visualizer can generate a query plan, there must be at least one running Oracle CQL query (with the Running attribute set totrue) on the Oracle CQL processor. For more information, see Section 6.1.8, "How to View a Rule in an Oracle CQL Processor".6.2.1 How to View a Query Plan for an Oracle CQL Processor
You can view a query plan for an Oracle CQL processor using the Oracle CEP Visualizer.
To view a query plan for an Oracle CQL processor:
-
In the left pane, navigate to and expand the Applications node of the Oracle CEP instance to which the application is deployed.
-
Select appname, where appname is the name of the application you want to use.
-
Select the Oracle CQL processor you wish to use:
-
To use the EPN diagram:
-
Click the Event Processing Network tab.
-
Double-click the Oracle CQL processor you wish to use.
-
-
To use the domain tree:
-
Expand the appname > Stages node, where appname is the name of the application you want to use.
-
Click the Oracle CQL processor you wish to use.
-
In the right pane, click the General tab
-
The Processor panel is displayed as Figure 6-1 shows.
-
-
Click the Query Plan tab.
The Query Plan tab appears as Figure 6-79 shows.
For information on the various tools along the top of the Query Plan canvas, see Section 6.2.2, "Managing the Query Plan Diagram".
-
To view properties and values in the Property table for any stage, do either of the following:
-
Click the stage icon in the query plan diagram on the right.
The corresponding row in the Data table on the left is also selected.
-
Click the row in the Data table on the left that corresponds to the stage.
The corresponding stage icon in the query plan diagram is also selected.
-
-
To configure the query plan, click the Query Plan Preference button.
The Query Plan Preference dialog appears as Figure 6-80 shows.
-
Edit the dialog as Table 6-24 describes.
Table 6-24 Query Plan Preference Attributes
Attribute Description Draw store/statesCheck this option to have Oracle CEP display store and states in the query plan diagram.
Displayed Operator Statistics FieldsCheck the statistics you want to see in the Data table on the Query Plan tab.
To configure the statistics displayed in the table, select:
-
In Messages: the total number of events received by this stage from its inbound stage.
-
Out Messages: the total number of events transmitted by this stage to its outbound stage.
-
Executions: the number of times an Oracle CQL query was executed on this stage.
-
Latest In Messages: the number of messages received from all input queues during the last invocation.
-
Latest out Messages: the number of tuples output by this operator during the last invocation.
To configure the statistics displayed in the graph, select:
-
NumInMessages: the total number of events received by this stage from its inbound stage.
-
NumOutMessages: the total number of events transmitted by this stage to its outbound stage.
-
NumExecutions: the number of times an Oracle CQL query was executed on this stage.
-
NumInMessagesLatest: the number of messages received from all input queues during the last invocation.
-
NumOutMessagesLatest: the number of tuples output by this operator during the last invocation.
Note: The Threshold value applies to the statistic you select here
ThresholdThe maximum value for the Displayed Operator Stats Field in Graph statistic. If a stage exceeds this threshold, the value is colored on the query plan diagram using the color you specify for Alert Color.
Default: 500.
Alert ColorChoose the color used to highlight stages that violate their threshold in the query plan display.
If you do not want to show violations in color, select white as the alert color.
Default: red.
Statistics Refresh Interval(Seconds).Specify the frequency at which Oracle CEP collects statistics (in seconds).
Default: 5.
-
-
To start gathering statistics, click the Get Stats button.
The Get Stats button turns into a Stop Stats button.
The Data table columns display the current statistics (according to your Displayed Operator Stats Fields in Table preference configuration) and threshold violations (according to your Displayed Operator Stats Field in Graph and Threshold preference configuration) are shown in the query plan diagram in red as Figure 6-81 shows.
Figure 6-81 Query Plan While Getting Statistics
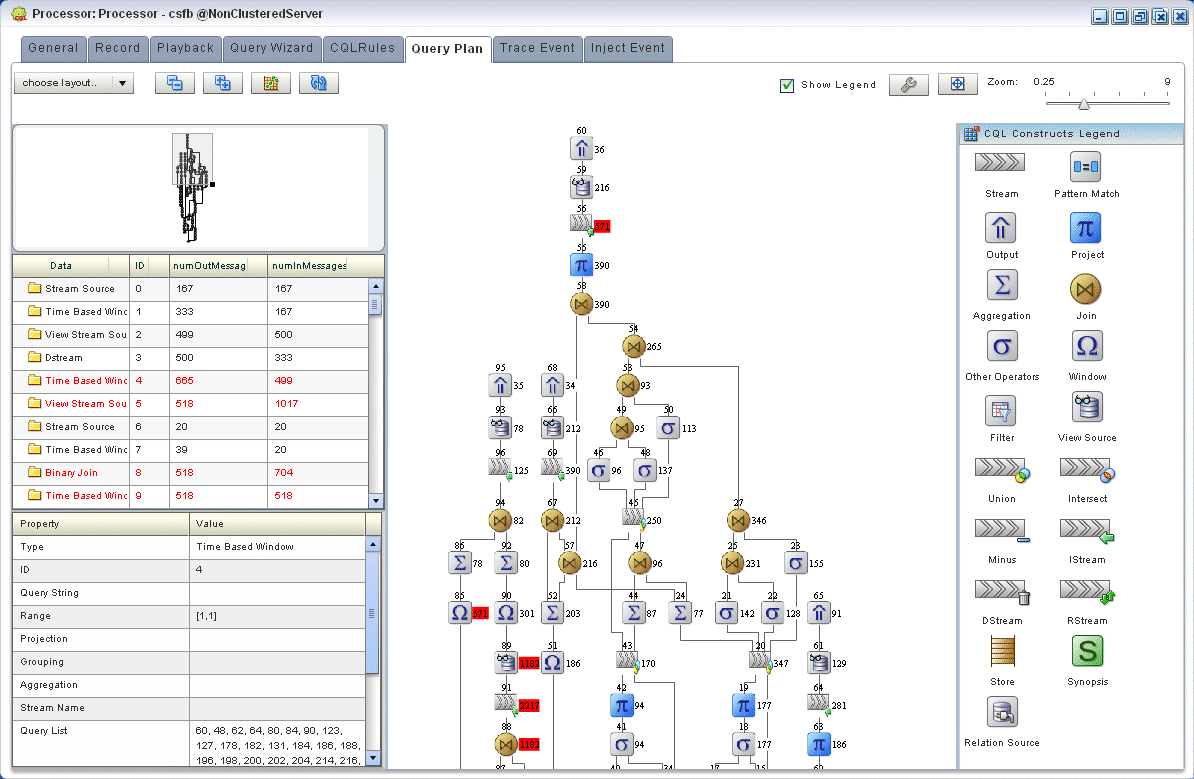
Description of "Figure 6-81 Query Plan While Getting Statistics"
-
To stop getting statistics, click the Stop Stats button.
-
To drill-down into a stage to determine rate determining steps, do either of the following:
-
Click the stage icon in the query plan diagram on the right that shows a threshold violation.
The corresponding row in the Data table on the left is also selected and
-
Click the row in the Data table on the left that corresponds to the stage.
The corresponding stage icon in the query plan diagram is also selected.
-
-
To view dependencies amongst stages, click on an Output row in the Data table.
All the dependent stages are selected in the query plan diagram as Figure 6-82 shows.
Figure 6-82 Query Plan Showing Dependencies
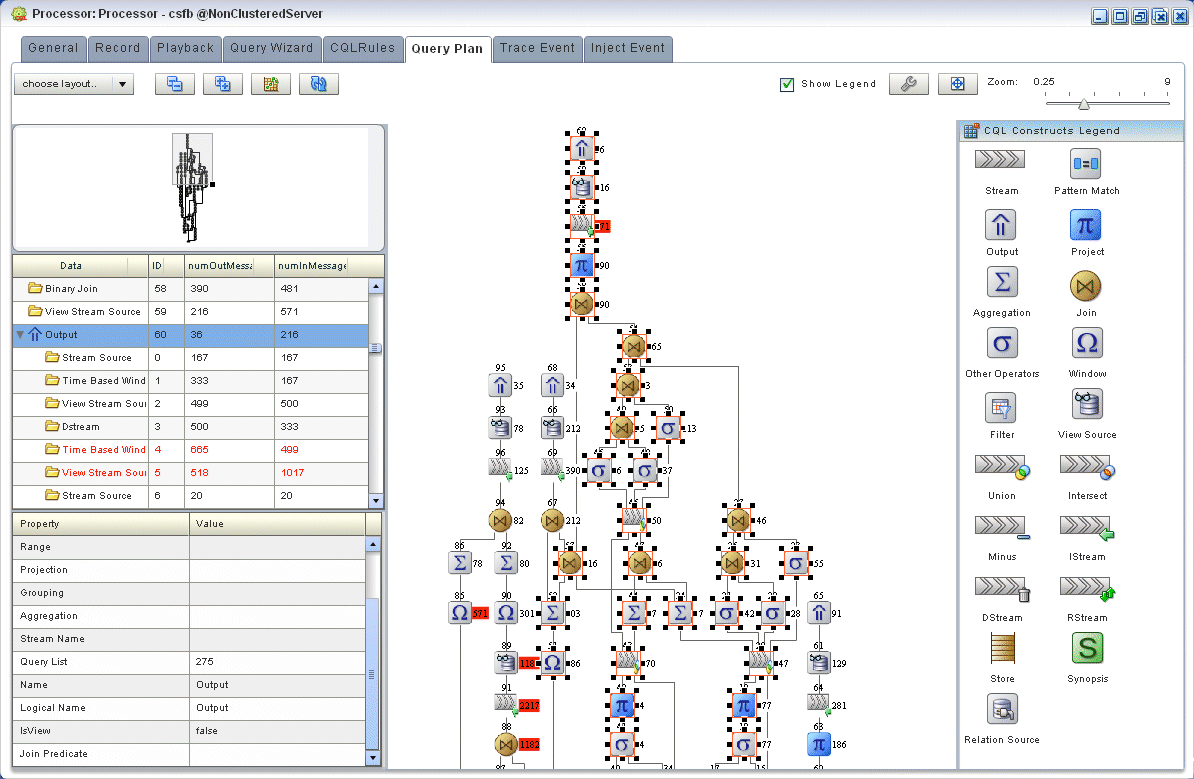
Description of "Figure 6-82 Query Plan Showing Dependencies"
6.2.2 Managing the Query Plan Diagram
This section describes the various tools along the top of the Query Wizard canvas as Figure 6-83 shows.
You use these tools to manage the Query Wizard diagram of your Oracle CQL statement.
6.2.2.1 Choose Layout
Use the Choose Layout pull-down menu to select alternate ways of distributing CQL constructs and showing their dependencies. You can choose any of:
-
Left-Right
-
Bottom-Top
-
Right-Left
-
Top-Bottom
6.2.2.2 Collapse All and Expand All
Use the Collapse All and Expand All buttons to collapse or expand the entries in the Data table.
6.2.2.3 Get Statistics and Stop Statistics
Use the Get Statistics button to instruct Oracle CEP to begin collecting statistics for the stages of the query plan.
When you click on the Get Statistics button, it turns into a Stop Statistics button. Click the Stop Statistics button to stop collecting statistics.
6.2.2.5 Show Legend
Use the Show Legend check box to show (checked) or hide (unchecked) the CQL Constructs Legend.
6.2.2.6 Preferences
Use the Preferences button to open the Query Plan pre-Renaissance dialog as Figure 6-80 shows.
6.2.2.7 Fit Content
Click the Fit Content button to adjust the zoom level automatically to make all of the diagram visible in the current browser window.
