3 Working with Facts and Bucketsets
Facts are the objects that rules reason on and bucketsets define groupings of fact property values.
This chapter includes the following sections:
-
Section 3.1, "Introduction to Working with Facts and Bucketsets"
-
Section 3.7, "Associating a Bucketset with Facts and Functions"
3.1 Introduction to Working with Facts and Bucketsets
In Oracle Business Rules facts that you can run against the rules are data objects that have been asserted. Each object instance corresponds to a single fact. If an object is re-asserted (whether it has been changed or not), the Rules Engine is updated to reflect the new state of the object. Re-asserting the object does not create a fact. To have multiple facts of a particular fact type separate object instances must be asserted.
In Rules Designer, you make business objects and their methods known to Oracle Business Rules using fact definitions that are part of a data model.
You must create one or more facts, and optionally bucketsets, before you can create rules.
In Rules Designer you can work with the following types of facts:
-
XML Facts: XML Facts are imported from existing sources by specifying XML Schema. You can add aliases to imported XML Facts or use XML Facts with RL Facts to change the data model according to your business needs.
For more information, see Section 3.2, "Working with XML Facts".
-
Java Facts: Java Facts are imported from existing sources. You can add aliases to Java Facts or use them with RL Facts to target the data model to business needs. Java Facts are also used to import supporting Java classes for use with the rules or Decision Tables that you create.
For more information, see Section 3.3, "Working with Java Facts".
-
RL Facts: RL Facts are the only kind of facts that you can create directly and do not have an external source. All other types of Oracle Business Rules facts are imported. An RL Fact is similar to a relational database row or a JavaBean without methods. An RL Fact contains a list of properties of types available in the data model, either RL Facts, Java Facts, or primitive types. You can use RL Facts to extend a Java application object model by providing virtual dynamic types.
For more information, see Section 3.4, "Working with RL Facts".
-
ADF Business Components Facts: ADF Business Components Facts allow you to use ADF Business Components as Facts in rules and in Decision Tables. By using ADF Business Components Facts you can assert view object graphs representing the business objects upon which rules should be based, and let Oracle Business Rules deal with the complexities of managing the relationships between the various related view objects in the view object graph.
For more information, see Section 3.5, "Working with ADF Business Components Facts".
You typically use Java fact types and XML fact types to create rules that examine the business objects in a rule-enabled application, or to return results to the application. You use RL Language fact type definitions to create intermediate facts that can trigger other rules in the Rules Engine.
You can create bucketsets to define a list of values or a range of values of a specified type. After you create a bucketset you can associate the bucketset with a fact property of matching type. When a bucketset is associated with a fact property Oracle Business Rules uses the buckets that you define as constraints for the values for the fact properties in rules or in Decision Tables.
For more information, see:
3.2 Working with XML Facts
The XML fact type allows XML Schema types, elements, and attributes to be used when writing rules. Elements and types defined in XML Schema can be imported into the data model and can then be used to create rules and Decision Tables, just as with Java fact types and RL Fact types. The mapping between the XML Schema definition and the XML Fact types uses the Java Architecture for XML Binding (JAXB). By default, Oracle Business Rules uses the JAXB 2.0 shipped with the Oracle Application Server. JAXB as defined in JSR-222 provides a mapping between the types, names, and conventions in an XML Schema definition and the available types, allowed names and conventions in Java. For example, an element named order-id and of type xsd:integer is mapped to a Java Bean property named orderID of type BigInteger (and xsd:int type maps to Java int).
Thus, with Oracle Business Rules if you have an XML document that contains data associated with your application and you have the schema associated with the XML document then you can use Rules Designer to define rules based on elements that you specify from the XML Schema.
To create XML fact types, perform the following steps:
-
Define or obtain an XML Schema.
-
Use Rules Designer to import the XML Schema into a dictionary. This step uses the JAXB compiler to generate Java classes from the XML Schema. After you compile the XML Schema, you select the desired elements from the schema to add XML Facts in the data model and import the generated JAXB classes into the data model. For more information on these steps, see Section 3.2.1, "How to Import XML Schema and Add XML Facts".
-
Write rules or create Decision Tables based on these XML Facts that you added to the data model. For more information, see Section 4.3, "Working with Rules" and Section 5.2, "Creating Decision Tables".
Elements and types defined in XML Schema can be imported into the data model so that instances of types can be created, asserted, modified, and retracted by rules. Most XML documents describe hierarchical information, where each element contains subelements. It is common for users to want to write individual rules based on multiple elements in this hierarchy, and the hierarchical relationship among the elements. In Oracle Business Rules the default behavior when you assert a fact is to only assert the single fact instance, and none of the child objects it may reference in the hierarchy of subelements. When you create rules or a Decision Table it is often desirable to assert an entire hierarchy of elements based on a reference to a root element. Oracle Business Rules provides the assertTree action type that allows for a recursive assert for a hierarchy. For more information, see Section 4.8, "Working with Tree Mode Rules".
3.2.1 How to Import XML Schema and Add XML Facts
Before you can use XML Schema definitions in a data model you must import XML schema. This step generates the JAXB classes and makes the generated classes and packages associated with the XML schema visible in Rules Designer.
To import XML schema and add XML facts:
-
In Rules Designer, select the Facts navigation tab.
-
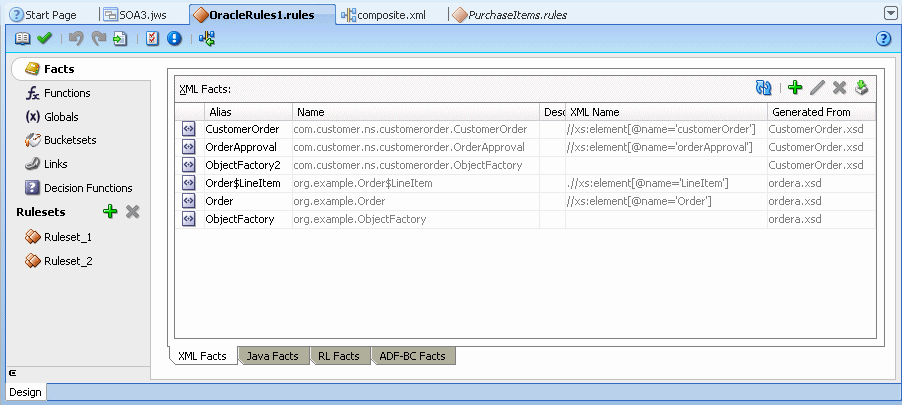
Select the XML Facts tab on the Facts navigation tab, as shown in Figure 3-1.
Figure 3-1 The XML Facts Tab in Rules Designer
Description of "Figure 3-1 The XML Facts Tab in Rules Designer"
-
In the XML Facts tab, click Create.... This displays the Create XML Fact dialog.
-
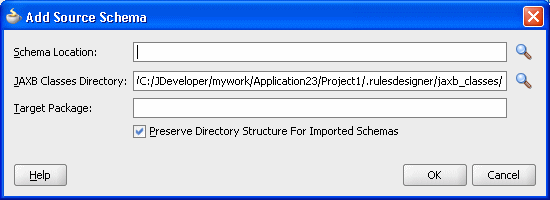
In the Create XML Fact dialog, in the Source Schemas area, click Add Source Schema.... This displays the Add Source Schema dialog, as shown in Figure 3-2.
Figure 3-2 XML Fact: Add Source Schema Dialog
Description of "Figure 3-2 XML Fact: Add Source Schema Dialog"
-
In the Add Source Schema dialog, in the Schema Location field, enter the location of the XML Schema you want to import, or click Browse to locate the XML schema. During the import the file is copied into the project.
-
In the Add Source Schema dialog, in the JAXB Classes Directory field, accept the default or enter the directory where you want Rules Designer to store the JAXB-generated Java source and class files.
-
In the Add Source Schema dialog, in the Target Package field, enter a target package name or leave this field empty. If you leave this field empty the JAXB classes package name is generated from the XML target namespace of the XML schema using the default JAXB XML-to-Java mapping rule or explicitly defined package name using annotations, or "
generated" if no namespace or annotation is defined. Using the schema namespace is preferred.For example, the namespace
http://www.oracle.com/as11/rules/demois mapped tocom.oracle.as11.rules.demo. -
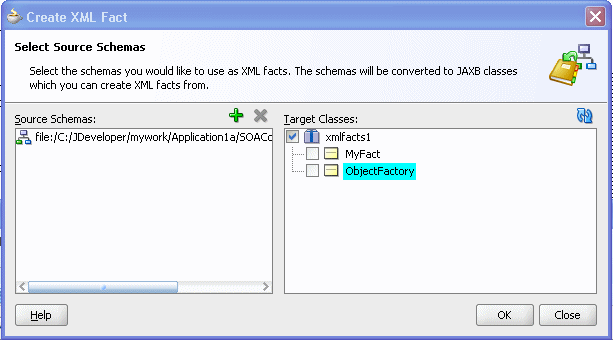
Click OK. Rules Designer processes the schema and compiles the JAXB, so depending on the size of the schema this step may take some time to complete. When this step completes Rules Designer displays the Create XML Fact dialog with the Target Classes area updated to include the JAXB classes, as shown in Figure 3-3.
Figure 3-3 XML Fact: Create XML Fact Dialog
Description of "Figure 3-3 XML Fact: Create XML Fact Dialog"
-
In the Create XML Fact dialog, in the Target Classes area, select the classes you want to import as XML fact types.
-
Click OK.
3.2.2 How to Display and Edit XML Facts
To work with an XML Fact, in Rules Designer open the Edit XML Fact dialog.
To display and edit XML facts:
-
In Rules Designer, select the Facts navigation tab.
-
Select the XML Facts tab on the Facts navigation tab.
-
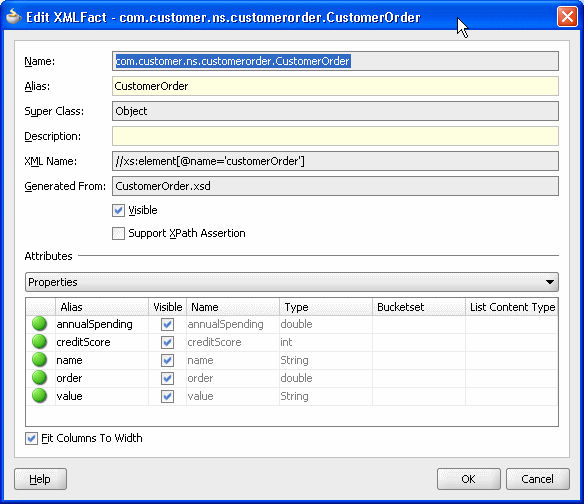
In the XML Facts table, double-click the icon for the XML Fact you want to edit. This displays the Edit XML Fact dialog, as shown in Figure 3-4.
The Edit XML Fact dialog includes the fields shown in Table 3-1.
Table 3-1 XML Fact: Edit XML Fact Dialog Fields
3.2.3 How to Reload XML Facts with Updated Schema
If an XML schema changes in a project, the schema must be reimported into the Oracle Business Rules dictionary. When you reimport the schema Oracle Business Rules uses JAXB to recompile all source schemas for every XML fact type and updates the XML fact type definitions with the updated XML Schema definitions. You should reimport facts if you changed the schema or classes and you want to use the changed schema or classes at runtime.
-
In Rules Designer, select the Facts navigation tab.
-
Select the XML Facts tab on the Facts navigation tab.
-
On the XML Facts page, click the Reload XML Facts from Updated Schemas icon.
After the reimport operation you need to correct any validation warnings that may be caused by incompatible changes (for example, the updated schema may include a change that removed a property that is referenced by a rule).
3.2.4 What You Need to Know About XML Facts
Keep the following points in mind when you work with XML Facts:
-
When writing rules, the
assertTreeaction type is available only in advanced mode. For more information on creating rules usingassertTree, see Section 4.8, "Working with Tree Mode Rules". -
When creating a decision function, the
treeoption for the input types defines whetherassertorassertTreeis used to put the input facts in working memory. For more information onassertTree, see Section 4.8, "Working with Tree Mode Rules". -
When XML Schema contain a
restrictiondefinition, this allows a user to restrict the types that are valid for use in an element. A common use of restriction is to define an enumeration of strings which can be used for an element, as shown in Example 3-1.Example 3-1 XML Schema Restriction Example
<xs:simpleType name="status-type">
        <xs:restriction base="xs:string">
            <xs:enumeration value="manual"/>
            <xs:enumeration value="approved"/>
            <xs:enumeration value="rejected"/>
        </xs:restriction>
</xs:simpleType>
Oracle JAXB 2.0 maps a restriction to a Java enum type. When you use Rules Designer to import either a Java enum type or an element with an XML restriction, the static final fields representing the enums are available for use in expressions. Additionally, Oracle Business Rules creates a bucketset for each enum containing all of the enum values and null. For more information on bucketsets, see Section 3.6, "Working with Bucketsets".
-
There is a default version of the JAXB binding compiler supplied with Oracle Application Server. You can use a different JAXB binding compiler. However, to use a different JAXB binding compiler you must manually perform the XML schema processing and then import the generated Java packages and classes into the data model as Java Facts.
For more information about JAXB, see
-
You should reimport facts if you changed the schema or classes and you want to use the changed schema or classes at runtime. You should correct any validation warnings that may be caused by incompatible changes (for example, removing a property that is referenced by a rule). For more information, see Section 3.2.3, "How to Reload XML Facts with Updated Schema".
-
Most users should not need to use the ObjectFactory or import it. If you do need to import and use the ObjectFactory, then use a different package name for every XML Schema that you import; otherwise the different ObjectFactory classes conflict.
-
The use of XML schema with elements that have
minOccurs="0"andnillable="true"has special handling in JAXB. For more information, see Section C.13, "Why do XML Schema with xsd:string Typed Elements Import as Type JAXBElement?". -
The default element naming conventions for JAXB can cause XML schema containing the underscore character in XML-schema element names to fail to compile. For more information, see Section D.8, "Why Does XML Schema with Underscores Fail JAXB Compilation?".
-
There are certain restrictions on the types and names of inputs for the Decision Service. For more information, see Section D.9, "How Are Decision Service Inputs and Outputs Restricted?".
3.3 Working with Java Facts
In Rules Designer, importing a Java Fact makes the Java classes and their methods become visible to Rules Designer. Rules Designer does not copy the Java code or bytecode into the data model or into the dictionary.
A Java fact type allows selected properties and methods of a Java class to be imported to the Rules Engine so that rules can access, create, modify, and delete instances of the Java class.
Importing a Java fact type allows the Rules Engine to access and use public attributes, public methods, and bean properties defined in a Java class (bean properties are preferable because they can be modified using the modify action).
3.3.1 How to Import Java Classes and Define Java Facts
Before you can use Java Facts in rules and in Decision Tables, you must make the classes and packages that contain the Java Facts available to Rules Designer. To do this you use Rules Designer to specify the classpath that contains the Java classes, and then you import the Java Facts.
To import and define Java Facts:
-
In Rules Designer, select the Facts navigation tab.
-
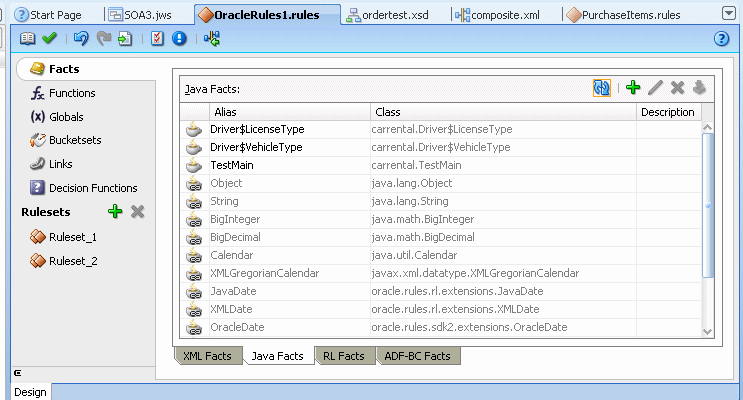
Select the Java Facts tab on the Facts navigation tab as shown in Figure 3-5.
Figure 3-5 The Java Facts Table in the Facts Navigation Tab
Description of "Figure 3-5 The Java Facts Table in the Facts Navigation Tab"
-
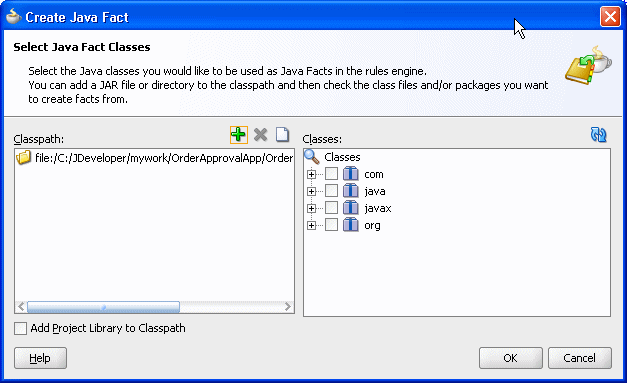
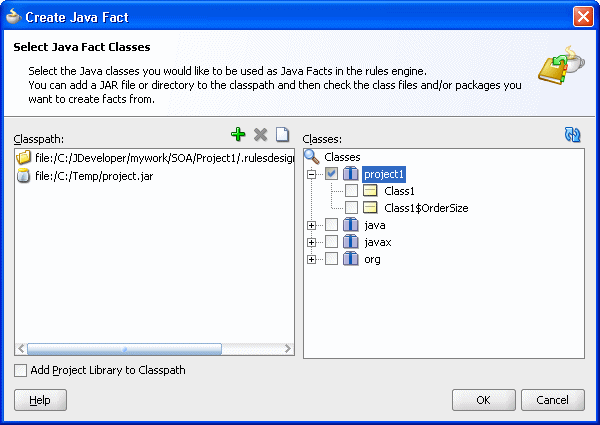
In the Java Facts tab, click Create.... This displays the Create Java Fact dialog, as shown in Figure 3-6.
-
In the Create Java Fact dialog, if the classpath that contains the classes you want to import is not shown in the Classpath area, then click Add to Classpath. This displays the Choose Directory/Jar dialog.
The default Rules Designer classpath includes three packages,
java,javax, andorg. These packages contain classes that Rules Designer lets you import from the Java runtime library (rt.jar). Rules Designer does not let you remove these classes from the Classes area (and the associated classpaths are not shown in the Classpaths area). -
In the Choose Directory/Jar dialog, browse to select the classpath or jar file to add. By default, the output directory for the project is on the import classpath and any Java classes in the project should appear in the Classes importer. If they do not appear, execute the Build action for the project.
-
Click Open. This adds the classpath or jar file and updates the Classes area.
-
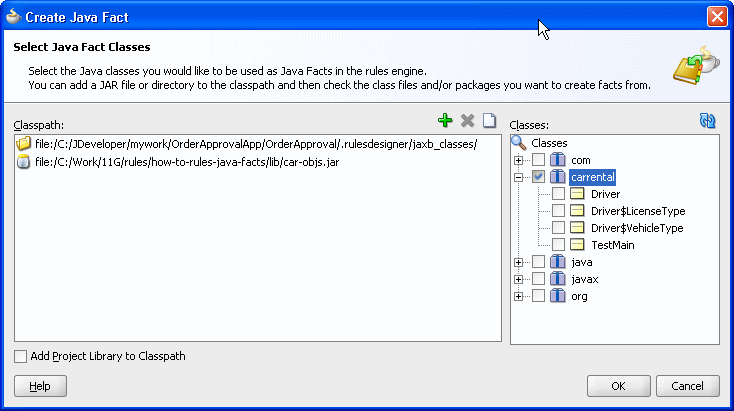
In the Create Java Fact dialog, in the Classes area select the packages and classes to import as shown in Figure 3-7.
Figure 3-7 Selecting Java Classes for Java Facts
Description of "Figure 3-7 Selecting Java Classes for Java Facts"
-
Click OK. This updates the Java Facts table in the Java Facts tab.
3.3.2 How to Display and Edit Java Facts
To display or edit Java Facts after you import the Java Facts, use the Edit Java Fact dialog.
To display and edit Java facts:
-
In Rules Designer, click the Facts navigation tab.
-
Select the Java Facts tab in the Facts navigation tab.
-
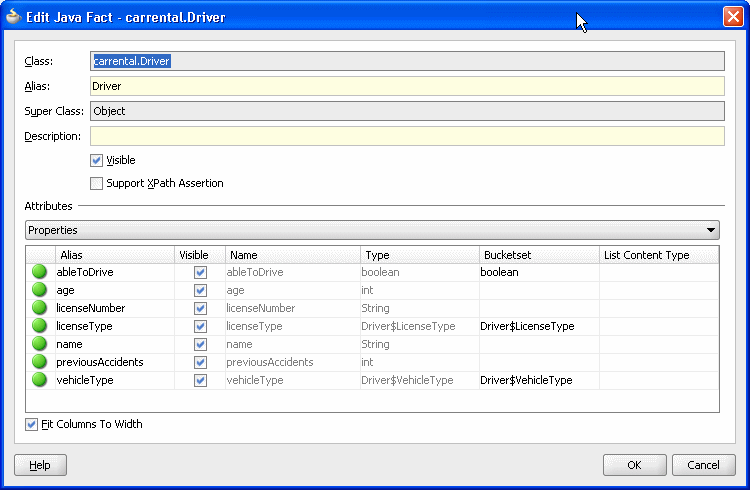
In the Java Facts table, double-click the Java Fact you want to edit. This displays the Edit Java Fact dialog as shown in Figure 3-8.
The Edit Java Fact dialog includes the fields shown in Table 3-2.
Table 3-2 Edit Java Fact Dialog Fields
3.3.3 What You Need to Know About Java Facts
When you define Java Facts you need to know the following:
-
On Windows systems, you can use a backslash (
\) or a slash (/) to specify the classpath in the Classpath area. Rules Designer accepts either path separator. -
Classes and interfaces that you use in Rules Designer must adhere to the following rules: If you are using a class or interface, only its superclass or one of its implemented interfaces may be made visible.
-
When you specify the classpath you can specify a JAR file, a ZIP file, or a full path for a directory.
-
When you specify a directory name for the classpath, the directory specifies the classpath that ends with the directory that contains the "root" package (the first package in the full package name). Thus, if the classpath specifies a directory, Rules Designer looks in that tree for directory names matching the package name structure.
For example, to import a class
cool.example.Test1located inc:\myprj\cool\example\Test1.class, specify the classpath value,c:\myprj. -
You should reimport facts if you change the classes. After the reimport operation you may see validation warnings due to class changes. You should correct any validation warnings that may be caused by incompatible changes (for example, removing a property that is referenced by a rule).
3.4 Working with RL Facts
RL Facts are the only kind of facts that you can create directly and do not have an external source. All other types of Oracle Business Rules facts are imported. An RL Fact is similar to a relational database row or a JavaBean without methods. An RL Fact contains a list of properties of types available in the data model, either RL Fact, Java Fact, or primitive types. You can use an RL Fact to extend a Java application object model by providing virtual dynamic types.
For example:
IF customer spent $500 within past 3 months
THEN customer is a Gold Customer
This rule might use a Java Fact to specify the customer data and also use an action that creates an RL Fact, Gold Customer. A rule might be defined to use a Gold Customer fact, as follows:
IF customer is a Gold customer
THEN offer 10% discount
This rule uses the RL Fact named Gold Customer. This rule then infers, using the Gold Customer fact, that if a customer spent $500 within the past 3 months, then the customer is eligible for a 10% discount. In addition rules could specify other ways that a customer becomes a Gold Customer.
For testing and prototyping with Rules Designer you can create RL Facts and use the RL Facts to write and test rules before you import a schema and switch to XML Facts (you might need to wait for an approved XML schema to be created or to be made available). Switching from RL Facts to corresponding XML Facts involves the following steps:
-
Delete the RL Facts (this action shows validation warnings in the rules or Decision Tables you created that use these RL Facts).
-
Import the XML Facts and give the facts and their properties aliases that match the names of the RL Facts and properties you deleted in step 1.
-
This process should remove the validation warnings if the XML Fact and property aliases and types match those of the RL Facts that you remove.
3.4.1 How to Define RL Facts
You add RL Facts from the Facts navigation tab.
-
In Rules Designer, select the Facts navigation tab.
-
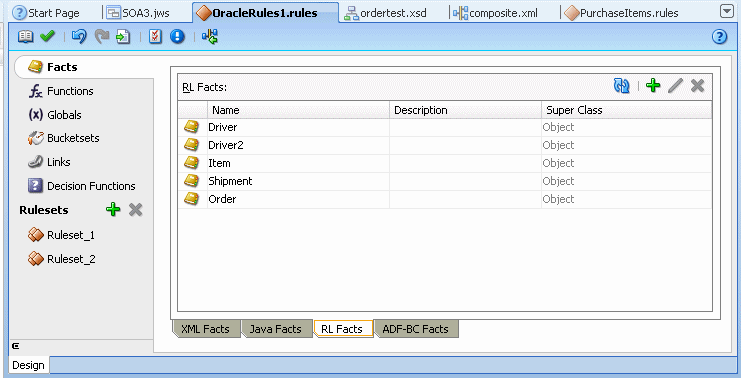
Select the RL Facts tab in the Facts navigation tab as shown in Figure 3-9.
Figure 3-9 RL Facts Tab in Rules Designer
Description of "Figure 3-9 RL Facts Tab in Rules Designer"
-
In the RL Facts tab, click Create.
-
In the RL Facts table, in the Name field, enter the name for the RL Fact or accept the default name.
-
In the RL Facts table, in the Description field, enter a description or accept the default, no description.
3.4.2 How to Display and Edit RL Facts and Add RL Fact Properties
You add properties to RL Facts using the Edit RL Facts dialog.
To display and edit RL facts and add RL fact properties:
-
In Rules Designer, select the Facts navigation tab.
-
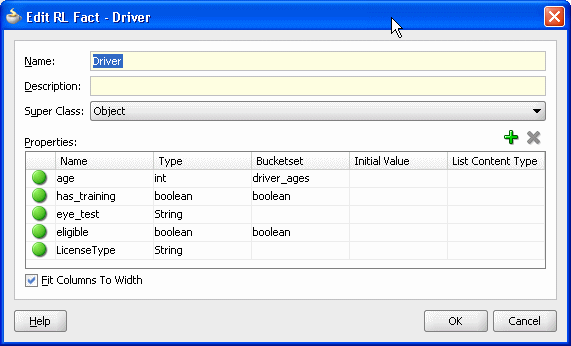
In the RL Facts tab, double-click the icon for the RL Fact to display or edit the fact. This displays the Edit RL Fact dialog, as shown in Figure 3-10.
-
To add RL Fact properties, on the Edit RL Fact dialog in the Properties area, click Create.
-
In the Name field, enter the property name.
-
In the Type field, select a type from the dropdown list or enter a property type.
-
To associate a bucketset with the property, from the dropdown list in the Bucketset field, select a bucketset.
-
To associate an initial value with the property enter a value in the Initial Value field.
-
-
Add additional properties by repeating these steps, as required.
-
Click OK.
3.4.3 What You Need to Know About RL Facts
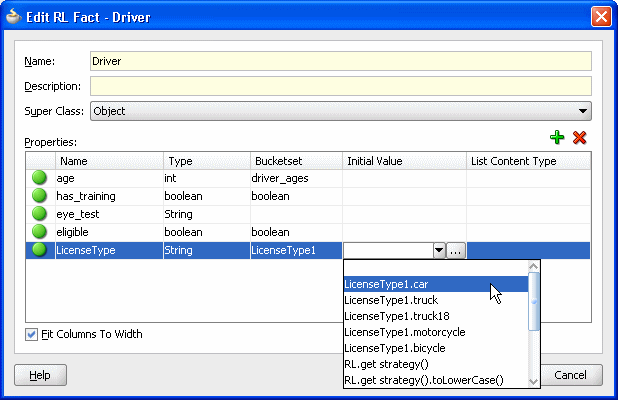
When you add properties to RL Facts using the Edit RL Facts dialog, in the Properties area the Initial Value field provides a dropdown list of possible values as shown in Figure 3-11.
Figure 3-11 Setting RL Fact Property Initial Value
Description of "Figure 3-11 Setting RL Fact Property Initial Value"
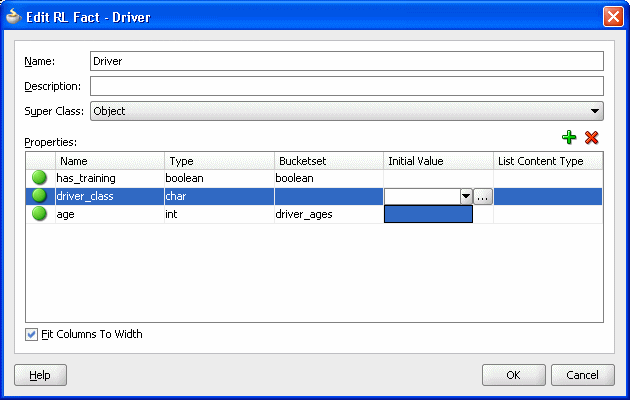
When you are working with some fields in Rules Designer, the initial values dropdown list or other dropdown lists may be empty as shown in Figure 3-12. In this case the dropdown list is an empty box. Thus, when Rules Designer does not find options to assist you in entering values, you must supply a value directly in the text entry area or click the Expression Builder icon to display the expression builder dialog.
Figure 3-12 RL Fact Empty List Options for Initial Value Field
Description of "Figure 3-12 RL Fact Empty List Options for Initial Value Field"
3.5 Working with ADF Business Components Facts
ADF Business Components Facts allow you to use ADF Business Components as Facts in rules and in Decision Tables. By using ADF Business Components Facts you can assert view object graphs representing the business objects upon which rules should be based, and let Oracle Business Rules deal with the complexities of managing the relationships between the various related view objects in the view object graph.
For more information, see Chapter 10, "Working with Oracle Business Rules and ADF Business Components".
3.5.1 How to Import and Define ADF Business Components Facts
When an ADF Business Components view object is imported, an ADF Business Components fact type is created which has a property corresponding to each attribute of the view object.
To add ADF Business Components facts:
-
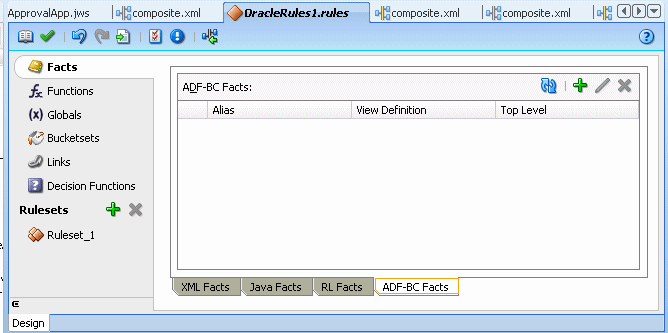
Click the Facts navigation tab and select the ADF-BC Facts tab. This displays the ADF-BC Facts table, as shown in Figure 3-13.
Figure 3-13 ADF Business Components Facts Tab
Description of "Figure 3-13 ADF Business Components Facts Tab"
-
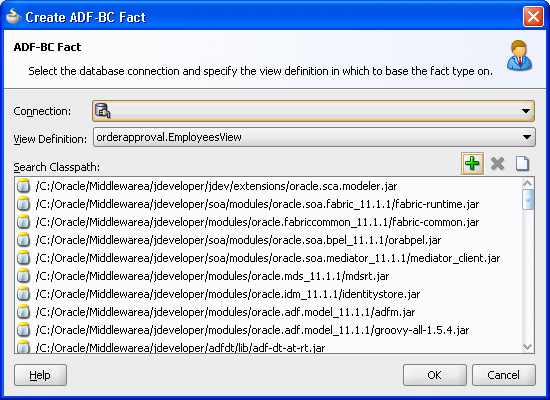
Click Create.... This displays the ADF Business Components Fact dialog, as shown in Figure 3-14.
-
In the Connection field, from the dropdown list, select the connection which your ADF Business Components objects use. The Search Classpath area shows a list of classpaths. For more information, see Section 3.5.2, "What You Need to Know About ADF Business Components Fact Classpaths".
-
In the View Definition field, select the name of the view object to import.
-
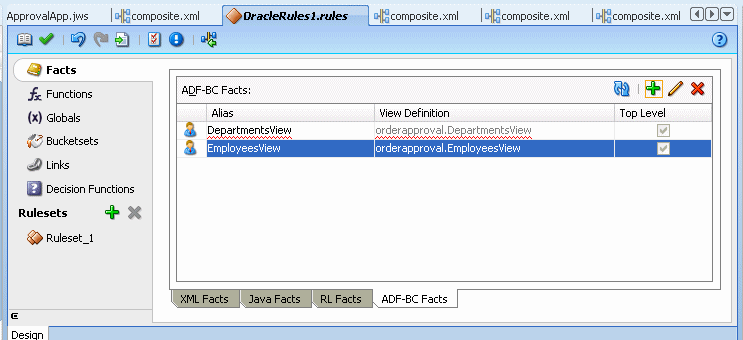
Click OK. This displays the Facts navigation tab, as shown in Figure 3-15. Note that the imported fact includes a validation warning. For information on how to remove this validation warning, see Section 3.5.3, "What You Need to Know About ADF Business Components Circular References".
Figure 3-15 ADF Business Components Facts in Rules Designer
Description of "Figure 3-15 ADF Business Components Facts in Rules Designer"
3.5.2 What You Need to Know About ADF Business Components Fact Classpaths
In the classpath list shown in the Search Classpath area in the Create ADF Business Components Fact dialog one of the listed classpaths allows you to see the view object definitions available in your project. In this dialog you only need to click Add to Classpath when you need to use a classpath that is not available to your project (this case should be very rare).
3.5.3 What You Need to Know About ADF Business Components Circular References
ADF Business Components Facts can include a circular reference, as shown in Figure 3-15. When this warning is shown in the Business Rule validation log you need to manually resolve the circular reference. To do this you must deselect the Visible checkbox for one of the properties that is involved in the circular reference.
3.5.4 What You Need to Know About ADF Business Components Facts
Each ADF Business Components fact type contains a property named ViewRowImpl that references the oracle.jbo.Row instance that the fact instance represents and a property named key_values which points to an oracle.rules.sdk2.decisionpoint.KeyChain object that may be used to retrieve the set of key-values for this row and its parent rows.
When working with ADF Business Components Facts you should know the following:
-
Relationships between view object definitions are determined by introspection of attributes on the View Definition, specifically, those attributes which are View Link Accessors.
The ADF Business Components fact type importer correctly determines which relationships are 1-to-1 and which are 1-to-many, and generates definitions in the dictionary accordingly. For 1-to-many relationships the type of the property generated is a
List, which contains facts of the indicated type at runtime. -
It is not possible to use ADF Business Components fact types which have cyclic type dependencies. These cycles must be broken by the deselecting the Visible checkbox for at least one property involved in the cycle.
-
ADF Business Components fact types are not Java fact types and do not allow invoking methods on any explicitly created implementation classes for the view object.
If you need to call such methods then add the view object implementation to the dictionary as a Java fact type instead of as an ADF Business Components fact type. In this case, all getters and setters and other methods become available but the trade-off is that related view objects become inaccessible and, should related view object access be required, these relationships must be explicitly managed.
-
Internally, ADF Business Components fact types are instances of RL fact types.
Thus, you cannot assert ADF Business Components view object instances directly to a Rule Session, but must instead use the helper methods provided in the
MetadataHelperandADFBCFactTypeHelperclasses. For more information, see Oracle Fusion Middleware Java API Reference for Oracle Business Rules.
3.6 Working with Bucketsets
You can create a bucketset to define a list of values or a list of value ranges to limit the acceptable set of values for a fact or a property of a fact in Oracle Business Rules. You can define a bucketset as a Global Bucketset that allows reuse, where a bucketset is named and stored in the data model, or as a Local Bucketset that is specified when you define a Decision Table and only applies to one condition expression. For more information on using a local bucketset, see Section 5.2.2, "How to Add Condition Rows to a Decision Table".
You can use Bucketsets for the following:
-
You can associate fact type properties with bucketsets. This allows you to limit the acceptable set of values for a property of a fact. For more information, see Section 3.7.1, "How to Associate a Bucketset with a Fact Property".
-
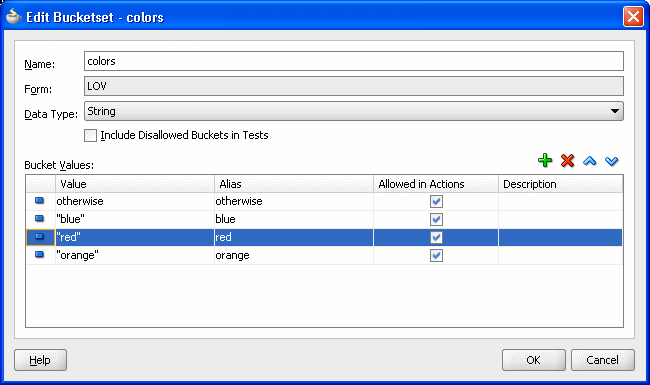
In a Decision Table a bucketset defines a list of values or value ranges in the condition expressions that are part of the Decision Table. The bucketset values or ranges determine, for each condition expression in a Decision Table, that it has two or more possibilities. Using a bucketset each possibility in a condition expression is divided into groups or ranges where a cell specifies one Bucket of values from the bucketset (or possibly multiple buckets of values per cell). For example, if a bucketset is defined for colors, then the buckets could include a list of strings: "blue", "red", and "orange". A bucketset that includes integers could have three buckets, less than 1, 1 to 10, and greater than 10. For more information, see Section 5.2.2, "How to Add Condition Rows to a Decision Table".
-
You can associate globals, functions, and function arguments with bucketsets. Associating a bucketset with a global allows for design-time validation that an assigned value is limited to the values specified in the bucketset. Associating a bucketset with a function argument validates that the function is only called with values in the bucketset. Using bucketsets in this manner allows Rules Designer to report validation warnings for global values and function arguments that are assigned or passed a constant argument value that is not allowed. This type of bucketset validation is "weak" in the sense that only design-time constant values are validated. No runtime checks are applied based on the globals or function arguments associated with bucketsets. Associating a bucketset with a function automatically sets a Decision Table condition row to use that bucketset when the function is used as the expression for that condition row. For more information, see Section 3.7.2, "How to Associate a Bucketset with Functions or Function Arguments".
-
In addition to design-time validation you can use an LOV bucketset to provide options that are displayed in lists when entering expressions in IF/THEN rule tests and actions. For more information, see Section 4.11.3, "How to Use Bucketsets to Provide Options for Test Expressions".
There are three forms for bucketsets:
-
LOV: Defined by a list of values (see Section 3.6.1, "How to Define a List of Values Global Bucketset").
-
Range: Defined by a list of value ranges, defined by the range endpoints (see Section 3.6.2, "How to Define a List of Ranges Global Bucketset").
-
Enum: Defined by a list of enumerated types that is imported from either of:
3.6.1 How to Define a List of Values Global Bucketset
A list of values bucketset lets you specify the type and the list of buckets for the bucketset.
For more information, see Section 3.6.5, "What You Need to Know About List of Values Bucketsets".
To define a list of values (LOV) global bucketset:
-
From Rules Designer select the Bucketsets navigation tab.
-
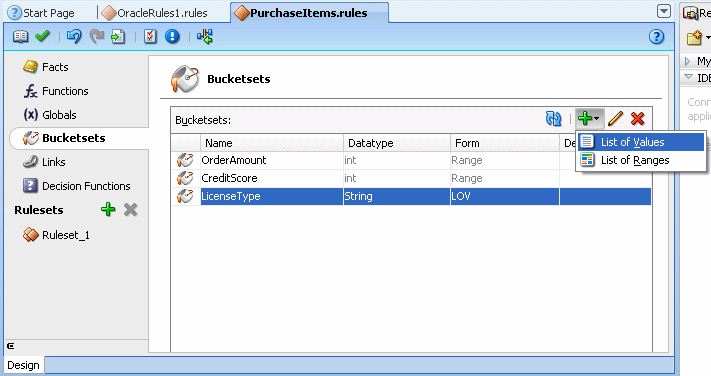
From the dropdown list next to the Create BucketSet... icon, select List of Values, as shown in Figure 3-16.
Figure 3-16 Adding a List of Values Bucketset
Description of "Figure 3-16 Adding a List of Values Bucketset"
-
Double-click the bucket icon for the bucket. This displays the Edit Bucketset dialog.
-
In the Edit Bucketset dialog, enter the bucketset name in the Name column.
-
In the Data Type column select a data type from dropdown list.
For example, select String from the dropdown list.
-
Click the Create icon to add a value.
-
For each bucket that you add, do the following:
-
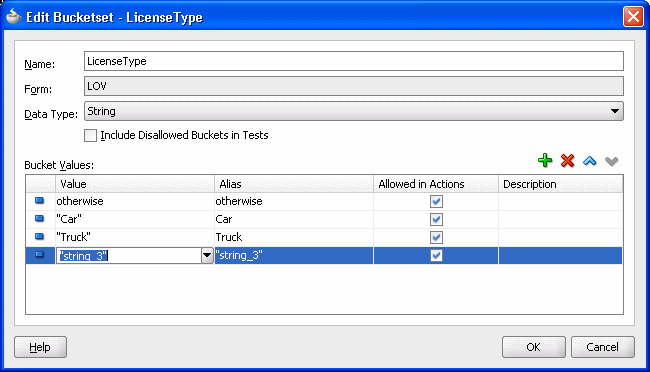
In the Value field, enter a value. Note that for String type values in an LOV bucket, you can select the entire string with three clicks. This allows you to enter the string and Rules Designer adds the same alias without quotation marks, as shown in Figure 3-17.
-
In the Alias field, enter an alias.
-
In the Allowed in Actions field, select this if the value is an allowable value.
For more information on the Allowed in Actions field and the Include Disallowed Buckets in Tests field, see Section 3.6.7, "What You Need to Know About Bucketset Allowed in Actions Option".
-
In the Description field, enter a description.
-
-
Add additional values by clicking the Create icon as needed for the bucketset, as shown in Figure 3-17.
Figure 3-17 Create List of Values Bucketset
Description of "Figure 3-17 Create List of Values Bucketset"
-
On the Edit Bucketset window, click OK.
You can control rule ordering in a Decision Table by changing the relative position of the buckets in an LOV bucketset associated with a condition expression in a Decision Table.
To change the order of buckets in a list of values bucketset:
-
In the Edit Bucketset dialog for the bucketset, select the bucket you want to reorder.
-
Click the Move Down icon to reorder the bucket down.
-
Click the Move Up icon to reorder the bucket up.
-
Click OK.
3.6.2 How to Define a List of Ranges Global Bucketset
A list of ranges bucketset lets you specify the type and the endpoints for buckets in the bucketset.
For more information, see Section 3.6.6, "What You Need to Know About Range Bucketsets".
To define a list of ranges (range) global bucketset:
-
From Rules Designer select the Bucketsets navigation tab.
-
From the dropdown list next to the Create BucketSet... icon, select List of Ranges.
-
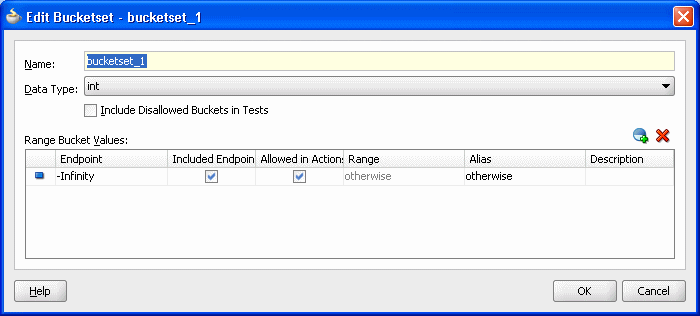
Double-click in the Data Type field. This displays the Edit Bucketset dialog, as shown in Figure 3-18.
Figure 3-18 Edit Bucketset: List of Ranges
Description of "Figure 3-18 Edit Bucketset: List of Ranges"
-
In the Edit Bucketset dialog, enter the bucketset name in the Name field.
-
In the Edit Bucketset dialog, in the Data Type field, from the dropdown list, select the appropriate data type for the bucketset.
In this example, select int.
-
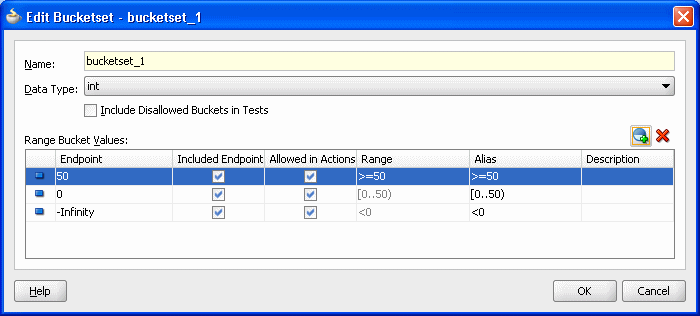
Click the Add Bucket icon repeatedly to add the number of buckets you need in the bucketset as shown in Figure 3-19.
Figure 3-19 Edit Bucketset: Adding Required Buckets
Description of "Figure 3-19 Edit Bucketset: Adding Required Buckets"
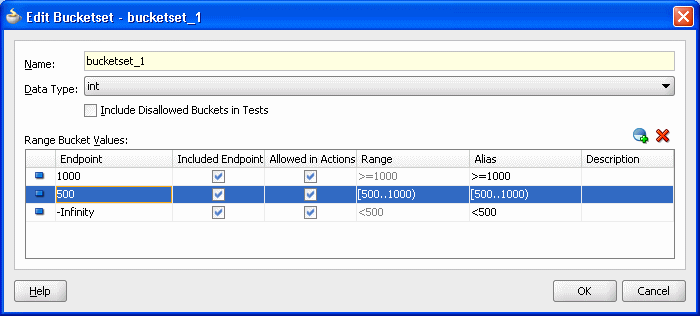
In these steps you add three buckets. You start with the default values, as shown in Figure 3-19. After changing the default buckets, the buckets have the following values:
-
greater than 1000
-
between 500 and 1000, inclusive
-
less than 500
Rules Designer added the buckets with the default values of 50 and 0 and a negative Infinity (-Infinity) bucket.
-
-
Starting at the first or top bucket, in the Endpoint field, double-click the default value and enter the top value bucket endpoint, and press Enter.
In this example, enter 1000 for the first bucket.
-
In the Included Endpoint field, select the checkbox as appropriate to include or exclude the bucket endpoint.
In this example, you can leave this checkbox checked to include the bucket endpoint.
-
In the Allowed in Actions field select the checkbox as appropriate to include the bucket in the bucketset allowable values.
For more information on the Allowed in Actions field and the Include Disallowed Buckets in Tests field, see Section 3.6.7, "What You Need to Know About Bucketset Allowed in Actions Option".
-
Optionally, in the Alias field double-click the default value and enter the desired bucket alias, and press Enter.
The alias appears in Decision Tables that use this bucketset. Use an alias to give a more meaningful name to the bucket than the default value (the range-based Range value).
The Range field is read-only: it clearly identifies the actual range associated with the bucket regardless of the Alias value. For more information, see Section 3.6.6, "What You Need to Know About Range Bucketsets").
-
Moving down the list of buckets, for each subsequent bucket, repeat from Step 7. For the second bucket, enter the endpoint value 500.
Figure 3-20 shows the completed bucketset.
Figure 3-20 Edit Bucketset: Completed Range Buckets
Description of "Figure 3-20 Edit Bucketset: Completed Range Buckets"
-
In the Edit Bucketset dialog, click OK.
3.6.3 How to Define an Enumerated Type (Enum) Bucketset from XML Types
When you import an XML schema, if the XSD contains enumeration values Rules Designer automatically creates an enumerated type bucketset for each enumeration. Although enumerated type bucketsets are read-only, you can change the order of buckets.
For more information, see Section 3.2.4, "What You Need to Know About XML Facts".
To define an enumerated type (enum) bucketset from XML types:
-
Obtain an XSD with the desired enumerations.
Example 3-2 shows the
order.xsdschema file which contains the enumerationStatus.<?xml version="1.0" ?> <schema attributeFormDefault="qualified" elementFormDefault="qualified" targetNamespace="http://example.com/ns/customerorder" xmlns:tns="http://example.com/ns/customerorder" xmlns="http://www.w3.org/2001/XMLSchema"> <element name="CustomerOrder"> <complexType> <sequence> <element name="name" type="string" /> <element name="creditScore" type="int" /> <element name="annualSpending" type="double" /> <element name="value" type="string" /> <element name="order" type="double" /> </sequence> </complexType> </element> <element name="OrderApproval"> <complexType> <sequence> <element name="status" type="tns:Status"/> </sequence> </complexType> </element> <simpleType name="Status"> <restriction base="string"> <enumeration value="manual"/> <enumeration value="approved"/> <enumeration value="rejected"/> </restriction> </simpleType> </schema> -
Open a dictionary in Rules Designer and create XML facts using the specified schema that contains the enumeration. For more information, see Section 3.2, "Working with XML Facts".
-
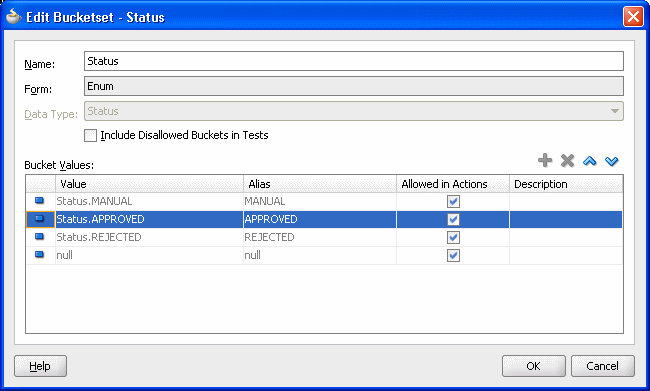
Click the Bucketsets navigation tab and select the Enum bucketset to see the bucketset, as shown in Figure 3-21. In Figure 3-21, notice that the imported
Statusenumeration values shown in Example 3-2 are imported as buckets with the XSD-specified values.Figure 3-21 Bucketset Showing the Form Enum with Imported Values
Description of "Figure 3-21 Bucketset Showing the Form Enum with Imported Values"
You can control rule ordering in a Decision Table by changing the relative position of the buckets in an enum bucketset associated with a condition expression in a Decision Table.
To change the order of buckets in an enum bucketset:
-
In the Edit Bucketset dialog for the bucketset, select the bucket you want to reorder.
-
Click the Move Down icon to reorder the bucket down.
-
Click the Move Up icon to reorder the bucket up.
-
Click OK.
3.6.4 How to Define an Enumerated Type (Enum) Bucketset from Java Types
When you import a Java enum, Rules Designer automatically creates an enumerated type bucketset for each Java enum. Although enumerated type bucketsets are read-only, you can change the order of buckets.
To define an enumerated type (enum) bucketset from Java facts:
-
Create or obtain the Java class with the desired enumerations.
Example 3-3 shows the
RejectPurchaseItem.javaclass which contains enumerationOrderSize. -
In Rules Designer open a dictionary and create a Java Fact using the Java class. For more information, see Section 3.3, "Working with Java Facts".
Figure 3-22 shows a how to create a Java fact for the Java enumeration
Class1$OrderSize. -
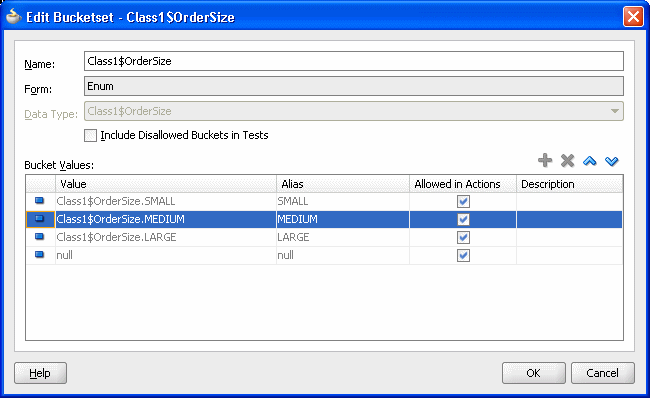
In Rules Designer click the Bucketsets navigation tab and select the Enum bucketset, as shown in Figure 3-23. Note that the
Class1$OrderSizeenumeration from the enumeration in Example 3-3 is now a bucketset with the Javaenum-specified values.Figure 3-23 Edit Bucketset Dialog for Java Enum
Description of "Figure 3-23 Edit Bucketset Dialog for Java Enum"
You can control rule ordering in a Decision Table by changing the relative position of the buckets in an enum bucketset associated with a condition expression in a Decision Table.
To change the order of buckets in an enumerated type (enum) bucketset:
-
In the Edit Bucketset dialog for the bucketset, select the bucket you want to reorder.
-
Click the Move Down icon to reorder the bucket down.
-
Click the Move Up icon to reorder the bucket up.
-
Click OK.
3.6.5 What You Need to Know About List of Values Bucketsets
In a Decision Table the order of the buckets in a bucketset associated with a condition expression determines the order of the condition cells, and thus the order of the rules. You can control rule ordering in a Decision Table by changing the relative position of the buckets in a list of values bucketset associated with a condition expression; however, you cannot reorder range buckets.
Figure 3-24 shows a bucketset definition in Rules Designer for a bucketset named colors using a list of values.
Figure 3-24 Bucketset Definition Using List of Values
Description of "Figure 3-24 Bucketset Definition Using List of Values"
As shown in Figure 3-24, by default with a List of Values bucketset there is a value otherwise included with the list of values (LOV). This value, otherwise, is distinct from all other values and matches all values of the type that have no other bucket. Thus, with otherwise in the list of values a condition expression that uses the bucketset can handle every value and provides a match for every value of the specified type, where a match is either a defined value or the otherwise bucket. The otherwise value cannot be removed from an LOV bucketset but it can be excluded by clearing the Allowed in Actions checkbox (when otherwise is excluded an attempt to assign any value that is not in the list of buckets in the bucketset causes a validation warning).
Table 3-3 shows the bucketset values that Rules Designer supports for LOV bucketsets.
Table 3-3 Supported Types for LOV Bucketsets
| Type | Description |
|---|---|
|
Java primitive types |
This includes |
|
|
Contains |
|
|
Contains |
Note:
You are not required to specify an LOV bucketset when you use a boolean type in a Decision Table. For boolean types, Oracle Business Rules provides built-in buckets for the possible values (true and false).3.6.6 What You Need to Know About Range Bucketsets
When you add a bucket to a List of Ranges bucketset, the value is calculated based on the currently selected bucket value and the next highest bucket value. When you change the endpoint value the value is automatically sorted in the bucketset; thus, it does not matter where a bucket is added. However, it is possible for Rules Designer to not have spaces between the current bucketset endpoint value and the endpoint value. In this case, Rules Designer shows a validation warning of the following form:
RUL-05849: Bucketset has duplicate bucket value "4999"
To correct this problem you must modify bucket endpoints to remove the duplicate bucket.
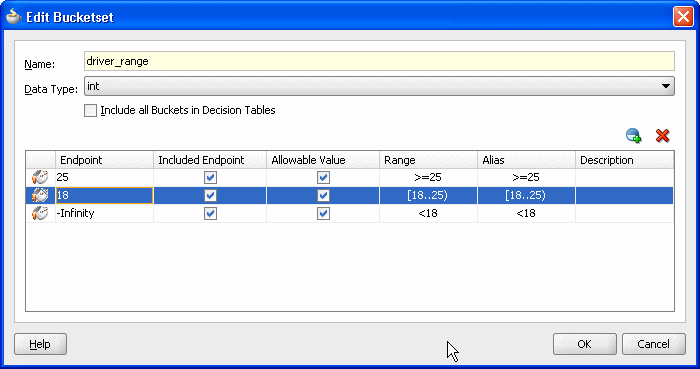
Figure 3-25 shows the Edit Bucketset window for a bucketset with an integer, int, range.
Figure 3-25 Bucketset Definition Using List of Ranges and Three Endpoints
Description of "Figure 3-25 Bucketset Definition Using List of Ranges and Three Endpoints"
Table 3-4 shows the types Rules Designer supports for Range buckets.
Table 3-4 Supported Types for Range Buckets
| Type | Description |
|---|---|
|
Selected primitive types |
This includes: |
|
|
Contains Calendar types in the current locale |
Note the following conventions for the Range field:
-
Logical operator: specifies a range with respect to positive or negative infinity. For example, "
>=25"means "from 25 to positive infinity" and"<18"means from negative infinity up to but not including 18. -
Square bracket "
[": specifies a range that includes this end point value. For example,"[18..25)"means "from 18 up to but not including 25". -
Round bracket ")": specifies a range that excludes this end point value. For example,
"(18..25]"means "over 18, not including 18, up to and including 25".
3.6.7 What You Need to Know About Bucketset Allowed in Actions Option
When you define buckets in a bucketset you might define some buckets corresponding to non-permissible values. For example, in a bucketset for driver ages you would typically not allow a bucket that contains values less than 0. Thus, when a fact with driver data includes an age property associated with a driver ages bucketset, then you should not be able to create or modify a fact that has the age property set to a value such as -1. In a bucketset you select Allowed in Actions for valid buckets and deselect this option for invalid buckets.
The bucketset option Include Disallowed Buckets in Tests allows you to include all the buckets, whether Allowed in Actions is selected or not, in Decision Table conditions and in rule tests. By including all buckets you can explicitly test for illegal values. Using the option Include Disallowed Buckets in Tests you can handle two possible cases:
-
The input data for the Oracle Business Rules Engine is clean and does not contain invalid data (such as a negative age). In this case, you should deselect the Include Disallowed Buckets in Tests. Note: the reason you do not want to make
age < 0an Allowed in Actions is this provides design time validation warnings if you try to create an action that uses an invalid value, such as the following:modify(driver, age: -1)). For more information, see Section 4.11, "Using Bucketsets as Constraints for Options Values in Rules". -
You want to consider excluded buckets in rule tests and in Decision Tables. In this case, you should select Include Disallowed Buckets in Tests. This is useful when the input data for the Oracle Business Rules Engine may not be clean and may contain invalid data (for example an invalid negative age). A Decision Table that provides actions for all bucketsets could include cases for excluded buckets and provide an appropriate action, such as asserting an error fact. To handle this you could either select the Allowed in Actions field for every bucket in the bucketset, or, leave the Allowed in Actions field configured as is and select the Include Disallowed Buckets in Tests field. Using the Include Disallowed Buckets in Tests field is not only convenient, you do not need to reconfigure every bucket, it also preserves the configuration of Allowed in Actions so that you can easily reuse this bucketset to handle the first case (when you deselect Include Disallowed Buckets in Tests).
3.6.8 What You Need to Know About Bucket Values
When you enter a bucket value in a bucketset, the value you supply must be valid for the type specified for the bucketset. If the value you enter is not valid for the bucketset type, Rules Designer makes the value you supply a string by adding quotation marks. Adding quotation marks is the only way to make a legal literal when the user provided data is not appropriate for the specified type. For example, if you add an int type LOV bucketset, and then supply a value 2.2 to a bucket, Rules Designer shows a warning such as the following:
RUL-05833: Invalid characters "2.2" in bucket value
To fix this problem either enter a valid value for the bucket value, for example in this case the value 2, or change the type of the bucketset.
For an additional example, when you enter a value for a bucket, for example if you enter a bucket value with bucketset with data type short and add a bucket with the value 999999, Rules Designer assigns this the value "999999". The maximum value for a short is 32767. In this case you see a warning related to the bucket value, similar to the previous example, because a String is not a valid bucket value for a bucketset with data type short. The solution to this is to enter appropriate values for all buckets (in this example, enter a value less than or equal to 32767).
3.7 Associating a Bucketset with Facts and Functions
After you define a global bucketset you can associate parts of the data model with the global bucketset (if their types are compatible). In this way, condition cells in the Conditions area can automatically be assigned a bucketset when you define a Decision Table. Also, when a bucketset is associated with a fact property Oracle Business Rules uses the buckets that you define as constraints for the values for expressions for the fact property in rules.
3.7.1 How to Associate a Bucketset with a Fact Property
To prepare for creating Decision Tables you can associate a global bucketset with fact properties in the data model.
To associate a bucketset with a fact property:
-
From Rules Designer select the Facts navigation tab.
-
Select the fact type you are interested. This displays the appropriate Edit Fact dialog for the fact type you select.
-
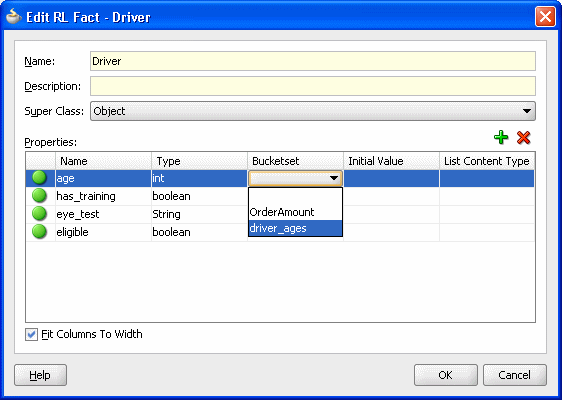
In the Properties table, under Bucketset, select the cell for the appropriate fact property and from the dropdown list select the bucketset you want to associate with the property. For example, see Figure 3-26.
Figure 3-26 Defining a Bucketset for a Property
Description of "Figure 3-26 Defining a Bucketset for a Property"
-
On the Edit Fact page, click OK.
3.7.2 How to Associate a Bucketset with Functions or Function Arguments
To prepare for creating Decision Tables you can associate a global bucketset with functions in the data model.
To associate a bucketset with a function return value:
-
From Rules Designer select the Functions tab.
-
Select the function to edit. This shows the function arguments and the function body for the specified function.
-
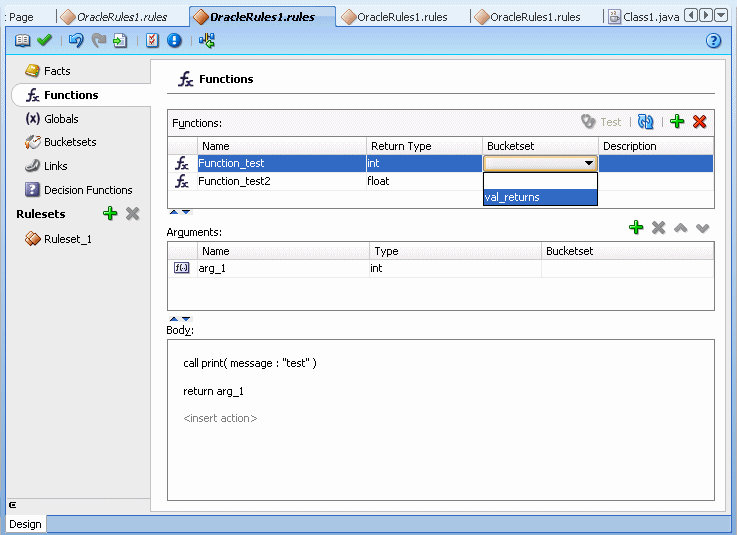
In the Functions table, under Bucketset, select the cell and from the dropdown list select the bucketset you want to use. For example, see Figure 3-27.
Figure 3-27 Defining a Bucketset for a Function Return Value
Description of "Figure 3-27 Defining a Bucketset for a Function Return Value"
To associate a bucketset with a function argument:
-
From Rules Designer select the Functions navigation tab.
-
Select the function to edit. This shows the function arguments and the function body for the specified function.
-
In the Functions table, in the Arguments area select the appropriate argument.
-
For the specified argument, under Bucketset, select the cell and from the dropdown list select the bucketset you want to use.
