 Verifying ETL Components Have Imported Properly
This chapter discusses how to:
Verify ETL components have been imported properly
Compile ETL jobs
Use the Master Run Utility to run your ETL jobs
Run ETL setup jobs to bring source data into EPM
Verifying ETL Components Have Imported ProperlyAfter you have finished configuring DataStage for EPM and imported all of the appropriate *.dsx files (which include different ETL components) you must verify that all the necessary components have been imported properly. This must be performed prior to running any ETL setup jobs.
 Verifying Routines
Perform the following steps to verify that your ETL routines are present:
In DataStage Manager, attach to your project and expand the Routines node in the left navigation panel of the window.
Verify that the object, EPM90_Routines, is present in the list of routines.
If this object does not exist in the list, your import of the Common_Utilities_E_E1.dsx file was unsuccessful. You must re-import the *.dsx file.
Verifying Shared Containers
Perform the following steps to verify that your shared containers are present:
In DataStage Manager, attach to your project and expand the Shared Containers node in the left navigation panel of the window.
Verify that the objects, Incremental_Logic and Language_Swap, are present in the list of shared containers. The Incremental_Logic object should also contain six components and Language_Swap should contain one.
If these objects do not exist in the list, your import of the Common_Utilities_E_E1.dsx file was unsuccessful. You must re-import the *.dsx file.
Verifying ETL Jobs
Perform the following steps to verify that your ETL jobs are present:
In DataStage Manager, attach to your project and expand the Jobs node in the left navigation panel of the window.
Expand each of the sub-folders in the Jobs node, such as Common_Dimensions_E,Global_Dimensions_E, and Shared_Lookups, and verify that each folder has the requisite ETL jobs in it.
The number of jobs present in each sub-folder vary depending on the product you are implementing.
Repeat the first two steps for each product and related project ( for example HCM Warehouse).
Compiling ETL JobsBefore you run any ETL setup jobs, you must compile all jobs first. The jobs should be compiled after you imported the related *.dsx file. The following sections discuss how to verify if your jobs are compiled, and compile those that might not have been.
Verifying ETL Job CompilationPerform the following steps to verify that your ETL jobs have been properly compiled:
In DataStage Director attach to your project and select View, Status from the menu.
In the left navigation panel of the DataStage Director window, expand the Jobs node.
Verify that the status of all jobs are equal to compiled.
If any of the jobs are not compiled, compile them using the steps outlined in the following sections.
Compiling Individual ETL Jobs (Optional)
Perform the following steps to compile individual ETL jobs:
In DataStage Designer, navigate to the job you want to compile, open it, and click on the Compile button.
After compiling the job you receive a message informing you of the outcome in the Compilation Status window.
If the job compiled with no errors, click Close.
If the job compiled errors, click Re-Compile.
Repeat steps one and two for each job you wish to compile.
Step 1 - Compile button:
Step 1 - Compilation Status Window:
Compiling Multiple ETL Jobs (Optional)
Perform the following steps to compile multiple ETL jobs:
In the DataStage Manager attach to your project and select Tools, Run Multiple Job Compile from the menùˋ.
The DataStage Batch Job Compilation Wizard opens.
In the wizard, select the Server, Sequence, Only select uncompiled jobs, and Show job selection page check boxes.
The right panel of the wizard window lists all uncompiled jobs.
Click Next.
Click the Start Compile button.
After job compilation is complete, the status for each job reads Compiled OK.
Click Next, then Finish to complete the process.
The Job Compilation Report displays for you to review, should you wish to do so.
Step 5 - Job Compilation Report:
See Also
Ascential DataStage Designer Guide
Using the Master Run Utility to Automatically Run Your ETL JobsThis section provides an overview of the Master Run Utility and discusses how to run the utility.
Understanding the Master Run UtilityPeopleSoft provides the Master Run Utility, which enables you to automatically run a set of jobs located in a flat file on the DataStage Server. When you use the Master Run Utility, it reads a list of jobs that are present in a specified flat file and triggers the jobs to run in serial mode, using the dependency logic specified in the Input flat file.
The following features are incorporated into the Master Run Utility:
Run jobs from a specified flat file.
Reset jobs and rerun when they are in an aborted stage.
Active restart recovery.
Run jobs in dependent or independent modes.
Generate a job status report in the log file at the end of a run.
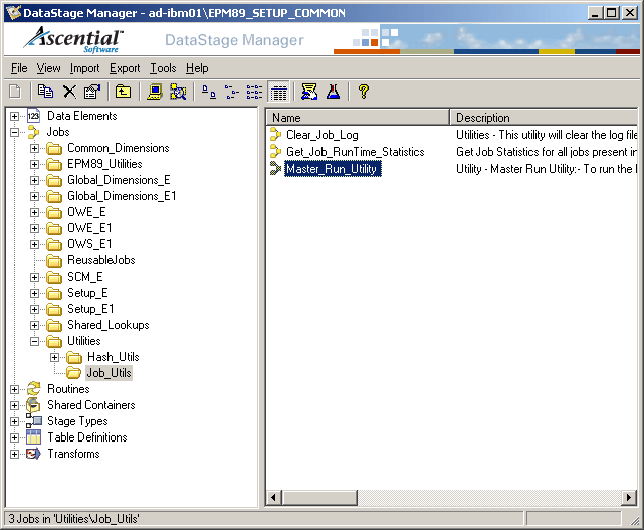
Location of the Master Run Utility
The Master Run Utility is available in the Common_Utilities_E_E1.dsx file. After you import this *.dsx file, you can locate the utility using the following navigation: Jobs, Utilities, Job_Utils.
Location of the ETL Master Run Utility
Input File for Master Run Utility
The Input flat file contains the list of ETL jobs that are available in the DataStage Server and indicates whether a job is independent or dependent. Dependency information is used to determine job execution in the Master Run Utility. If a job labeled as independent fails to run properly, the Master Run Utility logs the information and proceeds to the next job. However, if a job labeled as dependent fails to run properly, the utility itself aborts. All jobs listed in the flat file contain the suffix N (Independent job) or D (Dependent Job) to indicate their dependency.
The Input flat file also contains comments that describe each set of ETL jobs. Comments are prefixed with an asterisk (*) to clearly indicate they are comments. The following screen shot provides an example flat file:
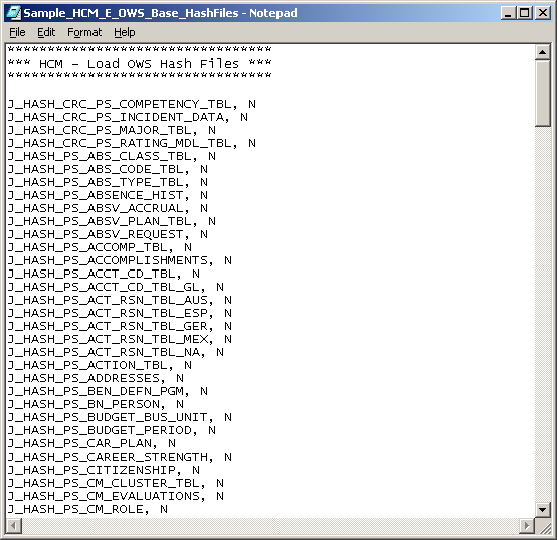
Sample_HCM_E_OWS_Base_HashFiles.txt
The sample file above contains the list of HCM jobs used to load data into OWS target tables.
Restart Recovery Feature
When a dependent job fails to run properly, the Master Run Utility automatically aborts the job and all subsequent jobs. Assuming you fix the problem that caused the job to fail, you must rerun the Master Run Utility to complete the process of running those jobs that were aborted. Instead of running all the jobs in that particular folder, the restart recovery feature enables you to rerun only those jobs that were aborted.
For example, assume the file SAMPLE_HCM_E_GLOBAL_DIMENSIONS_Base_Tables.txt contains Global Dimension jobs that are all dependent to each other. If the SEQ_J_Dim_PS_D_POS job is aborted, the entire utility aborts. Later you fix the issue in the SEQ_J_Dim_PS_D_POS job. This time, you can run the Master_Run_Utility with the Restart Recovery option set to Yes so that it runs the jobs from SEQ_J_Dim_PS_D_POS only and ignores the jobs that have previously completed successfully.
Running the Master Run UtilityPerform the following steps to run the Master Run Utility:
In DataStage Director, navigate to the Master Run Utility using the following navigation: Jobs, Utilities, Job_Utils.
Select Master_Run_Utility and click Run.
The Master_Run_Utility - Job Run Options window appears.
Enter the path to the location to the flat file and specify whether you want to use the restart recovery feature.
Click Run.
From the DataStage Director menu, select View, Log.
The Master Run Utility generates a report with the following information:
Jobs that have completed successfully.
Jobs that have completed with warnings.
Jobs that have aborted
Jobs that have not compiled
Jobs that have incorrect names.
If you double-click log entries that contain the phrase COMPLETED SUCCESSFULLY, the Event Details window appears and displays all the jobs that have successfully completed.
Likewise, if you double-click log entries that contain the key word ABORTED, the Event Details window appears and displays all the jobs that have aborted.
Step 2 - Master_Run_Utility, Job Run Options window:
Step 4 - Master Run Utility Log:
Step 4 - Event Details window:
Running ETL Setup Jobs to Bring Source Data Into EPMAfter you verify that all ETL components have been successfully imported and all ETL jobs compiled, you are ready to run the jobs which bring your source data into the EPM database (the OWS Load_Hash_Files and Load_Tables jobs).
You have the option of running these jobs manually or using the Master Run Utility. To run the jobs automatically with the Master Run Utility, simply follow the steps described in the preceding section (Using the Master Run Utility to Automatically Run Your ETL Jobs). To run the jobs manually, follow the steps described below.
Running Hash Files Setup Jobs Manually
Perform the following steps to manually run hash files setup jobs:
In DataStage Director, navigate to the hash file jobs by expanding the nodes in the left navigation panel using the following path: Setup_E, OWS, <Warehouse Code>,Base, Load_Hash_Files, Server.
Note. Warehouse Code refers to each of the functional warehouse products (for example, CRM, FSCM, or HCM).
Select each hash file setup job in the Job Status view and select Job, Run Now... from the menu.
The Job Run Options box appears.
Update the job parameters if necessary and click Run.
The job is scheduled to run with the current date and time, and the job’s status is updated to Running.
Running the Setup - OWS Jobs Manually
Perform the following steps to manually run setup - OWS jobs:
In DataStage Director, navigate to the setup jobs by expanding the nodes in the left navigation panel using the following path: Setup_E, OWS, <Warehouse Code>, Base, Load_Tables, Sequence.
Note. Warehouse Code refers to each of the functional warehouse products (for example, CRM, FSCM, or HCM).
Select each setup - OWS job in the Job Status view and select Job, Run Now... from the menu.
The Job Run Options box appears.
Update the job parameters if necessary and click Run.
The job is scheduled to run with the current date and time, and the job’s status is updated to Running.