 Understanding Slowly Changing Dimensions
This chapter provides an overview of slowly changing dimensions and discusses how to convert type 1 slowly changing dimension jobs to type 2 slowly changing dimension jobs.
Understanding Slowly Changing DimensionsData warehouses store historical data from an online transaction processing (OLTP) system. As new data is extracted into the data warehouse from the source OLTP system, some records may change. When the attributes of a given dimension table change, this is called a slowly changing dimension.
For example, an organization may use its Product dimension table to store product descriptions. The description lists the ingredients of the product. If there is a change to the ingredient list, the description in the OLTP is updated to reflect this change. When the changed record (the slowly changing dimension) is extracted into the data warehouse, the data warehouse updates the appropriate record with the new data. How that change is reflected in the data warehouse depends on how slowly changing dimensions has been implemented in the warehouse.
There are three types of slowly changing dimensions:
Type 1 Slowly Changing Dimension: This method overwrites the existing value with the new value and does not retain history.
Type 2 Slowly Changing Dimension: This method adds a new row for the new value and maintains the existing row for historical and reporting purposes.
Type 3 Slowly Changing Dimension: This method creates a new current value column in the existing record but also retains the original column.
 Type 1 Slowly Changing Dimensions
 A type 1 slowly changing dimension overwrites the existing data warehouse value with the new value coming from the OLTP system. Although the type I does not maintain history, it is the simplest and fastest way to load dimension data. Type I is used when the old value of the changed dimension is not deemed important for tracking or is an historically insignificant attribute.
For example, a company that manufactures cardboard boxes might have a Product dimension table that tracks the product ID, product name, and product description. Similar columns would be present in the warehouse Product dimension, with the addition of a surrogate ID (primary key) to track each unique record.
If one of the product descriptions were to change from glued box to pasted box in the OLTP system, it would trigger a slowly changing dimension event in the warehouse Product dimension. If you want to overwrite the former description without saving history, you would use type 1 slowly changing dimension:
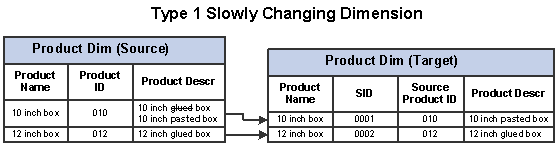
Type 1 slowly changing dimension
Note. After overwriting an existing dimension value, you may find that some of your reports that depended on the value will not return the same information as before.
Type 2 Slowly Changing DimensionsA type 2 slowly changing dimension enables you to track the history of updates to your dimension records. When a changed record enters the warehouse, it creates a new record to store the changed data and leaves the old record intact. Type 2 is the most common type of slowly changing dimension because it enables you to track historically significant attributes. The old records point to all history prior to the latest change, and the new record maintains the most current information.
Each change to a dimension generates a new dimension record, and each record partitions history perfectly. This is done by a combination of:
Effective dating both the new and old record (the old record is assigned a non-active effective date and the new record is assigned an active effective date).
Assigning the new record a new (and unique) surrogate key.
Using the same cardboard manufacturing company as an example from the previous section, and assuming one of the product descriptions changed from glued box to pasted box in the OLTP system, type 2 slowly changing dimension would be used to retain the former description while incorporating the new. Instead of overwriting the existing value in the product description column, a new record is added, and a new surrogate ID (primary key) is assigned to the record. The original record with the description glued box remains. The following graphic demonstrates this type 2 slowly changing dimension scenario:
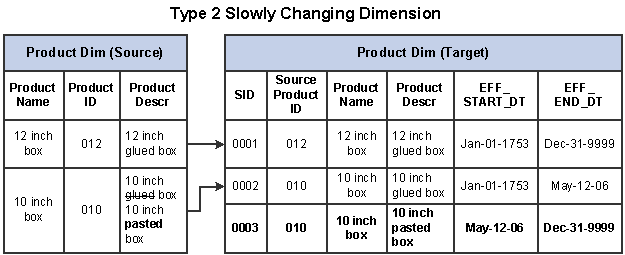
Type 2 slowly changing dimension
Note that the values for source product ID and source product name columns remain unchanged, but the surrogate key values are unique for each record and the effective start and end dates indicate the current record. This distinguishes the past and current records and enables you to report on historical and current data alike.
The main drawback of type 2 slowly changing dimensions is the need to generalize the dimension key and the growth of the dimension table itself. The dimension table could become quite large in cases where there are a number of changes to the dimensional attributes that are tracked.
Type 3 Slowly Changing DimensionsA type 3 slowly changing dimension creates a new current value column in the existing record but retains the original column as well. The new current value column holds the new dimension data coming from the OLTP system. This type of slowly changing dimension is used when a change in a dimension value must be tracked but the old value must be retained as part of the record, usually for reporting.
For example, a type 3 slowly changing dimension might be useful in a sales force realignment. When the names of the sales regions have changed but there is a need to state today's sales in terms of the past region names for comparison, a new field in the sales dimension table named current_region is added. The old field can be renamed to previous_region and no changes are made to the sales dimension record keys or to the number of sales team records. These two fields now enable an application to group all sales fact records by either the old sales assignments (previous region) or the new sales assignments (current region).
Type 3 slowly changing dimensions handle only the two most recent changes. If many changes take place and they must all be tracked, type 2 slowly changing dimensions should probably be used.
Understanding Slowly Changing Dimensions in EPMEPM is designed to support both type 1 and type 2 slowly changing dimensions, while type 3 are not supported. The majority of prepackaged EPM dimensions are set to type 1 with a smaller number set to type 2 (for example, D_EMPL_JOB).
Because the EPM data model supports both type 1 and type 2 slowly changing dimensions, there is no need to modify it should you wish to change a dimension from a type 1 to a type 2. Only the ETL job that loads the dimension must be changed. Instructions for modifying a dimension job for this purpose is discussed in the following section of this chapter.
Every EPM dimension table includes a Valid Date Range subrecord to help facilitate the process of converting a type 1 slowly changing dimension to a type 2. The subrecord tracks the date range for which a version of a dimension entity was valid. This subrecord is discussed in more detail in this section.
Fact Table Job Support for Slowly Changing DimensionsAll EPM dimension tables that source from tables which use the effective date (EFFDT) as part of their operational key are eligible for conversion to a type 2 slowly changing dimension. These types of dimensions are prepackaged with type 2 slowly changing dimension lookups to make it easier for you to convert.
Dimension lookups in EPM Fact table jobs are implemented using the date range from the Valid Date Range subrecord. If you decide to change a type 1 slowly changing dimension to a type 2, the fact jobs do not need to be altered. This feature enables you to affect fewer ETL jobs when configuring jobs for type 2 slowly changing dimensions.
Valid Date Range SubrecordAll EPM dimension tables have a Valid Date Range subrecord added to them to facilitate implementation of type 1 and type 2 slowly changing dimensions. The following table displays the structure of the Valid Date Range subrecord:
|
Column |
Data Type |
|
EFF_START_DT |
Date |
|
EFF_END_DT |
Date |
|
CURRENT_IND |
CHAR(1) |
EFF_START_DT and EFF_END_DT
For type 1 slowly changing dimensions, the EFF_START_DT and EFF_END_DT columns are assigned default values. EFF_START_DT is set to Jan-01-1753 and EFF_END_DT is set to Dec-31-9999.
For type 2 slowly changing dimensions, the EFF_START_DT and EFF_END_DT columns serve to partition the related dimension records and indicate which version is active. When a changed record is extracted into an MDW dimension table, the new record is assigned an EFF_START_DT value, which is derived from the EFFDT column. The old record is assigned an EFF_END_DT value equal to the new EFFDT minus one day (EFFDT - 1 day = EFF_END_DT of old record), and the new record is assigned an EFF_END_DT value equal to Dec-31-9999.
Note. The EFF_START_DT and EFF_END_DT columns are populated during ETL process.
CURRENT_IND
When a control (dimension) table in the source system has multiple records with the same business keys and different effective dates, the corresponding tables in the MDW also have multiple records with the same business keys and different EFF_START_DT and EFF_END_DT values. The applications only use the row that is currently valid (when the system date falls between the EFF_START_DT and EFF_END_DT values).
To help determine which records are valid and active, the CURRENT_IND column has been added to dimension tables and it indicates whether a row is active for a given system date. The CURRENT_IND column uses two-valued logic. Current rows are marked with CURRENT_IND = ‘Y’ and past and future dated rows are marked with CURRENT_IND = ‘N’.
For a type 1 slowly changing dimension implementation, this column will have a have default value of ‘Y’.
Design Differences Between Type 1 and Type 2 Slowly Changing Dimension JobsThis section describes the differences between type 1 and type 2 slowly changing dimension jobs in EPM and is divided into the following topics:
Source Query
Target DRS Stage
Target Lookup Stage
Source Query
The source query for a type 1 slowly changing dimension has a correlated sub query to take the latest effective dated row from the source table in the source DRS (Dynamic Relational Stage).
The source query for the type 2 slowly changing dimension does not have a correlated sub query; instead it uses an ORDER BY clause based on the effective date from the source table in the source DRS (Dynamic Relational Stage).
Target DRS Stage
There is only one target DRS stage for a type 1 slowly changing dimension and it uses an update existing rows or insert new rows logic for its loading strategy.
There are two target DRS stages for the type 2 slowly changing dimension:
The first target DRS stage uses an update existing rows only logic for its loading strategy.
The link with update existing rows only has the constraint SCDFlag=’Y’ so that it will update the EFF_END_DT and CURRENT_IND columns of the old dimension record.
The second target DRS stage uses an update existing rows or insert new rows logic for its loading strategy.
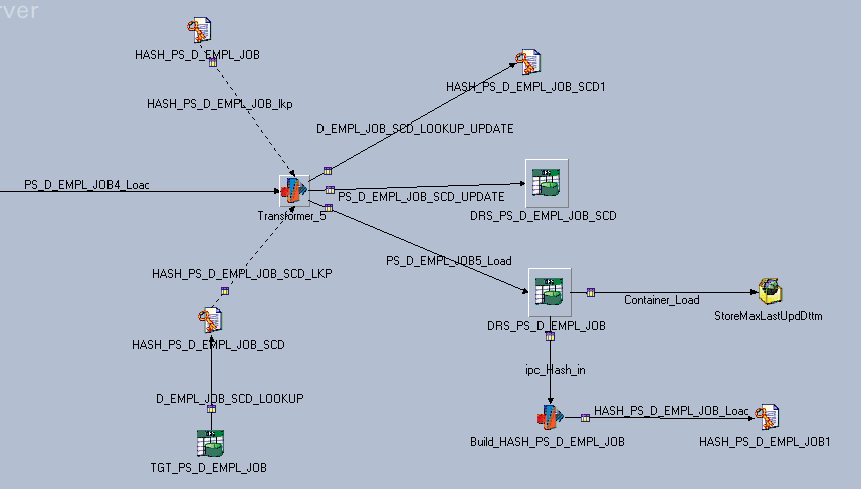
Slowly changing dimension and target DRS stage
Target Lookup Stage
If the incoming rows already exist in the dimension table, the type 1 slowly changing dimension lookup stage retrieves the SID value using a lookup on the target dimension that matches the business keys from the incoming row with those of the target table. If the keys match, the existing SID is extracted.
There are two target lookup stages for the type 2 slowly changing dimension:
The first target lookup stage retrieves the latest SID in case the incoming rows are already there in the target dimension table.
The first lookup should have EFFDT as key column and it has to be joined with incoming row to get the SID value if the incoming dimensional row is already there in the target table.
The second target lookup stage indicates whether the incoming row falls under slowly changing dimension logic.
It is loaded in the same job with the latest EFFDT and SID value to compare it with incoming data. If the incoming row falls under slowly changing dimension logic, the SID is retrieved and the EFF_END_DT column is updated for the old dimension row. As soon as we processed the SCD logic, we will update the second lookup in the same job.
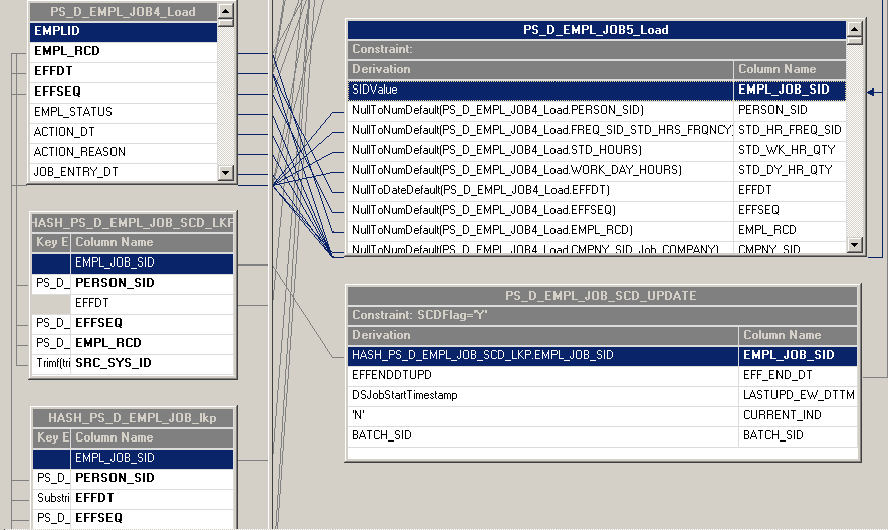
Please refer the figure below to get the information about the lookups (HASH_PS_D_EMPL_JOB_SCD1 and HASH_PS_D_EMPL_JOB_SCD) that are used to determine the SCD logic. The following Stage Variables are added to determine the SCD logic: SCDFlag, EFFENDDTUPD and EFFENDDT.
Slowly changing dimension and target lookup stage
Converting Type 1 Slowly Changing Dimension Jobs to Type 2
This section discusses how to convert a type 1 slowly changing dimension ETL job to a type 2 slowly changing dimension ETL job:
Using the Effective Date and EFFSEQ
Without using the Effective Date
Converting Type 1 Slowly Changing Dimension Jobs Using the Effective Date and EFFSEQThe following steps are required to convert your type 1 slowly changing dimension jobs to type 2 using the Effective Date and EFFSEQ:
Modify the Source Query
Modify the Target Hash Lookup Stage
Add Lookup stages to identify SCD logic
Add the WHERE clause to the newly added Lookup DRS stage
Add a new Hash File stage to refresh the Lookup data
Add a target DRS stage to update the old dimension record
Verify the number of links in the Job design
Add stage variables to perform slowly changing dimension logic
Modify column expressions to perform slowly changing dimension logic
Compile the job
These steps are discussed in further detail below.
Note. The EFFSEQ field is not available in all source tables and should only be used when it exists in the source table. If the EFFSEQ field does not exist in the source table, you should only use the Effective Date (EFFDT) field in the conversion steps.
Step 1: Modifying the Source Query
Perform the following steps to modify the source query:
In DataStage Designer, navigate to the type 1 slowly changing dimension job you would like to convert by expanding the nodes in the left navigation panel; then open the job.
Locate the source DRS stage within the job and open it.
In the Output tab, select the Selection sub-tab to edit the WHERE clause of your source table.
Note. Most of the Type 1 dimension jobs have the correlating sub-query to get the latest effective dated dimensional record.
Remove the correlating sub-query.
You should be left with the following SQL statement:
(LASTUPD_EW_DTTM > %DateTimeIn('#LastModifiedDateTime#') OR LASTUPD_EW_DTTM IS NULL) ORDER BY EFFDT, EFFSEQ
Note. There is an ORDER BY clause to sort the dimensions that are changed over a period of time.
Click OK.
Step 4:
Step 2: Modifying the Target Hash Lookup Stage
Perform the following steps to modify the target hash lookup stage:
Locate the target hash lookup stage within the job and open it.
In the Output tab, select the Columns sub-tab and add EFFDT and EFFSEQ as a key columns, and EFF_END_DT as a non-key column with Timestamp(19) as the datatype.
Select the General sub-tab and change the Hash File and Hash Stage names by adding the suffix _TGT to them.
Locate the transformer stage that defines the lookup transformation between this hash file and the incoming row and open it.
In the Output tab, select the Columns sub-tab and map the EFFDT and EFFSEQ columns from the incoming link to the newly added EFFDT and EFFSEQ columns of this Hash File.
Click OK.
Step 5:
Step 3: Adding Lookup Stages to Identify Slowly Changing Dimension Logic
Perform the following steps to add lookup stages:
Add new DRS and Hash File stages to the job, placing them next to the transformer that loads the target table.
Link the DRS stage to the newly added Hash File stage.
Link the new Hash File stage to the aforementioned transformer.
Note. The new DRS stage should refer to that target dimension table name with target database connection parameters . The DRS stage should have all the alternate key columns and primary key columns (SID column) in the columns metadata. The alternate key columns should be enabled as key columns in the Input and Output of Hashed File columns metadata.
Change the DRS stage, DRS link, Hash File stage, and Hash File link names by adding the suffix _SCD to them.
Click OK.
Step 4: Adding a WHERE Clause to the Lookup DRS Stage
Perform the following steps to add a WHERE clause to the lookup DRS stage:
Locate the new DRS stage and open it.
In the Output tab, select the Selection sub-tab to edit the WHERE clause.
Add the following WHERE condition to get the most recent SID value:
CURRENT_IND = ‘Y’
Specify the database connection parameters in the General tab of the DRS stage.
Click OK.
Step 2:
Step 5: Adding a New Hash File Stage to Refresh the Lookup Data
Perform the following steps to add a new hash file stage:
Add a new hash file stage to the job.
Link the new hash file stage to the target transformer such that the target transformer loads the has file stage.
Note. The new DRS stage should refer to that target dimension table name with target database connection parameters . The DRS stage should have all the alternate key columns and primary key columns (SID column) in the columns metadata. The alternate key columns should be enabled as key columns in the Input and Output of Hashed File columns metadata.
Change the hash file name by adding the suffix _SCD to it.
Click OK.
Step 6: Adding a Target DRS Stage to Update the Old Dimension Record
Perform the following steps to add a target DRS stage:
Copy the DRS stage from where the data is loaded and paste it into the same job.
Change the new DRS stage and DRS link names by adding the suffix _SCD_UPDATE to them.
Link the target transformer stage with the new target DRS stage.
Open the new DRS stage and select the Input tab.
Select the General sub-tab and change the Update action value to Update existing rows only.
Click OK.
Step 5:
Step 7: Verifying the Number of Links in the Job Design
Examine the entire job and verify that there are a total of six links in the job. There should be three input links to the target transformer stage and three output links from target transformer. All the links should be connected as follows:
Step 8: Adding Stage Variables to Perform Slowly Changing Dimension Logic
Perform the following steps to add stage variables:
Locate the target transformer and open it.
Verify the lookup join between input link and the new lookup stage (for example, _TGT) .
Link the key columns of the input link to those in the [hash file name]_SCD lookup link.
Add a new SCDFlag stage variable to the transformer, using the following expression:
If NOT(HASH_PS_D_EMPL_JOB_SCD_LKP.NOTFOUND) AND (Substrings(PS_D_EMPL_JOB4_Load.EFFDT, 1, 19) <> Substrings(HASH_PS_D_EMPL_JOB_SCD_LKP.EFFDT, 1, 19) or (HASH_PS_D_EMPL_JOB_SCD_LKP.EFFSEQ <> PS_D_EMPL_JOB4_Load.EFFSEQ))Then 'Y' Else 'N'
Add a new EFFENDDTUPD stage variable to the transformer, using the following expression:
AddToDate(<INPUT_LINK_NAME>.EFFDT, 'DD', -1)
Add a new EFFENDDTUPD stage variable to the transformer, using the following expression:
If Len(<TGT_LOOKUP_LINK_NAME>.EFF_END_DT)= 0 Then MaxDate Else <TGT_LOOKUP_LINK_NAME>.EFF_END_DT
Click OK.
Step 9: Modifying Column Expressions to Perform Slowly Changing Dimension Logic
Perform the following steps to modify column expressions:
Locate the target transformer and open it.
Locate the output link that loads the target with Update existing rows or Insert new rows.
Open the link for editing and modify the expression for the EFF_START_DT column as follows:
EFF_START_DT = <INPUT_LINK_NAME>.EFFDT
Modify the expression for the EFF_END_DT column as follows:
EFF_END_DT = EFFENDDT (it is a stage variable)
Locate the output link that updates the target with Update existing rows only.
Open the link for editing and delete all columns from the table except the primary key column (SID column), EFF_END_DT, LASTUPD_EW_DTTM, CURRENT_IND and BATCH_SID.
Modify the expression for the SID column as follows:
SID column = <SCD_LOOKUP_LINK_NAME>.<PRIMARY_SID_COLUMN_NAME>
Modify the expression for the EFF_END_DT column as follows:
EFF_END_DT = EFFENDDTUPD
Modify the expression for the LASTUPD_EW_DTTM column as follows:
LASTUPD_EW_DTTM = DSJobStartTimestamp
Modify the expression for the CURRENT_IND column as follows:
CURRENT_IND = ‘N’
Modify the expression for the BATCH_SID column as follows:
BATCH_SID = BATCH_SID
Add the following constraint to the link so that the EFF_END_DT of the old dimension record is updated:
SCDFlag = ‘Y’
Locate the output link that updates the new Hash file (for example, [hash file name]_SCD).
Map the alternate key columns from the input link to alternate keys in the lookup table.
Although the column mapping is one-to-one, there should be proper NULL handling based on the column data type.
Modify the expression for the primary key (SID) column so that the expression uses the stage variable SIDValue.
Click OK.
Step 10: Compiling the job
Perform the following steps to compile the job:
Select File, Save from the menu to save the job.
Select File, Compile from the menu to compile the job.
If your mapping is correct, the Compilation Status window displays the Job successfully compiled with no errors message. If your mapping is incorrect, theCompilation Status window displays an error message.
If your job successfully compiles, select Close.
If you job does not compile successfully, you must return to the job and troubleshoot the errors.
Converting Type 1 Slowly Changing Dimension Jobs Without Using the Effective DateTo convert your type 1 slowly changing dimension jobs to type 2 without using the Effective Date, follow the steps as described in the previous section (Converting Type 1 Slowly Changing Dimension Jobs Using the Effective Date and EFFSEQ) noting the variation in steps three, five, and eight, outlined below.
Note. The column you choose to convert your slowly changing dimension jobs is referred to generically in the steps below as: COLUMN_X.
Step 3: Adding Lookup Stages to Identify Slowly Changing Dimension Logic
COLUMN_X should not be enabled as a key in the input and output links of the hash file stage (for example, [hash file name]_SCD).
Step 5: Adding a New Hash File Stage to Refresh the Lookup Data
COLUMN_X should not be enabled as a key in the input links of the hash file stage (for example, [hash file name]_SCD).
Step 8: Adding Stage Variables to Perform Slowly Changing Dimension Logic
Add a new SCDFlag stage variable to the transformer, using the following expression:
If NOT(<SCD_LOOKUP_LINK_NAME>.NOTFOUND) AND <INPUT_LINK_NAME>.<COLUMN_X> <> <SCD_LOOKUP_LINK_NAME>.<COLUMN_X> Then 'Y' Else 'N'