The Plumtree Development Environment: UI Customization
Setting Up a 5.0.x Portal Development Environment (Java)
This page explains how to compile and run the UI projects
with Eclipse and how to build a new WAR file using Ant.
Software Requirements & Recommendations
Before beginning any installation, make sure you have
installed the components listed in the table below.
The variables listed in the table below are used in
this guide to reference the location of the associated application.
|
Variable |
Application |
Sample Location |
|
ANT_HOME |
ANT 1.6.1 |
C:\apache-ant-1.6.1 |
|
ECLIPSE_HOME |
Eclipse 2.1 |
C:\eclipse |
|
JAVA_HOME |
JDK 1.4.1 |
C:\jakarta-tomcat-4.1.30-LE-j2sdk1.4.1_05\j2sdk1.4.1_05 |
|
PORTAL_HOME |
Plumtree Corporate Portal |
C:\Program Files\plumtree\ptportal\5.0 |
|
PT_HOME |
(Plumtree home) |
C:\Program Files\plumtree |
|
SOURCE_HOME |
(UI source code) |
C:\UI Source Code |
|
TOMCAT_HOME |
Tomcat 4.1.30 |
C:\jakarta-tomcat-4.1.30-LE-j2sdk1.4.1_05 |
Installing Portal Source Code
Note: Before
installing the portal source code, confirm that you have a working Java
portal. If you have trouble with installation, refer to the Plumtree
Corporate Portal Installation and Upgrade Guide.
Extract UISourceCode.zip
from the CD and copy the resulting \UI Source Code folder
to the C:\ drive. This folder contains the following projects:
- nullnavigation
- portal50
- portalnavigation
- portalpages
- portalsamples
- portaluiinfrastructure
- samplePEI
- userprofile
(The folder also contains a \zBuildIncludes subfolder
that contains all the necessary build scripts for the Ant build.)
Add the necessary environment
variables to the system:
- Press Window and Break
(or navigate to Control Panel | System).
- Select the Advanced tab and
click the Environment Variables button.
- Under System Variables, click
New. Complete this process for each of the following
variables:
|
Variable Name |
Value |
|
ANT_HOME |
ANT_HOME (e.g. C:\apache-ant-1.5.4) |
|
ANT_OPTS |
-Xms512m -Xmx512m |
|
BUILD_STAGE_HOME |
PT_HOME (e.g. C:\Program
Files\plumtree) |
|
JAVA_HOME |
JAVA_HOME (e.g. C:\jakarta-tomcat-4.1.27-LE-j2sdk1.4.1_05\j2sdk1.4.1_05) |
|
JAVA_OPTS |
-Xms512m -Xmx512m |
|
PTSOURCE_HOME |
SOURCE_HOME (e.g. C:\UI
Source Code) |
|
TOMCAT_HOME |
TOMCAT_HOME (e.g. C:\jakarta-tomcat-4.1.27-LE-j2sdk1.4.1_05) |
The Xms and Xmx tags in the ANT_OPTS and JAVA_OPTS environment
variables refer to the minimum and maximum amount of megabytes allocated
to ANT and JAVA processes.
- Add the paths to the ANT_HOME\bin and JAVA_HOME\bin
locations to the PATH environment variable.
The next step is to compile the UI source code using
the Eclipse IDE.
Compiling Portal Source Code: Eclipse
Follow the instructions below to compile the UI source
code using Eclipse. If this is the first time you are compiling the portal
code, you must first complete the steps in the previous section.
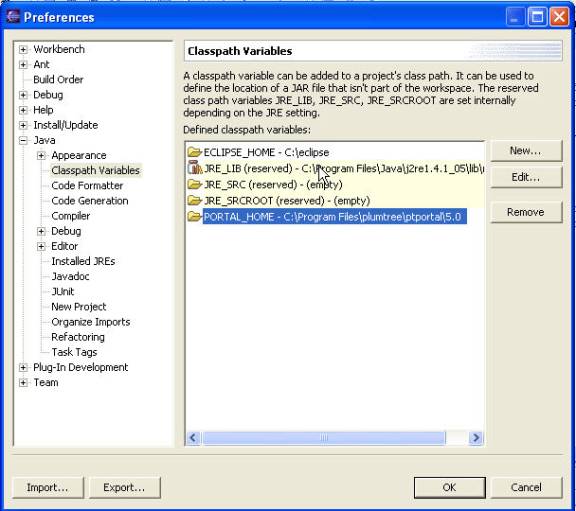
Open Eclipse and click
Window | Preferences.
Navigate to Java
| Classpath Variables.
Click New
to add a new variable. (All JAR references within the source code projects
are done through a classpath environment variable.)
In the New Variable Entry
window, enter PORTAL_HOME as the Name for the variable and click the Folder
button. Navigate to PT_HOME\ptportal\5.0. Click OK to
accept the location and click OK again to close the Preferences
window.
Click File
| Import. Select Existing Project into Workspace
option and click Next.
Click Browse
and navigate to SOURCE_HOME\nullnavigation\java. Click
OK, then click Finish.
Repeat steps 5 and 6
for the following projects:
- portal50
- portalnavigation
- portalpages
- portalsamples
- portaluiinfrastructure
- samplePEI
- userprofile
In the main window, select
all the projects, right-click, and select Refresh.
In the Eclipse Menu,
select Project | Rebuild All.
The next step is to debug the compiled source code.
Debugging Portal Source Code: Eclipse
To debug the source code, first
set up the Eclipse debugger for Tomcat by following the directions below.
In Eclipse, select Window
| Open Perspective | Java.
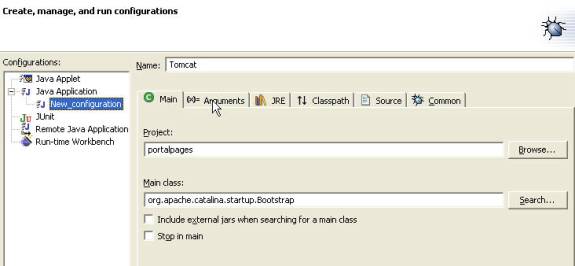
Click Run
| Debug... and double-click on Java Application.
Name the project "Tomcat".
Browse the projects and
select portalpages.
In the Main class
field, type the following: org.apache.catalina.startup.Bootstrap
-
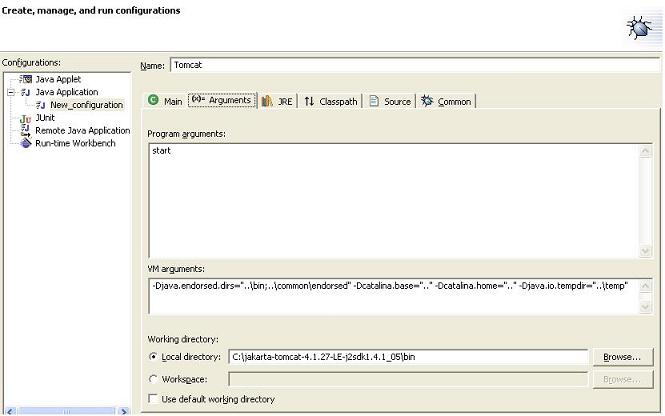
Click the Arguments tab.
- In the Program arguments
window, type the following: start
- In the VM arguments window,
type the following: -Djava.endorsed.dirs="..\bin;..\common\endorsed"-Dcatalina.base=".."
-Dcatalina.home=".." -Djava.io.tempdir="..\temp"
- Under Working directory,
uncheck Use default working directory, and select Local
directory.
- Click Browse, navigate to
TOMCAT_HOME\bin and click OK.
-
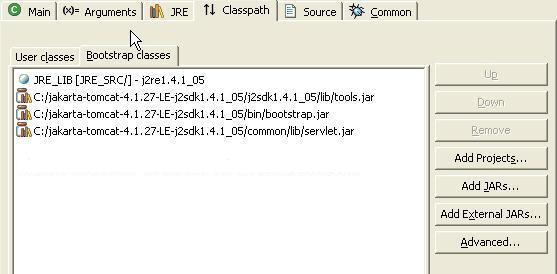
Click the Classpath tab.
- Click the Bootstrap subtab.
- Uncheck Use default class path.
- Click Add External JARs
and add the following files (you can add one file at a time):
-
- JAVA_HOME\lib\tools.jar
- TOMCAT_HOME\bin\bootstrap.jar
- TOMCAT_HOME\common\lib\servlet.jar
- Still on the Classpath tab, click the User
classes subtab.
- Select all the existing projects and JAR
files and click Remove.
- Click Add External JARs
and navigate to PORTAL_HOME\lib\java. Select all the files in the folder
(Ctrl-a), then deselect portalpages, portalluiinfrastructure, portal50,
and servlet (hold Ctrl while you select the files). Click Open.
Note: You should depend on the projects in Eclipse
for the first three library files. If you wanted to debug the other project
files you could leave out those JARs as well. servlet.jar is not included
because you have already included Tomcat's servlet.jar.
-
Select activation.jar (at the top of the list)
and click Add Projects. Add the following projects:
- portalpages
- portaluiinfrastructure
- portal50.
Note: The other
projects are included through the JAR files because in most cases, you
do not need to debug through them (you can only step through source code
that has been included via a project).
- Uncheck the two boxes labeled Add
exported entries of selected projects and Add required
projects of select projects.
Click Close
and save the Tomcat configuration.
In the Eclipse package
explorer, navigate to LoginView.java in the portalpages
project (com.plumtree.portalpages.browsing.login).
-
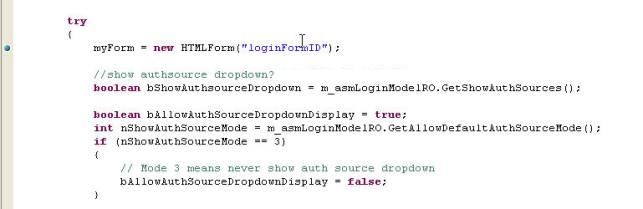
Scroll down to the Display() method and add a breakpoint
as shown below (double click in the grey left margin in front of the line
on which you want to set the breakpoint).
Click Start
| Programs | Plumtree and open PTSpy.
Confirm that info logs are enabled: go to View | Runtime
Settings and make sure Info-Severity Tracing
is checked.
In Eclipse, select Run
| Debug... and choose the newly created Tomcat application.
Hit Debug.
(You can ignore the log4j warnings printed out to the console.)
After you see a message
in PTSpy indicating that startup was successful, open a browser window
and navigate to your portal. You should hit the breakpoint when you get
to the login page. Use the options under the Run menu
to Step Into, Step Over, Step Return, Resume or Terminate.
Note: If Tomcat doesn't
start and if you get the following exception in the Console: Catalina.start:
java.lang.NullPointerException, select Run | Debug..., select the Tomcat
application, go to the Classpath tab, move xerces144.jar to the top of
the list and try again.
You can now start creating your
own project and begin customizing your portal. When you are done, you
must update your production machine with a new WAR file. The next section
explains how to build the new WAR file using Ant.
Building the New WAR File Using Ant
To successfully update and deploy custom Java code,
you must run the provided Ant scripts to compile all Java code and create
a WAR file (collection of JAR files) to be placed in the deployment directory
of the portal environment.
Note: To
use Ant scripts for deployment, the PATH environment variable must include
the paths to the ANT_HOME\bin and JAVA_HOME\bin locations.
Follow the instructions below to compile the UI projects
and build the WAR file.
Download the AssemblyInfo.zip
file from the Threads and Samples page of the Developer Center. Unzip
it and copy the resulting \assemblyinfo folder to the
PT_HOME directory.
Open a command prompt
and change the directory to SOURCE_HOME (i.e., the location of the c_buildui.xml
script).
Run a clean build using
the following command: ant -f c_buildui.xml dev.clean.tomcat
Note: A clean build deletes all the source projects' classes
and JAR files. They are then rebuilt and deployed. If the build is unable
to delete jar files, make sure that you are not running or debugging the
portal.
You should get a message
about a successful build. The new WAR file is created under PORTAL_HOME\webapp.
You can now create your own project and begin customizing
your portal. For details on creating custom projects, see Creating
a Custom Project. For a list of topics, see the table
of contents.
Next: Installing
UI Customization Sample Code