Chapter 1: Getting Started
Welcome to BEA TUXEDO, the software designed to support high performance client-server applications. You will find BEA TUXEDO is a powerful, intuitive solution for managing application configuration and administration for your company's mission critical applications.
Administration through the Web
If you are new to BEA TUXEDO, make sure you are familiar with the concepts discussed in the BEA TUXEDO Product Overview and the BEA TUXEDO Administrator's Guide before you start using this book.
This guide introduces an exciting new feature: a graphical user interface (GUI), available from the World Wide Web, for administering a BEA TUXEDO application. As an administrator, you will find your job simplified when you use the new Web GUI. If you are a new BEA TUXEDO administrator, the Web GUI will enable you to start learning your job right away!
What exactly is that job? As an administrator, your role is to set up and maintain the operation of an application built on the BEA TUXEDO System. In some organizations the administrator is also responsible for application design and programming, but those jobs are not discussed in this book; see BEA TUXEDO Programmer's Guide if your job description includes these assignments.
Your application might be as simple as a single client and server operating entirely on one machine. Or it might be more complicated, due to one of the following circumstances:
System Requirements
This section lists the hardware, operating system resources, and browser you must provide to support the Web GUI.
Hardware Requirements
The Web GUI requires a color display device.
Operating System Requirements
Given the broad outlines of an application design, you must verify the availability of operating system resources needed to support your application. Operating system resources include:
Browser Requirements
Although any Java-capable Web browser may be able to run the GUI, at this time BEA supports only the following browsers:
Installation
The Web GUI is automatically installed when you install BEA TUXEDO software. Software installation instructions are provided in the BEA TUXEDO Installation Guide.
Setting Up Your Environment for the Web-based GUI
In order to run the Web-based GUI, you need to set up two servers:
Starting tuxwsvr
$ tuxwsvr [-d network_device] -l//machine:port -i \
$ TUXDIR/udataobj/tuxwsvr.ini
During installation, the tuxwsvr.ini file is created. Usually you do not need to edit this file; you can use it as is. Under certain circumstances, however, you may want to do so. For example, you may decide, after installation, to move your Java files to a non-default directory. In that case, you would need to edit the pathnames in the initialization file appropriately. For details, see the tuxwsvr(1) man page.
Starting wlisten
- Before starting wlisten, check the webgui.ini file (in $TUXDIR/udataobj/webgui) to make sure that the default values assigned to the parameters during installation are appropriate. If not, make the appropriate changes.
For example, on a machine called "popeye," the default port assigned to wlisten is "4003." To run wlisten with port "6060" edit the "NADDR" parameter line in the webgui.ini file as follows:
NADDR=//popeye:6060
For details about other parameters in the webgui.ini file, see the wlisten(1) man page.
- Now start the wlisten process:
$ wlisten
Starting the Web GUI
- Start the browser.
- Enter the following URL:
http://<machine_name>:<port>/webguitop.html
Use of this URL depends on the following assumptions:
- The BEA cover window opens on the screen, displaying BEA's logo (a traffic light) and several legal notices. When you are ready to proceed, click on the prompt at the bottom of the screen to start the Web GUI. A "sign-in" window opens on the screen, prompting you to log in.
- Enter your login name and password after the appropriate prompts. Then click on the "LOGIN" button below your password. The main window of the Web GUI opens on your screen.
Tutorial
In this tutorial we will lead you, step by step, through a procedure that lets you use the Web GUI to configure a single-machine domain. The sample application we will use is simpapp, which is provided with your BEA TUXEDO software.
For a description of simpapp, see the "README" file that you will copy into your simpapp directory after #4 in Step 1, below.
The procedures in this tutorial are based on a UNIX system environment. On a Windows NT system, substitute the appropriate commands as necessary.
Step 1: Set Up Your Environment
- Create a directory called "simpapp":
$ mkdir simpapp
- Change to your new directory:
$ cd simpapp
- Set up your environment by setting and exporting three environment variables:
$ export TUXDIR=<TUXEDO_installation_directory>
$ export PATH=$TUXDIR/bin:$PATH
$ export LD_LIBRARY_PATH=$TUXDIR/lib:$LD_LIBRARY_PATH
If you are using HP-UX, set "SHLIB_PATH"; if you are using AIX, use "LIBPATH."
- Copy the simpapp domain to your current directory (simpapp):
$ cp $TUXDIR/apps/simpapp/* .
- Build the client by running the following command:
$ buildclient -o simpcl -f simpcl.c
- Build the server by running the following command:
$ buildserver -o simpserv -f simpserv.c -s TOUPPER
- Read the "README" file that is now in your simpapp directory to learn more about the simpapp domain.
- Start the Web server by running:
$ tuxwsvr -l //lcsol1:8080 -i $TUXDIR/udataobj/tuxwsvr.ini\
-d /dev/tcp
Here "lcsol1" is the name of the machine used in this tutorial. "8080" is the port assigned to the Web server. You may use "80" for the port if you have not already used it for another (commercial) Web server.
The argument to the -d option is usually /dev/tcp, but there are exceptions for a few platforms, such as HP-UX, for which "/dev/null" is used as the argument to -d. On NT platforms the -d option is not specified at all.
If you get the following error message:
Could not establish listening endpoint.
then you must use a port number other than 8080. (Consult your system administrator to make sure you select a valid number that is not already being used.)
- Start the wlisten process by running the following command:
$ wlisten
- If the wlisten starts, skip to the next step. If the wlisten does not start, edit the line NADDR=//lcsol1:4003 in the file $TUXDIR/udataobj/webgui/webgui.ini by replacing the port number (4003) with a valid port number. Then run wlisten again.
- Start the browser. In this example we are using Netscape Navigator 3.01 on a PC running Windows.
You can administer your BEA TUXEDO domain using any
machine (even a PC) that supports a Java-capable browser.
- Enter the following URL:
http://lcsol1:8080/webguitop.html
If you are using a commercial Web server on the default port (80), you can use the following URL:
http://lcsol1/webguitop.html
- The BEA cover window opens on the screen, displaying BEA's logo (a traffic light) and several legal notices. When you are ready to proceed, scroll to the bottom of the window and click on the following prompt:
Click Here to Run the BEA TUXEDO Administration GUI
A new window opens, prompting you to log in.
- Enter your login name and the tlisten password after the appropriate prompts. Then click on the "LOGIN" button below your password. The main window of the Web GUI opens on your screen.

For a complete description of the main window, see Chapter 2, "A Tour of the Main Window."
Step 2: Create a New Domain
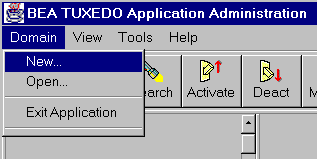
- Select "New" from the "Domain" menu (on the Menu Bar).
- When the "Create New Object" pop-up window is displayed, enter the values indicated in the appropriate fields, as shown in the following figure.

- Leaving the remaining fields blank, click on the "Create" button.
If you get an error message, enter a different value in the "IPC Key" field.
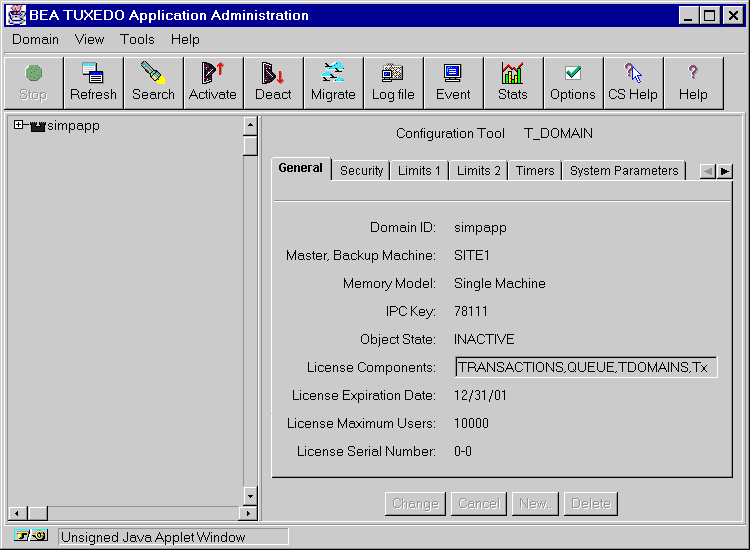
Your newly created domain (simpapp) is now represented in the Tree area of the main window, as shown in the following figure.
Step 3: Add GROUP1 to the simpapp Domain
- Expand the Tree by clicking on the plus sign (+) in front of the domain name (simpapp).
Listings for two folders ("Machines" and "Service Defaults") are displayed in the Tree.
- Expand the Machines folder. You will see the "lcsol1" machine displayed in an inactive state.
- Expand the "lcsol1" machine so the Tree is displayed as shown in the following figure.

- Click the right mouse button on the "Groups" folder to display the Quick Menu.
- Select "New" to add a new group.
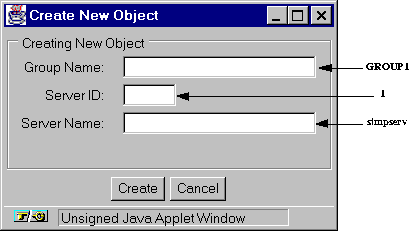
- When the "Create New Object" pop-up window is displayed, enter the values indicated in the appropriate fields, as shown in the following figure.

- Click on "Create."
Once the operation has succeeded, a confirmation message is displayed in a pop-up window. Click on "OK."
Step 4: Add Server "simpserv" to GROUP1
- In the Tree, expand the "Groups" folder to view GROUP1.
- Expand GROUP1; you will see folders for "Servers" and "Transactions."
- Click the right mouse button on "Servers." The "Create New Object" pop-up window is displayed, as follows.
- Click on "Create."
Once the operation has succeeded, a confirmation message is displayed in a
pop-up window. Click on "OK."
Step 5: Activate the simpapp Domain
- Click on the "Activate" button in the Power Bar. The "Activate Objects" pop-up window is displayed, as follows.
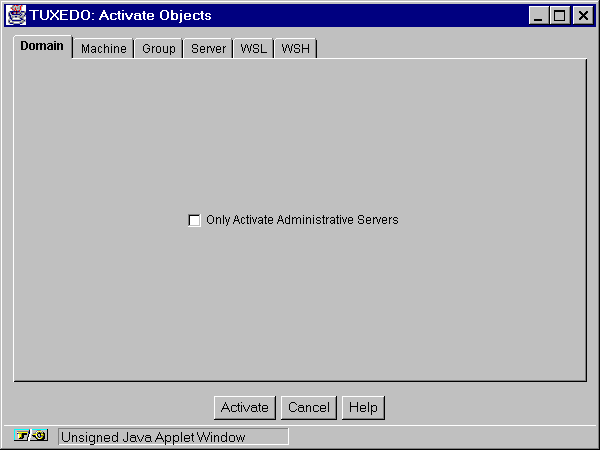
- Click on the "Activate" button. The "Progress of Activate (Entire Domain)" window is displayed, as follows.
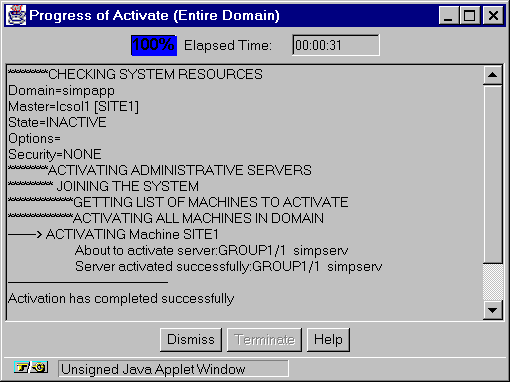
- When you see the message "Activation has completed successfully," click on "Dismiss."
Step 6: Run simpapp
- Expand the "Servers" folder. The Tree will display the "simpserv" server in an active state.
- Set and export the TUXCONFIG environment variable as follows:
$ export TUXCONFIG=<your_simpapp_directory>/tuxconfig
- Execute the client by running the following command:
$ simpcl hello
- If simpcl runs successfully, it will display the following output:
Returned string is: HELLO
- Select the "simpserv" server from the Tree. You will notice that the Configuration Tool is updated with the current parameters for the "simpserv" server.
- Click on "Deactivate" in the Power Bar. The "Deactivate Objects" pop-up window is displayed.
- Select "Force deactivation even if clients remain."
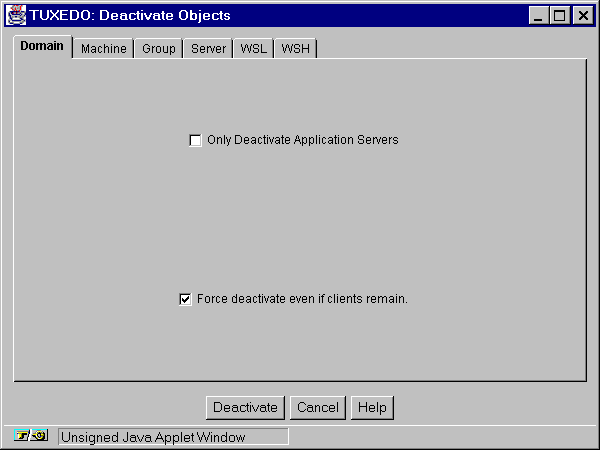
- Click on the "Deactivate" button. The "Progress of Deactivate (Entire Domain)" window will be displayed.
- When you see the message "Deactivation has completed successfully," click on "Dismiss."
- From the "Domain" menu (on the Menu Bar), select "Exit Application" to exit the GUI.
Congratulations!
You have successfully configured and run simpapp through the Web GUI. Now you are ready to start setting up your environment for your own BEA TUXEDO domain.