Timer controls are used within conversational, stateful web services. Conversational web services have three phases: start, continue, and finish.
To use a timer in a conversational web service, after declaring the timer control as described in Setting up a Timer Control, you must implement a conversational web service to access the timer control. The minimum requirements to access a timer control are:
- Ensure that the web service implements the Serializable interface.
- Define at least a start and finish operation.
- Define an event handler to receive the callback(s) from the timer control when the timer elapses.
Setting the Web Service to Implement Serializable
Conversational web services must implement the java.io.Serializable interface. To set this in your web service, on the class definition line for your web service, insert implements Serializable so that the class definition looks something like this:
public class TimerService implements Serializable {
This will cause an error marker to appear in the marker bar on the class declaration line. Right click on the error marker and choose Quick Fix.
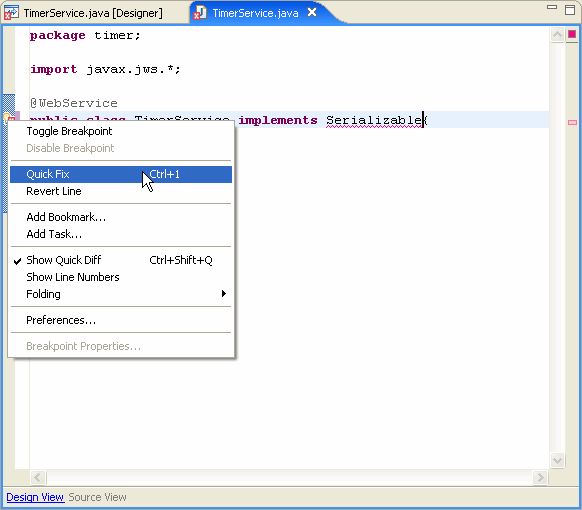
Right click on the error marker and choose Quick Fix. The Quick Fix pull-down will appear:
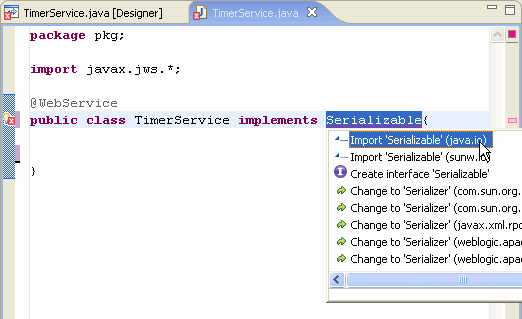
Click Import Serializable and press Enter and a new import line will be generated to resolve the error.
Defining Start/Stop Conversational Web Methods
A conversational web service differs from a regular web service in only one way: the Conversation property is set to START, CONTINUE or FINISH. A web service typically has three operations:
- An operation to start the timer which has Conversation set to START and contains a call to the timer control's start() method.
- An operation to stop the timer which has Conversation set to STOP and contains a call to the timer control's stop() method.
- An optional operation to restart the timer which has Conversation set to CONTINUE and contains a call to the timer control's restart() method. This is primarily used for resetting a relative timeout or recurring time intervals.
To define a conversational web method, right click on the code editor window and click Insert > Web Method. With the name of the new web method highlighted, click on the Conversation setting in the Properties view. Use the pulldown to set the conversational state for the method.
Calling the Methods of the TimerControl Interface
Once you have declared and configured a timer control, you can invoke its methods from within your application to start and stop the timer and to change its configuration. For complete information on each method, see TimerControl Interface.
The following list contains the methods of the TimerControl interface that you can use to start and stop the timer:
- start(): starts timer operation. The timer control will fire after the period specified by the timeout, timeoutSeconds, repeatsEvery or repeatsEverySeconds attribute has passed. The start() method can be called in either the START or CONTINUE phase of the conversation.
- restart(): stops the timer control and starts it again. This method is only useful when working with relative timeout or recurring time intervals, since the timer is restarted with the same parameters.
- stop(): stops the timer control from firing again. Calling start() will start the timer again. The stop() method can be called in either the FINISH or CONTINUE phase of the conversation. Be sure to call the stop() method when the conversation ends. Note that if you do not call the stop() method, the container will automatically terminate the timer for you.
Setting up an Event Handler for Timer Callbacks
In addition to the web methods that start/stop the timer, the web service must provide for callbacks when the timer elapses.
The timer control defines one callback: onTimeout. You can add code to the callback event handler to run when the timer fires. The callback event handler for the onTimout event is named timerName_onTimeout, where timerName is the name of the timer control instance.
The callback event handler takes two parameters: the time in seconds since the timer was started and the payload. Note that this is not the same as the time at which the callback handler executes. A delay may occur between timer control expiration and callback handler invocation, depending on the system load.
To create the callback event handler for a timer control's onTimeout callback, right click on the code window and choose Insert > Control Event Handler. Workshop creates a callback event handler and places the cursor in the callback event handler.