You're almost ready to test. In this step you'll write page flow source code that invokes your session EJB — which, in turn, invokes your entity EJB. Specifically, rather than writing typical EJB invocation code, you'll use an EJB control that handles that for you.
In this section, you will:
- Add an EJB control to the test project
- Add EJB Control Reference and Method Invocations to the Page Flow
- Create a User Interface and Test the EJB
To Add an EJB Control to the Test Project
In these steps you create an EJB control that will represent your entity bean to your test code.
- In the Project Explorer, expand VisitWebTest > Java Resources, right-click src, then click New > Package.
- In the New Java Package dialog, in the Name box, enter controls, then click Finish.
- Switch to the Page Flow perspective by selecting Window > Open Perspective > Page Flow.
- In the Page Flow Explorer, right-click the Referenced Controls node and select Add Control.
- In the Select Control dialog, under New System Control, select EJB Control. Click OK.
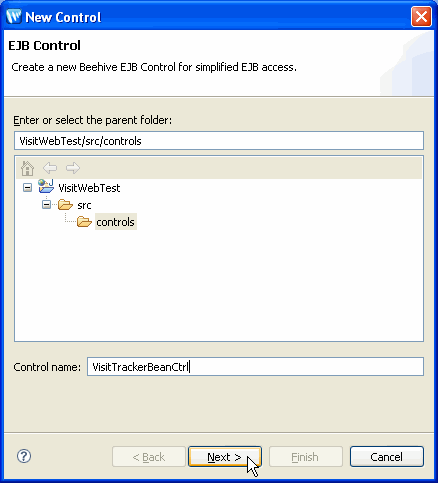
- In the New Control dialog, in the parent folder box, expand the tree to VisitWebTest > src > controls, then select the controls node.
- In the Control name box, enter VisitTrackerBeanCtrl,
then click Next.
- Under EJB Control, click Browse Application
EJBs.
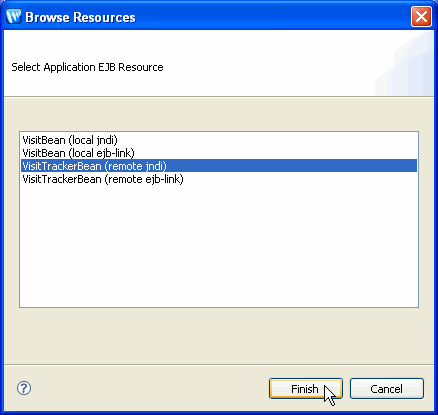
In the Browse Resources dialog, note that the two EJBs you've created are listed. - Select VisitTrackerBean (remote jndi), then click Finish.
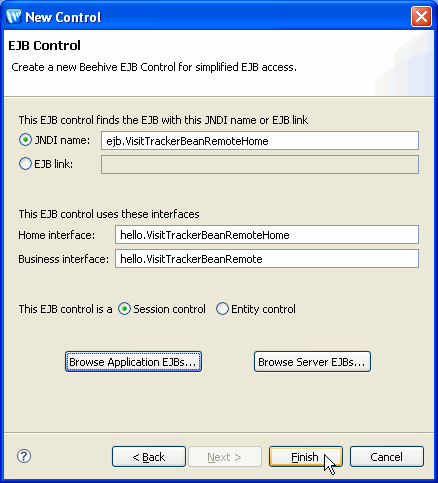
- Confirm that the settings displayed are as follows, then click Finish.
You'll get EJB control source code such as the following in VisitTrackerBeanCtrl.java:
![]()
The code's simplicity masks its capability. For example, by extending the SessionEJBControl interface,
the control supports implicit retrieval of the target EJB's home and business
interface instances as well as a check to discover whether a target instance
is available for method invocation. In other words, this is plumbing common
to using an EJB for which you don't need to write code — the control
takes care of it.
The @ControlExtension annotation designates to the compiler
that this interface is a control. The @EJBHome annotation specifies
the JNDI name of the home interface for the target EJB that this control
provides access to.
To Add EJB Control Reference and Method Invocations to the Page Flow
In the following steps you'll add page flow code to use the control you created. In page flows, a controller is a central place for client logic — a place to contain state variables and data that would otherwise need to be contained in separate files (such as in JSPs).
In the case of VisitWebTest, your controller will be responsible not only for invoking your session bean via the EJB control you created, but also for passing the bean's responses along to the JSP files that make up the presentation components in your application.
- On the Page Flow Explorer tab, locate Controller.java and double-click it.
- In the Controller.java source code, note that a variable representing
the control has been added.

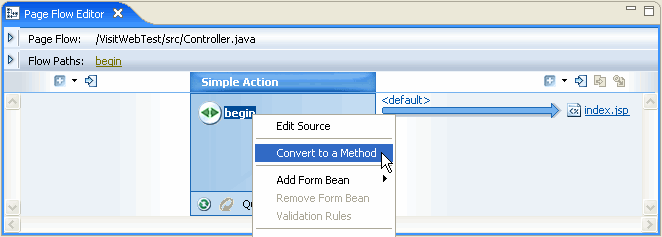
- In the Page Flow Editor tab, locate the begin
icon, right-click it and select Convert to a Method.
- In the source code for Controller.java, add the following import statements to support code you'll be adding.
- Edit the
beginmethod so it appears as follows. This code looks up and stores the home interface for the entity beanVisitTrackerBeanand forwards processing to index.jsp. - Beneath the
beginmethod code, add the following code. This code provides an action that can be called from index.jsp; that action will invoke the session bean. If the action is successful, the result will be forwarded to showForm.jsp, which you'll create in a moment.@Jpf.Action(forwards = { @Jpf.Forward(name = "success", path = "showForm.jsp") } ) protected Forward invokeEJB(InvokeEJBForm form) { String response; try { response = visitTrackerBeanCtrl.greetVisitor(form.getName()); } catch(RemoteException re) { response = "An error has occurred"; } getRequest().setAttribute("returnvalue", response); return new Forward("success"); } /** * Get and set methods may be overwritten by the Form Bean editor. */ public static class InvokeEJBForm implements java.io.Serializable { private static final long serialVersionUID = 1L; private String name; public void setName(String name) { this.name = name; } public String getName() { return this.name; } } - Press Ctrl+Shift+S to save your work.
import java.rmi.RemoteException;
import javax.ejb.CreateException;
@Jpf.Action(forwards =
    {
        @Jpf.Forward(name = "success", path = "index.jsp")
    }
)
protected Forward begin()
{
    try
    {
        visitTrackerBeanCtrl.create();
    } catch(CreateException ce) {}
    catch(RemoteException re) {}
    return new Forward("success");
}
To Create a User Interface and Test the EJB
Here you'll update files in your application's user interface so that the page flow controller can use them to present the results of its interaction with your EJBs.
- In the Page Flow Explorer tab, open the node Pages > index.jsp. Double-click index.jsp to open the file.
- Modify the
<netui:html>tag so that it appears as follows. This code calls theinvokeEJBaction you coded in the preceding steps. - On the Page Flow Explorer tab, right-click the Pages > showForm.jsp node and select Create.
- Double-click the Pages > showForm.jsp node to open its source code.
- Replace its source code with the following. This code receives results from a successful invocation of the session bean and displays a response.
- Press Ctrl+Shift+S to save your work.
- On the Page Flow Explorer tab, right-click Controller.java, then click Run on Server.
- If the Select Tasks dialog is displayed, click Finish.
- After Workshop has finished building your application's components, it will display the index.jsp.
- Enter a name in the box provided, then click invoke EJB.
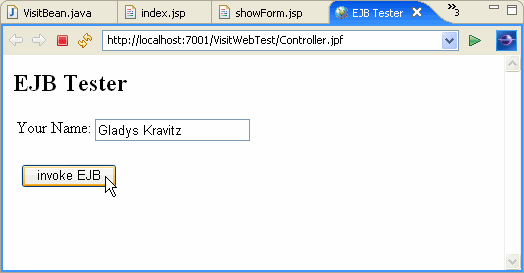
- Note that the response page includes the name you entered echoed back
to you. Remember that the logic that generates this message is contained
in the
VisitTrackerBeansession bean that you created in Step 3.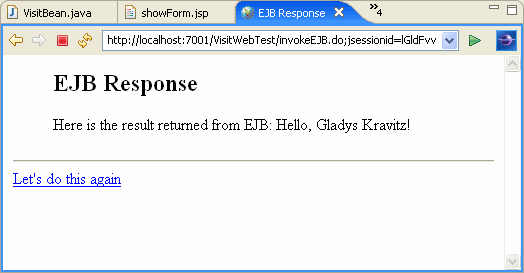
- To keep testing, click Let's do this again, enter the same name as before, then click invoke EJB again. With each test you'll see an updated response.
<netui:html>
<head>
<title>
EJB Tester
</title>
</head>
<body>
<h2> EJB Tester </h2>
<netui:form action="invokeEJB">
<table>
<tr valign="top">
<td>Your Name:</td>
<td>
<netui:textBox dataSource="actionForm.name"/>
</td>
</tr>
</table>
<br/>
<netui:button value="invoke EJB" type="submit"/>
</netui:form>
</body>
</netui:html>
<%@ page language="java" contentType="text/html;charset=UTF-8"%>
<%@taglib uri="http://beehive.apache.org/netui/tags-html-1.0" prefix="netui"%>
<%@taglib uri="http://beehive.apache.org/netui/tags-databinding-1.0" prefix="netui-data"%>
<%@taglib uri="http://beehive.apache.org/netui/tags-template-1.0" prefix="netui-template"%>

<netui:html>
    <head>
        <title>
            EJB Response
        </title>
    </head>
    <body>
        <blockquote>
        <h2>EJB Response</h2>
        <p>
        Here is the result returned from EJB: <netui:label value="${requestScope.returnvalue}"></netui:label>
        </blockquote>
        <hr>
        <netui:anchor href="index.jsp">Let's do this again</netui:anchor>
    </body>
 </netui:html>
That's it! You've built and tested two Enterprise JavaBeans with Workshop. The next step in this tutorial is a summary of what the tutorial covered, along with links to information you might find helpful.