Generating JPA Mappings
Workshop greatly eases the process of creating a JPA persistence layer. It provides these basic paths to creating EJB3 entities:
- Create JPA mappings from a database schema. In this path you use a wizard that starts with a database schema and generates new annotated Java classes and (optionally) an updated persistence.xml file. Along the way, you're prompted to customize the mapping details, but you can also accept defaults.
- Annotating existing Java classes (POJOs) with information from a schema. This path assumes you already have a Java class that you want to map to a database table. Here, a wizard prompts you for mapping details, then annotates your class source code. It optionally updates a persistence.xml file.
Of course, Workshop also supports creating a persistence.xml and annotating class source code manually.
Before you get started, you'll need a web application project that supports JPA. Also, while you can do it along the way, it's a good idea to have set up a database connection in advance.
- A project that supports JPA simply has the appropriate EJB3 provider JAR files on its classpath. You can add support for JPA by following the steps in Adding JPA Support.
- If you haven't yet set up a connection to the database that your entity beans will interact with, you can create a connection using the steps described in Establishing a Database Connection. You can view your connection in DbXplorer view. To open this view, click Window > Show View > Other, then expand Workshop, click DbXplorer, then click OK.
Creating JPA Mappings from a Schema
You can create EJB3 entity beans from an existing database schema. When you do, Workshop will generate Java classes with the appropriate accessors and EJB3 annotations. Your entity beans become the persistence layer interacting with that database.
For illustration purposes, this topic uses a connection to an employee database.
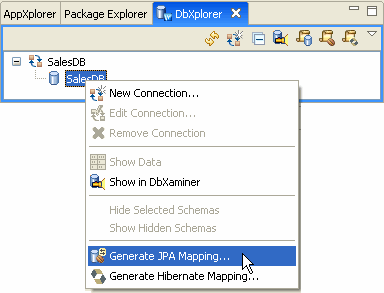
- In DbXplorer, right-click the database containing tables from which you want to generate entity beans, then click Generate JPA Mapping.

- In the Web Application dialog, select the web application in which your generated persistence classes should be created, then click OK.

- In the EJB3 ORM Generation dialog, under Database Tables, select the database connection you want to generate classes from. (If you don't yet have this connection set up, you can create a new one by clicking New, then following the steps described in Establishing a Database Connection.
After you've selected a connection, select a schema (if one is available), then select the tables from which entity beans should be generated. Leave the Copy driver and add to the class path check box selected if you want the driver to be available to the code that uses your persistence layer. (Of course, if you clear the check box, you can add a driver library later using the project properties dialog.) Note that you are generate one entity bean for each table selected in the dialog.
With tables selected, click Next.

- Under Table Associations, edit table associations as needed.
This dialog displays the table associations as observed in the database schema from foreign key relationships. Green boxes designate associations that will be translated into entity relationships. Use this dialog to determine the associations you want generated for your entity beans.

- You can create new entities associations in the case where your database lacks foreign key definitions (such as for performance reasons).
Add associations that aren't displayed in the dialog by clicking Create New Assocation. When you do, Workshop displays the Create New Assocation dialog so that you can associate tables.
The following illustrates how you might add a categories-products relationship if it didn't already exist.
- Select the
tables that should be associated, then click Next.

- Select the table columns that should be associated, then click Next.

- Select the association cardinality, then click Finish.

- Once you've finish editing table associations, click Next.
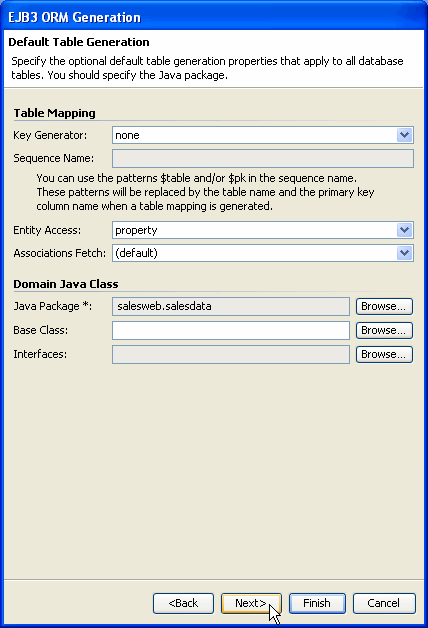
- Under Default Table Generation, edit properties as needed.
Note that all the properties are optional, but you should be sure to enter a value for the Java Package box; this will be the package into which your generated entity beans will go. If you haven't yet created a package for these classes, you can create one by clicking the box's Browse button.

The Key Generator dropdown lists values that determine how a primary key should be generated. The available values include:
 |
 |
 |
 |
| Key Value |
Description |
| auto |
Choose the generator based on the database |
| identity |
Database supplies the new key |
| sequence |
Use a SEQUENCE type to generate the key |
| table |
Use the @TableGenerator annotation for the key |
| none |
No auto generation for this field |
|
 |
 |
 |
 |
The Entity Access dropdown lists values that determine how data in entity objects will be accessed. The available values include:
 |
 |
 |
 |
| Access Value |
Description |
| property |
Uses bean-style setters and getters. |
| field |
Use Java fields directly. |
|
 |
 |
 |
 |
- When you've finished setting table generation properties, click Next.
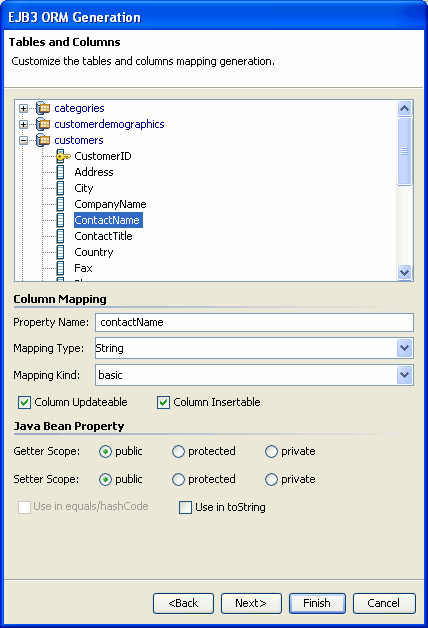
- Under Tables and Columns, edit mapping characteristics for tables and columns.
When you select a table in the schema tree, the area beneath the tree will display how that table will translate into a generated entity bean. Under Table Mapping, leave the default values or edit characteristics for the generated entity bean. By default, the schema's table names are used for generated class names. Note that tooltips display the table and column
properties as defined in the database schema.

When you select a column in the schema tree, the area beneath the tree will display how that column will translate into a generated entity bean property. Under Column Mapping, leave the default values or edit characteristics for the generated entity bean property.

- After you've finished editing generation characteristics, click Next.
- Under Mapping Generation, ensure that the Update EJB3 configuration file check box is selected, as it is by default. This will ensure that the persistence.xml file is updated to include the mapping information you've just defined.

- Click Finish to complete your mapping settings and prompt Workshop to generate entity beans.
Save State of ORM Generation Wizard
You can now save the state of the ORM Generation wizard prior to ORM Entity bean generation. This allows you to use the mapping wizard to specify some of your O/R mappings, save the state, and return at a later time to add additional mappings before generating. On the last page of the wizard, click Save wizard state to save the current mappings without generating.
Annotating Existing Classes for JPA
You can use a database schema to annotate existing Java classes (POJOs) to make them into EJB3 entity beans. When you do, Workshop will add EJB3 annotations to the appropriate accessors.
For illustration purposes, this topic uses a connection to an employee database.
- In the AppXplorer view, click on the name of the web project.
- From the File menu, choose New > Other. Expand Java Persistence API (JPA) and select Annotate Java Class, then click Next.

- Under Java Class, browse for the Java Class in your project to which annotations should be added, then click Next.

- The Entity Access dropdown lists values that determine how data in entity objects will be accessed. The available values include:
 |
 |
 |
 |
| Access Value |
Description |
| property |
Uses bean-style setters and getters. |
| field |
Use Java fields directly. |
|
 |
 |
 |
 |
In other words, if you choose property, Workshop will annotate your class's accessors; if you choose field, it will annotate your class's fields.
- Under Class Mapping Properties, select the schema (if any), table, and primary key property, then click Next.
The following shows that the employee table will be mapped to the sample.employeeinfo.Employee class selected above. It also shows that that class's employeeId field will be mapped to the table's primary key.

Under Bean Properties Mapping, verify or edit mappings between database columns and fields discovered in the Java class you'll be annotating. Note that you can click the Edit button to display the Basic Property Tag dialog for editing a selected property mapping.

- When you're done editing mappings, click Finish.
Workshop will add EJB3 annotations to your Java class source code. These annotations will map the class and its properties or fields to the selected table and columns.

Exploring Databases with the DbXplorer
Managing EJB3 Entity Relationships
Configuring JPA Properties
Still need help? Post a question on the Workshop
newsgroup.


