Step 2: Add a Page Flow and a Control
The tasks in this step are:
- Create a New Page Flow
- To Add a Control to the Page Flow
- To Create an Action to Forward Data to a JSP
Create a New Page Flow
- In the Project Explorer, right-click on the CustomerCare project and select New > Page Flow.
- In the New Page Flow dialog, in the field Page
Flow folder name enter customerManagement
and click Finish.
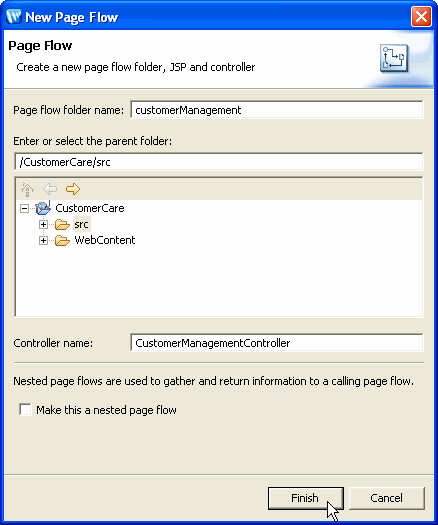
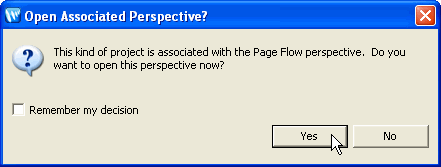
- When asked to open the Page Flow perspective, click Yes.
When you add a new Page Flow, it is displayed in the Page Flow Perspective by default. The Page Flow Perspective gives you four different views on a particular Page Flow:
- Page Flow Explorer
- Page Flow Editor
- Source Editor
- Page Flow Overview
 Page
Flow Explorer
Page
Flow Explorer
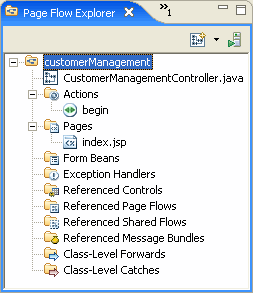
The Page Flow Explorer shows a logical view of the current Page Flow, listing all of the Actions, Pages, Form Beans, etc. contained in the Page Flow. The Page Flow Explorer depicts the elements in a way similar to a file tree. But it is important to note that this tree is not the file system layout of Page Flow artifacts. (To see the actual file tree of a Page Flow as it is appears on the file system, switch to the Navigator view.)
The top-level node shows the package of the current Page Flow controller. This is also the name of the folder under WebContent where the JSP's reside. The package and WebContent folders for a given page flow must always match. In this case they share the name customerManagement.
The first child node gives the Page Flow Controller class being viewed, in
this case, CustomerManagementController.java.
The next node lists the Actions. In this case there is only one action: begin.
This action is created by default with each new Page Flow.
Next the JSPs are listed. There is only one JSP at this time: index.jsp.
At this time, all of the other nodes are empty, because our Page Flow is relatively undeveloped. As we proceed we'll add items to the nodes.
Page Flow Editor
The Page Flow Editor gives a graphical view of a specific element of the current page flow.
The graphical view depicts the Page Flow's actions, JSPs, and the connections between the actions and pages. In the picture below, the begin action is shown in the center pane. An arrow extending from the begin action to the index.jsp page depicts the Forward that navigates users to index.jsp, whenever the begin action is called.
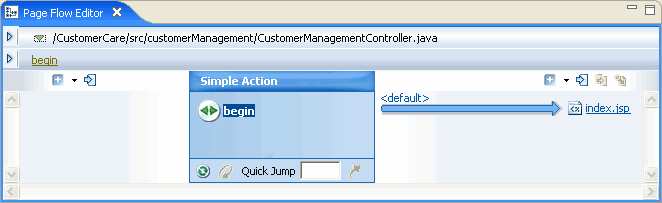
The left side of the pane is called the upstream pane and the right side is called the downstream pane. Note that the Page Flow Editor always depicts the direction of flow as starting from the left and progressing to the right.
To change the current Page Flow depicted, click the dropdown list marked by the green triangle, as shown below.
As you can see from the dropdown list shown below, there are two Page Flows in the web application: (1) Controller (a default Page Flow created with each web application) and (2) CustomerManagementController (which you will be developing for the remainder of this tutorial).
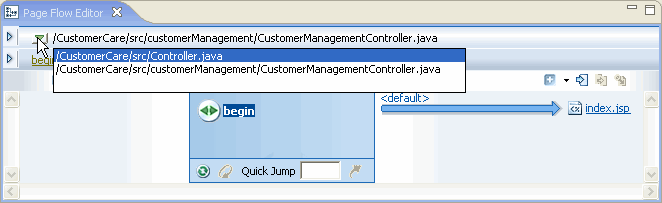
You can also access a list of available Page Flows by clicking the icon on the Page Flow Explorer tab. In the image below the icon is circled in red. (The icon directly to the left will pop up the new Page Flow wizard.)

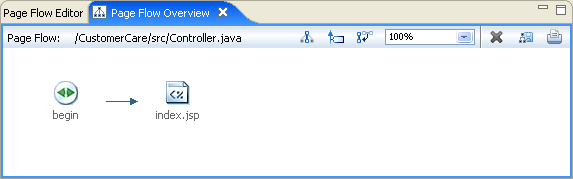
Page Flow Overview
The Page Flow Overview gives a graphical summary of a page flow. It shows all of the actions, pages, and the relationships between them.
Selecting a node in the Page Flow Overview will cause the same node to appear in the center pane of the Page Flow Editor.
Double-clicking on an icon in the Page Flow Overview shows the associated source code in Source View.
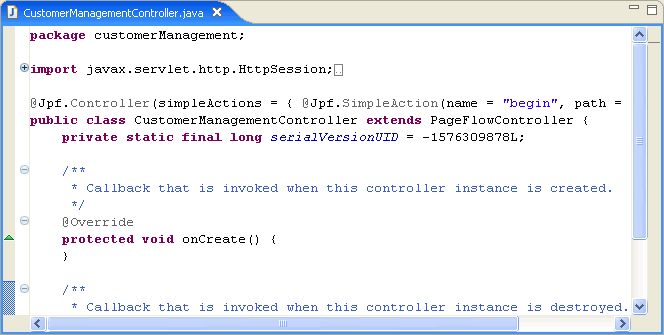
Source Editor
The source editor, appearing directly underneath the Page Flow Overview, shows the Java source for the Page Flow Controller class.
To Add a Control to the Page Flow
In this step, you will add a control, CustomerControl.java, to the Page Flow. The methods of this control (addCustomer, editCustomer, etc.) allow the Page Flow client to interact with customer data in a database. The interaction between the Page Flow client and the database consists of three classes:
- CustomerManagementController.java: the client Page Flow class
- CustomerControl.java: a wrapper intermediary Control class
- CustomerDB.java: the Database Control class, queries the database directly
The control CustomerControl.java acts as a wrapper intermediary class between the client, CustomerManagementController.java, and the Database Control CustomerDB.java. This wrapper intermediary increases the modularity of the application, allowing the user (1) to switch to a different Database Control if necessary in the future and (2) to execute any data type recasting within the wrapper class.
In this tutorial no actual recasting occurs, but it is easy to imagine a case where recasting is necessary. For example, suppose your Page Flow expects a Customer[] object but your Database Control returns an ArrayList of Customer objects. In such a situation you could use the intermediary wrapper class to load the ArrayList into a Customer[] before passing the data to the Page Flow.
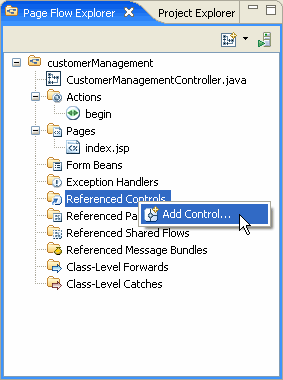
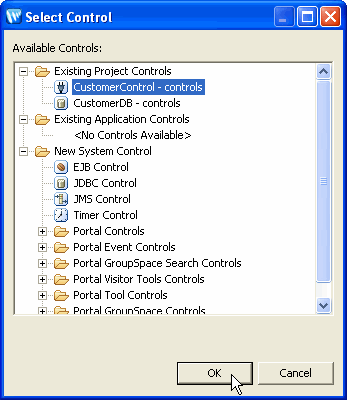
- On the Page Flow Explorer tab, right-click on the Referenced
Controls node and select Add Control.
- In the Select Control dialog, select Existing
Project Controls > CustomerControl - controls.
Click OK.
You have just added four lines of code to the Page Flow Controller class CustomerManagementController.java:
    import org.apache.beehive.controls.api.bean.Control;
    import controls.CustomerControl;

	...

    @Control
    private CustomerControl customerControl;
These lines declare the Customer control on the Page Flow, allowing you to call control methods.
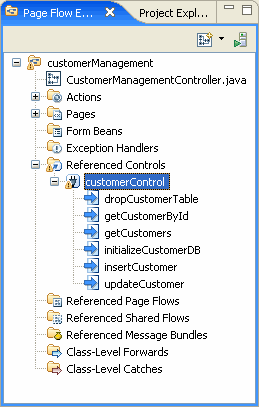
When you declare a control on a Page Flow class, it appears in the Referenced Controls node, along with a list of its available methods:
To Create an Action to Forward Data to a JSP
In this task you will edit the Page Flow class so that it retrieves customer data from the CustomerControl. In particular, you will add an Action ( i.e., an annotated method called getCustomers() ) to the Page Flow class that calls the CustomerControl method getCustomers(), a method which returns an array of Customer objects. (In the next step you will create a JSP that displays this array of Customer objects, rendering it as an HTML table.)
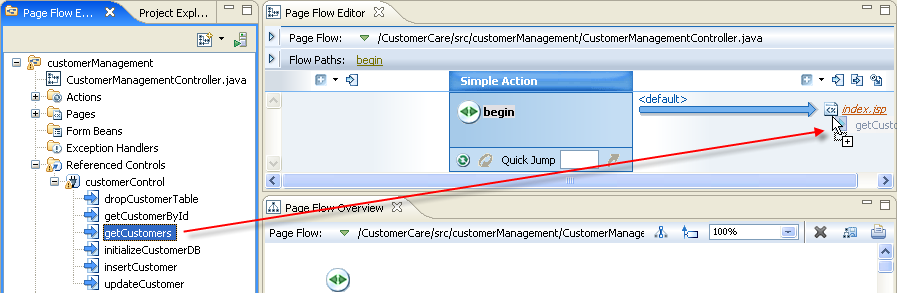
- On the Page Flow Explorer tab, open the node Referenced Controls > customerControl and locate the getCustomers method.
- Drag the getCustomers method directly on top of the index.jsp
page displayed on the right-hand side of the Page Flow Editor tab.
Note: Make sure that the Page Flow CustomerManagementController is displayed in the Page Flow Editor. If any other Page Flow is displayed, select CustomerManagementController from the dropdown list (click the green triangle to show the dropdown list).
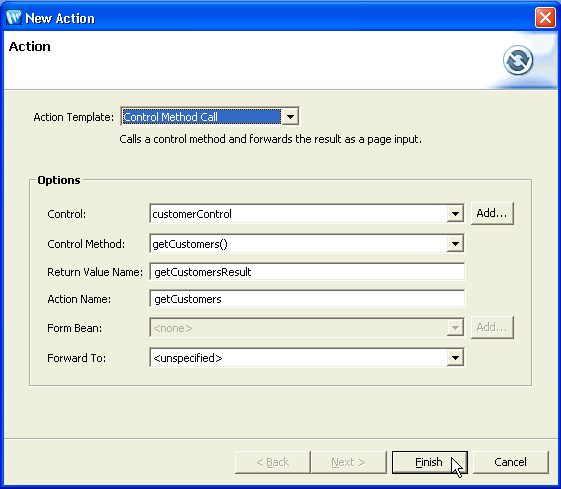
- In the New Action dialog, accept the defaults and click
Finish.
When the dialog closes, the Page Flow Editor should appear as follows:
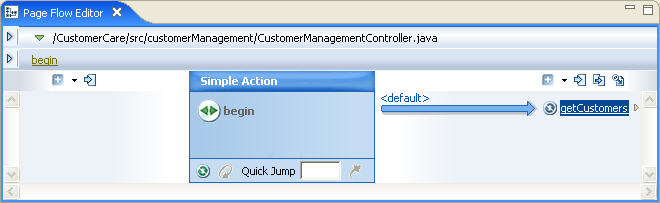
You have now created a new Page Flow Action getCustomers() that calls the Control method getCustomers(). The source code of the Action looks like this:@Jpf.Action(forwards = { @Jpf.Forward(name = "success", path = "", actionOutputs = { @Jpf.ActionOutput(name = "getCustomersResult", type = model.Customer[].class) }) }) public Forward getCustomers() { Forward forward = new Forward("success"); model.Customer[] getCustomersResult = customerControl.getCustomers(); forward.addActionOutput("getCustomersResult", getCustomersResult); return forward; } - Press Ctrl-Shift-S to save your work.
Click one of the following arrows to navigate through the tutorial:
|
|
|
Still need help? Post a question on the Workshop newsgroup.