Creating a New Task Control
An instance of a Task control can create a single task instance. If multiple tasks need to be created, use a factory type of Task control. To learn about factories, see "Using Task Control Factories" in Advanced Topics in Using the Worklist, which is located at the following URL:
http://download.oracle.com/docs/cd/E13214_01/wli/docs81/worklist/advanced.html
A Task control instance can also interact with a task instance that already exists by setting its active task ID. After creating or setting the active task ID, your control instance can get information about that task or update that task in various ways.
You can customize Task controls for different business purposes, by adding new operations or callbacks, or by altering the signatures of existing operations or callbacks.
To create a new Task control
- Open your WebLogic Integration application in WebLogic Workshop.
- In the Application pane, double-click the business process (JPD file) to which you want to add the logic to integrate business users using the Worklist system. The business process is displayed in the Design View.
- On the Data Palette, in the Controls tab, click Add —> Integration Controls to display a list of integration controls that represent the resources with which your business process can interact.
Note: If the Controls tab is not visible, from the menu bar, click View —> Windows —> Data Palette.
- Choose Task. The Insert Control dialog box is displayed.
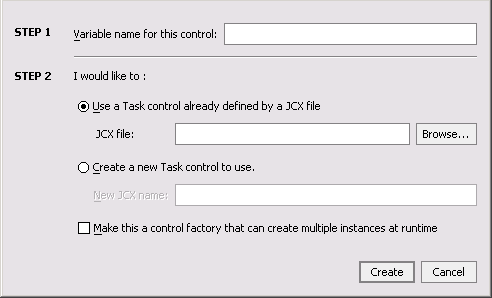
- In the Insert Control dialog box (Step 1), enter a name for the instance of this control. The name you enter must be a valid Java identifier.
- In the Insert Control dialog box (Step 2), select one of the following options:
- Use a Task control already defined by a JCX file.
Enter a filename for the Task control in the JCX file field, or click Browse to find the JCX file in your file system.
- Create a new Task control to use.
Enter a filename in the New JCX name field.
- Choose whether you want to make this a control factory by selecting or clearing the Make this a control factory that can create multiple instances at runtime check box.
To learn about factories, see "Using Task Control Factories" in Advanced Topics in Using the Worklist, which is located at the following URL:
http://download.oracle.com/docs/cd/E13214_01/wli/docs81/worklist/advanced.html
- Click Create. A new Task control and an instance of it are created and the Insert Control dialog box is closed.
A new JCX file is created and displayed in the Application tab in WebLogic Workshop. (You can double-click any JCX file to view or edit it in the Design or Source View.) The instance of the control is displayed on the Controls tab of the Data Palette.
- To display the base methods provided on a Task control, expand the control instance by clicking the + beside its name on the Data Palette.

- After you create an instance of the Task control in your business process, you can design the interaction of the business process with the Task control by simply dragging and dropping the Task control methods from the Data Palette onto the Design View at the point in your business process at which you want to design the interaction.
For examples of designing interactions between a business process and an instance of a Task control, see Using Task and Task Worker Controls in Business Processes.
- After you create a Task control in your business process, you can view and edit the properties of the control type or the instance of that control type in the Property Editor. The control type is represented as a JCX file in the Application pane and the instance is represented in the Data Palette.
Task Instances have data values associated with them, many of which are set when the task is created. You can use the Property Editor on a Task control to set the default values for some of these data values. These values are used whenever that control instance creates a new task. Note that the properties set on a factory type Task control propagate to any Task control instances created from that factory.
To learn about factories, see "Using Task Control Factories" in Advanced Topics in Using the Worklist, which is located at the following URL:
http://download.oracle.com/docs/cd/E13214_01/wli/docs81/worklist/advanced.html
Note: To learn how to use the Property Editor for specifying properties for control types versus control instances, see Setting Control Properties.

|

|