Testing Maps in the Test View
The following functionality is available from the Test View of the mapper:
- Test—Clicking Test runs the query (transformation) to converting the data displayed in the Source Data pane against the mappings in the query displaying the result in the Result Data pane.
Note: Java interfaces and abstract Java classes are supported as source or target types for a transformation but you will not be able to execute your transformation in the Test View. However, a transformation with a Java interfaces and/or abstract Java classes as source or target types can be invoked from a business process (JPD) without error.
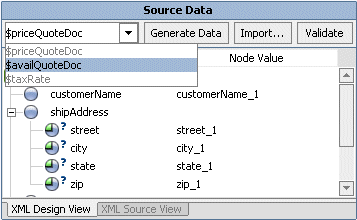
- Select Another Source (Input) Type Using the Pull-Down Menu in the Source Data Pane—The variables listed in drop-down menu of the Source Data pane are the source (input) types selected for the transformation in the Configure XQuery Transformation Method pane. To edit another source type in the Source Data pane, you can change the displayed source type by selecting another source type from the pull-down menu as shown here.
- Import...—Clicking Import... displays the Open File To Test pane. From the Open File To Test pane, you can browse for source XML and non-XML data files to load into the Source Data pane to use as input to the query. After importing, you can click Test to run the transformation using the imported source data or Validate to validate the displayed source data against the associated schema.
Note: When you import source data the source data is validated against the associated schema and any warnings and errors are displayed in the Output pane. You can import XML data for Global Types and Local Elements but since Global Types and Local elements are not validated, no errors or warnings will be reported for invalid data. To learn more, including which types can be validated, see Validating During Design Time.
- Generate Data—Clicking Generate Data regenerates the source data used as input to the transformation. When you initially bring up the Test View, WebLogic Workshop generates an initial set of source sample data and displays it in the Source Data pane. If you make changes to the data and then decide that you want to regenerate the sample data, click Generate Data. For example, you might want to start over with the original sample data if your edits result in an XML document that is no longer valid to the associated XML Schema.
- Validate—Clicking Validate, validates the displayed source data against the associated schema and any errors are reported during design time.
Note: Not all types can be validated in the Test View. To learn more, including which types can be validated, see Validating During Design Time.
- Editing the Data in the Source Data Pane—When you initially bring up the Test View, WebLogic Workshop generates an initial set of source data and displays it in the Source Data pane. You can also optionally import data from source XML and non-XML data files by clicking Import.... You can edit and alter the data in the Source Data pane of the Test View using any of the following methods:
- You can change the generated source data by selecting the desired the Node Value field of the Source Data pane and entering your data.
- You can change the generated source data by right-clicking on a node in the Node Name field of the Source Data pane and from the drop-down menu, selecting Edit Value.
- Adding, Removing, and Moving Data in the XML Design View by Right-Clicking on a Node—You can alter the data in the XML Design View tab of the Source Data pane of the Test View, by right-clicking on a node (element) in the Node Name field of the Source Data pane. Only valid menu items for the selected element as defined by the XML Schema will be displayed.
In the Node Name field of the Source Data pane, right-click on a node (element) and from the drop-down menu selecting (if active) one of the following menu options:
- Duplicate node—Right-clicking on an instance of a complexType node and selecting the Duplicate node option generates another instance of the selected node. The Duplicate menu option will only be available if the maxOccurs setting in the XML Schema element definition for the selected element is greater than 1 or unbounded.
- Insert Child node—Right-clicking on a node and selecting the Insert Child node —> child option, insert a child node under the selected node. This option will only be active if child nodes are allowed by the XML Schema for the selected node.
Note: In the Test View, the option for inserting a child node to the test data for a recursive schema is disabled in the XML Design View tab of the Source Data pane. If you wish to add child nodes to the test data for a recursive schema, switch to the XML Source View and add the child node to the test data directly as XML.
- Remove node—Right-clicking on a node and selecting the Remove node option, deletes the node. The Remove menu option will only be available if the XML Schema element definition for the selected element is optional (minOccurs=0).
- Move Up—Right-clicking on an instance of a node and selecting the Move Up option, moves the current instance of the node up a level in the list.
- Move Down—Right-clicking on an instance of a node and selecting the Move Down option, moves the current instance of the node down a level in the list.
Note: You can also alter the data by directly editing the XML data in the XML Source View tab of the Source Data pane.
- Viewing and Editing XML Data—The following two views are available for displaying XML data from the Source Data and Result Data panes:
- XML Design View—Clicking the XML Design View tab allows you to view and edit a graphical representation of the XML data.
- XML Source View—Clicking the XML Source View tab allows you to view and edit the data as an XML document.
- Viewing and Editing Non-XML Data—The following two views are available for displaying non-XML data from the Source Data and Result Data panes:
- Hex—Clicking the Hex tab allows you to the edit the data using both hexadecimal numbers and as text (Unicode characters). The data is displayed on the left side of the pane as hexadecimal numbers and on the right side as text.
- Text—Clicking the Text tab allows you to the edit the data as text (characters). The Text tab displays the printable characters (usually in the form of words and numbers) and certain control characters (carriage return, tab, and so on). For example, carriage returns are shown as line breaks. Non-printable characters, are displayed as small squares.
To View and Test an XQ file in the Test View of the Mapper
- Open a query in the mapper pane. For instructions see General Steps to Open or Create a Query in the Mapper.
- Select the Test View tab.
A graphical display of the generated source data is displayed in the Source Data pane.
- If desired, change the generated source data.
For details see the preceding sections.
- If desired, validate the source data against the associated schema. In the Source Data pane of the Test View, click Validate. To learn more, see Validating During Design Time.
- In the Result Data pane, click Test.
If not currently running, the WebLogic Server for the current application will be started. In order for a query to run, the WebLogic Server for the current application must be running.
In the Result Data pane, after the query is run a graphical representation of the target data is displayed.
- To view the resulting data as an XML document, in the Result Data pane select the XML Source View tab.
- If desired, you can validate the result data against the associated schema. In the Result Data pane of the Test View, click Validate. To learn more, see Validating During Design Time.

|

|