How Do I: Create a New Application?
A WebLogic Workshop application—displayed as the top-level (parent) node on the Application tab—contains one or more projects, which in turn contain the folders and files that make up your application.
Application—The components of the application you are creating are represented in a hierarchical tree structure on the Application tab in your WebLogic Workshop environment. J2EE applications and their components are deployed on WebLogic Server as Enterprise Application Archive (EAR) files. The name you specify for the application becomes the name of the EAR file that you use to deploy your application.
Projects—Projects that are contained in your application represent WebLogic Server web applications. That is, when you create a project, you are creating a web application. The name of your project will be included in the URL your clients use to access your application. For example, if you create a business process (HelloWorld.jpd) in a project named World, clients can access your business process via the following URL:
http://host:port/WorldWeb/HelloWorld.jpd
In the preceding URL, host and port represent the name of your host server and the listening port.
Note: When you name your project folder, the word Web is automatically appended to the end of the project folder name and used as the Web application name.
Schemas—To make the XML and MFL schemas in your application available in your business process, you must place them in the Schemas folder. This project folder is also where you must place your Channel files. The Schemas folder is a child folder of your business process application folder in WebLogic Workshop. To learn more about projects and applications, see Creating a Business Process Application.
When you add MFL and XML schemas to the Schemas folder in your business process project, representations of these schemas are available in some of the panes of WebLogic Workshop. In addition, Java interfaces for accessing the data represented in the schemas are generated. To learn more about XML and MFL schemas, see Importing Schemas and Importing Files into the Schemas Project.
To Create a New Application
- From the WebLogic Workshop menu, choose File —> New —> Application.
The New Application dialog box is displayed.
- To create a business process application, in the left pane of the dialog box, select Process or Tutorial. In the right pane, select one of the following options:
- Process Application—Creates a new business process application that contains a basic business process project. A basic process (process.jpd) contains a Start node, a Starting Event placeholder, and Finish node. Folders used in your application, such as a Schemas project folder, are also created.
- Tutorial: Process Application—Creates an application containing components for the Business Process and Data Transformation tutorials. To learn about completing the tutorial, see Tutorial: Building Your First Data Transformation.
- Tutorial: Hello World Process Application—Creates an application folder, a project folder (helloWeb), and a sample business process (HelloWorld.jpd). A Schemas folder is also created in the application. To learn about adding XML Schemas to your business process applications, see Importing Files into the Schemas Project. These template business process applications are provided to help you quickly get started creating business process applications.
You can also build an ebXML or RosettaNet participant business process in WebLogic Workshop by using specially created templates. For more information about how to create these participant processes, see Building ebXML Participant Business Processes and Building RosettaNet Participant Business Processes.
- In the Directory field, specify the directory in which to create the Application folder.
- In the Name field, specify a name for your new application.
- In the Server field, select the integration sample domain or any other WebLogic Integration domain. Click Browse to find a WebLogic Server configuration file.
To learn about creating domains, see Tutorials: Using the Configuration Wizard at http://download.oracle.com/docs/cd/E13196_01/platform/docs81/confgwiz/tutorials.html.
- Click Create.
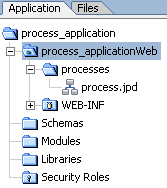
Your application is displayed in the Application tab in WebLogic Workshop. An example of an application created using the New Business Process Application option is displayed in the following figure.
Related Topics
Tutorial: Building Your First Business Process
Tutorial: Building Your First Data Transformation
How Do I: Create a New Project?
How Do I: Create a New Business Process File?
Guide to Building Business Processes
Building ebXML Participant Business Processes
Building RosettaNet Participant Business Processes
Tutorials: Using the Configuration Wizard

