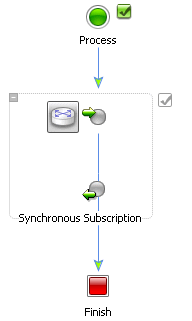
If you specified that your business process is started via the Subscribe synchronously to a Message Broker channel and start via an event option (see To Define the Start Method for Your Business Process), your Start node is displayed as shown in the following figure:
A synchronous static subscription to a Message Broker channel is defined on the Synchronous Subscription node. Your business process is started as the result of receiving a synchronous message from a Message Broker channel.
Note: In WebLogic Integration, subscriptions to Message Broker channels defined at a Start node are referred to as static subscriptions, and subscriptions defined using a Message Broker Subscription control are referred to as dynamic subscriptions. See "Note about Static and Dynamic Subscriptions" in @jpd:mb-static-subscription Annotation.
The following sequence summarizes the message flow at run time for the scenario in which you design a Synchronous Subscription node at the start of your business process:
About Choosing Synchronous or Asynchronous Subscription Start Nodes
In general, an asynchronous subscription start pattern is recommended because it causes the subscribed business process to run in a different transaction from the publisher's transaction. In contrast, a synchronous subscription start causes the subscribed business process to run in the same transaction as the publisher. This type of subscription decreases loose coupling and can associate the results of a transaction rollback of one subscriber with an otherwise independent subscriber. However, there are two scenarios in which the synchronous subscription start pattern is recommended:
When a JMS event generator publishes to a channel that is known to have one subscriber, it generally improves performance to use the synchronous subscription start method on the subscriber. Note that in this case, the subscriber is doing work on the event generator thread, so you should adjust the event generator thread count accordingly.
Setting suppressible to true specifies that the static subscription is suppressed in favor of dynamic subscriptions. In other words, you use suppressible=true to prevent specific messages on a Message Broker channel from starting a new business process; instead the messages can be received, using a dynamic subscription, by a business process that is already running.
To learn about this scenario, see Using the Suppressible Attribute for a Static Subscription.
To Complete the Design of Your Synchronous Subscription Start Node
Note: You can configure only the node that represents the message received by the business process. That is, you can only invoke a node builder for the first of the icons in the pair that represents the Synchronous Subscription Start node.
Tabs on the node builder include:
The following steps describe the tasks available on these tabs.
Note: If no appropriate channels are available for you to select, you must create a file that specifies the Message Broker channels for your application. To learn how to create this file, see How Do I Create Message Broker Channels?
The data type and format of the data your subscription request method (that is, the data type for the method parameter) is specified automatically, based on the configuration of your channel file.
Specifying a filter is optional. Filters can be applied to the data type the business process receives from the channel, or when you have specified a qualified metadata type in your channel configuration.
The field in the Specify Filter tab is populated with the data type for the subscription method parameter you specified on the preceding tab. If you specified your channel to be able to receive qualified metadata, the Qualified Metadata attribute is also listed and you can filter on that parameter instead.
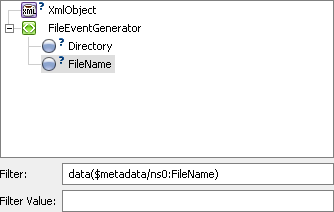
Note: If you want to filter on an XMLObject parameter, you will have to enter the XQuery statement in the Filter field or edit your source code directly.
This tab allows you to define one or more variables to hold the data that your business process receives from the channel.
The Client Sends field is populated with the parameter(s) you specified on the General Settings tab, in other words, the parameter type of the channel.
The node builder transformation pane is displayed; the data types expected by your method are displayed in the Client Sends pane.
Note: To remove a variable from the node builder pane, select the variable in the list and then click Remove. This action removes the variable from the node builder, not from your business process. The variable is still included in your business process; it is visible in the Variables pane in the Data Palette.
When designing a business process, you use a Transformation to create maps between disparate data types. Your project must contain an instance of a Transformation control (defined by a DTF file) for you to create the map.
The transformation tool displays a representation of the source schema and target schema in Source and Target panes. You can create a map between the data type of the method parameter and the data type of the variable, or variables, to which you want to assign the data. To learn how to create and test a map using the mapping tool, see Guide to Data Transformation.
Note: To return to node builder, in the Application pane, double-click the JPD file.
Note: To learn about changing the configuration you design in the Transformation pane of a node builder, see About Editing Node Configurations.
In the Design View, the check box icon  indicates that you completed the configuration and design of this node.
Subscription Start (Asynchronous)
Client Operations and Control Communication Methods
How Do I Create Message Broker Channels?
How Do I: Call a Business Process?
Message Broker Publish Control
Using Event Generators to Publish to Message Broker Channels

|

|