Using Portal Controls

Portal Controls are collections of actions (Java methods) you can drag and drop into your Page Flows, making Java development easier and more automated. You can add actions in a graphical interface and configure the actions with the Property Editor, insulating your from working directly with Java code (though you can still work directly with code in Source View). Even if you want to work directly with code, working initially with the graphical interface (Flow View and Action View) automates code entry and makes it more syntax error free.

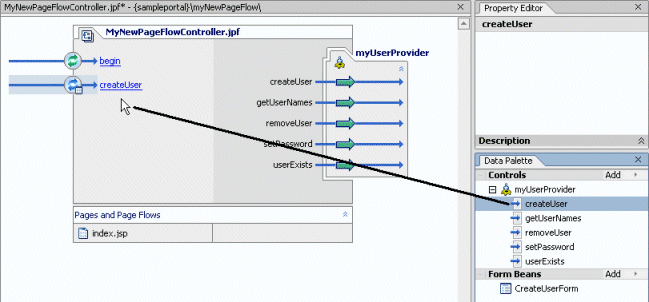
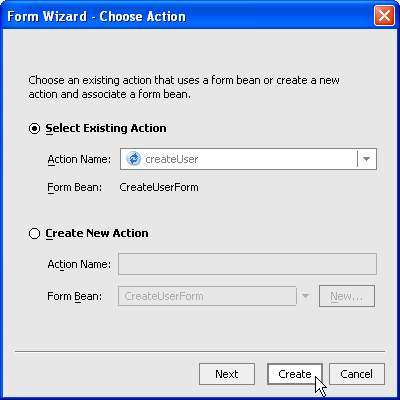
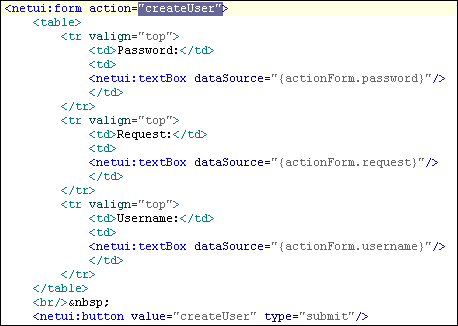
For example, Portal Controls provide built-in forms on some methods. If you want an action that creates a user, you can use the createUser method in the User Provider control. In the Page Flow's Action View, if you drag the createUser method from the Data Palette into the control's action area, the control provides a CreateUserForm bean that can be added to a JSP and linked to the action automatically. (That process is described in To use controls that provide forms.)

To add a control to a Page Flow:

  1. Open an existing Page Flow (.jpf file) or create a new "basic" Page Flow.
  2. Select the Action View tab.
  3. In the Data Palette, on the Controls bar, click Add --> [Portal Controls or Portal Event Controls] --> [control].
  4. In the Insert Control dialog box, enter a name for the new control and click Create. The control and all its available methods appear in the Action View, as well as in the Data Palette under the Controls bar.

    All the methods in the control are now available to your Page Flow.
  5. Add a method (action) to your page flow by dragging a method from the Data Palette into the action area of the Page Flow (the left side of the window in Action View).
  6. Switch to Flow View, where you can connect the action to the appropriate location in the Page Flow.

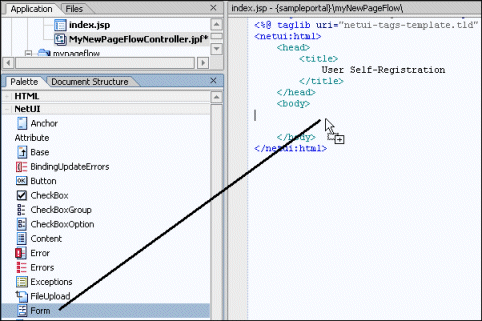
To use controls that provide forms:

Some methods (actions) on controls lend themselves to form entry, such as the createUser method on the User Provider control, where you can, for example, have a new user enter a username and password for self-registration. This procedure walks you through the createUser scenario to highlight the basics of adding such a form to a Page Flow.

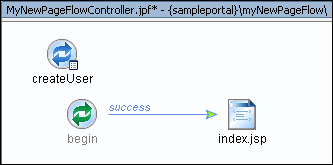
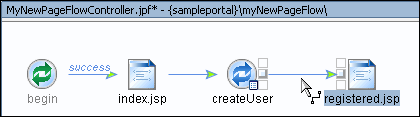
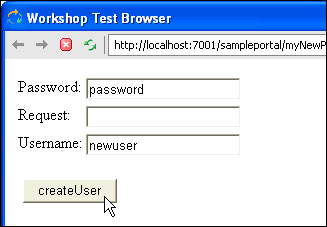
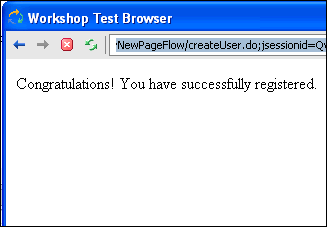
The basic scenario is providing a user self-registration form. When the user enters his username and password, the new user is created and the user is taken to the next JSP.

  1. To use a createUser action, you must add the User Provider control to the Page Flow, as described in To add a control to a Page Flow, above.
  2. With the control in the Page Flow, select Action View in the Page Flow editor, and drag the createUser method from the Data Palette to the action area of the Page Flow, as shown in the following illustration. Notice in the action area of the Page Flow editor that the createUser icon is different than the begin icon, because the action provides a form. The form is visible in the Data Palette under the Form Beans bar.

  3. The following illustration shows the Page Flow in Flow View, where the createUser action now appears. Again, the createUser icon shows there is a form associated with the action.

  4. Now you can add the createUser form to the JSP where users will self-register. Open the JSP and select the Source View tab.
  5. With the JSP open, drag the Form tag from the Palette into the JSP, as shown in the following illustration.

  6. In the Form Wizard window that appears, as shown in the following illustration, select the createUser action and click Create.

  7. The following illustration shows the form that is added to the JSP. Notice the form is tied to the createUser action. When the user fills in the fields and clicks the "createUser" button on the form, the form data is sent to the createUser action, and the new user is added to the authentication provider you specify in the Property Editor (with the control selected in Action View or Source View).

    Note: In this example, the authentication provider must support write access for the user to be created. See the WebLogic Administration Portal online help for more information on using multiple authentication providers.

  8. Save and close the JSP.
  9. Select the Flow View tab on the Page Flow. Now that the form has been used for the createUser action, the Page Flow is automatically updated, as shown in the following illustration. Notice the arrow from the index.jsp to the createUser action. (The developer creating this Page Flow has rearranged the icons in Flow View.)

  10. Now you have a form in a JSP that users can fill out to self-register, and you have an action that creates a new user with the user's form data. Now all you need is a JSP that will be displayed after the createUser action succeeds.

    In the Page Flow directory, create a new JSP and give it a text message such as, "Congratulations! You have successfully registered."
  11. In Flow View, connect the createUser action to the new JSP, as shown in the following illustration.

  12. Save the Page Flow. You can view the results by clicking the Start button in the toolbar or pressing Ctrl+F5.

    The user experience is shown in the following illustration.

  13. As the previous illustration shows, you may need to modify the default form by rearranging/removing input fields and renaming buttons.

In a real-world Page Flow, you would create JSPs to handle action failures and exceptions, such as if a user entered a username that was already in use.

For detailed information on forms, see Using Data Binding in Page Flows.

Related Topics

Getting Started with Page Flows

Adding Portal Controls to Java Page Flows

Building Java Page Flow Portlets

Tutorial: Creating a Login Portlet Using Portal Controls

Portal Control Properties

Portal Control Security

Portal Control Declaration