Here are the instructions for adding page flow functionality to an existing
(or "legacy") J2EE web project. The overall steps are to:
If you use a custom action servlet for a Struts application, you will also
need to perform subsequent edits to the web project's /WEB-INF/web.xml file
each time you add a new page flow.
To Install the Libraries for Page Flows
This section explains how to install the libraries files that are provided
for page flows.
- In the WebLogic Workshop IDE, open the Application pane.
- Choose your existing Web project from the listing. Then right-mouse click
and select Install > Web Project Libraries...
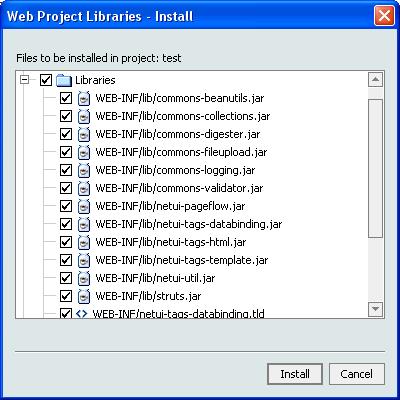
- Make sure a check mark is in the Libraries selection box, as shown here:

The libraries include JAR files that implement page flow functionality
and special JSP tag libraries.
- Optionally, can you scroll down and click the Resources selection box.
This selection will install a default page flow controller, simple JSP pages,
default graphics, and other supporting files. Note: Before
you select all these options, though, make sure that the files to be provided
will not overwrite any of your existing project files.
- When you are ready, choose the Install button.
- After the installation completes, choose the Close button.
To Customize the Existing Web Project's web.xml File
Your existing web project contains a web.xml file in the /WEB-INF directory.
This section explains the additional XML elements that are required in the
web.xml so that your project will work with page flows. You will be adding
elements for a filter, a filter mapping, a listener, a standard action servlet
configuration, and three tag libraries.
Note: Please refer to the Web.xml
Deployment Descriptor Elements chapter of the "Developing Web Applications
for WebLogic Server" for details about these elements.
Follow these steps:
-
In the WebLogic Workshop IDE, open the Application pane.
- Open your existing web project's /WEB-INF/web.xml in the editor.
- Add the following new elements, in the order shown, anywhere between the
main <web-app> and </web-app> elements. If you have existing blocks
of the element types shown here, such as an existing <filter> ... </filter>
block in your web.xml, you can group the additions in the same area of the
file.
- First, add the following filter and filter-mapping elements:
<filter>
<filter-name>PageFlowJspFilter</filter-name>
<filter-class>com.bea.wlw.netui.pageflow.PageFlowJspFilter</filter-class>
</filter>
<filter-mapping>
<filter-name>PageFlowJspFilter</filter-name>
<url-pattern>*.jsp</url-pattern>
</filter-mapping>
- Add the following listener elements:
<listener>
<listener-class>
com.bea.wlw.runtime.core.servlet.WebappContextListener
</listener-class>
</listener>
- Add this entire set of elements for the standard action servlet configuration.
This is the configuration that is based on Struts version 1.1 (Release Candidate
1) and implemented by WebLogic Workshop. If your web project uses Struts and
you have implemented a custom action servlet, see the important note that
appears after this listing.
<!-- Standard Action Servlet Configuration
(with debugging) -->
<servlet>
<servlet-name>action</servlet-name>
<servlet-class>com.bea.wlw.netui.pageflow.PageFlowActionServlet</servlet-class>
<init-param>
<param-name>config</param-name>
<param-value>/WEB-INF/.pageflow-struts-generated/jpf-struts-config.xml</param-value>
</init-param>
<init-param>
<param-name>config/-global</param-name>
<param-value>/WEB-INF/.pageflow-struts-generated/jpf-struts-config--global.xml</param-value>
</init-param>
<init-param>
<param-name>debug</param-name>
<param-value>2</param-value>
</init-param>
<init-param>
<param-name>detail</param-name>
<param-value>2</param-value>
</init-param>
<load-on-startup>2</load-on-startup>
</servlet>
Important: If your existing web project uses Struts, and
if you have implemented a custom action servlet, you must manually edit the
project's web.xml each time you add a new page flow, and register it in the
<servlet> elements. For example, if you add a page flow named "login"
the additional elements to insert in the <servlet>...</servlet>
elements are as follows:
<init-param>
<param-name>config/login</param-name>
<param-value>/WEB-INF/jpf-struts-config-login.xml</param-value>
</init-param>
This manual step is not necessary for each new page flow if your web project
uses the standard action servlet provided by WebLogic Workshop, once you have
added the <servlet> elements shown at the beginning of this step.
- Add the Struts Action Servlet mappings. Because Struts takes the last
mapping here as the extension to add to actions posted from forms, the mapping
for the "*.do" must come after mapping for the "*.jpf"
extension. This order is required.
<servlet-mapping>
<servlet-name>action</servlet-name>
<url-pattern>*.jpf</url-pattern>
</servlet-mapping>
<servlet-mapping>
<servlet-name>action</servlet-name>
<url-pattern>*.do</url-pattern>
</servlet-mapping>
-
This next step is optional and depends on whether you
already have a welcome file and error page defined for the existing web
project. If needed, you can add these elements:
<welcome-file-list>
<welcome-file>index.jsp</welcome-file>
</welcome-file-list>
<error-page>
<error-code>500</error-code>
<location>/error.jsp</location>
</error-page>
- Finally, add the following elements for the three tab libraries used with
page flow applications:
<!-- Define the Page Flow Tag
Library TLDs -->
<taglib>
<taglib-uri>netui-tags-html.tld</taglib-uri>
<taglib-location>/WEB-INF/netui-tags-html.tld</taglib-location>
</taglib>
<taglib>
<taglib-uri>netui-tags-databinding.tld</taglib-uri>
<taglib-location>/WEB-INF/netui-tags-databinding.tld</taglib-location>
</taglib>
<taglib>
<taglib-uri>netui-tags-template.tld</taglib-uri>
<taglib-location>/WEB-INF/netui-tags-template.tld</taglib-location>
</taglib>
-
Save your changes in the /WEB-INF/web.xml file.
