Creating Principals and Role-Principal Mappings
When you define a web service, Java control, page flow, or EJB scoped security role and the corresponding role-principal mapping, you do not actually define the principals in the security realm. Creating principals can be done in two ways: (1) through your application's Security Roles folder and (2) through the WebLogic Server console.
Note. Defining security roles is described in detail in Implementing Role-Based Security.
Using the Security Roles Folder
The Security Roles folder provides a convenient way
to create principals in the security.
The
Security
Roles folder appears as a project folder on the Application tab,
as shown below.

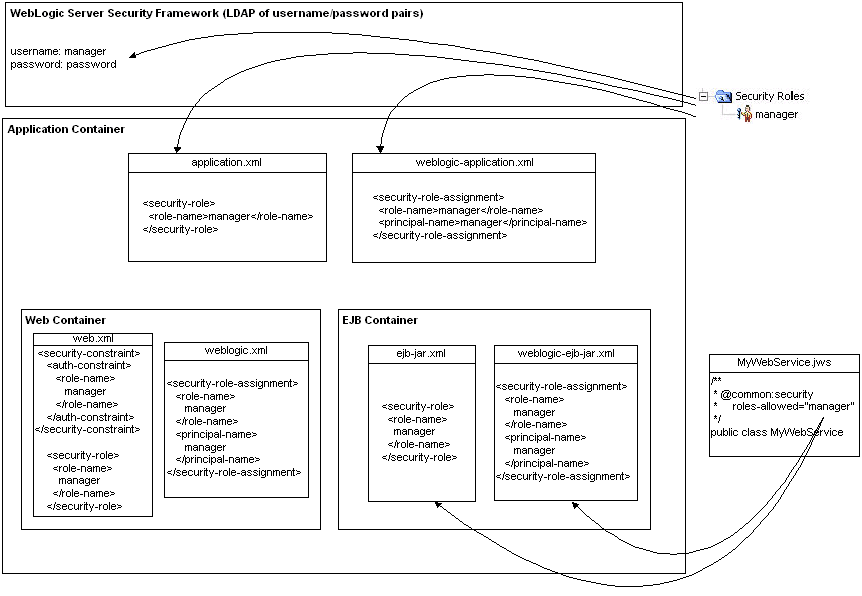
To use the Security Roles folder to create a principal, right-click the folder and select Create a new role, and make sure that you the Use role name option. Only when you select this option, a user with the same name as the security role is automatically created in the security realm and this user is mapped as the principal to the application-scoped role. The password for this user is password. (For more specific instructions and for more information on the other principal name options in the dialog, see How Do I: Create An Application-Scoped Security Role?) The diagram below shows how in this scenario a user is created in WebLogic Server's security framework and how application scoped roles and role-principal mappings are defined application's configuration files.
To provide a contrast, the diagram also shows how the @common:security roles-allowed annotation automatically defines EJB scoped roles and role-principal mappings in the ejb-jar.xml and weblogic-ejb-jar.xml files, but does not create the actual principals in the security realm. The same applies to the @ejbgen:role-mapping annotation for EJBs (not shown below). Note that the page flow annotations @jpf:action roles-allowed and @jpf:controller roles-allowed do not even automatically write web application scoped roles to the deployment descriptors. Instead, you must manually manage these roles in the web.xml and weblogic.xml deployment descriptor files. For more information, see Implementing Role-Based Security.
 Using the WebLogic Server Console
You can also use the WebLogic Server console to define application-scoped or global roles, to create users and groups, and to map roles to principals. Below it is shown how to create users and how to create application-scoped roles and role-principal mapping. For a detailed description of all the WebLogic Server security functionality, see the WebLogic Server help topic Securing WebLogic Resources.
...to Create Test Users
To enter users through the WebLogic Server console, follow these steps.
